


在学习Android Wifi的code时,到处可以看到StateMachie和AsyncChannel的影子,这里我们先大致分析一下它们两个的原理。
StateMachine原理分析
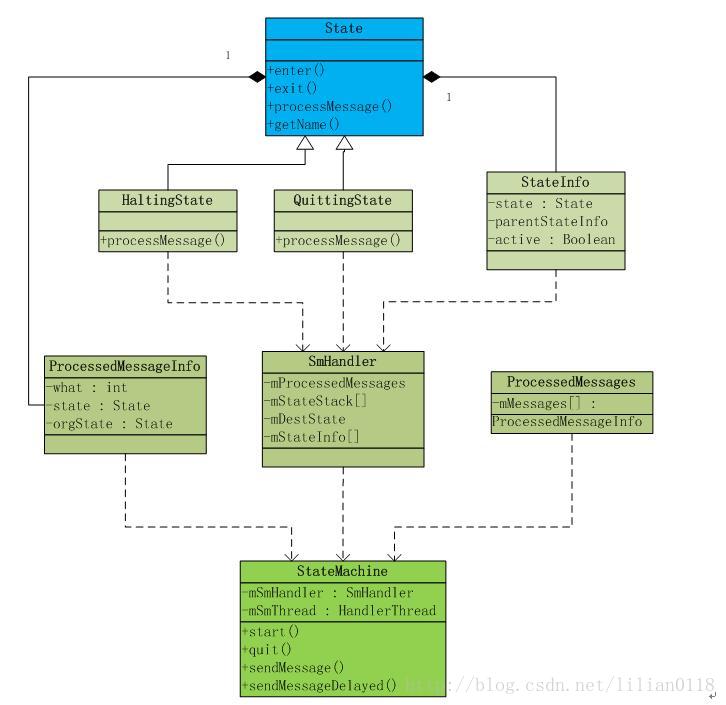
从图中我们可以看到State和StateMachie两个大类,StateMachine主要依靠SmHandler去完成消息的分发与处理,在SmHandler中通过mStateStack[]来维持各个State直接的层次关系,而State只定义了简单的几个方法,如enter()、exit()、processMessage()等,分别用来表示刚进入这个状态、退出这个状态以及在这个状态中处理消息。在构建StateMachine时,会把一个个State通过addState()方法加入到mStateInfo中来,通过StateInfo的结构我们可以看出,每个StateInfo不仅包含其自身State,并且也会包含其父State,并且还有active这样变量来表示这个状态是否处于可见状态,这样SmHandler就可以通过mStateStack和mStateInfo来找到当前处于顶端的State,并调用其processMessage()方法,我们稍后会来介绍这样。先进入到StateMachine的构造函数看一下:
- /**
- * Constructor creates a StateMachine with its own thread.
- *
- * @param name of the state machine
- */
- protected StateMachine(String name) {
- mSmThread = new HandlerThread(name);
- mSmThread.start();
- Looper looper = mSmThread.getLooper();
- initStateMachine(name, looper);
- }
- /**
- * Constructor creates a StateMachine using the looper.
- *
- * @param name of the state machine
- */
- protected StateMachine(String name, Looper looper) {
- initStateMachine(name, looper);
- }
这里有两中构造方法,一是只传入StateMachine的名字,StateMachine自己构造HanderThread;第二种是传入StateMachine的名字和一个looper,两种方法的区别在于处理的SmHandler将附在哪一个looper上面,后面我们将会看到这两种构造函数的使用。接着看 initStateMachine ( name , looper )
- private void initStateMachine(String name, Looper looper) {
- mName = name;
- mSmHandler = new SmHandler(looper, this);
- }
下面我们以WifiStateMachine这个实例的来仔细分析StateMachine的创建以及运行,WifiStateMachine是继承与StateMachine,其创建过程在WifiService中,代码如下:
- public WifiService(Context context) {
- mContext = context;
- mInterfaceName = SystemProperties.get("wifi.interface", "wlan0");
- mWifiStateMachine = new WifiStateMachine(mContext, mInterfaceName);
- mWifiStateMachine.enableRssiPolling(true);
- .......
- HandlerThread wifiThread = new HandlerThread("WifiService");
- wifiThread.start();
- mClientHandler = new ClientHandler(wifiThread.getLooper());
- mWifiStateMachineHandler = new WifiStateMachineHandler(wifiThread.getLooper());
- mWifiController = new WifiController(mContext, this, wifiThread.getLooper());
- mWifiController.start();
进入到WifiStateMachine的构造函数分析,code在framwork/base/wifi/java/android/net/wifi/WifiStateMachine.java
- public WifiStateMachine(Context context, String wlanInterface) {
- super("WifiStateMachine");
- mContext = context;
- mInterfaceName = wlanInterface;
- .......
- mWifiNative = new WifiNative(mInterfaceName);
- mWifiConfigStore = new WifiConfigStore(context, mWifiNative);
- mWifiMonitor = new WifiMonitor(this, mWifiNative);
- mWifiInfo = new WifiInfo();
- mSupplicantStateTracker = new SupplicantStateTracker(context, this, mWifiConfigStore,
- getHandler());
- .......
- addState(mDefaultState);
- addState(mInitialState, mDefaultState);
- addState(mSupplicantStartingState, mDefaultState);
- addState(mSupplicantStartedState, mDefaultState);
- addState(mDriverStartingState, mSupplicantStartedState);
- addState(mDriverStartedState, mSupplicantStartedState);
- addState(mScanModeState, mDriverStartedState);
- addState(mConnectModeState, mDriverStartedState);
- addState(mL2ConnectedState, mConnectModeState);
- addState(mObtainingIpState, mL2ConnectedState);
- addState(mVerifyingLinkState, mL2ConnectedState);
- addState(mCaptivePortalCheckState, mL2ConnectedState);
- addState(mConnectedState, mL2ConnectedState);
- addState(mDisconnectingState, mConnectModeState);
- addState(mDisconnectedState, mConnectModeState);
- addState(mWpsRunningState, mConnectModeState);
- addState(mWaitForP2pDisableState, mSupplicantStartedState);
- addState(mDriverStoppingState, mSupplicantStartedState);
- addState(mDriverStoppedState, mSupplicantStartedState);
- addState(mSupplicantStoppingState, mDefaultState);
- addState(mSoftApStartingState, mDefaultState);
- addState(mSoftApStartedState, mDefaultState);
- addState(mTetheringState, mSoftApStartedState);
- addState(mTetheredState, mSoftApStartedState);
- addState(mUntetheringState, mSoftApStartedState);
- setInitialState(mInitialState);
- setLogRecSize(2000);
- setLogOnlyTransitions(false);
- if (DBG) setDbg(true);
- //start the state machine
- start();
- .......
- }
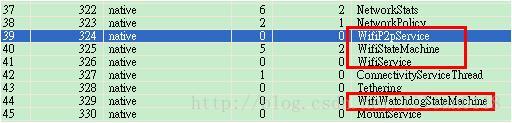
根据前面的StateMachine的构造函数,我们可以知道WifiStateMachine会新建一个HandlerThread,名字为“WifiStateMachine”,而在WifiService中创建的另一个对象WifiController将运行在WifiService本身创建的thread里,这些我们可以用DDMS去查看system_server这个进程的所有线程来确认:
接着看WifiStateMachine的构造函数,我们会看到很多的addState方法,进入到这个函数来分析:
- /**
- * Add a new state to the state machine
- * @param state the state to add
- * @param parent the parent of state
- */
- protected final void addState(State state, State parent) {
- mSmHandler.addState(state, parent);
- }
- /**
- * Add a new state to the state machine, parent will be null
- * @param state to add
- */
- protected final void addState(State state) {
- mSmHandler.addState(state, null);
- }
一般来说,HSM只有会一个最上层的父亲State,其它所有的State都是其子State,这一点比较像多叉树。addState只是简单的调用SmHander的addState方法,那我们进入到这个方法中分析:
- private final StateInfo addState(State state, State parent) {
- if (mDbg) {
- mSm.log("addStateInternal: E state=" + state.getName() + ",parent="
- + ((parent == null) ? "" : parent.getName()));
- }
- StateInfo parentStateInfo = null;
- if (parent != null) {
- parentStateInfo = mStateInfo.get(parent);
- if (parentStateInfo == null) {
- // Recursively add our parent as it's not been added yet.
- parentStateInfo = addState(parent, null);
- }
- }
- StateInfo stateInfo = mStateInfo.get(state);
- if (stateInfo == null) {
- stateInfo = new StateInfo();
- mStateInfo.put(state, stateInfo);
- }
- // Validate that we aren't adding the same state in two different hierarchies.
- if ((stateInfo.parentStateInfo != null)
- && (stateInfo.parentStateInfo != parentStateInfo)) {
- throw new RuntimeException("state already added");
- }
- stateInfo.state = state;
- stateInfo.parentStateInfo = parentStateInfo;
- stateInfo.active = false;
- if (mDbg) mSm.log("addStateInternal: X stateInfo: " + stateInfo);
- return stateInfo;
- }
mStateInfo是一个HashMap,键是State,值为StateInfo,用于保存和查找StateMachine中所有的StateInfo,前面我们介绍过,StateInfo除了包含其自身State以外,还包含其父StateInfo,所以通过mStateInfo结构,我们可以很方便的从一个State找到其所有的父State,这在后面介绍的处理消息流程中非常重要。我们接着来看addState方法,首先根据第二个参数parent是否为空来判断是否要将所有加入到mStateInfo的State的所有父State也加入进来,如果parent不为空,则先去mStateInfo中获取parent state的StateInfo,如果没有查找到,说明这个父State还没有加入进来,则先递归的加入所有的父State;如果parent为空或者所有的所有的父State已经全部进入进来了,则构造一个StateInfo并且对其state、parentStateInfo和active进行赋值,并把它加入到mStateInfo中。当WifiStateMachine中所有的state全部加入到mStateInfo后,我们会看到这样一个树形结构:

在WifiStateMachine构造函数中添加完所有的state后,会调用setInitialState将InitialState设为初始状态,代码比较简单。最后就调用start()方法,让WifiStateMachine运行起来。这里的start()方法并不是新建一个thread之类的运行,而是根据InitialState去构建好从最上层State到InitialState这条分支上面的所有State信息,然后发送一个SM_INIT_CMD给SmHandler让其做初始化处理,来看代码:
- /**
- * Start the state machine.
- */
- public void start() {
- // mSmHandler can be null if the state machine has quit.
- SmHandler smh = mSmHandler;
- if (smh == null) return;
- /** Send the complete construction message */
- smh.completeConstruction();
- }
- /**
- * Complete the construction of the state machine.
- */
- private final void completeConstruction() {
- if (mDbg) mSm.log("completeConstruction: E");
- /**
- * Determine the maximum depth of the state hierarchy
- * so we can allocate the state stacks.
- */
- int maxDepth = 0;
- for (StateInfo si : mStateInfo.values()) {
- int depth = 0;
- for (StateInfo i = si; i != null; depth++) {
- i = i.parentStateInfo;
- }
- if (maxDepth < depth) {
- maxDepth = depth;
- }
- }
- if (mDbg) mSm.log("completeConstruction: maxDepth=" + maxDepth);
- mStateStack = new StateInfo[maxDepth];
- mTempStateStack = new StateInfo[maxDepth];
- setupInitialStateStack();
- /** Sending SM_INIT_CMD message to invoke enter methods asynchronously */
- sendMessageAtFrontOfQueue(obtainMessage(SM_INIT_CMD, mSmHandlerObj));
- if (mDbg) mSm.log("completeConstruction: X");
- }
start方法很简单,只是调用SmHandler的completeConstruction(),在这个函数中,首先计算mStateInfo中最大的深度,然后new两个数组,mStateStack和mTempStateStack用于保存处于活动状态分支上的所有State信息,上图中所示的WifiStateMachine的maxDepth=6。接着来看setUpInitStateStack函数:
- private final void setupInitialStateStack() {
- if (mDbg) {
- mSm.log("setupInitialStateStack: E mInitialState=" + mInitialState.getName());
- }
- StateInfo curStateInfo = mStateInfo.get(mInitialState);
- for (mTempStateStackCount = 0; curStateInfo != null; mTempStateStackCount++) {
- mTempStateStack[mTempStateStackCount] = curStateInfo;
- curStateInfo = curStateInfo.parentStateInfo;
- }
- // Empty the StateStack
- mStateStackTopIndex = -1;
- moveTempStateStackToStateStack();
- }
setUpInitStateStack根据mStateInfo和mInitialState来填充从根State到mInitialState这条路径上所有的State到mTempStateStack中,以WifiStateMachine来举例,即mTempStateStack内容为:0--InitialState, 1--DefaultState。接着来看moveTempStateStacktoStateStack():
- private final int moveTempStateStackToStateStack() {
- int startingIndex = mStateStackTopIndex + 1;
- int i = mTempStateStackCount - 1;
- int j = startingIndex;
- while (i >= 0) {
- if (mDbg) mSm.log("moveTempStackToStateStack: i=" + i + ",j=" + j);
- mStateStack[j] = mTempStateStack[i];
- j += 1;
- i -= 1;
- }
- mStateStackTopIndex = j - 1;
- if (mDbg) {
- mSm.log("moveTempStackToStateStack: X mStateStackTop=" + mStateStackTopIndex
- + ",startingIndex=" + startingIndex + ",Top="
- + mStateStack[mStateStackTopIndex].state.getName());
- }
- return startingIndex;
- }
从名字就可以看出moveTempStateStacktoStateStack只是把state信息从mTempStateStack移动到mStateStack,只不过把顺序反转了而已。反转后mStateStack的内容为:0--DefaultState, 1--InitialState。mStateStackTopIndex记录了栈底的state位置,即DefaultState在栈中的Index值。接着回到start函数调用的completeConstruction()中,在函数的最后会调用sendMessageAtFrontOfQueue():
- protected final void sendMessageAtFrontOfQueue(int what) {
- // mSmHandler can be null if the state machine has quit.
- SmHandler smh = mSmHandler;
- if (smh == null) return;
- smh.sendMessageAtFrontOfQueue(obtainMessage(what));
- }
这个函数只是封装了Handler的sendMessageAtFrontOfQueue,用来向MessageQueue的队列头部插入一条message,当MessageQueue从poll返回后,会马上处理这个消息,那我们到SmHandler的handlerMessage函数分析:
- public final void handleMessage(Message msg) {
- if (!mHasQuit) {
- if (mDbg) mSm.log("handleMessage: E msg.what=" + msg.what);
- /** Save the current message */
- mMsg = msg;
- /** State that processed the message */
- State msgProcessedState = null;
- if (mIsConstructionCompleted) {
- /** Normal path */
- msgProcessedState = processMsg(msg);
- } else if (!mIsConstructionCompleted && (mMsg.what == SM_INIT_CMD)
- && (mMsg.obj == mSmHandlerObj)) {
- /** Initial one time path. */
- mIsConstructionCompleted = true;
- invokeEnterMethods(0);
- } else {
- throw new RuntimeException("StateMachine.handleMessage: "
- + "The start method not called, received msg: " + msg);
- }
- performTransitions(msgProcessedState, msg);
- // We need to check if mSm == null here as we could be quitting.
- if (mDbg && mSm != null) mSm.log("handleMessage: X");
- }
- }
第一次调用start函数时,mIsConstructionCompleted将为false,等处理完SM_INIT_CMD后,mIsConstructionCompleted将变为true,以后处理所有的消息将进入到processMsg当中。我们先来看invokerEnterMethods(0):
- private final void invokeEnterMethods(int stateStackEnteringIndex) {
- for (int i = stateStackEnteringIndex; i <= mStateStackTopIndex; i++) {
- if (mDbg) mSm.log("invokeEnterMethods: " + mStateStack[i].state.getName());
- mStateStack[i].state.enter();
- mStateStack[i].active = true;
- }
- }
这个函数比较简单,只是调用mStateStack中从stateStackEnteringIndex到mStateStackTopIndex中间所有state的enter方法,并把它的active变量置为true。即先调用DefaultState的enter函数,再调用InitialState的enter函数。这样StateMachine就运行成功了,后面再有任何消息的处理都将会走到processMsg中,到这里我们先来简单介绍一下StateMachine的几种sendMsg的方法以及状态切换,然后再来接着看processMsg()和performTransitions()方法。
在StateMachine中有下面几种发送消息的方法:
- publicfinalvoid sendMessage(int what);
- publicfinalvoid sendMessage(int what,Object obj);
- publicfinalvoid sendMessage(int what,int arg1);
- publicfinalvoid sendMessage(int what,int arg1,int arg2);
- publicfinalvoid sendMessage(int what,int arg1,int arg2,Object obj)
- protectedfinalvoid deferMessage(Message msg);
前面几种都比较是直接调用Handler的方法,比较简单。我们来看deferMessage(),顾名思义,defer是推迟的意思,deferMessage是将消息推迟处理,推迟到什么时候呢? 我们先来看看deferMessage的实现:
- private final void deferMessage(Message msg) {
- if (mDbg) mSm.log("deferMessage: msg=" + msg.what);
- /* Copy the "msg" to "newMsg" as "msg" will be recycled */
- Message newMsg = obtainMessage();
- newMsg.copyFrom(msg);
- mDeferredMessages.add(newMsg);
- }
deferMessage将发送的msg拷贝到newMsg中,然后将它加入到mDeferredMessage中,mDeferredMessage是一个ArrayList,用来维护所有的defer message。接着我们来看看StateMachine的状态切换方法,在StateMachine中切换状态是通过transitionTo(IState destState)来实现的,状态的变换则意味着mStateStack的变化,那我们首先来看transitionTo(IState destState)的实现:
- protected final void transitionTo(IState destState) {
- mSmHandler.transitionTo(destState);
- }
直接调用SmHandler的transitionTo方法:
- private final void transitionTo(IState destState) {
- mDestState = (State) destState;
- if (mDbg) mSm.log("transitionTo: destState=" + mDestState.getName());
- }
现在我们回到handlerMessage中来接着看processMsg()和performTransitions()方法,首先我们来总体看一下handlerMessage大概的流程图:
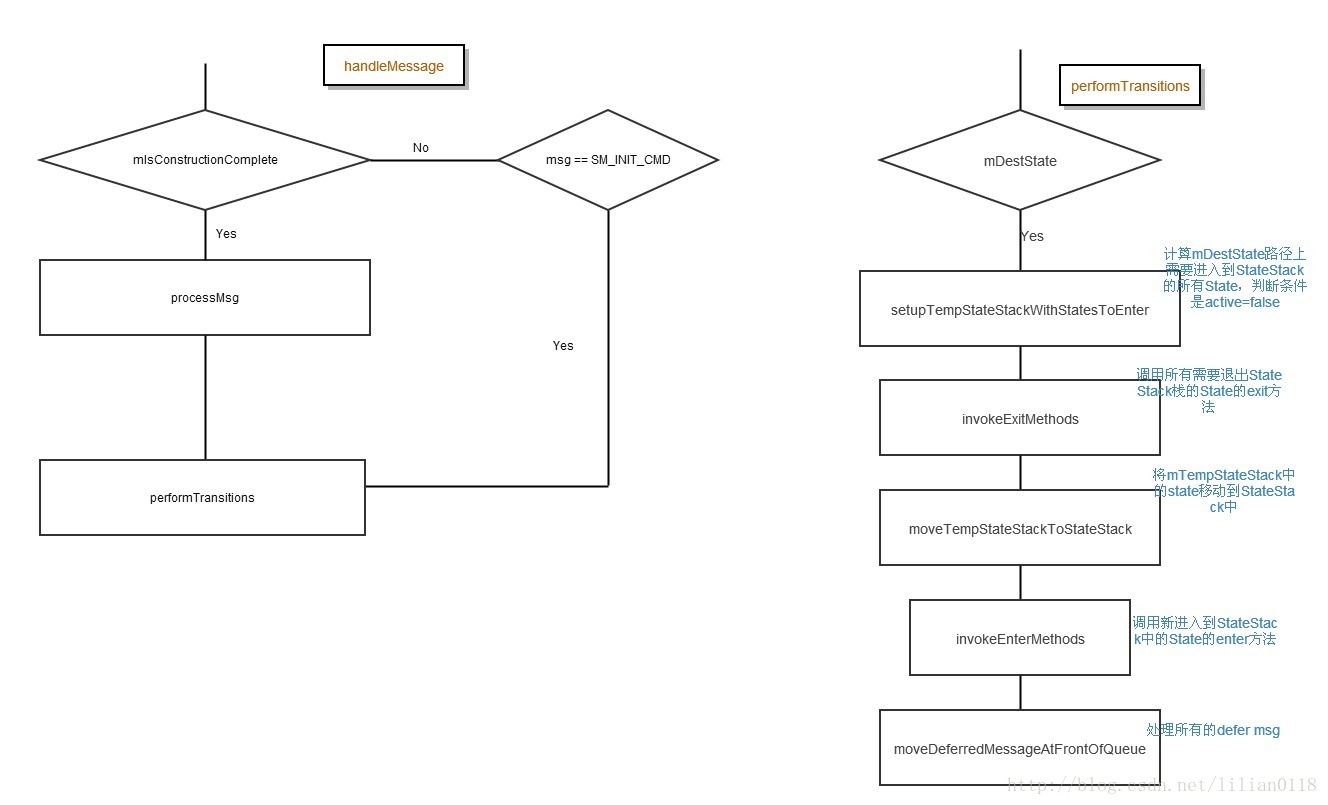
从图中我们可以看出,只有在发送state的transition的时候,才会有defer message的处理。到这里,StateMachine基本上讲完了,后面我们会在启动Wifi和连接AP中看到具体的State切换以及消息处理的过程。
AsyncChannel分析
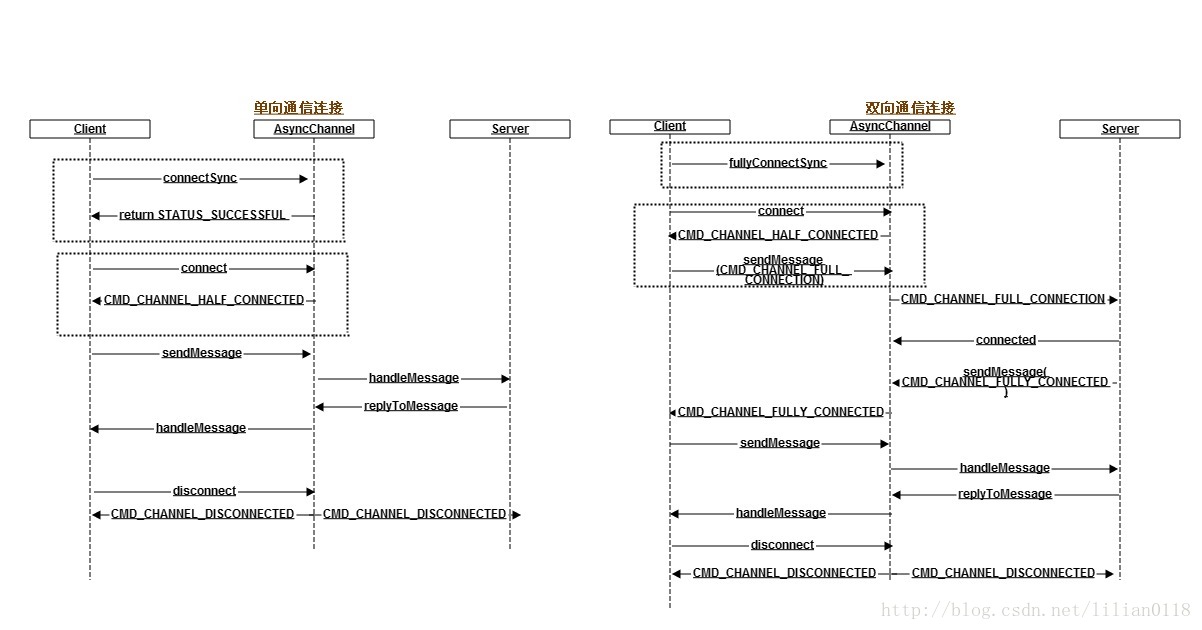
在WiFi framework中,有很多地方都运用了AsyncChannel,主要有两种用处,一是发送异步消息,防止主线程被卡住,例如WifiManager和WifiService之间;另一种是发送同步消息,需要等待Server的回复,例如WifiService与WifiStateMachine之间,因为WifiService与WifiStateMachine处理消息的handler处于不同的Thread和looper当中,所以当WifiService给WifiStateMachine发送了一个消息需要等待回复时,这时候就需要用到SyncMananger,这是AsyncChannel中的一个内部类,主要用来发送这种同步的消息。下面就以WifiManager和WifiService、WifiService给WifiStateMachine分别来介绍AsyncChannel的使用方法。
双向通信连接的建立
- private void init() {
- synchronized (sThreadRefLock) {
- if (++sThreadRefCount == 1) {
- Messenger messenger = getWifiServiceMessenger();
- if (messenger == null) {
- sAsyncChannel = null;
- return;
- }
- sHandlerThread = new HandlerThread("WifiManager");
- sAsyncChannel = new AsyncChannel();
- sConnected = new CountDownLatch(1);
- sHandlerThread.start();
- Handler handler = new ServiceHandler(sHandlerThread.getLooper());
- sAsyncChannel.connect(mContext, handler, messenger);
- try {
- sConnected.await();
- } catch (InterruptedException e) {
- Log.e(TAG, "interrupted wait at init");
- }
- }
- }
- }
getWifiServiceMessenger利用WifiService中的成员mClientHandler构造一个Messenger对象,然后我们来看connect函数的实现:
- public void connect(Context srcContext, Handler srcHandler, Messenger dstMessenger) {
- if (DBG) log("connect srcHandler to the dstMessenger E");
- // We are connected
- connected(srcContext, srcHandler, dstMessenger);
- // Tell source we are half connected
- replyHalfConnected(STATUS_SUCCESSFUL);
- if (DBG) log("connect srcHandler to the dstMessenger X");
- }
- public void connected(Context srcContext, Handler srcHandler, Messenger dstMessenger) {
- if (DBG) log("connected srcHandler to the dstMessenger E");
- // Initialize source fields
- mSrcContext = srcContext;
- mSrcHandler = srcHandler;
- mSrcMessenger = new Messenger(mSrcHandler);
- // Initialize destination fields
- mDstMessenger = dstMessenger;
- if (DBG) log("connected srcHandler to the dstMessenger X");
- }
- private void replyHalfConnected(int status) {
- Message msg = mSrcHandler.obtainMessage(CMD_CHANNEL_HALF_CONNECTED);
- msg.arg1 = status;
- msg.obj = this;
- msg.replyTo = mDstMessenger;
- /*
- * Link to death only when bindService isn't used.
- */
- if (mConnection == null) {
- mDeathMonitor = new DeathMonitor();
- try {
- mDstMessenger.getBinder().linkToDeath(mDeathMonitor, 0);
- } catch (RemoteException e) {
- mDeathMonitor = null;
- // Override status to indicate failure
- msg.arg1 = STATUS_BINDING_UNSUCCESSFUL;
- }
- }
- mSrcHandler.sendMessage(msg);
- }
从代码里面可以看到,connect函数只是简单的调用connected函数对一些成员变量进行赋值,然后调用replyHalfConnected函数向srcHandler发送一个CMD_CHANNEL_HALF_CONNECTED消息。同时我们看replyHalfConnected函数最后调用到linkToDeath函数,这是为了防止AsyncChannel用于不同进程通信时,若Server端所在的进程已经死掉,来通知Client端进程进行一些后期处理,例如调用disconnect断开连接。
- public void handleMessage(Message message) {
- Object listener = removeListener(message.arg2);
- switch (message.what) {
- case AsyncChannel.CMD_CHANNEL_HALF_CONNECTED:
- if (message.arg1 == AsyncChannel.STATUS_SUCCESSFUL) {
- sAsyncChannel.sendMessage(AsyncChannel.CMD_CHANNEL_FULL_CONNECTION);
- } else {
接着来看AsyncChannel的sendMessage方法:
- public void sendMessage(Message msg) {
- msg.replyTo = mSrcMessenger;
- try {
- mDstMessenger.send(msg);
- } catch (RemoteException e) {
- replyDisconnected(STATUS_SEND_UNSUCCESSFUL);
- }
- }
- public void sendMessage(int what) {
- Message msg = Message.obtain();
- msg.what = what;
- sendMessage(msg);
- }
这样在WifiService的mClientHandler对象将收到一个CMD_CHANNEL_FULL_CONNECTION的消息,我们来看具体代码:
- private class ClientHandler extends Handler {
- ClientHandler(android.os.Looper looper) {
- super(looper);
- }
- @Override
- public void handleMessage(Message msg) {
- case AsyncChannel.CMD_CHANNEL_FULL_CONNECTION: {
- AsyncChannel ac = new AsyncChannel();
- ac.connect(mContext, this, msg.replyTo);
- break;
- }
这里和上面的流程图里面有点差别的是调用的ac.connect而不是ac.connected,但由上面的connect函数实现我们来看,其实connect就是调用connected来实现的,只是多了一个向srcHandler发送一个CMD_CHANNEL_HALF_CONNECTED的消息,在mClientHandler收到这个消息后,会将WifiMananger的ServiceHandler加入到流量状态管理当中,用于以后通知ServiceHandler不同的状态。到此,双方就建立一个双向通信的连接,下面来简单的看一下WifiManager给WifiService发送一个消息的流程,以WifiManager的连接AP的connect函数为例:
- public void connect(WifiConfiguration config, ActionListener listener) {
- if (config == null) throw new IllegalArgumentException("config cannot be null");
- validateChannel();
- // Use INVALID_NETWORK_ID for arg1 when passing a config object
- // arg1 is used to pass network id when the network already exists
- sAsyncChannel.sendMessage(CONNECT_NETWORK, WifiConfiguration.INVALID_NETWORK_ID,
- putListener(listener), config);
- }
由前面的知识,我们可以知道在WifiService的mClientHandler中将收到CONNECT_NETWORK这个消息,到具体代码中来看:
- /* Client commands are forwarded to state machine */
- case WifiManager.CONNECT_NETWORK:
- case WifiManager.SAVE_NETWORK: {
- WifiConfiguration config = (WifiConfiguration) msg.obj;
- int networkId = msg.arg1;
- if (config != null && config.isValid()) {
- // This is restricted because there is no UI for the user to
- // monitor/control PAC.
- if (config.proxySettings != ProxySettings.PAC) {
- if (DBG) Slog.d(TAG, "Connect with config" + config);
- mWifiStateMachine.sendMessage(Message.obtain(msg));
- } else {
- Slog.e(TAG, "ClientHandler.handleMessage cannot process msg with PAC");
- if (msg.what == WifiManager.CONNECT_NETWORK) {
- replyFailed(msg, WifiManager.CONNECT_NETWORK_FAILED);
- } else {
- replyFailed(msg, WifiManager.SAVE_NETWORK_FAILED);
- }
- }
- } else
这里WifiService只是简单的转发这个消息到WifiStateMachine当中,我们到后面再来分析WifiStateMachine如果处理这个消息并连接AP的流程。
单向通信连接的建立
- private class WifiStateMachineHandler extends Handler {
- private AsyncChannel mWsmChannel;
- WifiStateMachineHandler(android.os.Looper looper) {
- super(looper);
- mWsmChannel = new AsyncChannel();
- mWsmChannel.connect(mContext, this, mWifiStateMachine.getHandler());
- }
- @Override
- public void handleMessage(Message msg) {
- switch (msg.what) {
- case AsyncChannel.CMD_CHANNEL_HALF_CONNECTED: {
- if (msg.arg1 == AsyncChannel.STATUS_SUCCESSFUL) {
- mWifiStateMachineChannel = mWsmChannel;
- } else {
- Slog.e(TAG, "WifiStateMachine connection failure, error=" + msg.arg1);
- mWifiStateMachineChannel = null;
- }
- break;
- }
以上就是AsyncChannel的实例化以及单向连接的建立过程,非常的简单,后面mWifiStateMachineChannel就可以直接发送消息给WifiStateMachine了。下面再来看一下如何在WifiService与WifiStateMachine实现同步,我们以enableNetwork为例来分析:
- public boolean enableNetwork(int netId, boolean disableOthers) {
- enforceChangePermission();
- if (mWifiStateMachineChannel != null) {
- return mWifiStateMachine.syncEnableNetwork(mWifiStateMachineChannel, netId,
- disableOthers);
- } else {
- Slog.e(TAG, "mWifiStateMachineChannel is not initialized");
- return false;
- }
- }
进入到WifiStateMachine的syncEnableNetwork来分析:
- public boolean syncEnableNetwork(AsyncChannel channel, int netId, boolean disableOthers) {
- Message resultMsg = channel.sendMessageSynchronously(CMD_ENABLE_NETWORK, netId,
- disableOthers ? 1 : 0);
- boolean result = (resultMsg.arg1 != FAILURE);
- resultMsg.recycle();
- return result;
- }
从这里可以看到调用sendMessageSynchronously后返回一个Message对象,那么这个Message对象是谁构造返回的呢?我们先来看看AsyncChannel的sendMessageSynchronously方法:
- public Message sendMessageSynchronously(int what, int arg1, int arg2) {
- Message msg = Message.obtain();
- msg.what = what;
- msg.arg1 = arg1;
- msg.arg2 = arg2;
- Message resultMsg = sendMessageSynchronously(msg);
- return resultMsg;
- }
- public Message sendMessageSynchronously(Message msg) {
- Message resultMsg = SyncMessenger.sendMessageSynchronously(mDstMessenger, msg);
- return resultMsg;
- }
- private static Message sendMessageSynchronously(Messenger dstMessenger, Message msg) {
- SyncMessenger sm = SyncMessenger.obtain();
- try {
- if (dstMessenger != null && msg != null) {
- msg.replyTo = sm.mMessenger;
- synchronized (sm.mHandler.mLockObject) {
- dstMessenger.send(msg);
- sm.mHandler.mLockObject.wait();
- }
- } else {
- sm.mHandler.mResultMsg = null;
- }
- } catch (InterruptedException e) {
- sm.mHandler.mResultMsg = null;
- } catch (RemoteException e) {
- sm.mHandler.mResultMsg = null;
- }
- Message resultMsg = sm.mHandler.mResultMsg;
- sm.recycle();
- return resultMsg;
- }
- }
从SyncMananger的sendMessageSynchronously方法看,当其给dstMessenger发送消息后,当前调用的线程就进入wait阶段等待别的时机再来唤醒,等它被唤醒后,在sm.mHandler.mResultMsg中就有我们上面提到的Message对象了。那给被谁唤醒?sm.mHandler.mResultMsg又是如何得来,我们先来看WifiStateMachine如何处理CMD_ENABLE_NETWORK这个消息吧。以WifiStateMachine中的ConnectModeState来看,当收到CMD_ENABLE_NETWORK消息后的处理流程如下:
- case CMD_ENABLE_NETWORK:
- ok = mWifiConfigStore.enableNetwork(message.arg1, message.arg2 == 1);
- replyToMessage(message, message.what, ok ? SUCCESS : FAILURE);
- break;
- private void replyToMessage(Message msg, int what, int arg1) {
- if (msg.replyTo == null) return;
- Message dstMsg = obtainMessageWithArg2(msg);
- dstMsg.what = what;
- dstMsg.arg1 = arg1;
- mReplyChannel.replyToMessage(msg, dstMsg);
- }<pre code_snippet_id="255785" snippet_file_name="blog_20140327_30_2518776" name="code" class="java"> public void replyToMessage(Message srcMsg, Message dstMsg) {
- try {
- dstMsg.replyTo = mSrcMessenger;
- srcMsg.replyTo.send(dstMsg);
- } catch (RemoteException e) {
- log("TODO: handle replyToMessage RemoteException" + e);
- e.printStackTrace();
- }
- }</pre><br>
- <pre></pre>
- <pre></pre>
- <pre></pre>
- private class SyncHandler extends Handler {
- /** The object used to wait/notify */
- private Object mLockObject = new Object();
- /** The resulting message */
- private Message mResultMsg;
- /** Constructor */
- private SyncHandler(Looper looper) {
- super(looper);
- }
- /** Handle of the reply message */
- @Override
- public void handleMessage(Message msg) {
- mResultMsg = Message.obtain();
- mResultMsg.copyFrom(msg);
- synchronized(mLockObject) {
- mLockObject.notify();
- }
- }
- }
在SyncHandler收到消息后,先将它拷贝到mResultMsg中,然后调用mLockObject.notify()将先前进入wait()的线程唤醒,这样就实现了同步调用。


 988
988

 被折叠的 条评论
为什么被折叠?
被折叠的 条评论
为什么被折叠?
 到【灌水乐园】发言


