


Spring Boot构建的Web应用中,基于MYSQL数据库的几种数据库连接方式进行介绍,包括JDBC、JPA、MyBatis、多数据源和事务。
Spring Boot的Web应用中使用Mysq数据库,也充分展示Spring Boot的优势(尽可能少的代码和配置)。数据访问层我们将使用Spring Data JPA和Hibernate(JPA的实现之一)。
注意:如果你想JDBC和JPA可以一起使用,Spring Boot 是支持的,你只需要把JDBC和JPA的依赖都添加在pom.xml 中即可。无需其他特殊处理。
我们先看看java应用使用mysql:
一、JAVA应用使用mysql
1、JDBC (Java DataBase Connectivity/Java数据库连接 )[原始手工]
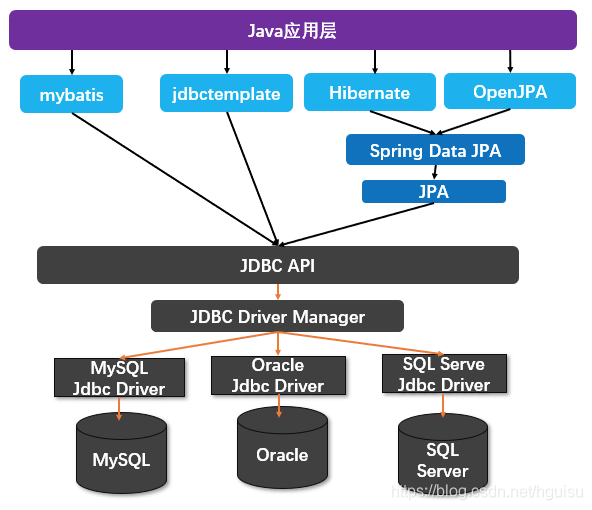
java应用接口访问数据库的Java API规范。为各种数据库(mysql、oracle),提供一个统一的接口,应用程序通过JDBC执行各种SQL(select、insert)操作。不同的数据库厂商都有自己的实现类,统一规范也就有了数据库驱动。
- 优点:运行期:快捷、高效
- 缺点:编辑器:代码量大、繁琐异常处理、不支持数据库跨平台
2、JdbcTemplate [半自动化]
JDBC已经能够满足大部分用户最基本的需求,但是接使用原始的JDBC操作数据库过于低效,必须自己来管理数据库资源如:获取PreparedStatement,设置SQL语句参数,关闭连接等步骤。
JdbcTemplate是Spring框架自带的对JDBC操作的封装,目的是使JDBC更加易于使用,我们只需要提供SQL语句和提取结果。它处理了资源的建立和释放,帮助我们避免一些常见的错误,比如忘了总要关闭连接。
优点:
- 运行期,简单效率快
- 内嵌Spring框架中,支持基于AOP的声明式事务
- 是spring对 jdbc操作数据库进行的封装,使得开发者可以直接在java文件中 编写sql,无需配置xml文件
缺点:
- 必须于Spring框架结合在一起使用、不支持数据库跨平台、默认没有缓存
- result结果集遍历时,需要硬编码获取表数据的映射,不利于维护。
使用JdbcTemplate时候:频繁创建关闭连接资源,影响数据库的性能。解决办法:使用数据库连接池,管理数据库的连接。
3、MyBatis [半自动化ORM]
MyBatis的前身就是iBatis,iBatis本是apache的一个开源项目,2010年这个项目由apahce sofeware foundation 迁移到了google code,并且改名。MyBatis提供的持久层框架包括SQL Maps和Dao,允许开发人员直接编写SQL(更好灵活).(Sql操作方式)
它消除了JDBC大量冗余的代码,不需要手动开关连接。因为操作简单,提高开发效率,节约不必要浪费的时间。
- 优点: 高效、支持动态、复杂的SQL构建, 支持与Spring整合和AOP事务、结果集做了轻量级Mapper封装、支持缓存
- 缺点:不支持数据库跨平台, 还是需要自己写SQL语句。过于笨重,比如在多表联合查询时相当繁琐。
通过 mybatis提供的映射方式,半自动的生成sql,大部分还是需要程序员编写sql。因此MyBatis 并不是一个完整的ORM框架
4、JPA(Java Persistence API/Java持久层接口规范)[ORM规范]
JPA全称为Java Persistence API(Java持久层API),它是Sun公司在JavaEE 5中提出的Java持久化规范。
JPA 是ORM(Object Relational Mapping/对象关系映射)的一个标准规范,ORM的作用是在数据库表与Java对象之间建立映射,理论上来说有ORM就无需直接通过SQL操作数据库了,通过Java对象即可,这样会方便很多,Hibernate是实现JPA标准的一个有名例子。但JPA也是建立在JDBC之上,也是通过JDBC访问数据库。本身是一种ORM规范,不是ORM框架.很多ORM框架都是实现了JPA的规范,如:Hibernate、EclipseLink。
JPA为我们提供了以下规范:
1. ORM映射元数据:JPA支持XML和注解两种元数据的形式,元数据描述对象和表之间的映射关系,框架据此将实体对象持久化到数据库表中
2. JPA 的API:用来操作实体对象,执行CRUD操作,框架在后台替我们完成所有的事情,开发人员不用再写SQL了
3. JPQL查询语言:通过面向对象而非面向数据库的查询语言查询数据,避免程序的SQL语句紧密耦合。
5、Spring Data JPA [ORM抽象]
Spring Data JPA是在实现了JPA规范的基础上封装的一套 JPA 应用框架,虽然ORM框架都实现了JPA规范,但是在不同的ORM框架之间切换仍然需要编写不同的代码,而使用Spring Data JPA能够方便大家在不同的ORM框架之间进行切换而不需要更改代码。Spring Data JPA旨在通过将统一ORM框架的访问持久层的操作,来提高开发人的效率。
Spring Data JPA给我们提供的主要的类和接口
Repository 接口:
Repository
CrudRepository
JpaRepository
Repository 实现类:
SimpleJpaRepository
QueryDslJpaRepository
6、Hibernate[完整ORM实现]
目前比较流行的ORM框架,设计灵巧,文档丰富(完全自动操作),只是性能不好控制(自己去控制性能,不是很好控制)。Hibernate是一个完整的ORM框架,常规CRUD我们不需要写一句SQL;
Hibernate是一个开放源代码的对象关系映射框架,它对JDBC进行了非常轻量级的对象封装,使得Java程序员可以随心所欲的使用对象编程思维来操纵数据库. Hibernate可以应用在任何使用JDBC的场合,既可以在Java的客户端程序使用,也可以在Servlet/JSP的Web应用中使用。
7、JPA、Spring Data JPA和Hibernate的关系
Hibernate其实是JPA的一种实现,而Spring Data JPA是一个JPA数据访问抽象。也就是说Spring Data JPA不是一个实现或JPA提供的程序,它只是一个抽象层,主要用于减少为各种持久层存储实现数据访问层所需的样板代码量。但是它还是需要JPA提供实现程序,其实Spring Data JPA底层就是使用的 Hibernate实现。

8、JPA 和Hibernate 和 Mybatis的区别
JPA:ORM规范,各大ORM框架实现这个规范。可以自动建表。
Hibernate:是完整的ORM,不需要我们写sql,框架比较重,学习成本比较高,性能不好控制,功能强大且文档丰富。
Mybatis:不是完整的ORM,程序员需要自己去写全部的SQL,轻量级框架,学习成本低,性能好控制。不能自动建表。虽然mybatis经常被和Hibernate比较,但mybatis不是JPA的一个实现。mybatis可以理解为加强版的SQL,实现了诸如动态SQL、结果集映射等,高效又不失灵活。
java使用数据库相关组件/规范的关系如下:
二、JPA方式:Spring Data Jpa
Spring Data Jpa 极大简化了数据库访问层代码,简单几步:
1. 添加pom.xml依赖
2. 配置数据库连接
3. 编写Entity类,依照JPA规范,定义实体
4. 编写Repository接口,依靠SpringData规范,定义数据访问接口(注意,只要接口,不需要任何实现)
5. 写一小陀配置文件 (Spring Scheme配置方式极大地简化了配置方式)
1.添加依赖 :Maven pom.xml文件
要使用MySQL,需要引入对应的mysql connector,因此,首先在pom文件中添加如下依赖:
<dependencies>
  <dependency>
    <groupId>org.springframework.boot</groupId>
    <artifactId>spring-boot-starter-data-jpa</artifactId>
  </dependency>
  <dependency>
    <groupId>mysql</groupId>
    <artifactId>mysql-connector-java</artifactId>
  </dependency>
</dependencies>
2.属性配置文件application.properties
在src/main/resources/application.properties中设置数据源和jpa配置,不需要另外的XML配置和Java配置。
spring.datasource.url = jdbc:mysql://localhost:3306/test
spring.datasource.username = root
spring.datasource.password = root
spring.datasource.driverClassName = com.mysql.jdbc.Driver
# Specify the DBMS
spring.jpa.database = MYSQL
# Show or not log for each sql query
spring.jpa.show-sql = true
# Hibernate ddl auto (create, create-drop, update)
spring.jpa.hibernate.ddl-auto = update
# Naming strategy
spring.jpa.hibernate.naming-strategy = org.hibernate.cfg.ImprovedNamingStrategy

# stripped before adding them to the entity manager)
spring.jpa.properties.hibernate.dialect = org.hibernate.dialect.MySQL5Dialect

#Show or not log for each sql query
spring.jpa.show-sql = true
# Hibernate ddl auto (create, create-drop, update)
spring.jpa.hibernate.ddl-auto = update
# Naming strategy
spring.jpa.hibernate.naming-strategy = org.hibernate.cfg.ImprovedNamingStrategy

# stripped before adding them to the entity manager)
spring.jpa.properties.hibernate.dialect = org.hibernate.dialect.MySQL5Dialect
简单说明
hibernate的ddl-auto=update配置表名,数据库的表和列会自动创建(根据Java实体的熟悉), 这里 可以看到更多得hibernate配置。如果希望通过Hibernate依靠Entity类自动创建数据库和数据表,则还需要加上配置项——spring.jpa.hibernate.ddl-auto=create-drop。
PS:在生产环境中不要使用create-drop,这样会在程序启动时先删除旧的,再自动创建新的,最好使用update;还可以通过设置spring.jpa.show-sql = true来显示自动创建表的SQL语句,通过spring.jpa.database = MYSQL指定具体的数据,如果不明确指定Spring boot会根据classpath中的依赖项自动配置。
@Autowired
private JdbcTemplate jdbcTemplate;
只要定义了上面这个代码,Spring Boot会自动创建一个Datasource对象,然后再创建一个jdbctemplate对象来管理datasource,通过jdbctemplate操作数据库可以减少大量模板代码。如果你对SpringBoot的原理感兴趣,可以在org.springframework.boot.autoconfigure.jdbc.DataSourceAutoConfiguration类中查看其具体实现。
3、实体
package com.city.data.domain;
import java.io.Serializable;
import javax.persistence.Column;
import javax.persistence.Entity;
import javax.persistence.Table;
import javax.persistence.GeneratedValue;
import javax.persistence.Id;

@Entity
@Table(name = "city")
public class City implements Serializable {
	private static final long serialVersionUID = 1L;
	@Id
	@GeneratedValue
	private int cityId;

	@Column(nullable = false)
	private String name;
	@Column(nullable = false)
	private int provinceId;

	public City() {
	}
	public City( int cityId) {
		super();
		this.cityId = cityId;
	}
	public int  getCityId() {
	      return cityId;
	 }
	public void setCityId(int id) {
	     this.cityId = id;
	}
        ......

}
4.实体的数据访问层Dao
package com.city.data.service;
/**
 *DAO层
 */
import org.springframework.data.domain.Page;
import org.springframework.data.domain.Pageable;
import org.springframework.data.repository.Repository;

import com.city.data.domain.City;
interface CityRepository extends Repository<City, Long> {
	City findByName(String name);
}
我们都没有写一行SQL语句,也没有在代码中涉及到数据库连接、建立查询等方面的内容。只有实体类上的各种注解表明我们在于数据库做交互:@Entity,@Repository,@Id,@GeneratedValue,@ManyToOne,@ManyToMany以及@OneToMany,这些注解属于Java Persistance API。我们通过Respository接口的子接口与数据库交互,同时由Spring建立对象与数据库表、数据库表中的数据之间的映射关系。下面依次说明这些注解的含义和使用:
- @Entity,说明被这个注解修饰的类应该与一张数据库表相对应,表的名称可以由类名推断,当然了,也可以明确配置,只要加上
@Table(name = "books")即可。需要特别注意,每个Entity类都应该有一个protected访问级别的无参构造函数,用于给Hibernate提供初始化的入口。 - @Id and @GeneratedValue:@Id注解修饰的属性应该作为表中的主键处理、@GeneratedValue修饰的属性应该由数据库自动生成,而不需要明确指定。
- @ManyToOne, @ManyToMany表明具体的数据存放在其他表中,在这个例子里,书和作者是多对一的关系,书和出版社是多对一的关系,因此book表中的author和publisher相当于数据表中的外键;并且在Publisher中通过@OneToMany(mapped = "publisher")定义一个反向关联(1——>n),表明book类中的publisher属性与这里的books形成对应关系。
- @Repository 用来表示访问数据库并操作数据的接口,同时它修饰的接口也可以被component scan机制探测到并注册为bean,这样就可以在其他模块中通过@Autowired织入。
5.业务逻辑层service
接口放在 src\main\java\com\city\data\service 包中,具体代码如下:
package com.city.data.service;

import org.springframework.beans.factory.annotation.Autowired;
import org.springframework.data.domain.Page;
import org.springframework.data.domain.Pageable;
import org.springframework.stereotype.Component;
import org.springframework.transaction.annotation.Transactional;
import org.springframework.util.Assert;
import org.springframework.util.StringUtils;


import com.city.data.domain.City;

@Component("cityService")
@Transactional
public class CityServiceImpl implements CityService {

	private final CityRepository cityRepository;
	@Autowired
	public CityServiceImpl(CityRepository cityRepository) {
		this.cityRepository = cityRepository;
	}


	//@Override
	public City getCity(String cityName) {
		Assert.notNull(cityName, "Name must not be null");
		return this.cityRepository.findByName(cityName);
	}
}
6.测试的控制器CityController
新建一个查询控制器CityController,接口放在src\main\java\com\city\data\web包中,具体代码如下:
package com.city.data.web;

import org.springframework.beans.factory.annotation.Autowired;
import org.springframework.stereotype.Controller;
import org.springframework.transaction.annotation.Transactional;
import org.springframework.web.bind.annotation.RequestMapping;
import org.springframework.web.bind.annotation.ResponseBody;
import org.springframework.web.bind.annotation.RequestMethod;
import org.springframework.web.bind.annotation.PathVariable;
import org.springframework.web.bind.annotation.RestController;
import java.util.*;


import com.city.data.service.CityService;
import com.city.data.domain.City;;


//原始格式
//@Controller
//json格式
@RestController
public class CityController {


	@Autowired
	private CityService cityService;


	@RequestMapping("/")
	@ResponseBody
	@Transactional(readOnly = true)
	public int getBeijing() {
		//return "helloWorld";
		return this.cityService.getCity("beijing").getCityId();
	}

	/**
	 * @PathVariable是用来获得请求url中的动态参数的
	 * @param name
	 * @return
	 */
	 @RequestMapping(value = "/{name}", method = RequestMethod.GET)
	public Map<String, Object> getCity( @PathVariable String name) {
	     City city =  this.cityService.getCity(name);

	    Map<String, Object> response = new LinkedHashMap<>();
	    response.put("msg", "get city with name(" + name +")");
	    response.put("city", city);
	    return response;
	 }

}
你可以使用浏览器访问url http://127.0.0.1:8080
三、使用jdbctemplate
1、属性配置文件
application.properties
spring.datasource.url=jdbc:mysql://localhost:3306/test
spring.datasource.username=root
spring.datasource.password=123456
spring.datasource.driverClassName=com.mysql.jdbc.Driver
如果使用JNDI,则可以替代 spring.datasource 的 url、username、password,如:
spring.datasource.jndi-name=java:tomcat/datasources/example
值得一提的是,无论是Spring Boot默认的DataSource配置还是你自己的DataSource bean,都会引用到外部属性文件中的属性配置。所以假设你自定义的DataSource bean,你可以在定义bean时设置属性,也可以在属性文件中,以“spring.datasource.*”的方式使属性配置外部化。
2、pom.xml 配置maven依赖
        <!-- MYSQL -->
        <dependency>
            <groupId>mysql</groupId>
            <artifactId>mysql-connector-java</artifactId>
         </dependency>
         <!-- Spring Boot JDBC -->
         <dependency>
            <groupId>org.springframework.boot</groupId>
            <artifactId>spring-boot-starter-jdbc</artifactId>
          </dependency>
3、Java代码范例
CityServiceImpl.java
注意,使用jdbc要有变量
@Autowired
private JdbcTemplate jdbcTemplate;
package com.city.data.service;


import org.springframework.beans.factory.annotation.Autowired;
import org.springframework.data.domain.Page;
import org.springframework.data.domain.Pageable;
import org.springframework.stereotype.Component;
import org.springframework.transaction.annotation.Transactional;
import org.springframework.util.Assert;
import org.springframework.util.StringUtils;
import org.springframework.jdbc.core.JdbcTemplate;
import org.springframework.jdbc.core.RowMapper;


import java.sql.ResultSet;
import java.sql.SQLException;
import java.util.*;

import com.city.data.domain.City;
import com.city.data.common.JdbcSQL;

@Component("cityService")
@Transactional

public class CityServiceImpl implements CityService {

	private final CityRepository cityRepository;

	@Autowired
	private JdbcTemplate jdbcTemplate;

	@Autowired
	public CityServiceImpl(CityRepository cityRepository) {
		this.cityRepository = cityRepository;

	}

	/**
	 *
	 */
	 public List<City> getCityList(CitySearchCriteria criteria){
	        String sql = "SELECT *  FROM city";
	        String cityName = criteria.getName();
	        int  provinceid  = criteria.getProvinceId();
	        String where  = "";
	        if(provinceid > 0 ) {
	        	where += " province_id=" + provinceid;
	        }
	        if(StringUtils.hasLength(cityName) ) {
	        	where += " name=" + cityName;
	        }
	        if(!where.isEmpty() ) {
	        	sql =sql + " where "  + where;
	        }


	        return (List<City>) jdbcTemplate.query(sql, new RowMapper<City>(){
	            @Override
	            public City mapRow(ResultSet rs, int rowNum) throws SQLException {
	                City  city = new City();
	                city.setCityId(rs.getInt("city_id"));
	                city.setName(rs.getString("name"));
	                city.setMap(rs.getString("map"));
	                city.setProvinceId(rs.getInt("province_id"));
	                return city;
	            }

	        });
	    }


	public  List getCityList2(Map<String, Object> condition){
		JdbcSQL jdbcSQL  =new JdbcSQL();
		jdbcSQL.setTable("city");
		jdbcSQL.setConditon(condition);
		return jdbcSQL.selectByCondition();
	}

	public  List<Map<String, Object>> getCityList2(Map<String, Object> condition) {
		 	String sql = "select * from city";
	        return jdbcTemplate.queryForList(sql);

	}

}
然后启动项目,访问地址: http://localhost:8080/

4、连接池说明
Tomcat7之前,Tomcat本质应用了DBCP连接池技术来实现的JDBC数据源,但在Tomcat7之后,Tomcat提供了新的JDBC连接池方案,作为DBCP的替换或备选方案,解决了许多之前使用DBCP的不利之处,并提高了性能。详细请参考:http://wiki.jikexueyuan.com/project/tomcat/tomcat-jdbc-pool.html
Spring Boot为我们准备了最佳的数据库连接池方案,只需要在属性文件(例如application.properties)中配置需要的连接池参数即可。
我们使用Tomcat数据源连接池,需要依赖tomcat-jdbc,只要应用中添加了spring-boot-starter-jdbc 或 spring-boot-starter-data-jpa依赖,则无需担心这点,因为将会自动添加 tomcat-jdbc 依赖。
假如我们想用其他方式的连接池技术,只要配置自己的DataSource bean,即可覆盖Spring Boot的自动配置。
请看我的数据源配置:
spring.datasource.url=jdbc:mysql://localhost:3306/test
spring.datasource.username=root
spring.datasource.password=123456
spring.datasource.driver-class-name=com.mysql.jdbc.Driver

spring.datasource.max-idle=10
spring.datasource.max-wait=10000
spring.datasource.min-idle=5
spring.datasource.initial-size=5
spring.datasource.validation-query=SELECT 1
spring.datasource.test-on-borrow=false
spring.datasource.test-while-idle=true
spring.datasource.time-between-eviction-runs-millis=18800
spring.datasource.jdbc-interceptors=ConnectionState;SlowQueryReport(threshold=0)
配置过连接池的开发人员对这些属性的意义都有所认识。
我们打开DEBUG日志输出,logback.xml 中添加:
<logger name="org.springframework.boot" level="DEBUG"/>然后启动项目,注意观察日志输出,如下图中会显示自动启用了连接池:
我在上面的数据源配置中添加了过滤器,并设置了延迟时间为0(故意设置很低,实际项目中请修改):
spring.datasource.jdbc-interceptors=ConnectionState;SlowQueryReport(threshold=0)这个时候,我们访问 http://localhost:8080/myspringboot/stu/list 观察日志,会发现框架自动将大于该时间的数据查询进行警告输出,如下:
问题:
1、连接池的连接在最大生存时间 时间内没有请求数据库,再次使用的连接就报错。
spring.datasource.max-lifetime=86400000 (单位 毫秒)
2、如果连接池的连接长时间不使用(可能时间短于max-lifetime),但是超过mysql的wait_timeout的时间,mysql也会进行回收这个连接的。
my.cnf
wait_timeout=31536000
interactive_timeout=31536000
Mysql服务器默认的“wait_timeout”是8小时【也就是默认的值默认是28800秒】,也就是说一个connection空闲超过8个小时,Mysql将自动断开该connection,通俗的讲就是一个连接在8小时内没有活动,就会自动断开该连接。 wait timeout的值可以设定,但最多只能是2147483,不能再大了。也就是约24.85天 .
四、使用mybatis
Mybatis作为近年来最流行的ORM框架,其特点:
1、易于上手和掌握。
2、sql可以写在xml里,便于统一管理和优化。
3、sql与程序代码的解耦。
4、提供映射标签,支持对象与数据库的orm字段关系映射
5、 提供对象关系映射标签,支持对象关系组建维护
6、提供xml标签,支持编写动态sql。
总的来说,虽然jdbc性能稍好点,但mybatis提高了开发效率,使开发变得简单。不过使用jdbc封装成工具类后也很好用。
1、数据库表:
CREATE TABLE `user` (
`uid` bigint(20) NOT NULL AUTO_INCREMENT,
`username` varchar(120) NOT NULL COMMENT 'username',
`password` varchar(255) NOT NULL COMMENT 'password',
`ctime` datetime NOT NULL ON UPDATE CURRENT_TIMESTAMP,
PRIMARY KEY (`uid`)
) ENGINE=InnoDB AUTO_INCREMENT=2 DEFAULT CHARSET=utf8
2. Springmvc集成Mybatis
我们先了解Springmvc集成Mybatis,然后就知道springboot集成Mybatis简单了很多。
1)、项目添加mybatis依赖
在pom.xml文件中增加如下:
<!-- jdbc -->
<dependency>
    <groupId>org.springframework</groupId>
    <artifactId>spring-jdbc</artifactId>
    <version>4.2.4.RELEASE</version>
</dependency>
<dependency>
    <groupId>org.springframework</groupId>
    <artifactId>spring-tx</artifactId>
    <version>4.2.4.RELEASE</version>
</dependency>
<!-- MyBatis相关 -->

<dependency> <!-- 导入Mysql数据库链接jar包 -->
    <groupId>mysql</groupId>
    <artifactId>mysql-connector-java</artifactId>
    <version>5.1.6</version>
</dependency>

<dependency><!-- mybatis核心包 -->
    <groupId>org.mybatis</groupId>
    <artifactId>mybatis</artifactId>
    <version>3.3.1</version>
</dependency>
<dependency><!-- mybatis/spring包 -->
    <groupId>org.mybatis</groupId>
    <artifactId>mybatis-spring</artifactId>
    <version>1.2.5</version>
</dependency>

<dependency><!-- 导入dbcp的jar包,用来在applicationContext.xml中配置数据库 -->
    <groupId>commons-dbcp</groupId>
    <artifactId>commons-dbcp</artifactId>
    <version>1.4</version>
</dependency>
<!-- end -->
2)、配置mybatis
可以单独使用文档spring-mybatis.xml来配置mybatis。主要内容就是自动扫描,自动注入,配置数据库。
\src\main\resources/spring-mybatis.xml:
<?xml version="1.0" encoding="UTF-8"?>
<beans xmlns="http://www.springframework.org/schema/beans"
       xmlns:xsi="http://www.w3.org/2001/XMLSchema-instance" xmlns:p="http://www.springframework.org/schema/p"
       xmlns:context="http://www.springframework.org/schema/context"
       xmlns:mvc="http://www.springframework.org/schema/mvc"
       xsi:schemaLocation="http://www.springframework.org/schema/beans
                        http://www.springframework.org/schema/beans/spring-beans-3.1.xsd
                        http://www.springframework.org/schema/context
                        http://www.springframework.org/schema/context/spring-context-3.1.xsd
                        http://www.springframework.org/schema/mvc
                        http://www.springframework.org/schema/mvc/spring-mvc-4.0.xsd">

    <context:component-scan base-package="com.demo.springmvc.drm.dao"></context:component-scan>
    <!--  引入配置文件:加载jdbc.properties文件中的内容,jdbcproperties文件中的key要有一定的特殊规则 -->
    <bean id="propertyConfigurer"
          class="org.springframework.beans.factory.config.PropertyPlaceholderConfigurer">
        <property name="location" value="classpath:jdbc.properties" />
    </bean>
    <!-- 配置数据源,使用dbcp连接池 -->
    <!--创建nlp_tuling数据源 -->
    <bean id="dataSourceDemo" class="org.apache.commons.dbcp.BasicDataSource">
        <property name="driverClassName" value="com.mysql.jdbc.Driver" />
        <property name="url" value="${jdbc.url}" />
        <property name="username" value="${jdbc.username}" />
        <property name="password" value="${jdbc.password}" />
        <!-- 数据库连接池 -->
        <property name="defaultAutoCommit" value="false" />
        <!-- 连接池中可同时连接的最大的连接数(默认值为8,调整为20,高峰单机器在20并发左右,自己根据应用场景定) -->
        <property name="maxActive" value="25"></property>
        <!-- 连接池启动时创建的初始化连接数量(默认值为0) -->
        <property name="initialSize" value="15"></property>
        <!-- 最大等待时间,当没有可用连接时,连接池等待连接释放的最大时间,超过该时间限制会抛出异常,如果设置-1表示无限等待(默认为无限,调整为60000ms,避免因线程池不够用,而导致请求被无限制挂起) -->
        <property name="maxWait" value="60000"></property>
        <!-- 连接池中最大的空闲的连接数,超过的空闲连接将被释放,如果设置为负数表示不限制(默认为8个,maxIdle不能设置太小,因为假如在高负载的情况下,连接的打开时间比关闭的时间快,会引起连接池中idle的个数
            上升超过maxIdle,而造成频繁的连接销毁和创建,类似于jvm参数中的Xmx设置) -->
        <property name="maxIdle" value="20"></property>
        <!-- 连接池中最小的空闲的连接数,低于这个数量会被创建新的连接(默认为0,调整为5,该参数越接近maxIdle,性能越好,因为连接的创建和销毁,都是需要消耗资源的;但是不能太大,因为在机器很空闲的时候,也会创建低于minidle个数的连接,类似于jvm参数中的Xmn设置) -->
        <property name="minIdle" value="15"></property>
        <!-- 超过removeAbandonedTimeout时间后,是否进 行没用连接(废弃)的回收(默认为false,调整为true) -->
        <property name="removeAbandoned" value="true"></property>
        <!-- 超过时间限制,回收没有用(废弃)的连接(默认为 300秒,调整为180) -->
        <property name="removeAbandonedTimeout" value="180"></property>
    </bean>

    <!-- spring和MyBatis完美整合,不需要mybatis的配置映射文件 -->
    <bean id="dataSourceSqlSessionFactory" class="org.mybatis.spring.SqlSessionFactoryBean">
        <property name="dataSource" ref="dataSourceDemo" />
        <!-- 自动扫描mapping.xml文件 -->
        <property name="mapperLocations" value="classpath*:mapper/*Mapper.xml"></property>
    </bean>


    <!-- DAO接口所在包名,Spring会自动查找其下的类 -->
    <bean class="org.mybatis.spring.mapper.MapperScannerConfigurer">
        <property name="basePackage" value="com.demo.springmvc.drm.dao" />
        <property name="sqlSessionFactoryBeanName" value="dataSourceSqlSessionFactory"></property>
    </bean>

    <!-- (事务管理)transaction manager, use JtaTransactionManager for global tx -->
    <!--<bean id="transactionManager"-->
          <!--class="org.springframework.jdbc.datasource.DataSourceTransactionManager">-->
        <!--<property name="dataSource" ref="dataSourceDemo" />-->
    <!--</bean>-->
</beans>
然后在xxx-servlet.xml引入文件
<import resource="classpath*:spring-mybatis.xml" />
3)、创建UserEntity
package com.demo.springmvc.drm.entity;

public class UserEntity {
    private Integer uid;
    private String userName;
    private String password;
    public Integer getUid() {
        return uid;
    }
    public void setUid(Integer uid) {
        this.uid = uid;
    }
    public String getUserName() {
        return userName;
    }
    public void setUserName(String userName) {
        this.userName = userName == null ? null : userName.trim();
    }
    public String getPassword() {
        return password;
    }
    public void setPassword(String password) {
        this.password = password == null ? null : password.trim();
    }
    @Override
    public String toString() {
        return "User [id=" + uid + ", userName=" + userName + ", password="
                + password + "]";
    }

}4)、创建dao
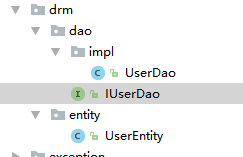
IUserDao接口
package com.demo.springmvc.drm.dao;
import com.demo.springmvc.drm.entity.UserEntity;
import org.springframework.stereotype.Service;

@Service
public interface IUserDao {

    public UserEntity getUserByUid(Integer uid);
    public Integer updateUser(UserEntity userEntity);
    public Integer insertUser(UserEntity userEntity);
}
UserDao
package com.demo.springmvc.drm.dao.impl;

import com.demo.springmvc.drm.dao.IUserDao;
import com.demo.springmvc.drm.entity.UserEntity;
import org.apache.ibatis.session.SqlSessionFactory;
import org.mybatis.spring.support.SqlSessionDaoSupport;
import org.springframework.beans.factory.annotation.Autowired;
import org.springframework.stereotype.Component;

@Component
public class UserDao extends SqlSessionDaoSupport implements IUserDao {
    @Autowired
    @Override
    public void setSqlSessionFactory( SqlSessionFactory sqlSessionFactory){
        super.setSqlSessionFactory(sqlSessionFactory);
    }

    @Override
    public UserEntity getUserByUid(Integer uid) {
        return this.getSqlSession().selectOne("selectUser", uid);
    }

    @Override
    public Integer updateUser(UserEntity userEntity) {
        return this.getSqlSession().update("updateUser", userEntity);
    }

    @Override
    public Integer insertUser(UserEntity userEntity) {
        return this.getSqlSession().update("insertUser", userEntity);
    }

}5)、创建mapper配置
src\main\resources\mapper\UserMapper.xml:
<?xml version="1.0" encoding="UTF-8"?>
        <!DOCTYPE mapper PUBLIC "-//mybatis.org//DTD Mapper 3.0//EN" "http://mybatis.org/dtd/mybatis-3-mapper.dtd">

<mapper namespace="com.demo.springmvc.drm.dao.impl.UserDaoImpl">
<select id="selectUser" resultType="com.demo.springmvc.drm.entity.UserEntity">
    SELECT * FROM user WHERE uid = #{uid};
</select>
<update id="updateUser" parameterType="com.demo.springmvc.drm.entity.UserEntity">
    UPDATE user SET username =#{username} WHERE uid = #{uid};
</update>
<insert id="insertUser" parameterType="com.demo.springmvc.drm.entity.UserEntity">
    INSERT  INTO user (username, password,ctime) VALUES (#{username},#{password},now());
</insert>
</mapper>
6)、service和controller测试
UserService :
package com.demo.springmvc.service;

import com.demo.springmvc.drm.dao.IUserDao;
import com.demo.springmvc.drm.entity.UserEntity;
import org.springframework.beans.factory.annotation.Autowired;
import org.springframework.stereotype.Service;

/**
 * Created by huangguisu on 2020/8/5.
 */
@Service
public class UserService {
    @Autowired
    private IUserDao userDao;

    public UserEntity getUserById(Integer userId) {
        return this.userDao.getUserByUid(userId);
    }
}
UserController:
package com.demo.springmvc.controller;
import com.demo.springmvc.drm.entity.UserEntity;
import com.demo.springmvc.service.UserService;
import org.springframework.beans.factory.annotation.Autowired;
import org.springframework.web.bind.annotation.*;
import org.springframework.stereotype.Controller;
import org.springframework.web.bind.annotation.RequestMapping;

@Controller
@RequestMapping("/user")

public class UserController {
    @Autowired
    UserService userService;
    @RequestMapping("/")
    @ResponseBody
    public String index() {
        return "Hello world";
    }

    @RequestMapping("/getuser/")
    @ResponseBody
    public UserEntity getUser(@RequestParam Integer uid) {

        UserEntity userEntity = userService.getUserById(uid);
        return userEntity;
    }


}
3. Spring boot集成Mybatis:使用xml配置【sql和代码解耦】
xml配置保持映射文件的老传统,优化主要体现在不需要实现dao的实现层【只需要定义接口类和方法】,系统会自动根据方法名在映射文件中找对应的sql【由namespace和名称坐标确定】。
1)、添加mybatis依赖
在pom.xml文件中增加如下:
引入mybatis-spring-boot-starter和mysql-connector-java
<dependency>
    <groupId>mysql</groupId>
    <artifactId>mysql-connector-java</artifactId>
</dependency>
<dependency>
    <groupId>org.mybatis.spring.boot</groupId>
    <artifactId>mybatis-spring-boot-starter</artifactId>
    <version>1.0.0</version>
</dependency>
2)、数据源配置
在resource文件夹下添加application.properties配置文件并输入数据库参数,如下:
spring.datasource.driverClassName = com.mysql.jdbc.Driver
spring.datasource.url = jdbc:mysql://192.168.10.34:3306/test
spring.datasource.username = test
spring.datasource.password = test123
spring.datasource.max-idle=10
spring.datasource.max-wait=1000
spring.datasource.min-idle=5
spring.datasource.initial-size=5
3)、映射器:添加mapper的接口
定义映射器
spring boot简化了很多Mybatis复杂的xml配置,但是作为Mybatis的四大组件之一的映射器是不可或缺的。可以这样理解,一个映射器 = 一个接口 + 一个xml文件。
在dao目录中创建IUserDao 接口. 使用@Mapper确保在IoC容器初始化。
package com.demo.springboot2.web.drm.dao;

import com.demo.springboot2.web.drm.UserEntity;
import org.springframework.stereotype.Service;

@Service
public interface IUserDao {
    public UserEntity getUserByUid(Integer uid);
    public Integer updateUser(UserEntity userEntity);
    public Integer insertUser(UserEntity userEntity);
}
4)、映射器:mapper配置xml文件
application.properties新增以下配置
mybatis.config-location=classpath:mybatis/mybatis-config.xml
mybatis.mapper-locations=classpath:mybatis/mapper/*.xml
UserMapper.xml:
<?xml version="1.0" encoding="UTF-8"?>
<!DOCTYPE mapper PUBLIC "-//mybatis.org//DTD Mapper 3.0//EN" "http://mybatis.org/dtd/mybatis-3-mapper.dtd">

<mapper namespace="com.demo.springboot2.web.drm.dao.IUserDao">
    <!--<resultMap id="BaseResultMap" type="com.demo.springboot2.web.drm.entity.UserEntity" >-->
        <!--<id column="uid" property="uid" jdbcType="BIGINT" />-->
        <!--<result column="username" property="username" jdbcType="VARCHAR" />-->
        <!--<result column="password" property="password" jdbcType="VARCHAR" />-->
    <!--</resultMap>-->

    <sql id="Base_Column_List" >
        uid, username, password
    </sql>

    <select id="getUserByUid"  resultType="com.demo.springboot2.web.drm.entity.UserEntity" >
        SELECT
        <include refid="Base_Column_List" />
        FROM user
        WHERE uid = #{uid}
    </select>

    <insert id="insertUser" parameterType="com.demo.springboot2.web.drm.entity.UserEntity" >
        INSERT INTO
        user
        (username,password)
        VALUES
        (#{username}, #{password})
    </insert>

    <update id="updateUser" parameterType="com.demo.springboot2.web.drm.entity.UserEntity" >
        UPDATE
        user
        SET
        <if test="username != null">userName = #{username},</if>
        <if test="password != null">passWord = #{password},</if>
        WHERE
        uid = #{uid}
    </update>
</mapper>
指定了mybatis基础配置文件和实体类映射文件的地址
<?xml version="1.0" encoding="UTF-8"?>
<!DOCTYPE configuration PUBLIC "-//mybatis.org//DTD Config 3.0//EN" "http://mybatis.org/dtd/mybatis-3-config.dtd">

<configuration>
    <typeAliases>
        <typeAlias alias="Integer" type="java.lang.Integer" />
        <typeAlias alias="Long" type="java.lang.Long" />
        <typeAlias alias="HashMap" type="java.util.HashMap" />
        <typeAlias alias="LinkedHashMap" type="java.util.LinkedHashMap" />
        <typeAlias alias="ArrayList" type="java.util.ArrayList" />
        <typeAlias alias="LinkedList" type="java.util.LinkedList" />
    </typeAliases>
</configuration>
3. Spring boot集成Mybatis:注解【耦合性高】
1)、 添加相关maven文件【同上】
2)、application.properties 相关配置【同上】
在启动类中添加对mapper包扫描@MapperScan,如果没有添加mapp包扫描。在Mapper类添加注解@Mapper。
@SpringBootApplication
@MapperScan("com.demo.springboot2.web.drm.dao")
public class Application {

    public static void main(String[] args) {
        SpringApplication.run(Application.class, args);
    }
}
3)、开发Mapper接口
通过注解@Select设置sql。
package com.demo.springboot2.web.drm.dao;

import com.demo.springboot2.web.drm.entity.UserEntity;
import org.apache.ibatis.annotations.Mapper;
import org.apache.ibatis.annotations.*;
@Mapper
public interface IUserDao2 {

    @Select("SELECT * FROM user WHERE uid = #{uid}")
//    @Results({
//            @Result(property = "userSex",  column = "user_sex", javaType = UserSexEnum.class),
//            @Result(property = "nickName", column = "nick_name")
//    })
    UserEntity getOne(Integer uid);
}
4)、使用DAO
上面就基本完成了相关dao层开发,使用的时候当作普通的类注入进入就可以:
package com.demo.springboot2.web.controller;

import com.demo.springboot2.web.drm.dao.IUserDao2;
import com.demo.springboot2.web.drm.entity.UserEntity;
import org.springframework.beans.factory.annotation.Autowired;
import org.springframework.web.bind.annotation.*;

@RestController
public class TestController {
    @RequestMapping("/")
    @ResponseBody
    public String index() {
        return "Hello world";
    }


    @Autowired
    private IUserDao2 iUserDao2;

    @RequestMapping("/getuser2/")
    @ResponseBody
    public UserEntity getUser2(@RequestParam Integer uid) {
        UserEntity userEntity = iUserDao2.getOne(uid);
        return userEntity;
    }
}
五、SpringBoot2整合Druid数据源
Druid是阿里巴巴开源的一个数据源,主要用于java数据库连接池,相比spring推荐的DBCP和hibernate推荐的C3P0、Proxool数据库连接池,Druid在市场上占有绝对的优势;
虽说 HikariCP 的性能比 Druid 高,但是因为 Druid 包括很多维度的统计和分析功能,所以大家都选择使用Druid 的更多;
关于文档可以从官网知道,可以参考https://github.com/alibaba/druid;
主要特点:
-
Druid 是阿里巴巴开源平台上一个数据库连接池实现,结合了 C3P0、DBCP 等 DB 池的优点,同时加入了日志监控。
-
Druid 可以很好的监控 DB 池连接和 SQL 的执行情况,天生就是针对监控而生的 DB 连接池。
-
Spring Boot 2.0 以上默认使用 Hikari 数据源,可以说 Hikari 与 Driud 都是当前 Java Web 上最优秀的数据源。
如何使用:
1、添加Druid依赖
<!--alibaba druid datasource-->
<dependency>
    <groupId>com.alibaba</groupId>
    <artifactId>druid</artifactId>
    <version>${druid-version}</version>
</dependency>
2) 添加配置
直接使用springboot的properties配置文件application.properties:
#DataSource settings
spring.datasource.type=com.alibaba.druid.pool.DruidDataSource
spring.datasource.url = jdbc:mysql://localhost:3306/test?useUnicode=true&characterEncoding=UTF8
spring.datasource.username = root
spring.datasource.password = root
spring.datasource.driverClassName = com.mysql.jdbc.Driver

#连接池的配置信息
spring.datasource.initialSize=5
spring.datasource.minIdle=5
spring.datasource.maxActive=20

# 配置获取连接等待超时的时间
spring.datasource.maxWait=60000

# 配置间隔多久才进行一次检测,检测需要关闭的空闲连接,单位是毫秒
spring.datasource.timeBetweenEvictionRunsMillis=60000

# 配置一个连接在池中最小生存的时间,单位是毫秒
spring.datasource.minEvictableIdleTimeMillis=300000
spring.datasource.validationQuery=SELECT 1 FROM DUAL
spring.datasource.testWhileIdle=true
spring.datasource.testOnBorrow=false
spring.datasource.testOnReturn=false

# 打开PSCache,并且指定每个连接上PSCache的大小
spring.datasource.poolPreparedStatements=true
spring.datasource.maxPoolPreparedStatementPerConnectionSize=20

# 配置监控统计拦截的filters,去掉后监控界面sql无法统计,'wall'用于防火墙
spring.datasource.filters=stat,wall,log4j
# 通过connectProperties属性来打开mergeSql功能;慢SQL记录
spring.datasource.connectionProperties=druid.stat.mergeSql=true;druid.stat.slowSqlMillis=5000

#是否启用StatFilter默认值true
spring.datasource.druid.web-stat-filter.enabled=true
#多个白名单IP以逗号分隔
druid.monitor.allow=127.0.0.1
#多个黑名单IP以逗号分隔
druid.monitor.deny=0.0.0.0
#druid监控管理界面登录帐号
druid.monitor.loginUsername=admin
#druid监控管理界面登录密码
druid.monitor.loginPassword=password
#是否开启重置功能
druid.monitor.resetEnable=false
| 参数 | 默认值 | 解释 |
|---|---|---|
| initialSize | 3 | 初始化配置连接数 |
| minIdle | 3 | 最小连接数 |
| maxActive | 15 | 最大连接数 |
| maxWait | 5000 | 获取连接超时时间(单位:ms) |
| timeBetweenEvictionRunsMillis | 90000 | 连接有效性检测时间(单位:ms) |
| testOnBorrow | false | 获取连接检测 |
| testOnReturn | false | 归还连接检测 |
| minEvictableIdleTimeMillis | 1800000 | 最大空闲时间(单位ms) |
| testWhileIdle | true | 在获取连接后,确定是否要进行连接空间时间的检查 |
- 配置说明:
1:minEvictableIdleTimeMillis(最大空闲时间):默认为30分钟,配置里面不进行设置。
2:testOnBorrow ,testOnReturn 默认为关闭,可以设置为不配置。
3:testWhileIdle(在获取连接后,确定是否要进行连接空闲时间的检查)。默认为true。配置里面不再进行设置。
- 流程说明:
1:在第一次调用connection的时候,才会进行 initialSize的初始化。
2:心跳检测时间线程,会休眠timeBetweenEvictionRunsMillis时间,然后只对(没有borrow的线程 减去 minIdle)的线程进行检查,如果空闲时间大于minEvictableIdleTimeMillis则进行close。
3:testWhileIdle必须设置为true,在获取到连接后,先检查testOnBorrow,然后再判定testwhileIdle,如果连接空闲时间大于timeBetweenEvictionRunsMillis,则会进行心跳检测。
4:不需要配置validationQuery,如果不配置的情况下会走ping命令,性能更高。
5:连接保存在数组里面,获取连接的时候,获取数组的最后一位。在imeBetweenEvictionRunsMillis时是从前往后进行检查连接的有效性。
3)、数据源配置类
package com.javademo.demo.web.database;

import com.alibaba.druid.pool.DruidDataSource;
import com.alibaba.druid.support.http.StatViewServlet;
import com.alibaba.druid.support.http.WebStatFilter;
import org.slf4j.Logger;
import org.slf4j.LoggerFactory;
import org.springframework.boot.context.properties.ConfigurationProperties;
import org.springframework.boot.web.servlet.FilterRegistrationBean;
import org.springframework.boot.web.servlet.ServletRegistrationBean;
import org.springframework.context.annotation.Bean;
import org.springframework.context.annotation.Configuration;
import org.springframework.context.annotation.PropertySource;

import javax.sql.DataSource;
import java.util.HashMap;
@Configuration
/**
 * 如果配置文件druid.properties
 * @PropertySource(value = "classpath:druid.properties")
 */
public class DruidConfiguration {
    @Bean
    @ConfigurationProperties(prefix = "spring.datasource")
    public DataSource druidDataSource() {
        return new DruidDataSource();
    }

}
4)druid监控配置
我们配置了Druid的监听器:
Druid 数据源具有监控的功能,并提供了一个 web 界面方便用户查看,druid提供了一个默认的 web 页面。
package com.javademo.demo.web.database;

import com.alibaba.druid.support.http.StatViewServlet;
import com.alibaba.druid.support.http.WebStatFilter;
import org.springframework.beans.factory.annotation.Value;
import org.springframework.boot.context.properties.ConfigurationProperties;
import org.springframework.boot.web.servlet.FilterRegistrationBean;
import org.springframework.boot.web.servlet.ServletRegistrationBean;
import org.springframework.context.annotation.Bean;
import org.springframework.context.annotation.Configuration;
import org.springframework.context.annotation.PropertySource;

@Configuration
/**
 * 如果配置文件druid-monitor.properties
 * @PropertySource(value = "classpath:druid-monitor.properties")
 */
public class DruidMonitorConfiguration {

    @Value("${druid.monitor.allow:127.0.0.1}")
    private String allow;
    @Value("${druid.monitor.deny}")
    private String deny;
    @Value("${druid.monitor.loginUsername:admin}")
    private String loginUsername;
    @Value("${druid.monitor.loginPassword:password}")
    private String loginPassword;
    @Value("${druid.monitor.resetEnable:false}")
    private String resetEnable;

    /**
     * 配置Druid的监控
     * @return
     */
    @Bean
    public ServletRegistrationBean druidStatViewServlet() {
        ServletRegistrationBean servletRegistrationBean = new ServletRegistrationBean(new StatViewServlet(), "/druid/*");
        servletRegistrationBean.addInitParameter("allow", this.allow);
        servletRegistrationBean.addInitParameter("deny", this.deny);
        servletRegistrationBean.addInitParameter("loginUsername", this.loginUsername);
        servletRegistrationBean.addInitParameter("loginPassword", this.loginPassword);
        servletRegistrationBean.addInitParameter("resetEnable", this.resetEnable);
        return servletRegistrationBean;
    }

    /**
     * 配置一个web监控的filter
     * @return
     */
    @Bean
    public FilterRegistrationBean druidStatFilter() {
        FilterRegistrationBean filterRegistrationBean = new FilterRegistrationBean(new WebStatFilter());
        filterRegistrationBean.addUrlPatterns("/*");
        filterRegistrationBean.addInitParameter("exclusions", "*.js,*.gif,*.jpg,*.png,*.css,*.ico,/druid/*");
        return filterRegistrationBean;
    }
}
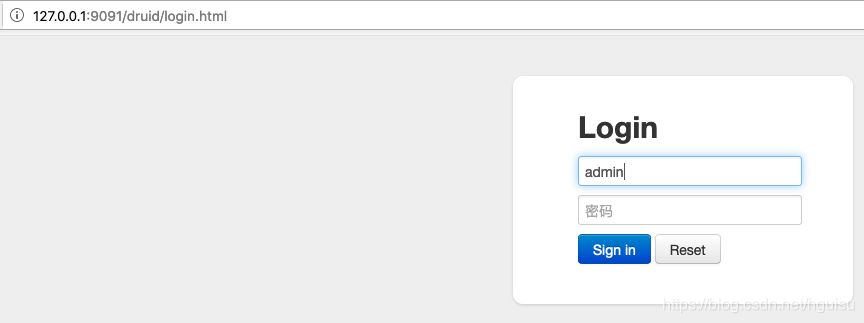
登录:http://127.0.0.1:9091/druid/login.html就可以,如果工程集成了SpringSecurity等权限工程的话是需要额外配置的
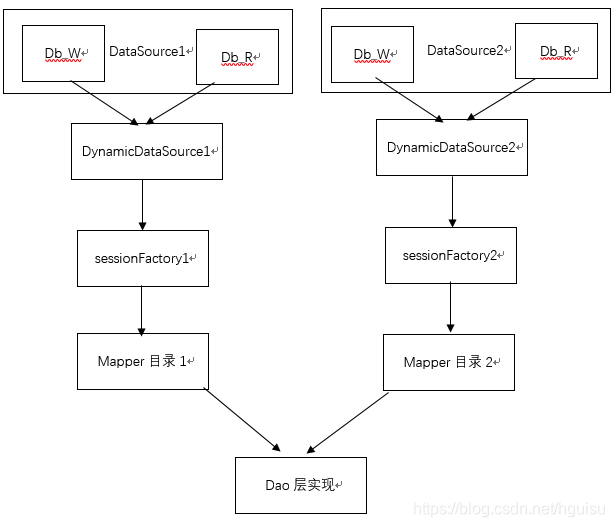
六、SpringBoot整合Druid多数据源
在一个项目中有多个数据源:
1、添加druid-spring-boot依赖
<dependency>
    <groupId>com.alibaba</groupId>
    <artifactId>druid-spring-boot-starter</artifactId>
    <version>1.1.9</version>
</dependency>
2、配置多数据源:
spring.datasource.druid.trade.url=jdbc:mysql://192.168.10.34:3306/demo_db1
spring.datasource.druid.trade.username=demo1
spring.datasource.druid.trade.password=demo123

spring.datasource.druid.member.url=jdbc:mysql://192.168.10.34:3306/demo_db2
spring.datasource.druid.member.username=demo2
spring.datasource.druid.member.password=demo123
3、配置类加载多个数据源:
1、@Primary这个注解必须要加,因为不加的话spring将分不清楚那个为主数据源(默认数据源)
2、 通过@MapperScan区分使用的mapper接口, 必须是区分在不同的包下。
3、PathMatchingResourcePatternResolver().getResources("classpath:mybatis/mapper/*Mapper.xml")); 区分使用的mapper xml配置在不同的目录下。
package com.javademo.demo.web.database;

import com.alibaba.druid.pool.DruidDataSource;
import com.alibaba.druid.spring.boot.autoconfigure.DruidDataSourceBuilder;
import org.mybatis.spring.annotation.MapperScan;
import org.springframework.boot.context.properties.ConfigurationProperties;
import org.springframework.context.annotation.Bean;
import org.springframework.beans.factory.annotation.Qualifier;
import org.springframework.context.annotation.Configuration;
import org.springframework.context.annotation.Primary;
import org.springframework.context.annotation.PropertySource;

import org.apache.ibatis.session.SqlSessionFactory;
import org.mybatis.spring.SqlSessionFactoryBean;
import org.mybatis.spring.SqlSessionTemplate;
import org.springframework.core.io.support.PathMatchingResourcePatternResolver;

import javax.sql.DataSource;
@Configuration
/**
 * 如果配置文件druid.properties
 * @PropertySource(value = "classpath:druid.properties")
 */
@MapperScan(basePackages = "com.javademo.demo.web.drm.dao.default", sqlSessionFactoryRef = "defaultSqlSessionFactory")
public class DruidConfiguration {
    /**
     * 默认数据源
     * @return
     */
    @Bean(name ="default")
    @ConfigurationProperties(prefix = "spring.datasource")
    @Primary
    public DataSource druidDataSource() {
        return new DruidDataSource();
    }

    @Bean(name = "defaultSqlSessionFactory")
    @Primary
    // @Qualifier表示查找Spring容器中名字为tradeSqlSessionFactory的对象
    public SqlSessionFactory defaultSqlSessionFactory(@Qualifier("default") DataSource datasource)
            throws Exception
    {
        SqlSessionFactoryBean bean = new SqlSessionFactoryBean();
        bean.setDataSource(datasource);
        bean.setMapperLocations(
                // 设置mybatis的xml所在位置
                new PathMatchingResourcePatternResolver().getResources("classpath:mybatis/mapper/*Mapper.xml"));
        return bean.getObject();
    }

    @Bean("defaultSqlSessionTemplate")
    @Primary
    public SqlSessionTemplate defaultSqlSessionTemplate(
            @Qualifier("defaultSqlSessionFactory") SqlSessionFactory sessionFactory)
    {
        return new SqlSessionTemplate(sessionFactory);
    }

}
member数据源:
package com.javademo.demo.web.database;

import com.alibaba.druid.pool.DruidDataSource;
import com.alibaba.druid.spring.boot.autoconfigure.DruidDataSourceBuilder;
import org.mybatis.spring.annotation.MapperScan;
import org.springframework.boot.context.properties.ConfigurationProperties;
import org.springframework.context.annotation.Bean;
import org.springframework.beans.factory.annotation.Qualifier;
import org.springframework.context.annotation.Configuration;
import org.springframework.context.annotation.Primary;
import org.springframework.context.annotation.PropertySource;

import org.apache.ibatis.session.SqlSessionFactory;
import org.mybatis.spring.SqlSessionFactoryBean;
import org.mybatis.spring.SqlSessionTemplate;
import org.springframework.core.io.support.PathMatchingResourcePatternResolver;

import javax.sql.DataSource;
@Configuration
/**
 * 如果配置文件druid.properties
 * @PropertySource(value = "classpath:druid.properties")
 */
@MapperScan(basePackages = "com.javademo.demo.web.drm.dao.member", sqlSessionFactoryRef = "memberSqlSessionFactory")
public class DruidConfigurationMember {

    /**
     * 会员数据源
     * @return
     */
    @Bean(name = "memberDataSource")
    @Qualifier("memberDataSource")
    @ConfigurationProperties(prefix="spring.datasource.druid.member")
    public DataSource memberDataSource() {
        return DruidDataSourceBuilder.create().build();
    }


    @Bean(name = "memberSqlSessionFactory")
    // @Qualifier表示查找Spring容器中名字为tradeSqlSessionFactory的对象
    public SqlSessionFactory memberSqlSessionFactory(@Qualifier("memberDataSource") DataSource datasource)
            throws Exception
    {
        SqlSessionFactoryBean bean = new SqlSessionFactoryBean();
        bean.setDataSource(datasource);
        bean.setMapperLocations(
                // 设置mybatis的xml所在位置
                new PathMatchingResourcePatternResolver().getResources("classpath:mybatis/mapper/member/*.xml"));
        return bean.getObject();
    }

    @Bean("memberSqlSessionTemplate")
    public SqlSessionTemplate memberSqlSessionTemplate(
            @Qualifier("memberSqlSessionFactory") SqlSessionFactory sessionFactory)
    {
        return new SqlSessionTemplate(sessionFactory);
    }

}
4、在service层中根据不同的业务注入不同的dao层:
@Autowired
private IUserDao iUserDao;

@Autowired
private MUserDao mUserDao;

@Autowired
TUserDao tUserDao;


 3534
3534

 被折叠的 条评论
为什么被折叠?
被折叠的 条评论
为什么被折叠?
 到【灌水乐园】发言


