


 本文详细介绍如何使用SpringBoot和SpringCloud构建微服务架构,包括服务发现、配置管理、OAuth2.0认证及Docker化。
抽丝剥茧,细说架构那些事——【优锐课】
让我们接着使用Spring Boot和Spring Cloud构建和打包微服务架构(一)继续来!
使用Service发现在微服务之间进行通信
首先,添加所需的依赖关系很重要。将以下内容添加到pom.xml文件中(在school-service和school-ui projects中):
<dependency>
    <groupId>org.springframework.cloud</groupId>
    <artifactId>spring-cloud-starter-netflix-eureka-client</artifactId>
</dependency>
该模块是Spring Cloud计划的一部分,因此,需要一个新的依赖项管理节点,如下所示(请不要忘记将其添加到两个项目中):
<dependencyManagement>
    <dependencies>
        <dependency>
            <groupId>org.springframework.cloud</groupId>
            <artifactId>spring-cloud-dependencies</artifactId>
            <version>${spring-cloud.version}</version>
            <type>pom</type>
            <scope>import</scope>
        </dependency>
    </dependencies>
</dependencyManagement>
现在,您需要配置两个应用程序以向Eureka注册。
在两个项目的application.properties文件中,添加以下行:
eureka.client.serviceUrl.defaultZone=${EUREKA_SERVER:http://localhost:8761/eureka}
spring.application.name=school-service
不要忘记在school-ui项目中将应用程序名称从school-service更改为school-ui。请注意,第一行中有一种新型的参数:{EUREKA_SERVER:http://localhost:8761/eureka}。这意味着“如果环境变量EUREKA_SERVER存在,则使用其值,否则使用默认值。”这将在以后的步骤中很有用。
你知道吗?两个应用程序都准备好将自己注册到发现服务中。您无需执行任何其他操作。我们的主要目标是学校用户界面项目不需要知道学校服务在哪里。因此,您需要更改SchoolController(在school-ui项目中)以在其REST端点中使用school-service。 您也可以在此类中删除serviceHost变量。
package com.okta.developer.docker_microservices.ui.controller;
import com.okta.developer.docker_microservices.ui.dto.TeachingClassDto;
import org.springframework.core.ParameterizedTypeReference;
import org.springframework.http.HttpMethod;
import org.springframework.http.ResponseEntity;
import org.springframework.stereotype.Controller;
import org.springframework.web.bind.annotation.GetMapping;
import org.springframework.web.bind.annotation.RequestMapping;
import org.springframework.web.client.RestTemplate;
import org.springframework.web.servlet.ModelAndView;
import java.util.List;
@Controller
@RequestMapping("/")
public class SchoolController {
    private final RestTemplate restTemplate;
    public SchoolController(RestTemplate restTemplate) {
        this.restTemplate = restTemplate;
    }
    @RequestMapping("")
    public ModelAndView index() {
        return new ModelAndView("index");
    }
    @GetMapping("/classes")
    public ResponseEntity<List<TeachingClassDto>> listClasses() {
        return restTemplate
                .exchange("http://school-service/classes", HttpMethod.GET, null,
                        new ParameterizedTypeReference<List<TeachingClassDto>>() {});
    }
}
在集成Eureka之前,您已经进行了配置,指出了学校服务的位置。 现在,您已将服务调用更改为使用其他服务使用的名称:无端口,无主机名。您需要的服务就在某处,您不需要知道在哪里。
school-service可能具有的多个实例,并且最好在这些实例之间进行负载均衡负载。幸运的是,Spring有一个简单的解决方案:在创建RestTemplate bean时,如下所示添加@LoadBalanced批注。每当您向服务器提出问题时,Spring都会管理多个实例调用。
package com.okta.developer.docker_microservices.ui;
import org.springframework.boot.SpringApplication;
import org.springframework.boot.autoconfigure.SpringBootApplication;
import org.springframework.cloud.client.loadbalancer.LoadBalanced;
import org.springframework.context.annotation.Bean;
import org.springframework.web.client.RestTemplate;
import org.springframework.web.servlet.config.annotation.*;
@SpringBootApplication
public class UIWebApplication implements WebMvcConfigurer {
    public static void main(String[] args) {
        SpringApplication.run(UIWebApplication.class, args);
    }
    @Bean
    @LoadBalanced
    public RestTemplate restTemplate() {
        return new RestTemplate();
    }
    @Override
    public void addResourceHandlers(ResourceHandlerRegistry registry) {
        if(!registry.hasMappingForPattern("/static/**")) {
            registry.addResourceHandler("/static/**")
                    .addResourceLocations("classpath:/static/", "classpath:/static/js/");
        }
    }
}
现在,开始重新启动school-service和school-ui(并保持Discovery服务启动)。再次快速浏览一下 http://localhost:8761:
现在,您的服务正在与发现服务器共享信息。您可以再次测试该应用程序,然后查看它是否可以正常运行。只需在您喜欢的浏览器中转到http://localhost:8080。
将配置服务器添加到您的微服务架构
尽管此配置有效,但最好删除项目源代码中任何配置值的痕迹。 首先,配置URL已从项目中删除,并由服务进行管理。现在,您可以使用Spring Cloud Config对项目中的每个配置执行类似的操作。
首先,使用Spring Initializr和以下参数创建配置项目:
• Group: com.okta.developer.docker_microservices
• Artifact: config
• Dependencies: Config Server, Eureka Discovery
在主类中,添加@EnableConfigServer:
package com.okta.developer.docker_microservices.config;
import org.springframework.boot.SpringApplication;
import org.springframework.boot.autoconfigure.SpringBootApplication;
import org.springframework.cloud.config.server.EnableConfigServer;
@SpringBootApplication
@EnableConfigServer
public class ConfigApplication {
    ...
}
在项目的 application.properties中添加以下属性和值:
spring.application.name=CONFIGSERVER
server.port=8888
spring.profiles.active=native
spring.cloud.config.server.native.searchLocations=.
eureka.client.serviceUrl.defaultZone=${EUREKA_SERVER:http://localhost:8761/eureka}
有关属性的一些解释:
• spring.profiles.active=native — 表示Spring Cloud Config必须使用本机文件系统来获取配置。通常,使用Git存储库,但是为了简单起见,我们将坚持使用本机文件系统。
• spring.cloud.config.server.native.searchLocations —包含配置文件的路径。如果将其更改为硬盘驱动器上的特定文件夹,请确保并在其中创建school-ui.properties文件。
现在,您需要一些配置和适用于此示例。Okta的配置如何?让我们将school-ui放在授权层的后面,并使用配置项目提供的属性值。
您可以注册一个永久免费的开发人员帐户,该帐户使您可以创建所需使用的尽可能多的用户和应用程序!创建帐户后,在Okta的信息中心(Applications > Add Application)中创建一个新的Web应用程序:

并用以下值填写下一个表格:
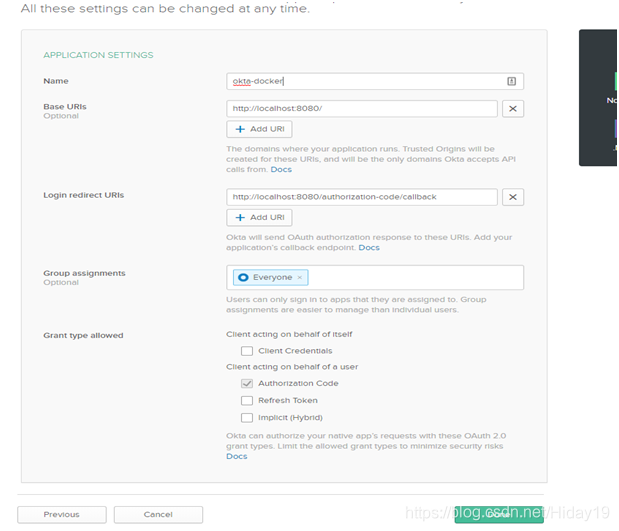
该页面将为您返回一个应用程序ID和一个密钥。确保它们安全,并在配置项目的根文件夹中创建一个名为school-ui.properties的文件,内容如下。不要忘记填充变量值:
okta.oauth2.issuer=https://okta.okta.com/oauth2/default
okta.oauth2.clientId={yourClientId}
okta.oauth2.clientSecret={yourClientSecret}
现在,运行config项目并检查其是否正确获取了配置数据:
./mvnw spring-boot:run
> curl http://localhost:8888/school-ui.properties
okta.oauth2.clientId: YOUR_CLIENT_ID
okta.oauth2.clientSecret: YOUR_CLIENT_SECRET
okta.oauth2.issuer: https://YOUR_DOMAIN/oauth2/default
更改School UI以使用Spring Cloud Config和OAuth 2.0
现在,您需要对Spring UI项目进行一些更改。
首先,您需要更改school-ui / pom.xml并添加一些新的依赖项:
<dependency>
    <groupId>org.springframework.cloud</groupId>
    <artifactId>spring-cloud-starter-config</artifactId>
</dependency>
<dependency>
    <groupId>com.okta.spring</groupId>
    <artifactId>okta-spring-boot-starter</artifactId>
    <version>1.1.0</version>
</dependency>
<dependency>
    <groupId>org.thymeleaf.extras</groupId>
    <artifactId>thymeleaf-extras-springsecurity5</artifactId>
</dependency>
在 com.okta…ui.config包中创建一个新的SecurityConfiguration类:
package com.okta.developer.docker_microservices.ui;
import org.springframework.context.annotation.Configuration;
import org.springframework.security.config.annotation.method.configuration.EnableGlobalMethodSecurity;
import org.springframework.security.config.annotation.web.builders.HttpSecurity;
import org.springframework.security.config.annotation.web.configuration.WebSecurityConfigurerAdapter;
@Configuration
@EnableGlobalMethodSecurity(prePostEnabled = true)
public class SpringSecurityConfiguration extends WebSecurityConfigurerAdapter {
   @Override
    protected void configure(HttpSecurity http) throws Exception {
        http
            .authorizeRequests()
                .antMatchers("/").permitAll()
                .anyRequest().authenticated()
            .and()
                .logout().logoutSuccessUrl("/")
            .and()
                .oauth2Login();
    }
}
更改您的SchoolController,以便仅允许具有范围配置文件的用户使用(每位经过身份验证的用户都拥有)。
import org.springframework.security.access.prepost.PreAuthorize;
....
@GetMapping("/classes")
@PreAuthorize("hasAuthority('SCOPE_profile')")
public ResponseEntity<List<TeachingClassDto>> listClasses(){
    return restTemplate
        .exchange("http://school-service/class", HttpMethod.GET, null,
                new ParameterizedTypeReference<List<TeachingClassDto>>() {});
}
一些配置需要在项目启动时定义。Spring有一个聪明的解决方案,可以在上下文启动之前正确定位并提取配置数据。您需要创建一个文件src/main/resources/bootstrap.yml,如下所示:
eureka:
  client:
    serviceUrl:
      defaultZone: ${EUREKA_SERVER:http://localhost:8761/eureka}
spring:
  application:
    name: school-ui
  cloud:
    config:
      discovery:
        enabled: true
        service-id: CONFIGSERVER
引导文件会创建一个预启动的Spring Application Context,用于在实际应用程序启动之前提取配置。您需要将所有属性从application.properties移到该文件,因为Spring需要知道Eureka Server的位置以及如何搜索配置。在上面的示例中,您启用了通过发现服务进行配置(spring.cloud.config.discovery.enabled)并指定了配置服务ID。
更改 application.properties文件,使其仅具有一个OAuth 2.0属性:
okta.oauth2.redirect-uri=/authorization-code/callback
最后一个要修改的文件是src/main/resources/templates/index.hml . 对其进行调整,以在用户未通过身份验证时显示登录按钮,在用户登录时显示注销按钮。
<!doctype html>
<html lang="en" xmlns:th="http://www.thymeleaf.org">
<head>
    <!-- Required meta tags -->
    <meta charset="utf-8">
    <meta name="viewport" content="width=device-width, initial-scale=1, shrink-to-fit=no">
    <!-- Bootstrap CSS -->
    <link rel="stylesheet" href="https://stackpath.bootstrapcdn.com/bootstrap/4.1.3/css/bootstrap.min.css" integrity="sha384-MCw98/SFnGE8fJT3GXwEOngsV7Zt27NXFoaoApmYm81iuXoPkFOJwJ8ERdknLPMO" crossorigin="anonymous">
    <title>Hello, world!</title>
</head>
<body>
<nav class="navbar navbar-default">
    <form method="post" th:action="@{/logout}" th:if="${#authorization.expression('isAuthenticated()')}" class="navbar-form navbar-right">
        <input type="hidden" th:name="${_csrf.parameterName}" th:value="${_csrf.token}" />
        <button id="logout-button" type="submit" class="btn btn-danger">Logout</button>
    </form>
    <form method="get" th:action="@{/oauth2/authorization/okta}" th:unless="${#authorization.expression('isAuthenticated()')}">
        <button id="login-button" class="btn btn-primary" type="submit">Login</button>
    </form>
</nav>
<div id="content" th:if="${#authorization.expression('isAuthenticated()')}">
    <h1>School classes</h1>
    <table id="classes">
        <thead>
        <tr>
            <th>Course</th>
            <th>Teacher</th>
            <th>Year</th>
            <th>Number of students</th>
        </tr>
        </thead>
        <tbody>
        </tbody>
    </table>
    <!-- Optional JavaScript -->
    <!-- jQuery first, then Popper.js, then Bootstrap JS -->
    <script src="https://code.jquery.com/jquery-3.3.1.min.js" crossorigin="anonymous"></script>
    <script src="https://cdnjs.cloudflare.com/ajax/libs/popper.js/1.14.3/umd/popper.min.js" integrity="sha384-ZMP7rVo3mIykV+2+9J3UJ46jBk0WLaUAdn689aCwoqbBJiSnjAK/l8WvCWPIPm49" crossorigin="anonymous"></script>
    <script src="https://stackpath.bootstrapcdn.com/bootstrap/4.1.3/js/bootstrap.min.js" integrity="sha384-ChfqqxuZUCnJSK3+MXmPNIyE6ZbWh2IMqE241rYiqJxyMiZ6OW/JmZQ5stwEULTy" crossorigin="anonymous"></script>
    <script src="static/js/school_classes.js"></script>
</div>
</body>
</html>
您应该在此HTML中了解一些Thymeleaf属性:
• @{/logout} — returns the logout URL defined on the back-end
• th:if="KaTeX parse error: Expected '}', got '#' at position 2: {#̲authorization.e…{#authorization.expression(‘isAuthenticated()’)}" —only print the HTML inside the node if the user is logged off
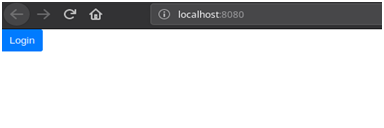
现在,重新启动配置项目和school-ui。如果导航到键入http://localhost:8080,则应该看到以下屏幕:
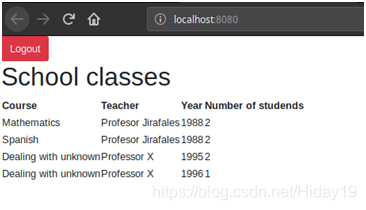
登录后,屏幕应显示如下:
恭喜,您已经使用Spring Cloud config和Eureka创建了微服务架构来进行服务发现!现在,让我们更进一步,并对每个服务进行Dockerize。


 168万+
168万+

 被折叠的 条评论
为什么被折叠?
被折叠的 条评论
为什么被折叠?
 到【灌水乐园】发言


