


特别感谢他
c#和Python交互,完美解决Python调用OpenCV等第三方库以及分发时需配置python环境的问题_c#调用python封装的dll文件需要安装python运行环境嘛-CSDN博客
天下代码都是抄来的,所以为了方便给码友抄,并且抄了能直接运行,我备注的很清楚!
yoloModule.py
# -*- coding: utf-8 -*-
# 载入所需库
import cv2
import numpy as np
import os
import time
import sys

def yolo_detect(pathIn='',
                pathOut=None,
                confidence_thre=0.5,
                nms_thre=0.3,
                jpg_quality=80):
        #pathIn:原始图片的路径
        #pathOut:结果图片的路径
        #label_path:类别标签文件的路径
        #config_path:模型配置文件的路径
        #weights_path:模型权重文件的路径
        #confidence_thre:0-1,置信度(概率/打分)阈值,即保留概率大于这个值的边界框,默认为0.5
        #nms_thre:非极大值抑制的阈值,默认为0.3
        #jpg_quality:设定输出图片的质量,范围为0到100,默认为80,越大质量越好

        # 加载类别标签文件
        LABELS = open('coco.names').read().strip().split("\n")
        nclass = len(LABELS)

        # 为每个类别的边界框随机匹配相应颜色
        np.random.seed(42)
        COLORS = np.random.randint(0, 255, size=(nclass, 3), dtype='uint8')

        # 载入图片并获取其维度
        base_path = os.path.basename(pathIn)
        img = cv2.imread(pathIn)
        (H, W) = img.shape[:2]

        # 加载模型配置和权重文件 readNetFromDarknet使用这个会报错
        #print('从硬盘加载YOLO......')
        net = cv2.dnn.readNet('yolov3.weights', 'yolov3.cfg')

        # 获取YOLO输出层的名字 [ln[i[0] - 1] for 网上很多是这样,会报错
        ln = net.getLayerNames()
        ln = [ln[i - 1] for i in net.getUnconnectedOutLayers()]

        # 将图片构建成一个blob,设置图片尺寸,然后执行一次
        # YOLO前馈网络计算,最终获取边界框和相应概率
        blob = cv2.dnn.blobFromImage(img, 1 / 255.0, (416, 416), swapRB=True, crop=False)
        net.setInput(blob)
        start = time.time()
        layerOutputs = net.forward(ln)
        end = time.time()

        # 显示预测所花费时间
        #print('YOLO模型花费 {:.2f} 秒来预测一张图片'.format(end - start))

        # 初始化边界框,置信度(概率)以及类别
        boxes = []
        confidences = []
        classIDs = []

        # 迭代每个输出层,总共三个
        for output in layerOutputs:
            # 迭代每个检测
            for detection in output:
                # 提取类别ID和置信度
                scores = detection[5:]
                classID = np.argmax(scores)
                confidence = scores[classID]

                # 只保留置信度大于某值的边界框
                if confidence > confidence_thre:
                    # 将边界框的坐标还原至与原图片相匹配,记住YOLO返回的是
                    # 边界框的中心坐标以及边界框的宽度和高度
                    box = detection[0:4] * np.array([W, H, W, H])
                    (centerX, centerY, width, height) = box.astype("int")


                    # 计算边界框的左上角位置
                    x = int(centerX - (width / 2))
                    y = int(centerY - (height / 2))

                    # 更新边界框,置信度(概率)以及类别
                    boxes.append([x, y, int(width), int(height)])
                    confidences.append(float(confidence))
                    classIDs.append(classID)

        # 使用非极大值抑制方法抑制弱、重叠边界框
        idxs = cv2.dnn.NMSBoxes(boxes, confidences, confidence_thre, nms_thre)

        personCount = 0
        allCount = 0
        # 确保至少一个边界框
        if len(idxs) > 0:
            # 迭代每个边界框
            for i in idxs.flatten():
                # 提取边界框的坐标
                (x, y) = (boxes[i][0], boxes[i][1])
                (w, h) = (boxes[i][2], boxes[i][3])

                # 绘制边界框以及在左上角添加类别标签和置信度
                color = [int(c) for c in COLORS[classIDs[i]]]
                cv2.rectangle(img, (x, y), (x + w, y + h), color, 20)
                allCount = allCount + 1
                #如果是人物就单独累计一下
                typeStr = LABELS[classIDs[i]]
                if typeStr == "person":
                   personCount = personCount + 1
                text = '{}: {:.3f}'.format(typeStr, confidences[i])
                (text_w, text_h), baseline = cv2.getTextSize(text, cv2.FONT_HERSHEY_SIMPLEX, 0.5, 2)
                cv2.rectangle(img, (x, y - text_h - baseline), (x + text_w, y), color, -1)
                cv2.putText(img, text, (x, y - 5), cv2.FONT_HERSHEY_SIMPLEX, 0.5, (0, 0, 0), 2)

        rltstr = '共检测到数据:{}项,person:{}个'.format(allCount,personCount)
        #print(rltstr)
        # 输出结果图片
        if pathOut is None:
            cv2.imwrite('with_box_' + base_path, img, [int(cv2.IMWRITE_JPEG_QUALITY), jpg_quality])
        else:
            cv2.imwrite(pathOut, img, [int(cv2.IMWRITE_JPEG_QUALITY), jpg_quality])
        return rltstr
#pathIn = 'image/10.jpg'
#pathOut = 'image/10_1.jpg'
#yolo_detect(pathIn,pathOut)
if __name__ == '__main__':
   print(yolo_detect(sys.argv[1],sys.argv[2]))
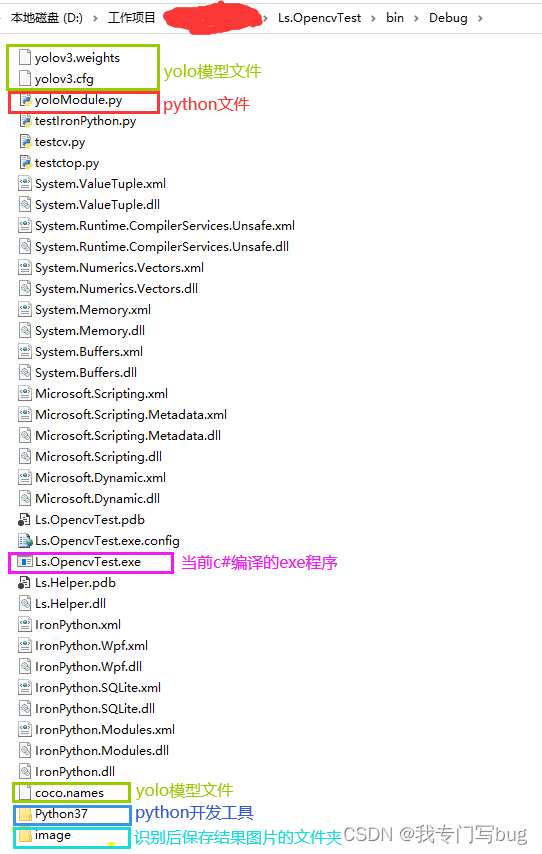
注意:'yolov3.weights', 'yolov3.cfg','coco.names' 这三个文件没写路径,因为需要和c#编译的程序以及py程序放在同一级目录里面。
using System;
using System.Collections.Generic;
using System.ComponentModel;
using System.Data;
using System.Diagnostics;
using System.Drawing;
using System.Drawing.Imaging;
using System.IO;
using System.Linq;
using System.Text;
using System.Threading.Tasks;
using System.Windows.Forms;

namespace Ls.OpencvTest
{
    public partial class Form2 : Form
    {
        public Form2()
        {
            InitializeComponent();
        }
        string imgurl = "";
        private void button1_Click(object sender, EventArgs e)
        {
            OpenFileDialog ofd = new OpenFileDialog();
            ofd.Title = "请选择图片文件";
            if (ofd.ShowDialog() == DialogResult.OK)
            {
                ofd.Filter = "**jpg|*.JPG|*.GIF|*.GIF|*.BMP|*.BMP";
                imgurl = ofd.FileName;
                Image img = Image.FromFile(imgurl);
                this.pictureBox1.Image = img;
                this.label1.Text = imgurl;
            }


        }

        private void button4_Click(object sender, EventArgs e)
        {
            if (string.IsNullOrEmpty(imgurl))
            {
                MessageBox.Show("请选择图片!");
                return;
            }
            string sArgName = @"yoloModule.py";
            string[] strArr = new string[2];
            strArr[0] = imgurl;
            var newimgurl = "image/" + DateTime.Now.ToString("yyyyMMddHHmmss") + ".jpg";
            strArr[1] = newimgurl;
            Process p = new Process();
            //把写好的python文件和本程序放在同一级目录里面,通过下面的方式获取路径
            string rootPath = AppDomain.CurrentDomain.SetupInformation.ApplicationBase;
            p.StartInfo.FileName = rootPath + "Python37\\python.exe";
            string sArguments = rootPath + sArgName;
            foreach (string sigstr in strArr)
            {
                sArguments += " " + sigstr;//传递参数
            }
            p.StartInfo.Arguments = sArguments;
            p.StartInfo.UseShellExecute = false;
            p.StartInfo.RedirectStandardOutput = true;
            p.StartInfo.RedirectStandardInput = true;
            p.StartInfo.RedirectStandardError = true;
            p.StartInfo.CreateNoWindow = true;
            p.Start();
            string output = p.StandardOutput.ReadToEnd();

            this.label2.Text = "结果:" + output;
            var newpic = rootPath + newimgurl;
            if (File.Exists(newpic))
            {
                this.pictureBox2.Image = Image.FromFile(newpic);
            }
            p.WaitForExit();
        }
    }
}
注意:rootPath + "Python37\\python.exe" 这是把整个python开发工具安装后的文件夹一起复制到和c#编译的程序同一级目录。当然,Python37\Lib\site-packages 下面只保留了cv2、numpy、numpy-1.21.6.dist-info、opencv_python-4.7.0.72.dist-info 这几个文件夹。这样在最后把整个c#程序编译好后,在没有安装环境的电脑上就能直接运行了!
目录结构如下:
测试效果:

注意:选择图片的时候,路径不要带中文。


 632
632


 被折叠的 条评论
为什么被折叠?
被折叠的 条评论
为什么被折叠?
 到【灌水乐园】发言


