


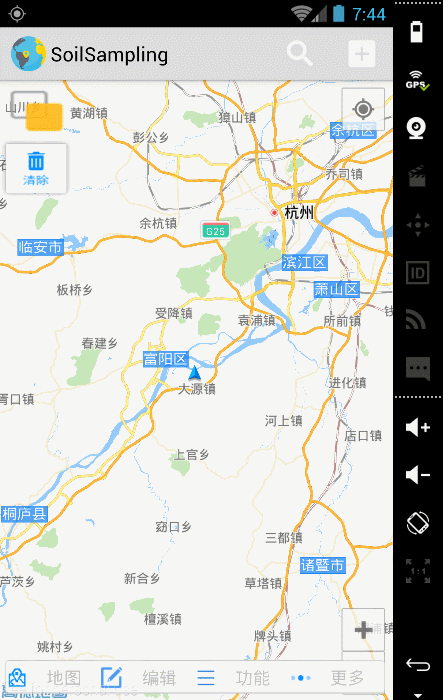
先来看效果图
1 本文实现的功能如下:
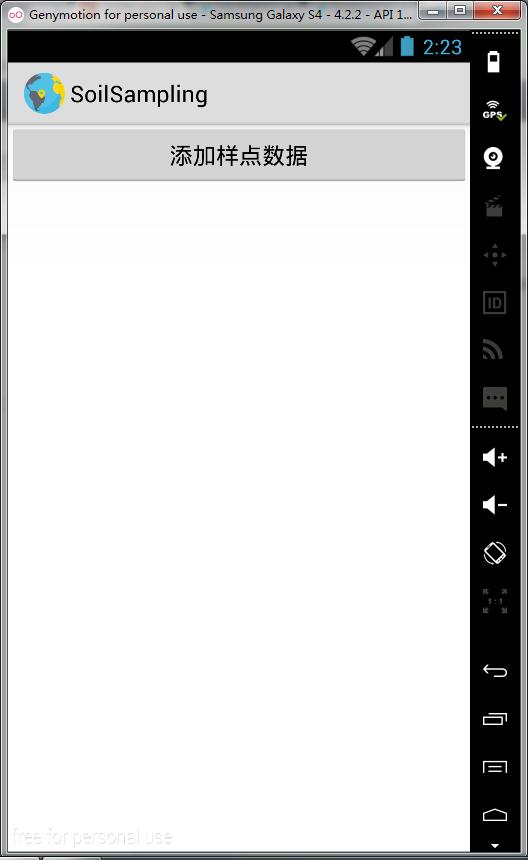
1.1 浏览本地文件,找到KML文件;
1.2 读取解析KML文件;
1.3 将KML文件中的位置信息显示在高德地图上;
总体框架和思路:打开文件对话框浏览*.kml文件,点击kml文件之后,返回此文件的路径,在AddSample.java类中获取到我们选择的kml文件的路径,然后调用ReadKml.java类中的parseKml方法,将KML文件路径传给parseKml以便解析。在解析KML时要先将KML文件解压缩(也可以不用解压缩),目的是解析KML压缩文件内的doc.kml。我们解析到KML文件中我们需要的属性值,x,y,name之后,要建立一个Coordinate类,用来存放上述的三个属性,每个Coordinate实例化对象才是我们所需要的。此处可以设置一个list,用来存放每个实例化对象。接下来便是参考高德地图的官方demo设置一下每个point的marker属性了。循环将其添加到地图上即可。
2 具体实现
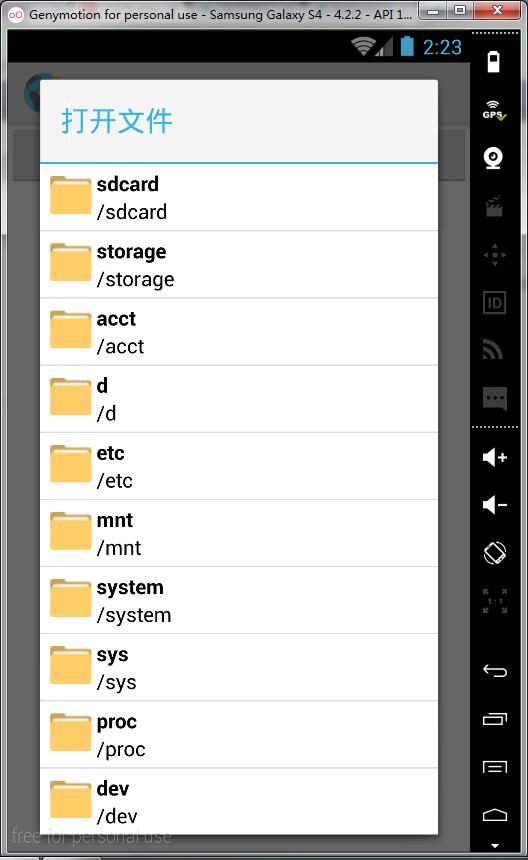
2.1 打开文件对话框,浏览本地文件(此处完全用的是另外一大神博客中的代码,地址实在是找不到了,在此感谢)
2.1.1 先添加一个按钮的布局文件addsample.xml,点击此按钮后能够弹出打开文件的对话框
<?xml version="1.0" encoding="utf-8"?>
<LinearLayout xmlns:android="http://schemas.android.com/apk/res/android"
    android:layout_width="match_parent"
    android:layout_height="match_parent"
    android:orientation="vertical" >
    <Button
        android:id="@+id/addsample_button"
        android:layout_width="match_parent"
        android:layout_height="wrap_content"
        android:text="@string/add_sample" />

</LinearLayout>
再添加一个浏览本地文件界面的布局文件filedialogitem.xml
<?xml version="1.0" encoding="utf-8"?>
<LinearLayout xmlns:android="http://schemas.android.com/apk/res/android"
    android:id="@+id/file_dialog"
    android:layout_width="match_parent"
    android:layout_height="wrap_content"
    android:background="#FFFFFF"
    android:padding="4dp"
    android:orientation="horizontal" >
    <ImageView
        android:id="@+id/filedialogitem_img"
        android:layout_width="32dp"
        android:layout_height="32dp"
        android:layout_margin="4dp"/>
    <LinearLayout
        android:layout_width="wrap_content"
        android:layout_height="wrap_content"
        android:orientation="vertical">
        <TextView
            android:id="@+id/filedialogitem_name"
            android:layout_width="match_parent"
            android:layout_height="wrap_content"
            android:textSize="16sp"
            android:textColor="#000000"
            android:textStyle="bold"/>
        <TextView
            android:id="@+id/filedialogitem_path"
            android:layout_width="match_parent"
            android:layout_height="wrap_content"
            android:textSize="16sp"
            android:textColor="#000000"/>
    </LinearLayout>

</LinearLayout>
2.1.2 添加回调函数CallBackBundle.java
import android.os.Bundle;

public interface CallBackBundle {
    void callBack(Bundle bundle);
}
2.1.3 添加OpenFileDialog.java,是实现浏览文件功能的主要代码
import java.io.File;
import java.util.ArrayList;
import java.util.HashMap;
import java.util.List;
import java.util.Map;
import com.soil.soilsampling.R;
import android.app.Activity;
import android.app.AlertDialog;
import android.app.Dialog;
import android.content.Context;
import android.os.Bundle;
import android.util.AttributeSet;
import android.view.View;
import android.widget.AdapterView;
import android.widget.ListView;
import android.widget.SimpleAdapter;
import android.widget.Toast;
import android.widget.AdapterView.OnItemClickListener;
public class OpenFileDialog {
public static String tag = "OpenFileDialog";
public static final String sRoot = "/"; //根目录
public static final String sParent = ".."; //父目录
public static final String sFolder = "."; //当前文件夹
public static final String sEmpty = "";
private static final String sErrorMsg = "访问出错!";
public static Dialog createDialog(int id, Context context, String title, CallBackBundle callBack, String suffix, Map<String, Integer> images)
{
AlertDialog.Builder builder = new AlertDialog.Builder(context);
builder.setView(new FileSelectView(context, id, callBack, suffix, images));
Dialog dialog = builder.create();
dialog.setTitle(title);
return dialog;
}
// 点击打开浏览文件按钮后(或者加载样点按钮)出现的浏览磁盘文件的view
static class FileSelectView extends ListView implements OnItemClickListener
{
// 此view就是一个listview,每一行就是一个文件夹路径,每一行我们设置包括:文件夹图标,文件夹名称,路径
private CallBackBundle callBack = null;
private String path = sRoot;
private List<Map<String, Object>> list = null; //浏览文件窗口实际上是一个listview,那么这个list就是listview的每一行
// 一个list包含:当前文件夹的路径,名字和图标
private int dialogId = 0;//对话框ID
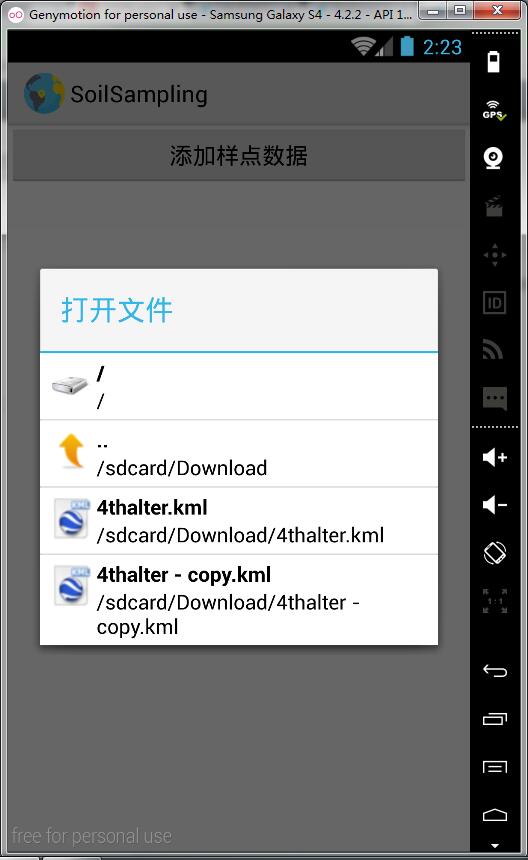
private String suffix = null;//我们要选取的文件类型后缀,如kml文件
private Map<String, Integer> imageMap = null;
public FileSelectView(Context context,int dialogId, CallBackBundle callBack, String suffix, Map<String, Integer> images) {
super(context);
this.imageMap = images;
this.suffix = suffix==null?"":suffix.toLowerCase();
this.callBack = callBack;
this.dialogId = dialogId;
this.setOnItemClickListener(this);
refreshFileList();
}
private String getSuffix(String fileName)
{
int dix = fileName.lastIndexOf('.');
if (dix < 0) {
return "";
}
else {
return fileName.substring(dix+1);
}
}
// 获取某个文件目录(如根目录,父目录等目录)的图标
private int getImageId(String s)
{
if (imageMap == null) {
return 0;
}
else if (imageMap.containsKey(s)) {
return imageMap.get(s);
}
else if (imageMap.containsKey(sEmpty)) {
return imageMap.get(sEmpty);
}
else {
return 0;
}
}
// 刷新文件列表
private int refreshFileList()
{
File[] files = null;
try {
files = new File(path).listFiles();
} catch (Exception e) {
files = null;
}
if (files == null) {
//如果访问出错
Toast.makeText(getContext(), sErrorMsg, Toast.LENGTH_SHORT).show();
return -1;
}
if (list != null) {
list.clear();
}
else {
list = new ArrayList<Map<String, Object>>(files.length);
}
//用来保存文件夹和文件的两个列表
ArrayList<Map<String, Object>> lfolders = new ArrayList<Map<String,Object>>();
ArrayList<Map<String, Object>> lfiles = new ArrayList<Map<String,Object>>();
if (! this.path.equals(sRoot)) {
//如果当前目录不是根目录,就添加根目录和上一层目录
Map<String, Object> map = new HashMap<String, Object>();
map.put("name", sRoot);
map.put("path", sRoot);
map.put("img", getImageId(sRoot));
list.add(map);
map = new HashMap<String, Object>();
map.put("name", sParent);
map.put("path", path);
map.put("img", getImageId(sParent));
list.add(map);
}
for (File file:files) {
if (file.isDirectory() && file.listFiles()!=null) {
//添加文件夹
Map<String, Object> map = new HashMap<String, Object>();
map.put("name", file.getName());
map.put("path", file.getPath());
map.put("img", getImageId(sFolder));
lfolders.add(map);
}
else if (file.isFile()) {
// 添加文件
String fileSuffix = getSuffix(file.getName()).toLowerCase();
if(suffix == null || suffix.length()==0 || (fileSuffix.length()>0 && suffix.indexOf("."+fileSuffix+";")>=0))
{
Map<String, Object> map = new HashMap<String, Object>();
map.put("name", file.getName());
map.put("path", file.getPath());
map.put("img", getImageId(fileSuffix));
lfiles.add(map);
}
}
}
list.addAll(lfolders);//先添加文件夹,确保文件夹显示在list的上面
list.addAll(lfiles);//再添加文件
SimpleAdapter adapter = new SimpleAdapter(getContext(), list, R.layout.filedialogitem, new String[]{"img","name","path"},
new int[]{R.id.filedialogitem_img, R.id.filedialogitem_name, R.id.filedialogitem_path});
this.setAdapter(adapter);
return files.length;
}
@Override
public void onItemClick(AdapterView<?> parent, View view, int position, long id) {
// TODO Auto-generated method stub
//条目选择
String filePath = (String)list.get(position).get("path");
String fileName = (String)list.get(position).get("name");
if (fileName.equals(sRoot) || fileName.equals(sParent)) {
//如果选择的是根目录或者父目录
File file = new File(filePath);
String pathParent = file.getParent();
if (pathParent != null) {
path = pathParent;
}
else {
path = sRoot;
}
}
else {
File file = new File(filePath);
//如果选择的是文件
if (file.isFile()) {
((Activity)getContext()).dismissDialog(this.dialogId);//让文件对话框消失
//设置回调的返回值
Bundle bundle = new Bundle();
bundle.putString("path", filePath);
bundle.putString("name", fileName);
// 调用事先设置的回调函数
this.callBack.callBack(bundle);
return;
}
else if (file.isDirectory()) {
//如果选择的是文件夹,则进入文件夹
path = filePath;
}
}
this.refreshFileList();
}
}
}
2.1.4 添加AddSample.java,是addsample.xml布局文件的实现
import java.util.HashMap;
import java.util.Map;

import com.soil.parsexml.ReadKml;
import com.soil.soilsampling.R;

import android.app.Activity;
import android.app.Dialog;
import android.os.Bundle;
import android.util.Log;
import android.view.View;
import android.view.View.OnClickListener;

public class AddSample extends Activity{
    static private int openFileDialogId = 0;
    ReadKml readKml = new ReadKml();
    @Override
    protected void onCreate(Bundle savedInstanceState) {
        // TODO Auto-generated method stub
        super.onCreate(savedInstanceState);
        setContentView(R.layout.addsample);
        findViewById(R.id.addsample_button).setOnClickListener(new OnClickListener() {
            @Override
            public void onClick(View v) {
                // TODO Auto-generated method stub
                showDialog(openFileDialogId);
            }
        });
    }

    @Override
    protected Dialog onCreateDialog(int id) {
        if (id == openFileDialogId) {
            // 设置各种文件类型的图标
            Map<String, Integer> images = new HashMap<String, Integer>();
            images.put(OpenFileDialog.sRoot, R.drawable.filedialog_root);//根目录图标
            images.put(OpenFileDialog.sParent, R.drawable.up32);//返回上一层,父目录图标
            images.put(OpenFileDialog.sFolder, R.drawable.folder34);//文件夹图标
            images.put("kml", R.drawable.kml32);
            //images.put("kmz", R.drawable.kml32);
            images.put(OpenFileDialog.sEmpty, R.drawable.filedialog_root);
            Dialog dialog = OpenFileDialog.createDialog(id,this , "打开文件", new CallBackBundle() {

                @Override
                public void callBack(Bundle bundle) {
                    // TODO Auto-generated method stub
                    String filePath = bundle.getString("path");
                    //String fileName = bundle.getString("name");
                    setTitle(filePath);
                    try {
                        readKml.parseKml(filePath);//调用ReadKML类中的解析方法

                    } catch (Exception e) {
                        // TODO Auto-generated catch block
                        e.printStackTrace();
                    }
                }
            }, ".kml;", images);

            return dialog;
        }
        return null;
    }


}
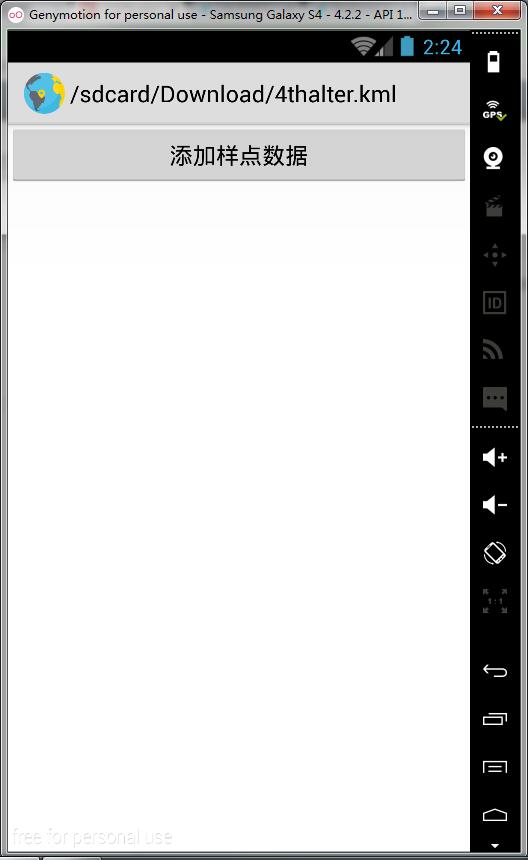
至此,我们已经实现了打开文件对话框,浏览KML文件的功能,效果图如下:
2.2 读取并解析KML文件
我们要实现的就是,找到sdcard中的KML文件之后,点击,程序便开始解析KML文件。我们要在地图上显示出KML中的点,必须将KML文件中Placemark节点下面的coordinates节点中的x,y坐标解析出来。又每个x,y坐标必须是一对,因此我们建立一个Coordinate类专门用来存放x,y坐标。在解析KML时主要使用了dom4j包。在这里可以参考我的另外一篇博客:http://blog.csdn.net/hnyzwtf/article/details/50202405
2.2.1 新建ReadKml.java实现解析KML的核心功能
import java.io.File;
import java.io.FileInputStream;
import java.io.IOException;
import java.io.InputStream;
import java.util.ArrayList;
import java.util.Iterator;
import java.util.List;
import java.util.zip.ZipEntry;
import java.util.zip.ZipException;
import java.util.zip.ZipFile;
import java.util.zip.ZipInputStream;

import org.dom4j.Document;
import org.dom4j.DocumentException;
import org.dom4j.Element;
import org.dom4j.io.SAXReader;
import org.jsoup.Jsoup;
import org.jsoup.select.Elements;

import com.soil.model.Coordinate;
import com.soil.soilsampling.MainActivity;

import android.util.Log;

public class ReadKml {
    public static boolean addSampleSuccess = false; //判断读取KML是否成功
    private Coordinate coordinate = null; //存储从KML文件中读取出来的坐标值和name
    private static List<Coordinate> coordinateList = new ArrayList();//存储每次实例化的Coordinate对象,每个Coordinate都保存着不同的x,y,name
    public void parseKml(String pathName) throws Exception
    {
        File file = new File(pathName);//pathName为KML文件的路径
        try {
            ZipFile zipFile = new ZipFile(file);
            ZipInputStream zipInputStream = null;
            InputStream inputStream = null;
            ZipEntry entry = null;
            zipInputStream = new ZipInputStream(new FileInputStream(file));
            while ((entry = zipInputStream.getNextEntry()) != null) {
                String zipEntryName = entry.getName();
                if (zipEntryName.endsWith("kml") || zipEntryName.endsWith("kmz")) {
                    inputStream = zipFile.getInputStream(entry);
                    parseXmlWithDom4j(inputStream);
                }else if (zipEntryName.endsWith("png")) {

                }
            }
            zipInputStream.close();
            inputStream.close();
        } catch (ZipException e) {
            // TODO Auto-generated catch block
            e.printStackTrace();
        } catch (IOException e) {
            // TODO Auto-generated catch block
            e.printStackTrace();
        }
    }
    public Boolean parseXmlWithDom4j(InputStream input) throws Exception
    {
        SAXReader reader = new SAXReader();
        Document document = null;
        try {
            document = reader.read(input);
            Element root = document.getRootElement();//获取doc.kml文件的根结点
            listNodes(root);
            addSampleSuccess = true;
            //选择sd卡中的kml文件,解析成功后即调用MainActivity中的添加marker的方法向地图上添加样点marker
            MainActivity mainActivity = new MainActivity();
            mainActivity.addSampleMarker();//调用MainActivity中的方法
        } catch (DocumentException e) {
            // TODO: handle exception
            e.printStackTrace();
        }
        return addSampleSuccess;
    }
    //遍历当前节点下的所有节点
    public void listNodes(Element node){

        String name = "";//Placemark节点中的name属性
        String x = "";//坐标x
        String y = "";//坐标y
        double d_x = 0.0;//对x作string to double
        double d_y = 0.0;
        try {
            if ("Placemark".equals(node.getName())) {//如果当前节点是Placemark就解析其子节点
                List<Element> placemarkSons = node.elements();//得到Placemark节点所有的子节点
                for (Element element : placemarkSons) { //遍历所有的子节点
                    if ("name".equals(element.getName())) {
                        name = element.getText();
                    }
                }
                Element pointSon;//Point节点的子节点
                Iterator i = node.elementIterator("Point");//遍历Point节点的所有子节点
                while (i.hasNext()) {
                    pointSon = (Element)i.next();
                    String nodeContent = "";
                    nodeContent = pointSon.elementText("coordinates");//得到coordinates节点的节点内容
                    String nodeContentSplit[] = null;
                    nodeContentSplit = nodeContent.split(",");
                    x = nodeContentSplit[1];
                    y = nodeContentSplit[0];
                    d_x = Double.valueOf(x.trim());
                    d_y = Double.valueOf(y.trim());
                }
                coordinate = new Coordinate(d_x, d_y , name);
                coordinateList.add(coordinate);//将每一个实例化的对象存储在list中
            }
        } catch (Exception e) {
            e.printStackTrace();
        }
        //同时迭代当前节点下面的所有子节点
        //使用递归
        Iterator<Element> iterator = node.elementIterator();
        while(iterator.hasNext()){
            Element e = iterator.next();
            listNodes(e);
        }
    }
    public List<Coordinate> getCoordinateList()
    {
        return this.coordinateList;
    }
}
2.2.2 Coordinate类
package com.soil.model;

public class Coordinate {
    private double x;
    private double y;
    private String name;
    public Coordinate(double x, double y, String name)
    {
        this.x = x;
        this.y = y;
        this.name = name;
    }
    public double getX() {
        return x;
    }
    public void setX(double x) {
        this.x = x;
    }
    public double getY() {
        return y;
    }
    public void setY(double y) {
        this.y = y;
    }
    public String getName() {
        return name;
    }
    public void setName(String name) {
        this.name = name;
    }

}
2.3 设置要添加到地图上的point的一些属性
2.3.1 新建SoilSampleUtil.java
package com.soil.utils;

import java.util.ArrayList;
import java.util.List;

import android.util.Log;

import com.amap.api.maps.AMap;
import com.amap.api.maps.model.BitmapDescriptor;
import com.amap.api.maps.model.BitmapDescriptorFactory;
import com.amap.api.maps.model.LatLng;
import com.amap.api.maps.model.Marker;
import com.amap.api.maps.model.MarkerOptions;
import com.soil.model.Coordinate;
import com.soil.parsexml.ReadKml;
import com.soil.soilsampling.R;

/*
 * 设置要添加到地图上的样点Marker的一些属性
 * */
public class SoilSampleUtil {
    public static AMap aMapUtil;//添加marker到地图上需要使用AMap类的实例化对象
    static ReadKml readKml = new ReadKml();
    private static MarkerOptions markerOption;
    private static ArrayList<Marker> markers = new ArrayList<Marker>();
    private static List<Coordinate> sampleList = readKml.getCoordinateList();
    static double x = 0.0;
    static double y = 0.0;
    public static void addSampleMarkersData()
    {
        if (markers.size() == 0) {
            //设置marker的图标为默认的天蓝色气泡
            BitmapDescriptor bitmapDescriptor = BitmapDescriptorFactory.defaultMarker(BitmapDescriptorFactory.HUE_AZURE);
            for (int i = 0; i < sampleList.size(); i++) {
                x = sampleList.get(i).getX();//获取marker的坐标值
                y = sampleList.get(i).getY();
                markerOption = new MarkerOptions();
                markerOption.setFlat(true);
                markerOption.anchor(0.5f, 0.5f);
                markerOption.icon(bitmapDescriptor);
                markerOption.position(new LatLng(x, y));
                //Log.d("SoilSampleUtil", String.valueOf(i)+"-->"+String.valueOf(x)+","+String.valueOf(y));
                try {
                    if (aMapUtil != null) {
                        Marker marker = aMapUtil.addMarker(markerOption);
                        markers.add(marker);
                    }
                    else {
                        Log.d("SoilSampleUtil", "aMap is null !!!");
                    }
                } catch (Exception e) {
                    e.printStackTrace();
                }

            }

        }

    }
}
2.3.2 我们在MainActivity中添加一个方法,调用2.3.1中的addSampleMarkersData方法即可。
 public void addSampleMarker()
    {
        if (ReadKml.addSampleSuccess) {
            SoilSampleUtil.addSampleMarkersData();
        }
        else {
            Log.d("MainActivity", "addSampleSuccess is false or aMap is null");
        }
    }
另外,我们必须在onPause方法中添加以下代码
@Override
protected void onPause() {
//当点击添加样点数据按钮时,MainActivity就会隐藏不可见,因此,在其声明周期“暂停”之前,必须将AMap的实例化对象传给SoilSampleUtil中的aMapUtil
//以避免AMap实例化对象为空
SoilSampleUtil.aMapUtil = aMap;
super.onPause();
mapView.onPause();
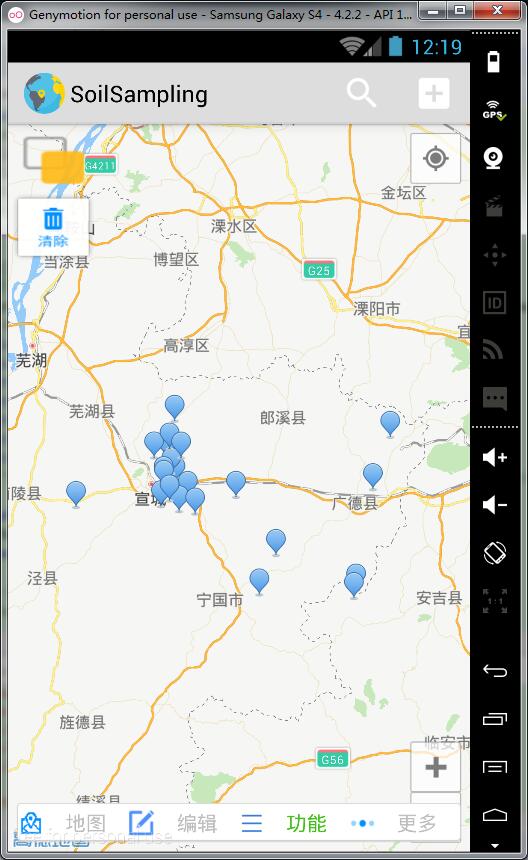
}3 至此,我们已经实现了解析KML文件并在高德地图加载marker的功能
效果图如下:


 468
468

 被折叠的 条评论
为什么被折叠?
被折叠的 条评论
为什么被折叠?
 到【灌水乐园】发言


