


holydancer原创,如需转载,请在显要位置注明:
转自holydancer的CSDN专栏,原文地址:http://blog.csdn.net/holydancer/article/details/7371643
先介绍一个自定义类描述的方法description,一般情况下,一个自定义类我们在用%@输出的时候,给出的是一个内存地址,我们在该类的.m文件里重写description方法,来修改输出内容,呆会儿我们要用到这个方法来验证今天学习内容,所以先看一段代码熟悉一下:
Human.h:
#import <Foundation/Foundation.h>

@interface Human : NSObject
{
    int age;
    NSString *name;
    Human *child;
}

@property int age;
@property (copy)NSString *name;
@property (retain)Human *child;
@end
Human.m:
#import "Human.h"

@implementation Human
@synthesize age;
@synthesize name;
@synthesize child;

//-(NSString *)description
//{
//    NSString *des = [NSString stringWithFormat:@"%d,%@,%@",age,name,child];
//    return des;
//}

@end
上面的重写描述被注释掉了,我们先看未修改前的输出:
main.m:
#import <Foundation/Foundation.h>
#import "Human.h"

int main(int argc, const char * argv[])
{

    @autoreleasepool {
        Human *human1=[[Human alloc]init];
        Human *human2=[[Human alloc]init];
        human1.child=human2;
        human1.name=@"holydancer";
        human1.age=22;
        NSLog(@"%@",human1);

    }
    return 0;
}
2012-03-20 08:47:32.980 category[304:403] <Human: 0x7ff2cb414380>
如果把human.m中的注释去掉的话输出结果如下:
2012-03-20 08:48:09.869 category[315:403] 22,holydancer,0,(null),(null)
很简单吧,这样就可以查看自己定义类的内容了,好了,下面就让我们来研究一下在objective-c中如何实现序列化。
在OC中,有四类对象是可以直接使用writeToFile方法将内容写入磁盘的,分别是NSString,NSArray,NSDictionary,NSData.看代码:
#import <Foundation/Foundation.h>
#import "Human.h"

int main(int argc, const char * argv[])
{

    @autoreleasepool {

        NSData *data=[[NSData alloc]init];
        NSString *string=[[NSString alloc]init];
        NSArray *array=[[NSArray alloc]init];
        NSDictionary *dictionary=[[NSDictionary alloc]init];

        [data writeToFile:@"/Users/holydancer/Desktop/text1.txt" atomically:YES];
        [string writeToFile:@"/Users/holydancer/Desktop/text2.txt" atomically:YES];
        [array writeToFile:@"/Users/holydancer/Desktop/text3.txt" atomically:YES];
        [dictionary writeToFile:@"/Users/holydancer/Desktop/text4.txt" atomically:YES];
        //atomically参数是指是否将写入文件的内容开启保护机制,如果开启,会在复制时创建临时文件进行复制,以免写入失败破坏原始文件。安全,但是会消耗内存。
        //上面的文件地址,如果不存在的话会自动生成。有的话会覆盖原有文件内容。
    }
    return 0;
}
以上四种是COCOA自带可以写入磁盘文件的类型,但是我们常常用到自定义类,可是里面并没有writeToFile方法,怎么办呢?这时NSData的作用就体现出来了,我们可以把任意自定义类转化成NSData格式即可,这个过程我们称之为编码,或者archive归档,需要将自定义类实现NSCoding协议并重写encodeWithCoder和initWithCoder两个方法,分别用以编码和反编码。然后在编码时会用NSCoder的子类NSKeyedArchiver和NSKeyedUnarchiver分别调用archivedDataWithRootObject和unarchiveObjectWithData来启动自定义类中重写的那两个方法,类似于回调。看代码:
Human.h:
#import <Foundation/Foundation.h>

@interface Human : NSObject<NSCoding>
{
    int age;
    NSString *name;
    Human *child;
}

@property int age;
@property (copy)NSString *name;
@property (retain)Human *child;
@end
Human.m:
#import "Human.h"

@implementation Human
@synthesize age;
@synthesize name;
@synthesize child;

-(NSString *)description
{
    NSString *des = [NSString stringWithFormat:@"%d,%@,%@",age,name,child];
    return des;
}
-(void)encodeWithCoder:(NSCoder *)aCoder//要一一对应
{
    [aCoder encodeInt:age forKey:@"age"];
    [aCoder encodeObject:name forKey:@"name"];
    [aCoder encodeObject:child forKey:@"child"];
}
-(id)initWithCoder:(NSCoder *)aDecoder//和上面对应
{
    if (self=[super init]) {
        self.age=[aDecoder decodeIntForKey:@"age"];
        self.name=[aDecoder decodeObjectForKey:@"name"];
        self.child=[aDecoder decodeObjectForKey:@"child"];
    }
    return self;
}
@end
main.m:
#import <Foundation/Foundation.h>
#import "Human.h"
#import <Foundation/NSKeyedArchiver.h>

int main(int argc, const char * argv[])
{

    @autoreleasepool {

        Human *human1=[[Human alloc]init];
        Human *human2=[[Human alloc]init];
        human1.age=20;
        human1.name=@"holydancer";
        human1.child=human2;
        //定义好自定义对象后使用NSCoding的子类调用archivedDataWithRootObject方法进行archive
        NSData *data1=[NSKeyedArchiver archivedDataWithRootObject:human1];
        //转成NSData类型后就可以写入本地磁盘了
        [data1 writeToFile:@"/Users/holydancer/Desktop/tmp.txt" atomically:YES];
        //倒过来的话先读取磁盘文件
        NSData *data2=[NSData dataWithContentsOfFile:@"/Users/holydancer/Desktop/tmp.txt"];
        Human *human3=[NSKeyedUnarchiver unarchiveObjectWithData:data2];
        NSLog(@"%@,%@",human1,human3);
    }
    return 0;
}
2012-03-20 10:10:29.871 category[458:403]
20,holydancer,0,(null),(null)
20,holydancer,0,(null),(null)
有的同学一直不太清楚NSKeyedArchiver和NSKeyedUnarchiver是什么,调用的又是什么方法,大家可以在头文件里找到这样的信息: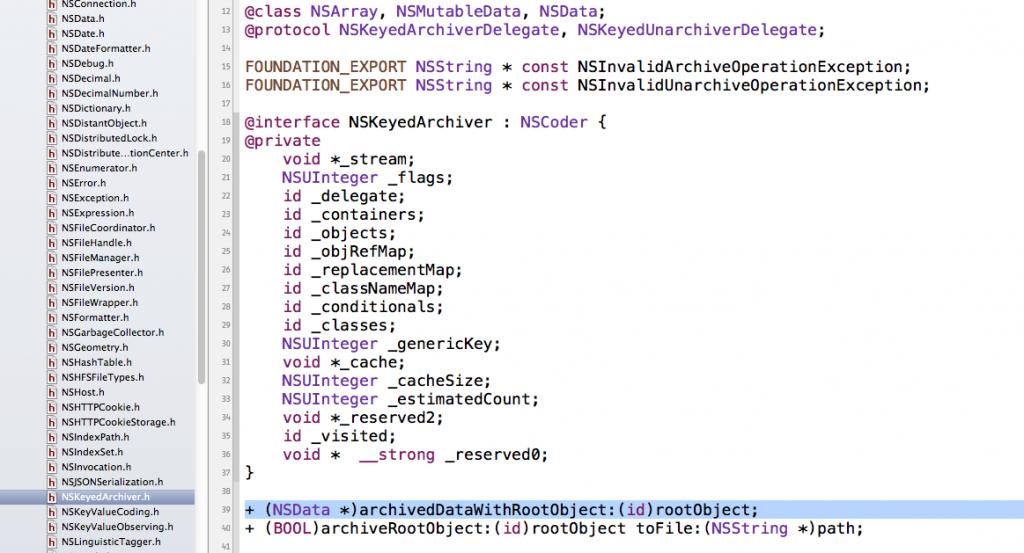
可以发现,NSKeyedArchiver是NSCoder的子类,而archivedDataWithRootObject是里面的一个类方法,这时我们看到archivedDataWithRootObject方法下在还有一个方法,不错,这个方法可以直接将自定义类写入本地磁盘,所以上在的代码我们还可以这样写:
#import <Foundation/Foundation.h>
#import "Human.h"
#import <Foundation/NSKeyedArchiver.h>

int main(int argc, const char * argv[])
{

    @autoreleasepool {

        Human *human1=[[Human alloc]init];
        Human *human2=[[Human alloc]init];
        human1.age=20;
        human1.name=@"holydancer";
        human1.child=human2;
        [NSKeyedArchiver archiveRootObject:human1 toFile:@"/Users/holydancer/Desktop/tmp.txt"];//直接写入磁盘
        Human *human3=[NSKeyedUnarchiver unarchiveObjectWithFile:@"/Users/holydancer/Desktop/tmp.txt"];//从磁盘直接读取为id类型
        NSLog(@"\n%@\n%@",human1,human3);
    }
    return 0;
}
2012-03-20 10:16:43.561 category[475:403]
20,holydancer,0,(null),(null)
20,holydancer,0,(null),(null)
最后,不得不说说cocoa中的方法命名,一个一个方法长得,虽然很人性化很好记,不过敲起来真是麻烦啊。
关键字:objective-c ,objective c , oc ,本地化,序列化,归档,archive ,NSCoder ,NSCoding , NSKeyedArchiver ,NSKeyedUnarchiver


 2366
2366

 被折叠的 条评论
为什么被折叠?
被折叠的 条评论
为什么被折叠?
 到【灌水乐园】发言


