


文章目录
0.本文目的
本文是工作中SPDK与DPDk的实验过程记录,方便在以后的工作中快速切入业务,关于关键技术点与业务内容,需要详看SPDK、DPDK官网,保持学习的持续性。
1.参考
[2.iSCSI Target Getting Started Guide](SPDK: iSCSI Target)
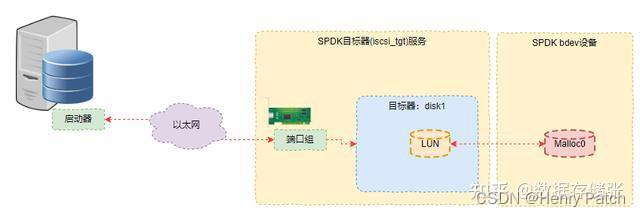
3.SPDK软件架构+IP-SAN应用场景:通过spdk 构建一个iSCSI目标端应用,并通过iSCSI来访问。
2.spdk-dpdk的编译
1.1 git clone
git clone --recurse-submodules -b v23.09 https://github.com/spdk/spdk.git
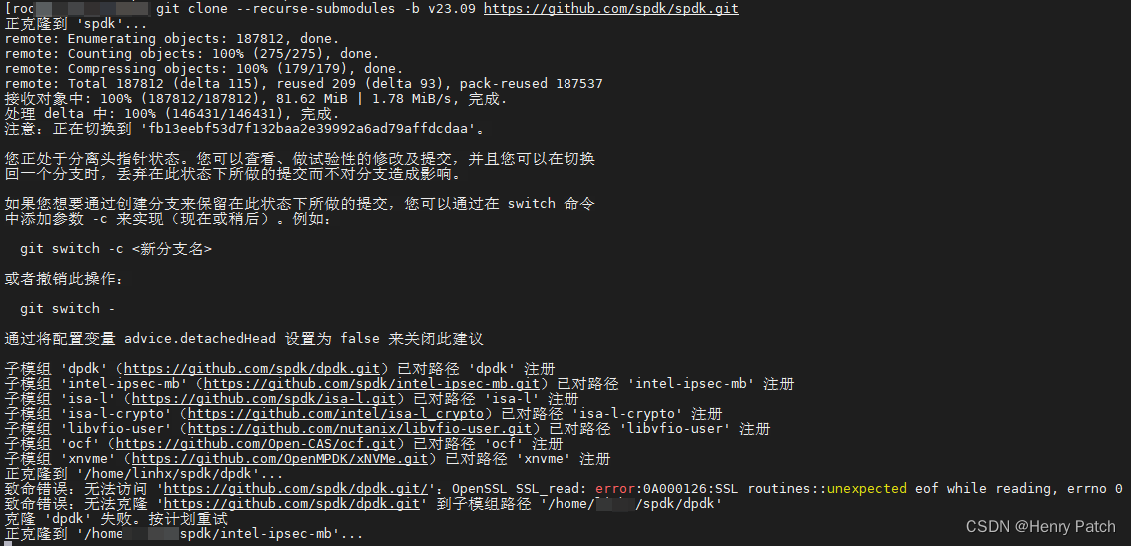
网络不好的话,需要一个个拉取github 仓库,注意不同版本spdk依赖组件的版本
git clone --recurse-submodules -b spdk-23.07 https://github.com/spdk/dpdk.git
git clone --recurse-submodules -b spdk-1.5 https://github.com/spdk/intel-ipsec-mb.git
git clone --recurse-submodules -b spdk-v2.30.0 https://github.com/spdk/isa-l.git
git clone --recurse-submodules  https://github.com/intel/isa-l_crypto.git
git clone --recurse-submodules -b v22.6.1 https://github.com/nutanix/libvfio-user.git
git clone --recurse-submodules -b v0.7.3 https://github.com/OpenMPDK/xNVMe.git
1.2 编译依赖安装
1)可参考daos/utils/scripts/install-ubuntu.sh脚本,附加nasm、python3-pyelftools
或者
2)按照官方Installing Prerequisites:
The scripts/pkgdep.sh script will automatically install the bare minimum dependencies required to build SPDK. Use --help to see information on installing dependencies for optional components.
sudo scripts/pkgdep.sh
Option –all will install all dependencies needed by SPDK features.
sudo scripts/pkgdep.sh --all
1.3 编译DPDK
cd spdk/dpdk
-
configure a DPDK build
# 格式 meson setup <options> build #执行之前,如果不是第一次编译,先rm -rf build # 可查看可配置项options meson configure |less # 默认执行 meson setup build #where “build” is the desired output build directory, and “<options>” can be empty or one of a number of meson or DPDK-specific build options, described later in this section. The configuration process will finish with a summary of what DPDK libraries and drivers are to be built and installed, and for each item disabled, a reason why that is the case. This information can be used, for example, to identify any missing required packages for a driver. 执行完成后:(示例) Configuring rte_build_config.h using configuration Message: ================= Applications Enabled ================= apps: graph, pdump, proc-info, test-acl, test-bbdev, test-cmdline, test-compress-perf, test-crypto-perf, test-dma-perf, test-eventdev, test-fib, test-flow-perf, test-gpudev, test-mldev, test-pipeline, test-pmd, test-regex, test-sad, test-security-perf, test, Message: ================= Libraries Enabled ================= libs: log, kvargs, telemetry, eal, ring, rcu, mempool, mbuf, net, meter, ethdev, pci, cmdline, metrics, hash, timer, acl, bbdev, bitratestats, bpf, cfgfile, compressdev, cryptodev, distributor, dmadev, efd, eventdev, dispatcher, gpudev, gro, gso, ip_frag, jobstats, latencystats, lpm, member, pcapng, power, rawdev, regexdev, mldev, rib, reorder, sched, security, stack, vhost, ipsec, pdcp, fib, port, pdump, table, pipeline, graph, node, Message: =============== Drivers Enabled =============== common: cpt, dpaax, iavf, idpf, octeontx, cnxk, mlx5, nfp, qat, sfc_efx, bus: auxiliary, cdx, dpaa, fslmc, ifpga, pci, platform, vdev, vmbus, mempool: bucket, cnxk, dpaa, dpaa2, octeontx, ring, stack, dma: cnxk, dpaa, dpaa2, hisilicon, idxd, ioat, skeleton, net: af_packet, ark, atlantic, avp, axgbe, bnxt, bond, cnxk, cpfl, cxgbe, dpaa, dpaa2, e1000, ena, enetc, enetfec, enic, failsafe, fm10k, gve, hinic, hns3, i40e, iavf, ice, idpf, igc, ionic, ixgbe, memif, mlx4, mlx5, netvsc, nfp, ngbe, null, octeontx, octeon_ep, pfe, qede, ring, sfc, softnic, tap, thunderx, txgbe, vdev_netvsc, vhost, virtio, vmxnet3, raw: cnxk_bphy, cnxk_gpio, dpaa2_cmdif, ntb, skeleton, crypto: bcmfs, caam_jr, ccp, cnxk, dpaa_sec, dpaa2_sec, mlx5, nitrox, null, octeontx, openssl, scheduler, virtio, compress: isal, mlx5, octeontx, regex: mlx5, cn9k, ml: cnxk, vdpa: ifc, mlx5, nfp, sfc, event: cnxk, dlb2, dpaa, dpaa2, dsw, opdl, skeleton, sw, octeontx, baseband: acc, fpga_5gnr_fec, fpga_lte_fec, la12xx, null, turbo_sw, gpu: Message: ================= Content Skipped ================= apps: dumpcap: missing dependency, "libpcap" libs: drivers: common/mvep: missing dependency, "libmusdk" net/af_xdp: missing dependency, "libxdp >=1.2.2" and "libbpf" net/bnx2x: missing dependency, "zlib" net/ipn3ke: missing dependency, "libfdt" net/mana: missing dependency, "mana" net/mvneta: missing dependency, "libmusdk" net/mvpp2: missing dependency, "libmusdk" net/nfb: missing dependency, "libnfb" net/pcap: missing dependency, "libpcap" raw/ifpga: missing dependency, "libfdt" crypto/armv8: missing dependency, "libAArch64crypto" crypto/ipsec_mb: missing dependency, "libIPSec_MB" crypto/mvsam: missing dependency, "libmusdk" crypto/uadk: missing dependency, "libwd" compress/zlib: missing dependency, "zlib" gpu/cuda: missing dependency, "cuda.h" Build targets in project: 765 Found ninja-1.10.2 at /usr/bin/ninja # 可以看到缺少一些依赖 ,先不管,继续其他步骤 -
Once configured, to build and then install DPDK system-wide use
# The last two commands above generally need to be run as root, with the meson install step copying the built objects to their final system-wide locations, and the last step causing the dynamic loader ld.so to update its cache to take account of the new objects. cd build # 注意,先编译isal依赖,否则找不到头文件 ninja meson install # On some linux distributions, such as Fedora or Redhat, paths in /usr/local are not in the default paths for the loader. Therefore, on these distributions, /usr/local/lib and /usr/local/lib64 should be added to a file in /etc/ld.so.conf.d/ before running ldconfig. echo /usr/local/lib >> /etc/ld.so.conf echo /usr/local/lib64 >> /etc/ld.so.conf ldconfig -
编译isa-l
cd  spdk/isa-l
./autogen.sh
./configure
make
sudo make install
-
编译intel-ipsec-mb
略
-
编译isa-l_crypto
cd spdk/isa-l-crypto
./autogen.sh
./configure
make
sudo make install
-
编译libvfio-user
略
-
编译xNVMe
略
1.4 编译SPDK
ubuntu示例:
apt-get install libpmem*
cd spdk
./configure --prefix=/home/linhx/spdk-23.09/output_dir --with-dpdk --disable-unit-tests --with-vhost --with-crypto --without-rbd --without-vtune --without-shared --with-rdma --with-vbdev-compress --with-dpdk-compressdev
make -j 32
make install
更多,请参考1.Getting Started with SPDK
3.spdk-dpdk的配置
2.1 配置spdk
spdk-23.09\doc\system_configuration.md
Before running an SPDK application, some hugepages must be allocated and any NVMe and I/OAT devices must be unbound from the native kernel drivers.
sudo scripts/setup.sh

# print
[root@hik6 spdk]# ./scripts/setup.sh
0000:80:01.6 (8086 0b00): Already using the uio_pci_generic driver
0000:80:01.7 (8086 0b00): Already using the uio_pci_generic driver
0000:80:01.4 (8086 0b00): Already using the uio_pci_generic driver
0000:80:01.5 (8086 0b00): Already using the uio_pci_generic driver
0000:80:01.2 (8086 0b00): Already using the uio_pci_generic driver
0000:80:01.3 (8086 0b00): Already using the uio_pci_generic driver
0000:80:01.0 (8086 0b00): Already using the uio_pci_generic driver
0000:80:01.1 (8086 0b00): Already using the uio_pci_generic driver
0000:00:01.6 (8086 0b00): Already using the uio_pci_generic driver
0000:00:01.7 (8086 0b00): Already using the uio_pci_generic driver
0000:00:01.4 (8086 0b00): Already using the uio_pci_generic driver
0000:00:01.5 (8086 0b00): Already using the uio_pci_generic driver
0000:00:01.2 (8086 0b00): Already using the uio_pci_generic driver
0000:00:01.3 (8086 0b00): Already using the uio_pci_generic driver
0000:00:01.0 (8086 0b00): Already using the uio_pci_generic driver
0000:00:01.1 (8086 0b00): Already using the uio_pci_generic driver
To rebind devices back to the kernel, you can run
sudo scripts/setup.sh reset
By default, the script allocates 2048MB of hugepages. To change this number, specify HUGEMEM (in MB) as follows:
sudo HUGEMEM=4096 scripts/setup.sh
On Linux machines HUGEMEM will be rounded up to system-default huge page size boundary.
All available params can be viewed by running.
sudo scripts/setup.sh help
SPDK重要的配置信息
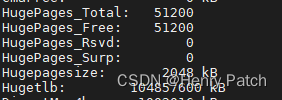
- hugepage alloc: 默认alloc 1024* 2M =2048MB hugemem,可以配置大一些,如102400MB=100GB

扩容后:
2.2 配置DPDK
无
4.SPDK使用
整理头绪
3.1.spdk框架
3.2.组件
spdk-23.09\doc\bdev.md #工作过程中重点关注了Compression Virtual Bdev Module {#bdev_config_compress}
3.3.上手
1.运行tgt程序
[root@localhost spdk]# ./build/bin/iscsi_tgt &
2.创建存储资源bdev
./scripts/rpc.py bdev_malloc_create -b Malloc0 64 512  #创建Malloc类型的bdev
结果:
[root@localhost spdk]# ./scripts/rpc.py bdev_malloc_create -b Malloc0 64 512
Malloc0
[root@localhost spdk]# ./scripts/rpc.py bdev_get_bdevs
[
  {
    "name": "Malloc0",
    "aliases": [
      "98d3b1bb-a417-4565-8954-e3f395a87e8a"
    ],
    "product_name": "Malloc disk",
    "block_size": 512,
    "num_blocks": 131072,
    "uuid": "98d3b1bb-a417-4565-8954-e3f395a87e8a",
    "assigned_rate_limits": {
      "rw_ios_per_sec": 0,
      "rw_mbytes_per_sec": 0,
      "r_mbytes_per_sec": 0,
      "w_mbytes_per_sec": 0
    },
    "claimed": false,
    "zoned": false,
    "supported_io_types": {
      "read": true,
      "write": true,
      "unmap": true,
      "write_zeroes": true,
      "flush": true,
      "reset": true,
      "compare": false,
      "compare_and_write": false,
      "abort": true,
      "nvme_admin": false,
      "nvme_io": false
    },
    "memory_domains": [
      {
        "dma_device_id": "SPDK_ACCEL_DMA_DEVICE",
        "dma_device_type": 2
      }
    ],
    "driver_specific": {}
  }
]
3.在目标器服务中创建一个端口组(port group),这里端口组的ID为1,地址为我们的物理机或虚拟机的IP地址
./scripts/rpc.py iscsi_create_portal_group 1 10.192.55.66:7000
[root@localhost spdk]# ./scripts/rpc.py iscsi_create_portal_group 1 10.192.55.66:7000
4.创建一个启动器组,其ID为2
后面的地址表示允许接入该目标器服务的IP地址。本文选用的是跟目标器相同的物理机,所以是相同的地址。当然也可以使用另外一个新的物理机,这个时候就需要更改该IP地址了
./scripts/rpc.py iscsi_create_initiator_group 2 ANY 10.192.55.66
[root@localhost spdk]# ./scripts/rpc.py iscsi_create_initiator_group 2 ANY 10.192.55.66
5.创建一个目标器,其名称是disk1,同时可以有一个别名“Data Disk1”
在该目标器中同时创建一个LUN0,其所使用的bdev设备是前面创建的Malloc0。同时建立该目标器与端口组1和启动器组2的关联。也就是说,在上述配置的IP地址上的启动器可以通过端口组访问该目标器了
./scripts/rpc.py iscsi_create_target_node disk1 "Data Disk1" "Malloc0:0" 1:2 64 -d
output:
[root@localhost spdk]# ./scripts/rpc.py iscsi_create_target_node disk1 "Data Disk1" "Malloc0:0" 1:2 64 -d
[root@localhost spdk]#
6.万事俱备,接下来我们就可以通过iSCSI协议来访问配置的资源
iscsiadm -m discovery -t sendtargets -p 10.192.55.66
output:
[root@localhost spdk]# iscsiadm -m discovery -t sendtargets -p 10.192.55.66
iscsiadm: cannot make connection to 10.192.55.66: Connection refused
iscsiadm: cannot make connection to 10.192.55.66: Connection refused
iscsiadm: cannot make connection to 10.192.55.66: Connection refused
iscsiadm: cannot make connection to 10.192.55.66: Connection refused
iscsiadm: cannot make connection to 10.192.55.66: Connection refused
iscsiadm: cannot make connection to 10.192.55.66: Connection refused
iscsiadm: connection login retries (reopen_max) 5 exceeded
iscsiadm: Could not perform SendTargets discovery: iSCSI PDU timed out
7.登录目标器
iscsiadm -m node –login
5.DPDK使用
待补充


 208
208


 被折叠的 条评论
为什么被折叠?
被折叠的 条评论
为什么被折叠?
 到【灌水乐园】发言


