


Preface
在 Spring Security 中只需要引入一个依赖,所有的接口就会自动保护起来!
原理
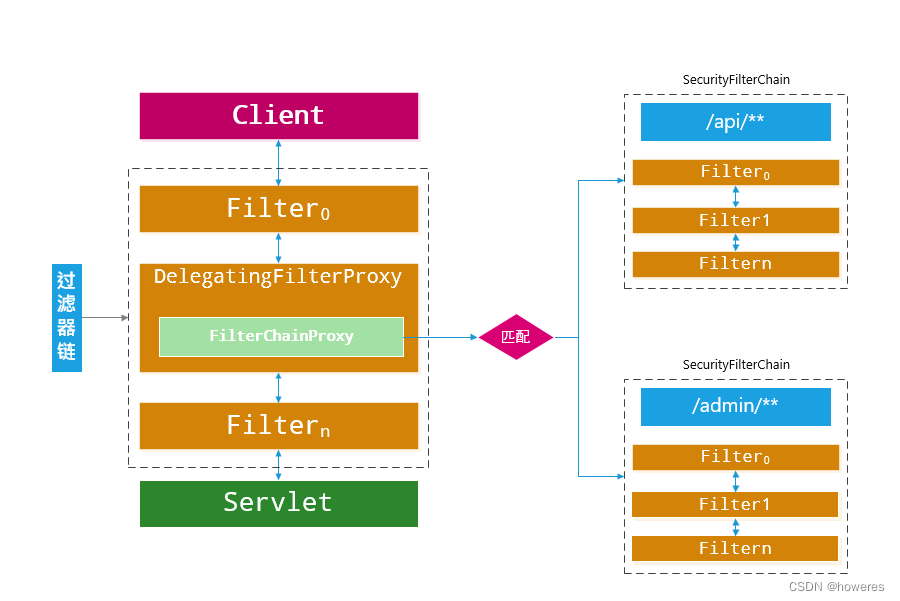
在 Spring Security 中 认证、授权 等功能都是基于过滤器完成的
默认用户生成
- 查看 SpringBootWebSecurity Configuration#defaultSecurity FilterChain 方法表单登录
- 处理登录为 FormLoginConfigurer 类中 调用 UsernamePasswordAuthenticationFilter这个类实例
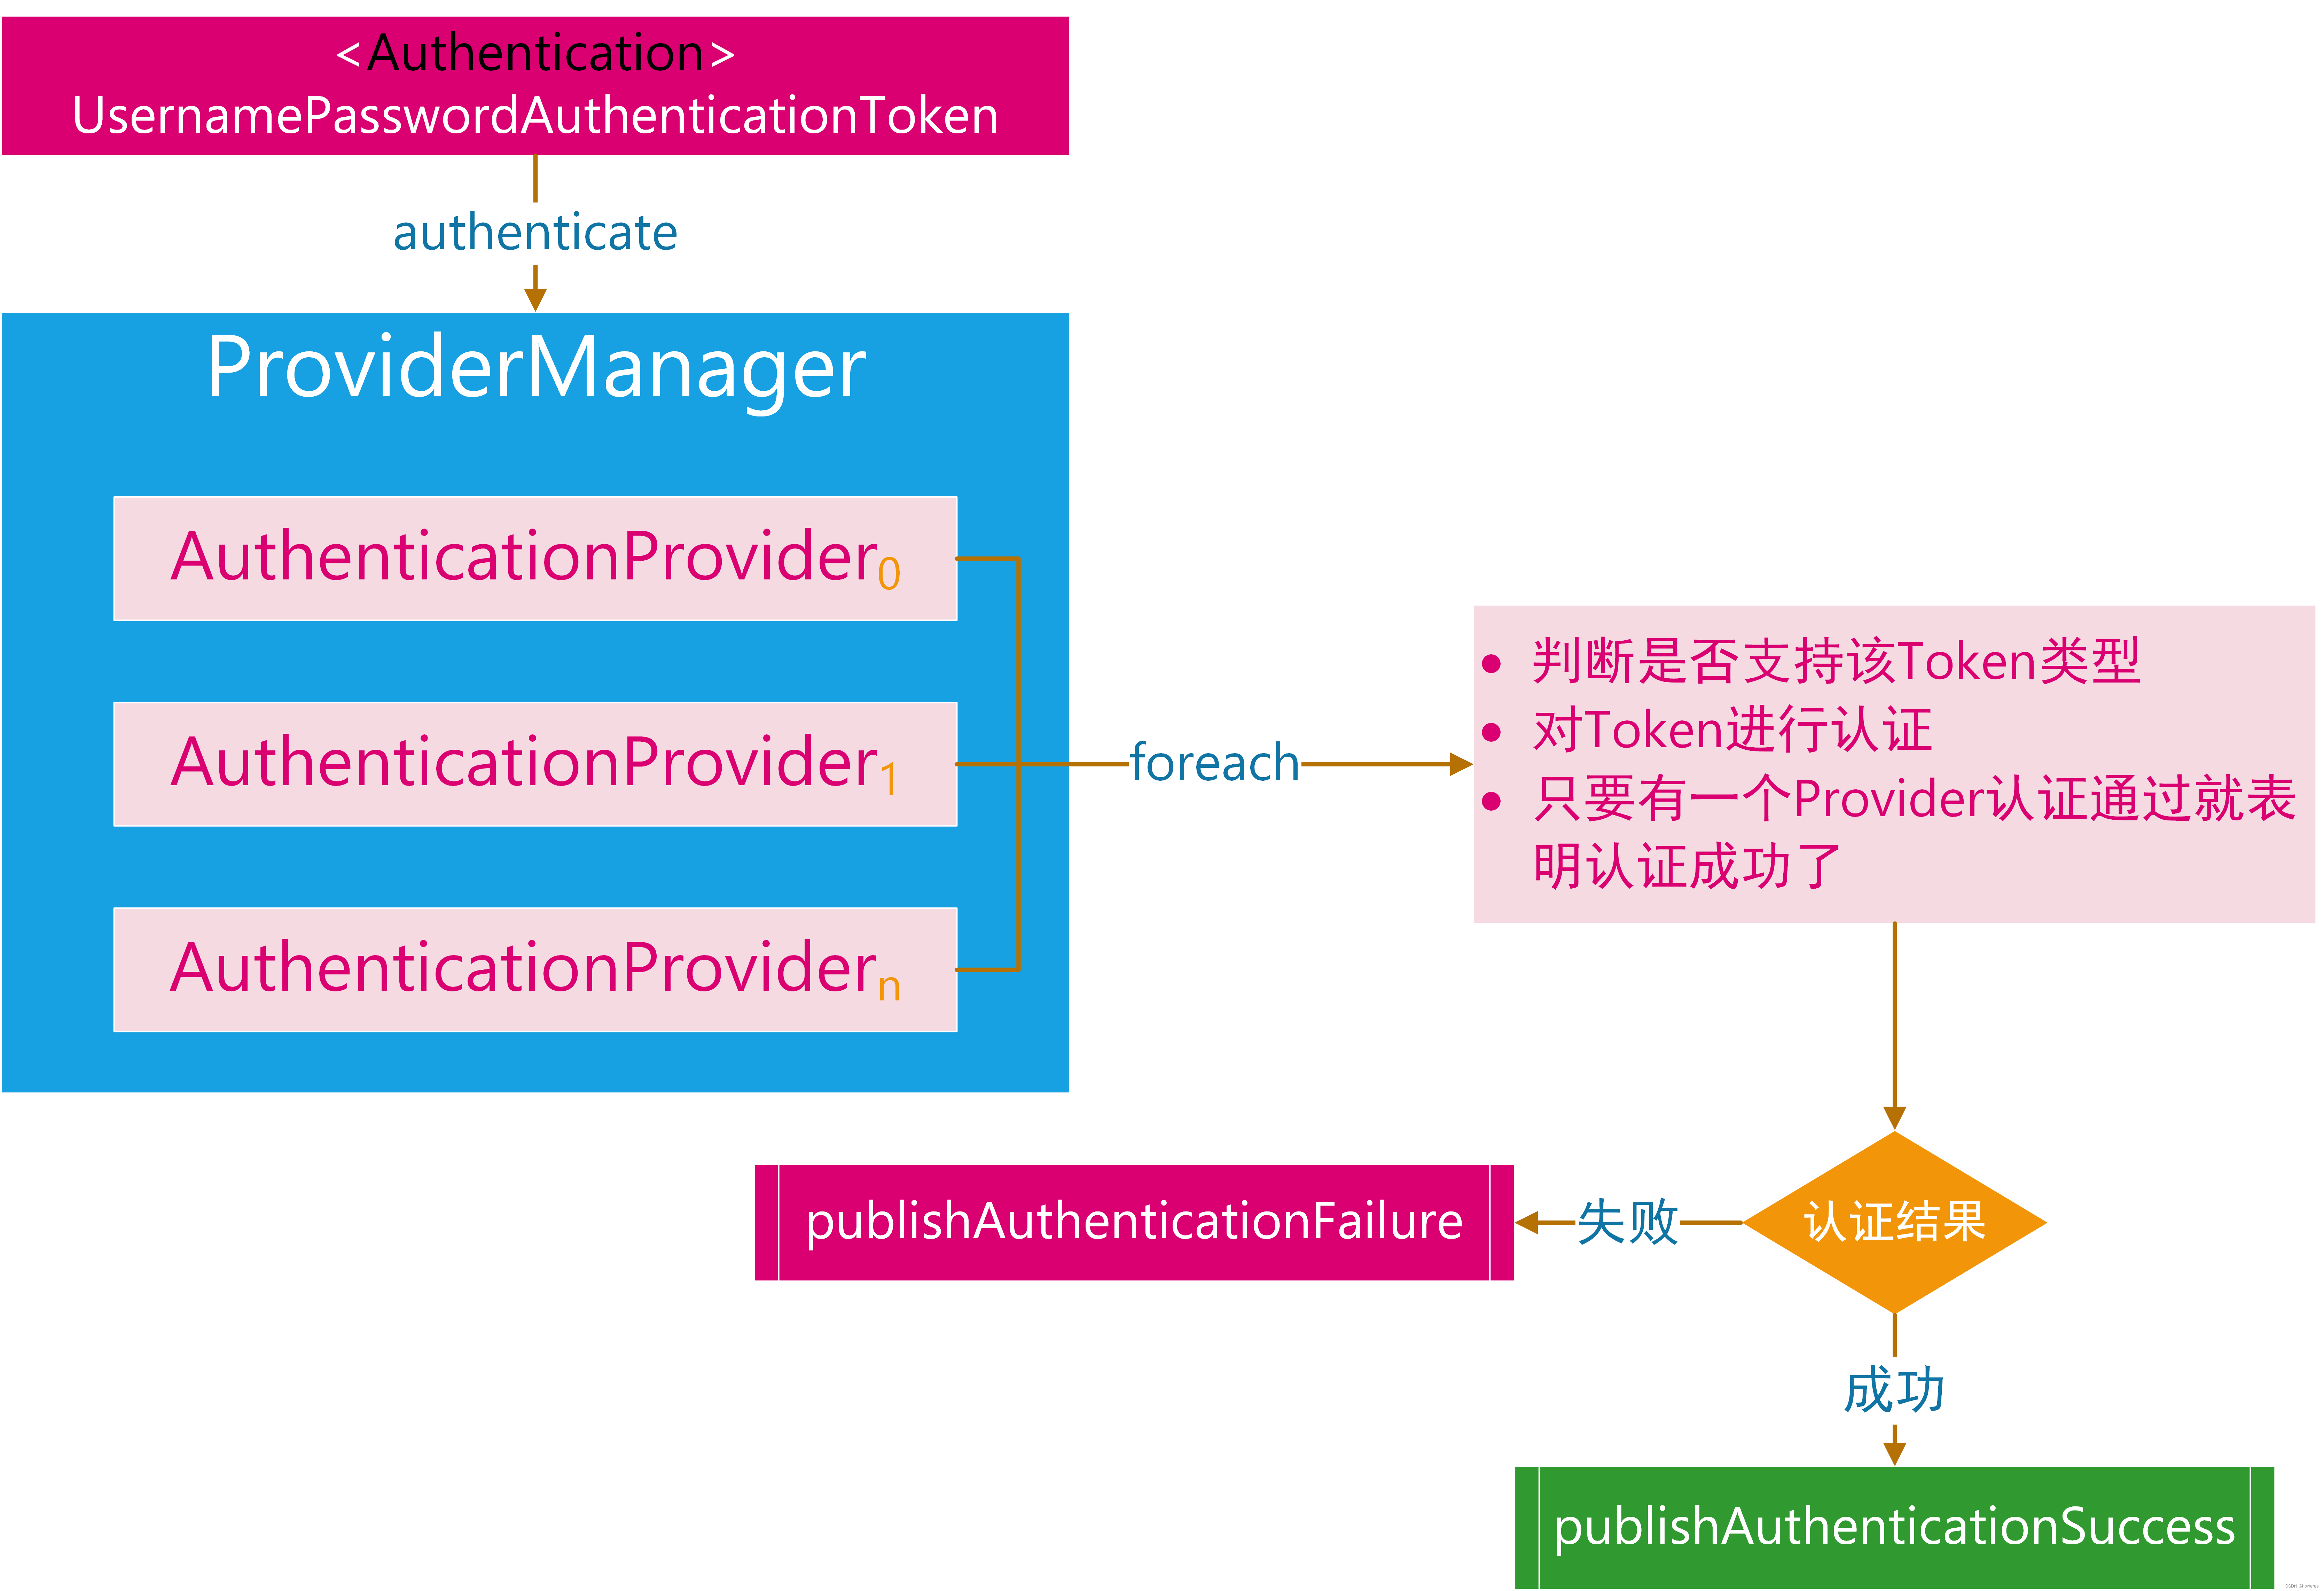
- 查看类中 UsernamePasswordAuthenticationFilter#attempAuthentication 方法得知实际调用 AuthenticationManager 中 authenticate 方法
- 调用 ProviderManager 类中方法 authenticate
- 调用了 ProviderManager 实现类中 AbstractUserDetailsAuthenticationprovider类中方法
- 最终调用实现类 DaoAuthenticationProvider 类中方法比较. 看到这里就知道默认实现是基于 InMemoryUserDetailsManager 这个类, 也就是内存的实现.
UserDetailService
通过刚才源码分析也能得知 UserDetailService 是顶层父接口,接口中 loaduserByName 方法是用来在认证时进行用户名认证方法.默认实现使用是内存实现,如果想要修改数据库实现我们只需要自定义 UserDetailservice 实现, 最终返回 UserDetails 实例即可.
UserDetailServiceAutoConfigutation
- 从自动配置源码中得知当classpath 下存在 AuthenticationManager 类
- 当前项目中,系统没有提供 AuthenticationManager.class、Authenticationbrovidarcaccserlptaisherviceclass、AuthenticationManagerResolver.class, 实例.
- 默认情况下都会满足,此时Spring Security会提供一个 InMemoryUserDetailManager 实例
SecurityProperties
其实根据 SecurityAutoConfiguration 类上的注解 @EnableConfigurationProperties(SecurityProperties.class) 找到对应的SecurityProperties 类就可以找到了该配置.
@ConfigurationProperties(prefix = "spring.security")
public class SecurityProperties {

	private final User user = new User();

	public User getUser() {
	   return this.user;
	}
	public static class User {

	private String name = "user";

	private String password = UUID.randomUUID().toString();
这就是默认生成 user 以及 uuid 密码过程!另外看明白源码之后,就知道只要在配置文件中加入如下配置可以对内存中用户和密码进行覆盖
spring:
  security:
    user:
      name: root
      password: root
三大概念
- Authentication 相关
- WebSecurityConfigurerAdaptor 扩展 Spring Security 所有默认配置
- UserDetailService 用来修改默认认证的数据源信息 (只有一个方法#loadUserByUsername)
自定义资源权限规则
WebSecurity 配置的是公共资源, HttpSecurity 配置的是 http 请求
- authorizeRequests() 代表开启请求的权限控制
- mvcMatchers() 代表匹配请求 (注意参数都需要斜杠
/) - permitAll() 放行资源 (放在认证前面)
- anyRequest().authenticated() 代表所有请求, 必须认证后才能访问
- formLogin() 代表开启表单验证
- and() 返回
HttpSecurity
使用:
// 放行资源要写在【任何】前面
.anyRequest().authenticated()
.and() // 特性: 匿名内部类中使用 类名.this.属性名,调用外部类属性 e.g.// ExpressionUrlAuthorizationConfigurer.this.and();
.formLogin()
// 登陆操作 在 formLogin() 后面,对登陆进行个性化设置
.loginPage("/login.html") // 指定登陆页面,一旦定义必须指定登陆api
.loginProcessingUrl("/doLogin") // 指定登陆api ,必须同时指定登陆页面
.usernameParameter("uname") // 修改默认用户名参数
.passwordParameter("pwd") // 修改默认密码参数
// .successForwardUrl("/hello") // forward 转发,url不变 (只能二选一)
// .defaultSuccessUrl("/hello") // redirect 重定向,url改变(只能二选一)
// .defaultSuccessUrl("/index", true) // default的特性,如果之前访问受限资源,会优先上一次。需要设为true才能强转
.successHandler(new LoginSuccessHandler())
// .failureForwardUrl("/login.html") // 转发 {request} 作用域中拿
// .failureUrl("/login.html") // 重定向(sendRedirect) {session} 作用域中拿
.failureHandler(new LoginFailureHandler())
.and()
// 登出操作 在 HttpSecurity 类中, 前面需要加 and()
.logout()
// .logoutUrl("/logout") // 默认的
.logoutRequestMatcher(new OrRequestMatcher(
        new AntPathRequestMatcher("/aa", "GET"),  // 注销url
        new AntPathRequestMatcher("/bb", "POST")
))
.invalidateHttpSession(true) // 默认为true 回话失效
.clearAuthentication(true) // 默认为true 清楚认证标记
.logoutSuccessUrl("/login.html") // 注销成功跳转页面
// 前后端分离的项目, 只需要返回一个json格式消息提示就行
// logoutSuccessHandler(new MyLogoutSuccessHandler())  // 调用LogoutSuccessHandler#onLogoutSuccess 方法


// 禁止 csrf 跨站请求保护
.and().csrf().disable();
登陆用户数据获取
SecurityContextHolder
Spring security 会将登录用户数据保存在 Session 中。但是,为了使用方便 Spring Security 在此基础上还做了一些改进,其中最主要的一个变化就是线程绑定。当用户登录成功后,Spring Security 会将登录成功的用户信息保存到 SecurityContextHolder 中。
SecurityContextHolder 中的数据保存默认景通过Threadlocal 来实现的,使用 Threadlocal 创建的变量只能被当前线程访问,不能被其他线程访问和修改,也就是用户数据和请求线程绑定在一起。当登录请求处理完毕后,Spring Security 会将 Security ContextHolder 中的数据拿出来保存到 Session 中,同时将 SecurityContexHolder 中的数据清空。以后每当有请求到来时,Spring Security 就会先从 Session 中取出用户登录数据,保存到SecuritvContextHolder 中,方便在该请求的后续处理过程中使用,同时在请求结束时将 SecurityContextHolder 中的数据拿出来保存到 Session 中,然后将 Security SecurityContextHolder 中的数据清空,实际上 SecurityContextHolder 中存储是 SecurityContext. 在 SecurityContext 中存储是 Authentication.
SecurityContextHolder > SecurityContext > Authentication
SecurityContextHolder 中的 strategy 是典型的策路设计模式
- MODE_THREADLOCAL :这种存放策略是将 Securitycontext 存放在 ThreadLocal中,大家知道 Threadlocal 的特点是在哪个线程中存储就要在哪个线程中读取,这其实非常适合web 应用,因为在默认情况下,一个请求无论经过多少Filter 到达 Servlet, 都是由一个线程来处理的。这也是 Security ContextHolder 的默认存储策略,这种存储策略意味着如果在具体的业务处理代码中,开启了子线程,在子线程中去获取登录用户数据,就会获取不到。
- MODE_INHERITABLETHREADLOCAL:这种存储模式适用于多线程环境,如果希望在子线程中也能够获取到登录用户数据,那么可以使用这种存储模式。(需要设置运行参数
-Dspring.security.strategy=MODE_INHERITABLETHREADLOCAL来开启) - MODE GLOBAL:这种存储模式实际上是将数据保存在一个静态变量中,在Javaweb开发中,这种模式很少使用到。
SecurityContextHolderStrategy
通过 SecurityContextHolder 可以得知, SecurityContextHolderStrategy 接口用来定义存储策略方法
接口中一共定义了四个方法:
- clearcontext:该方法用来清除存储的 SecurityContex对象
- getcontext:该方法用来获取存储的 Securitvcontext 对象
- setcontext:该方法用来设置存储的 Securitvcontext 对象
- create Empty Context :该方法则用来创建一个空的 SecuritvContext 对象.
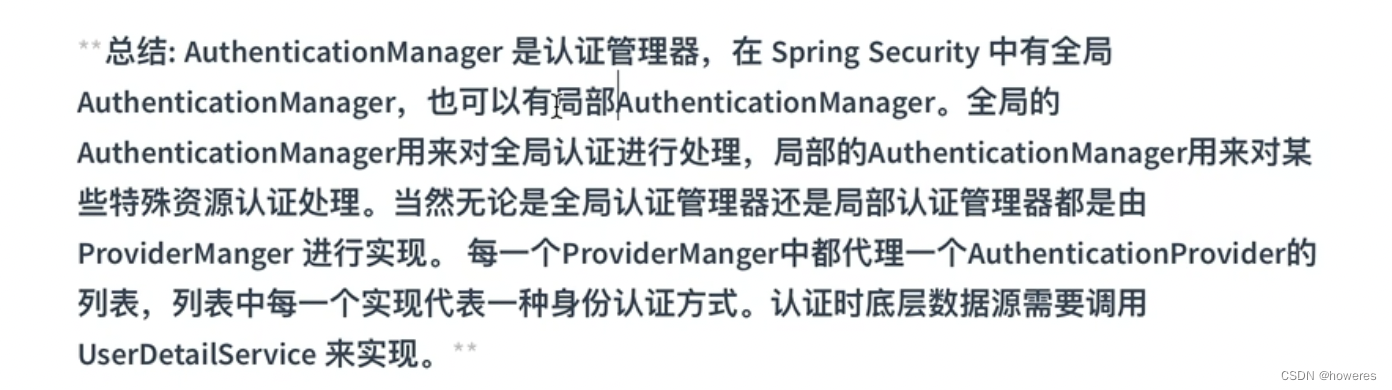
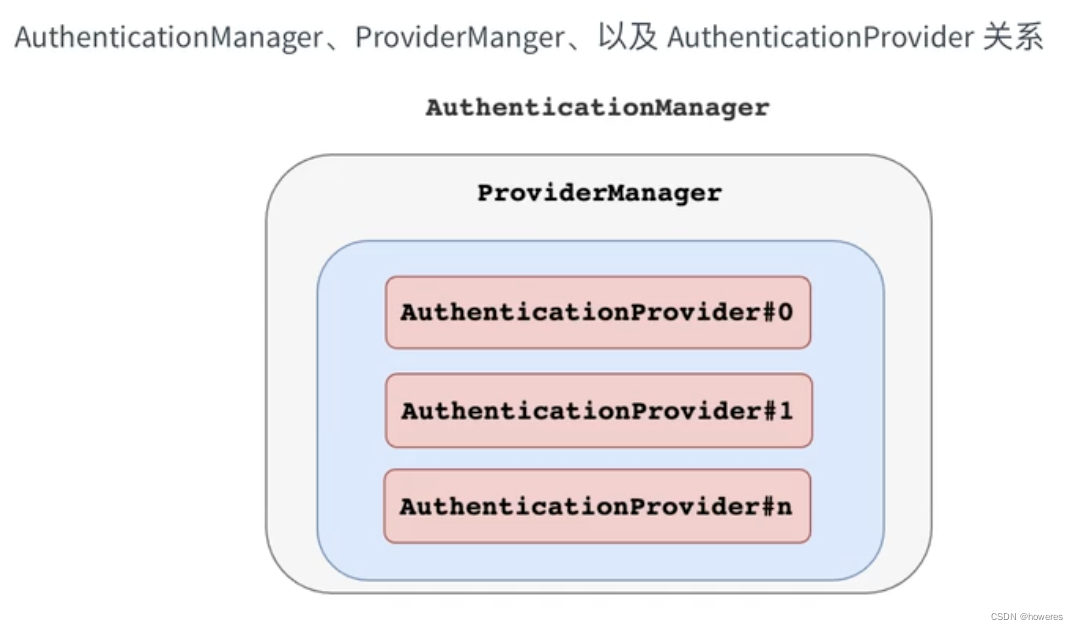
局部资源: 单独设置一个ProviderManager, 并设置一组provider 认证管理器组, PM 的作用就是设置受保护资源逻辑组.
整体结构
servlet api
DelegateFilterProxy
spring
FilterChainProxy == springSecurityFilterChain == WebSecurity == GenericFilterBean
List<SecurityFilterChain> == HttpSecurity
UsernamePasswordAuthenticationFilter
AuthenticationManager == ProviderManager == 认证管理器组 == 局部资源 == 受保护资源逻辑组
List<AuthenticationProvider> == AbstractUserDetailsAuthenticationProvider == DaoAuthenticationProvider => authenticate => additionalAuthenticationChecks
UserDetailsService
登陆授权
AccessDecisionManager 决定是否放行
- decide
- supports
- supports
AccessDcisionVoter 决定是否投票的 (类似于ProviderManage和AuthenticationProvider的关系)
- supports
- supports
- vote
ConfigAttribute 保存授权时的角色信息
- getAttribute
RememberMe
Cross Origin Resource Sharing 同源策略
Cross Site Request Forgery
AuthenticationEntryPoint
- Implement
AuthenticationProviderin order to integrate your custom authentication scheme into Spring Security. - Implement
AccessDecisionVoterin order to integrate your custom authorization scheme into Spring Security. You might also need to implement a customAccessDecisionManagerin some particular cases, altough the bundled ones are typically enough.
Note that neither of those is web-specific, in contrast with AuthenticationEntryPoint, that is a part of Spring Security Web and not Spring Security Core. The main function of AuthenticationEntryPoint is to allow the framework to send some sort of “to access this resource you must authenticate first” notification from application server to web client. Most standard notifications are already implemented in Spring Security Web. For example:
BasicAuthenticationEntryPoint: This is used with Basic authentication. The “notification” is a HTTP 401 response.LoginUrlAuthenticationEntryPoint: Your typical “redirect to login page” behaviour.CasAuthenticationEntryPoint: Similar to the former, redirects to an enterprise-wide login page to perform SSO via CAS.Http403ForbiddenEntryPoint: The notification is just an HTTP 403 response. This is useful when you use pre-authentication (such as client X.509 certificates) and the user credentials do not provide access.- …
As you can see, unless your required behaviour is too specific, you should not need to provide your own implementation of AuthenticationEntryPoint.
AccessDeniedHandler is another type of AuthenticationEntryPoint, similar in function
Ant 风格
@GetMapping("/?ant") // 你使用任意合法uri字符替代? 发现都可以匹配,比如/bant
public String ant() {
  return "ant";
} // Spring MVC 的一些 过滤器注册、格式化器注册都用到了 Ant 风格
-
?匹配任何单字符 -
*匹配0或者任意数量的 字符 -
**匹配0或者更多的 目录这里注意了单个
*是在一个目录内进行匹配。 而**是可以匹配多个目录,一定不要迷糊。
一旦一个uri 同时符合两个Ant匹配那么走匹配规则字符最多的。为什么走最长?因为字符越长信息越多就越具体。
UriComponentBuilder
MultiValueMap<String, String> queryParams = new LinkedMultiValueMap<>();
queryParams.add("appid", this.appId);
queryParams.add("secret", this.secret);
queryParams.add("js_code", jsCode);
queryParams.add("grant_type", "authorization_code");

URI uri = UriComponentsBuilder.fromHttpUrl(WX_URL)
  .queryParams(queryParams)
  .build()
  .toUri();
restTemplate.exchange(uri, HttpMethod.GET, entity, String.class)
MultiValueMap<?,?> queryParams = new LinkedMultiValueMap<>();
#newInstance#scheme#host#path#build#expand#encode#toUri
#fromUri#queryParam#build#encode#toUri
构造器 创建 extends OncePerRequestFilter 类, 不需要进行注入.
当前用户
public class CrudController {
    /**
     * 只需写上类名,就会自动帮我们注入
     *
     * @param authentication 登录关键参数的载体,亦称凭证
     * @param principal 主体身份 登陆成功才会填充
     * @return 登录的用户
     */
    @GetMapping("/currentUser")
    public Authentication getCurrentUser(Authentication authentication, Principal principal) {
        // Principal 代表登录的用户。Authentication 接口扩展了 Principal 接口,所以 Authentication is a Principal。
        // 在用户通过身份验证之前,Authentication 可以代表身份验证请求的令牌。
        // 用户通过身份验证后,它可以提供有关主体的额外信息,例如 getAuthorities(..),在成功身份验证后,您可以获得主体已被授予的权限。
        log.info("current user is " + principal.getName());
        return authentication;
    }

    /**
     * !!重要方式 1/2 提取出通用公共方法,可以写在抽象类里
     *
     * @return return
     */
    public String getCurrentUserName() {
        Authentication authentication = SecurityContextHolder.getContext().getAuthentication();
        if (!(authentication instanceof AnonymousAuthenticationToken)) {
            return authentication.getName(); // 一般为 loginId
        } else { // 解决匿名访问, 返回一个匿名用户的问题
            throw new RuntimeException("No User");
        }
    }
    /**
     * !!重要方式 2/2 自定义了用户对象UserDetails Spring Security 4.0 提供了注解 @AuthenticationPrincipal
     * 来获取当前用户的自定义UserDetails对象。 如果 CustomUser 是 UserDetails 的实现,那么我们可以:CustomUser customUser
     *
     * @param customUser customUser
     * @return return
     */
    @GetMapping("/current_user")
    public UserDetails currentUserName(@AuthenticationPrincipal UserDetails customUser) {
        return customUser;
    }

    /**
     * simplify 方式 2 的简单版,crud 基本款
     *
     * @param username username
     * @return return
     */
    @GetMapping("/current_user_name")
    public String currentUserName(
            @AuthenticationPrincipal(expression = "username") String username) {
        return username;
    }

    /**
     * Spring Security 5 提供了一个新的注解 @CurrentSecurityContext 来获取当前用户的安全上下文
     *
     * @param securityContext 安全上下文
     * @return name
     */
    @GetMapping("/current_username")
    public String currentUserName1(@CurrentSecurityContext SecurityContext securityContext) {
        Authentication authentication = securityContext.getAuthentication();
        return authentication.getName();
    }

    /**
     * 用5的注解 @CurrentSecurityContext 来获取当前用户
     *
     * <pre>
     *     注意:
     *    // null pointer @CurrentSecurityContext(expression = "authentication.principal")
     * </pre>
     *
     * @param authentication 凭证
     * @return loginId
     */
    @GetMapping("/current__username")
    public String currentUserName(
            @CurrentSecurityContext(expression = "authentication") Authentication authentication) {
        return authentication.getName();
    }
}
setUserDetail
将 HttpServletRequest 中的一些细节如 request.getRemoteAddr()、request.getSession 存入到 Token (凭证, 在 UsernamePasswordAuthenticationFilter 中, 处于不可信状态的通信证) 中.
EntryPoint 配置Bean
需要多少配置?
- UserDetailsService、UserDetailsPasswordService
- Filter (AbstractAuthenticationProcessingFilter)
- Paramter
- FilterProcessesUrl(“/login”)
- RememberMe
- AuthenticationManager
- AuthenticationSuccess/FailureHandler
- HttpSecurity
- authorizeRequests // antMathers / mvcMathers().permitAll() anyRequest.authenticated()
- formLogin()
- Logout()
- RememberMe // RememberMeService always paramter
- csrf() // csrfTokenRepository(CookieCsrfTokenRepository.withHttpOnlyFalse())); // 将令牌保存到 cookie 中(并允许前端获取)
- addFilterAt()
- exceptionHandling() // authenticationEntryPoint / accessDeniedHandler
- sessionManagement() // expiredSessionStrategy maximumSessions maxSessionsPreventsLogin
- authenticationManager
- authenticationProvider
- WebSecurityCustomizer // web.ignoring().antMatchers
- AuthenticationManagerBuilder.userDetailsService(xxService)
- @Autowired authenticationManagerBean()
@Bean
public SecurityFilterChain filterChain(HttpSecurity http) throws Exception {
    http.antMatcher("/**") // 不同的 SecurityFilterChain 是互斥而且平等的,它们之间不是上下游关系。可通过 /api 区分
            .authorizeRequests(
                    authorize ->
                            authorize
                                    .antMatchers("/withdraw")
                                    .permitAll()
                                    // .hasAnyRole("ADMIN", "ACCOUNTANT")
                                    .anyRequest()
                                    .authenticated());
    http.formLogin().and().logout();
    // http.rememberMe()
    //         .rememberMeServices(null)
    //         .tokenRepository(new JdbcTokenRepositoryImpl(){{
    //             this.setDataSource(dataSource); // 得引入 jdbc
    //             setCreateTableOnStartup(true); // 启动时创建表结构
    //         }})
    //         .alwaysRemember(true)
    //         .rememberMeParameter("rememberMe");
    http.exceptionHandling(
            exception ->
                    exception
                            .authenticationEntryPoint(
                                    (req, res, auth) -> {
                                        res.setContentType(MediaType.APPLICATION_JSON_VALUE);
                                        res.setStatus(HttpStatus.UNAUTHORIZED.value());
                                        res.getWriter().println("请认证后处理!");
                                    })
                            .accessDeniedHandler(
                                    (req, res, auth) -> {
                                        res.setContentType(MediaType.APPLICATION_JSON_VALUE);
                                        res.setStatus(HttpServletResponse.SC_FORBIDDEN);
                                        res.getWriter().println("权限不足,请联系管理员!");
                                    }));

    http.addFilterBefore(loginFilter(), UsernamePasswordAuthenticationFilter.class);
    http.sessionManagement(
            session ->
                    session.maximumSessions(1)
                            .maxSessionsPreventsLogin(true)
                            .expiredSessionStrategy(
                                    event -> {
                                        HttpServletResponse response = event.getResponse();
                                        response.setContentType(
                                                MediaType.APPLICATION_JSON_VALUE);
                                        String json =
                                                "{\"success\":false,\"message\":\"SESSION_INVALID\",\"code\":401}";
                                        response.getWriter().println(json);
                                    }));
    // .sessionRegistry(sessionRegistry()) // session 共享
    http.csrf(
            csrf ->
                    csrf.csrfTokenRepository(
                            CookieCsrfTokenRepository
                                    .withHttpOnlyFalse())); // 将令牌保存到cookie中(并允许前端获取)
    // http.authenticationManager(
    //         new ProviderManager(Collections.singletonList(captchaAuthenticationProvider())));
    // http.authenticationProvider(); // 加入到当前 CustomAuthenticationManager 中,不推荐,应该在自定义 Filter
    // 中设置
    return http.build();
}

@Bean
public WebSecurityCustomizer webSecurityCustomizer() {
    // 仅仅作为演示
    return (web) ->
            web.ignoring().antMatchers("/withdraw/info", "/withdraw/hello", "/captcha/**");
}
- 其中 Filter 可以自定义 ProviderManager (并对应上 Provider)
/**
 * 验证码认证过滤器.
 *
 * @return the captcha authentication filter
 */
@Bean
public AbstractAuthenticationProcessingFilter loginFilter() {
    // final LoginFilter loginFilter = new LoginFilter(); // 配置无关
    // loginFilter.setUsernameParameter("uname"); // 配置无关
    // loginFilter.setPasswordParameter("passwd"); // 配置无关
    final CaptchaAuthenticationFilter loginFilter =
            new CaptchaAuthenticationFilter(); // 配置 authenticationManager
    // loginFilter.setFilterProcessesUrl("/doLogin"); // 这里设置会进行顶替
    // loginFilter.setRememberMeServices(
    //         rememberMeServices()); // 前后端分离后,更改了获取方式后,存放也需要同步设置(2/2)
    // 指定认证管理器
    loginFilter.setAuthenticationManager(
            new ProviderManager(Collections.singletonList(captchaAuthenticationProvider())));
    // 指定成功时处理
    loginFilter.setAuthenticationSuccessHandler(
            (request, response, authentication) -> {
                response.setContentType(MediaType.APPLICATION_JSON_VALUE);
                response.setStatus(HttpStatus.OK.value());
                Map<String, Object> data = new HashMap<>();
                data.put("userInfo", authentication.getPrincipal());
                data.put("msg", "登陆成功");
                PrintWriter out = response.getWriter();
                ObjectMapper objectMapper = new ObjectMapper();
                out.write(objectMapper.writeValueAsString(data));
                out.flush();
                out.close();
            });
    // 指定失败时处理
    loginFilter.setAuthenticationFailureHandler(
            (request, response, exception) -> {
                response.setContentType(MediaType.APPLICATION_JSON_VALUE);
                Map<String, Object> data = new HashMap<>();
                data.put("msg", "登陆失败:" + exception.getMessage());
                response.setStatus(HttpStatus.UNAUTHORIZED.value());
                PrintWriter out = response.getWriter();
                ObjectMapper objectMapper = new ObjectMapper();
                out.write(objectMapper.writeValueAsString(data));
                out.flush();
                out.close();
            });
    return loginFilter;
}
会话次数限制失效
- session 会话控制失效问题
session.maximumSessions(1); // 失效
如果继承 UserDetails 的实体类没有重写 equals 和 hashCode 方法, 或调用了父类的方法 (super), 但父类没重写, 导致比对失败, 可以无限制登陆.
解决办法出处: https://stackoverflow.com/questions/51916715/concurrent-session-management-not-working-i-have-followed-the-documentation-bu
会话次数限制原理
- 对应 Filter : sessionManager 对应 SessionManagerFilter, 在 doFilter 里面,
// 是否第一次访问, 是的话直接放行
!securityContextRepository.containsContext(request)
// 获取认证对象, 后续进行判断 != null 是否为空, trustResolver.isAnonymous(a) 是否为匿名对象(勿需控制)
Authentication authentication = SecurityContextHolder.getContext().getAuthentication();
// 并发管理的关键, 找到 ConcurrentSessionControlAuthenticationStrategy.class 的实现
sessionAuthenticationStrategy.onAuthentication(authentication, request, response);
- ConcurrentSessionControlAuthenticationStrategy
// 关键代码
List<SessionInformation> sessions = sessionRegistry.getAllSessions(authentication.getPrincipal(), false);
- SessionRegistryImpl
// 关键代码
principals.get(principal);

// 这里的 principals 是一个 ConcurrentMap
private final ConcurrentMap<Object, Set<String>> principals;
所以根据分析 UserDetail 实现类的 equals 方法重写失败导致同一个用户 equals 判定失败.
最后, 提一下我最后找到原因, lombok 的 callSuper 策略 + 父类未重写 equals.
因为引入了一个全局 lombok.confg 配置, 导致自带了 callSuper 策略, 最后综合考虑去掉该配置, 解决
lombok.toString.callSuper = CALL
lombok.equalsAndHashCode.callSuper= CALL
JWT
        <!-- https://mvnrepository.com/artifact/com.auth0/java-jwt -->
        <dependency>
            <groupId>com.auth0</groupId>
            <artifactId>java-jwt</artifactId>
            <version>3.19.2</version>
        </dependency>
步骤:
- 工具类
- 加上 Filter
public class JWTFilter extends OncePerRequestFilter - 加入 SecurityConfiguration 配置
// 1. 加入 filter
http.addFilterBefore(jwtFilter, UsernamePasswordAuthenticationFilter.class);

// 2. 加入 STATELESS
http.sessionManagement(
           session ->
                   session.sessionCreationPolicy(SessionCreationPolicy.STATELESS)
                           .maximumSessions(1)
                           .maxSessionsPreventsLogin(true)
                           .expiredSessionStrategy(
                                   event -> {
                                       HttpServletResponse response = event.getResponse();
                                       response.setContentType(
                                               MediaType.APPLICATION_JSON_VALUE);
                                       String json =
                                               "{\"success\":false,\"message\":\"SESSION_INVALID\",\"code\":401}";
                                       response.getWriter().println(json);
                                   }));


 906
906


 被折叠的 条评论
为什么被折叠?
被折叠的 条评论
为什么被折叠?
 到【灌水乐园】发言


