


认证:用户输入账号密码,进行认证;
授权:登陆后,拿到当前用户的角色权限信息,给他进行分配权限,使他可以访问某些接口;
单体应用模式:就是单台机器;
用户-》请求:带着用户名密码-》认证-》访问数据库-》授权-》访问端点(EndPoint),可以认为是http接口,或者数据;
微服务模式:就是多台机器;
用户拿着用户名密码请求到-》授权中心Oauth2->访问数据库-》返回授权码或者令牌token->认证/校验->授权->访问端点(EndPoint);
http基础认证
通过http请求头,携带用户名密码进行登陆认证;
就是在f12控制台,在请求头中,显示Authorization: Basic base64加密的用户名密码;
在springboot2.4版本之前,SpringSecurity配置类需要继承WebSecurityConfigurerAdapter
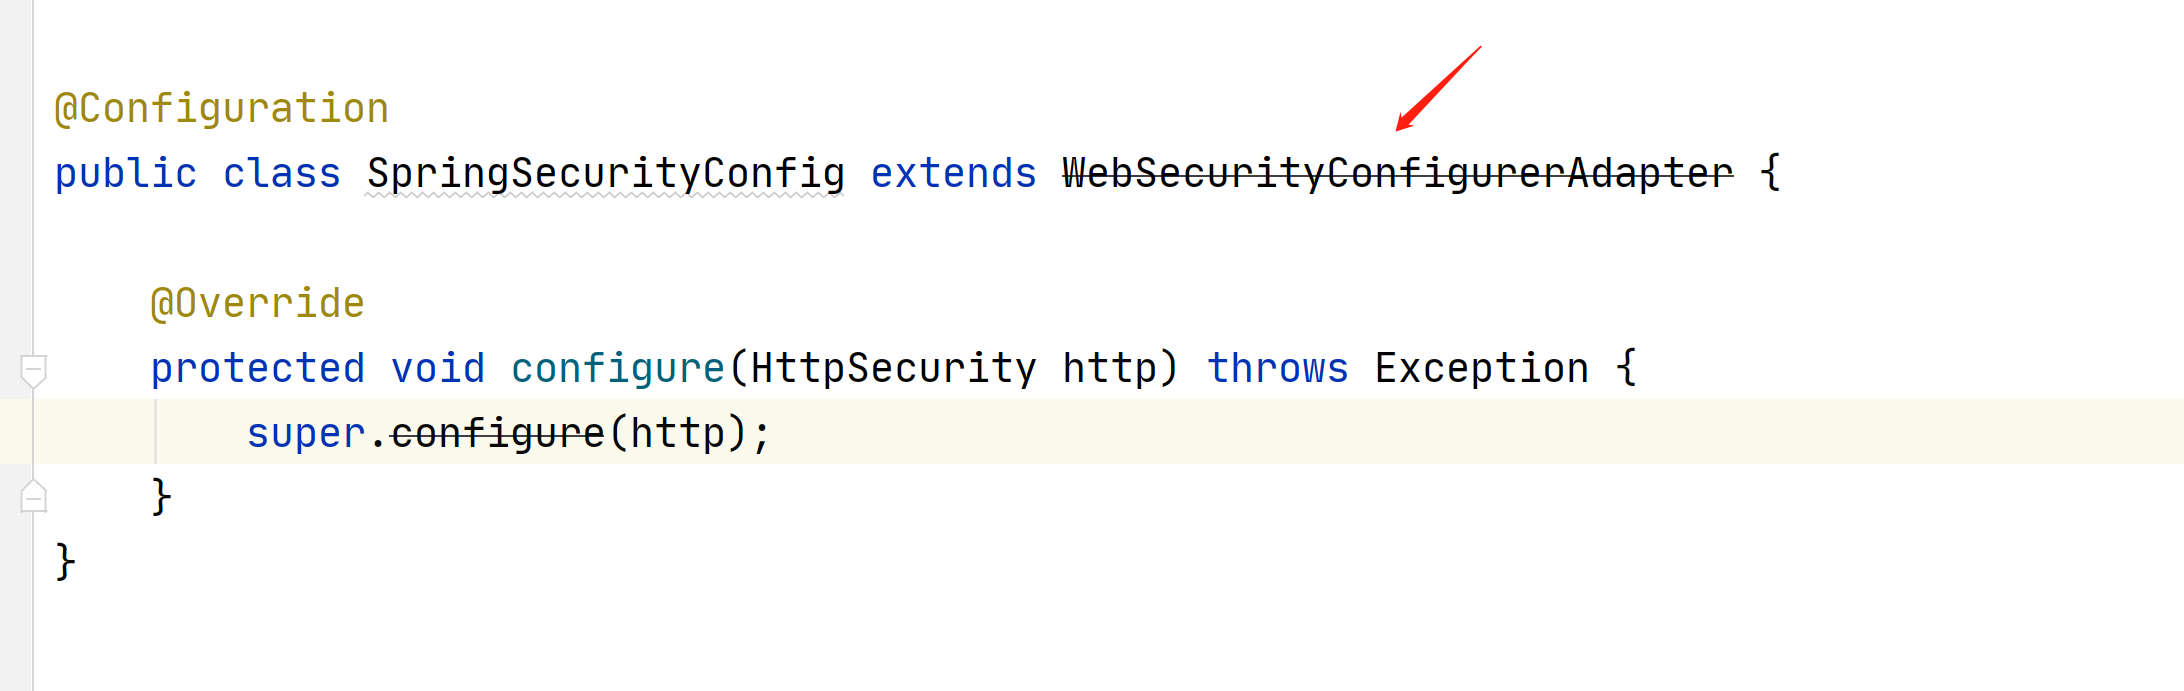
在2.4之后就不需要在继承了,可以看到他上面已经报黑线了
在2.4之后使用下面的方式,安全筛选器链

我们来看下http基础认证的代码
<?xml version="1.0" encoding="UTF-8"?>
<project xmlns="http://maven.apache.org/POM/4.0.0" xmlns:xsi="http://www.w3.org/2001/XMLSchema-instance"
         xsi:schemaLocation="http://maven.apache.org/POM/4.0.0 https://maven.apache.org/xsd/maven-4.0.0.xsd">
    <modelVersion>4.0.0</modelVersion>
    <groupId>com.example</groupId>
    <artifactId>demo</artifactId>
    <version>0.0.1-SNAPSHOT</version>
    <name>demo</name>
    <description>Demo project for Spring Boot</description>
    <parent>
        <groupId>org.springframework.boot</groupId>
        <artifactId>spring-boot-starter-parent</artifactId>
        <version>2.7.5</version>
        <relativePath/>
    </parent>
    <properties>
        <java.version>1.8</java.version>
        <project.build.sourceEncoding>UTF-8</project.build.sourceEncoding>
        <project.reporting.outputEncoding>UTF-8</project.reporting.outputEncoding>
    </properties>

    <dependencies>
        <dependency>
            <groupId>org.springframework.boot</groupId>
            <artifactId>spring-boot-starter-web</artifactId>
        </dependency>

        <dependency>
            <groupId>org.springframework.boot</groupId>
            <artifactId>spring-boot-starter-test</artifactId>
            <scope>test</scope>
            <exclusions>
                <exclusion>
                    <groupId>org.junit.vintage</groupId>
                    <artifactId>junit-vintage-engine</artifactId>
                </exclusion>
            </exclusions>
        </dependency>
        <dependency>
            <groupId>com.alibaba</groupId>
            <artifactId>fastjson</artifactId>
            <version>2.0.11.graal</version>
        </dependency>
        <dependency>
            <groupId>commons-lang</groupId>
            <artifactId>commons-lang</artifactId>
            <version>2.6</version>
        </dependency>

        <!--spring security核心包-->
        <dependency>
            <groupId>org.springframework.boot</groupId>
            <artifactId>spring-boot-starter-security</artifactId>
        </dependency>
        <dependency>
            <groupId>org.springframework.security</groupId>
            <artifactId>spring-security-test</artifactId>
            <scope>test</scope>
        </dependency>


    </dependencies>

    <dependencyManagement>
        <dependencies>
            <dependency>
                <groupId>org.springframework.boot</groupId>
                <artifactId>spring-boot-dependencies</artifactId>
                <version>${spring-boot.version}</version>
                <type>pom</type>
                <scope>import</scope>
            </dependency>
        </dependencies>
    </dependencyManagement>

    <build>
        <plugins>
            <plugin>
                <groupId>org.apache.maven.plugins</groupId>
                <artifactId>maven-compiler-plugin</artifactId>
                <version>3.8.1</version>
                <configuration>
                    <source>1.8</source>
                    <target>1.8</target>
                    <encoding>UTF-8</encoding>
                </configuration>
            </plugin>
            <plugin>
                <groupId>org.springframework.boot</groupId>
                <artifactId>spring-boot-maven-plugin</artifactId>
                <version>2.3.7.RELEASE</version>
                <configuration>
                    <mainClass>com.example.demo.DemoApplication</mainClass>
                </configuration>
                <executions>
                    <execution>
                        <id>repackage</id>
                        <goals>
                            <goal>repackage</goal>
                        </goals>
                    </execution>
                </executions>
            </plugin>
        </plugins>
    </build>

</project>
package com.example.demo.config;

import org.springframework.context.annotation.Bean;
import org.springframework.context.annotation.Configuration;
import org.springframework.security.config.Customizer;
import org.springframework.security.config.annotation.web.builders.HttpSecurity;
import org.springframework.security.config.annotation.web.configuration.WebSecurityConfigurerAdapter;
import org.springframework.security.web.SecurityFilterChain;
import org.springframework.web.servlet.config.annotation.WebMvcConfigurer;
/**
 *
 * 安全配置类
 * @param
 * @return
 * @throws Exception
 */
@Configuration
public class SpringSecurityConfig  {

   /**
    *
    * 安全过滤器链
    * @param
    * @return
    * @throws Exception
    */
   @Bean
   public SecurityFilterChain securityFilterChain(HttpSecurity http) throws Exception {
       //对那些请求进行拦截
       http.authorizeRequests((x)->{
           //所有请求都拦截
           x.anyRequest().authenticated();
        })      //http基础认证 不认证无法访问
               .httpBasic(Customizer.withDefaults());
       //创建对象
       return http.build();
   }
}
package com.example.demo.controller;

import org.springframework.web.bind.annotation.GetMapping;
import org.springframework.web.bind.annotation.RestController;

@RestController
public class TestController {

    @GetMapping("/test")
    public String test(){
        return "aa";
    }
}
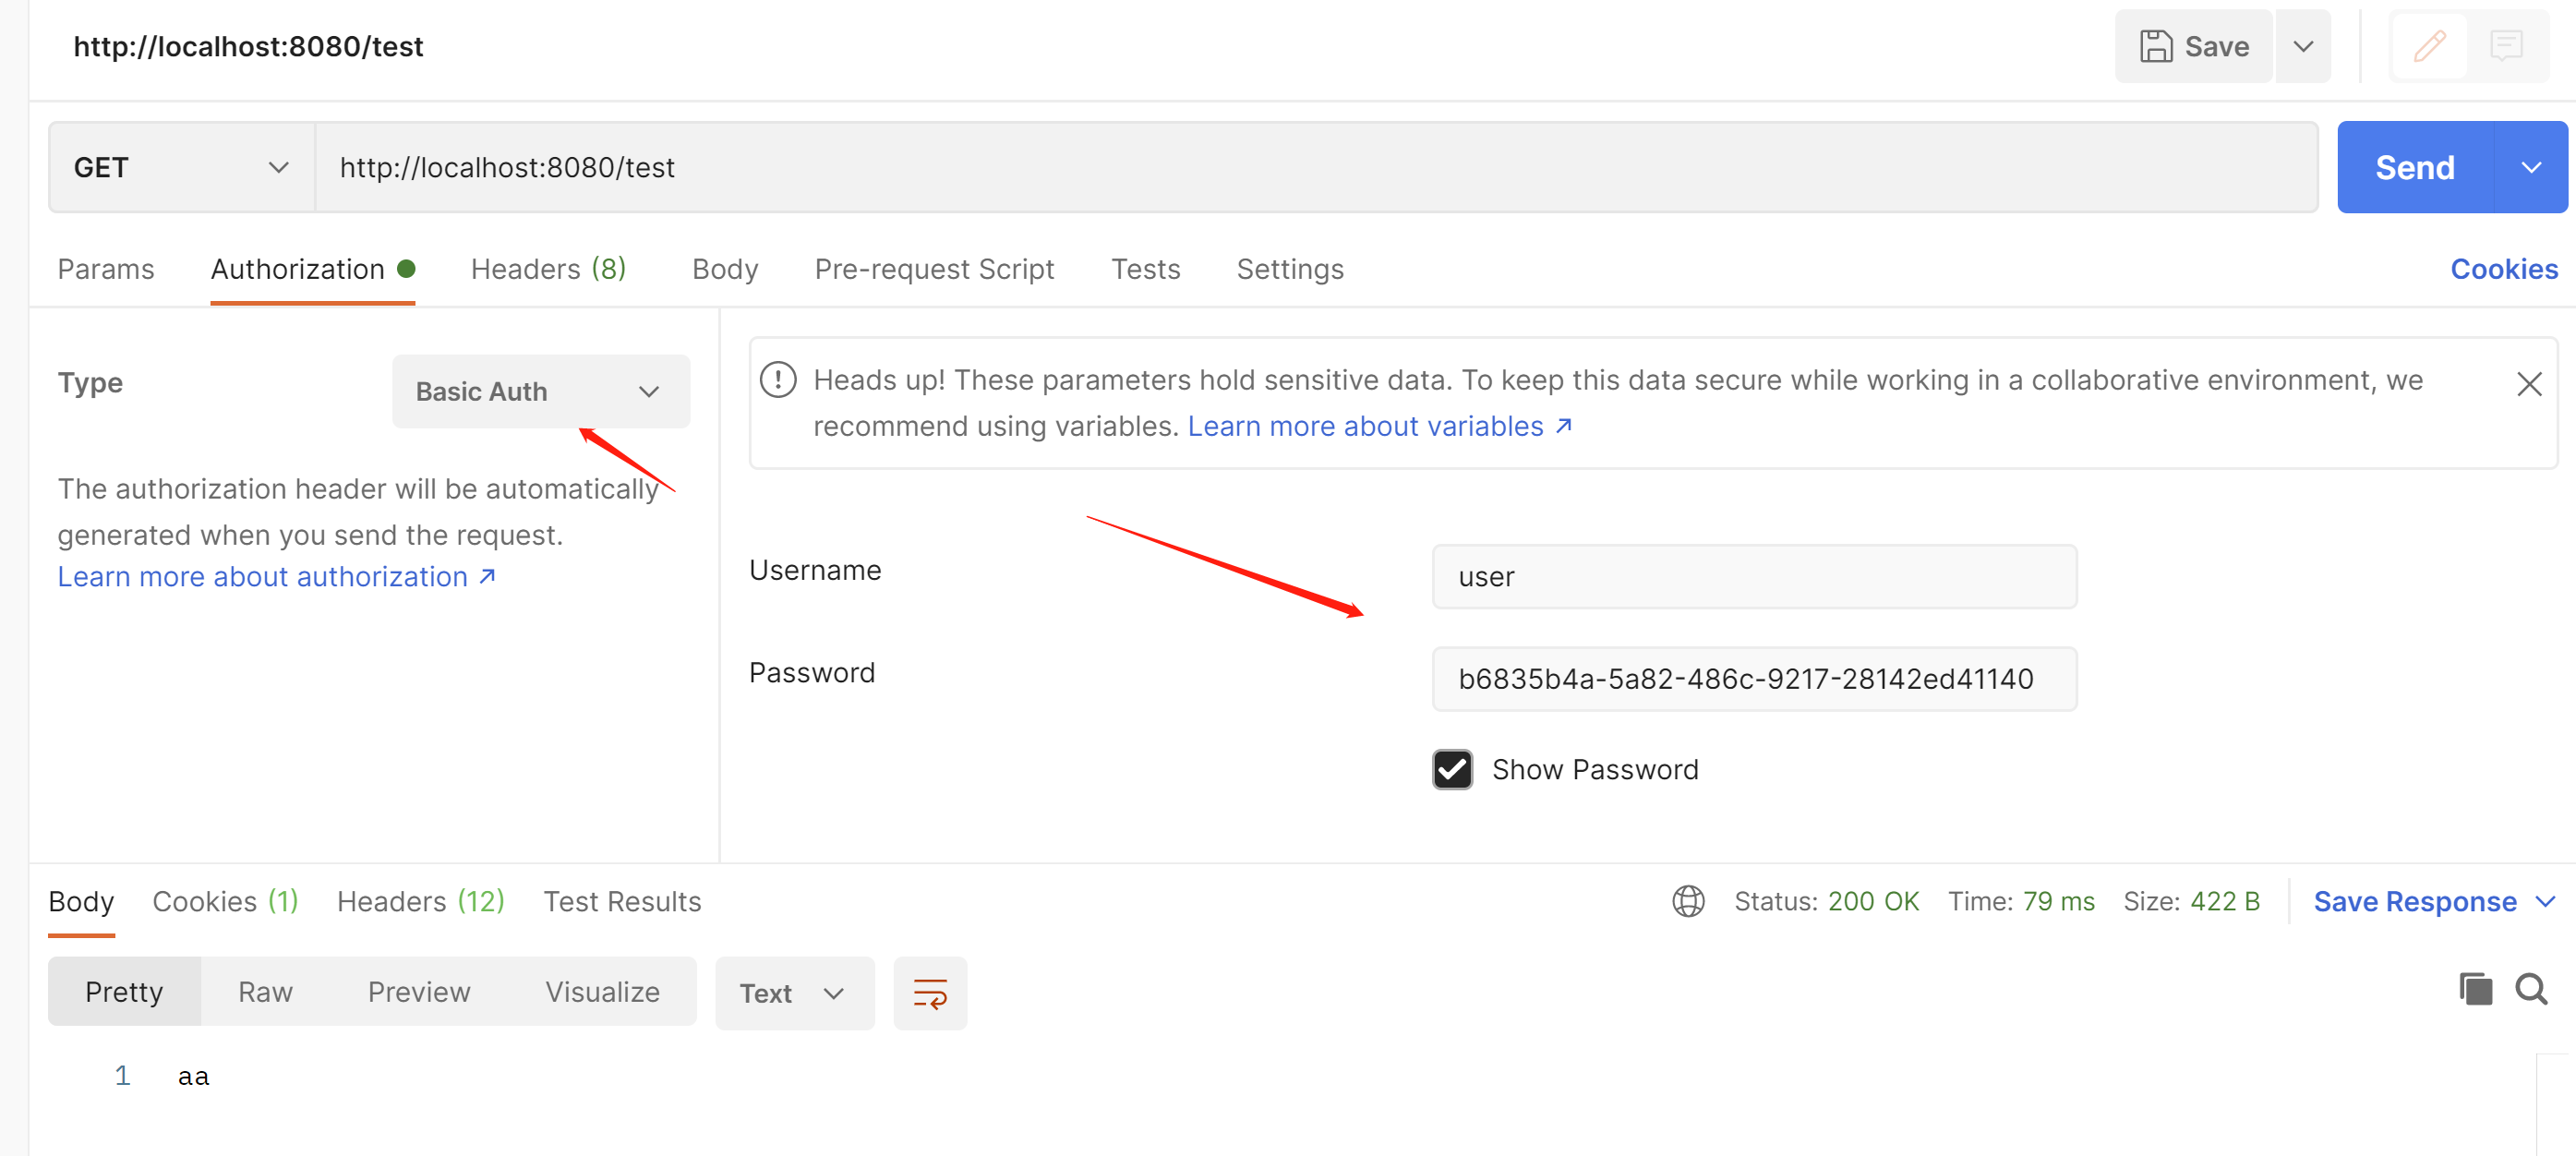
访问
弹出这个框就表示http基础认证

用户名user
在源码这里,默认的用户名

密码在这里
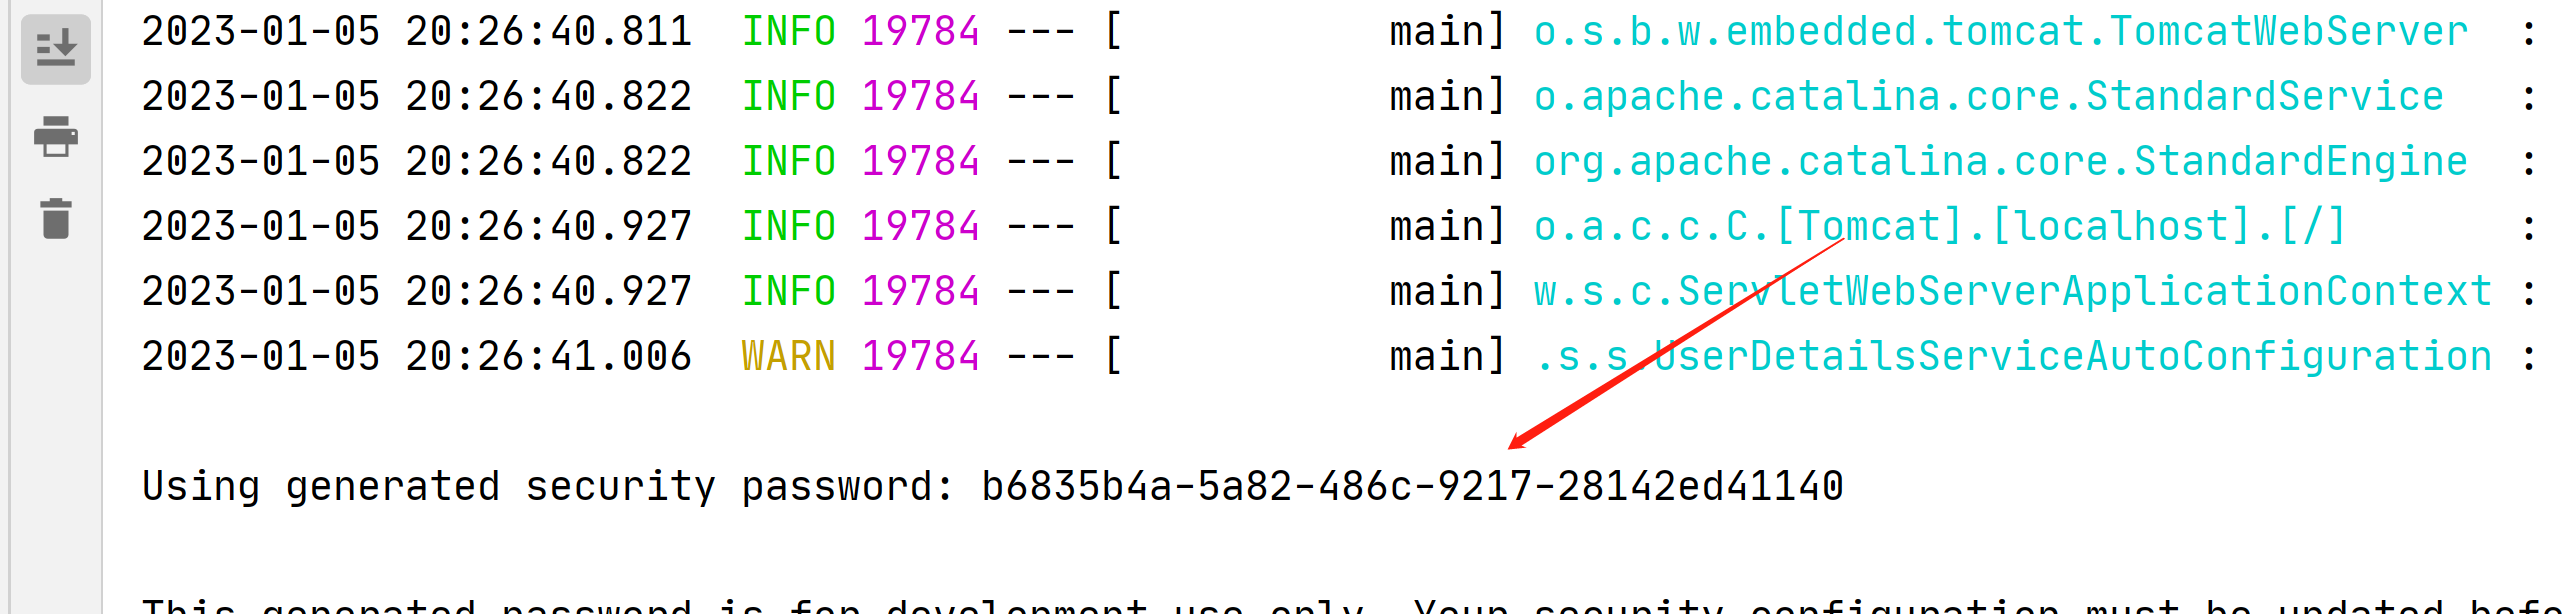
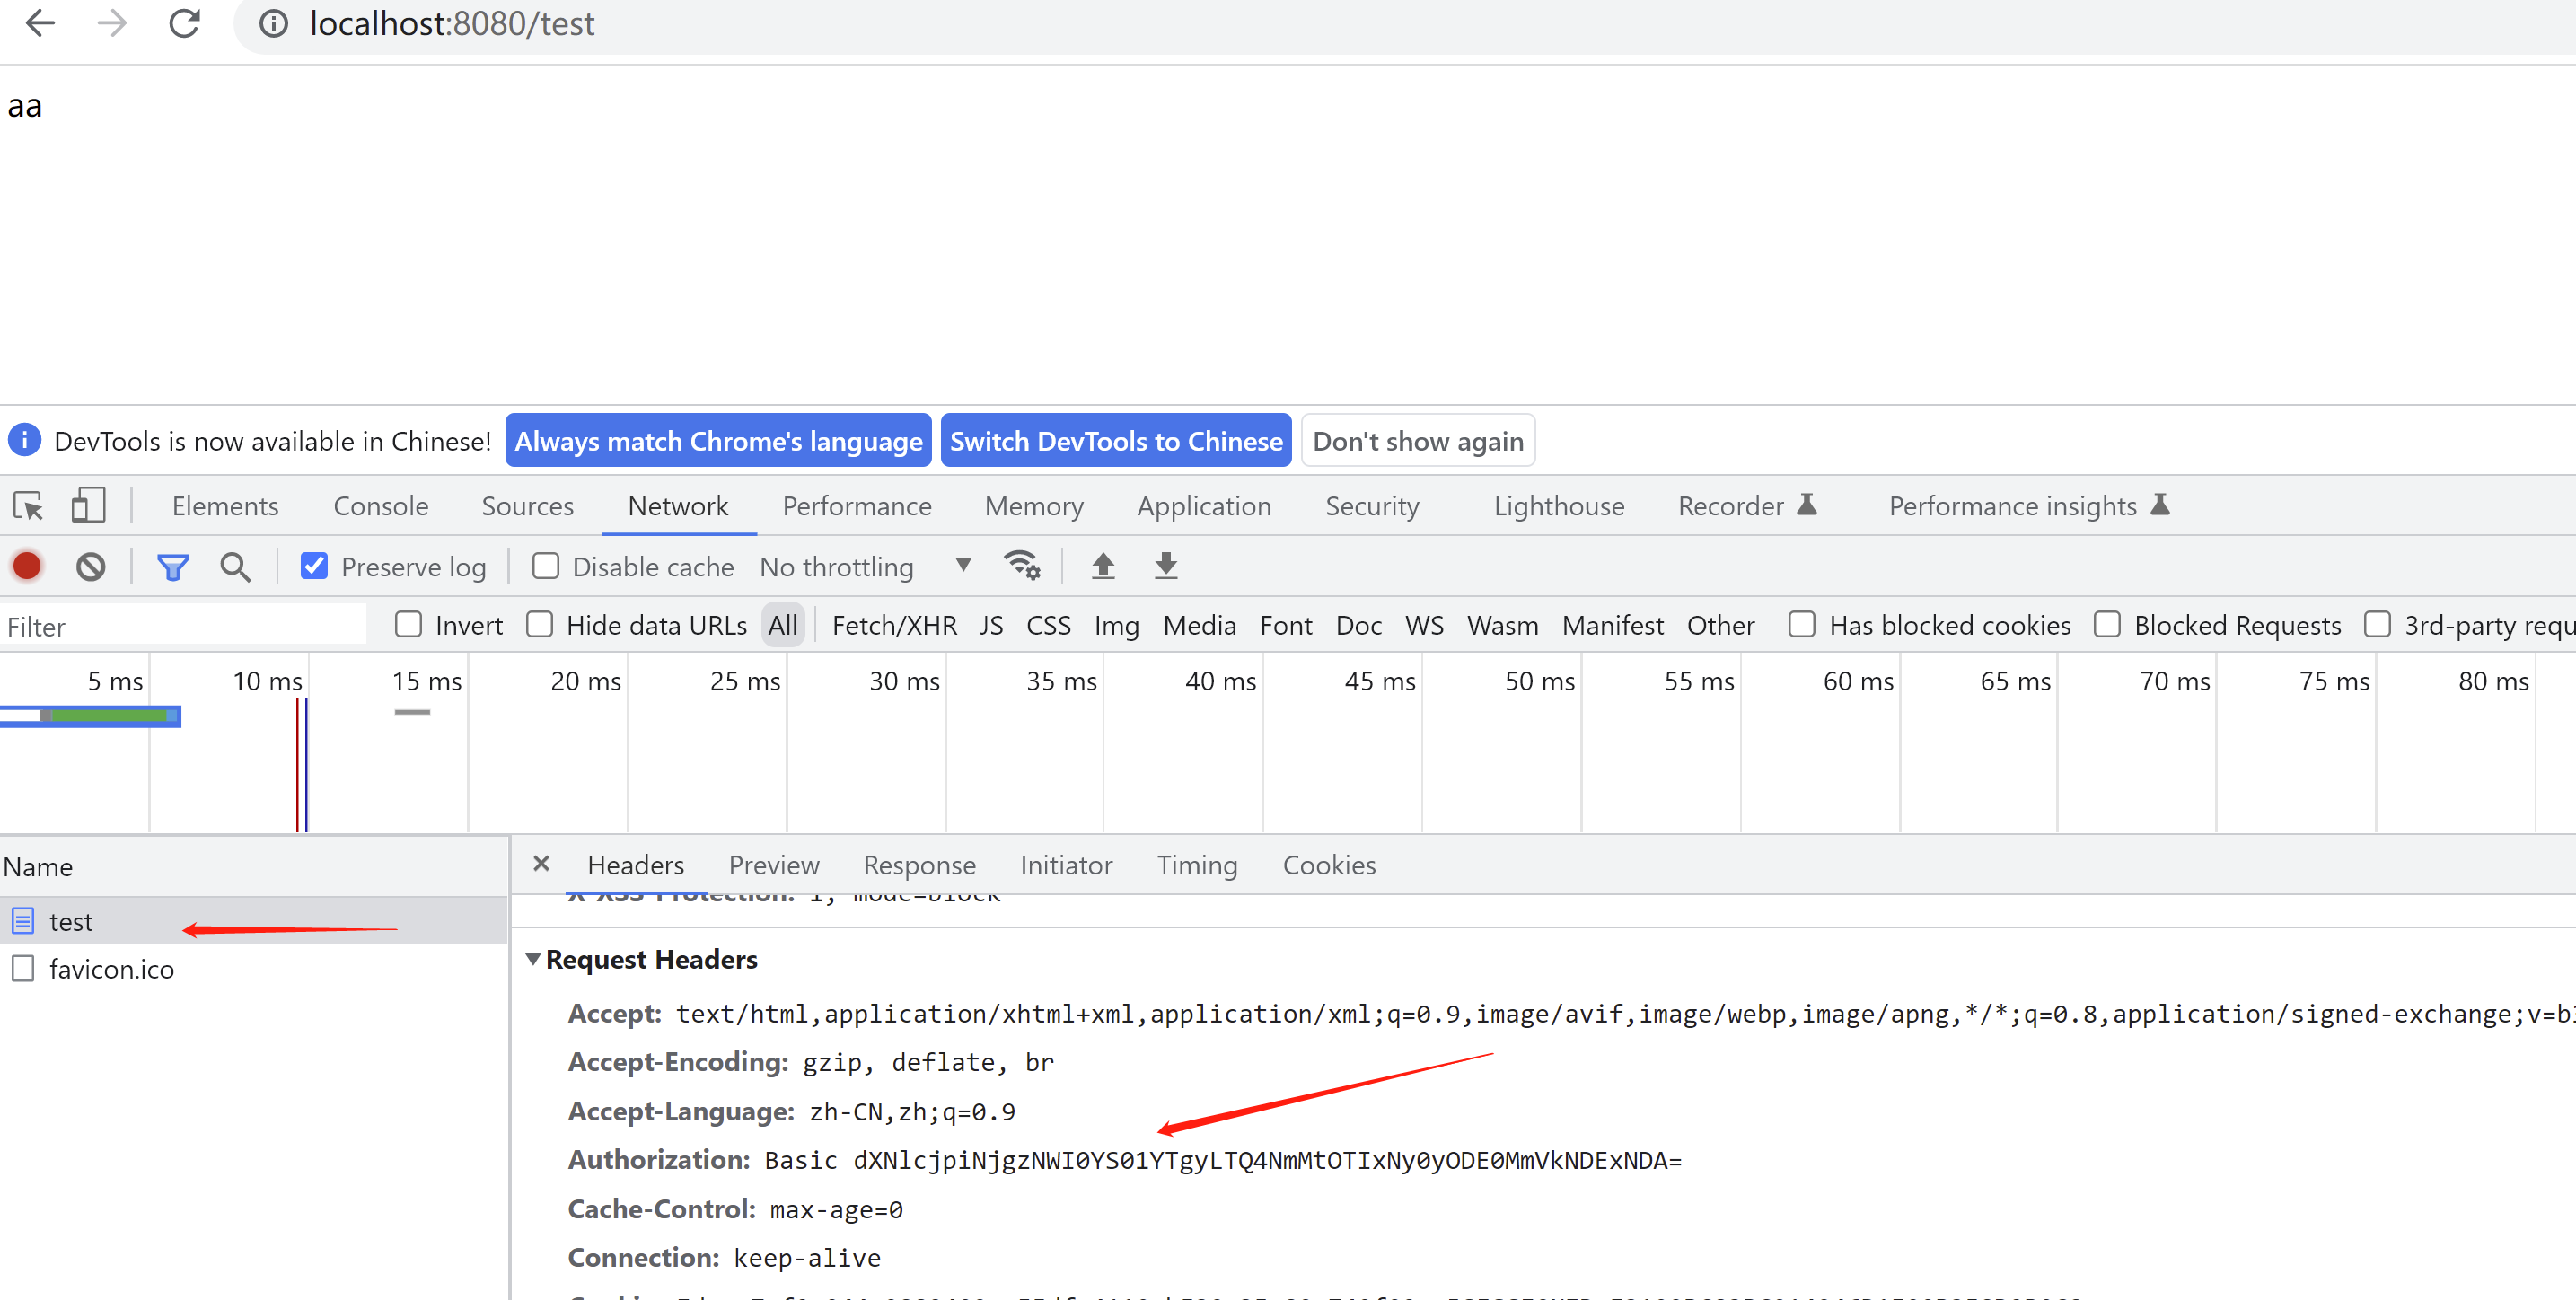
在f12控制台可以看到,这就是http基础认证
Authorization: Basic dXNlcjpiNjgzNWI0YS01YTgyLTQ4NmMtOTIxNy0yODE0MmVkNDExNDA=
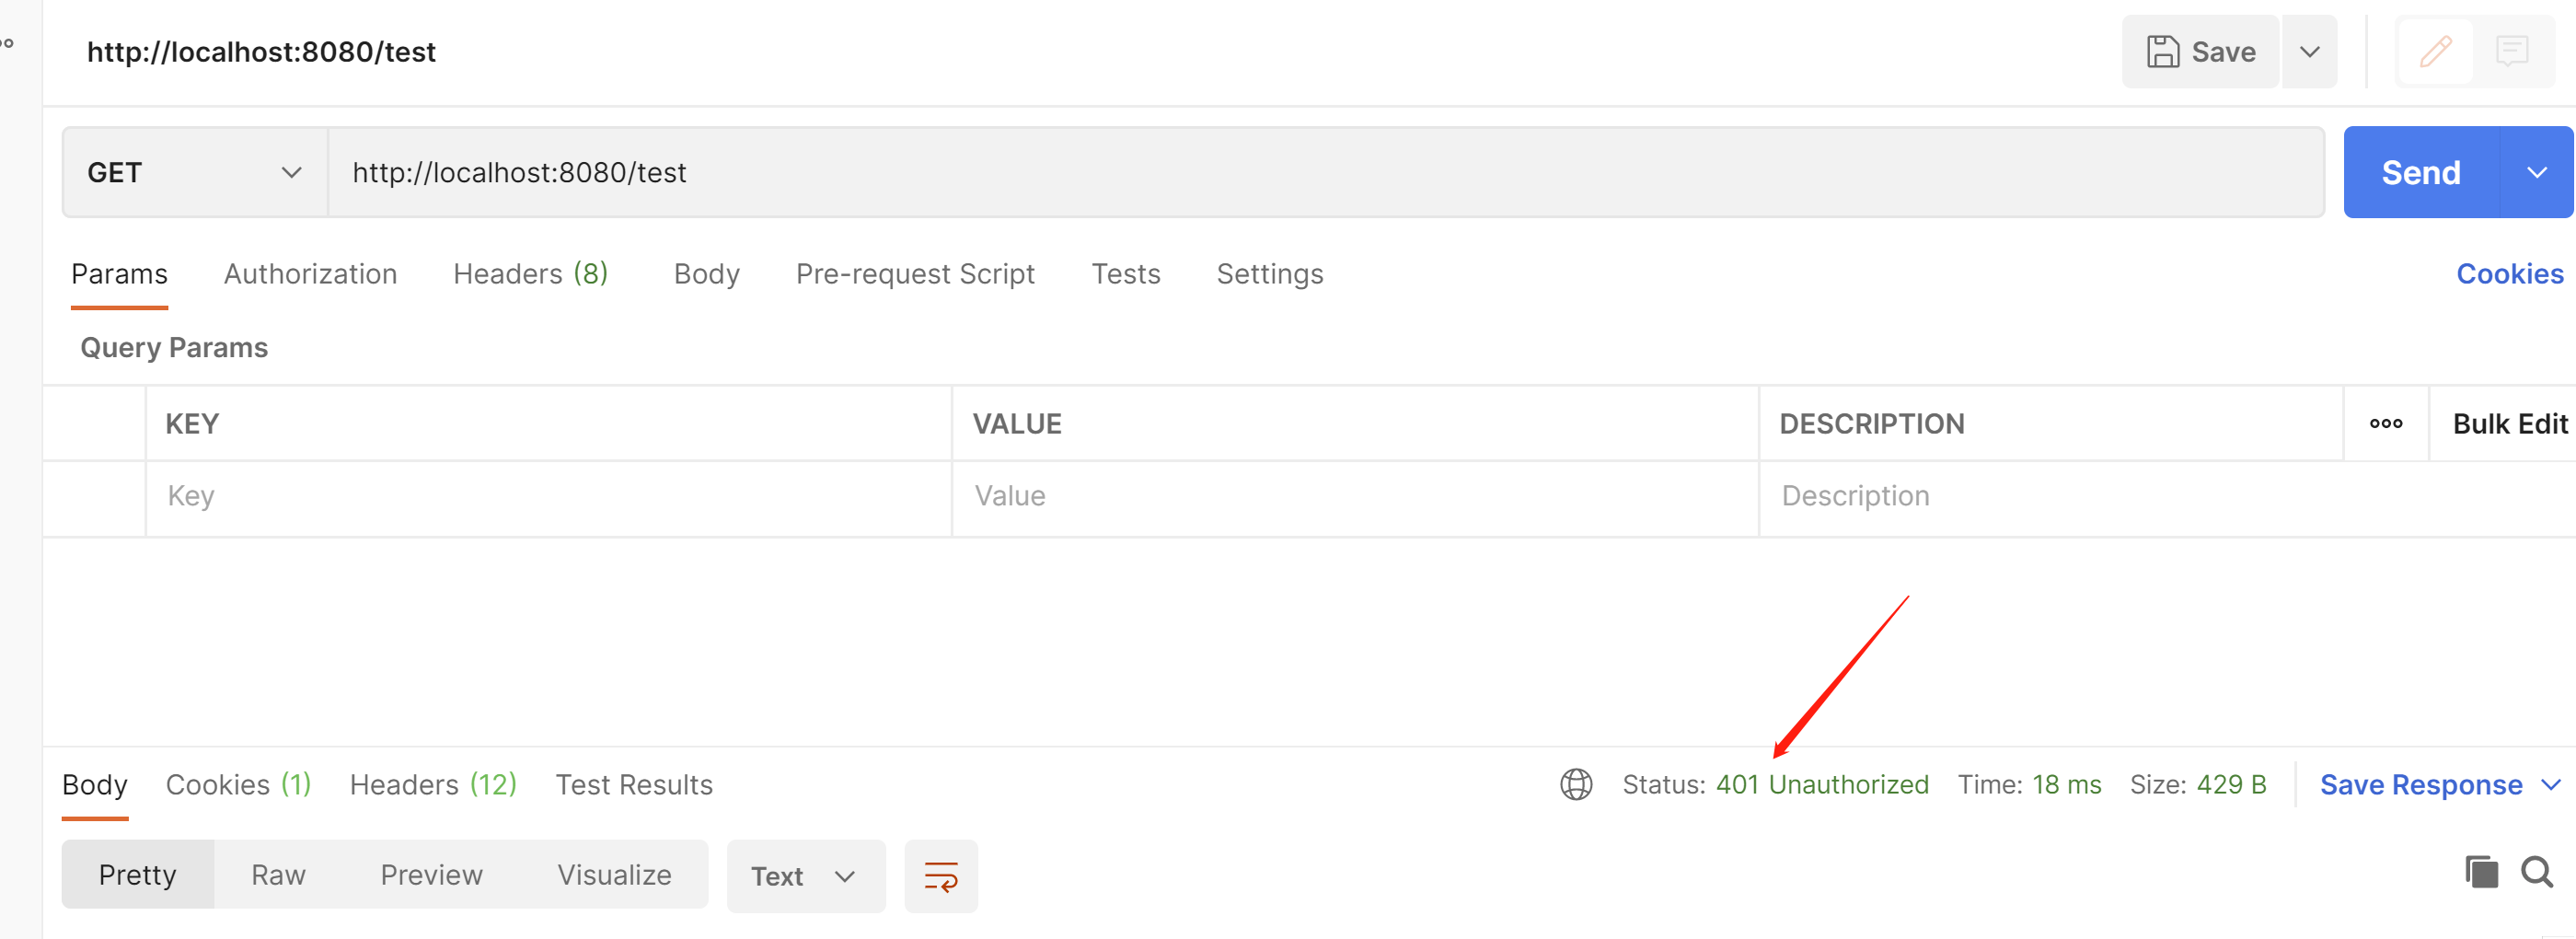
我们测试一下,不带请求头访问看看啥效果
可以看到401,没有权限
我们带上请求头看看啥效果
可以看到已经返回数据了

或者可以在这里输入账号密码
应用场景:给别的服务,在后端调用的时候使用,不需要前台登陆
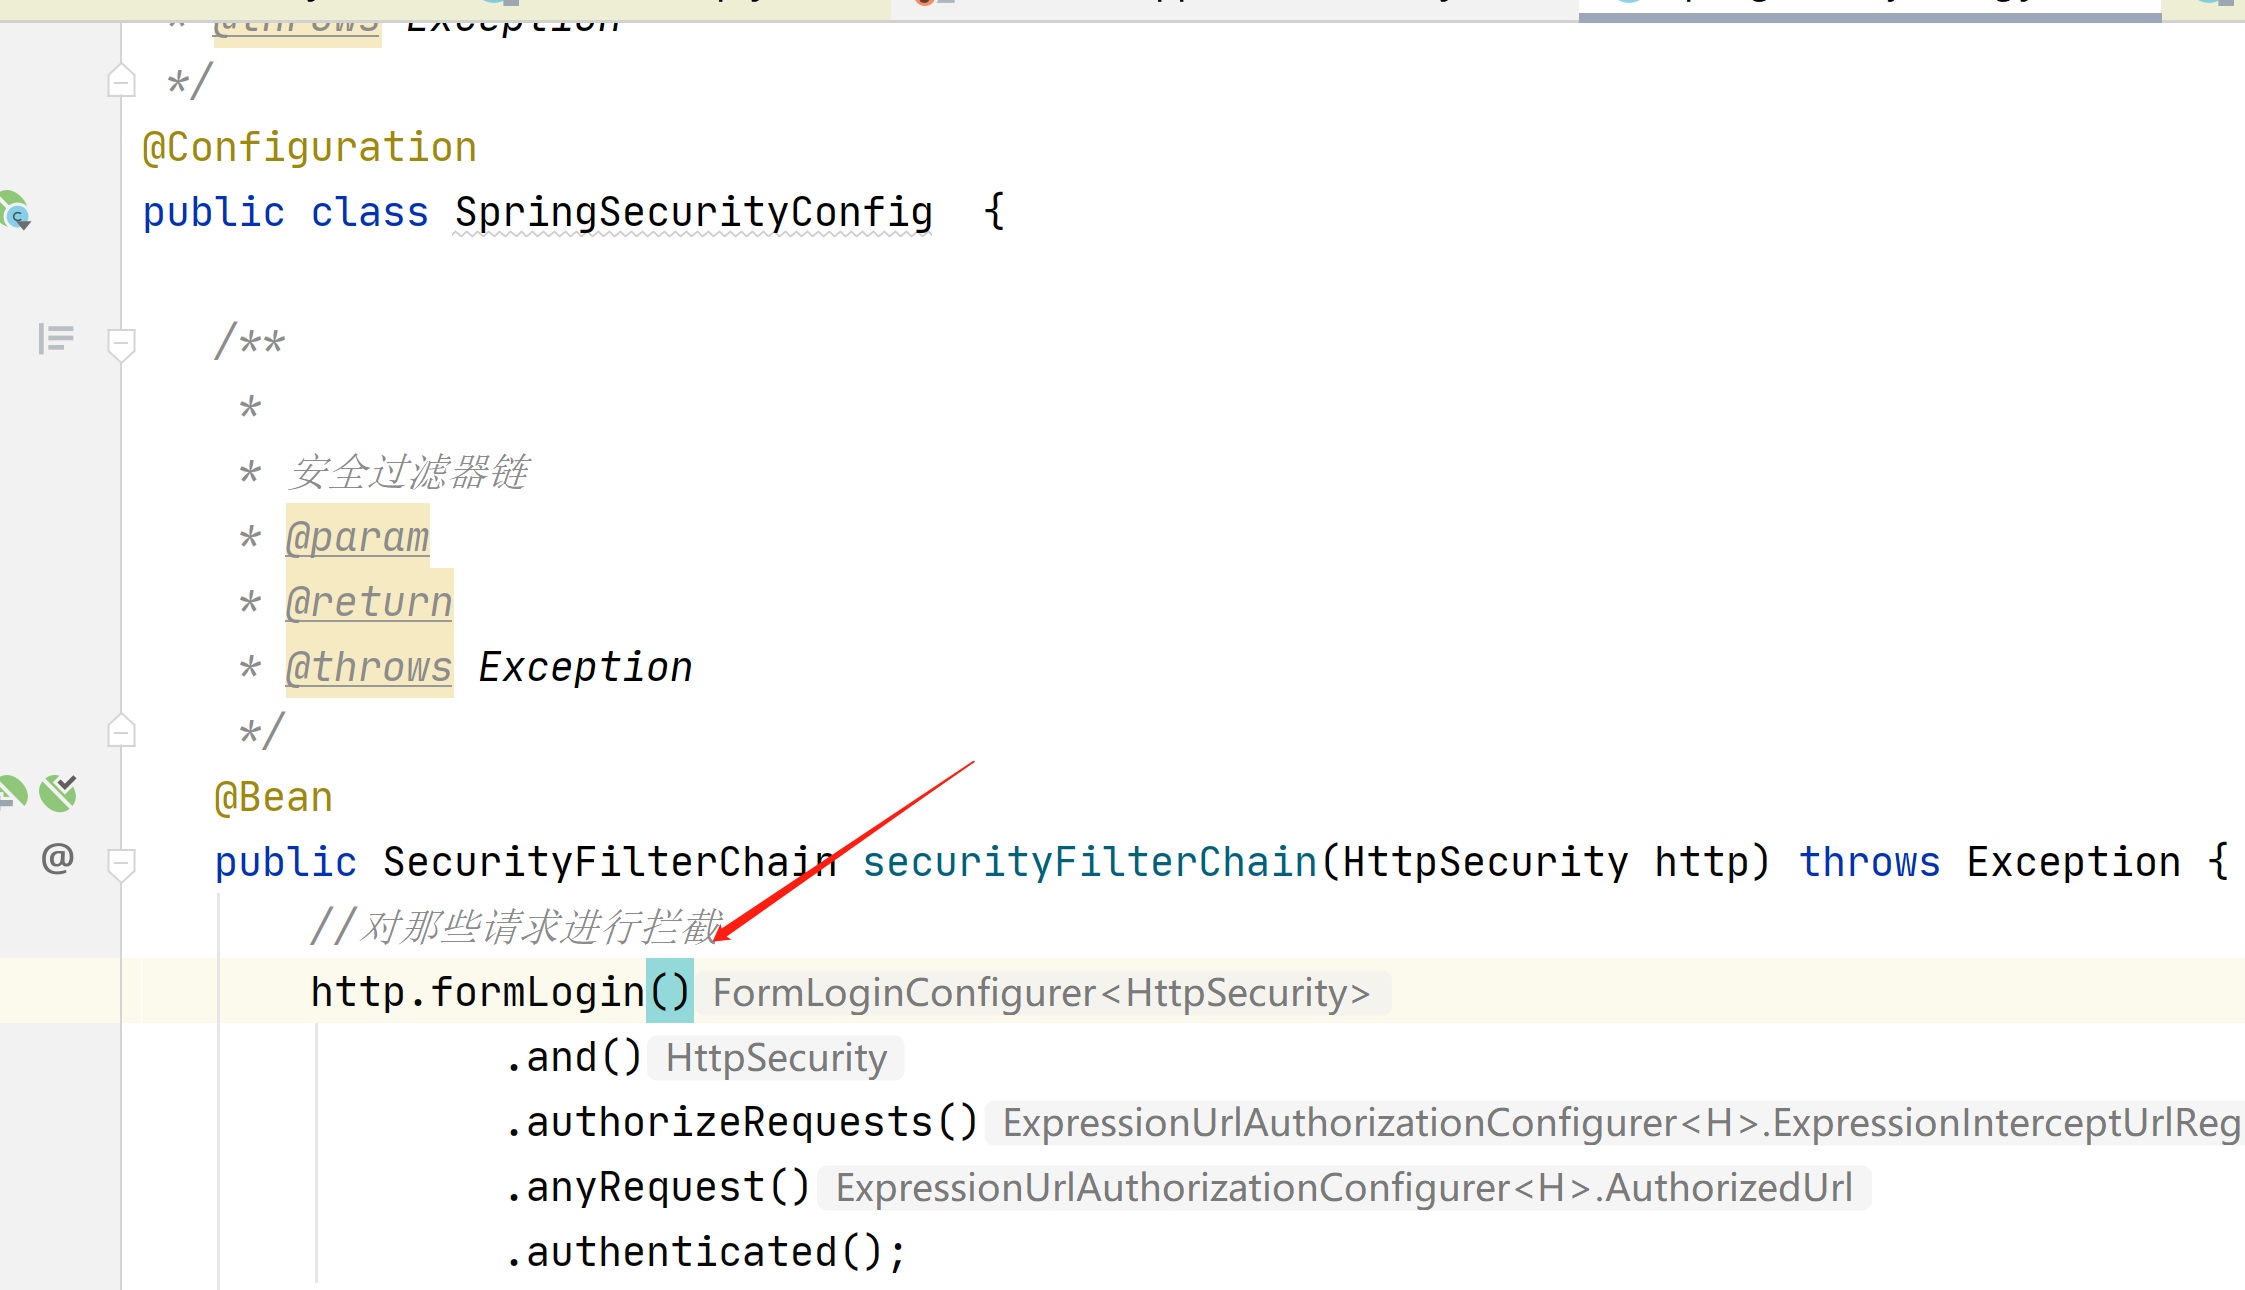
接下来我们在看下表单模式
这个样子就是表单模式
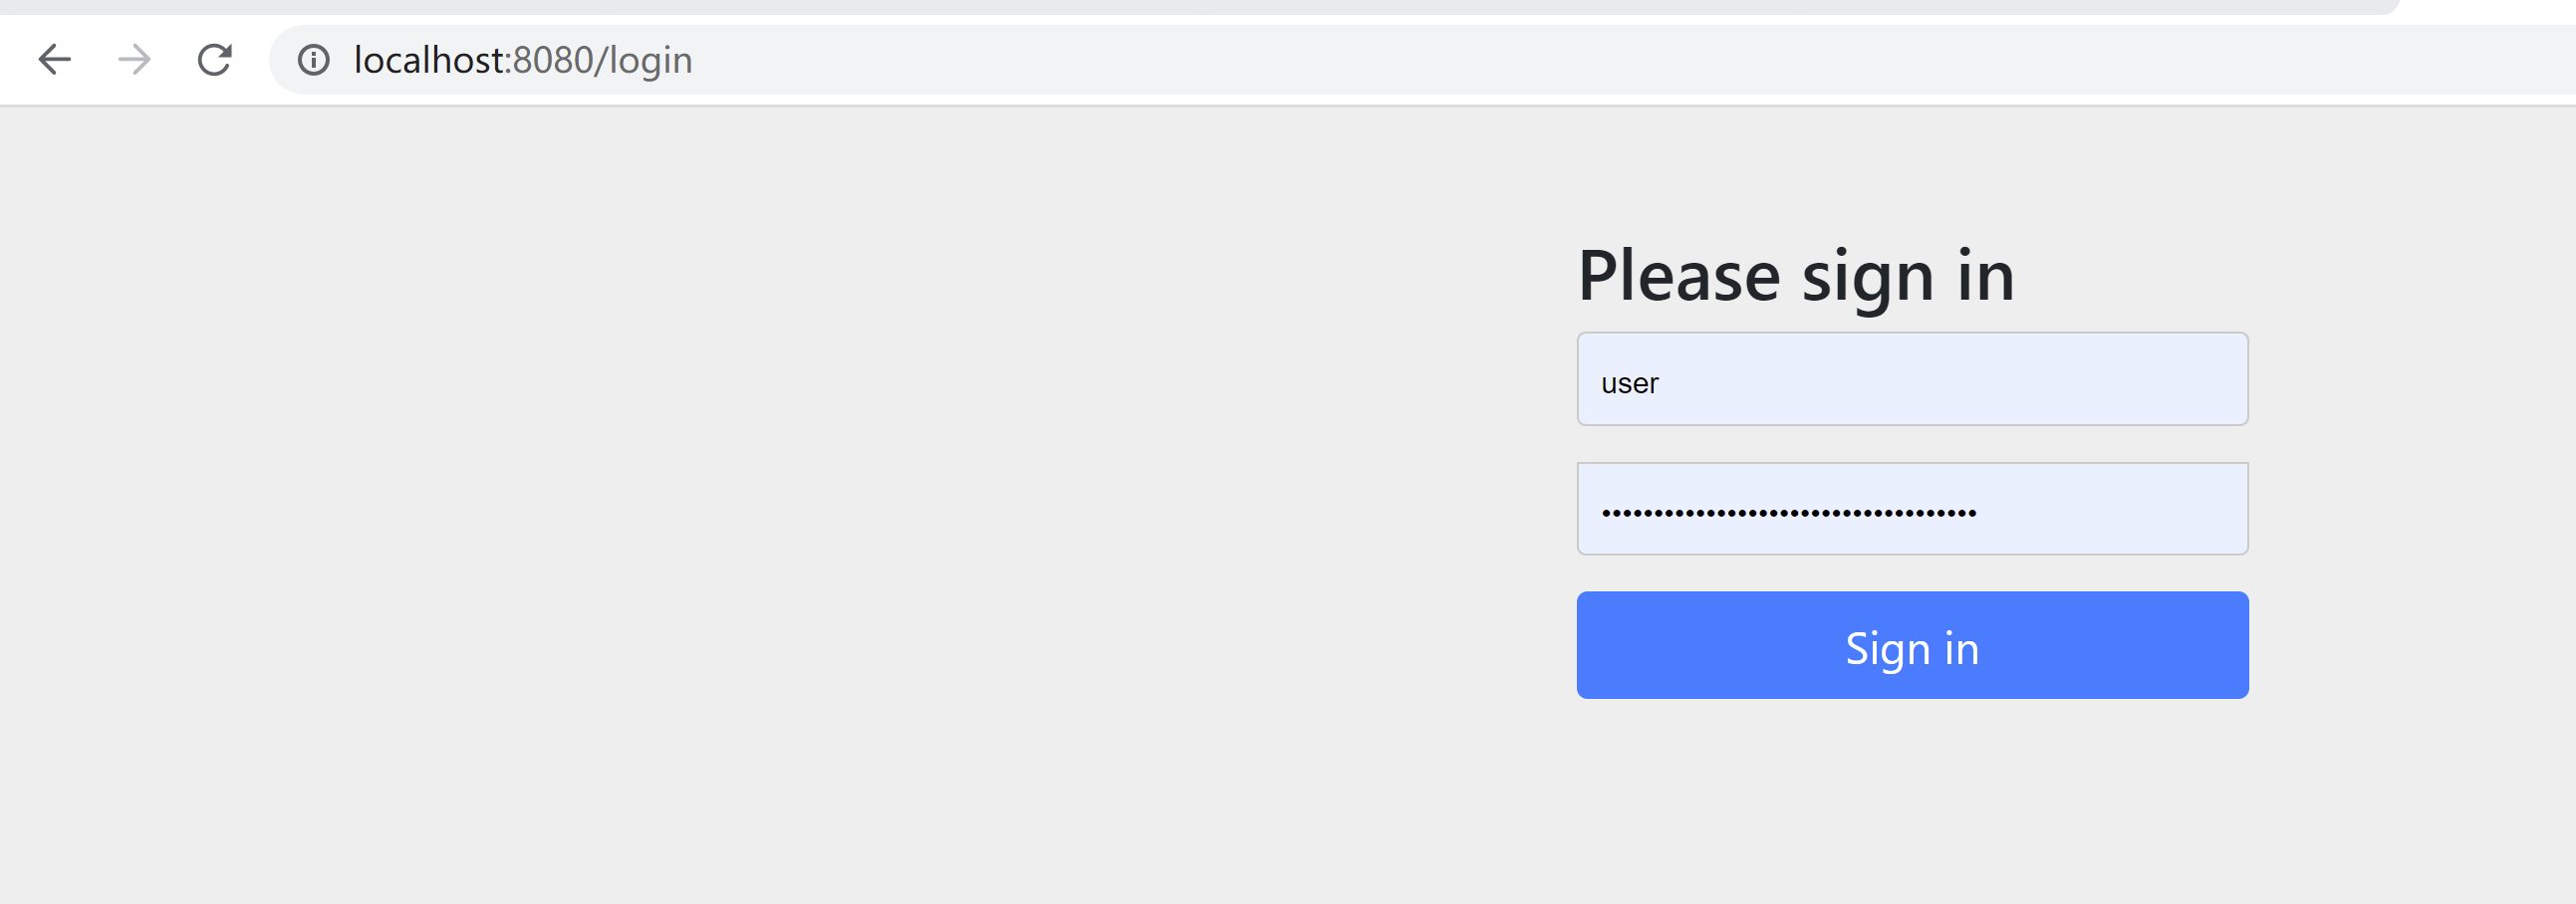
.formLogin()就是使用表单模式登陆
接下来我们引入mysql来实现自定义认证
创建用户表
CREATE TABLE `sys_user` (
  `id` int(11) NOT NULL AUTO_INCREMENT,
  `account` varchar(255) DEFAULT NULL,
  `password` varchar(255) DEFAULT NULL,
  `name` varchar(255) DEFAULT NULL,
  `enabled` int(255) DEFAULT NULL,
  PRIMARY KEY (`id`)
) ENGINE=InnoDB DEFAULT CHARSET=utf8;
添加一条测试数据
INSERT INTO `sys_user` (`id`, `account`, `password`, `name`, `enabled`) VALUES ('1', 'zhangsan', '123456', '张三', '1');
<?xml version="1.0" encoding="UTF-8"?>
<project xmlns="http://maven.apache.org/POM/4.0.0" xmlns:xsi="http://www.w3.org/2001/XMLSchema-instance"
         xsi:schemaLocation="http://maven.apache.org/POM/4.0.0 https://maven.apache.org/xsd/maven-4.0.0.xsd">
    <modelVersion>4.0.0</modelVersion>
    <groupId>com.example</groupId>
    <artifactId>demo</artifactId>
    <version>0.0.1-SNAPSHOT</version>
    <name>demo</name>
    <description>Demo project for Spring Boot</description>
    <parent>
        <groupId>org.springframework.boot</groupId>
        <artifactId>spring-boot-starter-parent</artifactId>
        <version>2.7.5</version>
        <relativePath/>
    </parent>
    <properties>
        <java.version>1.8</java.version>
        <project.build.sourceEncoding>UTF-8</project.build.sourceEncoding>
        <project.reporting.outputEncoding>UTF-8</project.reporting.outputEncoding>
    </properties>

    <dependencies>
        <dependency>
            <groupId>org.springframework.boot</groupId>
            <artifactId>spring-boot-starter-web</artifactId>
        </dependency>

        <dependency>
            <groupId>org.springframework.boot</groupId>
            <artifactId>spring-boot-starter-test</artifactId>
            <scope>test</scope>
            <exclusions>
                <exclusion>
                    <groupId>org.junit.vintage</groupId>
                    <artifactId>junit-vintage-engine</artifactId>
                </exclusion>
            </exclusions>
        </dependency>
        <dependency>
            <groupId>com.alibaba</groupId>
            <artifactId>fastjson</artifactId>
            <version>2.0.11.graal</version>
        </dependency>
        <dependency>
            <groupId>commons-lang</groupId>
            <artifactId>commons-lang</artifactId>
            <version>2.6</version>
        </dependency>

        <!--spring security核心包-->
        <dependency>
            <groupId>org.springframework.boot</groupId>
            <artifactId>spring-boot-starter-security</artifactId>
        </dependency>
        <dependency>
            <groupId>org.springframework.security</groupId>
            <artifactId>spring-security-test</artifactId>
            <scope>test</scope>
        </dependency>

        <!-- 添加MyBatisPlus的依赖 -->
        <dependency>
            <groupId>com.baomidou</groupId>
            <artifactId>mybatis-plus-boot-starter</artifactId>
            <version>3.5.1</version>
        </dependency>
        <!-- MySQL数据 -->
        <dependency>
            <groupId>mysql</groupId>
            <artifactId>mysql-connector-java</artifactId>
            <version>8.0.16</version>
        </dependency>
        <!-- druid  连接池-->
        <dependency>
            <groupId>com.alibaba</groupId>
            <artifactId>druid</artifactId>
            <version>1.1.14</version>
        </dependency>
        <dependency>
            <groupId>org.projectlombok</groupId>
            <artifactId>lombok</artifactId>
            <optional>true</optional>
        </dependency>


    </dependencies>

    <dependencyManagement>
        <dependencies>
            <dependency>
                <groupId>org.springframework.boot</groupId>
                <artifactId>spring-boot-dependencies</artifactId>
                <version>${spring-boot.version}</version>
                <type>pom</type>
                <scope>import</scope>
            </dependency>
        </dependencies>
    </dependencyManagement>

    <build>
        <plugins>
            <plugin>
                <groupId>org.apache.maven.plugins</groupId>
                <artifactId>maven-compiler-plugin</artifactId>
                <version>3.8.1</version>
                <configuration>
                    <source>1.8</source>
                    <target>1.8</target>
                    <encoding>UTF-8</encoding>
                </configuration>
            </plugin>
            <plugin>
                <groupId>org.springframework.boot</groupId>
                <artifactId>spring-boot-maven-plugin</artifactId>
                <version>2.3.7.RELEASE</version>
                <configuration>
                    <mainClass>com.example.demo.DemoApplication</mainClass>
                </configuration>
                <executions>
                    <execution>
                        <id>repackage</id>
                        <goals>
                            <goal>repackage</goal>
                        </goals>
                    </execution>
                </executions>
            </plugin>
        </plugins>
    </build>

</project>
配置文件
mybatis-plus:
  configuration:
    log-impl: org.apache.ibatis.logging.stdout.StdOutImpl
  mapper-locations: classpath:mapper/*.xml
server:
  port: 8080
spring:
  application:
    name: yewu
  datasource:
    driverClassName: com.mysql.cj.jdbc.Driver
    password: 123456
    type: com.alibaba.druid.pool.DruidDataSource
    url: jdbc:mysql://192.168.23.131:13306/db1?serverTimezone=Asia/Shanghai&useUnicode=true&characterEncoding=utf-8&useSSL=true
    username: root
package com.example.demo.service.impl;
import com.baomidou.mybatisplus.core.conditions.query.QueryWrapper;
import com.example.demo.entity.SysUser;
import com.example.demo.mapper.SysUserMapper;
import lombok.extern.slf4j.Slf4j;
import org.springframework.beans.factory.annotation.Autowired;
import org.springframework.security.core.userdetails.UserDetails;
import org.springframework.security.core.userdetails.UserDetailsService;
import org.springframework.security.core.userdetails.UsernameNotFoundException;
import org.springframework.stereotype.Service;
/**
* UserDetailsService 用户查询接口
*
* @param
* @return
* @throws Exception
*/
@Slf4j
@Service
public class SysUserService implements UserDetailsService {
@Autowired
private SysUserMapper sysUserMapper;
/**
* 根据账号查询用户信息
* @param
* @return
* @throws Exception
*/
@Override
public UserDetails loadUserByUsername(String username) throws UsernameNotFoundException {
QueryWrapper<SysUser>queryWrapper=new QueryWrapper<>();
queryWrapper.eq("account",username);
SysUser sysUser = sysUserMapper.selectOne(queryWrapper);
if(sysUser==null){
log.info("用户不存在");
throw new UsernameNotFoundException("用户不存在");
}
//因为我们在实体类已经实现了UserDetails接口 所以可以直接返回
return sysUser;
}
}
package com.example.demo.mapper;

import com.baomidou.mybatisplus.core.mapper.BaseMapper;
import com.example.demo.entity.SysUser;
import org.apache.ibatis.annotations.Mapper;

@Mapper
public interface SysUserMapper extends BaseMapper<SysUser> {
}
package com.example.demo.entity;

import com.baomidou.mybatisplus.annotation.IdType;
import com.baomidou.mybatisplus.annotation.TableId;
import com.baomidou.mybatisplus.annotation.TableName;
import lombok.Data;
import org.springframework.security.core.GrantedAuthority;
import org.springframework.security.core.authority.SimpleGrantedAuthority;
import org.springframework.security.core.userdetails.UserDetails;

import java.util.Arrays;
import java.util.Collection;

/**
 * UserDetails 用户详细信息接口
 *
 * @param
 * @return
 * @throws Exception
 */
@Data
@TableName("sys_user")
public class SysUser implements UserDetails {

    @TableId(type = IdType.AUTO)
    private Integer id;

    //账号
    private String account;

    //密码
    private String password;

    //姓名
    private String name;

    //是否启用 0:否  1:是
    private Integer enabled;


    @Override
    public Collection<? extends GrantedAuthority> getAuthorities() {
        return Arrays.asList(new SimpleGrantedAuthority("ROLE_USER"));
    }

    @Override
    public String getPassword() {
        return this.password;
    }

    @Override
    public String getUsername() {
        return this.account;
    }

    @Override
    public boolean isAccountNonExpired() {
        return true;
    }

    @Override
    public boolean isAccountNonLocked() {
        return true;
    }

    @Override
    public boolean isCredentialsNonExpired() {
        return true;
    }

    //是否启用 0:否  1:是
    @Override
    public boolean isEnabled() {
        if(this.enabled==1){
            return true;
        }
        return false;
    }
}
package com.example.demo.config;
import com.example.demo.service.impl.SysUserService;
import lombok.extern.slf4j.Slf4j;
import org.springframework.beans.factory.annotation.Autowired;
import org.springframework.context.annotation.Bean;
import org.springframework.security.authentication.AuthenticationProvider;
import org.springframework.security.authentication.BadCredentialsException;
import org.springframework.security.authentication.UsernamePasswordAuthenticationToken;
import org.springframework.security.core.Authentication;
import org.springframework.security.core.AuthenticationException;
import org.springframework.security.core.userdetails.UserDetails;
import org.springframework.security.crypto.bcrypt.BCryptPasswordEncoder;
import org.springframework.security.crypto.password.PasswordEncoder;
import org.springframework.stereotype.Component;
/**
*
* 实现身份验证提供程序
* @param
* @return
* @throws Exception
*/
@Slf4j
@Component
public class MyAuthenticationProvider implements AuthenticationProvider {
@Autowired
private SysUserService sysUserService;
@Autowired
private PasswordEncoder passwordEncoder;
/**
*
* 登陆认证
* @param
* @return
* @throws Exception
*/
@Override
public Authentication authenticate(Authentication authentication) throws AuthenticationException {
//从authentication获取用户名和凭证(密码)信息
String username=authentication.getName();
String password=authentication.getCredentials().toString();
log.info("密码=========================={}",password);
//查询用户是否存在
UserDetails userDetails = sysUserService.loadUserByUsername(username);
//比较和数据库的密码是否一样
if(passwordEncoder.matches(password,userDetails.getPassword())){
//返回用户名密码认证令牌
//因为UsernamePasswordAuthenticationToken的上级父类的父类是Authentication 所以可以直接返回
return new UsernamePasswordAuthenticationToken(username,password,userDetails.getAuthorities());
}else {
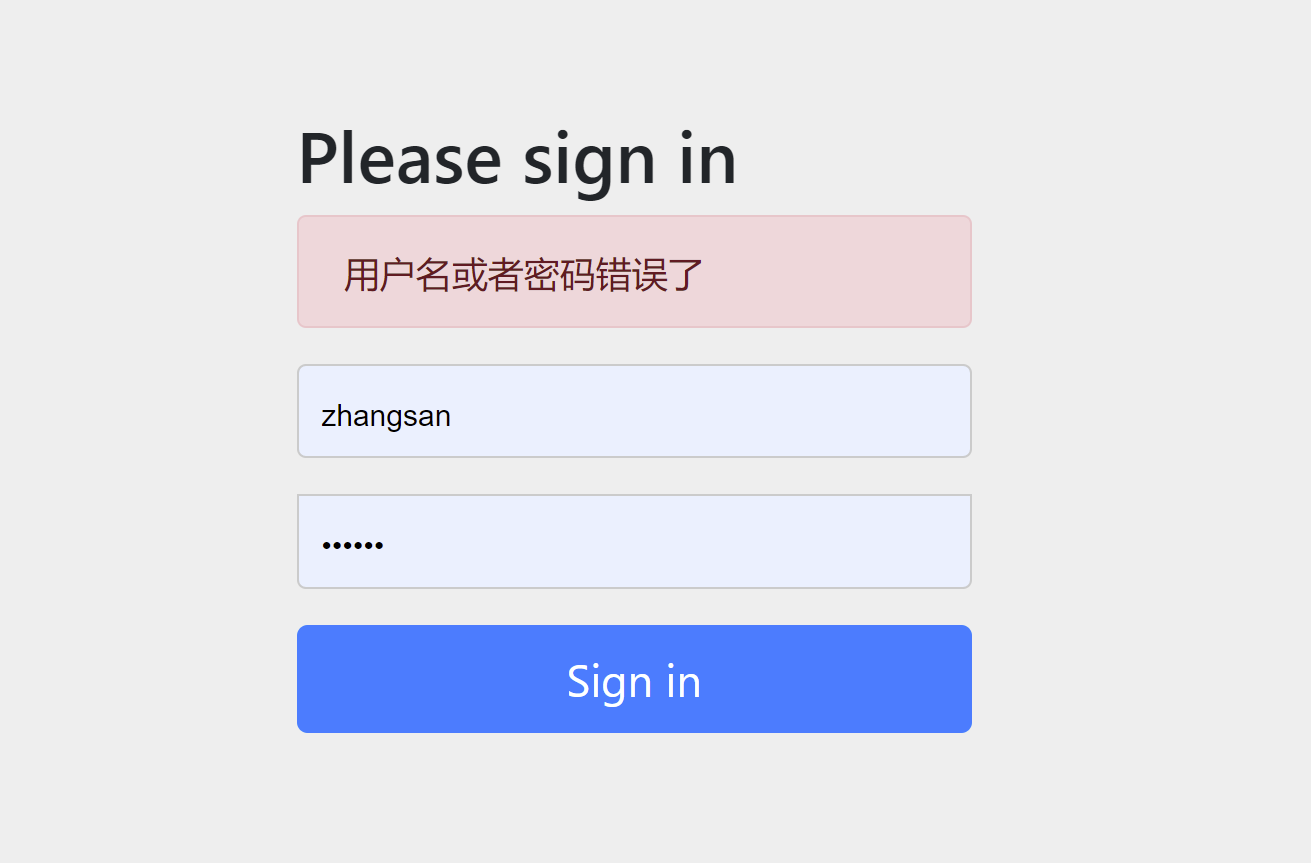
throw new BadCredentialsException("用户名或者密码错误了");
}
}
@Override
public boolean supports(Class<?> authentication) {
//保证认证和返回的对象都是UsernamePasswordAuthenticationToken
return authentication.equals(UsernamePasswordAuthenticationToken.class);
}
}package com.example.demo.config;
import com.example.demo.service.impl.SysUserService;
import lombok.extern.slf4j.Slf4j;
import org.springframework.beans.factory.annotation.Autowired;
import org.springframework.context.annotation.Bean;
import org.springframework.context.annotation.Configuration;
import org.springframework.security.authentication.AuthenticationProvider;
import org.springframework.security.authentication.BadCredentialsException;
import org.springframework.security.authentication.UsernamePasswordAuthenticationToken;
import org.springframework.security.config.annotation.web.builders.HttpSecurity;
import org.springframework.security.core.Authentication;
import org.springframework.security.core.AuthenticationException;
import org.springframework.security.core.userdetails.UserDetails;
import org.springframework.security.crypto.bcrypt.BCryptPasswordEncoder;
import org.springframework.security.crypto.password.PasswordEncoder;
import org.springframework.security.web.SecurityFilterChain;
/**
*
* 安全配置类
* @param
* @return
* @throws Exception
*/
@Slf4j
@Configuration
public class SpringSecurityConfig {
//密码加密
@Bean
public PasswordEncoder passwordEncoder(){
return new BCryptPasswordEncoder();
}
/**
*
* 安全过滤器链
* @param
* @return
* @throws Exception
*/
@Bean
public SecurityFilterChain securityFilterChain(HttpSecurity http) throws Exception {
//对那些请求进行拦截
http.formLogin()
.and()
.authorizeRequests()
.anyRequest()
.authenticated();
//创建对象
return http.build();
}
}
生成密码 放入数据库中
package com.example.demo.config;

import org.apache.tomcat.util.security.MD5Encoder;
import org.springframework.security.crypto.bcrypt.BCryptPasswordEncoder;
import org.springframework.security.crypto.password.PasswordEncoder;

public class Test {


    public static void main(String[] args) {
        BCryptPasswordEncoder bCryptPasswordEncoder=new BCryptPasswordEncoder();
        String encode = bCryptPasswordEncoder.encode("123456");
        System.out.println(encode);
    }
}

再次登陆 输入zhangsan 123456 登陆成功
输入错误的账号密码 登陆失败
当我们使用下面的代码的时候,每次都需要一次登陆,适合http基础认证,保证了接口的安全
//无状态的 不会创建session会话 每次都进行新的认证
http.sessionManagement().sessionCreationPolicy(SessionCreationPolicy.STATELESS);
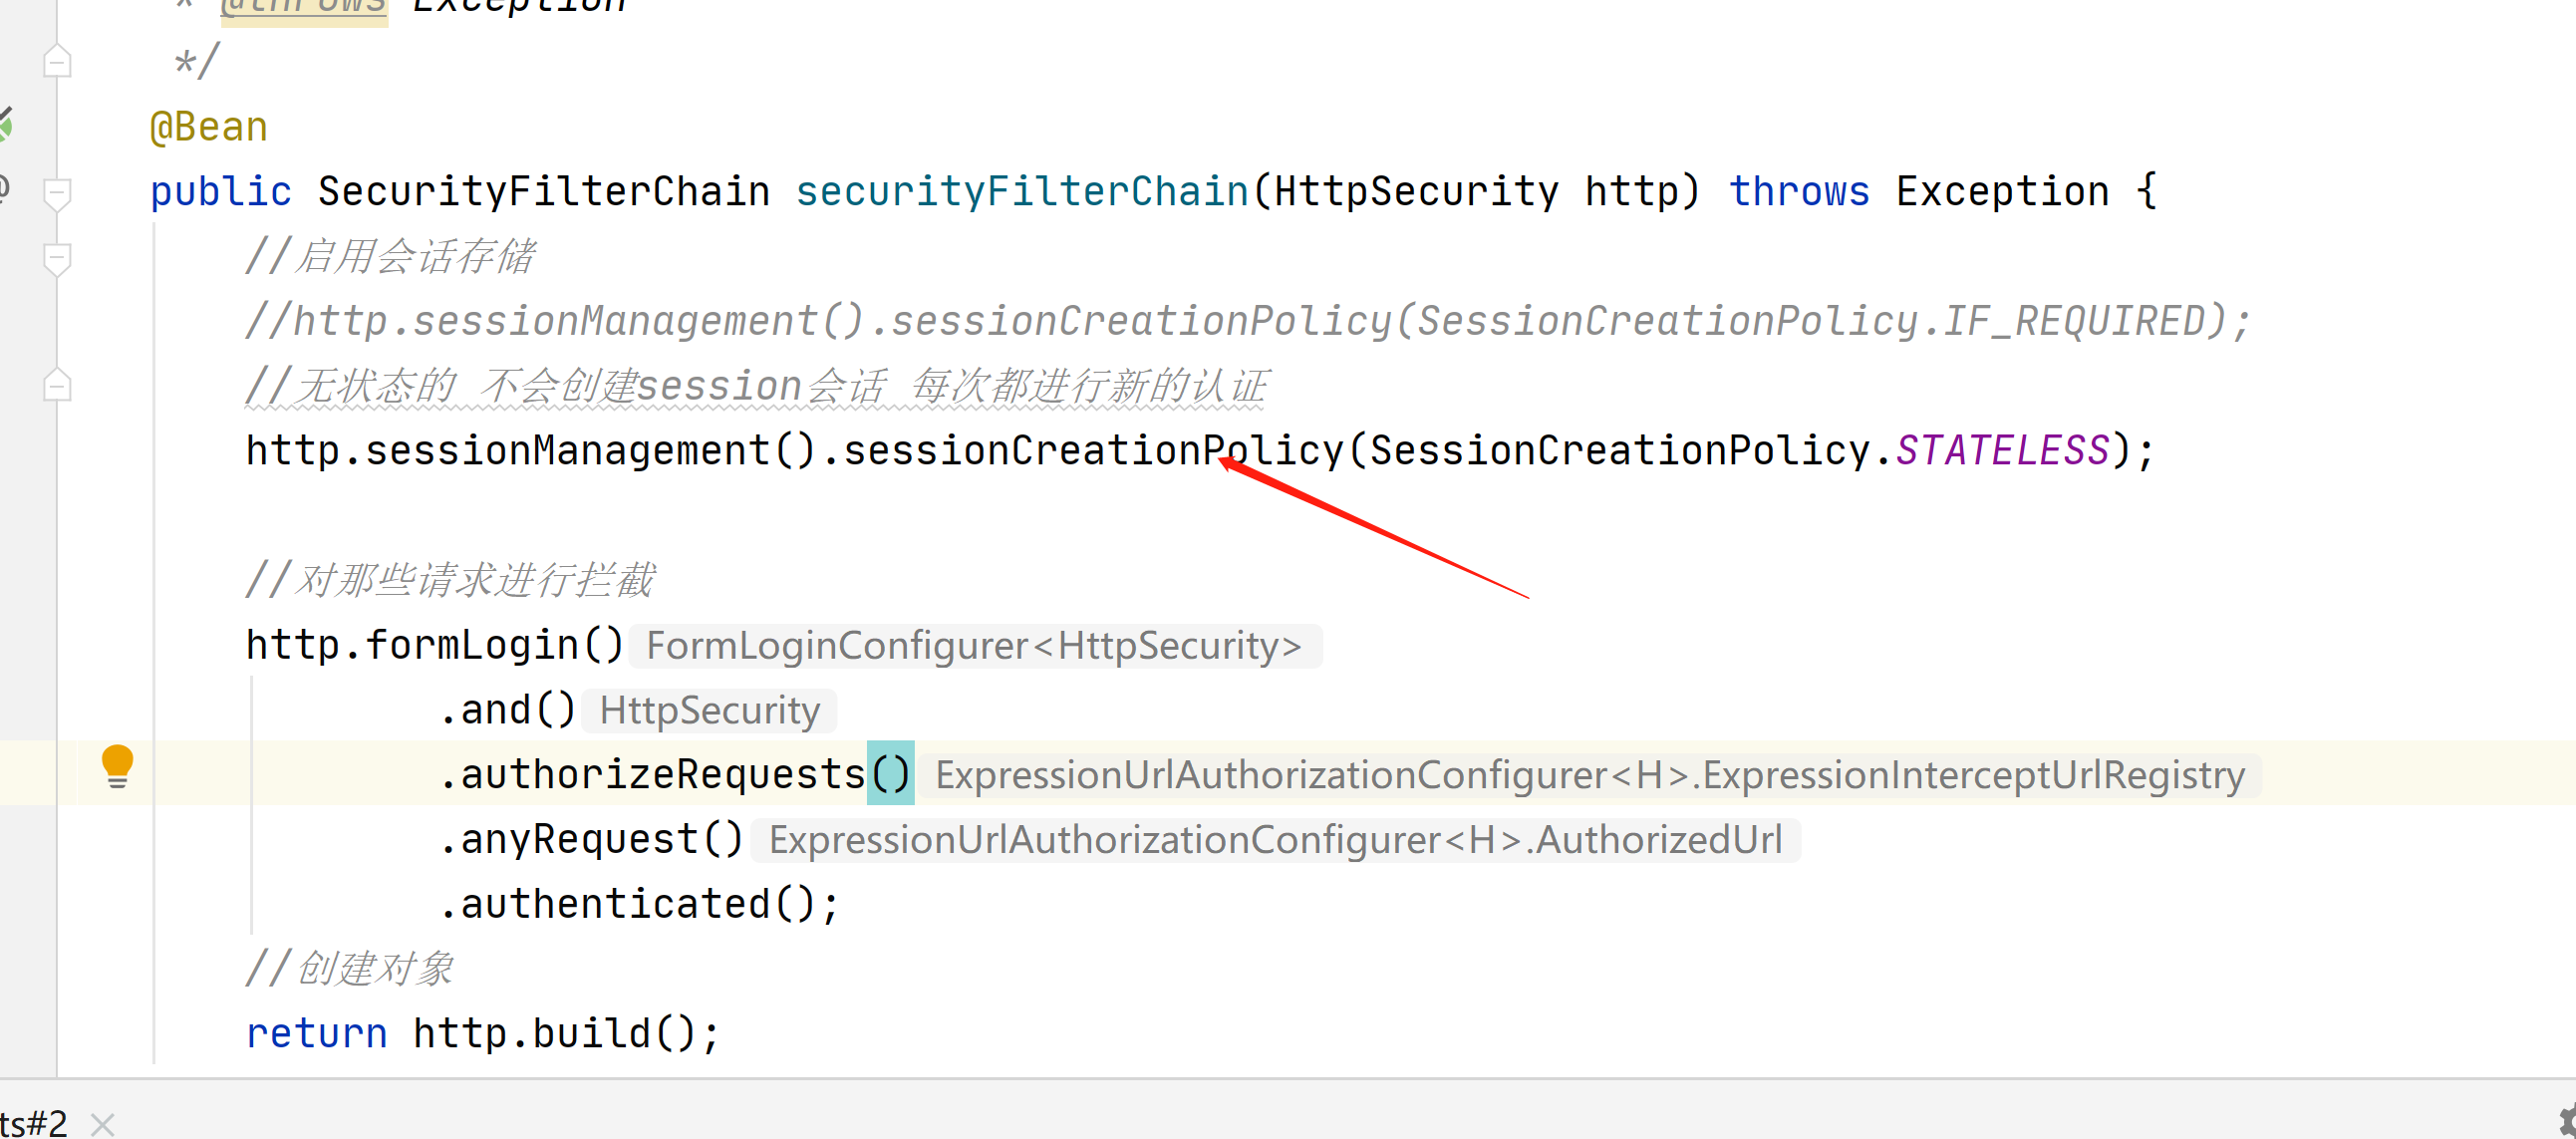
当使用表单登陆的时候,就需要session会话了,不用每次都登陆
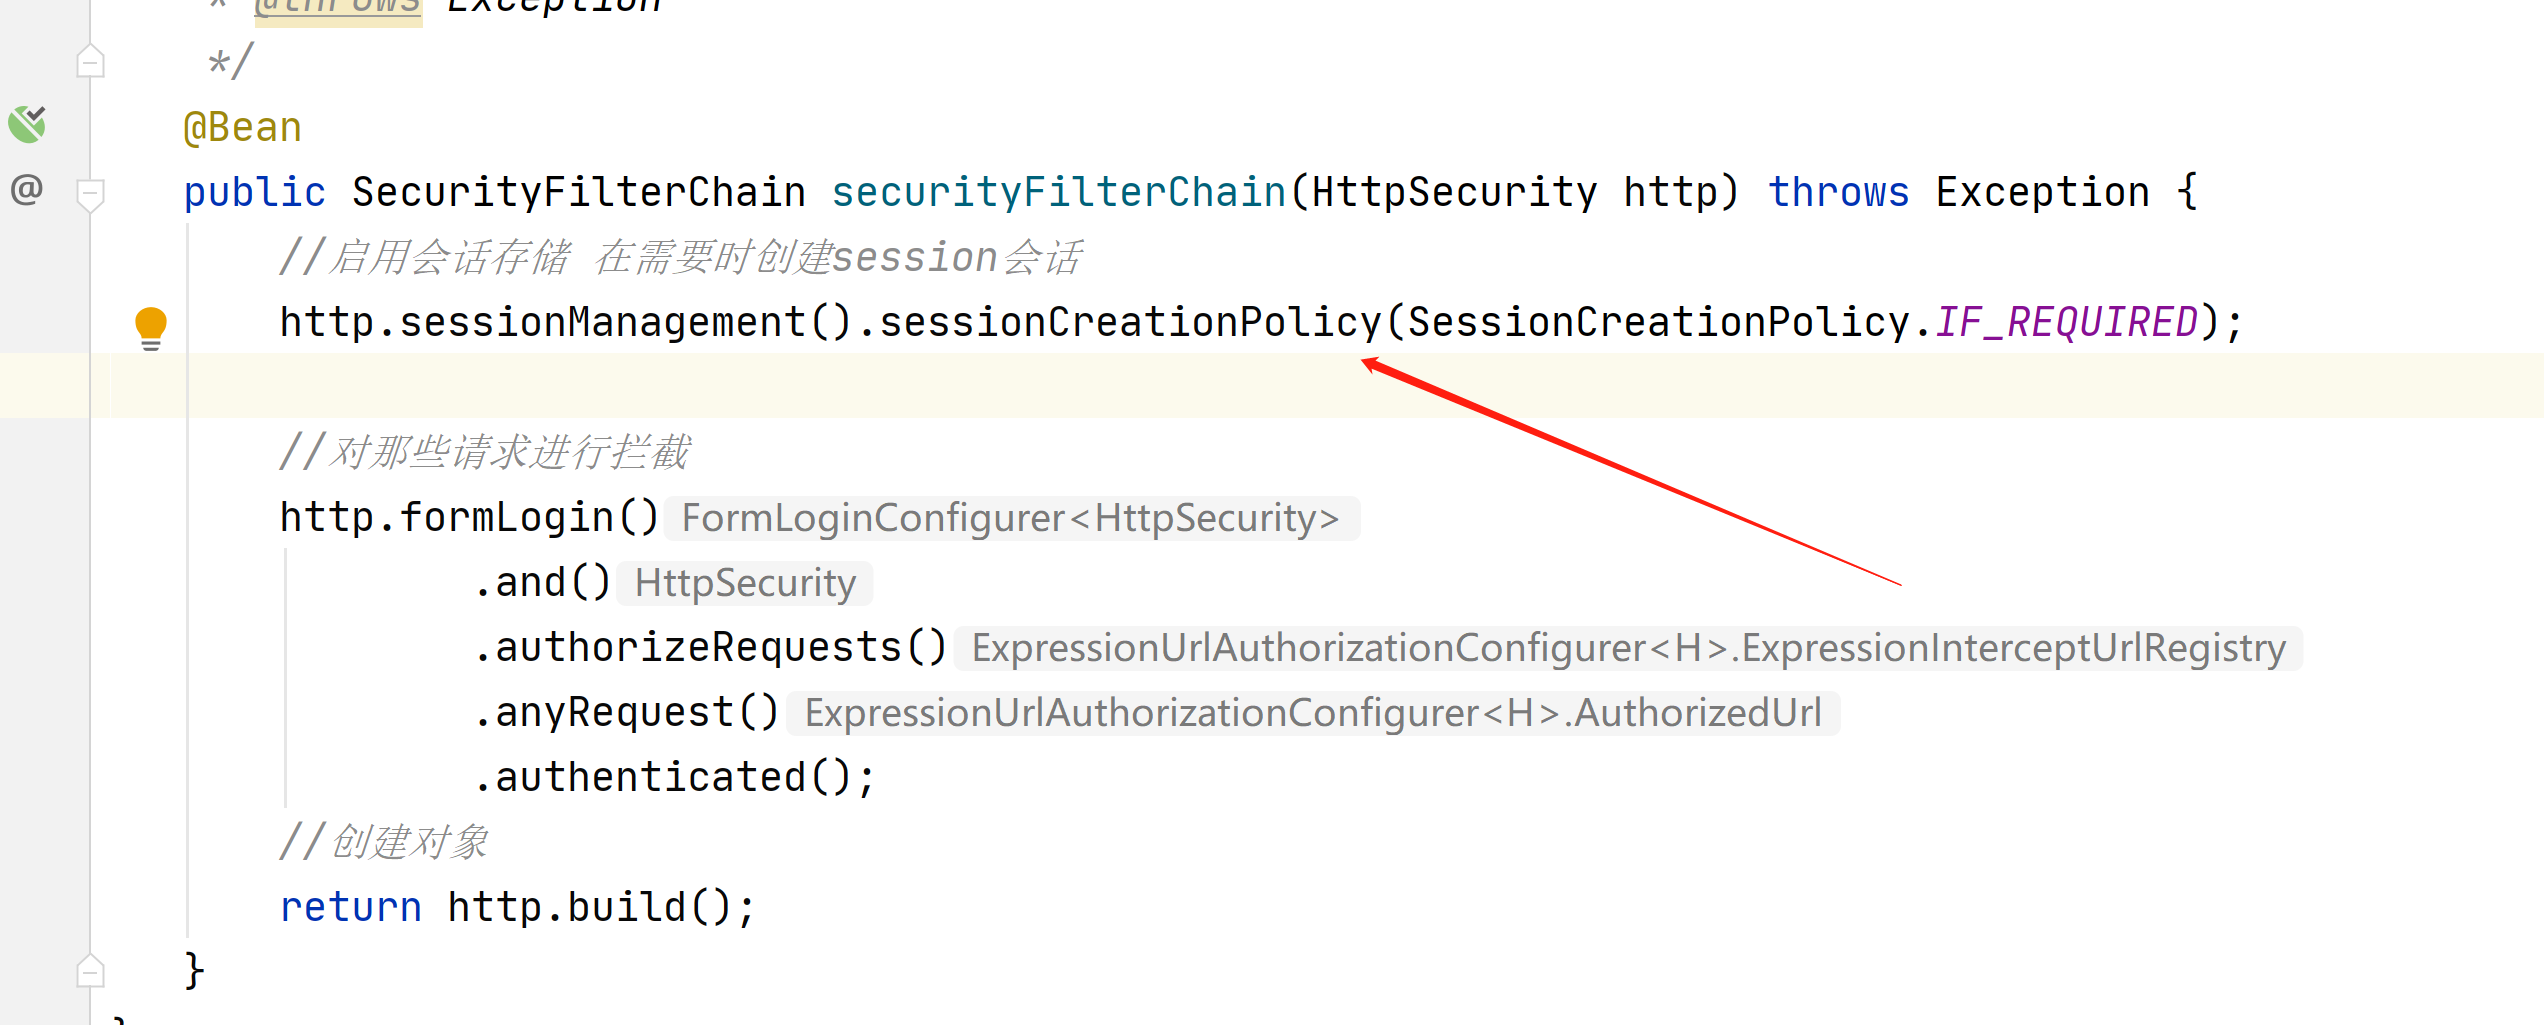
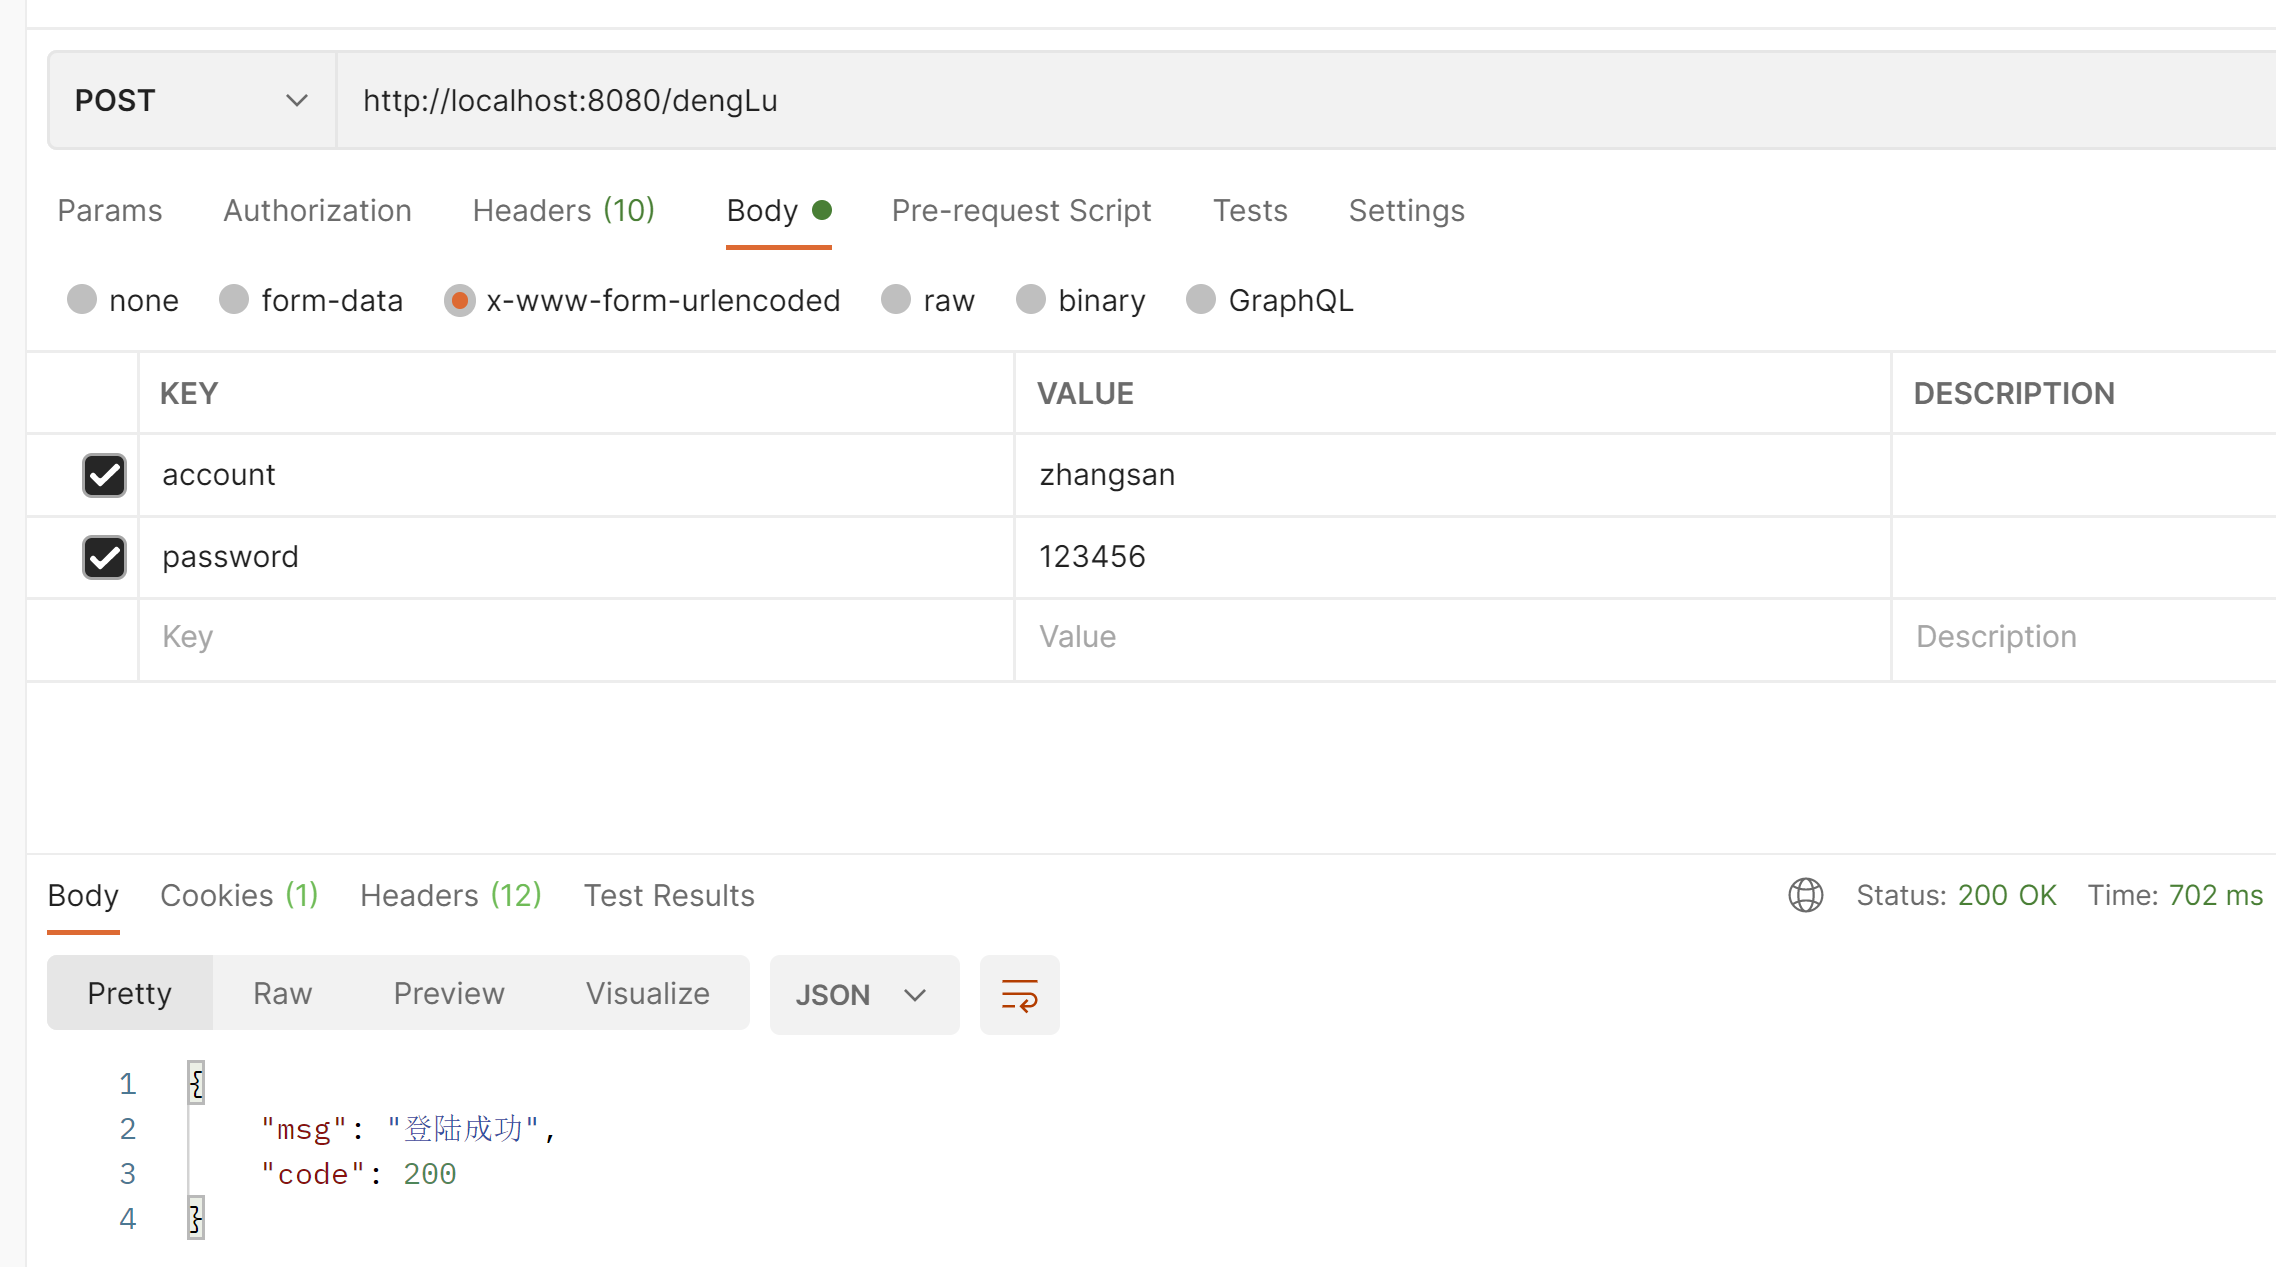
接下来我们创建一个自定义的登陆界面
在static目录下创建login.html
<!DOCTYPE html>
<html lang="en">
<head>
    <meta charset="UTF-8">
    <title>Title</title>
</head>
<body>

<form method="post" action="/dengLu">
    账号:<input type="text" name="account" value="">
    密码:<input type="text" name="password" value="">
    <input type="submit" value="登陆">
</form>

</body>
</html>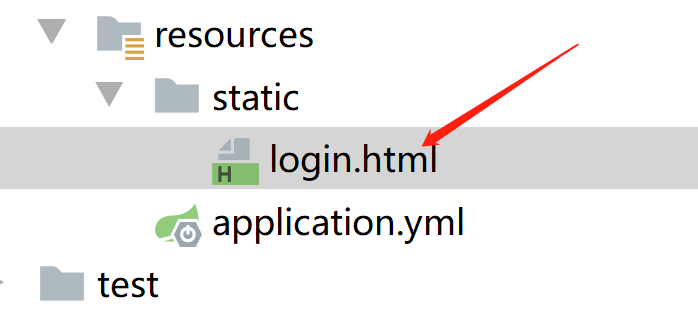
package com.example.demo.config;
import com.example.demo.service.impl.SysUserService;
import lombok.extern.slf4j.Slf4j;
import org.springframework.beans.factory.annotation.Autowired;
import org.springframework.context.annotation.Bean;
import org.springframework.context.annotation.Configuration;
import org.springframework.security.authentication.AuthenticationProvider;
import org.springframework.security.authentication.BadCredentialsException;
import org.springframework.security.authentication.UsernamePasswordAuthenticationToken;
import org.springframework.security.config.annotation.web.builders.HttpSecurity;
import org.springframework.security.config.http.SessionCreationPolicy;
import org.springframework.security.core.Authentication;
import org.springframework.security.core.AuthenticationException;
import org.springframework.security.core.userdetails.UserDetails;
import org.springframework.security.crypto.bcrypt.BCryptPasswordEncoder;
import org.springframework.security.crypto.password.PasswordEncoder;
import org.springframework.security.web.SecurityFilterChain;
/**
*
* 安全配置类
* @param
* @return
* @throws Exception
*/
@Slf4j
@Configuration
public class SpringSecurityConfig {
//密码加密
@Bean
public PasswordEncoder passwordEncoder(){
return new BCryptPasswordEncoder();
}
/**
*
* 安全过滤器链
* @param
* @return
* @throws Exception
*/
@Bean
public SecurityFilterChain securityFilterChain(HttpSecurity http) throws Exception {
//启用会话存储 在需要时创建session会话
http.sessionManagement().sessionCreationPolicy(SessionCreationPolicy.IF_REQUIRED);
//对那些请求进行拦截
http.authorizeRequests()
//任何请求都拦截
.anyRequest().authenticated()
.and()
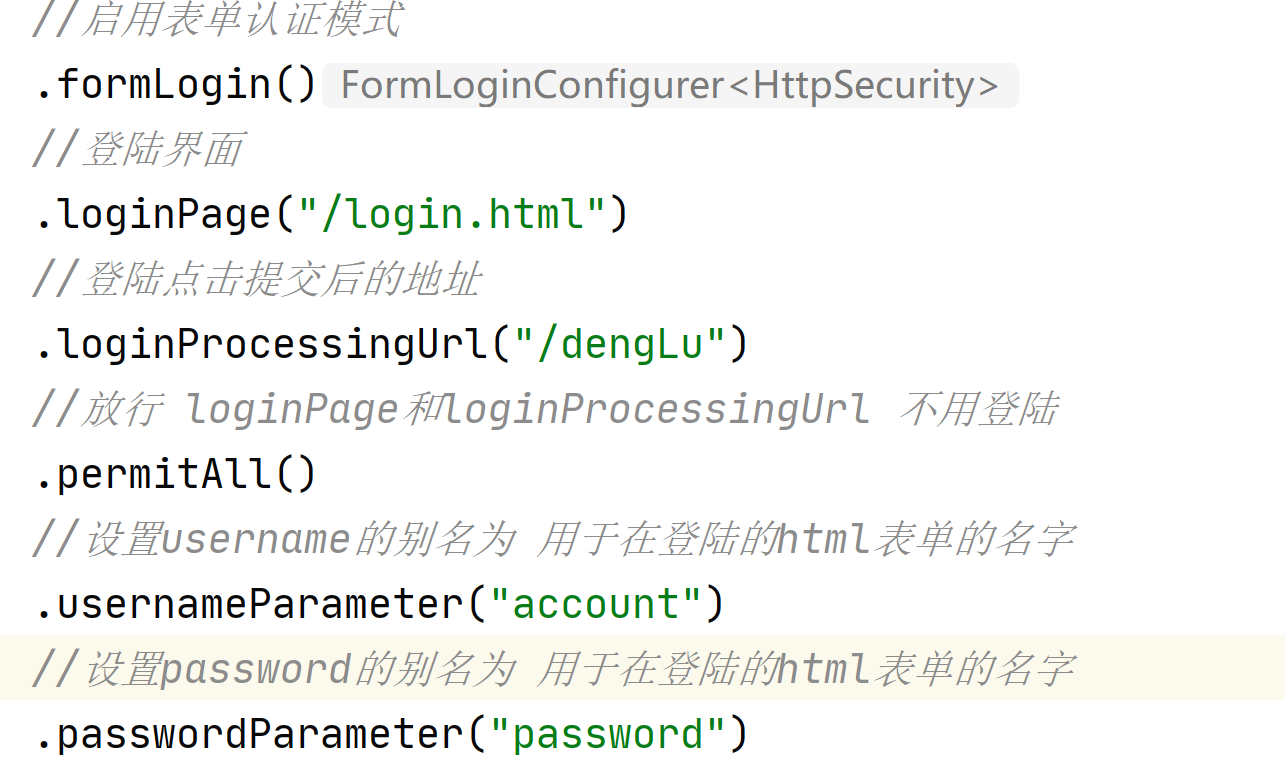
//启用表单认证模式
.formLogin()
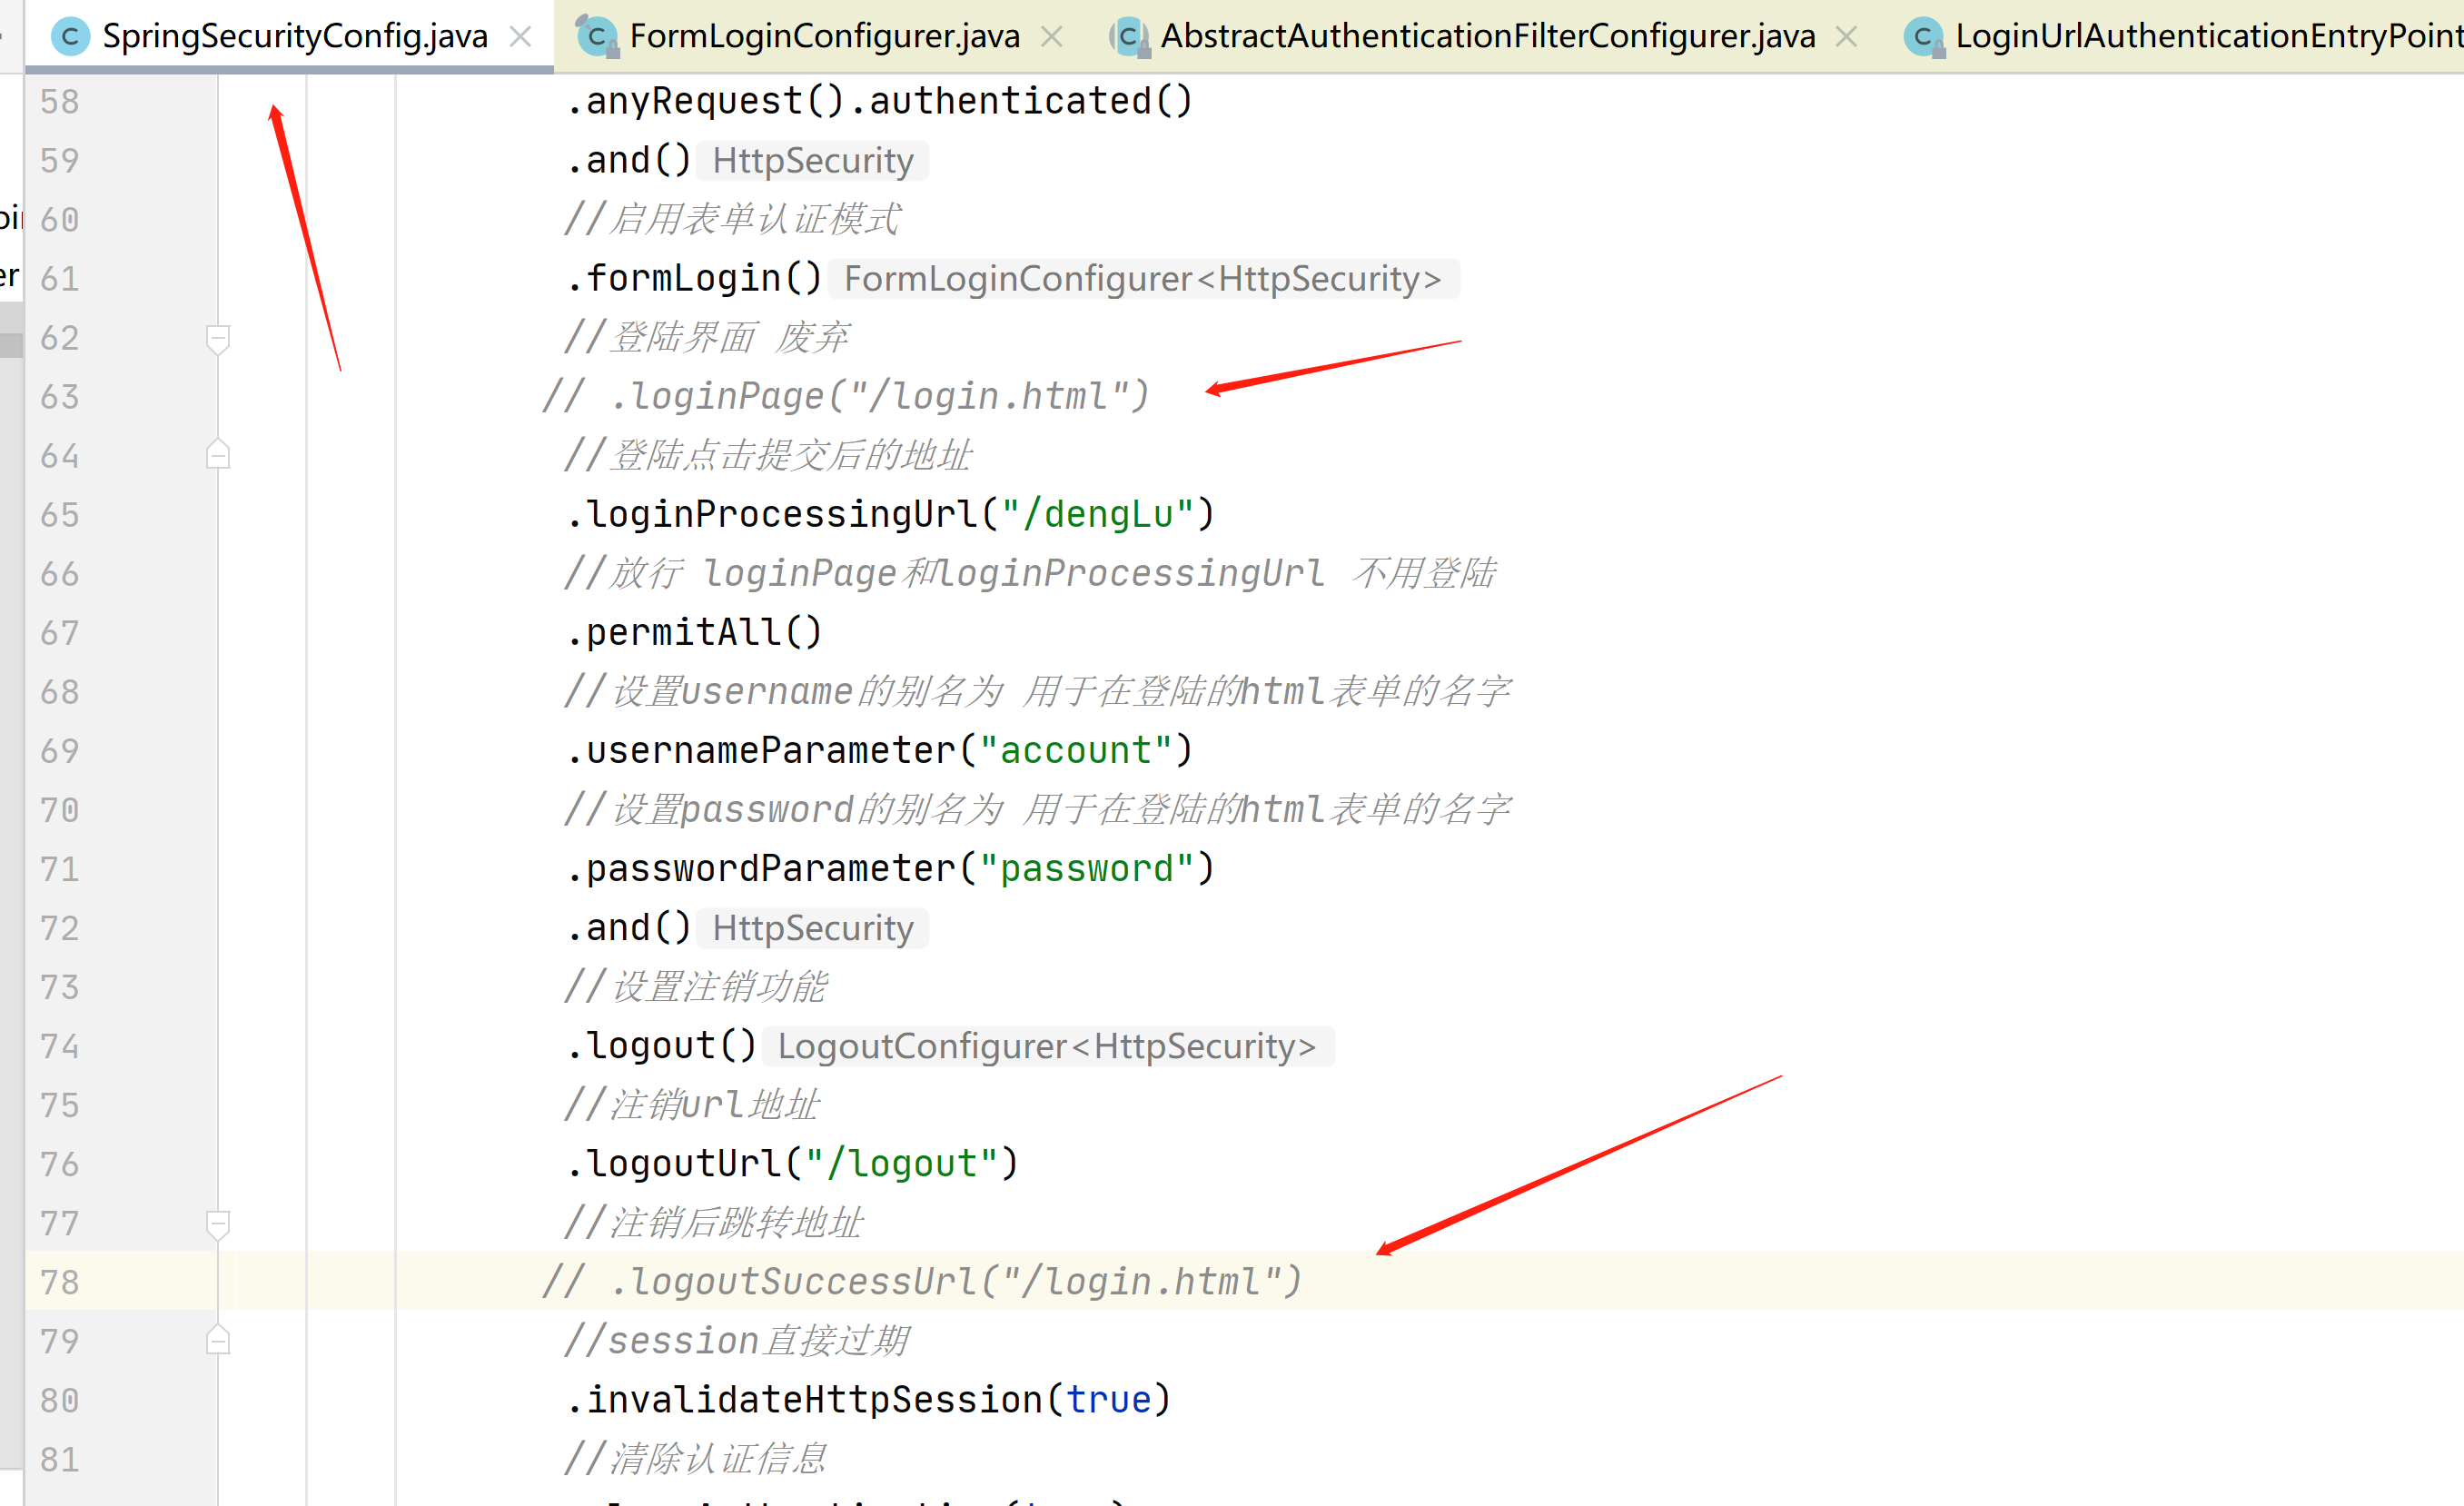
//登陆界面
.loginPage("/login.html")
//登陆点击提交后的地址
.loginProcessingUrl("/dengLu")
//放行 loginPage和loginProcessingUrl 不用登陆
.permitAll()
//设置username的别名为 用于在登陆的html表单的名字
.usernameParameter("account")
//设置password的别名为 用于在登陆的html表单的名字
.passwordParameter("password")
.and()
//设置注销功能
.logout()
//注销url地址
.logoutUrl("/logout")
//注销后跳转地址
.logoutSuccessUrl("/login.html")
//session直接过期
.invalidateHttpSession(true)
//清除认证信息
.clearAuthentication(true)
.and()
//禁用csrf安全防护
.csrf().disable();
//创建对象
return http.build();
}
}
这一部分是登陆信息
这一部分是注销信息

每一部分都用.and来开启新的设置
我们可以在源码看到,默认的用户名和密码字段,就叫这个

然后我们再次登陆
自动跳转到了,我们自定义的登陆界面

输入退出
退出后又跳转到了登陆界面
然后我们在访问
发现退出后,就需要再次登陆了
当我们使用微服务的时候,就不在使用自带的html了,而是使用vue前后端分离的场景
接下来我们来看下,怎么返回json数据
我们先把登陆地址和注销后跳转地址注释掉,因为已经用不到了
package com.example.demo.config;
import com.fasterxml.jackson.databind.ObjectMapper;
import org.springframework.security.core.AuthenticationException;
import org.springframework.security.web.AuthenticationEntryPoint;
import org.springframework.stereotype.Component;
import javax.servlet.ServletException;
import javax.servlet.http.HttpServletRequest;
import javax.servlet.http.HttpServletResponse;
import java.io.IOException;
import java.io.PrintWriter;
import java.util.HashMap;
import java.util.Map;
/**
* 我的身份验证入口点
* 没有登陆认证 异常处理器
* @param
* @return
* @throws Exception
*/
@Component
public class MyAuthenticationEntryPoint implements AuthenticationEntryPoint {
@Override
public void commence(HttpServletRequest request, HttpServletResponse response, AuthenticationException authException) throws IOException, ServletException {
//返回json格式
response.setContentType("application/json;charset=utf-8");
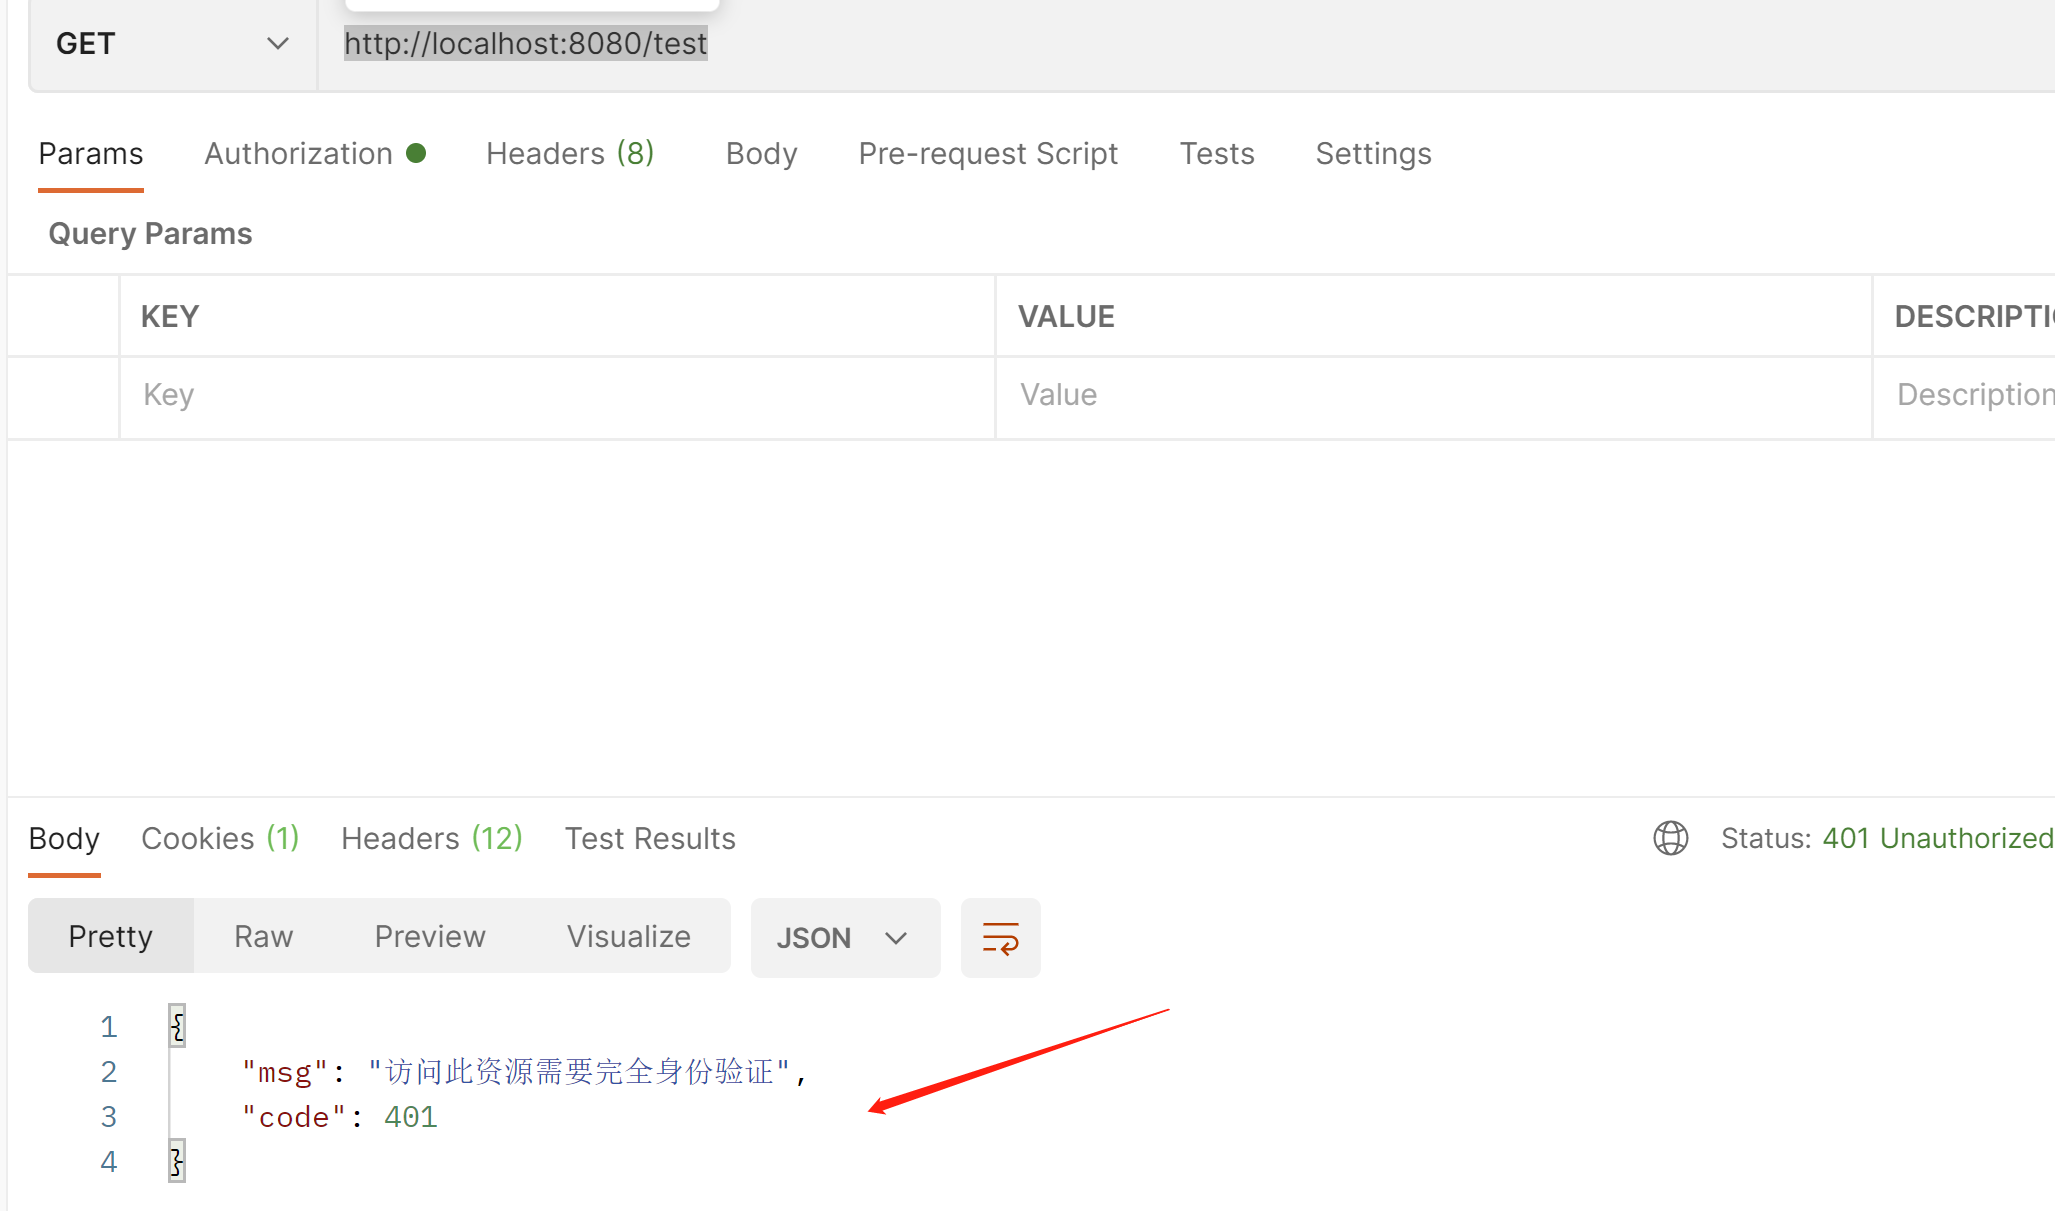
//没有登陆 直接访问其他接口 就报401
response.setStatus(401);
Map<String,Object> map=new HashMap<>();
map.put("code",401);
map.put("msg","访问此资源需要完全身份验证");
ObjectMapper objectMapper=new ObjectMapper();
String s=objectMapper.writeValueAsString(map);
//把json数据 写入 返回给前端
PrintWriter writer=response.getWriter();
writer.write(s);
writer.flush();
writer.close();
}
}
package com.example.demo.config;

import com.example.demo.service.impl.SysUserService;
import lombok.extern.slf4j.Slf4j;
import org.springframework.beans.factory.annotation.Autowired;
import org.springframework.context.annotation.Bean;
import org.springframework.context.annotation.Configuration;
import org.springframework.security.authentication.AuthenticationProvider;
import org.springframework.security.authentication.BadCredentialsException;
import org.springframework.security.authentication.UsernamePasswordAuthenticationToken;
import org.springframework.security.config.annotation.web.builders.HttpSecurity;
import org.springframework.security.config.http.SessionCreationPolicy;
import org.springframework.security.core.Authentication;
import org.springframework.security.core.AuthenticationException;
import org.springframework.security.core.userdetails.UserDetails;
import org.springframework.security.crypto.bcrypt.BCryptPasswordEncoder;
import org.springframework.security.crypto.password.PasswordEncoder;
import org.springframework.security.web.SecurityFilterChain;

/**
 *
 * 安全配置类
 * @param
 * @return
 * @throws Exception
 */
@Slf4j
@Configuration
public class SpringSecurityConfig  {

    @Autowired
    private MyAuthenticationEntryPoint myAuthenticationEntryPoint;

    //密码加密
    @Bean
    public PasswordEncoder passwordEncoder(){
        return new BCryptPasswordEncoder();
    }


   /**
    *
    * 安全过滤器链
    * @param
    * @return
    * @throws Exception
    */
   @Bean
   public SecurityFilterChain securityFilterChain(HttpSecurity http) throws Exception {
       //启用会话存储 在需要时创建session会话
       http.sessionManagement().sessionCreationPolicy(SessionCreationPolicy.IF_REQUIRED);

       //把没有登陆 直接访问的 异常信息添加进来
       http.exceptionHandling().authenticationEntryPoint(myAuthenticationEntryPoint)
               //任何请求都拦截
               .and().
               authorizeRequests()
               .anyRequest().authenticated()
               .and()
               //启用表单认证模式
               .formLogin()
               //登陆界面 废弃
              // .loginPage("/login.html")
               //登陆点击提交后的地址
               .loginProcessingUrl("/dengLu")
               //放行 loginPage和loginProcessingUrl 不用登陆
               .permitAll()
               //设置username的别名为 用于在登陆的html表单的名字
               .usernameParameter("account")
               //设置password的别名为 用于在登陆的html表单的名字
               .passwordParameter("password")
               .and()
               //设置注销功能
               .logout()
               //注销url地址
               .logoutUrl("/logout")
               //注销后跳转地址
              // .logoutSuccessUrl("/login.html")
               //session直接过期
               .invalidateHttpSession(true)
               //清除认证信息
               .clearAuthentication(true)
               .and()
               //禁用csrf安全防护
               .csrf().disable();
       //创建对象
       return http.build();
   }
}
我们再次访问,没有登陆,会报下面的json格式的提示信息
接下来我们在看登陆成功和失败的提示信息
package com.example.demo.config;

import com.fasterxml.jackson.databind.ObjectMapper;
import org.springframework.security.core.Authentication;
import org.springframework.security.web.authentication.AuthenticationSuccessHandler;
import org.springframework.stereotype.Component;

import javax.servlet.ServletException;
import javax.servlet.http.HttpServletRequest;
import javax.servlet.http.HttpServletResponse;
import java.io.IOException;
import java.io.PrintWriter;
import java.util.HashMap;
import java.util.Map;

/**
 * 登陆成功后返回的提示信息
 * 身份验证成功处理程序
 * @param
 * @return
 * @throws Exception
 */
@Component
public class MyAuthenticationSuccessHandler implements AuthenticationSuccessHandler {
    @Override
    public void onAuthenticationSuccess(HttpServletRequest request, HttpServletResponse response, Authentication authentication) throws IOException, ServletException {
        //返回json格式
        response.setContentType("application/json;charset=utf-8");
        //没有登陆 直接访问其他接口 就报401
        response.setStatus(200);
        Map<String,Object> map=new HashMap<>();
        map.put("code",200);
        map.put("msg","登陆成功");
        ObjectMapper objectMapper=new ObjectMapper();
        String s=objectMapper.writeValueAsString(map);
        //把json数据 写入 返回给前端
        PrintWriter writer=response.getWriter();
        writer.write(s);
        writer.flush();
        writer.close();
    }
}
package com.example.demo.config;

import com.fasterxml.jackson.databind.ObjectMapper;
import org.springframework.security.core.AuthenticationException;
import org.springframework.security.web.authentication.AuthenticationFailureHandler;
import org.springframework.stereotype.Component;

import javax.servlet.ServletException;
import javax.servlet.http.HttpServletRequest;
import javax.servlet.http.HttpServletResponse;
import java.io.IOException;
import java.io.PrintWriter;
import java.util.HashMap;
import java.util.Map;

/**
 * 登陆失败返回的提示信息
 * 身份验证失败处理程序
 * @param
 * @return
 * @throws Exception
 */
@Component
public class MyAuthenticationFailureHandler implements AuthenticationFailureHandler {

    @Override
    public void onAuthenticationFailure(HttpServletRequest request, HttpServletResponse response, AuthenticationException exception) throws IOException, ServletException {
        //返回json格式
        response.setContentType("application/json;charset=utf-8");
        //没有登陆 直接访问其他接口 就报401
        response.setStatus(403);
        Map<String,Object> map=new HashMap<>();
        map.put("code",403);
        map.put("msg","登陆失败");
        ObjectMapper objectMapper=new ObjectMapper();
        String s=objectMapper.writeValueAsString(map);
        //把json数据 写入 返回给前端
        PrintWriter writer=response.getWriter();
        writer.write(s);
        writer.flush();
        writer.close();
    }
}
package com.example.demo.config;

import com.fasterxml.jackson.databind.ObjectMapper;
import org.springframework.security.core.Authentication;
import org.springframework.security.web.authentication.logout.LogoutSuccessHandler;
import org.springframework.stereotype.Component;

import javax.servlet.ServletException;
import javax.servlet.http.HttpServletRequest;
import javax.servlet.http.HttpServletResponse;
import java.io.IOException;
import java.io.PrintWriter;
import java.util.HashMap;
import java.util.Map;

/**
 * 注销成功处理程序
 * 注销成功提示信息
 * @param
 * @return
 * @throws Exception
 */
@Component
public class MyLogoutSuccessHandler implements LogoutSuccessHandler {
    @Override
    public void onLogoutSuccess(HttpServletRequest request, HttpServletResponse response, Authentication authentication) throws IOException, ServletException {
        //返回json格式
        response.setContentType("application/json;charset=utf-8");
        //没有登陆 直接访问其他接口 就报401
        response.setStatus(200);
        Map<String,Object> map=new HashMap<>();
        map.put("code",200);
        map.put("msg","注销成功");
        ObjectMapper objectMapper=new ObjectMapper();
        String s=objectMapper.writeValueAsString(map);
        //把json数据 写入 返回给前端
        PrintWriter writer=response.getWriter();
        writer.write(s);
        writer.flush();
        writer.close();
    }
}
package com.example.demo.config;

import com.example.demo.service.impl.SysUserService;
import lombok.extern.slf4j.Slf4j;
import org.springframework.beans.factory.annotation.Autowired;
import org.springframework.context.annotation.Bean;
import org.springframework.context.annotation.Configuration;
import org.springframework.security.authentication.AuthenticationProvider;
import org.springframework.security.authentication.BadCredentialsException;
import org.springframework.security.authentication.UsernamePasswordAuthenticationToken;
import org.springframework.security.config.annotation.web.builders.HttpSecurity;
import org.springframework.security.config.http.SessionCreationPolicy;
import org.springframework.security.core.Authentication;
import org.springframework.security.core.AuthenticationException;
import org.springframework.security.core.userdetails.UserDetails;
import org.springframework.security.crypto.bcrypt.BCryptPasswordEncoder;
import org.springframework.security.crypto.password.PasswordEncoder;
import org.springframework.security.web.SecurityFilterChain;

/**
 *
 * 安全配置类
 * @param
 * @return
 * @throws Exception
 */
@Slf4j
@Configuration
public class SpringSecurityConfig  {

    @Autowired
    private MyAuthenticationEntryPoint myAuthenticationEntryPoint;

    @Autowired
    private MyAuthenticationSuccessHandler myAuthenticationSuccessHandler;

    @Autowired
    private MyAuthenticationFailureHandler myAuthenticationFailureHandler;

    @Autowired
    private MyLogoutSuccessHandler myLogoutSuccessHandler;

    //密码加密
    @Bean
    public PasswordEncoder passwordEncoder(){
        return new BCryptPasswordEncoder();
    }


   /**
    *
    * 安全过滤器链
    * @param
    * @return
    * @throws Exception
    */
   @Bean
   public SecurityFilterChain securityFilterChain(HttpSecurity http) throws Exception {
       //启用会话存储 在需要时创建session会话
       http.sessionManagement().sessionCreationPolicy(SessionCreationPolicy.IF_REQUIRED);

       //把没有登陆 直接访问的 异常信息添加进来
       http.exceptionHandling().authenticationEntryPoint(myAuthenticationEntryPoint)
               //任何请求都拦截
               .and().
               authorizeRequests()
               .anyRequest().authenticated()
               .and()
               //启用表单认证模式
               .formLogin()
               //登陆成功返回的提示信息
               .successHandler(myAuthenticationSuccessHandler)
               //登陆失败的返回提示信息
               .failureHandler(myAuthenticationFailureHandler)
               //登陆界面 废弃
              // .loginPage("/login.html")
               //登陆点击提交后的地址
               .loginProcessingUrl("/dengLu")
               //放行 loginPage和loginProcessingUrl 不用登陆
               .permitAll()
               //设置username的别名为 用于在登陆的html表单的名字
               .usernameParameter("account")
               //设置password的别名为 用于在登陆的html表单的名字
               .passwordParameter("password")
               .and()
               //设置注销功能
               .logout()
               //注销成功的提示信息
               .logoutSuccessHandler(myLogoutSuccessHandler)
               //注销url地址
               .logoutUrl("/logout")
               //注销后跳转地址
              // .logoutSuccessUrl("/login.html")
               //session直接过期
               .invalidateHttpSession(true)
               //清除认证信息
               .clearAuthentication(true)
               .and()
               //禁用csrf安全防护
               .csrf().disable();
       //创建对象
       return http.build();
   }
}
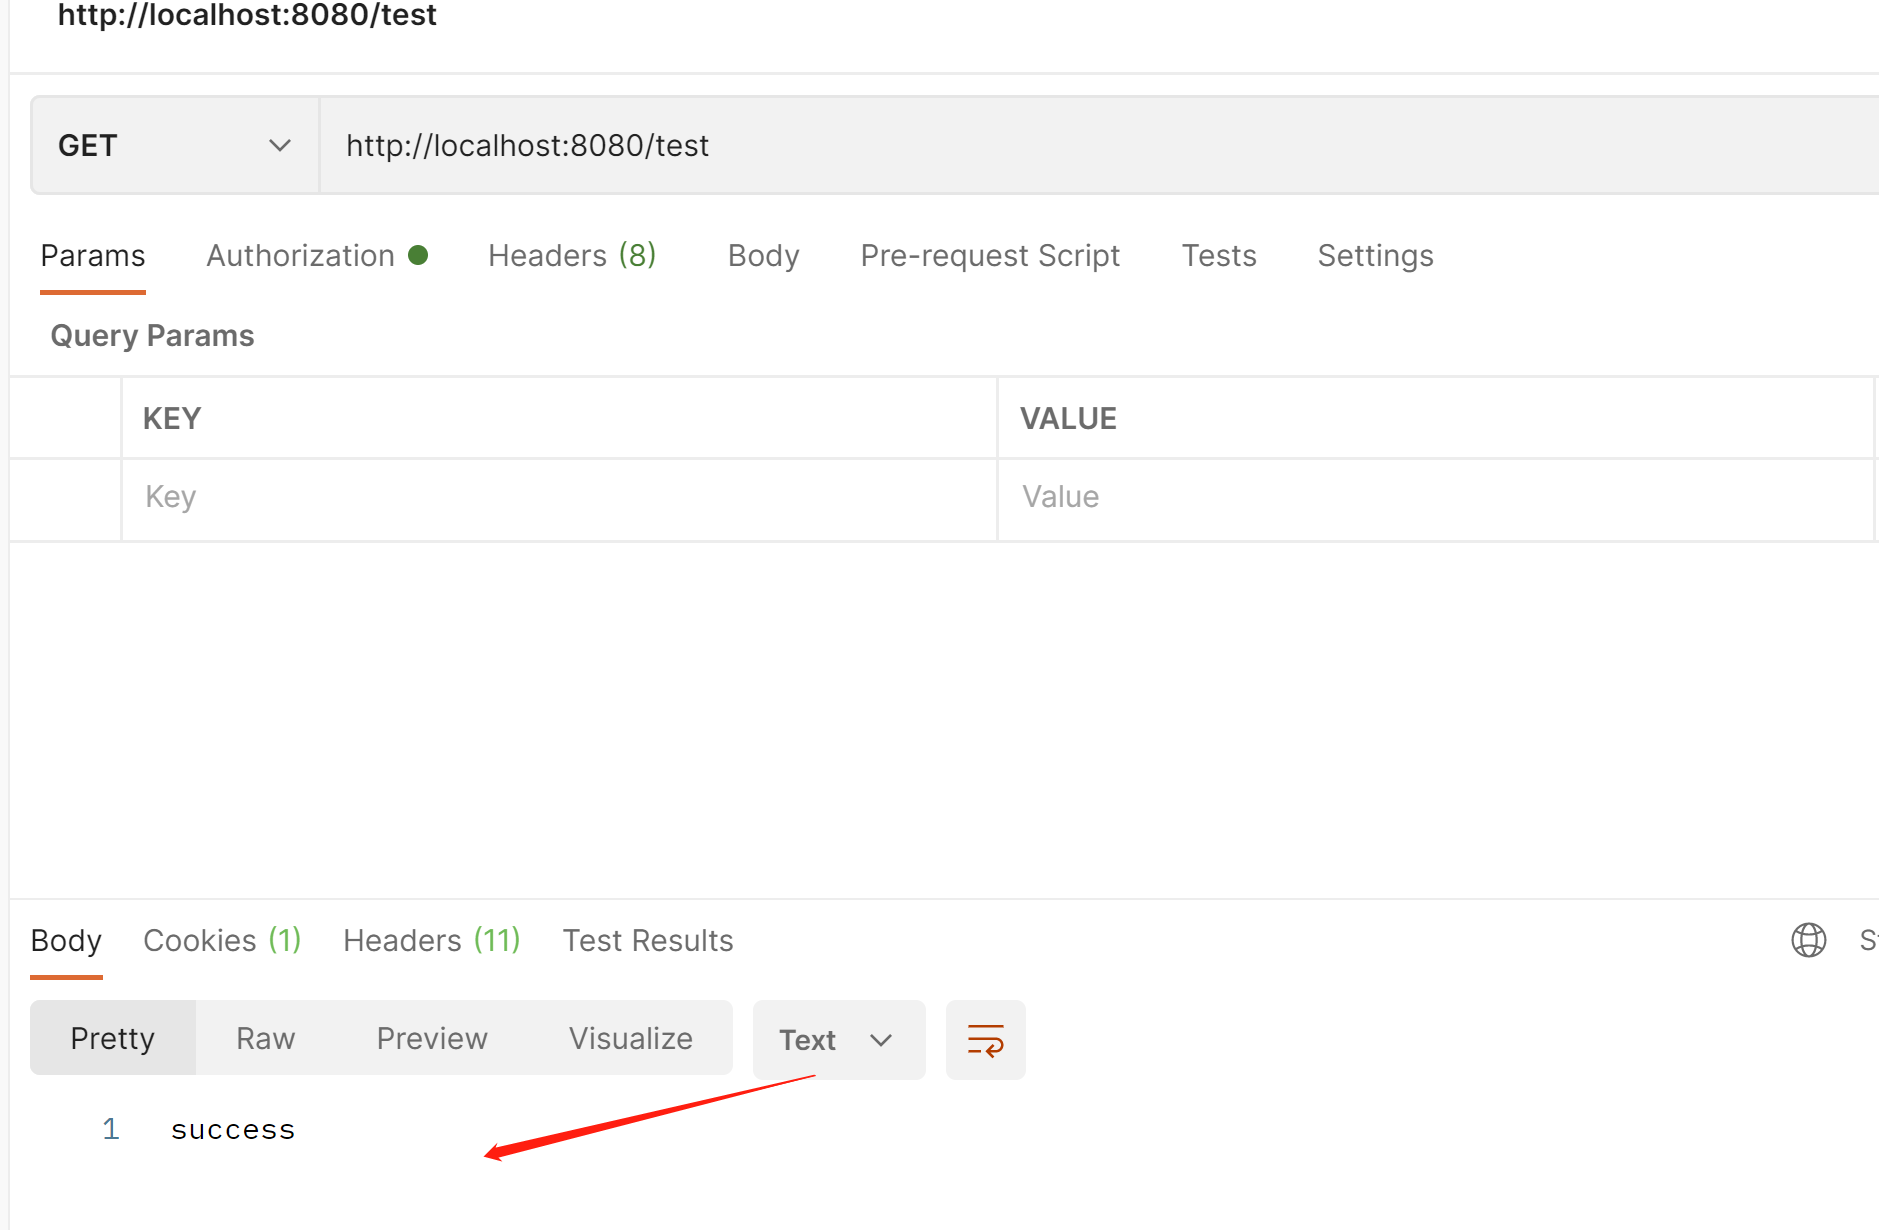
可以看到 登陆成功了

在看下登陆失败的

在看下注销成功的

主要关注这3个地方,登陆成功失败,必须在formLogin下面,注销成功必须在logout下面

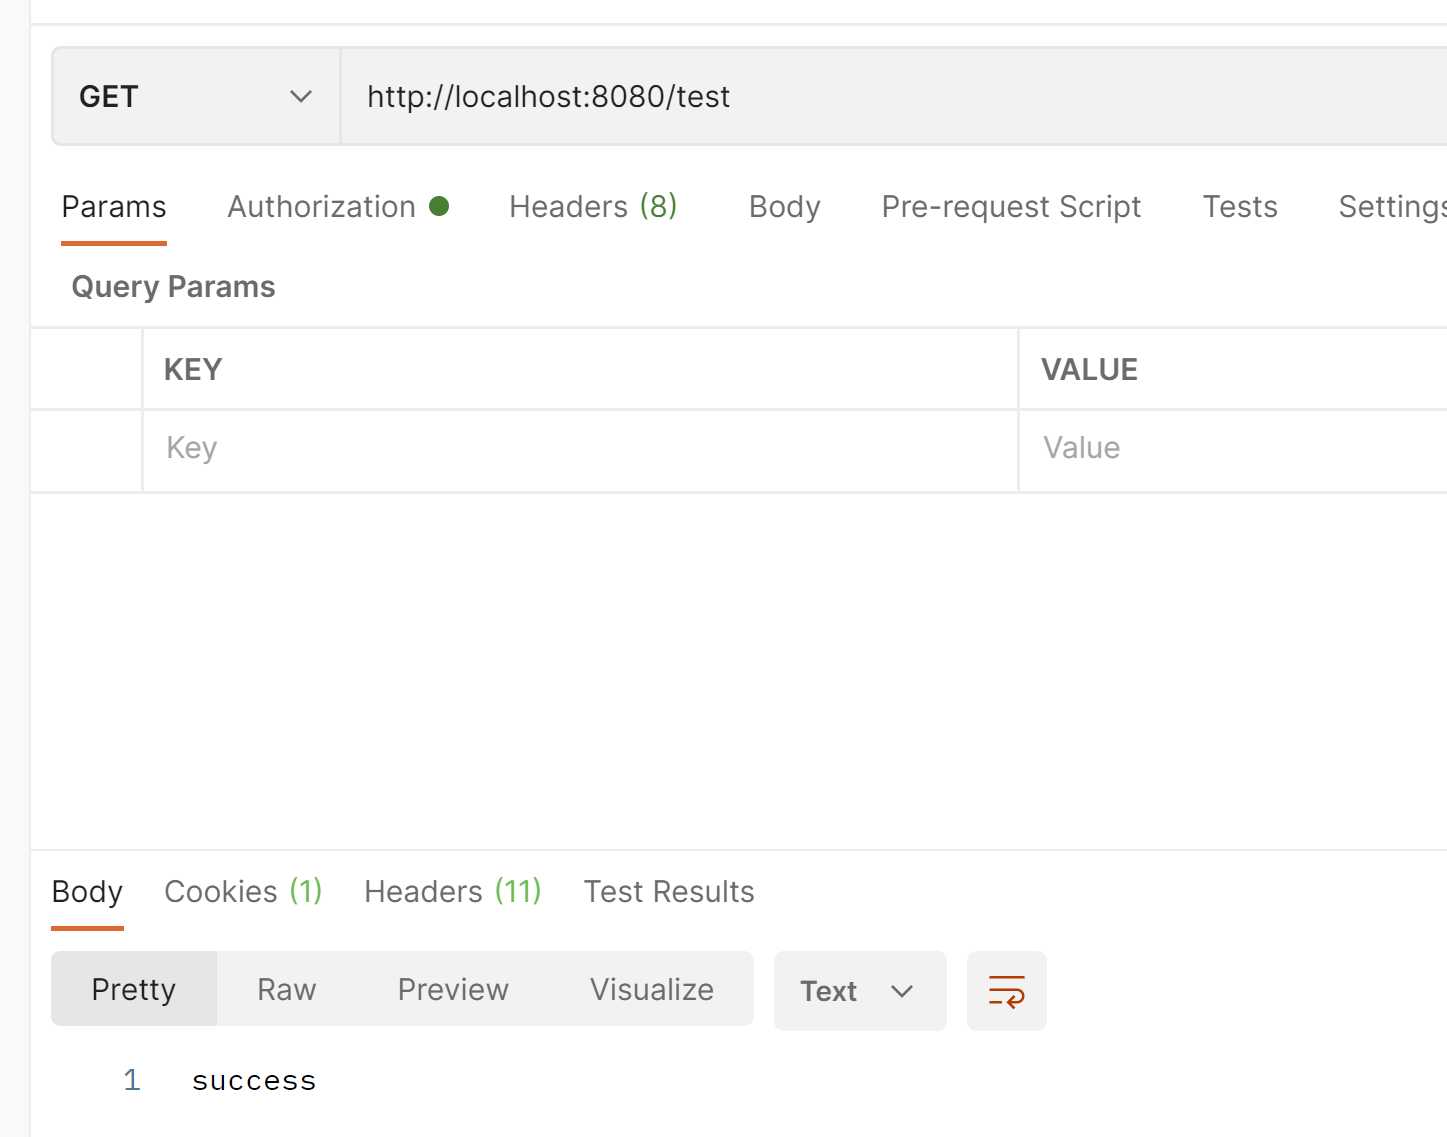
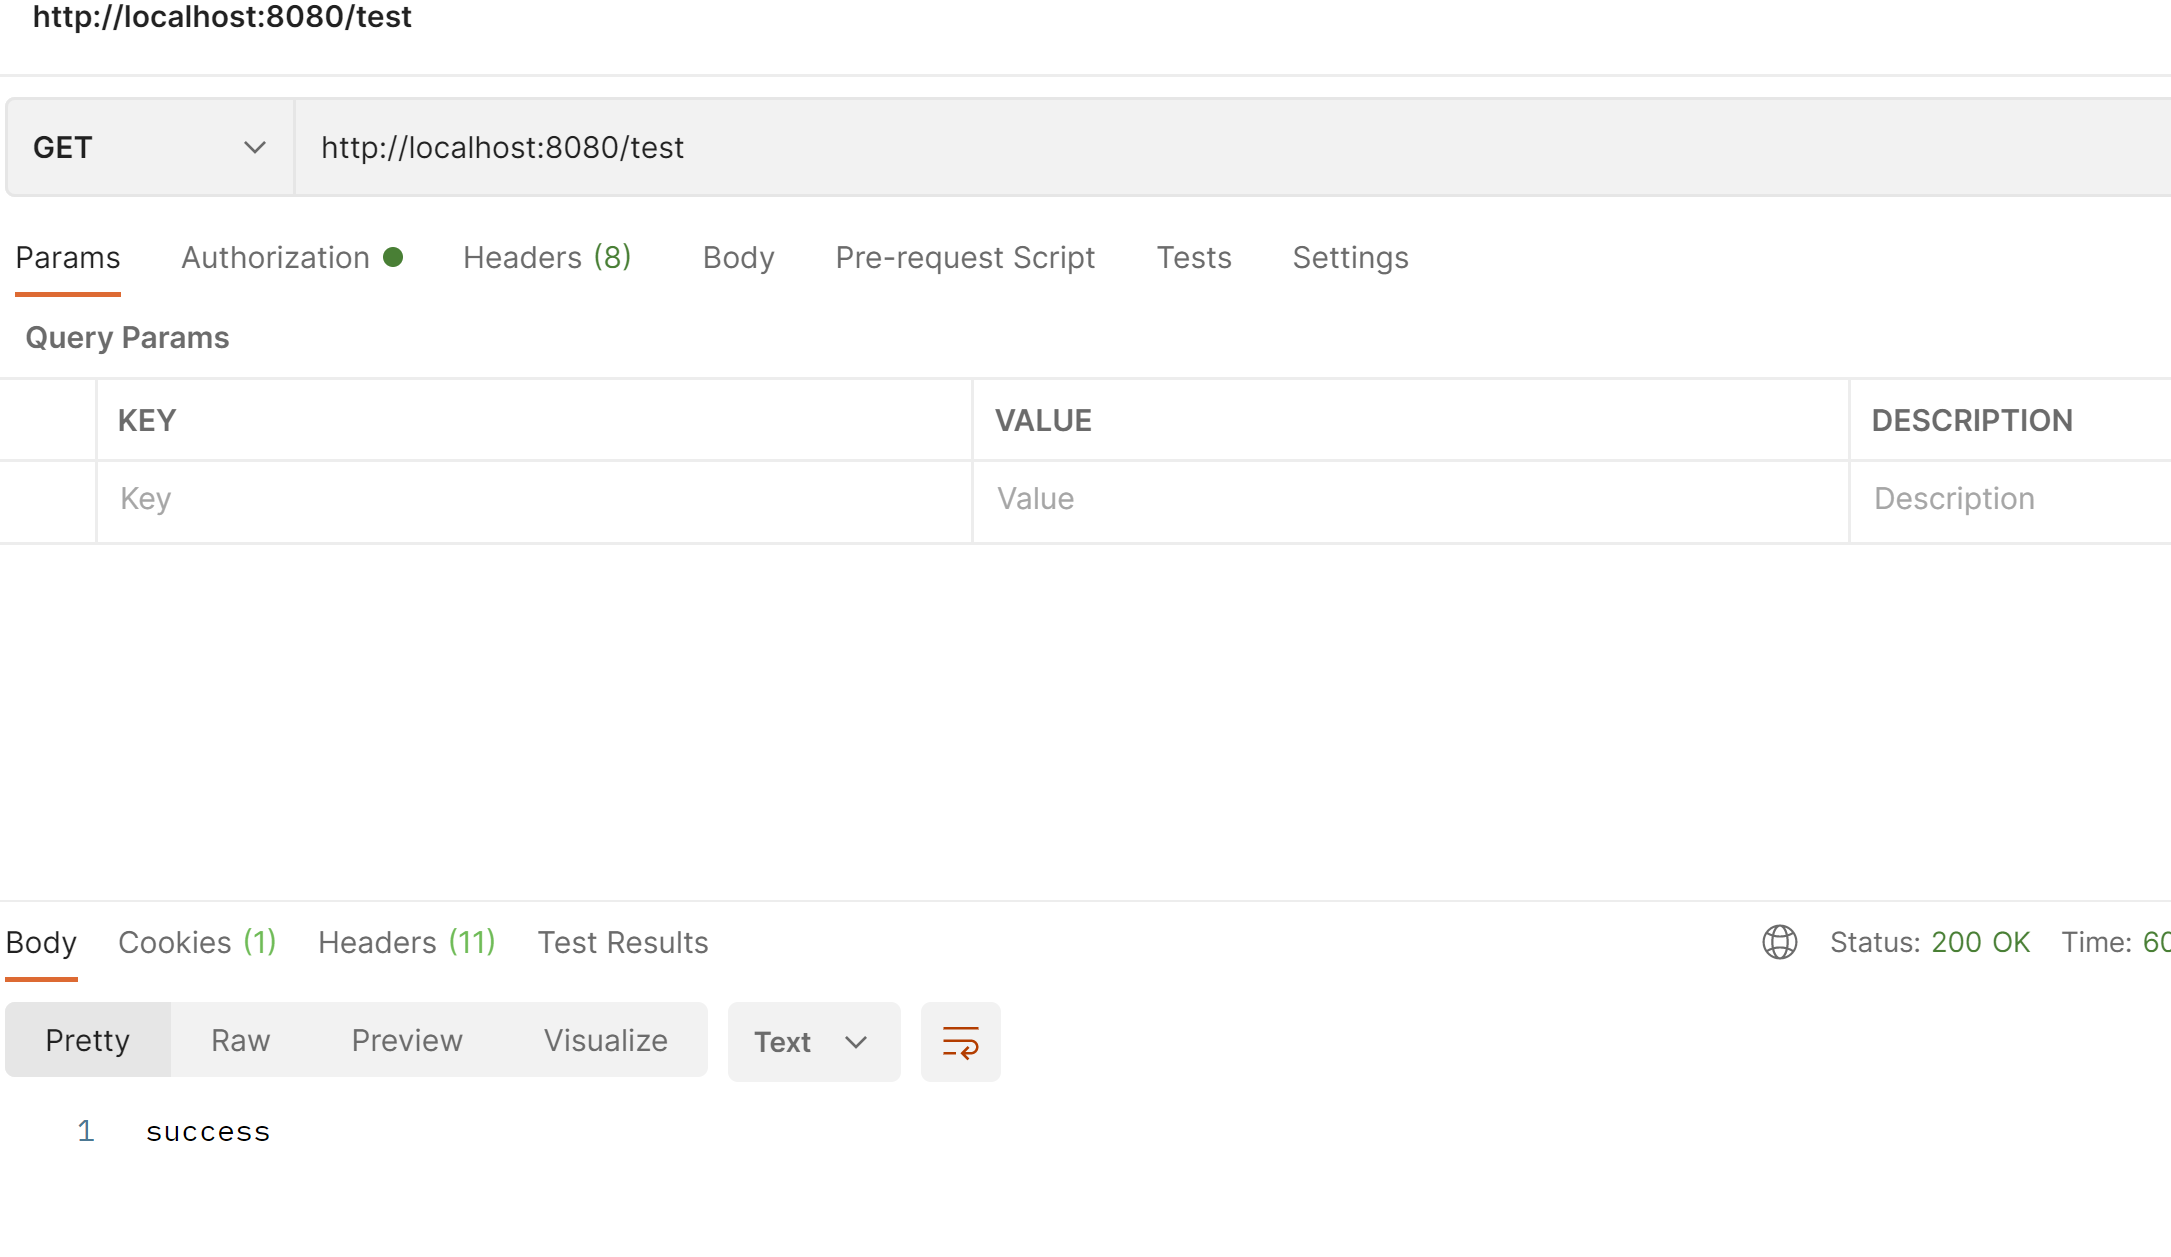
我们在看下 登陆后获取用户信息
package com.example.demo.controller;

import lombok.extern.slf4j.Slf4j;
import org.springframework.security.core.Authentication;
import org.springframework.security.core.context.SecurityContextHolder;
import org.springframework.web.bind.annotation.GetMapping;
import org.springframework.web.bind.annotation.RestController;

@Slf4j
@RestController
public class TestController {

    @GetMapping("/test")
    public String test(){
        Authentication authentication = SecurityContextHolder.getContext().getAuthentication();
        log.info("用户账号:{}",authentication.getName());
        log.info("主体信息:{}",authentication.getPrincipal());
        log.info("权限信息:{}",authentication.getAuthorities());
        return "success";
    }
}
权限是我们后台写死的

接下来我们看下自定义过滤器
package com.example.demo.filter;

import lombok.extern.slf4j.Slf4j;
import org.springframework.web.filter.GenericFilterBean;

import javax.servlet.FilterChain;
import javax.servlet.ServletException;
import javax.servlet.ServletRequest;
import javax.servlet.ServletResponse;
import java.io.IOException;

/**
 *
 * 在之后处理的过滤器
 * @param
 * @return
 * @throws Exception
 */
@Slf4j
public class AfterFilter extends GenericFilterBean {
    @Override
    public void doFilter(ServletRequest servletRequest, ServletResponse servletResponse, FilterChain filterChain) throws IOException, ServletException {
        log.info("在登陆之后的过滤器");
        //继续往下走
        filterChain.doFilter(servletRequest, servletResponse);
    }
}
package com.example.demo.filter;

import lombok.extern.slf4j.Slf4j;
import org.springframework.web.filter.GenericFilterBean;

import javax.servlet.FilterChain;
import javax.servlet.ServletException;
import javax.servlet.ServletRequest;
import javax.servlet.ServletResponse;
import java.io.IOException;

/**
 *
 * 在之前处理的过滤器
 * @param
 * @return
 * @throws Exception
 */
@Slf4j
public class BeforeFilter extends GenericFilterBean {
    @Override
    public void doFilter(ServletRequest servletRequest, ServletResponse servletResponse, FilterChain filterChain) throws IOException, ServletException {
        log.info("在登陆之前的过滤器");
        //继续往下走
        filterChain.doFilter(servletRequest, servletResponse);
    }
}
package com.example.demo.filter;

import lombok.extern.slf4j.Slf4j;
import org.springframework.web.filter.GenericFilterBean;

import javax.servlet.FilterChain;
import javax.servlet.ServletException;
import javax.servlet.ServletRequest;
import javax.servlet.ServletResponse;
import java.io.IOException;

/**
 *
 * 自定义处理的过滤器
 * @param
 * @return
 * @throws Exception
 */
@Slf4j
public class CustomFilter extends GenericFilterBean {
    @Override
    public void doFilter(ServletRequest servletRequest, ServletResponse servletResponse, FilterChain filterChain) throws IOException, ServletException {
        log.info("自定义处理的过滤器");
        //继续往下走
        filterChain.doFilter(servletRequest, servletResponse);
    }
}
package com.example.demo.config;
import com.example.demo.filter.AfterFilter;
import com.example.demo.filter.BeforeFilter;
import com.example.demo.filter.CustomFilter;
import com.example.demo.service.impl.SysUserService;
import lombok.extern.slf4j.Slf4j;
import org.springframework.beans.factory.annotation.Autowired;
import org.springframework.context.annotation.Bean;
import org.springframework.context.annotation.Configuration;
import org.springframework.security.authentication.AuthenticationProvider;
import org.springframework.security.authentication.BadCredentialsException;
import org.springframework.security.authentication.UsernamePasswordAuthenticationToken;
import org.springframework.security.config.annotation.web.builders.HttpSecurity;
import org.springframework.security.config.http.SessionCreationPolicy;
import org.springframework.security.core.Authentication;
import org.springframework.security.core.AuthenticationException;
import org.springframework.security.core.userdetails.UserDetails;
import org.springframework.security.crypto.bcrypt.BCryptPasswordEncoder;
import org.springframework.security.crypto.password.PasswordEncoder;
import org.springframework.security.web.SecurityFilterChain;
import org.springframework.security.web.authentication.UsernamePasswordAuthenticationFilter;
/**
*
* 安全配置类
* @param
* @return
* @throws Exception
*/
@Slf4j
@Configuration
public class SpringSecurityConfig {
@Autowired
private MyAuthenticationEntryPoint myAuthenticationEntryPoint;
@Autowired
private MyAuthenticationSuccessHandler myAuthenticationSuccessHandler;
@Autowired
private MyAuthenticationFailureHandler myAuthenticationFailureHandler;
@Autowired
private MyLogoutSuccessHandler myLogoutSuccessHandler;
//密码加密
@Bean
public PasswordEncoder passwordEncoder(){
return new BCryptPasswordEncoder();
}
/**
*
* 安全过滤器链
* @param
* @return
* @throws Exception
*/
@Bean
public SecurityFilterChain securityFilterChain(HttpSecurity http) throws Exception {
//启用会话存储 在需要时创建session会话
http.sessionManagement().sessionCreationPolicy(SessionCreationPolicy.IF_REQUIRED);
//把没有登陆 直接访问的 异常信息添加进来
http.exceptionHandling().authenticationEntryPoint(myAuthenticationEntryPoint)
//任何请求都拦截
.and().
authorizeRequests()
.anyRequest().authenticated()
.and()
//启用表单认证模式
.formLogin()
//登陆成功返回的提示信息
.successHandler(myAuthenticationSuccessHandler)
//登陆失败的返回提示信息
.failureHandler(myAuthenticationFailureHandler)
//登陆界面 废弃
// .loginPage("/login.html")
//登陆点击提交后的地址
.loginProcessingUrl("/dengLu")
//放行 loginPage和loginProcessingUrl 不用登陆
.permitAll()
//设置username的别名为 用于在登陆的html表单的名字
.usernameParameter("account")
//设置password的别名为 用于在登陆的html表单的名字
.passwordParameter("password")
.and()
//设置注销功能
.logout()
//注销成功的提示信息
.logoutSuccessHandler(myLogoutSuccessHandler)
//注销url地址
.logoutUrl("/logout")
//注销后跳转地址
// .logoutSuccessUrl("/login.html")
//session直接过期
.invalidateHttpSession(true)
//清除认证信息
.clearAuthentication(true)
.and()
//禁用csrf安全防护
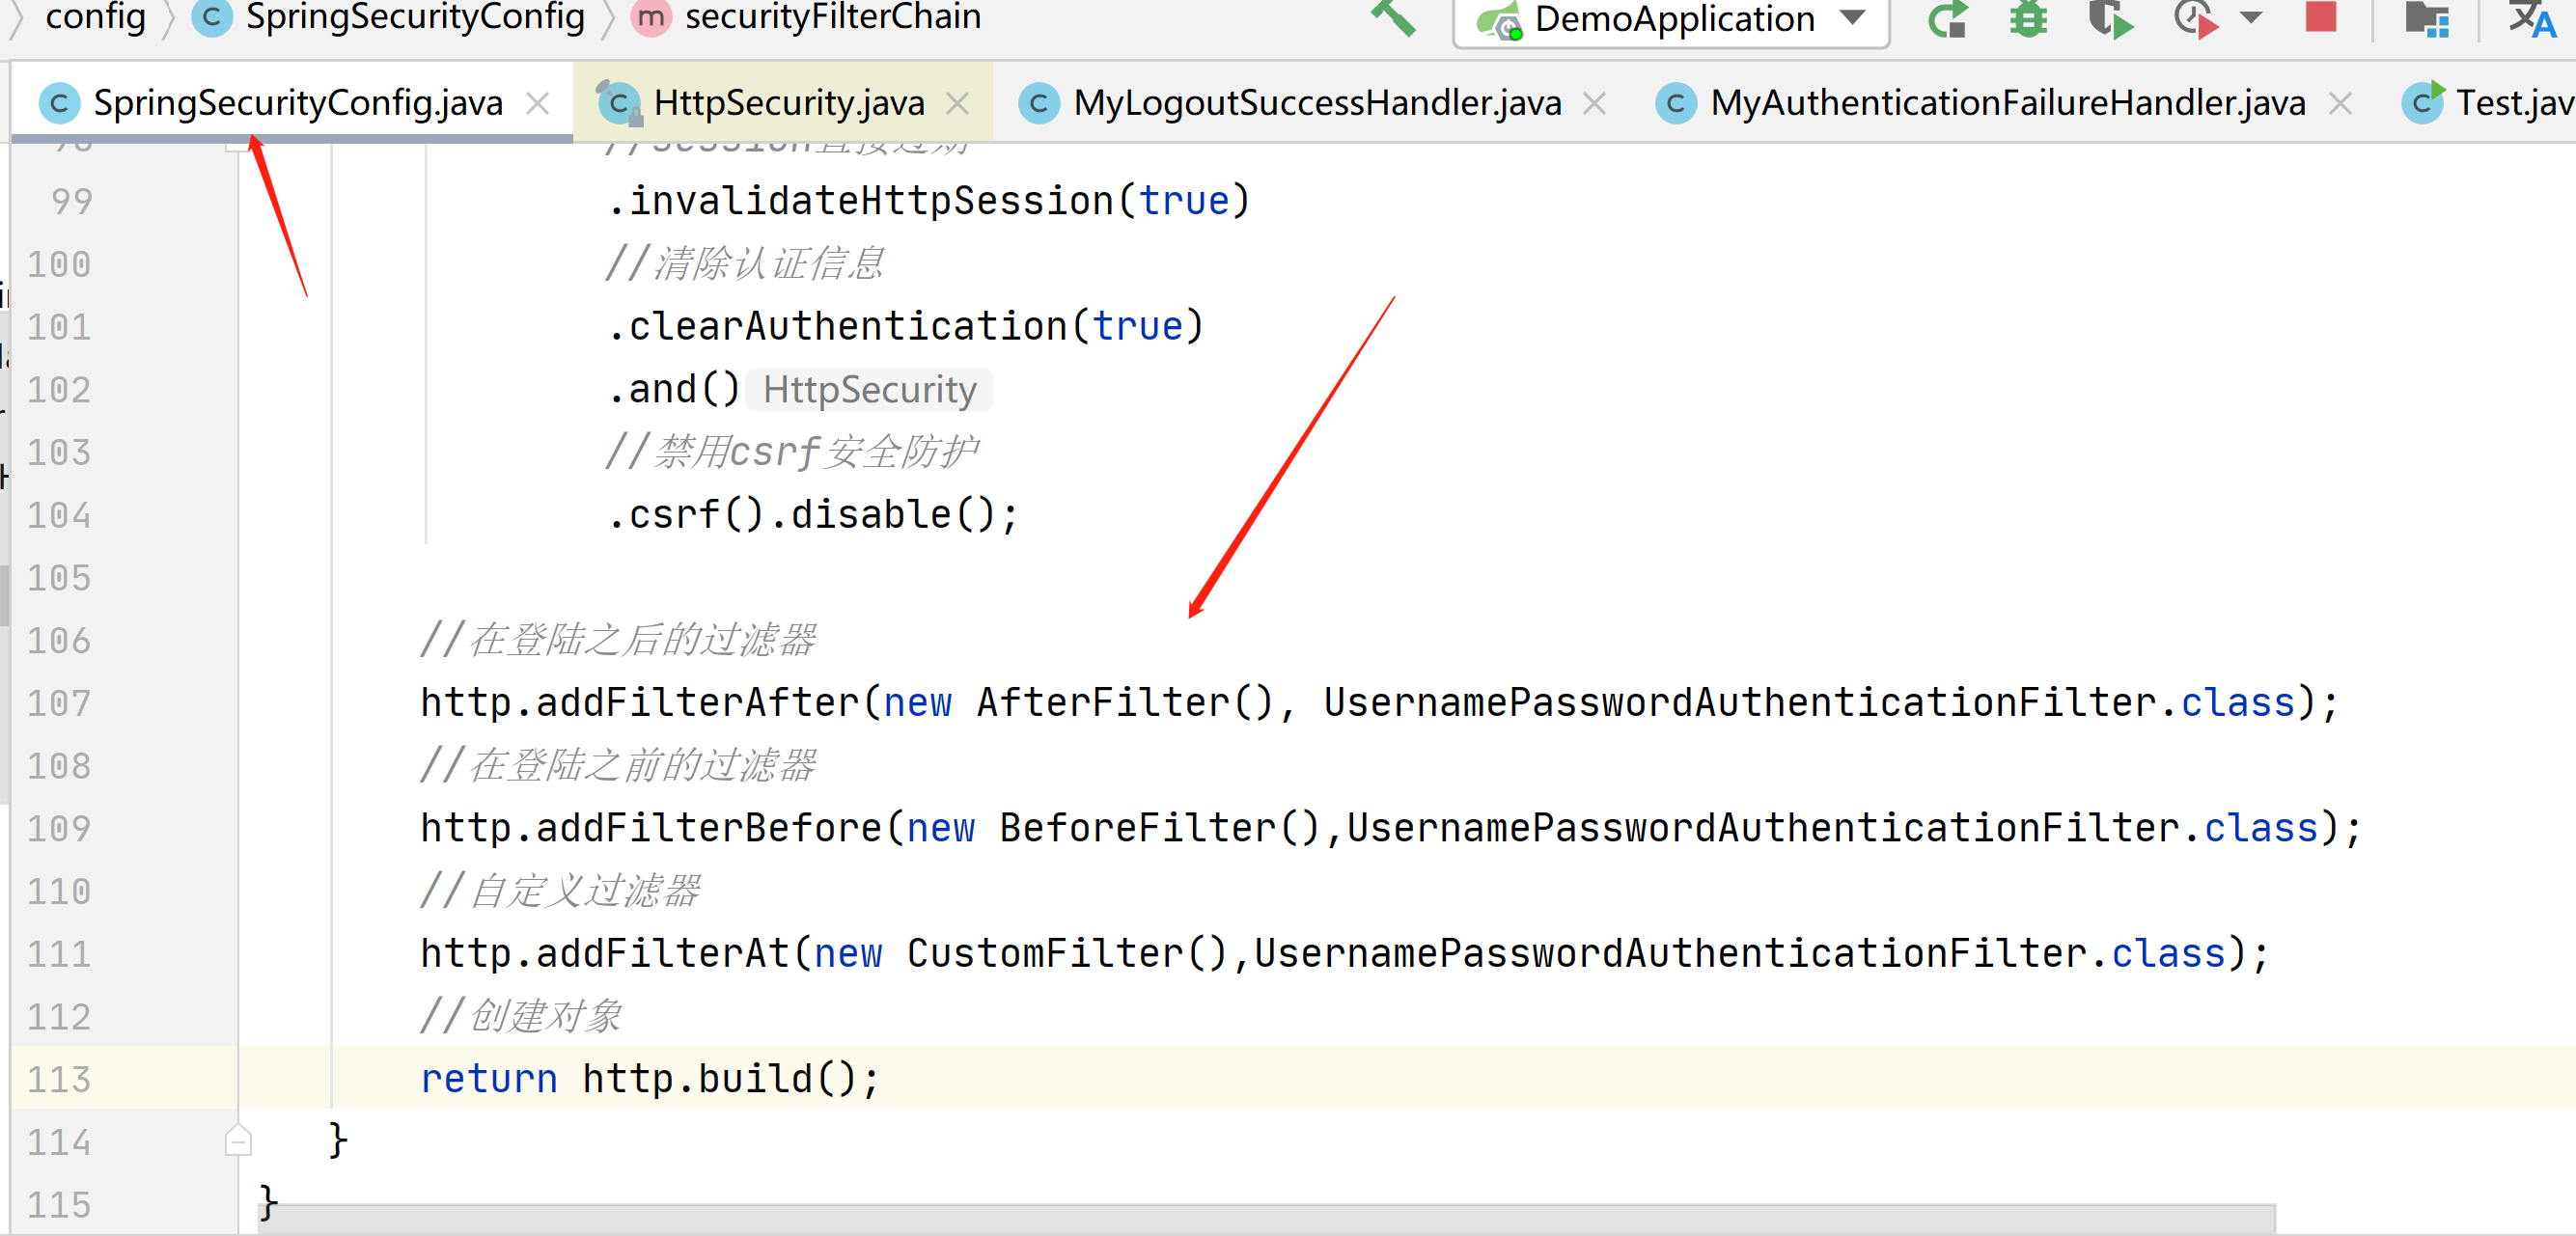
.csrf().disable();
//在登陆之后的过滤器
http.addFilterAfter(new AfterFilter(), UsernamePasswordAuthenticationFilter.class);
//在登陆之前的过滤器
http.addFilterBefore(new BeforeFilter(),UsernamePasswordAuthenticationFilter.class);
//自定义过滤器
http.addFilterAt(new CustomFilter(),UsernamePasswordAuthenticationFilter.class);
//创建对象
return http.build();
}
}
主要关注这里
我们来登陆一下
在登陆之前只打印了这2个过滤器

在获取下用户信息
这次3个过滤器都打印出来了

我们可以在这里判断那些角色可以访问
把.authenticated()注释掉
添加.access("hasAnyAuthority('ROLE_USER1')")
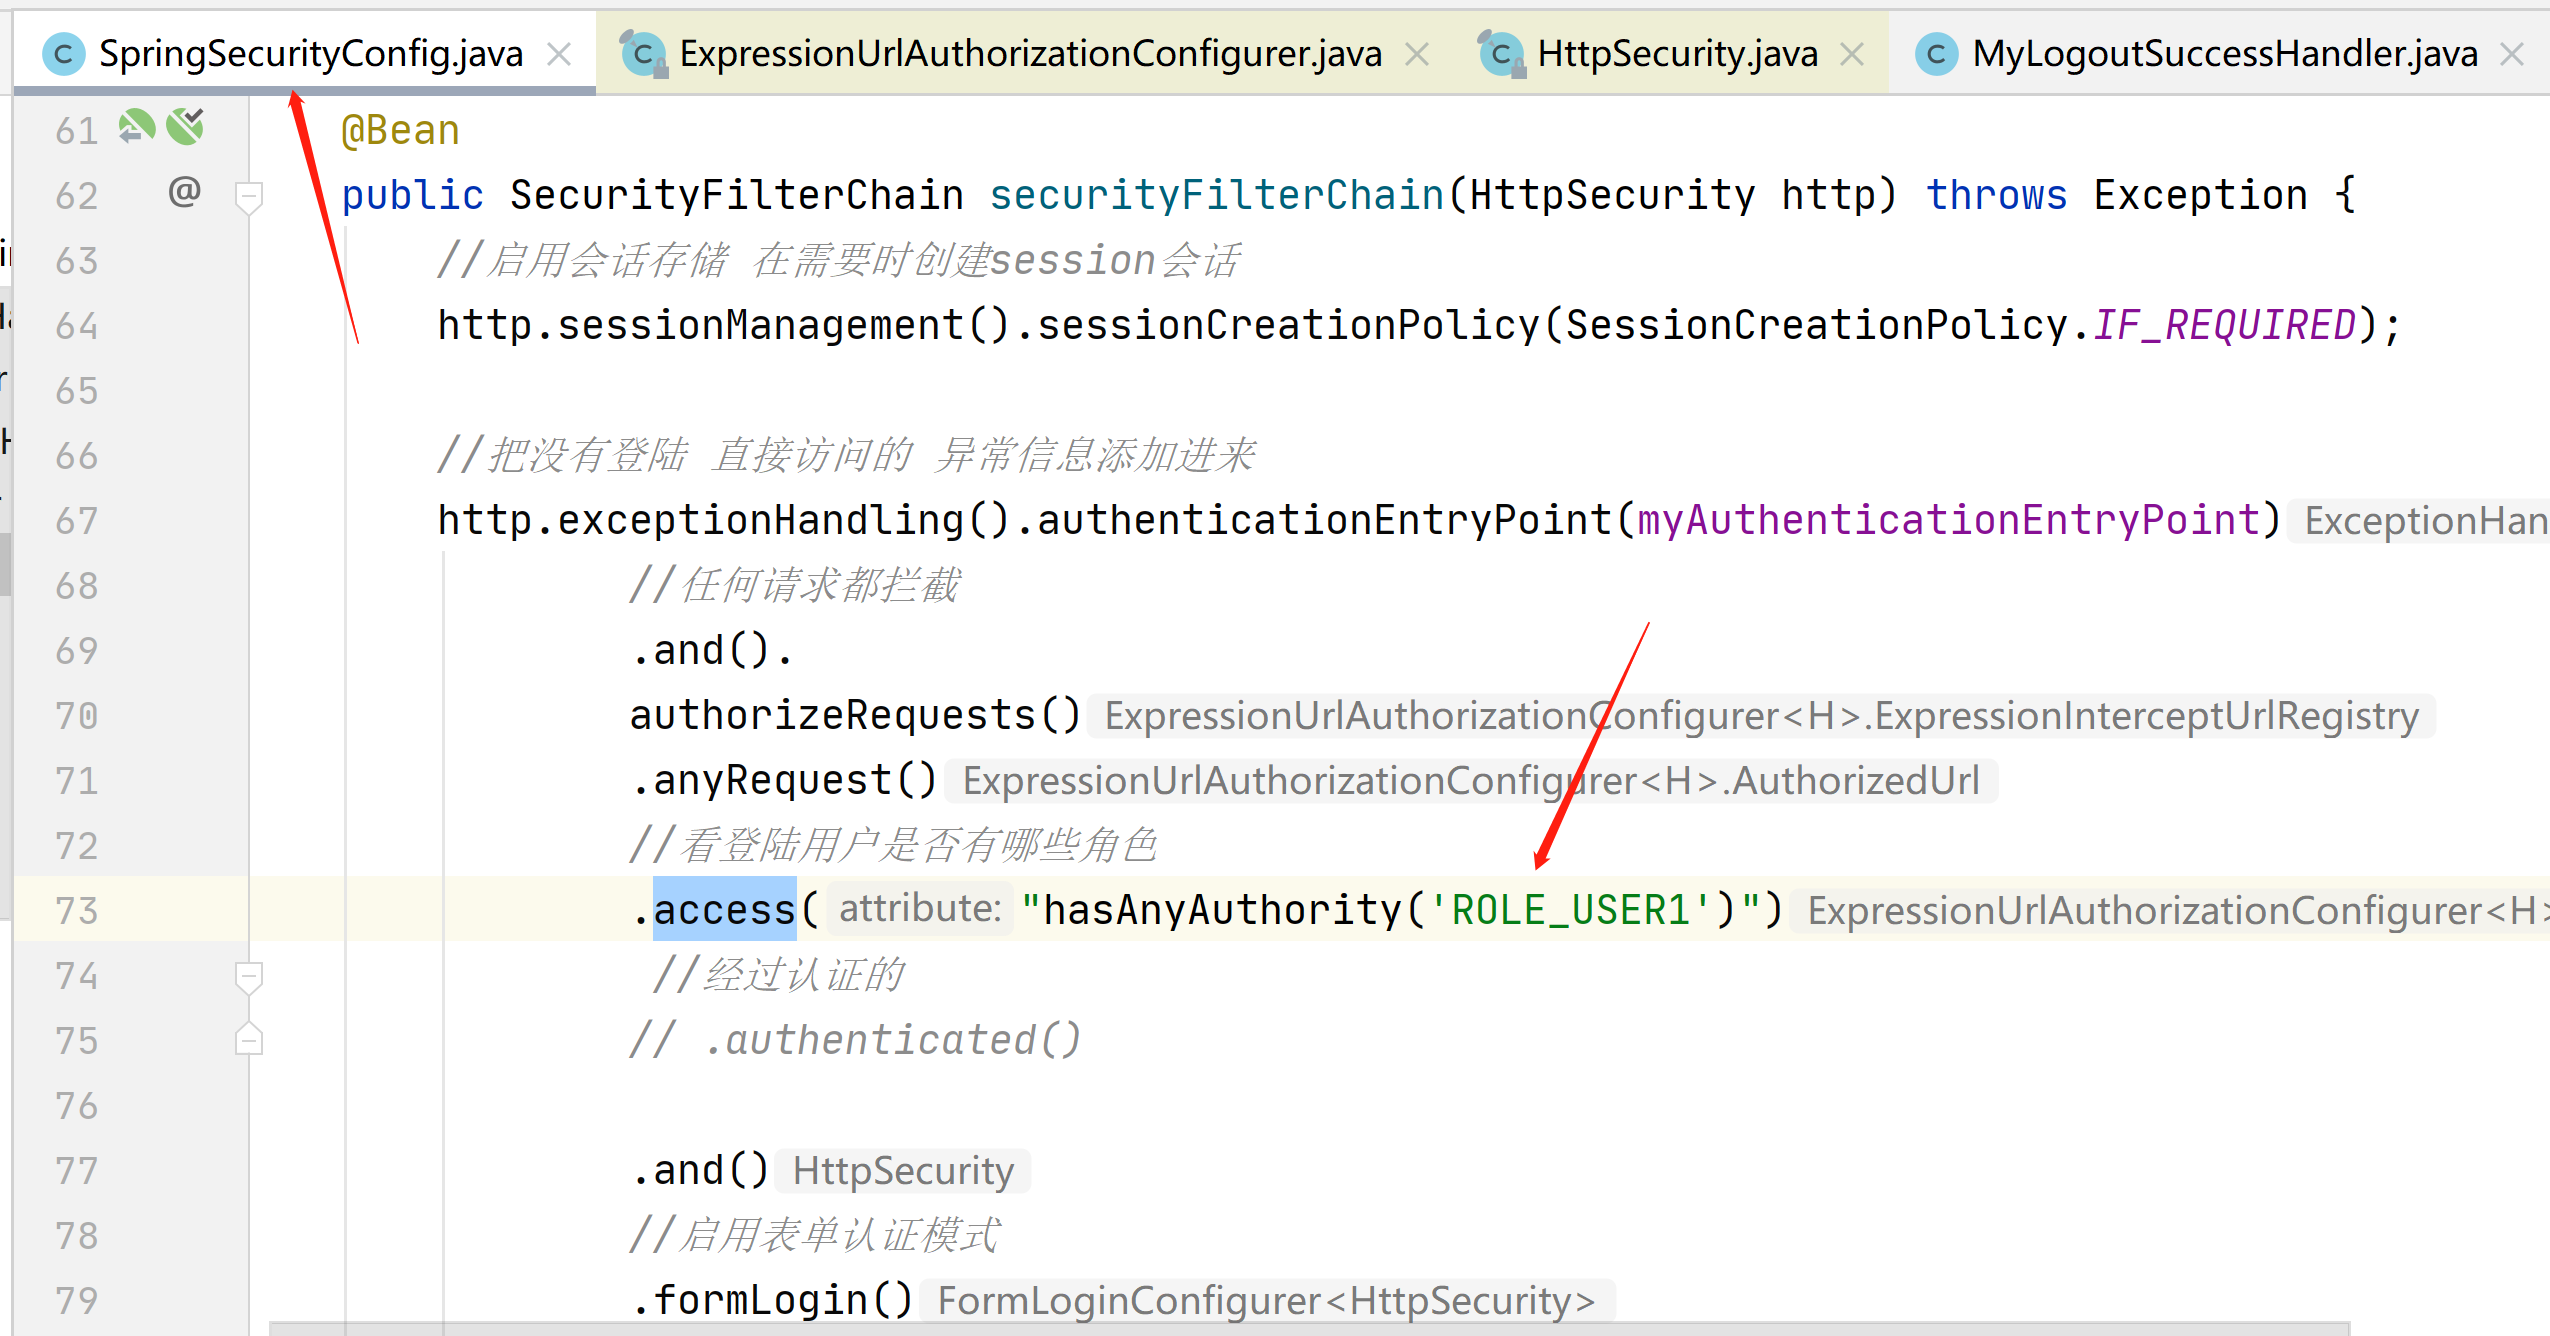
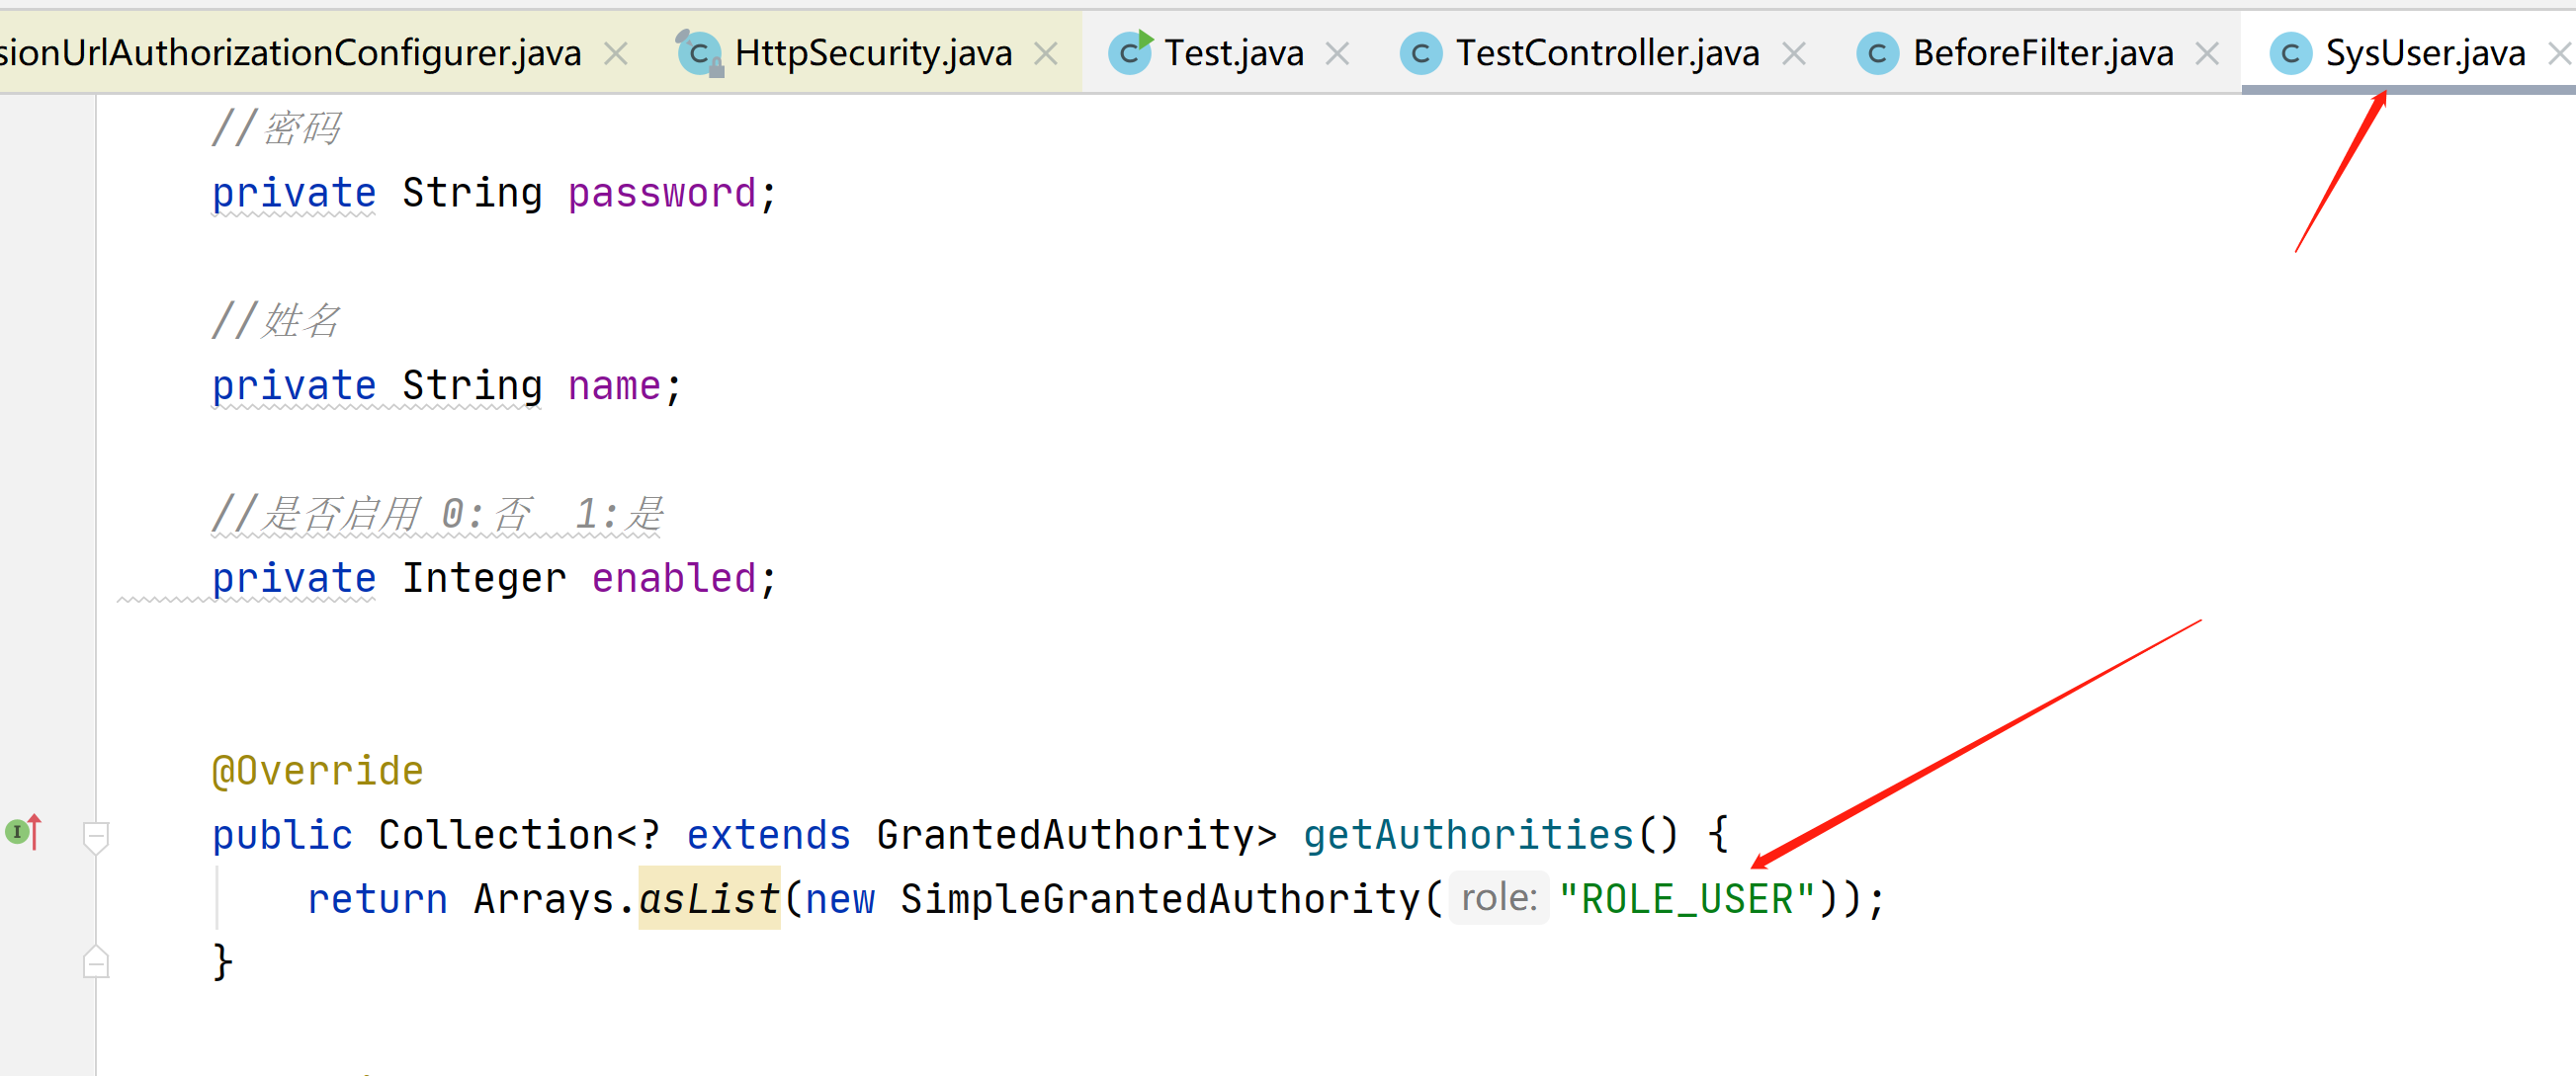
对应用户的这里
如果没有权限就会显示403

我们也可以判断这个接口有没有角色访问
.access("hasAnyRole('USER')")
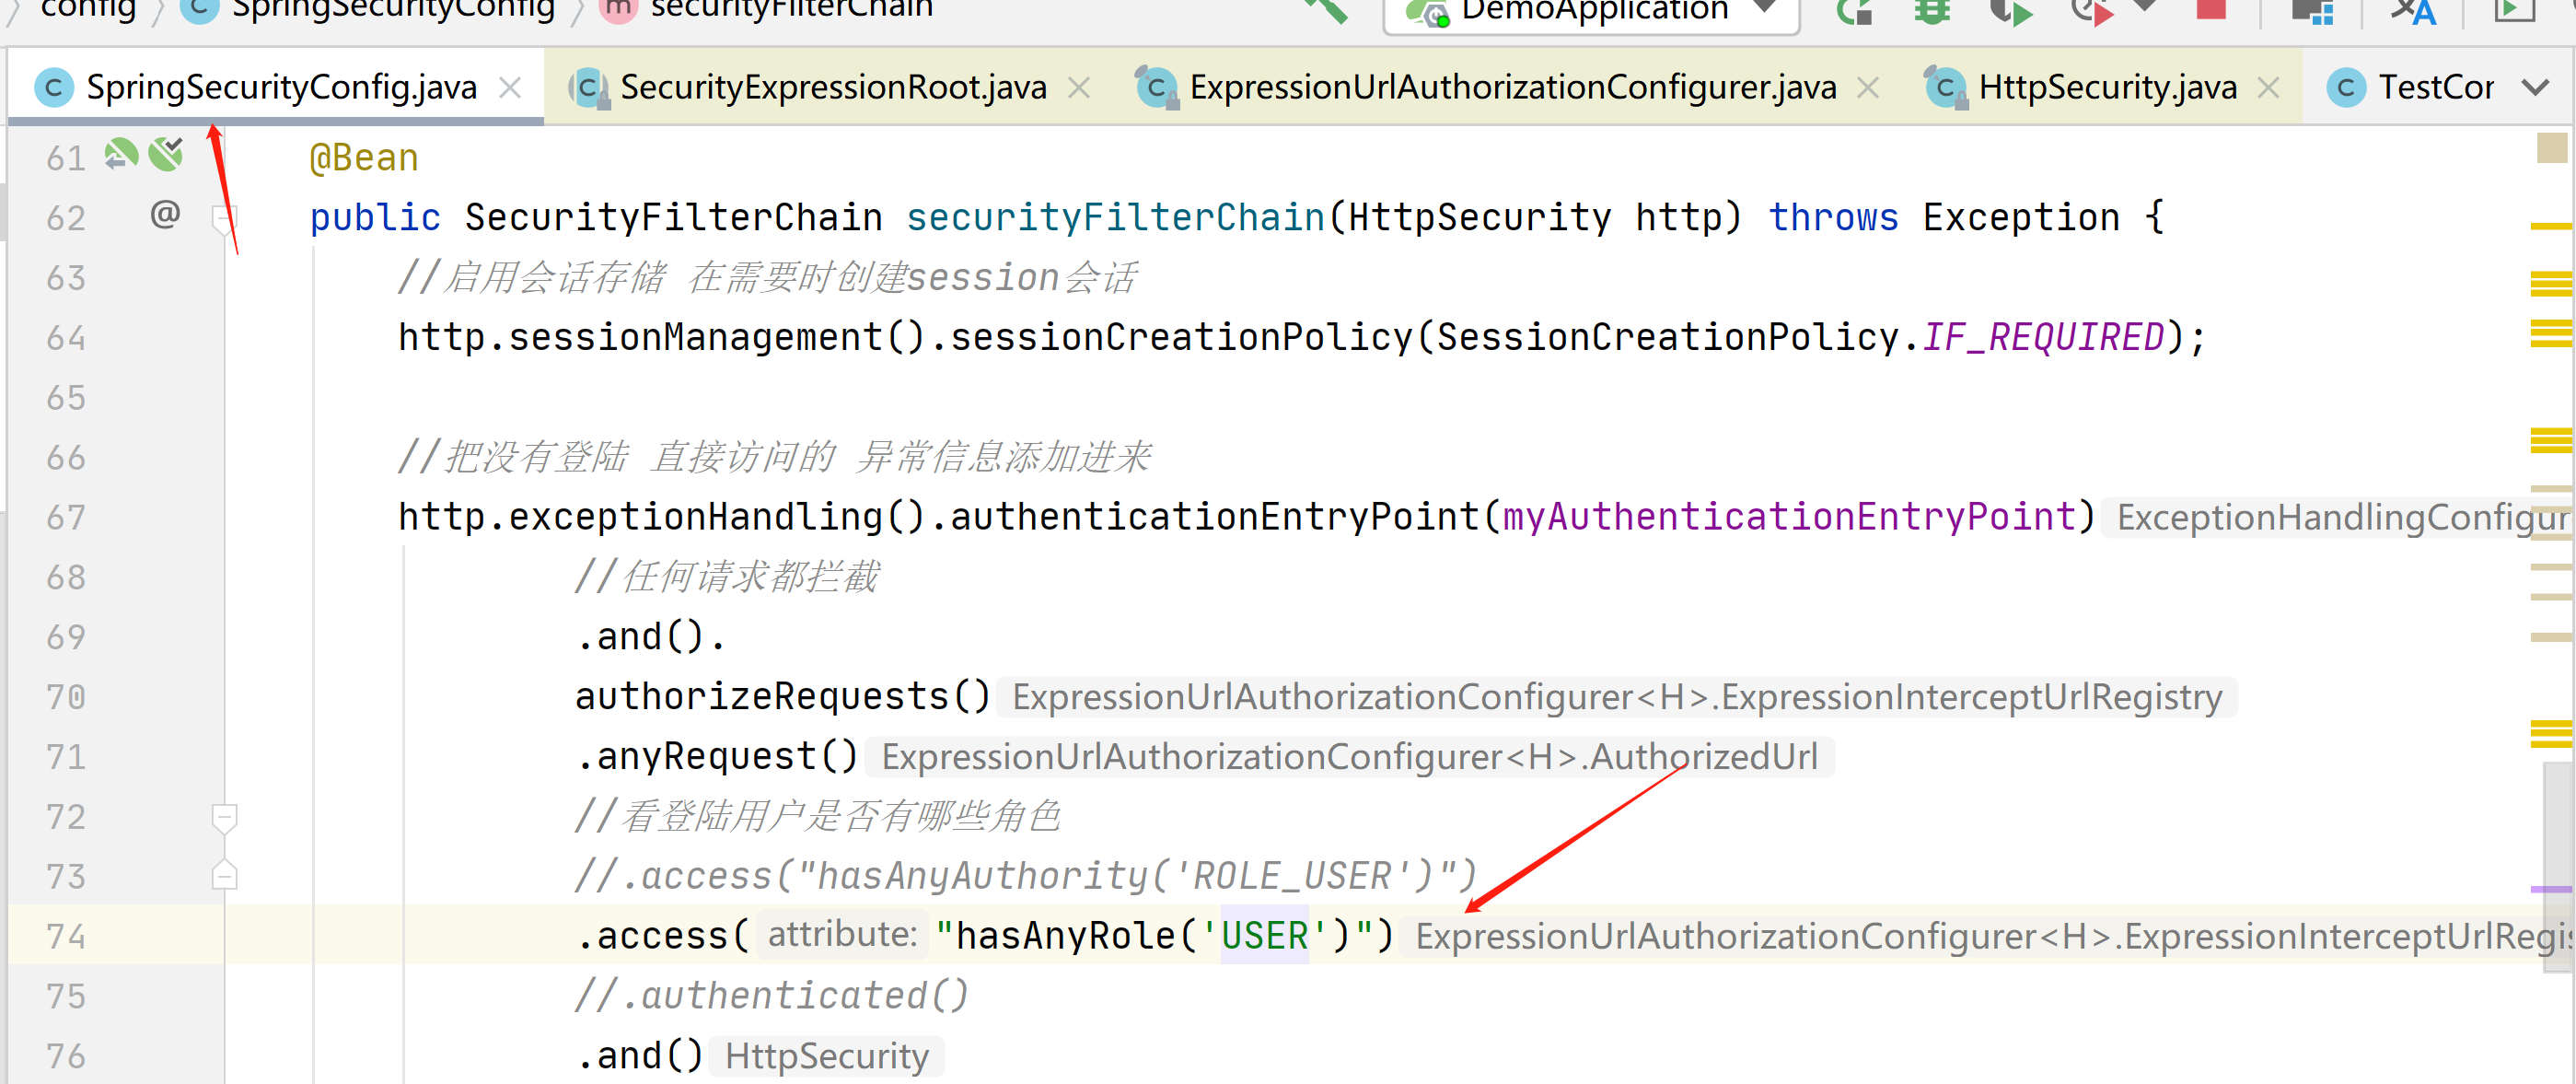
在这里不用加ROLE_,我们点击这个hasAnyRole进入源码
在源码里面会自动拼接上

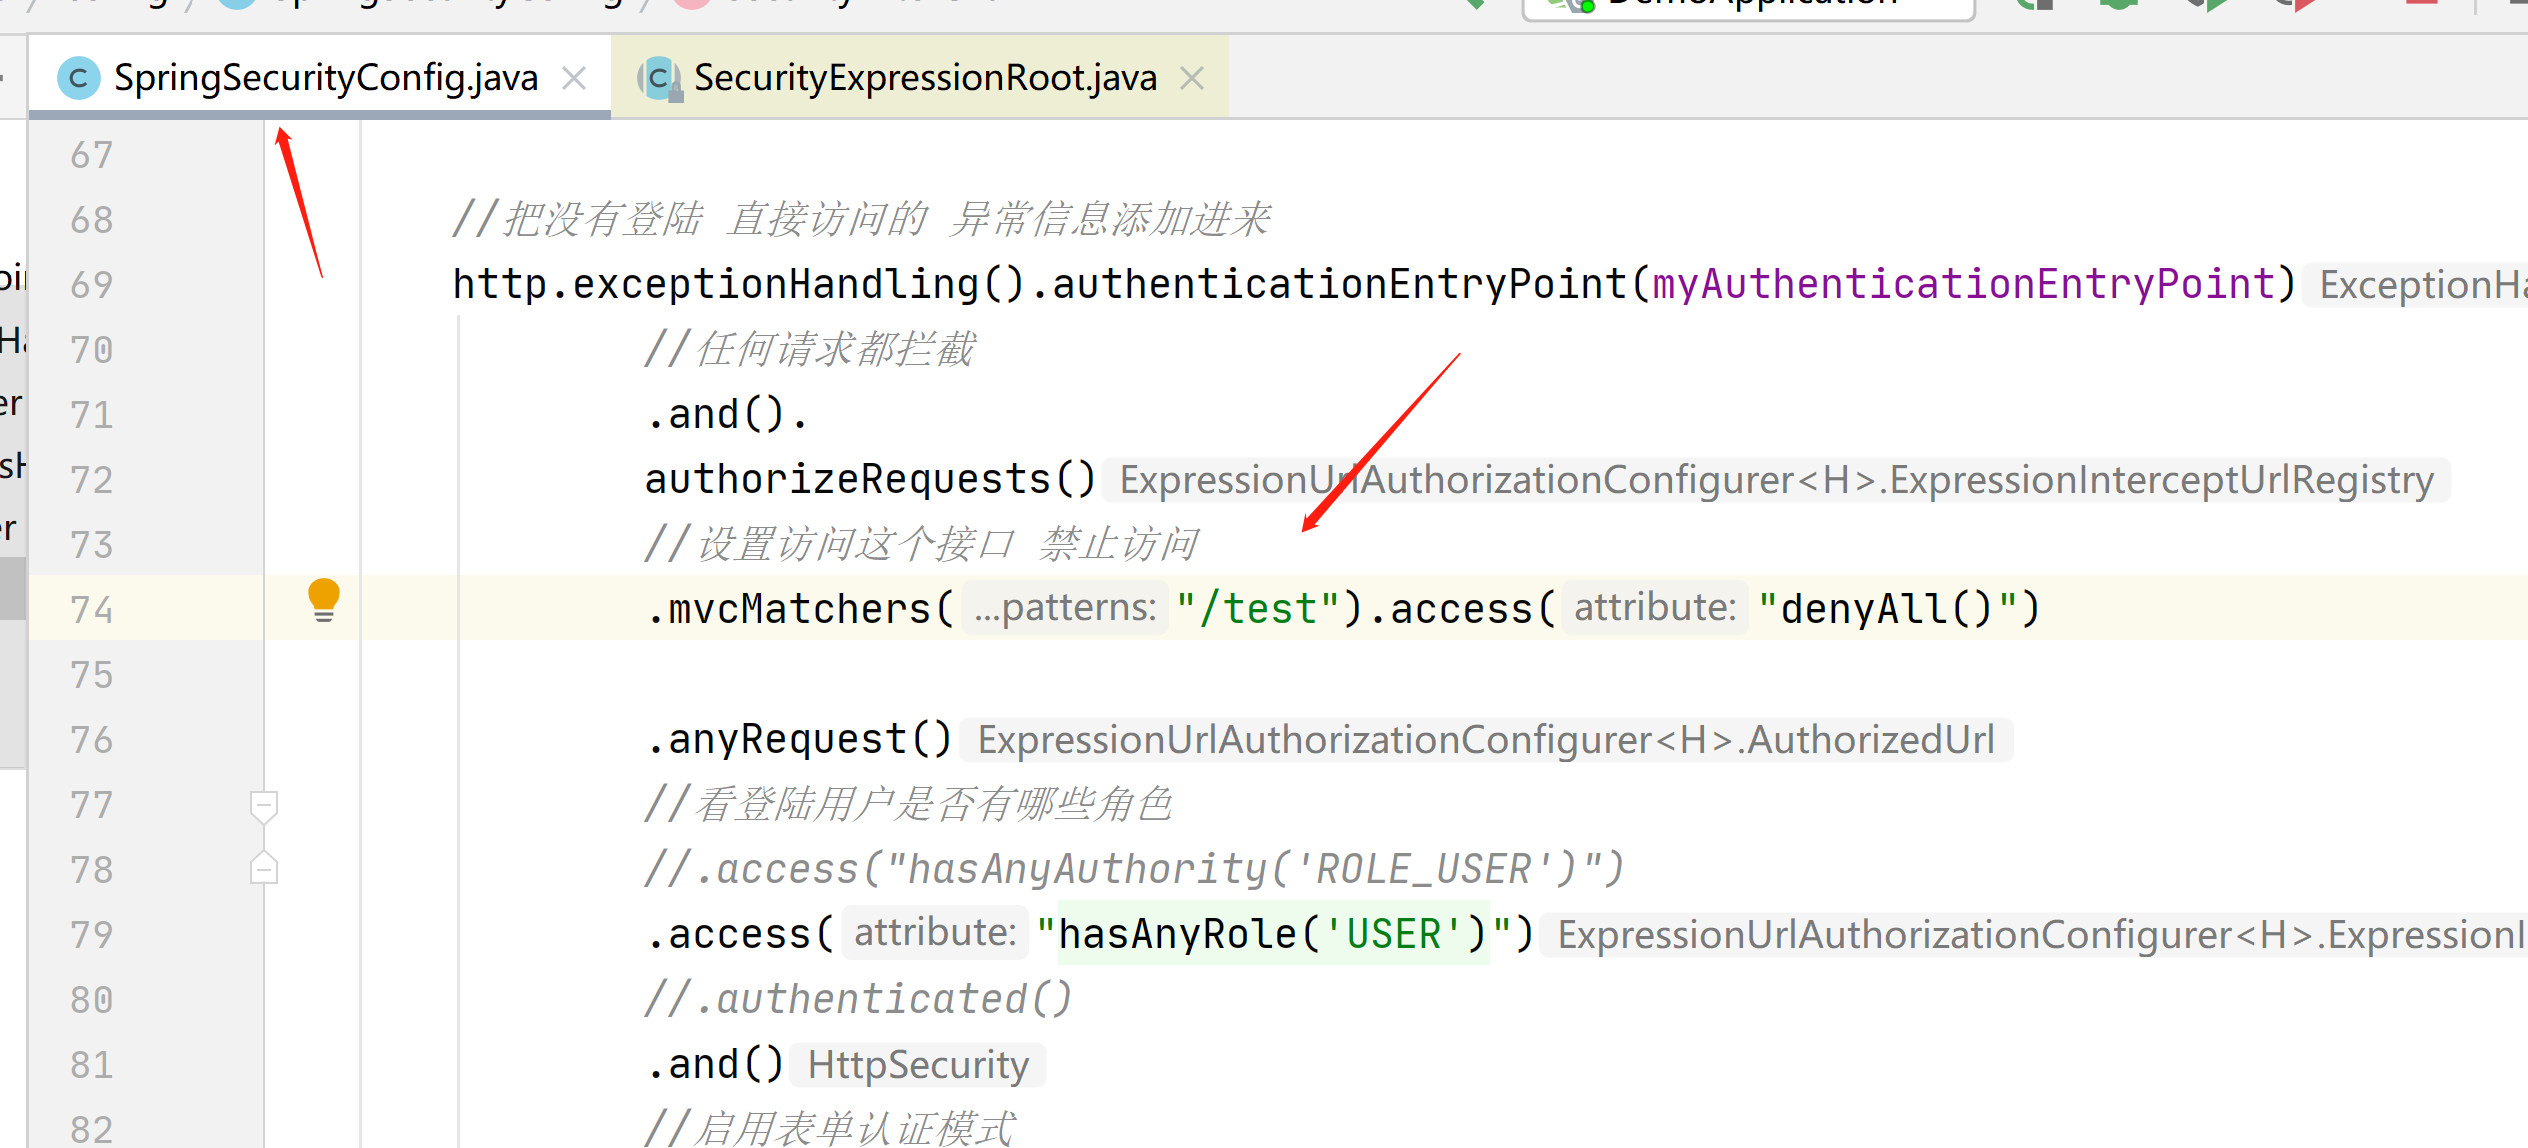
接下来我们在看下匹配器
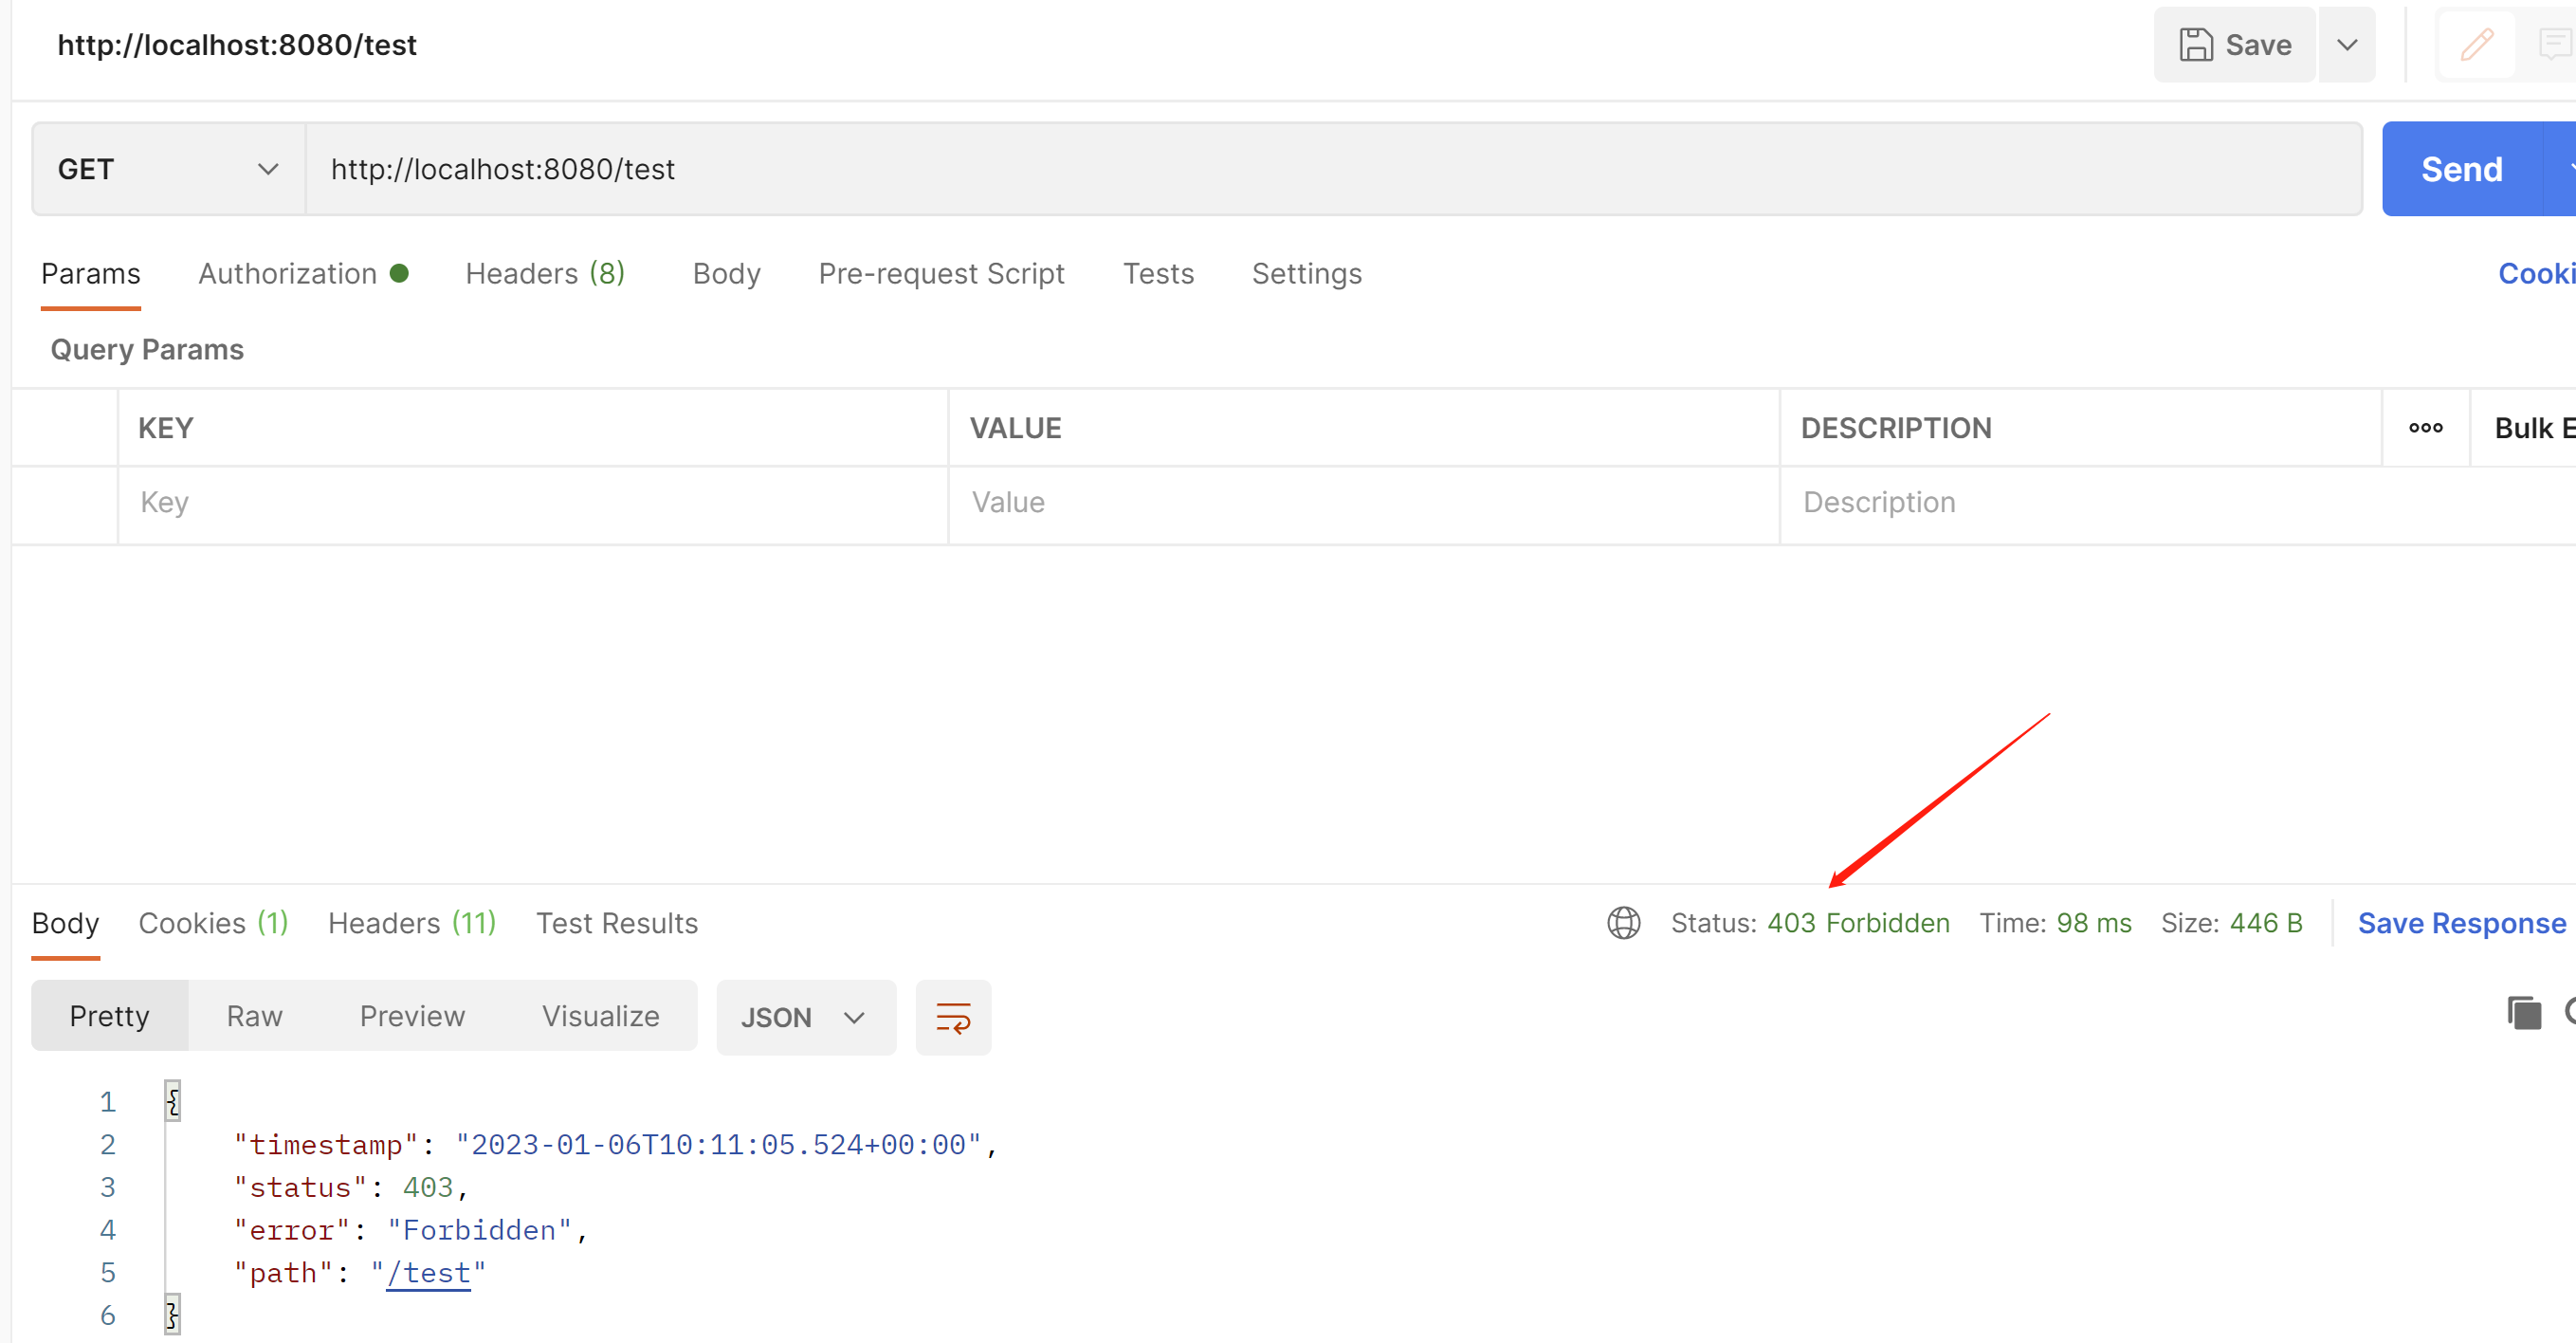
在这里可以使他禁止访问 403
.mvcMatchers("/test").access("denyAll()")
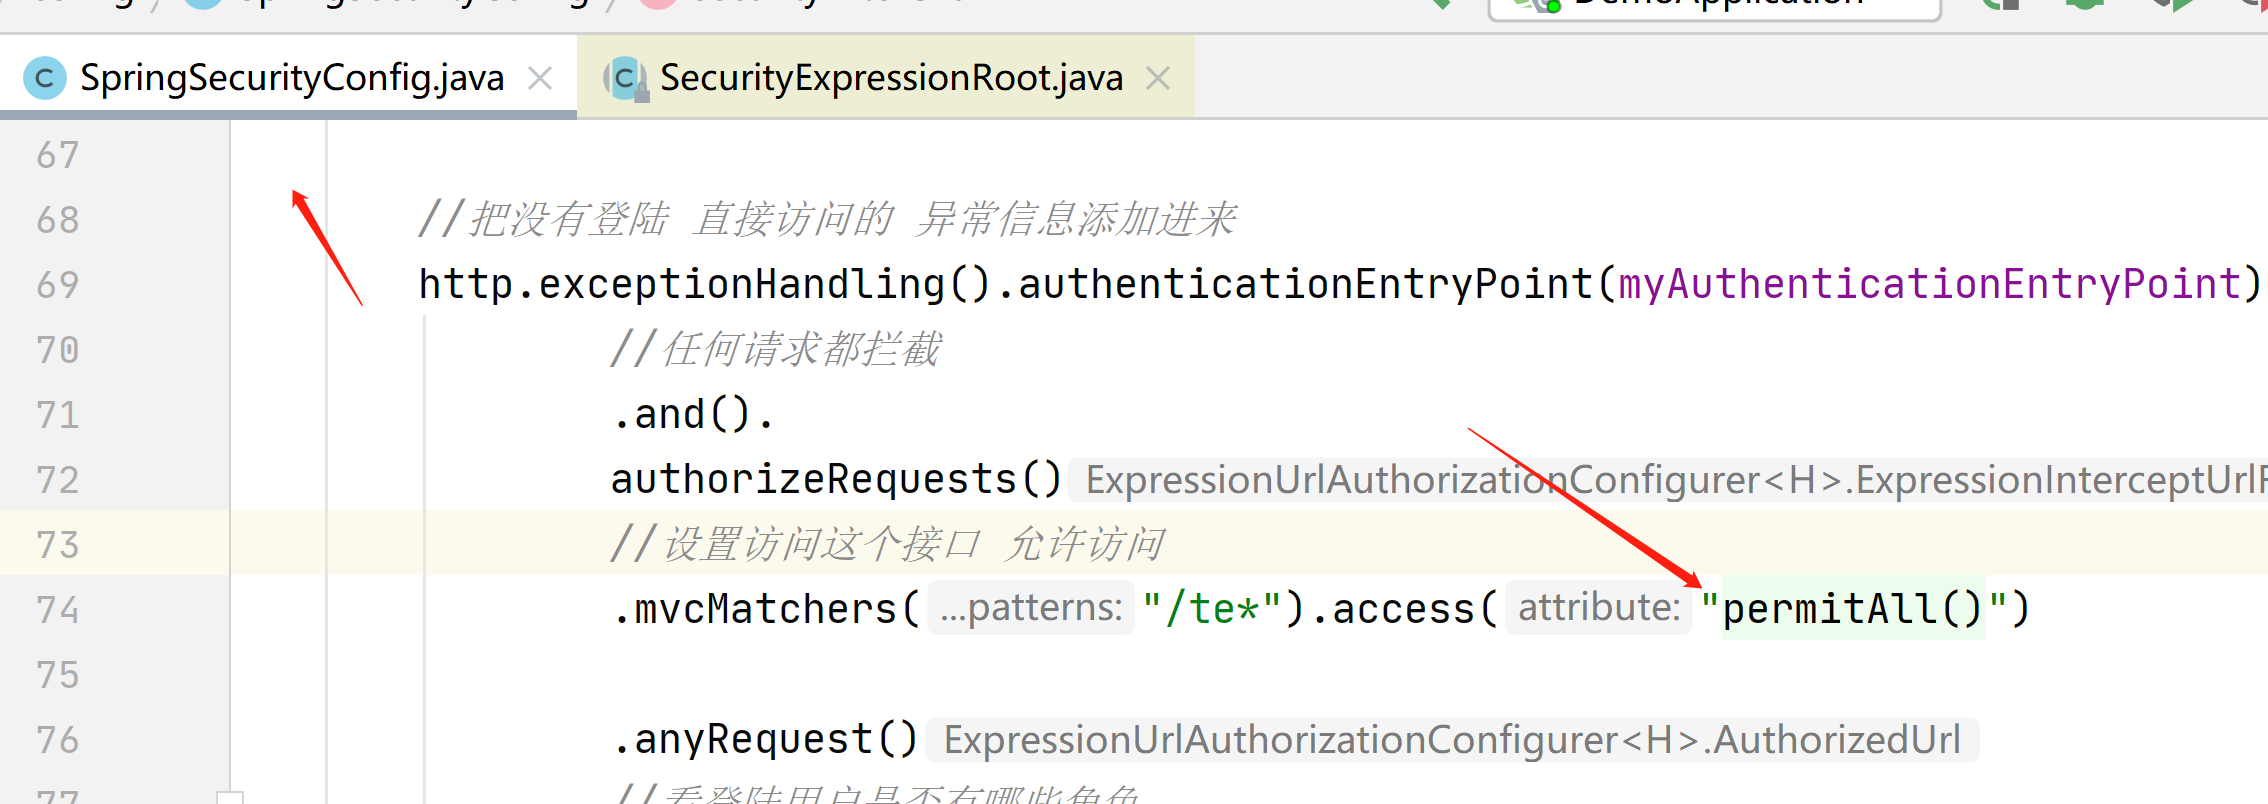
也可以模糊匹配,使他能访问
.mvcMatchers("/te*").access("permitAll()")
这里要注意匹配器要放在.anyRequest()前面,否则报错
Can't configure mvcMatchers after anyRequest
无法在anyRequest之后配置mvcMatchers
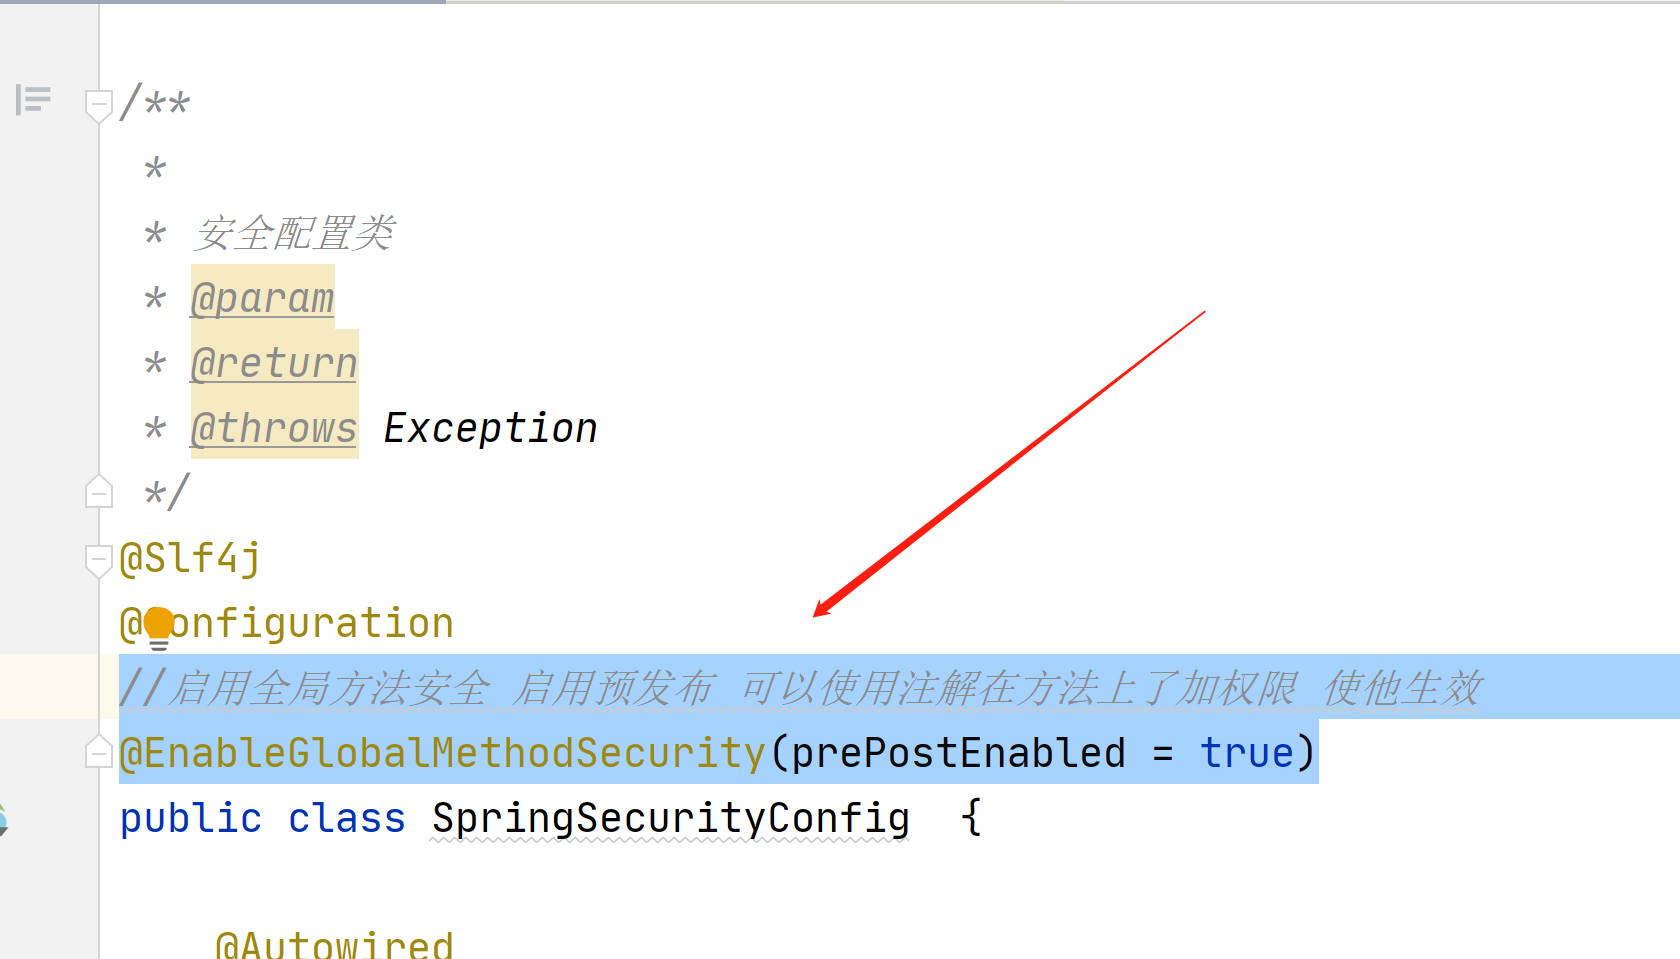
接下来我们在看下在方法上面授权
在配置类加入这个
//启用全局方法安全 启用预发布 可以使用注解在方法上了加权限 使他生效
@EnableGlobalMethodSecurity(prePostEnabled = true)
package com.example.demo.config;

import com.example.demo.filter.AfterFilter;
import com.example.demo.filter.BeforeFilter;
import com.example.demo.filter.CustomFilter;
import com.example.demo.service.impl.SysUserService;
import lombok.extern.slf4j.Slf4j;
import org.springframework.beans.factory.annotation.Autowired;
import org.springframework.context.annotation.Bean;
import org.springframework.context.annotation.Configuration;
import org.springframework.security.authentication.AuthenticationProvider;
import org.springframework.security.authentication.BadCredentialsException;
import org.springframework.security.authentication.UsernamePasswordAuthenticationToken;
import org.springframework.security.config.annotation.authentication.configuration.EnableGlobalAuthentication;
import org.springframework.security.config.annotation.method.configuration.EnableGlobalMethodSecurity;
import org.springframework.security.config.annotation.web.builders.HttpSecurity;
import org.springframework.security.config.http.SessionCreationPolicy;
import org.springframework.security.core.Authentication;
import org.springframework.security.core.AuthenticationException;
import org.springframework.security.core.userdetails.UserDetails;
import org.springframework.security.crypto.bcrypt.BCryptPasswordEncoder;
import org.springframework.security.crypto.password.PasswordEncoder;
import org.springframework.security.web.SecurityFilterChain;
import org.springframework.security.web.authentication.UsernamePasswordAuthenticationFilter;

/**
 *
 * 安全配置类
 * @param
 * @return
 * @throws Exception
 */
@Slf4j
@Configuration
//启用全局方法安全 启用预发布 可以使用注解在方法上了加权限 使他生效
@EnableGlobalMethodSecurity(prePostEnabled = true)
public class SpringSecurityConfig  {

    @Autowired
    private MyAuthenticationEntryPoint myAuthenticationEntryPoint;

    @Autowired
    private MyAuthenticationSuccessHandler myAuthenticationSuccessHandler;

    @Autowired
    private MyAuthenticationFailureHandler myAuthenticationFailureHandler;

    @Autowired
    private MyLogoutSuccessHandler myLogoutSuccessHandler;

    //密码加密
    @Bean
    public PasswordEncoder passwordEncoder(){
        return new BCryptPasswordEncoder();
    }


   /**
    *
    * 安全过滤器链
    * @param
    * @return
    * @throws Exception
    */
   @Bean
   public SecurityFilterChain securityFilterChain(HttpSecurity http) throws Exception {
       //启用会话存储 在需要时创建session会话
       http.sessionManagement().sessionCreationPolicy(SessionCreationPolicy.IF_REQUIRED);
       //把没有登陆 直接访问的 异常信息添加进来
       http.exceptionHandling().authenticationEntryPoint(myAuthenticationEntryPoint)
               //任何请求都拦截
               .and().
               authorizeRequests()
               .anyRequest()
               .authenticated()
               .and()
               //启用表单认证模式
               .formLogin()
               //登陆成功返回的提示信息
               .successHandler(myAuthenticationSuccessHandler)
               //登陆失败的返回提示信息
               .failureHandler(myAuthenticationFailureHandler)
               //登陆点击提交后的地址
               .loginProcessingUrl("/dengLu")
               //放行 loginPage和loginProcessingUrl 不用登陆
               .permitAll()
               //设置username的别名为 用于在登陆的html表单的名字
               .usernameParameter("account")
               //设置password的别名为 用于在登陆的html表单的名字
               .passwordParameter("password")
               .and()
               //设置注销功能
               .logout()
               //注销成功的提示信息
               .logoutSuccessHandler(myLogoutSuccessHandler)
               //注销url地址
               .logoutUrl("/logout")
               //session直接过期
               .invalidateHttpSession(true)
               //清除认证信息
               .clearAuthentication(true)
               .and()
               //禁用csrf安全防护
               .csrf().disable();

       //在登陆之后的过滤器
       http.addFilterAfter(new AfterFilter(), UsernamePasswordAuthenticationFilter.class);
       //在登陆之前的过滤器
       http.addFilterBefore(new BeforeFilter(),UsernamePasswordAuthenticationFilter.class);
       //自定义过滤器
       http.addFilterAt(new CustomFilter(),UsernamePasswordAuthenticationFilter.class);


       //创建对象
       return http.build();
   }
}
package com.example.demo.controller;

import lombok.extern.slf4j.Slf4j;
import org.springframework.security.access.prepost.PreAuthorize;
import org.springframework.security.core.Authentication;
import org.springframework.security.core.context.SecurityContextHolder;
import org.springframework.web.bind.annotation.GetMapping;
import org.springframework.web.bind.annotation.RestController;

@Slf4j
@RestController
public class TestController {

    @GetMapping("/test")
    public String test(){
        Authentication authentication = SecurityContextHolder.getContext().getAuthentication();
        log.info("用户账号:{}",authentication.getName());
        log.info("主体信息:{}",authentication.getPrincipal());
        log.info("权限信息:{}",authentication.getAuthorities());
        return "success";
    }


    @PreAuthorize("hasAnyRole('USER1')")
    @GetMapping("/aa")
    public String aa(){
        return "aaaaaaaaaaaaaaaaaaaaaaa";
    }
}
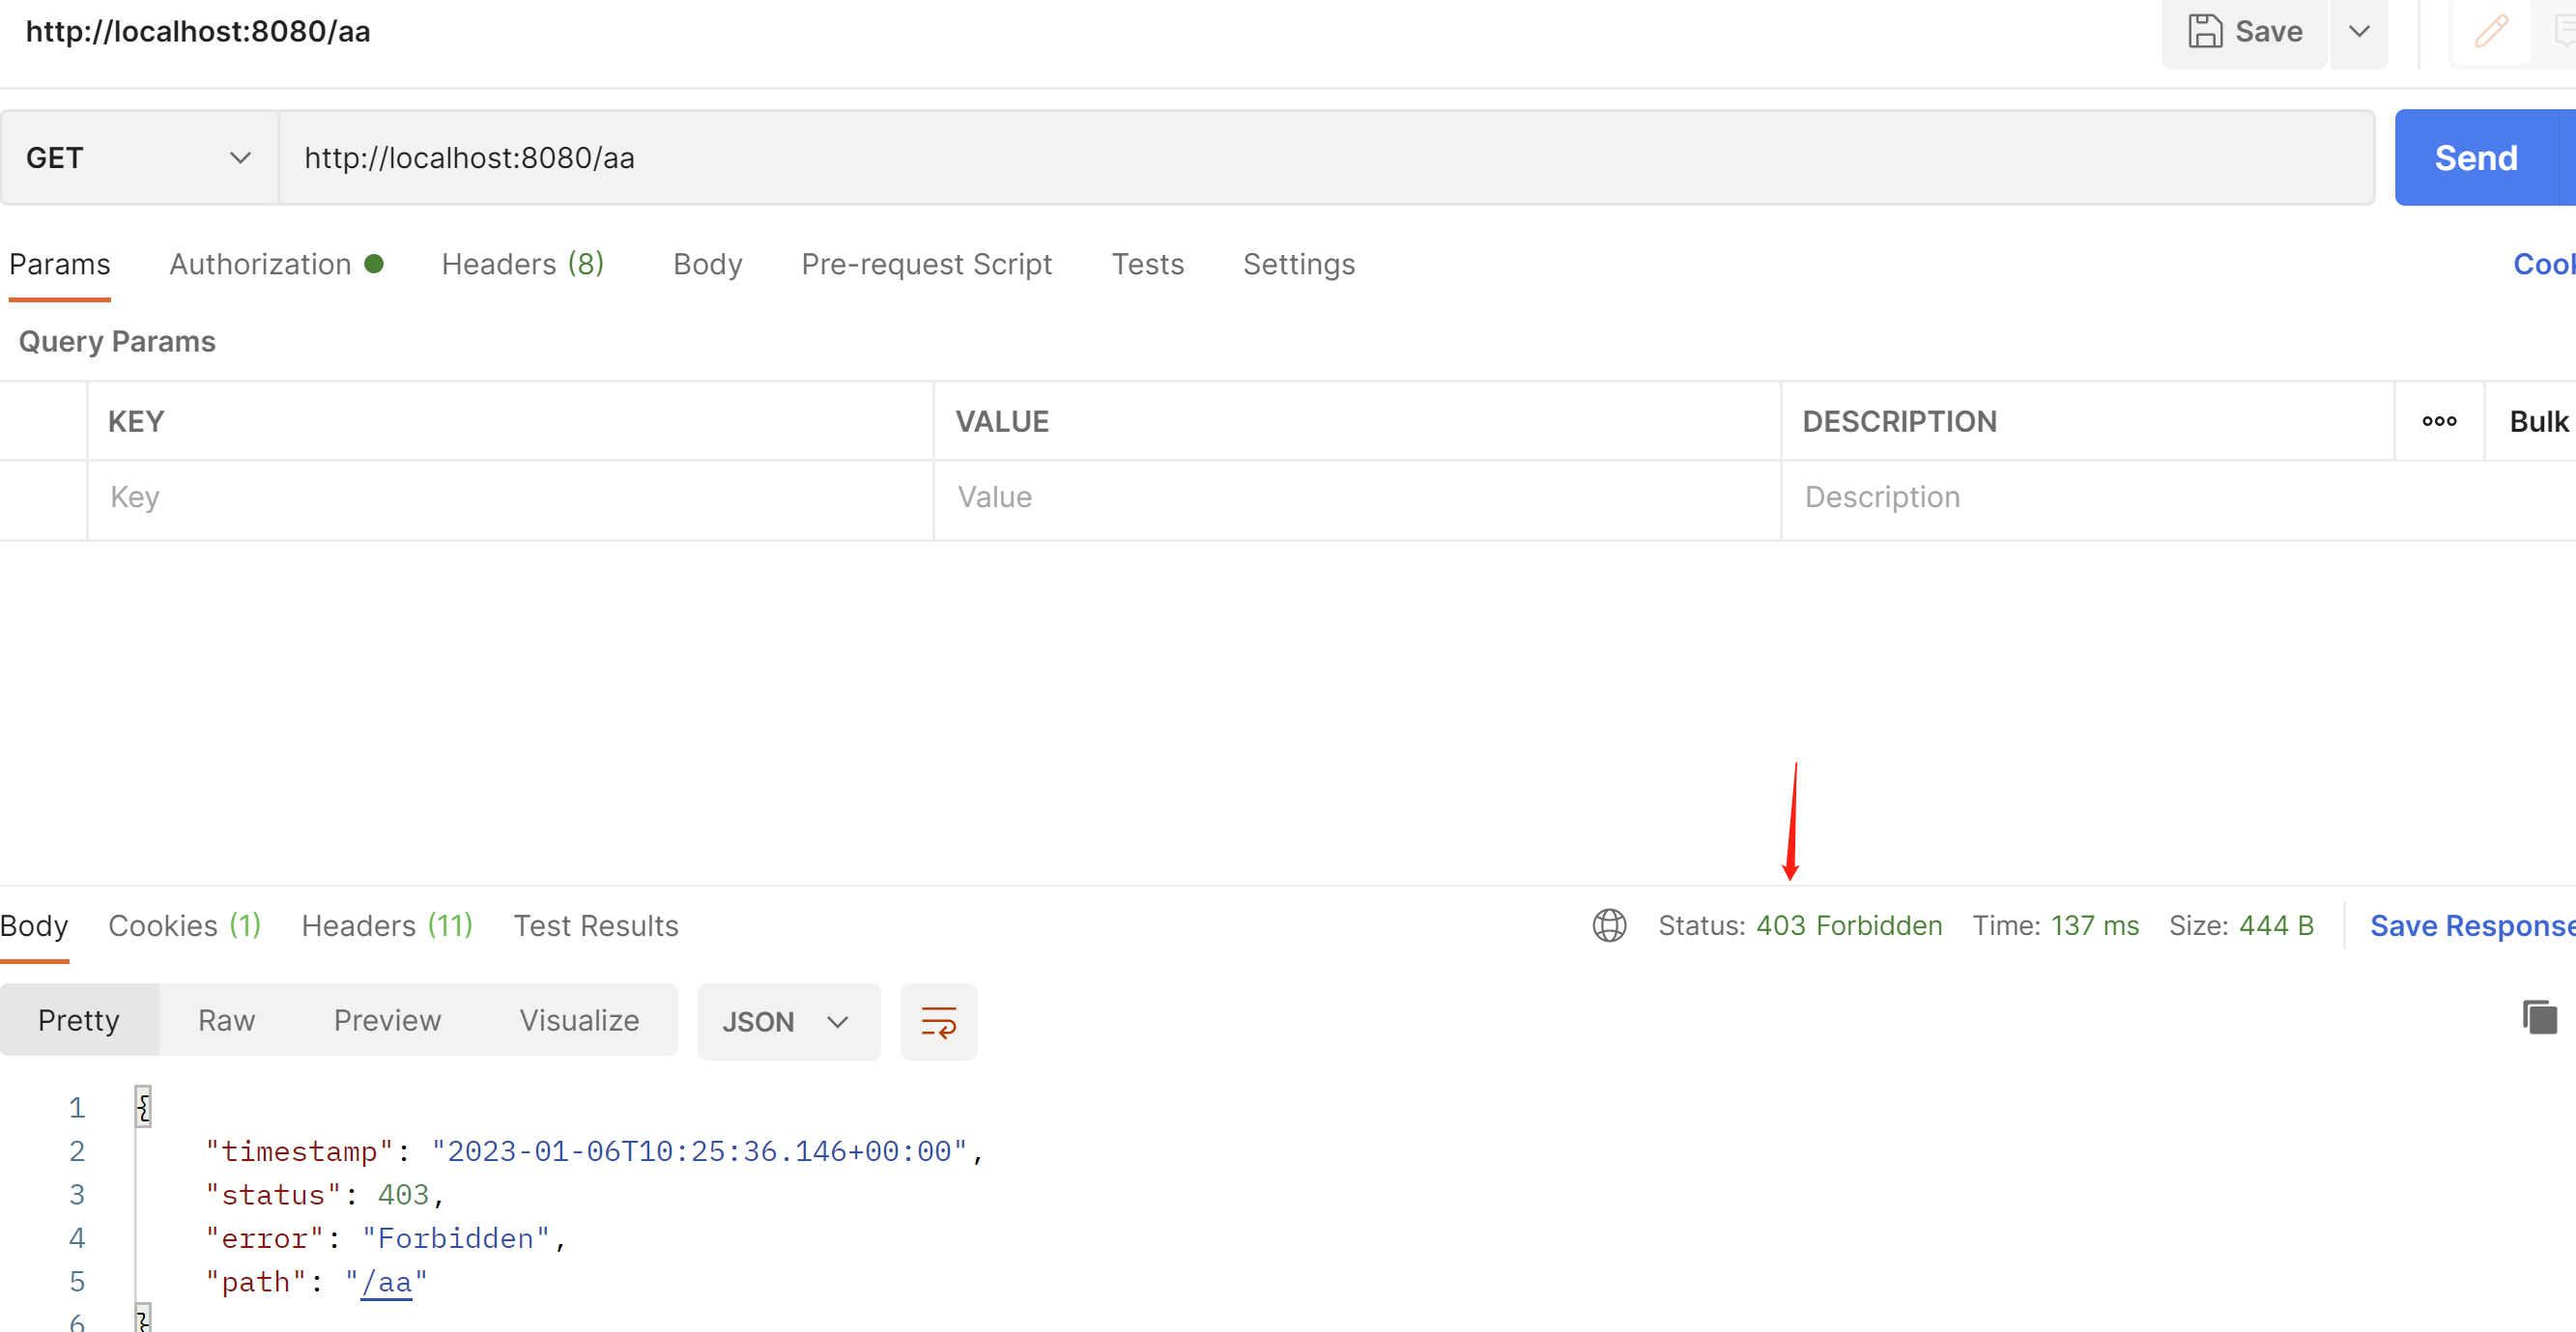
在这里加入不同的角色权限判断
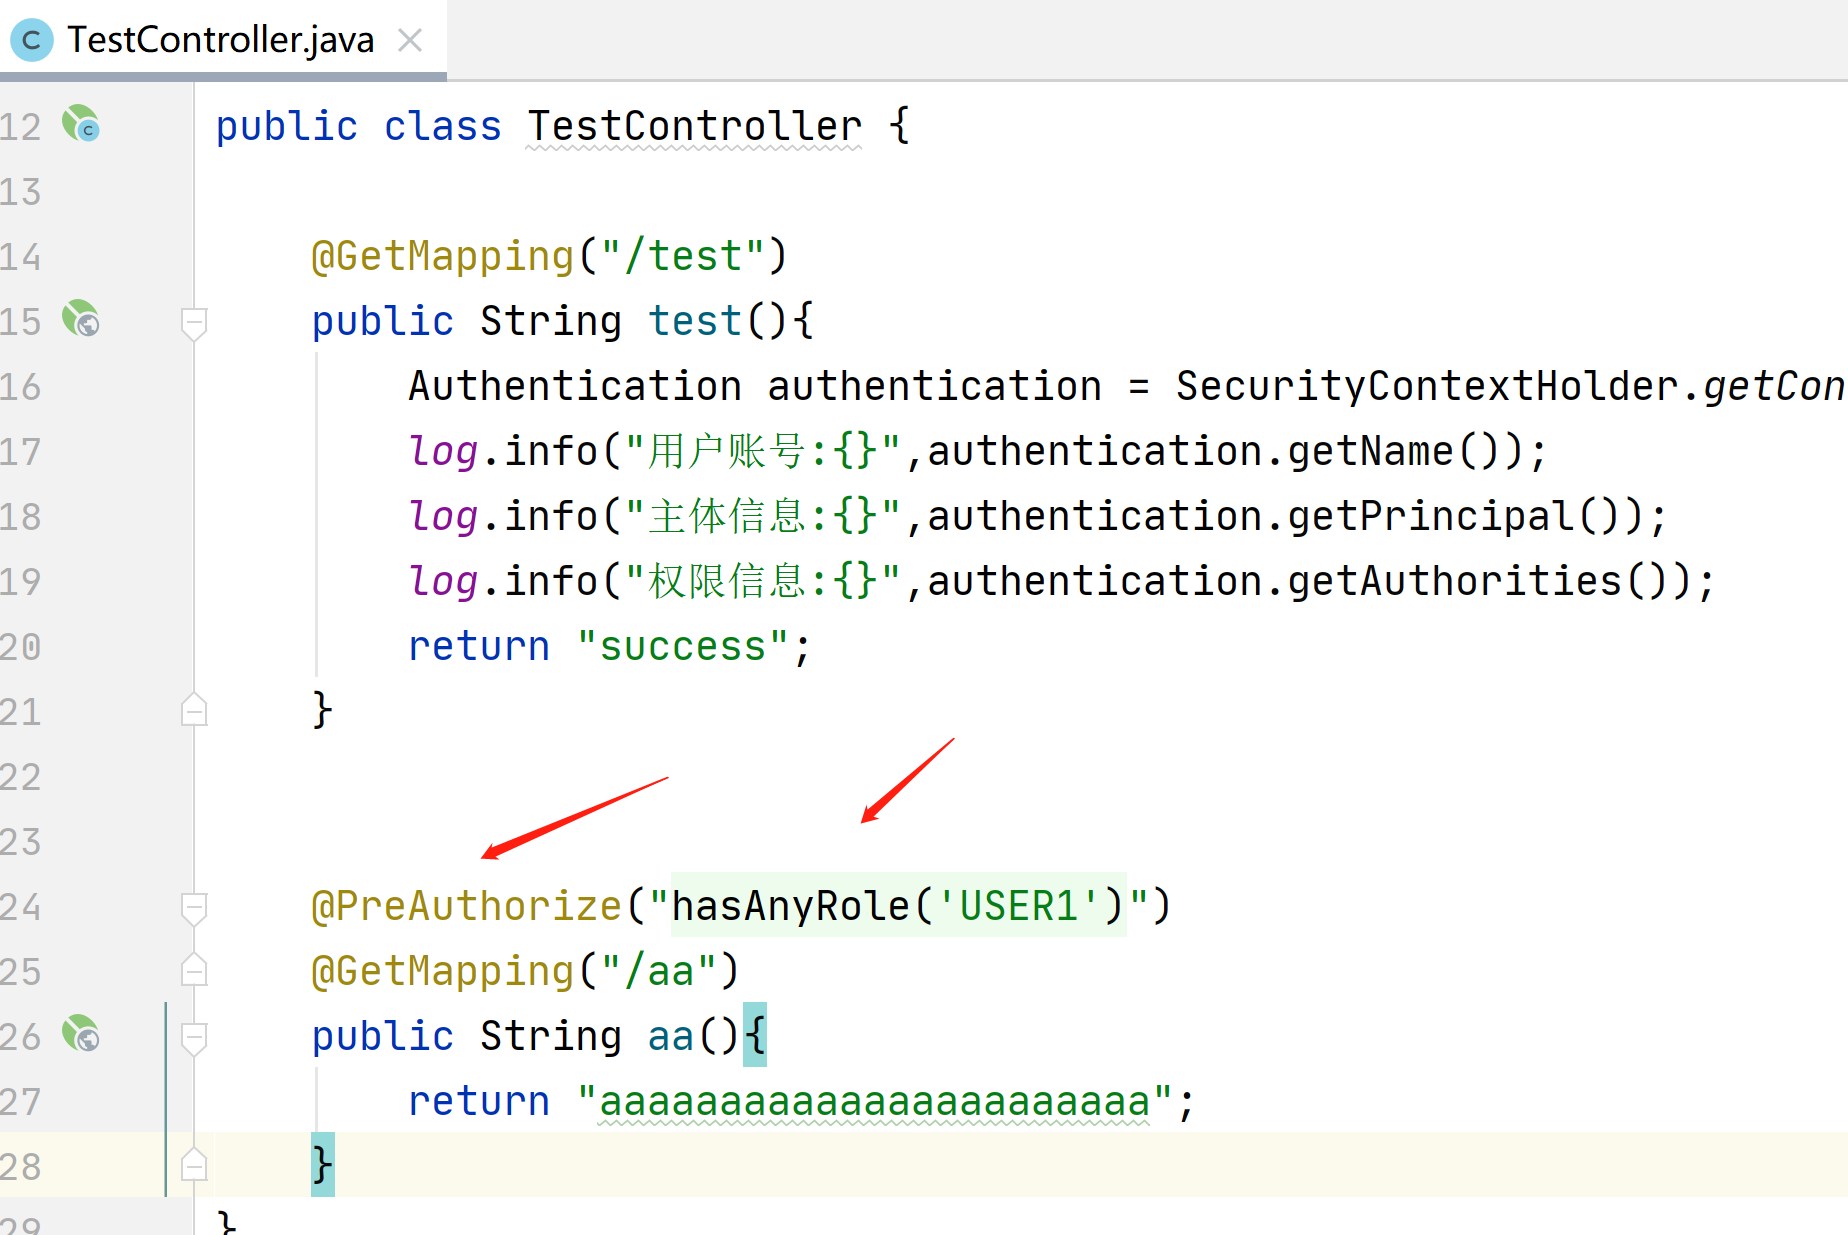
如果没有权限就会403
接下来我们来看下Oauth2协议
他有4种模式,授权码模式,客户端模式,密码模式,隐式授权模式,
我们常用的就是授权码模式
我们来看下什么是授权码模式
用户请求首页-》需要先跳转到第三方登陆-》获取授权服务器的token-》然后拿着token去资源服务器进行获取信息
我们来看下什么是客户端模式
就是需要先在第三方平台上注册好客户端的信息-》拿着客户端id和秘钥进行登陆-》授权服务器处理信息
其他2种模式用不到,不做介绍
接下来我们先在C:\Windows\System32\drivers\etc
配置好hosts
这样就能避免cookie 相同域名(localhost)覆盖的bug
127.0.0.1 auth-server
127.0.0.1 res-server
127.0.0.1 client
接下来我们先创建授权服务器
<?xml version="1.0" encoding="UTF-8"?>
<project xmlns="http://maven.apache.org/POM/4.0.0" xmlns:xsi="http://www.w3.org/2001/XMLSchema-instance"
         xsi:schemaLocation="http://maven.apache.org/POM/4.0.0 https://maven.apache.org/xsd/maven-4.0.0.xsd">
    <modelVersion>4.0.0</modelVersion>
    <parent>
        <groupId>org.springframework.boot</groupId>
        <artifactId>spring-boot-starter-parent</artifactId>
        <version>2.7.5</version>
        <relativePath/> <!-- lookup parent from repository -->
    </parent>
    <groupId>com.example</groupId>
    <artifactId>auth-server</artifactId>
    <version>0.0.1-SNAPSHOT</version>
    <name>auth-server</name>
    <description>Demo project for Spring Boot</description>
    <properties>
        <java.version>1.8</java.version>
    </properties>
    <dependencies>
        <dependency>
            <groupId>org.springframework.boot</groupId>
            <artifactId>spring-boot-starter-security</artifactId>
        </dependency>
        <dependency>
            <groupId>org.springframework.boot</groupId>
            <artifactId>spring-boot-starter-web</artifactId>
        </dependency>

        <dependency>
            <groupId>org.springframework.boot</groupId>
            <artifactId>spring-boot-starter-test</artifactId>
            <scope>test</scope>
        </dependency>
        <dependency>
            <groupId>org.springframework.security</groupId>
            <artifactId>spring-security-test</artifactId>
            <scope>test</scope>
        </dependency>
        <!--授权服务-->
        <dependency>
            <groupId>org.springframework.security</groupId>
            <artifactId>spring-security-oauth2-authorization-server</artifactId>
            <version>0.3.1</version>
        </dependency>

    </dependencies>

    <build>
        <plugins>
            <plugin>
                <groupId>org.springframework.boot</groupId>
                <artifactId>spring-boot-maven-plugin</artifactId>
            </plugin>
        </plugins>
    </build>

</project>
package com.example.authserver.security;
import com.nimbusds.jose.jwk.JWKSet;
import com.nimbusds.jose.jwk.RSAKey;
import com.nimbusds.jose.jwk.source.ImmutableJWKSet;
import com.nimbusds.jose.jwk.source.JWKSource;
import com.nimbusds.jose.proc.SecurityContext;
import org.springframework.context.annotation.Bean;
import org.springframework.context.annotation.Configuration;
import org.springframework.core.annotation.Order;
import org.springframework.security.config.Customizer;
import org.springframework.security.config.annotation.web.builders.HttpSecurity;
import org.springframework.security.config.annotation.web.configuration.EnableWebSecurity;
import org.springframework.security.config.annotation.web.configuration.OAuth2AuthorizationServerConfiguration;
import org.springframework.security.core.userdetails.User;
import org.springframework.security.core.userdetails.UserDetails;
import org.springframework.security.core.userdetails.UserDetailsService;
import org.springframework.security.oauth2.core.AuthorizationGrantType;
import org.springframework.security.oauth2.core.ClientAuthenticationMethod;
import org.springframework.security.oauth2.server.authorization.client.InMemoryRegisteredClientRepository;
import org.springframework.security.oauth2.server.authorization.client.RegisteredClient;
import org.springframework.security.oauth2.server.authorization.client.RegisteredClientRepository;
import org.springframework.security.oauth2.server.authorization.config.ClientSettings;
import org.springframework.security.oauth2.server.authorization.config.ProviderSettings;
import org.springframework.security.provisioning.InMemoryUserDetailsManager;
import org.springframework.security.web.SecurityFilterChain;
import org.springframework.security.web.authentication.LoginUrlAuthenticationEntryPoint;
import java.security.KeyPair;
import java.security.KeyPairGenerator;
import java.security.interfaces.RSAPrivateKey;
import java.security.interfaces.RSAPublicKey;
import java.util.UUID;
@Configuration
//开启web安全 应用在web环境下
// 1: 加载了WebSecurityConfiguration配置类, 配置安全认证策略
// 2: 加载了AuthenticationConfiguration, 配置了认证信息
@EnableWebSecurity
public class SecurityConfig {
/**
*
* 授权服务安全过滤器链
* 第一个进来
* @param
* @return
* @throws Exception
*/
@Order(1)
@Bean
public SecurityFilterChain authorizedServiceSecurityFilterChain(HttpSecurity http) throws Exception {
//授权服务配置 应用默认安全性 简化配置,在源码给你都配置好了
OAuth2AuthorizationServerConfiguration.applyDefaultSecurity(http);
http. //异常处理
exceptionHandling().
//设置默认的登陆界面
authenticationEntryPoint(new LoginUrlAuthenticationEntryPoint("/login"));
return http.build();
}
/**
* 默认安全过滤器链
* 用于身份认证
* 第二个进入
* @param
* @return
* @throws Exception
*/
@Order(2)
@Bean
public SecurityFilterChain defaultSecurityFilterChain(HttpSecurity http) throws Exception {
//必须认证才能登陆
http.authorizeHttpRequests()
.anyRequest()
.authenticated()
.and()
//采用表单认证方式登陆
.formLogin(Customizer.withDefaults());
return http.build();
}
/**
*
* 配置用户信息
* @param
* @return
* @throws Exception
*/
@Bean
public UserDetailsService userDetailsService(){
UserDetails userDetails= User.withDefaultPasswordEncoder()
//用户名 账号
.username("zhangsan")
//密码
.password("123456")
.roles("USER")
.build();
//内存用户详细信息管理器 不去使用数据库
return new InMemoryUserDetailsManager(userDetails);
}
/**
*
* 用于第三方认证
* 主要管理第三方的客户端
* 已注册客户端存储库
* @param
* @return
* @throws Exception
*/
@Bean
public RegisteredClientRepository registeredClientRepository(){
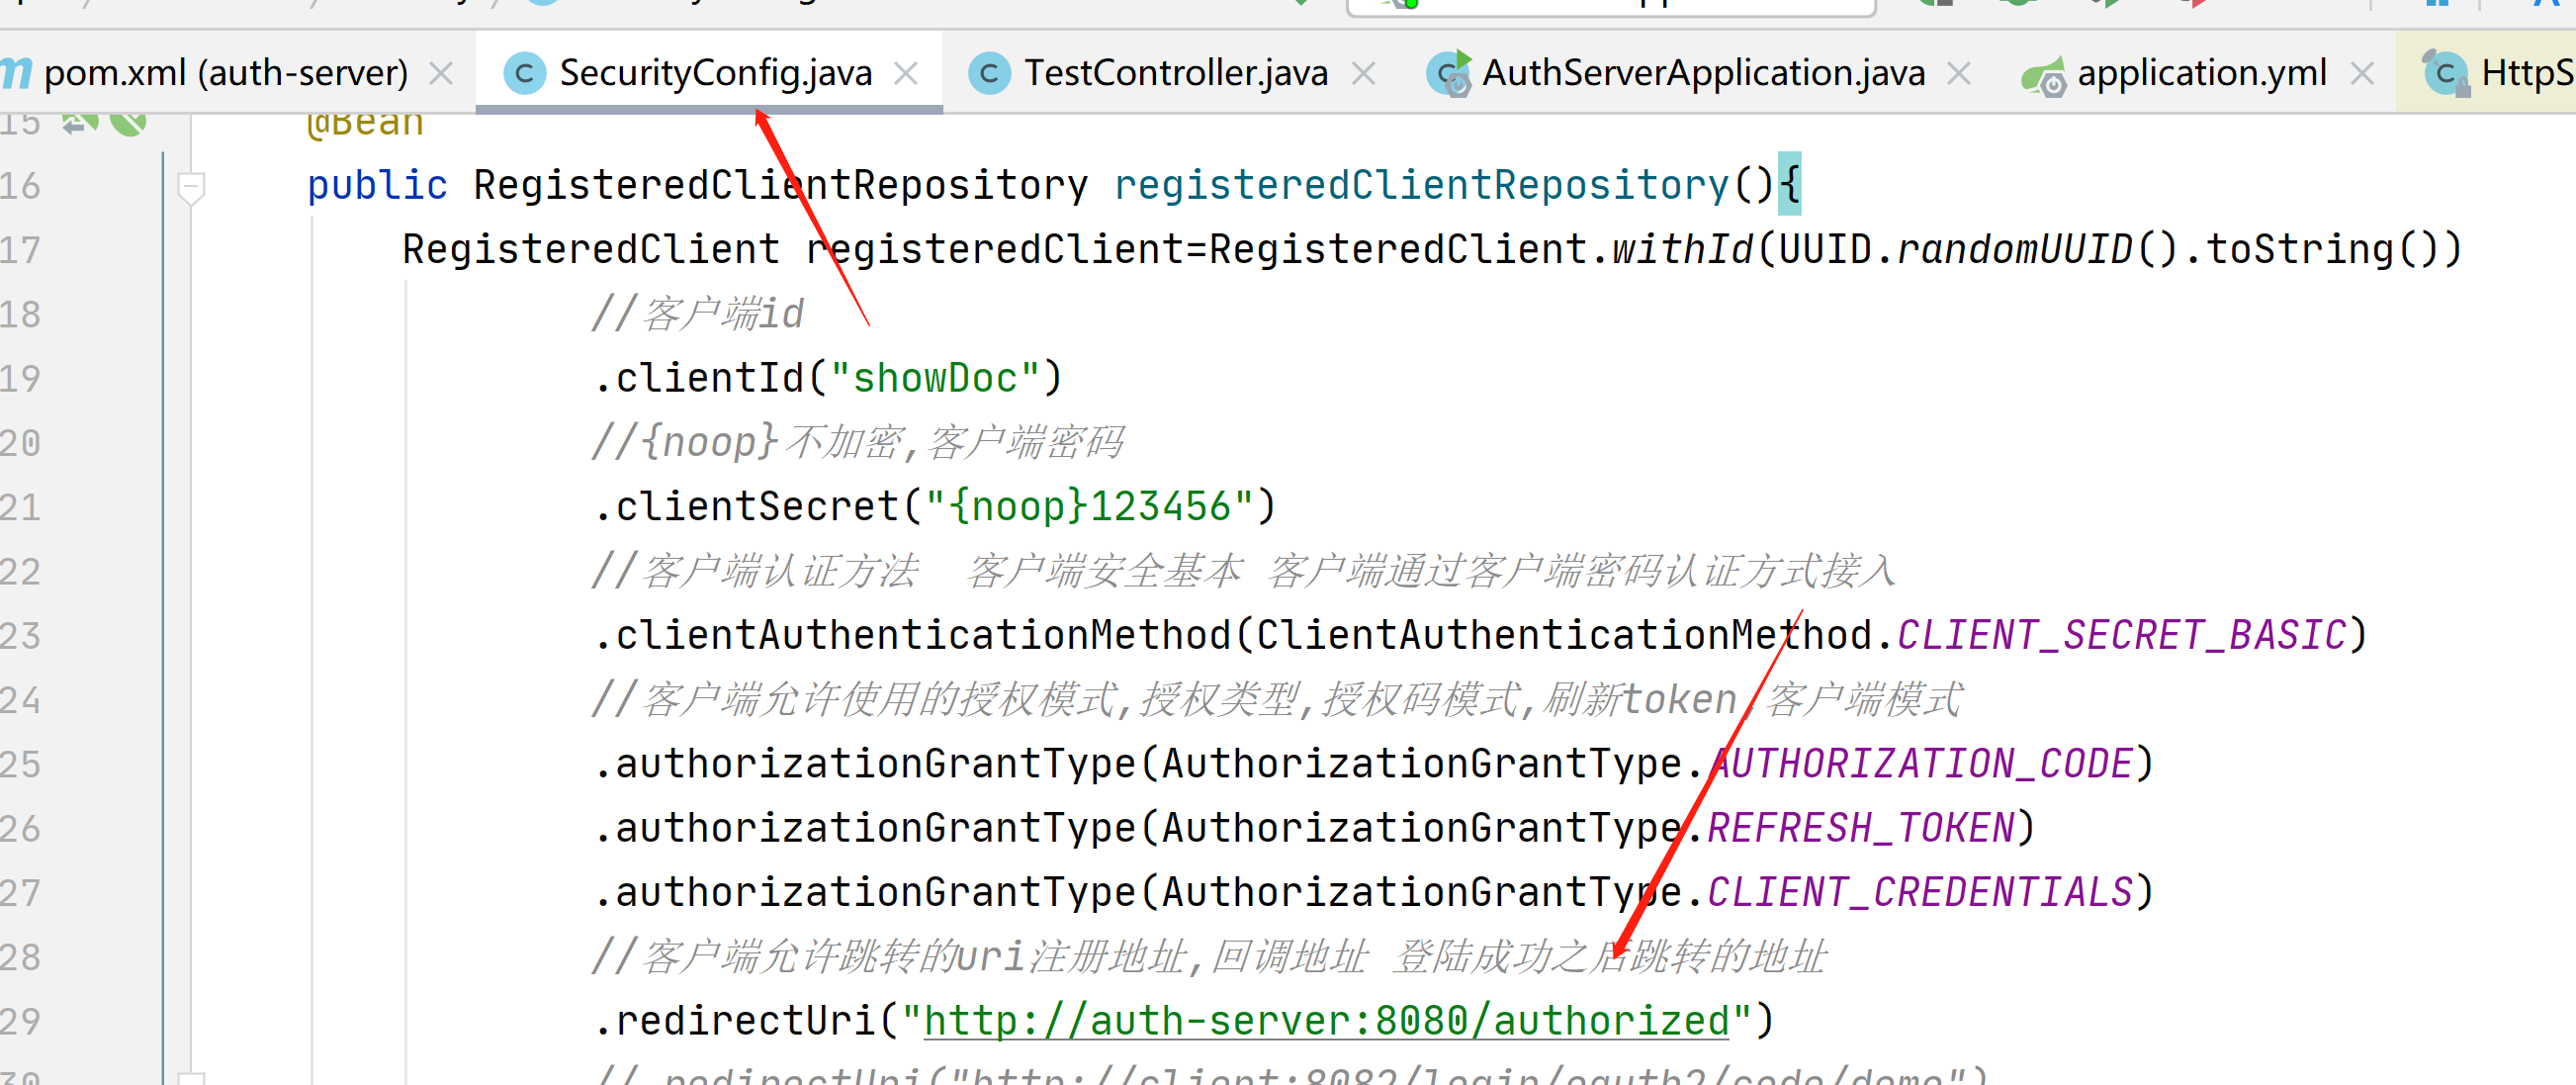
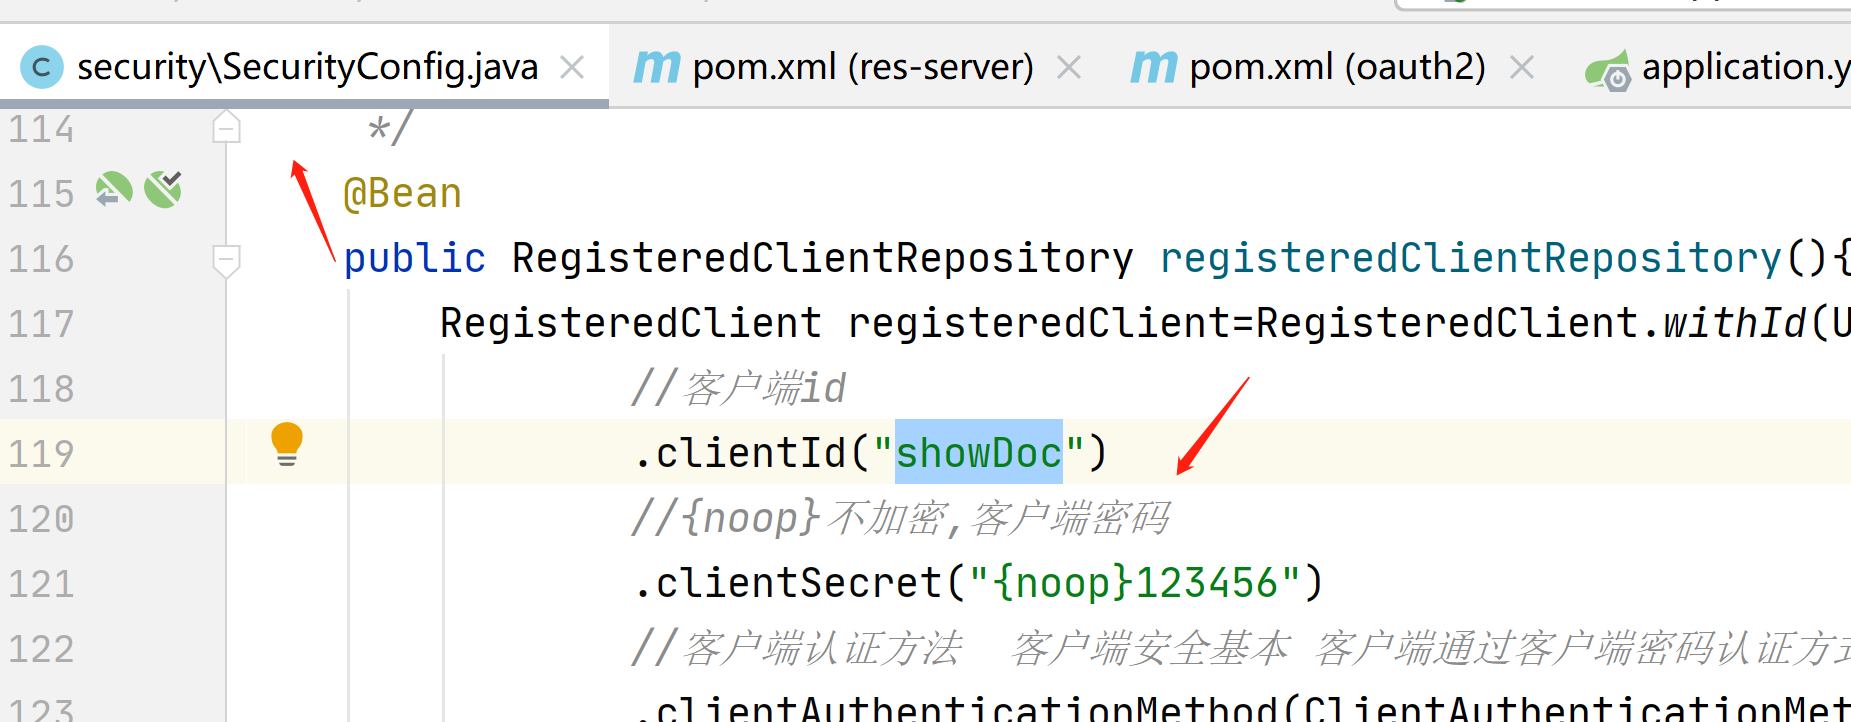
RegisteredClient registeredClient=RegisteredClient.withId(UUID.randomUUID().toString())
//客户端id
.clientId("showDoc")
//{noop}不加密,客户端密码
.clientSecret("{noop}123456")
//客户端认证方法 客户端安全基本 客户端通过客户端密码认证方式接入
.clientAuthenticationMethod(ClientAuthenticationMethod.CLIENT_SECRET_BASIC)
//客户端允许使用的授权模式,授权类型,授权码模式,刷新token,客户端模式
.authorizationGrantType(AuthorizationGrantType.AUTHORIZATION_CODE)
.authorizationGrantType(AuthorizationGrantType.REFRESH_TOKEN)
.authorizationGrantType(AuthorizationGrantType.CLIENT_CREDENTIALS)
//客户端允许跳转的uri注册地址,回调地址 登陆成功之后跳转的地址
.redirectUri("http://auth-server:8080/authorized")
//.redirectUri("http://client:8082/login/oauth2/code/demo")
//客户端允许使用的范围授权 如果对方写的不对 那么就没有权限进行登陆
.scope("read")
.scope("write")
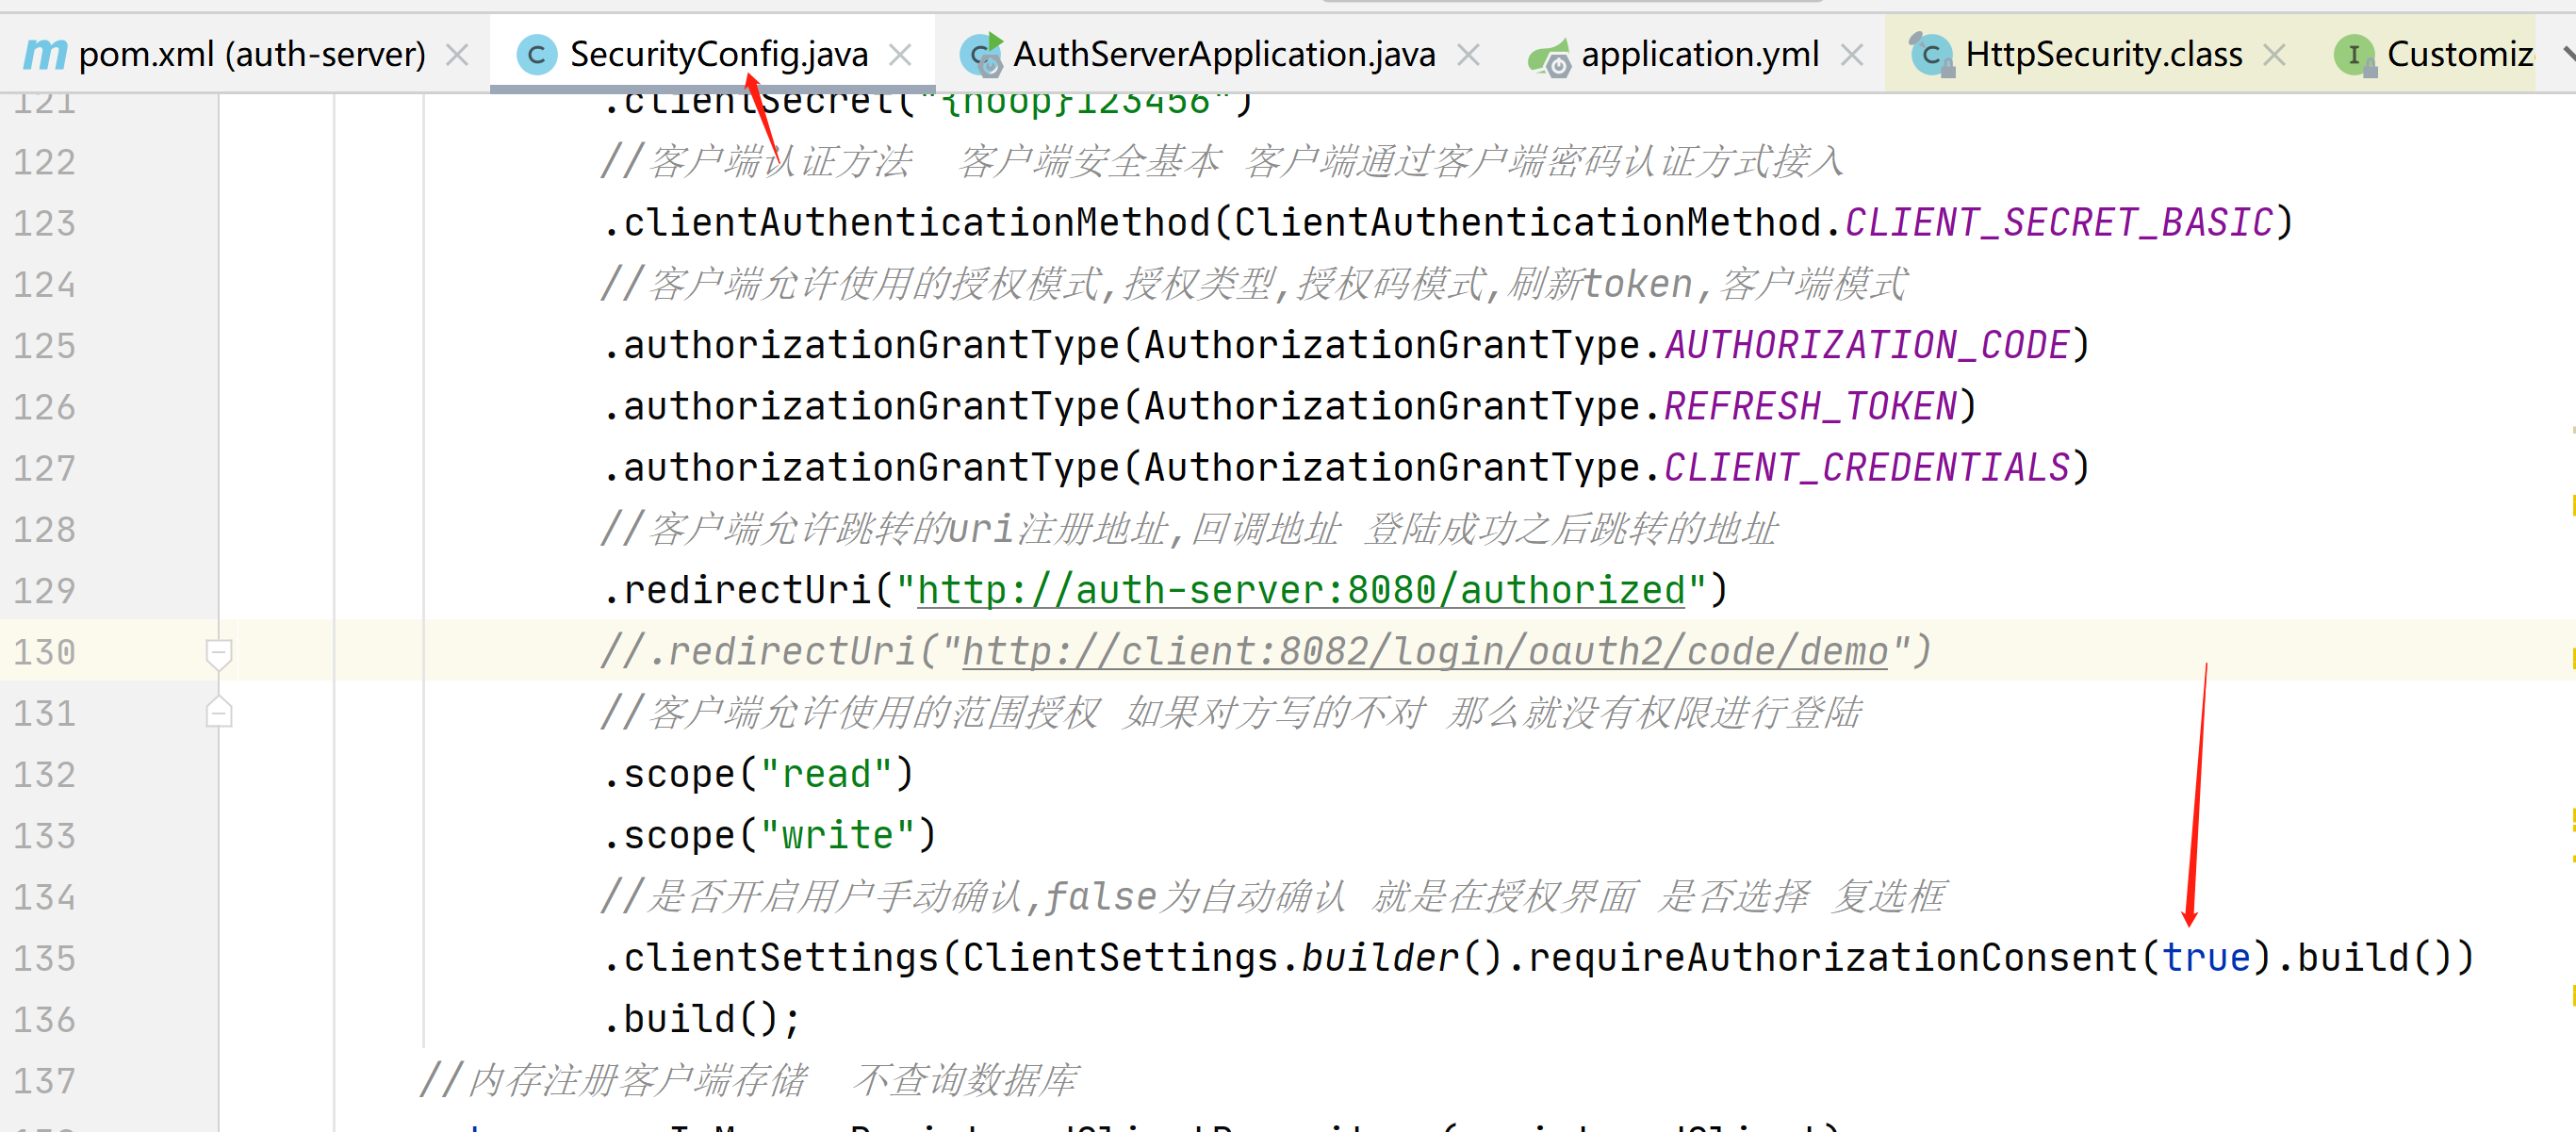
//是否开启用户手动确认,false为自动确认 就是在授权界面 是否选择 复选框
.clientSettings(ClientSettings.builder().requireAuthorizationConsent(true).build())
.build();
//内存注册客户端存储 不查询数据库
return new InMemoryRegisteredClientRepository(registeredClient);
}
/**
*
* 通过非对称加密生成access_token(jwt)的签名部分
* @param
* @return
* @throws Exception
*/
@Bean
public JWKSource<SecurityContext>jwkSource(){
KeyPair keyPair = generateRsaKey();
RSAPublicKey publicKey = (RSAPublicKey) keyPair.getPublic();
RSAPrivateKey privateKey = (RSAPrivateKey) keyPair.getPrivate();
RSAKey rsaKey = new RSAKey.Builder(publicKey)
.privateKey(privateKey)
.keyID(UUID.randomUUID().toString())
.build();
JWKSet jwkSet = new JWKSet(rsaKey);
return new ImmutableJWKSet<>(jwkSet);
}
/**
* ⽣成秘钥对,为jwkSource提供服务,私钥服务器⾃身持有,公钥对外开放。
*
* @return
*/
private static KeyPair generateRsaKey() {
KeyPair keyPair;
try {
KeyPairGenerator keyPairGenerator = KeyPairGenerator.getInstance("RSA");
keyPairGenerator.initialize(2048);
keyPair = keyPairGenerator.generateKeyPair();
} catch (Exception ex) {
throw new IllegalStateException(ex);
}
return keyPair;
}
/**
*
* 提供程序设置 默认配置
* @param
* @return
* @throws Exception
*/
@Bean
public ProviderSettings providerSettings(){
return ProviderSettings.builder().build();
}
}
使用这个链接进行访问授权地址,get请求
自动跳转到登陆界面

输入用户zhangsan 密码123456
选择read 添加提交进行授权
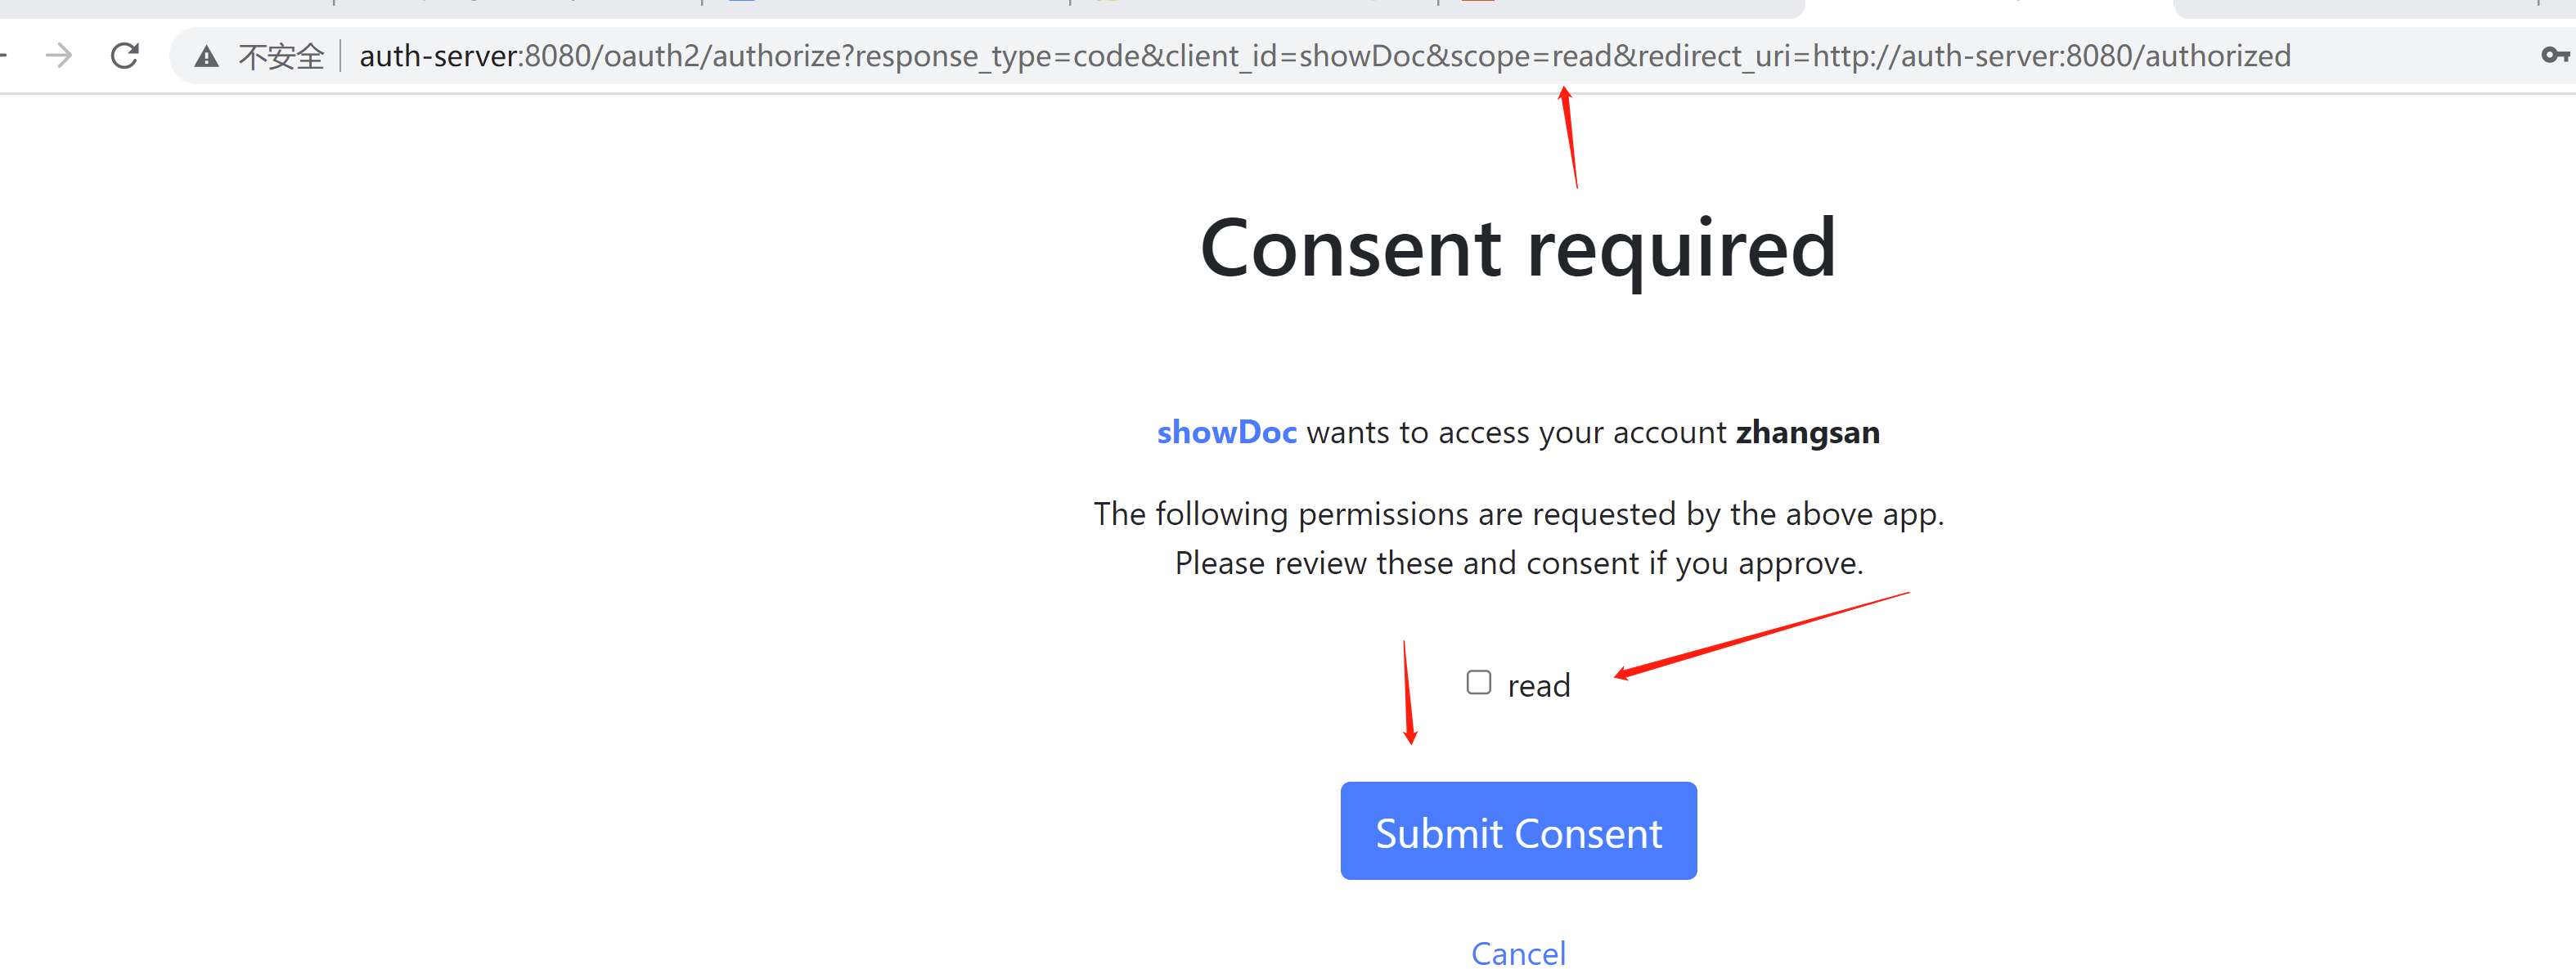
就是对应的这里,如果为true显示授权界面,如果为false 不显示 默认自动授权
这个时候我们看到404,是因为我们还没有写http://auth-server:8080/authorized接口

就是对应的这里
创建接口
package com.example.authserver.controller;

import org.springframework.web.bind.annotation.GetMapping;
import org.springframework.web.bind.annotation.RestController;

@RestController
public class TestController {


    /**
     *
     * 获取授权码
     * @param
     * @return
     * @throws Exception
     */
    @GetMapping("/authorized")
    public String authorized(String code){
        return code;
    }
}
我们在来一次 获取授权码
可以看到拿到了授权码

我们在把这里改成false,可以看到就自动跳到获取授权码的界面了

接下来我们创建资源服务器
比如说我们想看到外卖的信息,这些外卖的信息就是放在资源服务器的
<?xml version="1.0" encoding="UTF-8"?>
<project xmlns="http://maven.apache.org/POM/4.0.0" xmlns:xsi="http://www.w3.org/2001/XMLSchema-instance"
         xsi:schemaLocation="http://maven.apache.org/POM/4.0.0 https://maven.apache.org/xsd/maven-4.0.0.xsd">
    <modelVersion>4.0.0</modelVersion>
    <parent>
        <groupId>org.springframework.boot</groupId>
        <artifactId>spring-boot-starter-parent</artifactId>
        <version>2.7.5</version>
        <relativePath/> <!-- lookup parent from repository -->
    </parent>
    <groupId>com.example</groupId>
    <artifactId>res-server</artifactId>
    <version>0.0.1-SNAPSHOT</version>
    <name>res-server</name>
    <description>Demo project for Spring Boot</description>
    <properties>
        <java.version>1.8</java.version>
    </properties>
    <dependencies>
        <!--资源服务-->
        <dependency>
            <groupId>org.springframework.boot</groupId>
            <artifactId>spring-boot-starter-oauth2-resource-server</artifactId>
        </dependency>
        <dependency>
            <groupId>org.springframework.boot</groupId>
            <artifactId>spring-boot-starter-security</artifactId>
        </dependency>
        <dependency>
            <groupId>org.springframework.boot</groupId>
            <artifactId>spring-boot-starter-web</artifactId>
        </dependency>

        <dependency>
            <groupId>org.springframework.boot</groupId>
            <artifactId>spring-boot-starter-test</artifactId>
            <scope>test</scope>
        </dependency>
        <dependency>
            <groupId>org.springframework.security</groupId>
            <artifactId>spring-security-test</artifactId>
            <scope>test</scope>
        </dependency>
    </dependencies>

    <build>
        <plugins>
            <plugin>
                <groupId>org.springframework.boot</groupId>
                <artifactId>spring-boot-maven-plugin</artifactId>
            </plugin>
        </plugins>
    </build>

</project>
package com.example.resserver.config;

import org.springframework.context.annotation.Bean;
import org.springframework.context.annotation.Configuration;
import org.springframework.security.config.annotation.web.builders.HttpSecurity;
import org.springframework.security.web.SecurityFilterChain;

/**
 *
 * 安全配置类
 * @param
 * @return
 * @throws Exception
 */
@Configuration
public class SecurityConfig {


    /**
     *
     * 安全过滤器链
     * @param
     * @return
     * @throws Exception
     */
    @Bean
    public SecurityFilterChain filterChain(HttpSecurity http) throws Exception {
        //拦截所有请求
        http.authorizeRequests()
                    .anyRequest()
                    .authenticated()
                    .and()
                    //oauth2资源服务器 使用jwt 带着jwt的token访问资源服务器
                    .oauth2ResourceServer().jwt();
            return http.build();
    }

}
package com.example.resserver.controller;

import org.springframework.web.bind.annotation.GetMapping;
import org.springframework.web.bind.annotation.RestController;

@RestController
public class ResController {


    @GetMapping("/hello")
    public String hello(){
        return "你好啊。。。。。。。。。。。。。。。";
    }
}
配置文件
server:
  port: 8081
logging:
  level:
    root: debug
spring:
  security:
    oauth2:
      resourceserver:
        jwt:
          #获取公钥的路径 授权服务器的暴露的路径 不需要自己开发
          jwk-set-uri: http://auth-server:8080/oauth2/jwks
post请求,接下来拿着授权码获取令牌
注意这里对应的我们的客户端的id,秘钥
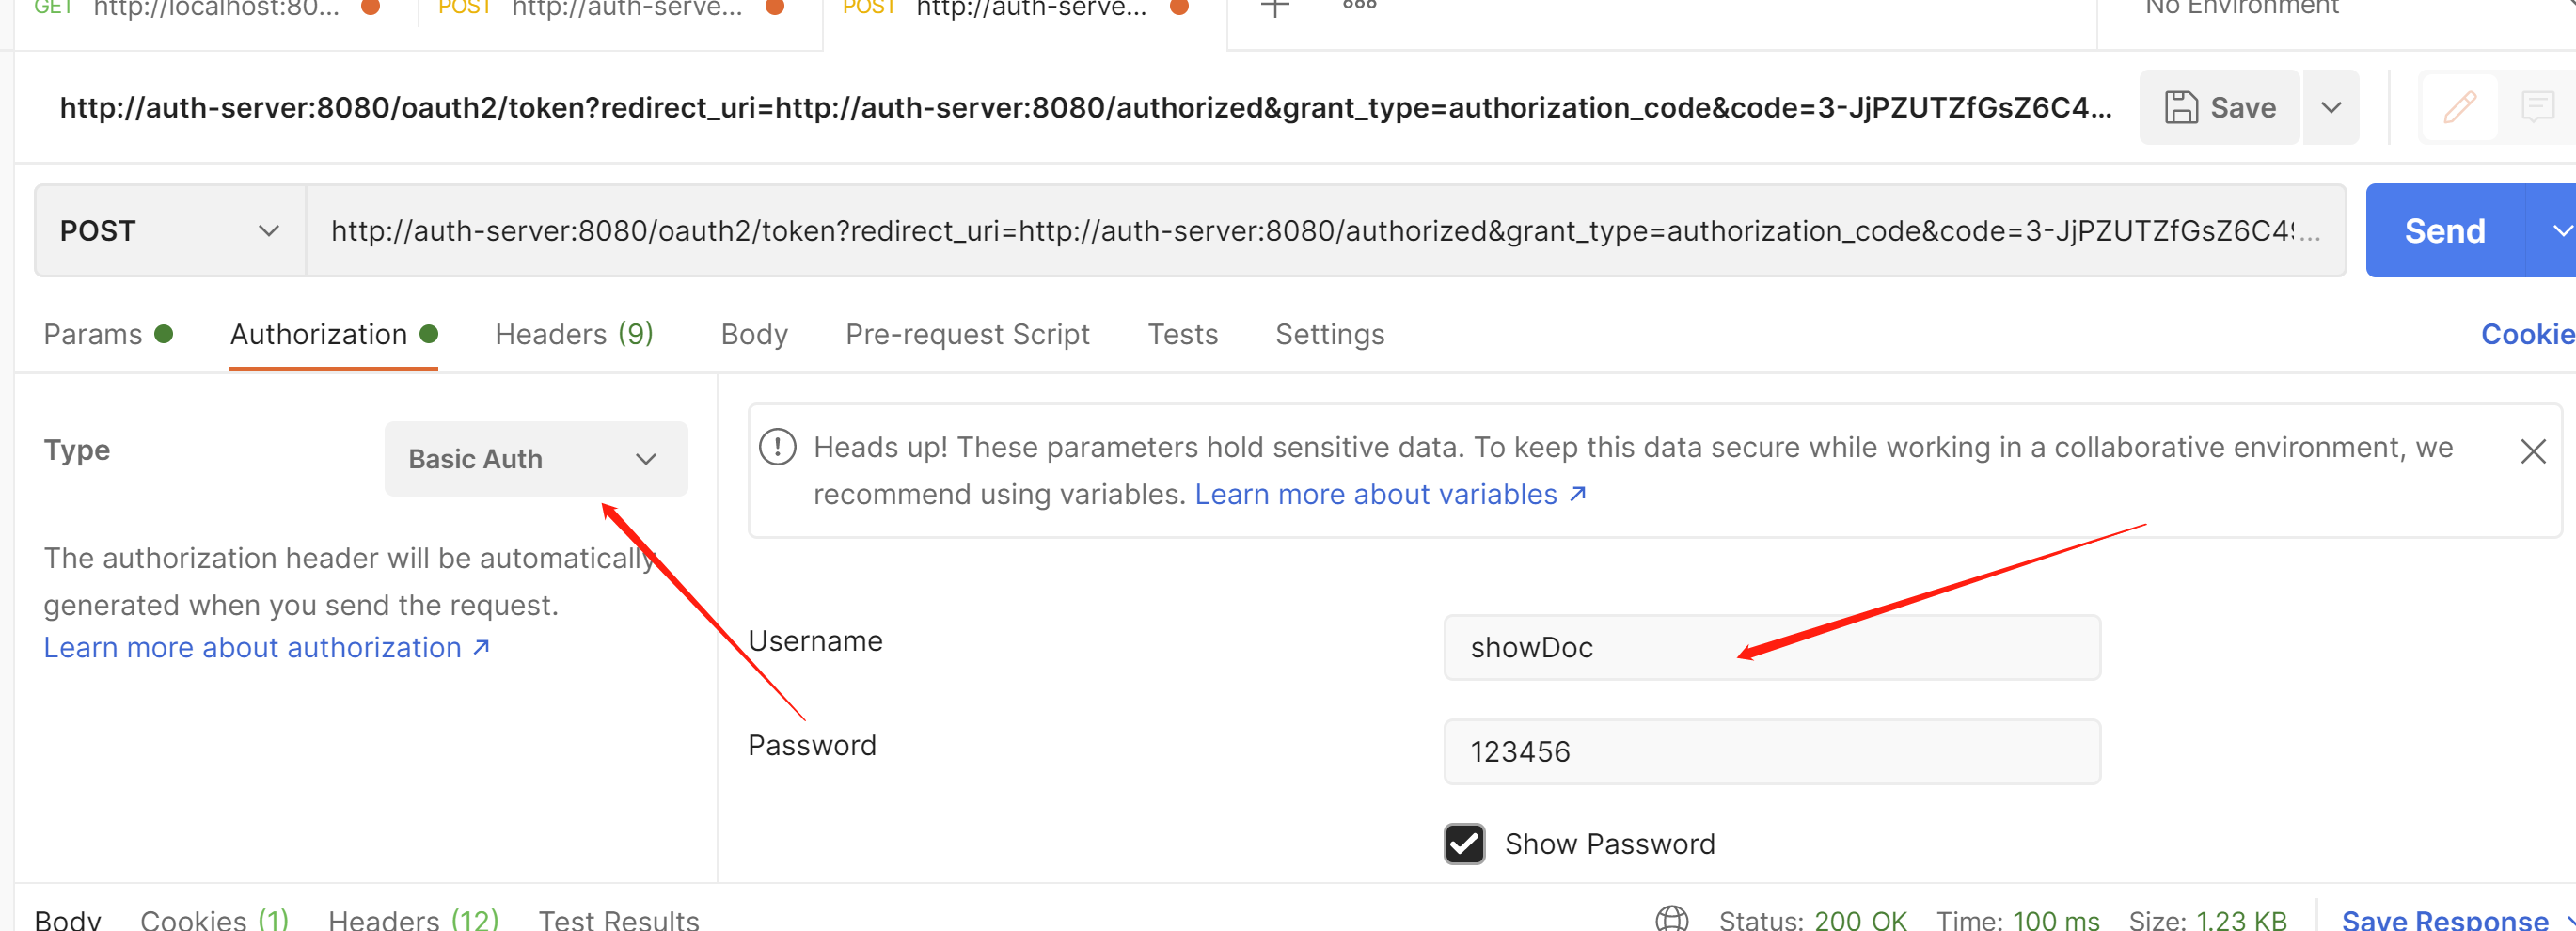
对应的这里
授权码只能使用一次,如果长时间不用,一会就过期了
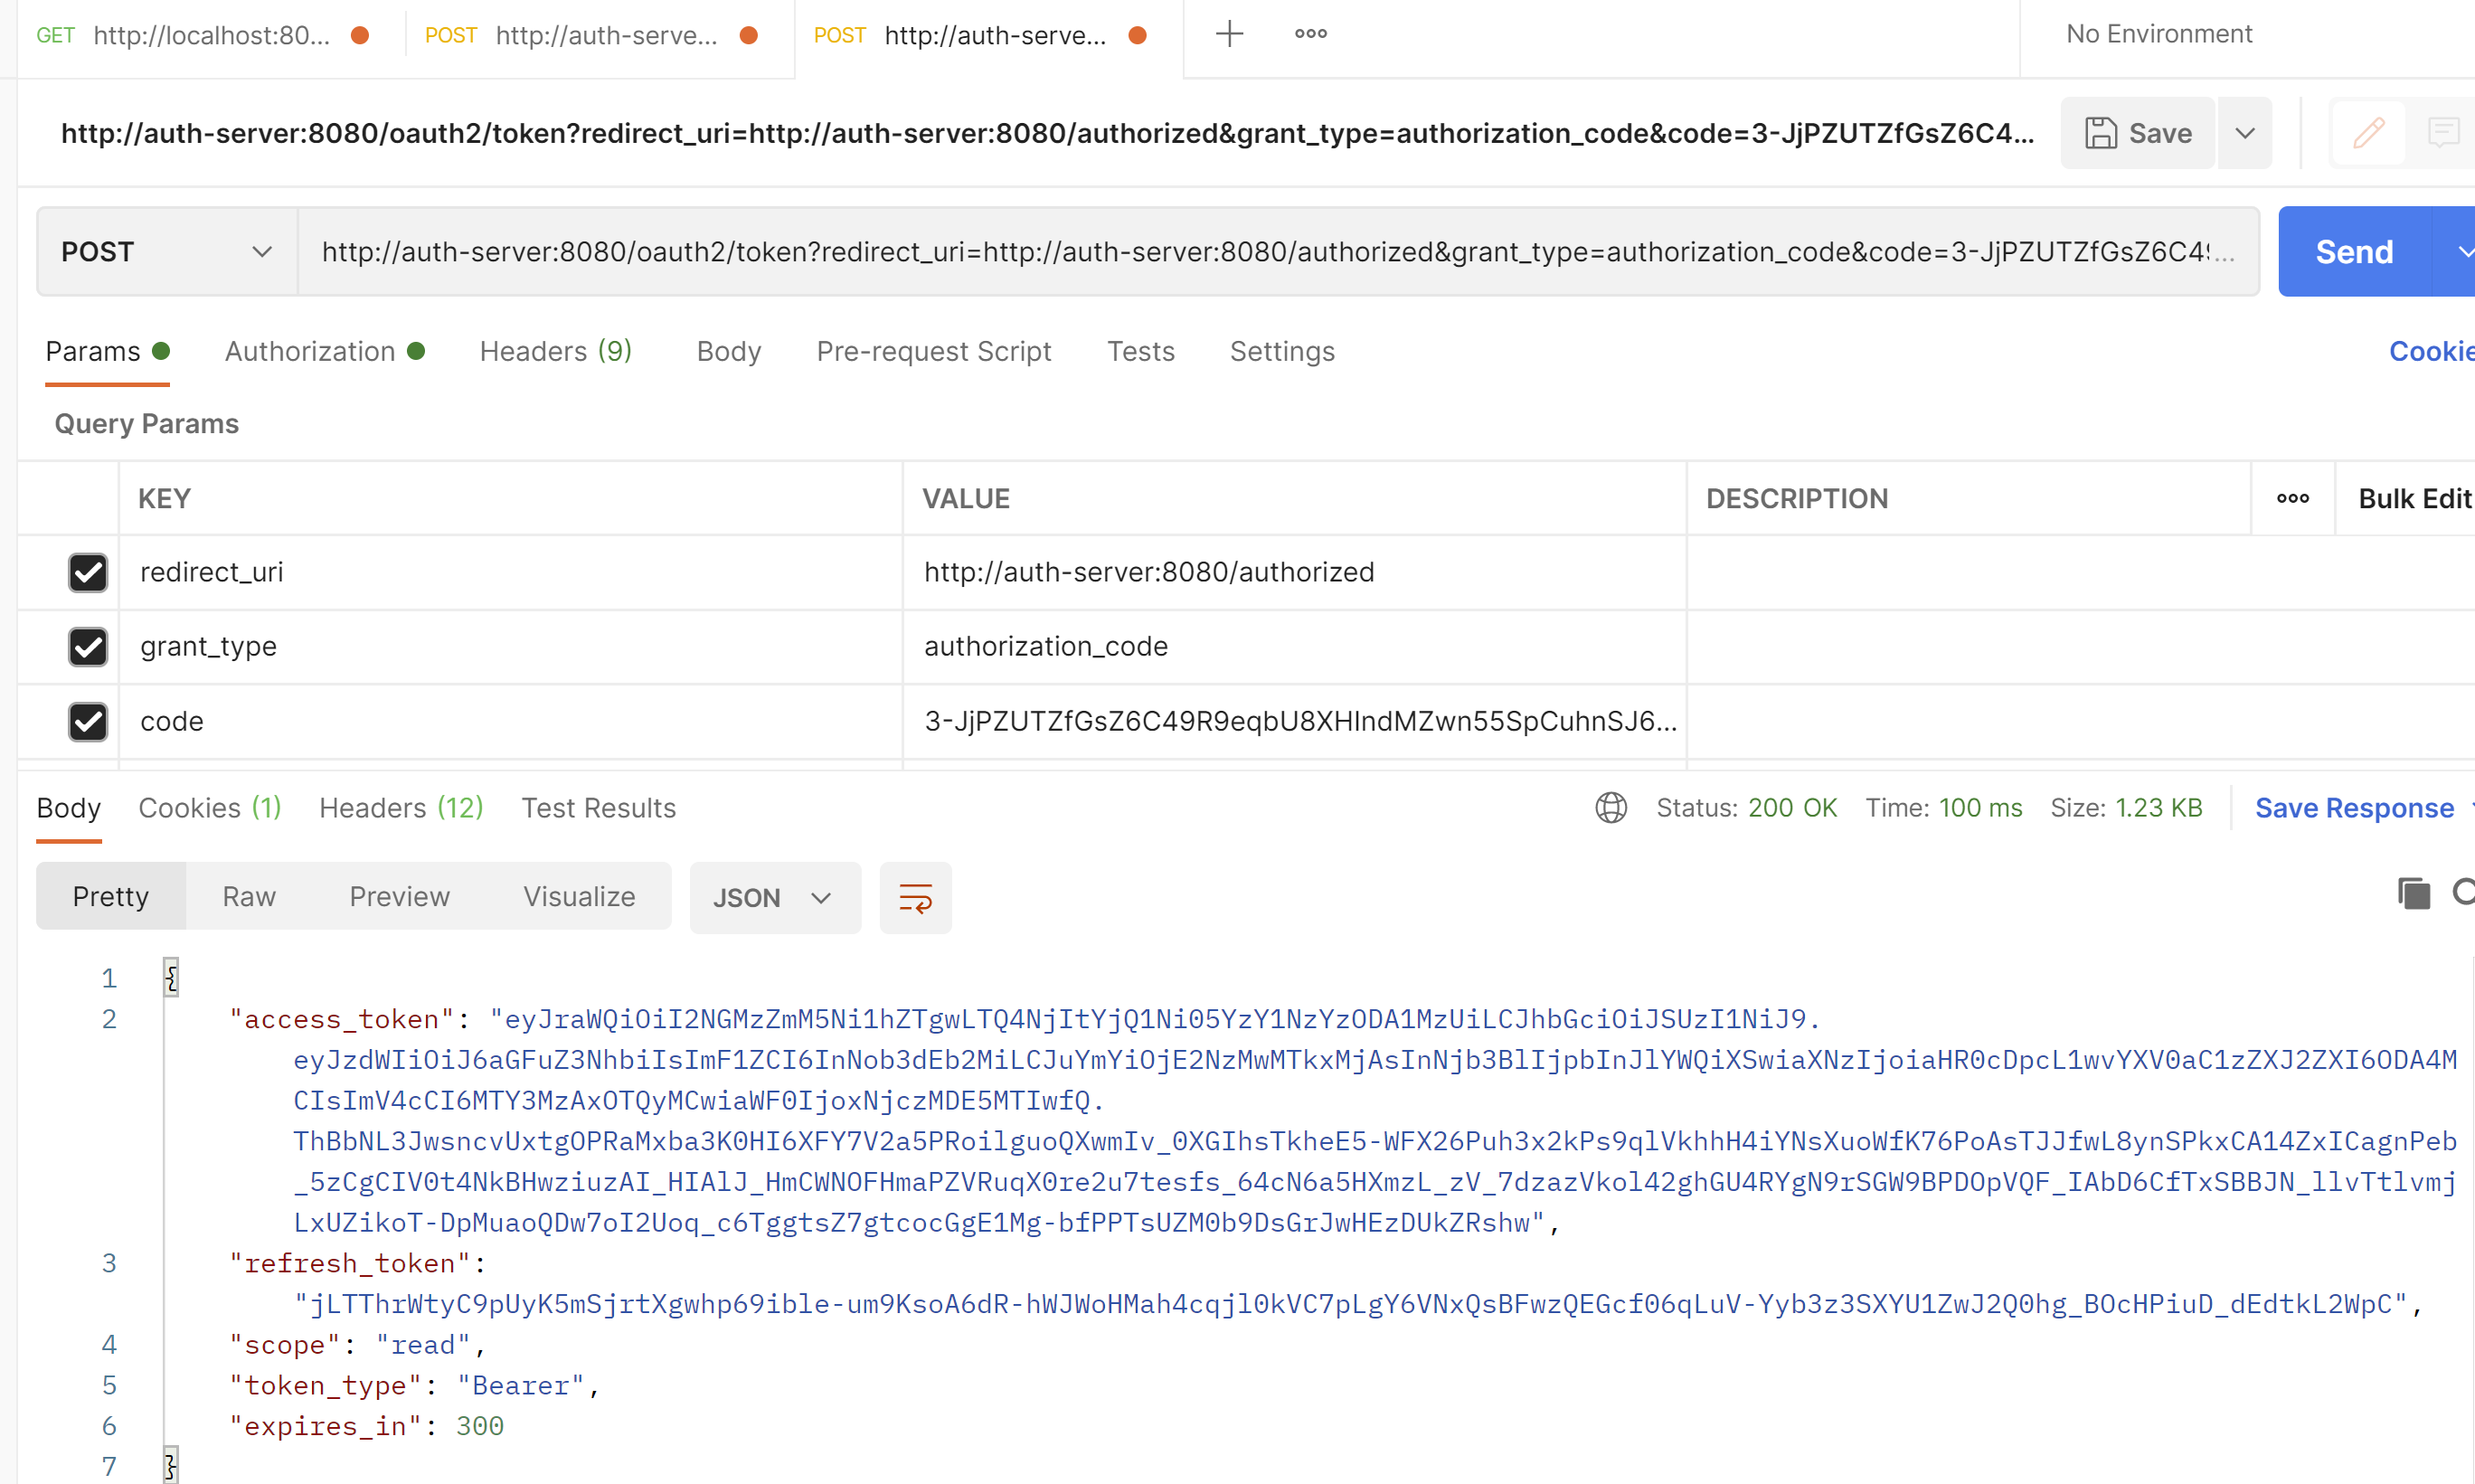
access_token就是我们要访问资源服务器获取接口的时候要传的值
refresh_token 就是令牌过期了,刷新的token
scope 授权的作用域
token_type token类型Bearer,传参数时候需要用到
expires_in 过期时间,300/60=5分钟
接下来我们访问资源服务器,获取接口信息
把access_token放入这里
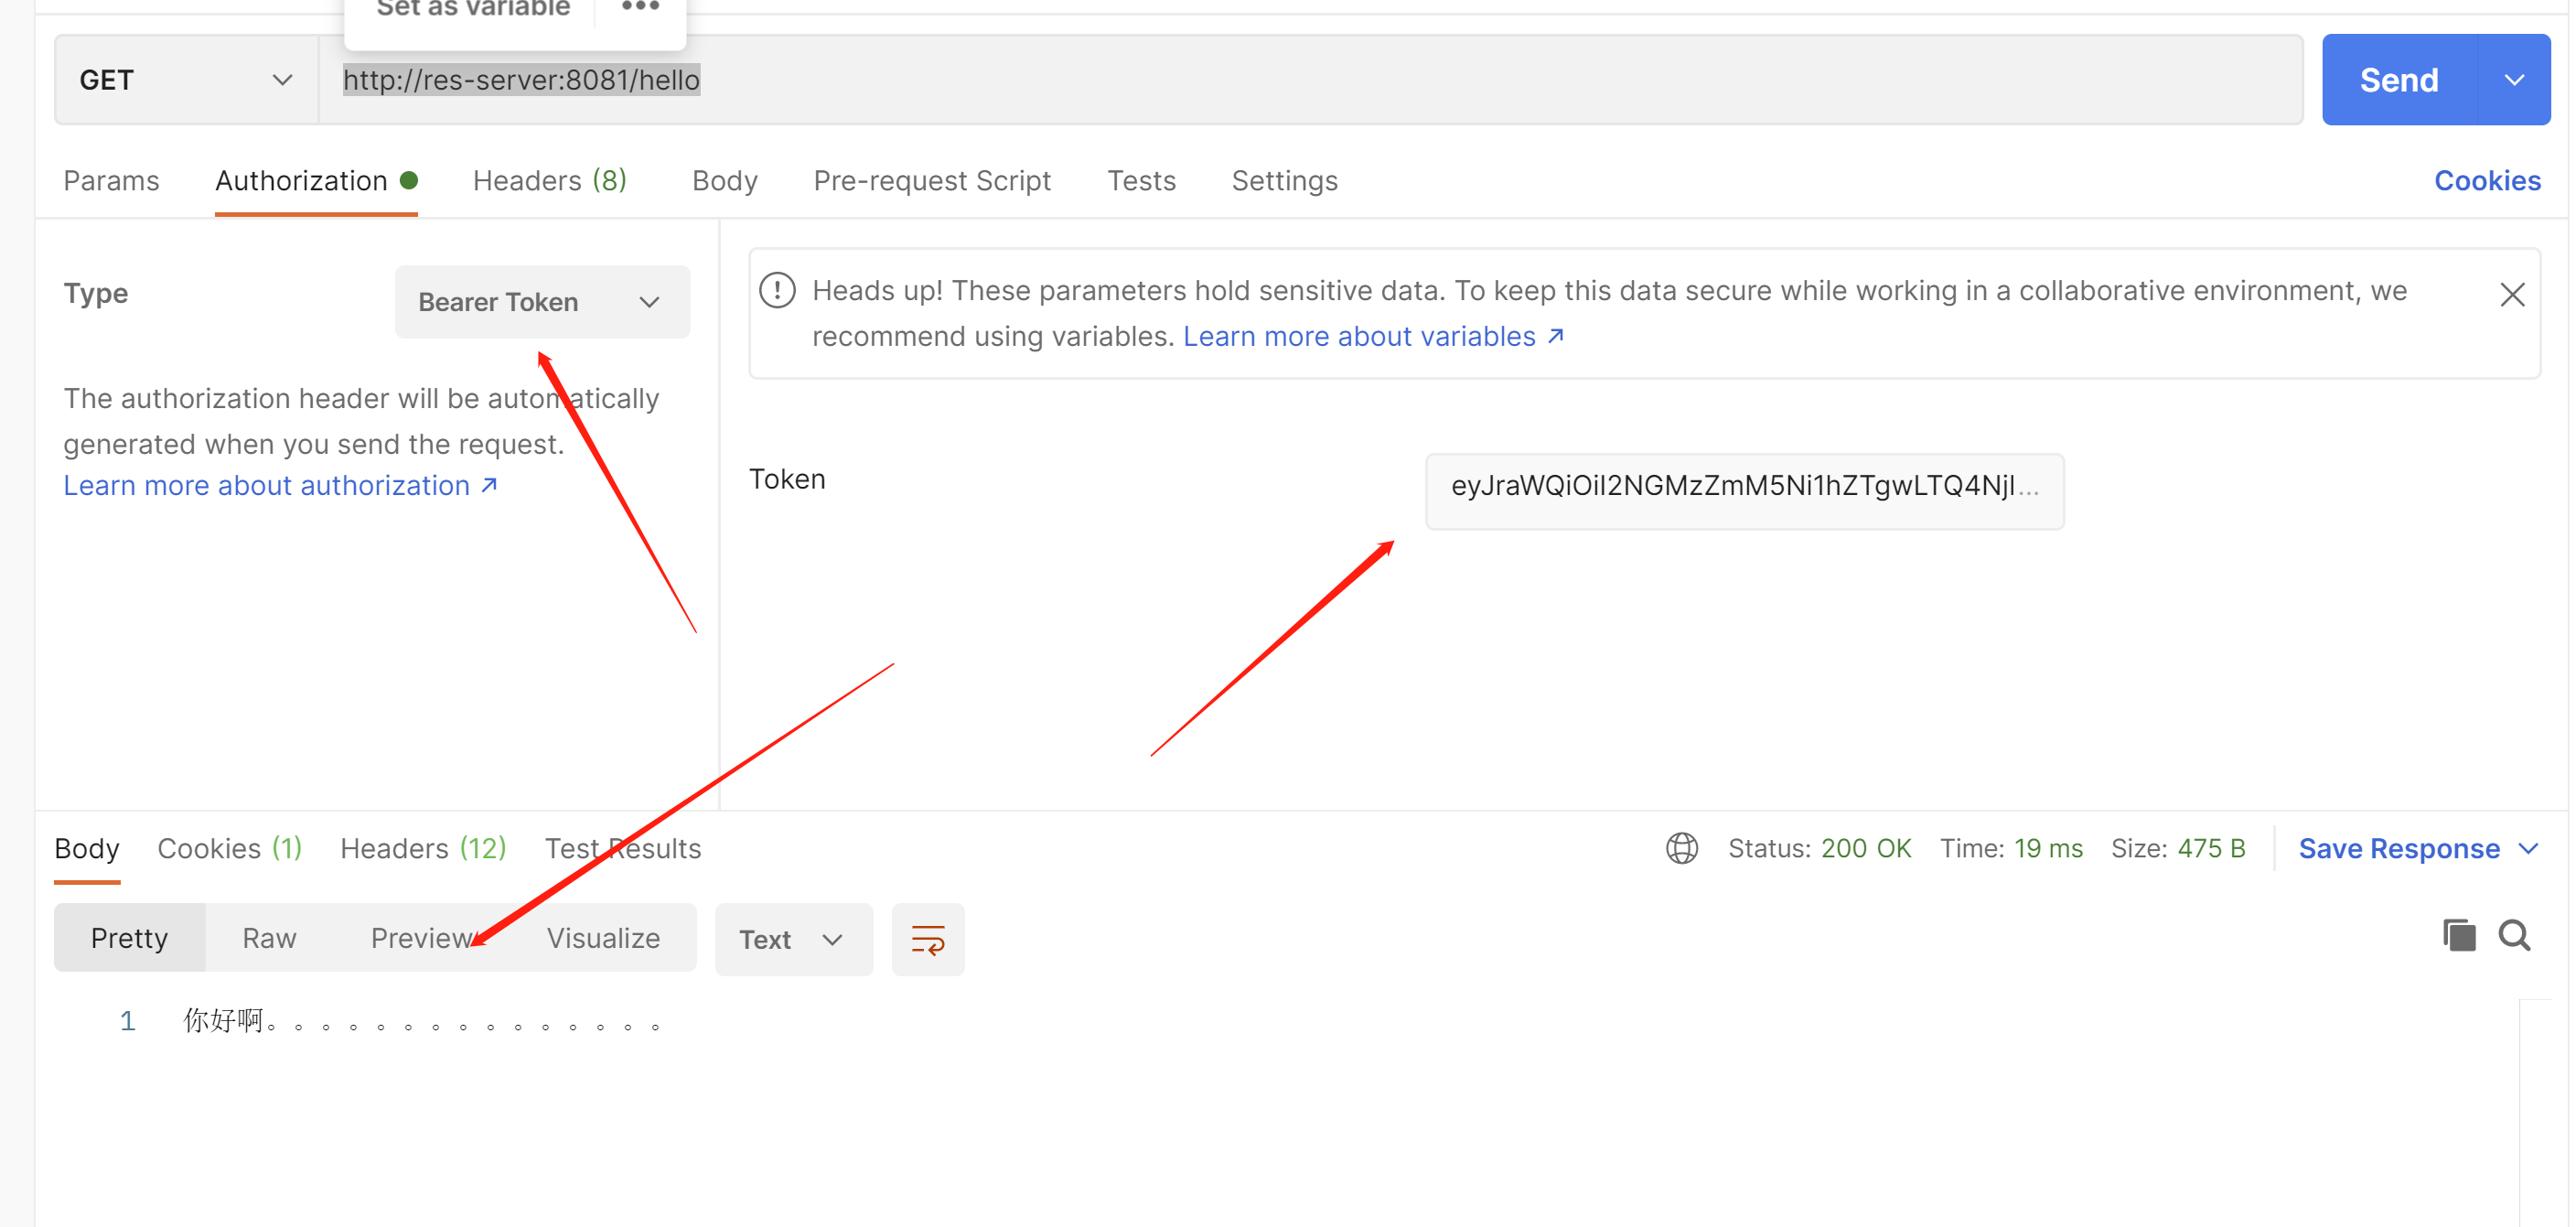
我们在浏览器访问
http://auth-server:8080/oauth2/jwks

如果在资源服务器不去配置jwk-set-uri,那么就会无法解密

jwk在oidc中的主要作用是为jwt(id_token)提供加密秘钥,用于加密、解密,或签名,验签,是json格式的数据;
jwks是指多个jwk组合在一起的一种格式;
授权服务器生成签名:Sign=RS256(Base64Encode(x)+Base64Encode(y),'私钥');
资源服务器拿着http://auth-server:8080/oauth2/jwks 去获取公钥;然后重新生成签名,Sign=RS256(Base64Encode(x)+Base64Encode(y),'公钥');
和私钥的签名进行对比,如果不正确,那么说明jwt中途被篡改,直接拒绝访问,这样就能保证数据的安全
RSA算法是一种非对称加密,我们在授权服务器这里使用的

接下来我们在资源服务器进行获取用户信息的接口
package com.example.resserver.controller;

import org.springframework.web.bind.annotation.GetMapping;
import org.springframework.web.bind.annotation.RestController;

import java.security.Principal;
import java.util.HashMap;
import java.util.Map;

@RestController
public class ResController {


    @GetMapping("/hello")
    public String hello(){
        return "你好啊。。。。。。。。。。。。。。。";
    }


    /**
     * 资源服务获取用户信息
     * @param
     * @return
     * @throws Exception
     */
    @GetMapping("/getUser")
    public Map<String,String> getUser(Principal principal){
        Map<String,String>map=new HashMap<>();
        map.put("name",principal.getName());
        return map;
    }
}
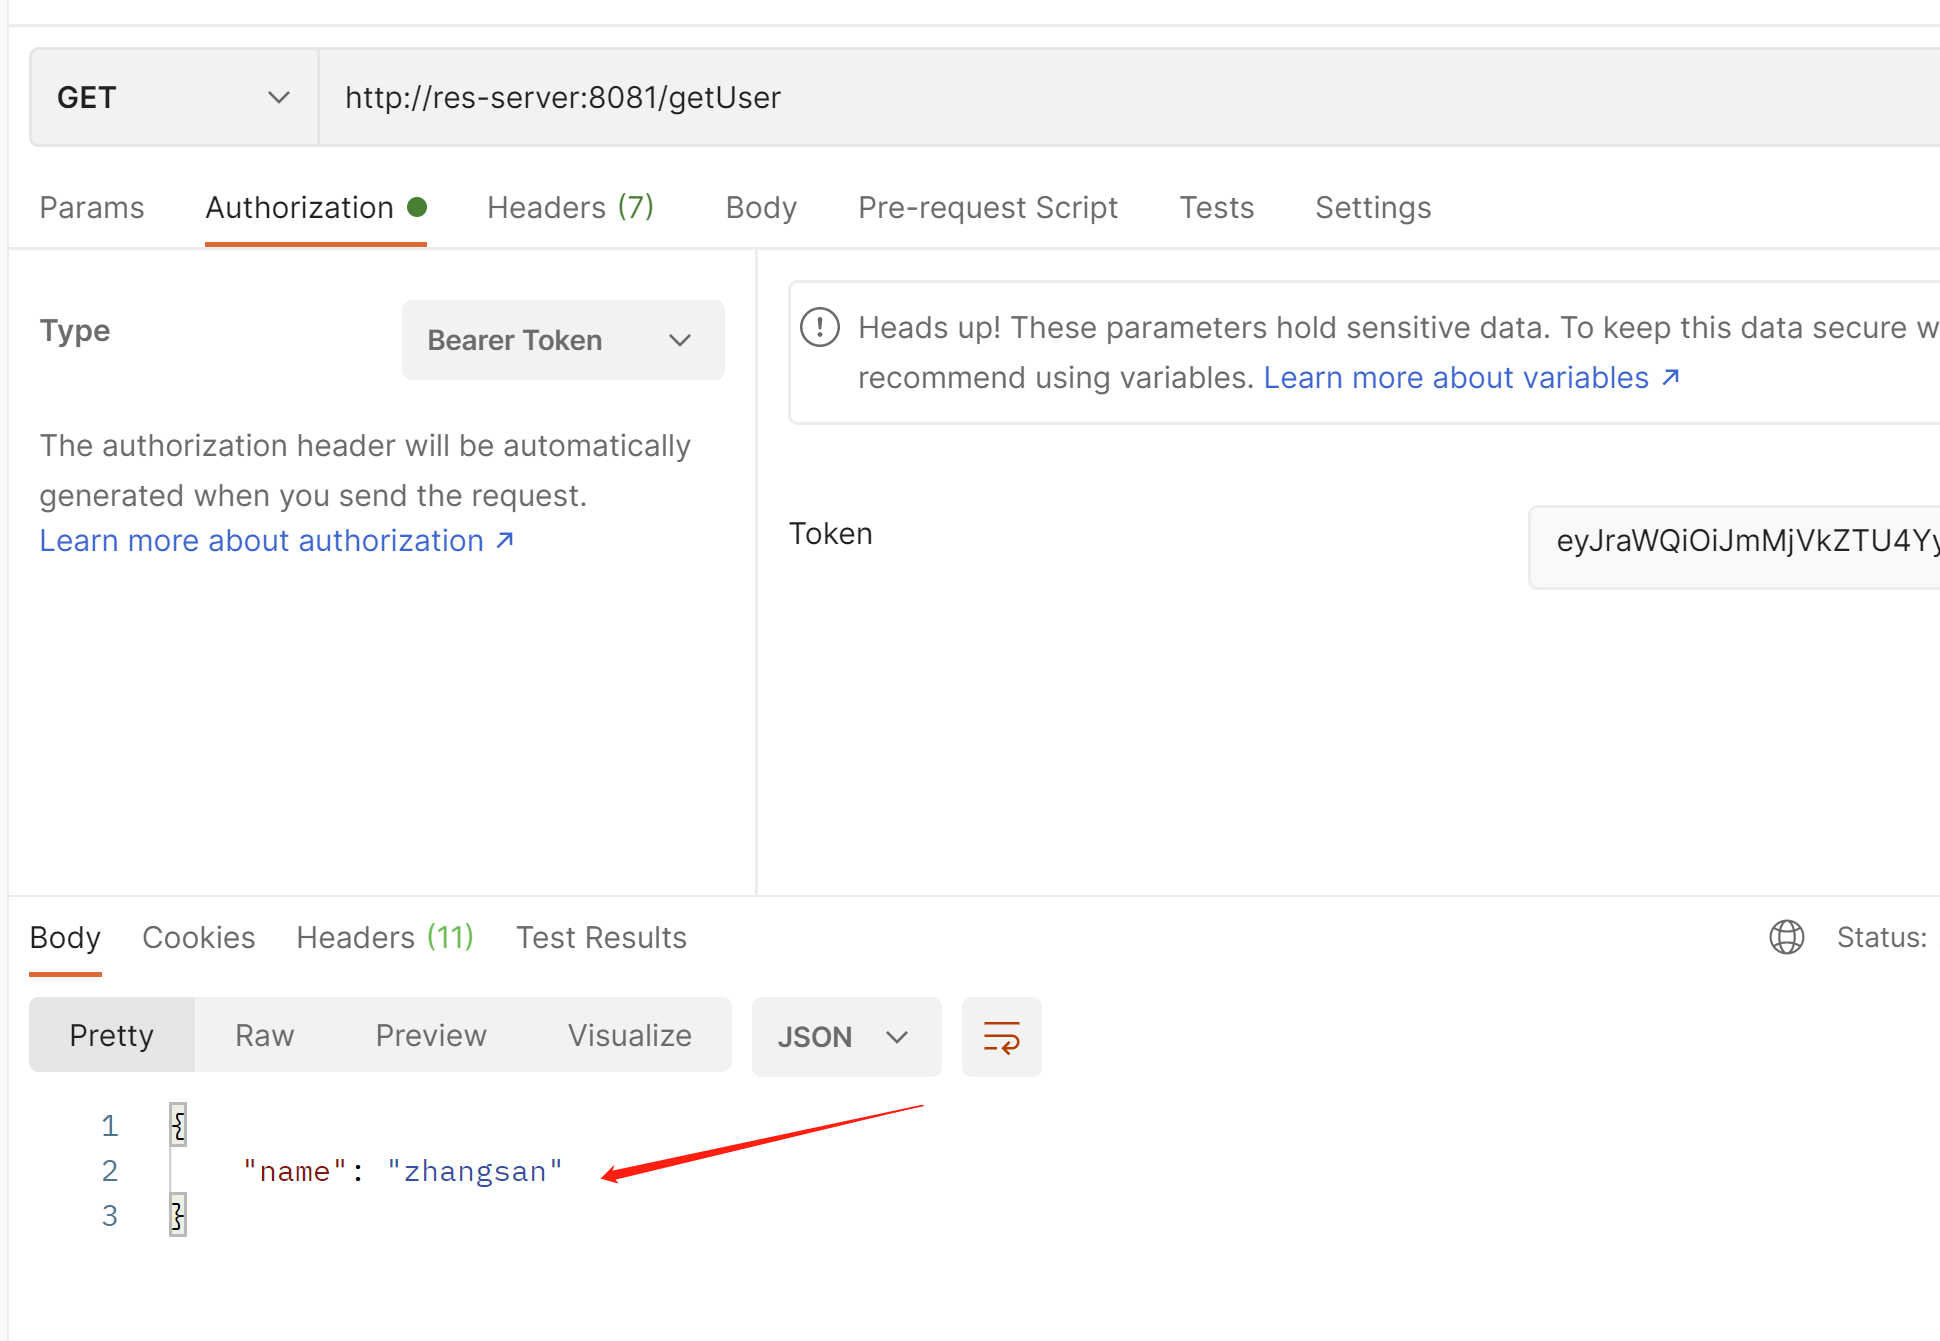
http://res-server:8081/getUser
可以看到在资源服务器也能拿到用户的账号
接下来我们创建客户端
客户端的意思就是比如我是库存系统,我自己没有登陆,但是我想要登陆,那么就需要先在授权服务器进行注册客户端,然后才能拿着授权服务器的登陆,接入到我自己的业务系统,这样我就可以进行单点登陆了
<?xml version="1.0" encoding="UTF-8"?>
<project xmlns="http://maven.apache.org/POM/4.0.0" xmlns:xsi="http://www.w3.org/2001/XMLSchema-instance"
         xsi:schemaLocation="http://maven.apache.org/POM/4.0.0 https://maven.apache.org/xsd/maven-4.0.0.xsd">
    <modelVersion>4.0.0</modelVersion>
    <parent>
        <groupId>org.springframework.boot</groupId>
        <artifactId>spring-boot-starter-parent</artifactId>
        <version>2.7.5</version>
        <relativePath/> <!-- lookup parent from repository -->
    </parent>
    <groupId>com.example</groupId>
    <artifactId>client</artifactId>
    <version>0.0.1-SNAPSHOT</version>
    <name>client</name>
    <description>Demo project for Spring Boot</description>
    <properties>
        <java.version>1.8</java.version>
    </properties>
    <dependencies>
        <dependency>
            <groupId>org.springframework.boot</groupId>
            <artifactId>spring-boot-starter-oauth2-client</artifactId>
        </dependency>
        <dependency>
            <groupId>org.springframework.boot</groupId>
            <artifactId>spring-boot-starter-security</artifactId>
        </dependency>
        <dependency>
            <groupId>org.springframework.boot</groupId>
            <artifactId>spring-boot-starter-web</artifactId>
        </dependency>

        <dependency>
            <groupId>org.projectlombok</groupId>
            <artifactId>lombok</artifactId>
            <optional>true</optional>
        </dependency>
        <dependency>
            <groupId>org.springframework.boot</groupId>
            <artifactId>spring-boot-starter-test</artifactId>
            <scope>test</scope>
        </dependency>
        <dependency>
            <groupId>org.springframework.security</groupId>
            <artifactId>spring-security-test</artifactId>
            <scope>test</scope>
        </dependency>
    </dependencies>

    <build>
        <plugins>
            <plugin>
                <groupId>org.springframework.boot</groupId>
                <artifactId>spring-boot-maven-plugin</artifactId>
                <configuration>
                    <excludes>
                        <exclude>
                            <groupId>org.projectlombok</groupId>
                            <artifactId>lombok</artifactId>
                        </exclude>
                    </excludes>
                </configuration>
            </plugin>
        </plugins>
    </build>

</project>
package com.example.client;

import org.springframework.boot.SpringApplication;
import org.springframework.boot.autoconfigure.SpringBootApplication;
import org.springframework.context.annotation.Bean;
import org.springframework.web.client.RestTemplate;

@SpringBootApplication
public class ClientApplication {

    /**
     *
     * 用于远程通信 远程接口调用
     * @param
     * @return
     * @throws Exception
     */
    @Bean
    public RestTemplate restTemplate(){
        return new RestTemplate();
    }

    public static void main(String[] args) {
        SpringApplication.run(ClientApplication.class, args);
    }

}
package com.example.client.controller;
import lombok.extern.slf4j.Slf4j;
import org.springframework.beans.factory.annotation.Autowired;
import org.springframework.http.HttpEntity;
import org.springframework.http.HttpHeaders;
import org.springframework.http.HttpMethod;
import org.springframework.http.ResponseEntity;
import org.springframework.security.oauth2.client.OAuth2AuthorizedClient;
import org.springframework.security.oauth2.client.annotation.RegisteredOAuth2AuthorizedClient;
import org.springframework.web.bind.annotation.GetMapping;
import org.springframework.web.bind.annotation.RestController;
import org.springframework.web.client.RestTemplate;
@Slf4j
@RestController
public class ClientControler {
@Autowired
private RestTemplate restTemplate;
/**
*
* 获取资源服务器的接口
*
* RegisteredOAuth2AuthorizedClient 注册在授权服务器的客户端
* @param
* @return
* @throws Exception
*/
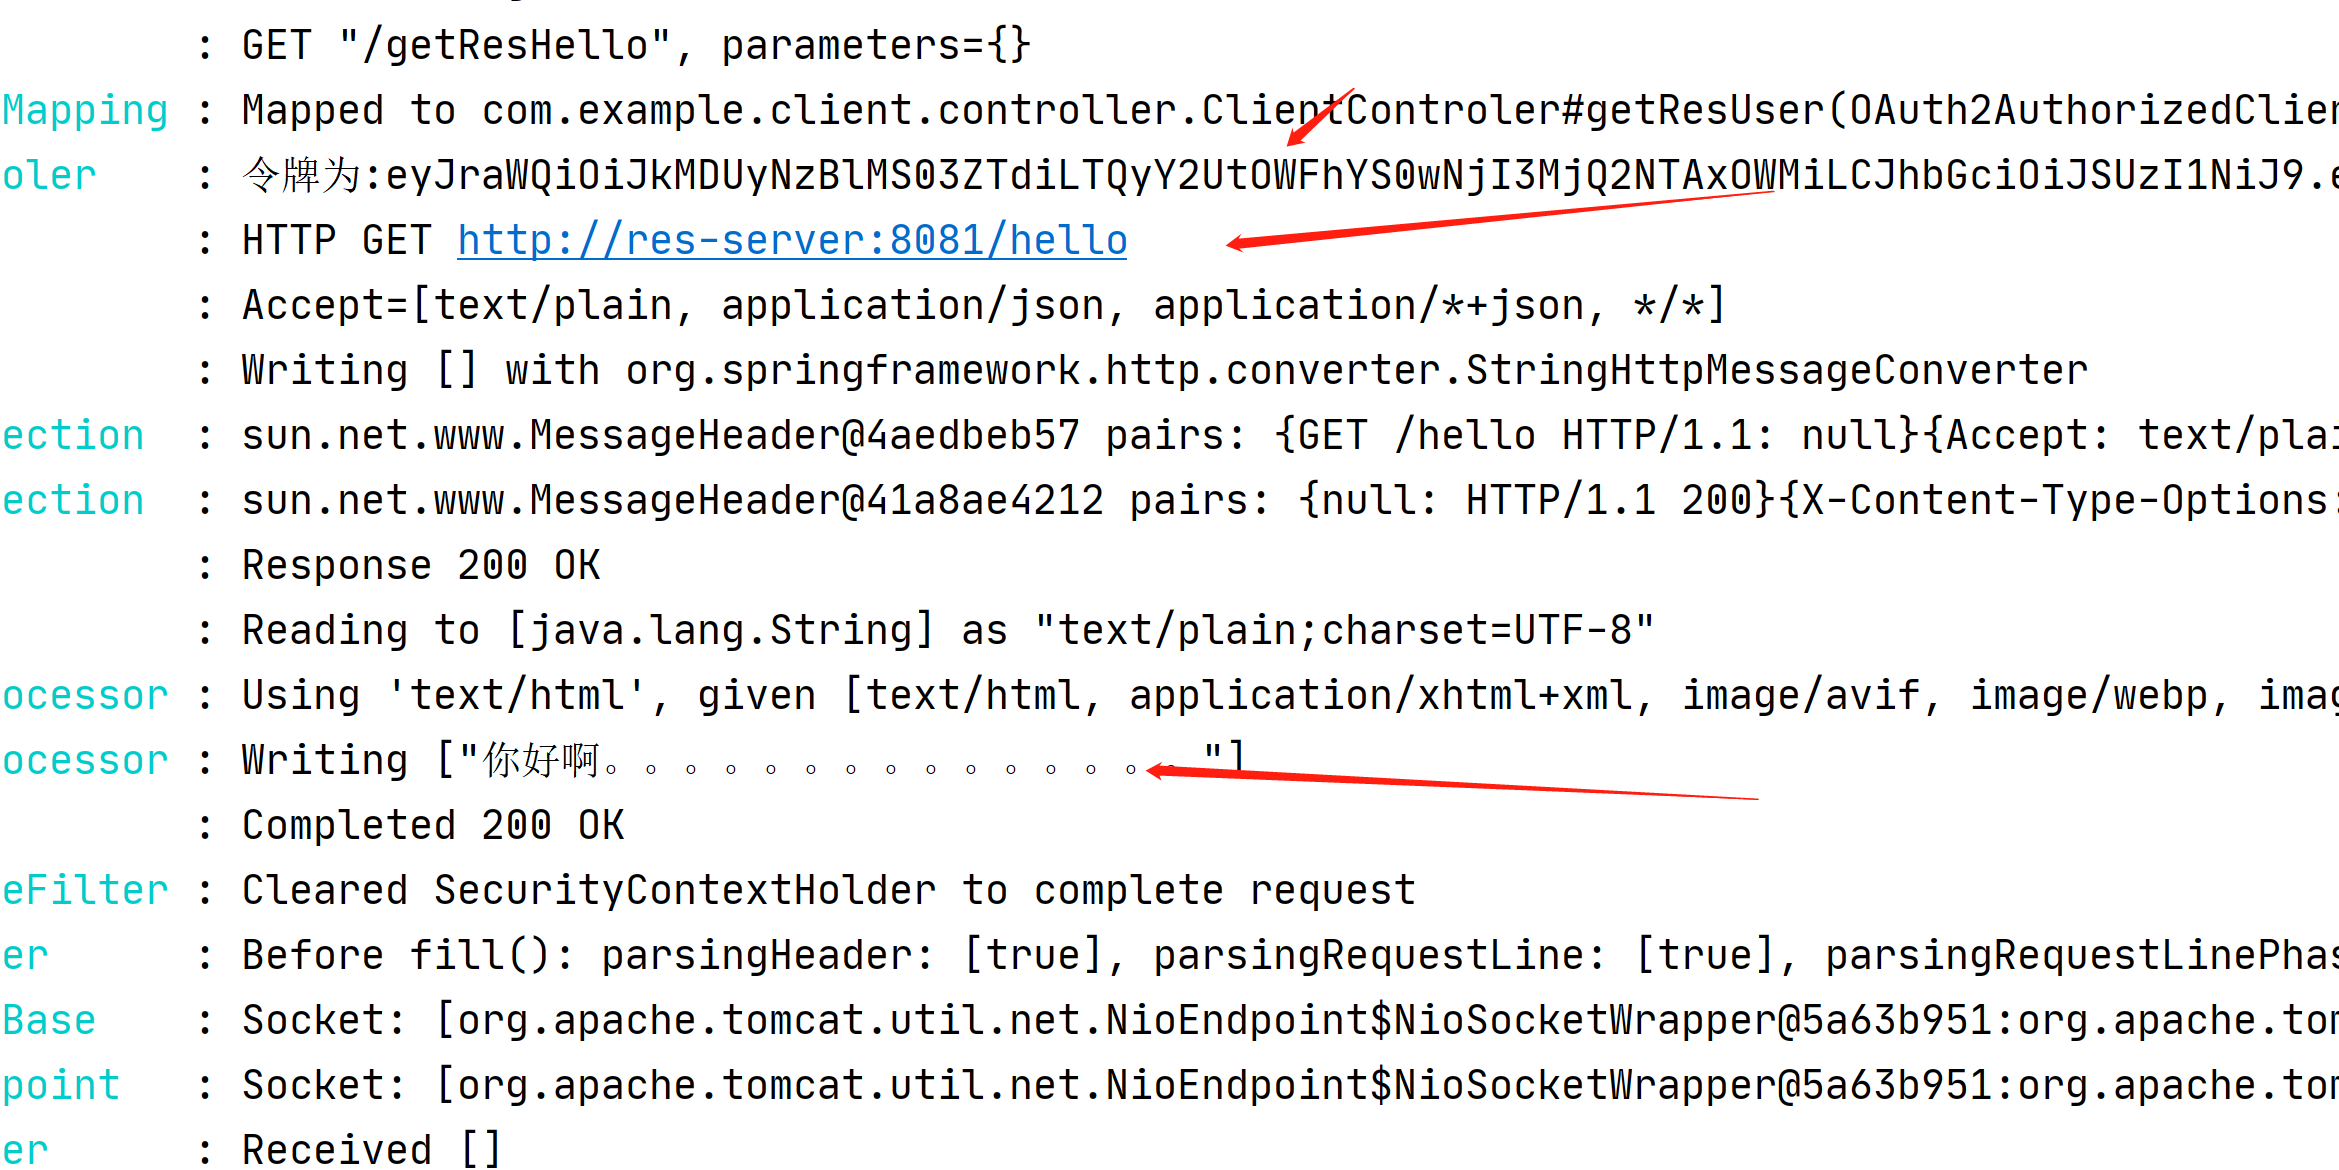
@GetMapping("/getResHello")
public String getResUser(@RegisteredOAuth2AuthorizedClient OAuth2AuthorizedClient client){
HttpHeaders headers=new HttpHeaders();
//从授权客户端拿到token
String token=client.getAccessToken().getTokenValue();
log.info("令牌为:{}",token);
//把token 放入请求头中 ,token类型为Bearer
//在源码里面this.set("Authorization", "Bearer " + token) 自动拼接Bearer空格
headers.setBearerAuth(token);
HttpEntity<String>request=new HttpEntity<>("",headers);
//拿着令牌去获取资源服务器的接口
ResponseEntity<String>responseEntity=restTemplate
.exchange("http://res-server:8081/hello",
HttpMethod.GET,request,String.class);
String body=responseEntity.getBody();
return body;
}
}
package com.example.client.config;

import org.springframework.context.annotation.Bean;
import org.springframework.context.annotation.Configuration;
import org.springframework.security.config.annotation.web.builders.HttpSecurity;
import org.springframework.security.web.SecurityFilterChain;

@Configuration
public class SecurityConfig {


    /**
     *
     * 安全过滤器链
     * @param
     * @return
     * @throws Exception
     */
    @Bean
    public SecurityFilterChain filterChain(HttpSecurity http) throws Exception {
        //拦截所有请求
        http.authorizeRequests()
                .anyRequest()
                .authenticated()
                .and()
                //使用oauth2登陆,自动跳转到授权服务的登陆界面
                .oauth2Login();
        return http.build();
    }
}
server:
  port: 8082
spring:
  security:
    oauth2:
      client:
        #注册客户端
        registration:
          #注册名称 随便起
          test:
            #客户端id 在授权服务器注册好的客户端
            client-id: showDoc
            #客户端秘钥
            client-secret: 123456
            #供应商 要对应下面的供应商一致的名字
            provider: test-provider
            #授权类型 为授权码模式
            authorization-grant-type: authorization_code
            #回调地址 接收授权码的uri规则: http://client:8082/login/oauth/code/{profile-name}
            #这个路径不用自己开发 默认的, test 可以换成你的注册名称 要和上面的registration下面的test一致
            #在访问的时候会自动把test忽略掉,他去找test注册名称 这一套配置
            redirect_uri: http://client:8082/login/oauth2/code/test
            #作用域 授权 复选框那个
            scope:
              - read
        #供应商
        provider:
          #供应商的名称 要和注册哪里的供应商名称一致
          test-provider:
            #授权接口 不需要自己开发
            authorization-uri: http://auth-server:8080/oauth2/authorize
            #获取token令牌 不需要自己开发
            token-uri: http://auth-server:8080/oauth2/token
            #获取用户信息接口 需要自己开发 我们在资源服务器 已经开发好了
            user-info-uri: http://res-server:8081/getUser
            #用户名属性 资源服务器获取用户信息里面 map里面的name的字段 来给到对方
            user-name-attribute: name
  codec:
    #日志请求详细信息
    log-request-details: true

logging:
  level:
    root: debug
然后我们在授权服务器的安全配置类里面把这一行回调地址注册上
.redirectUri("http://client:8082/login/oauth2/code/test")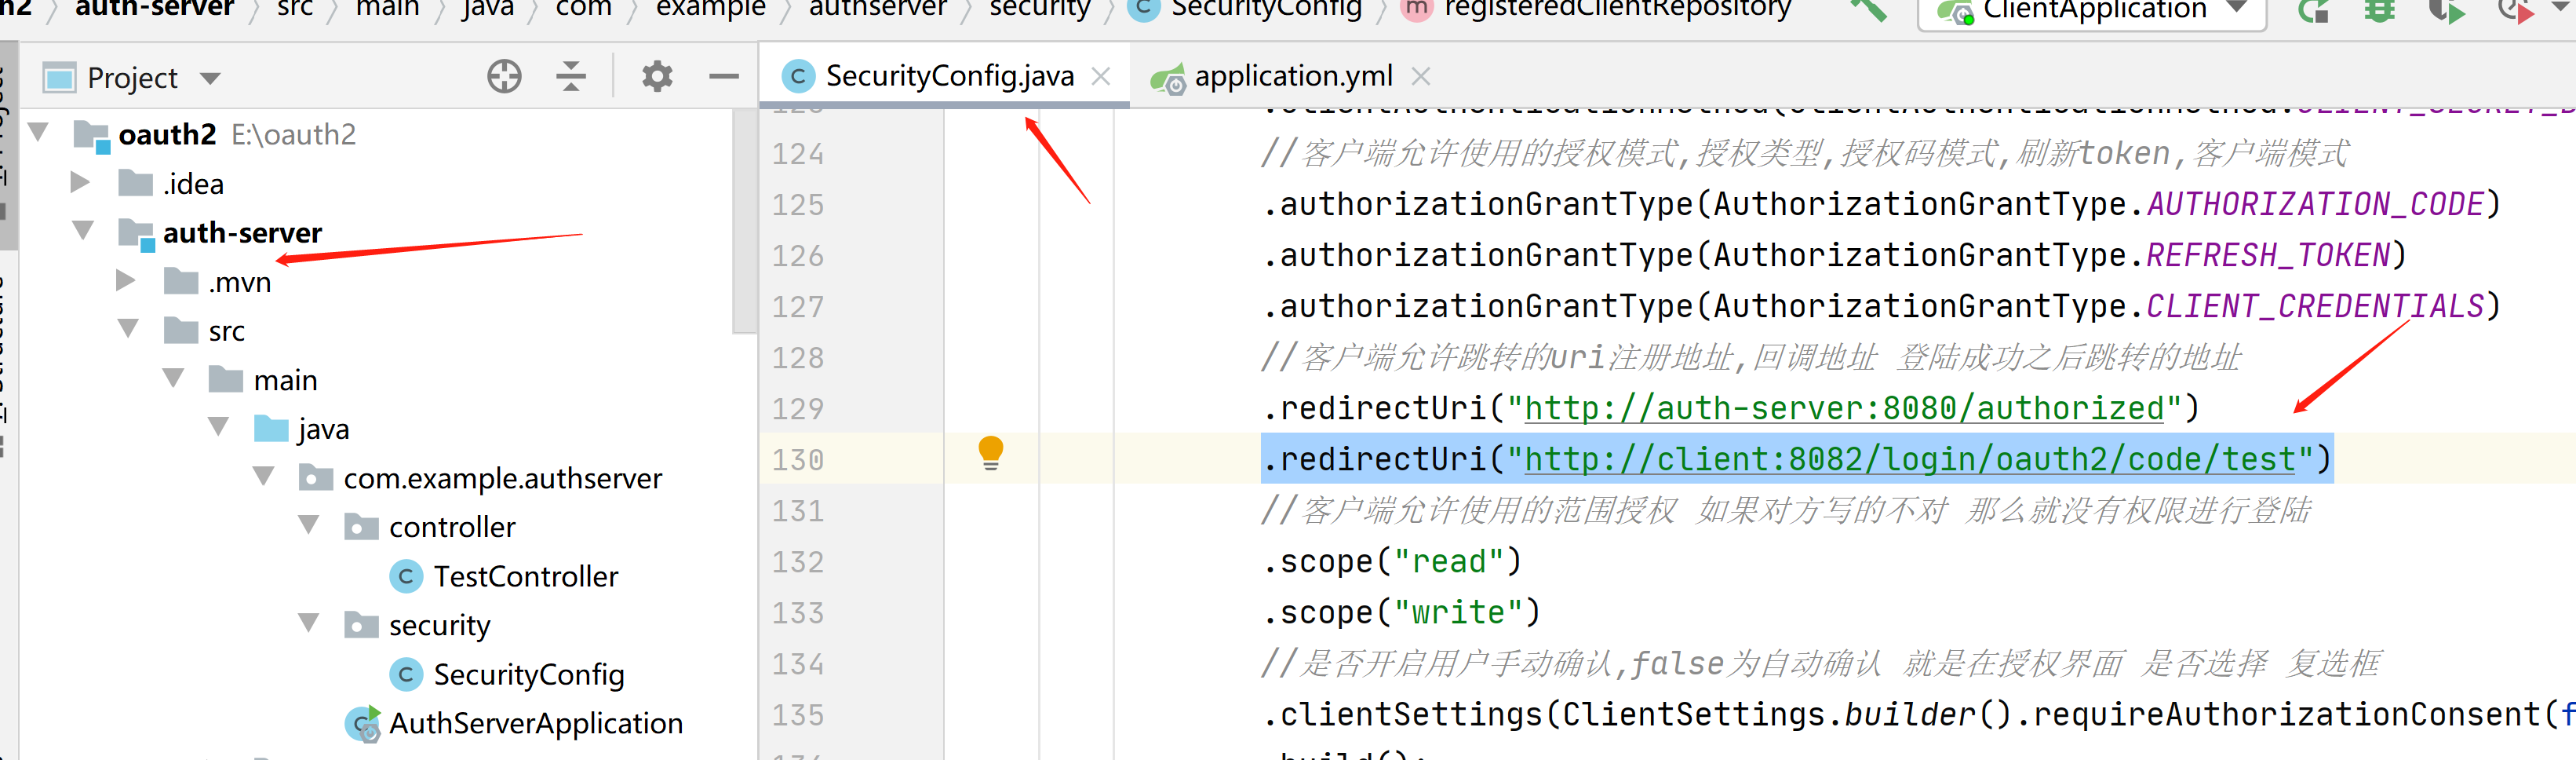
把3分服务都启动
访问http://client:8082/getResHello
可以看到自动跳转到了授权服务器的登陆,这就是单点登陆
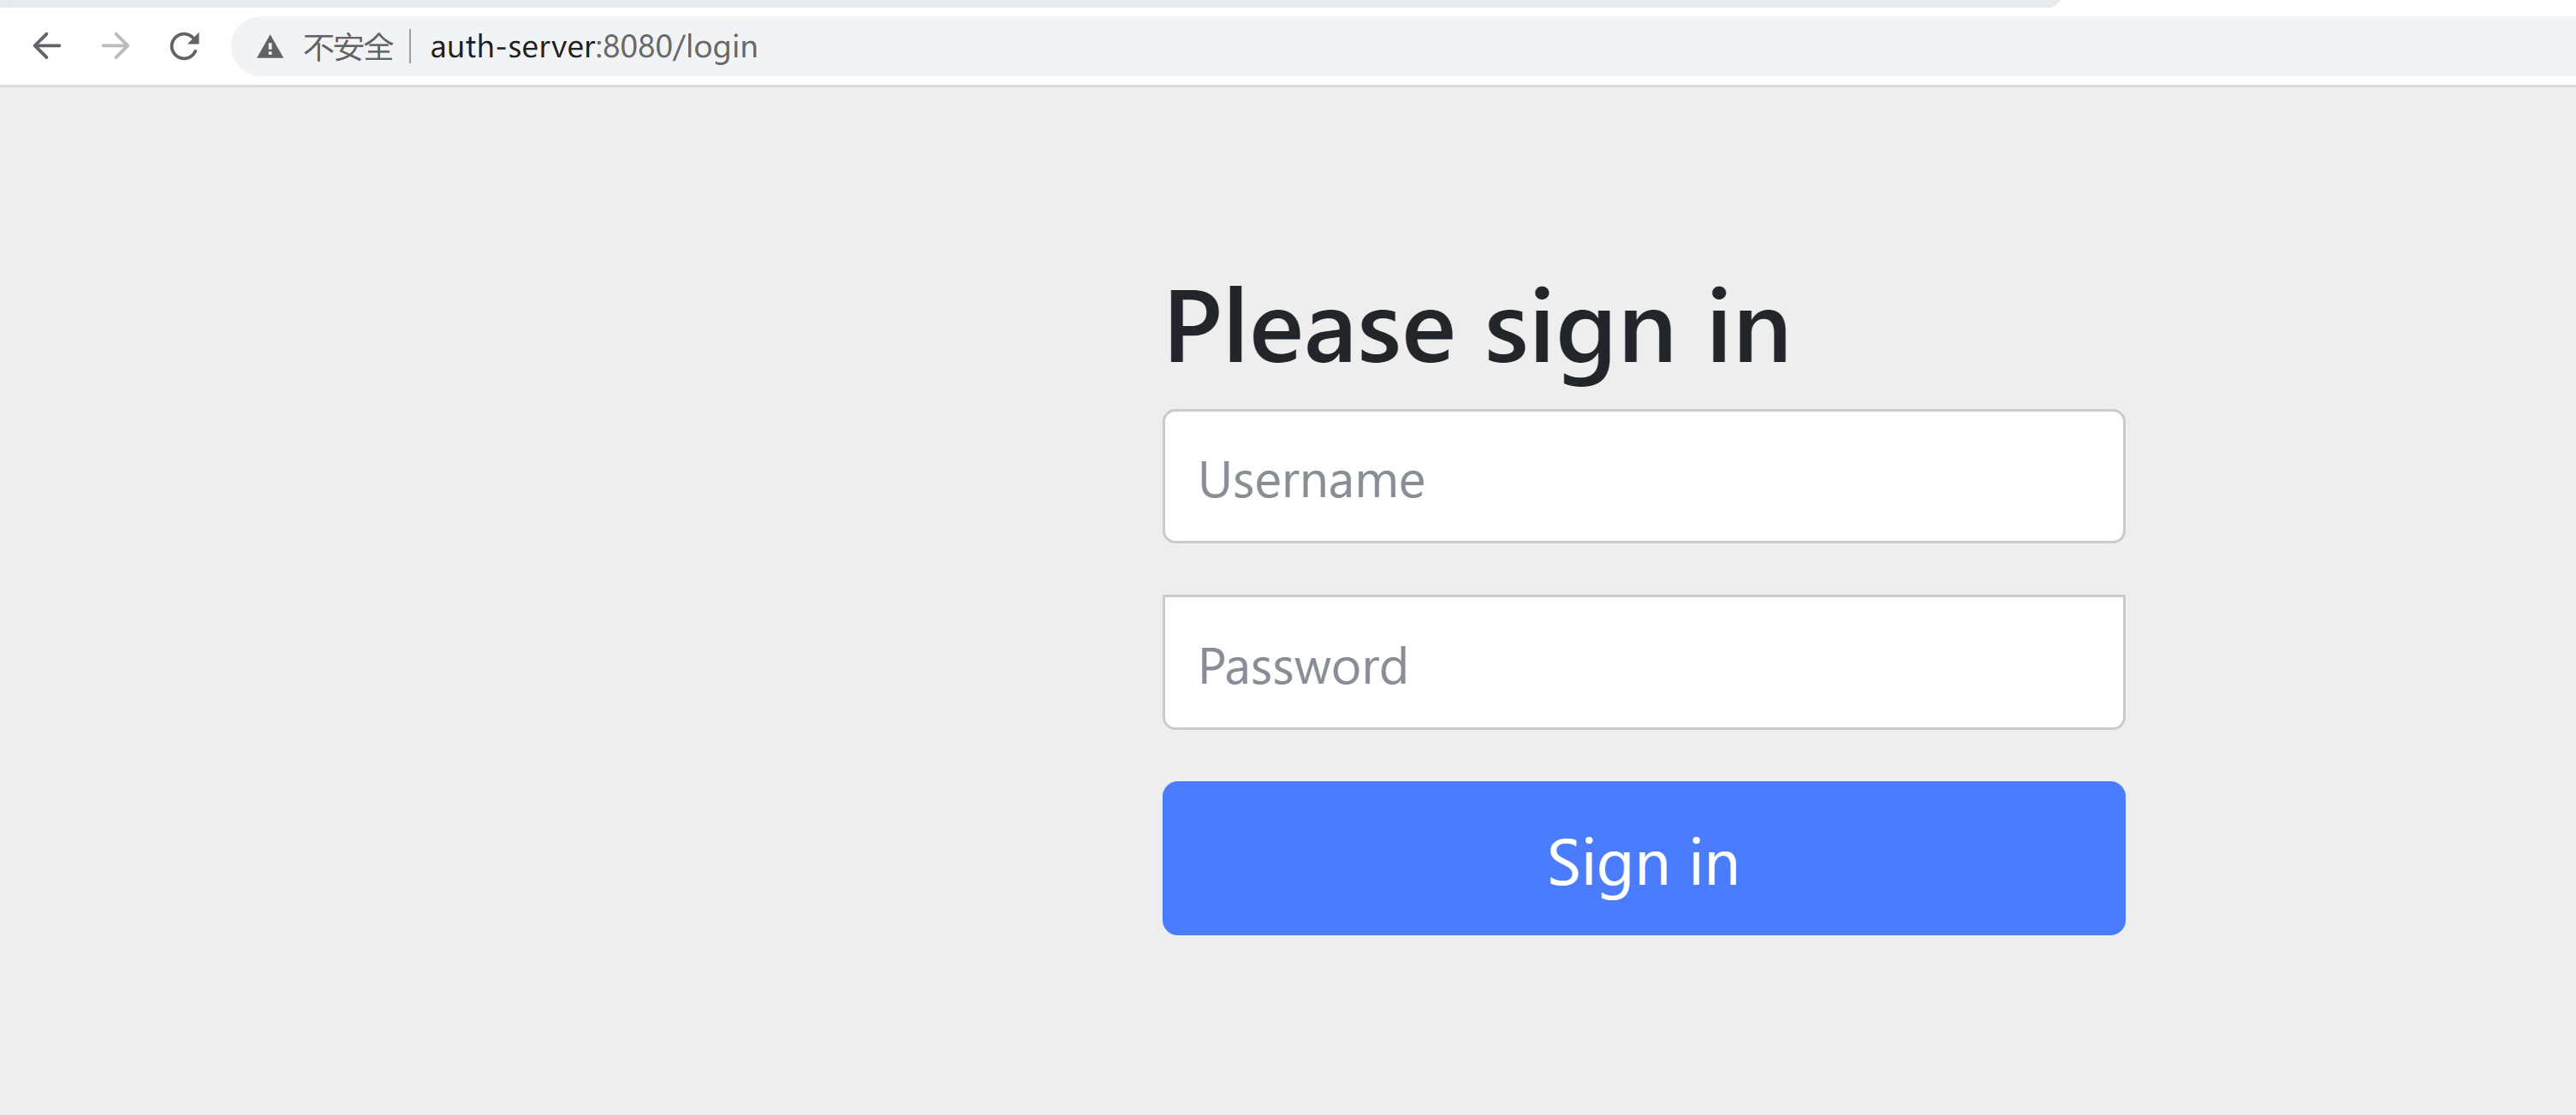
当输入客户端地址后回车的时候,自动跳转到授权服务器的路径
带着客户端id,授权码code,scope,状态,回调地址,去请求授权


接下来我们输入账号zhangsan,密码123456
可以看到,拿到了资源服务器的信息

我们在看下控制台日志
登陆之后,获取令牌,拿着令牌获取用户信息
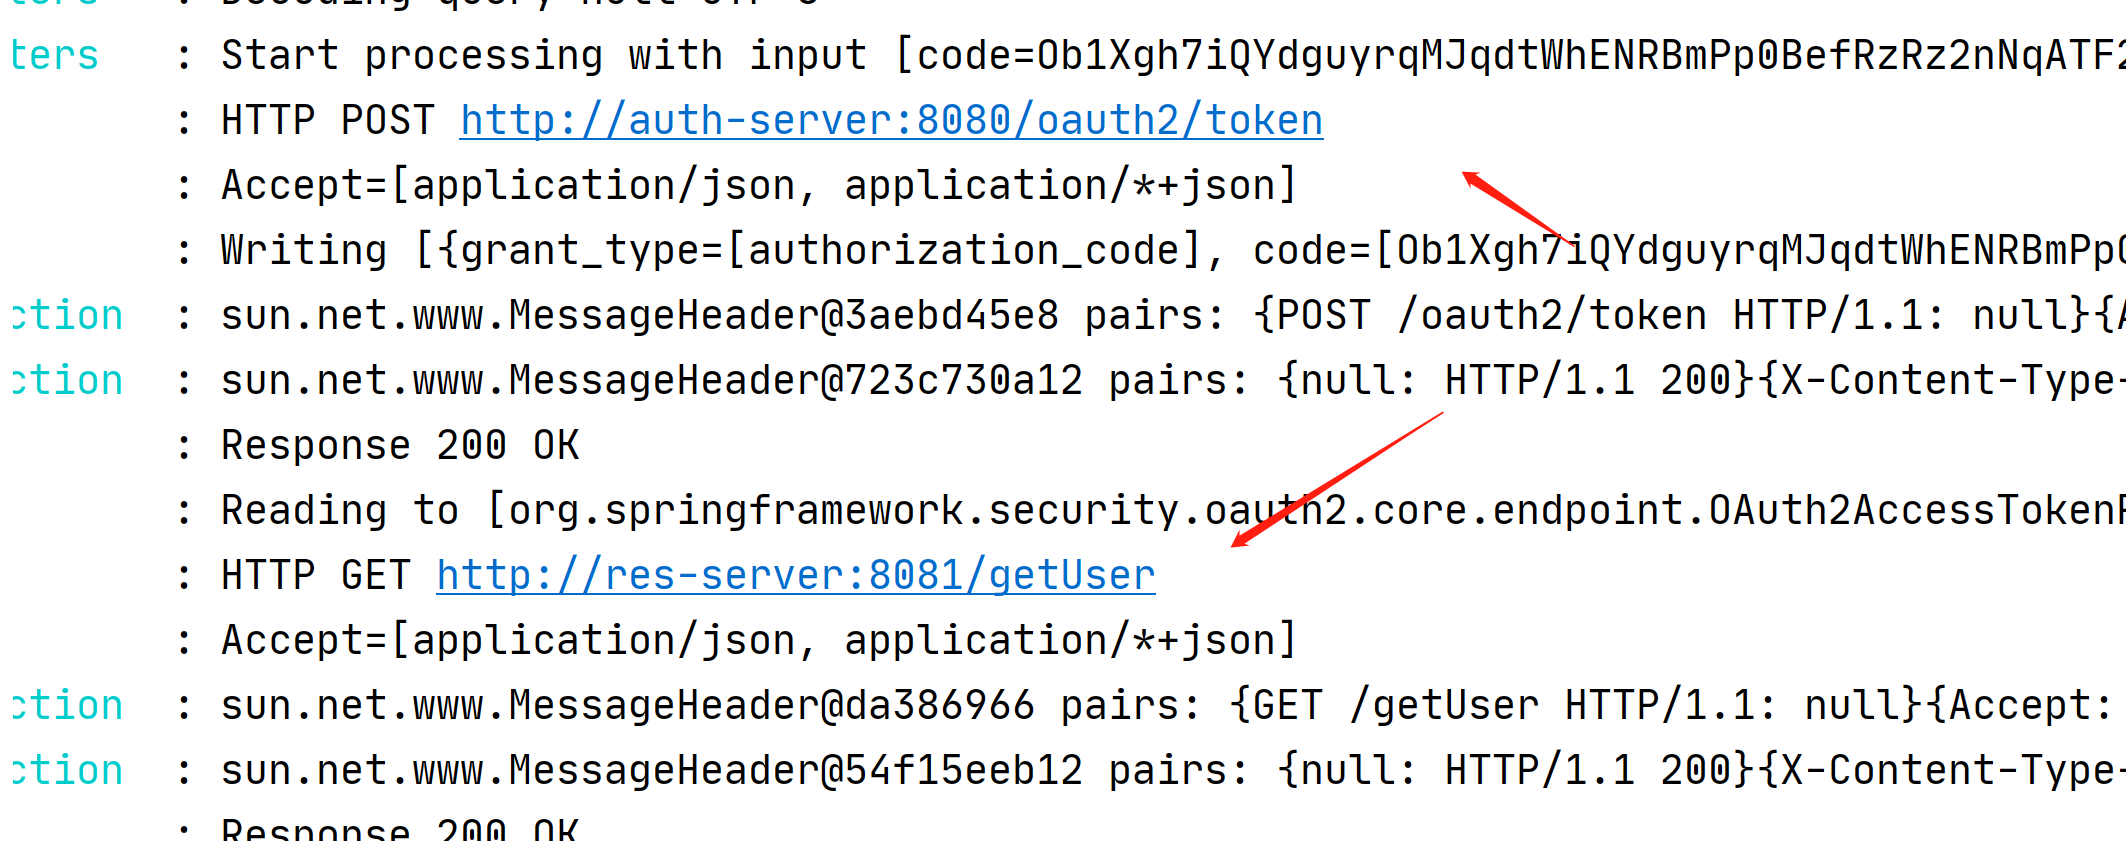
然后再重定向回来客户端的路径
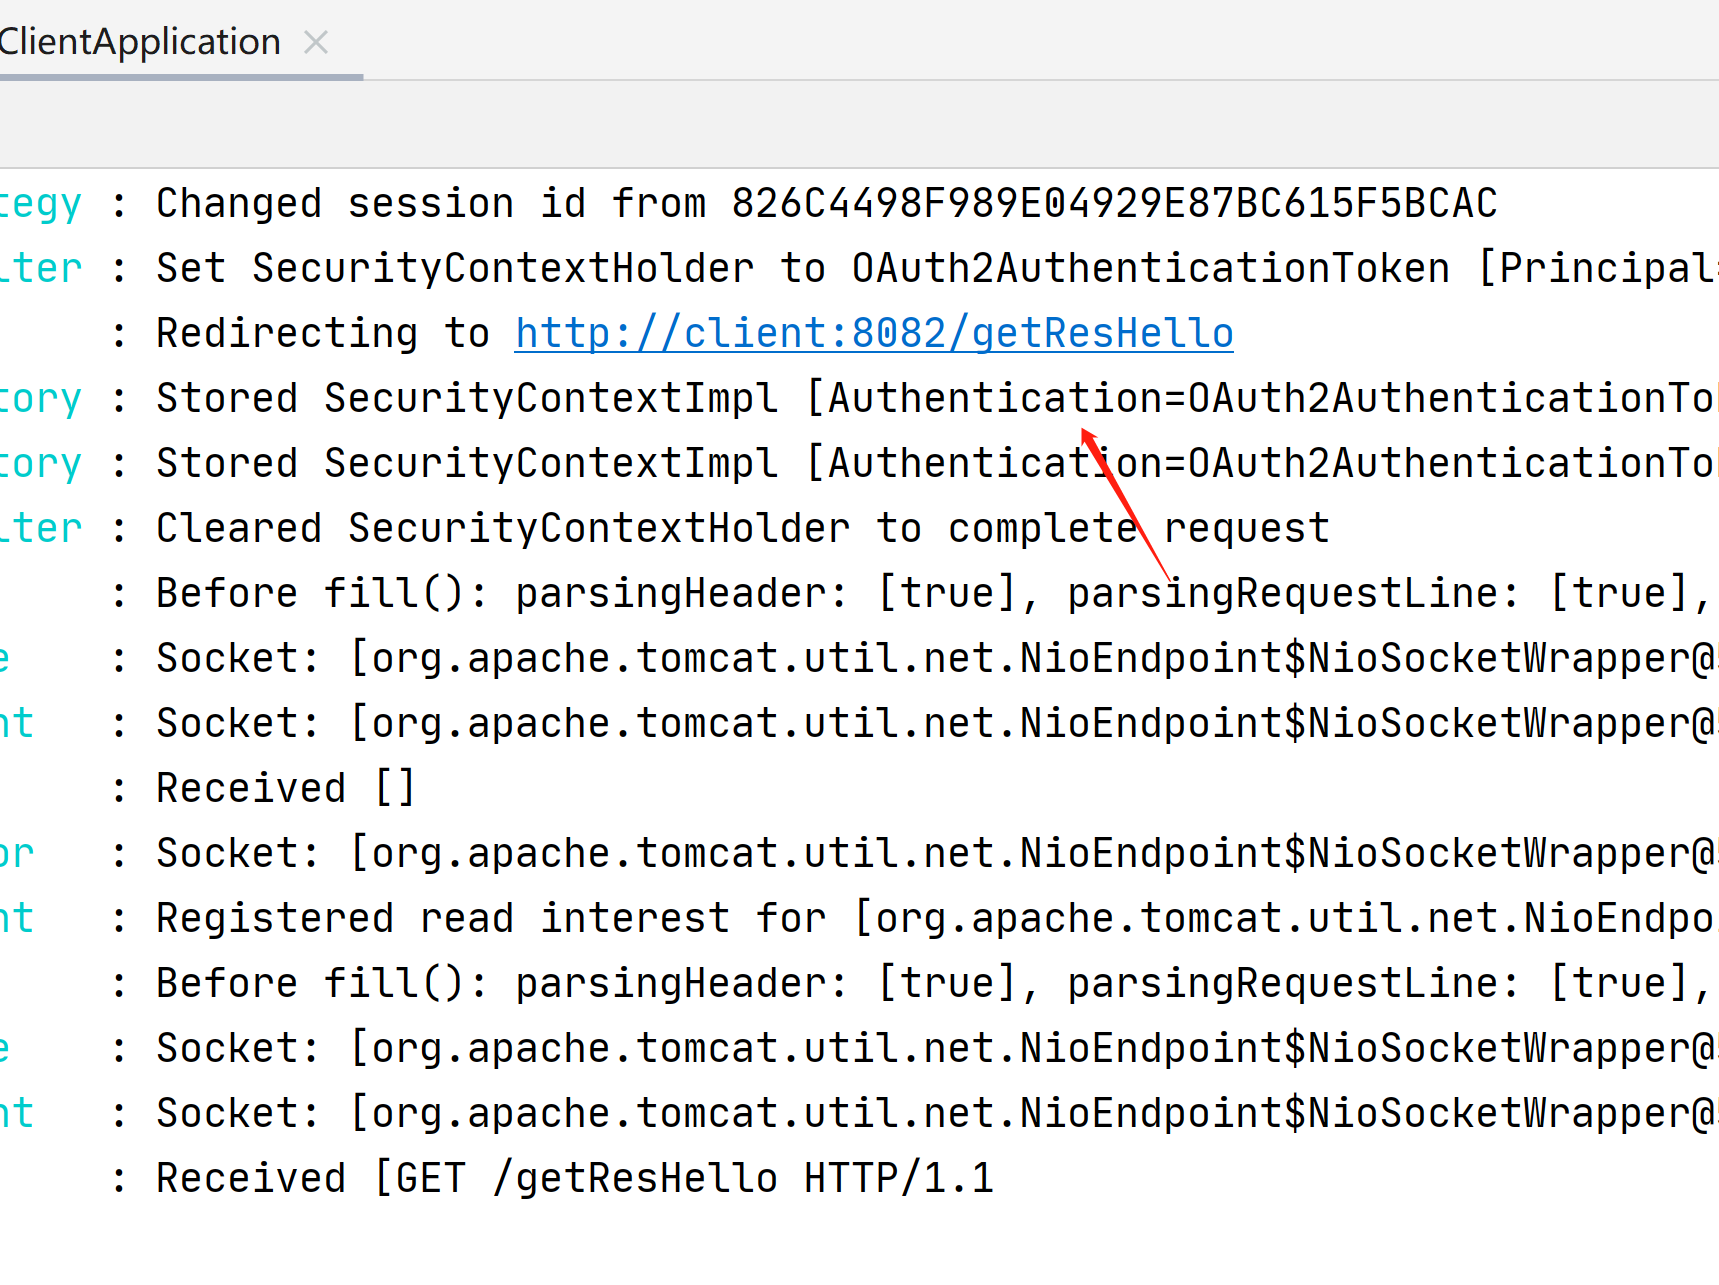
然后拿着令牌远程访问资源服务器的数据
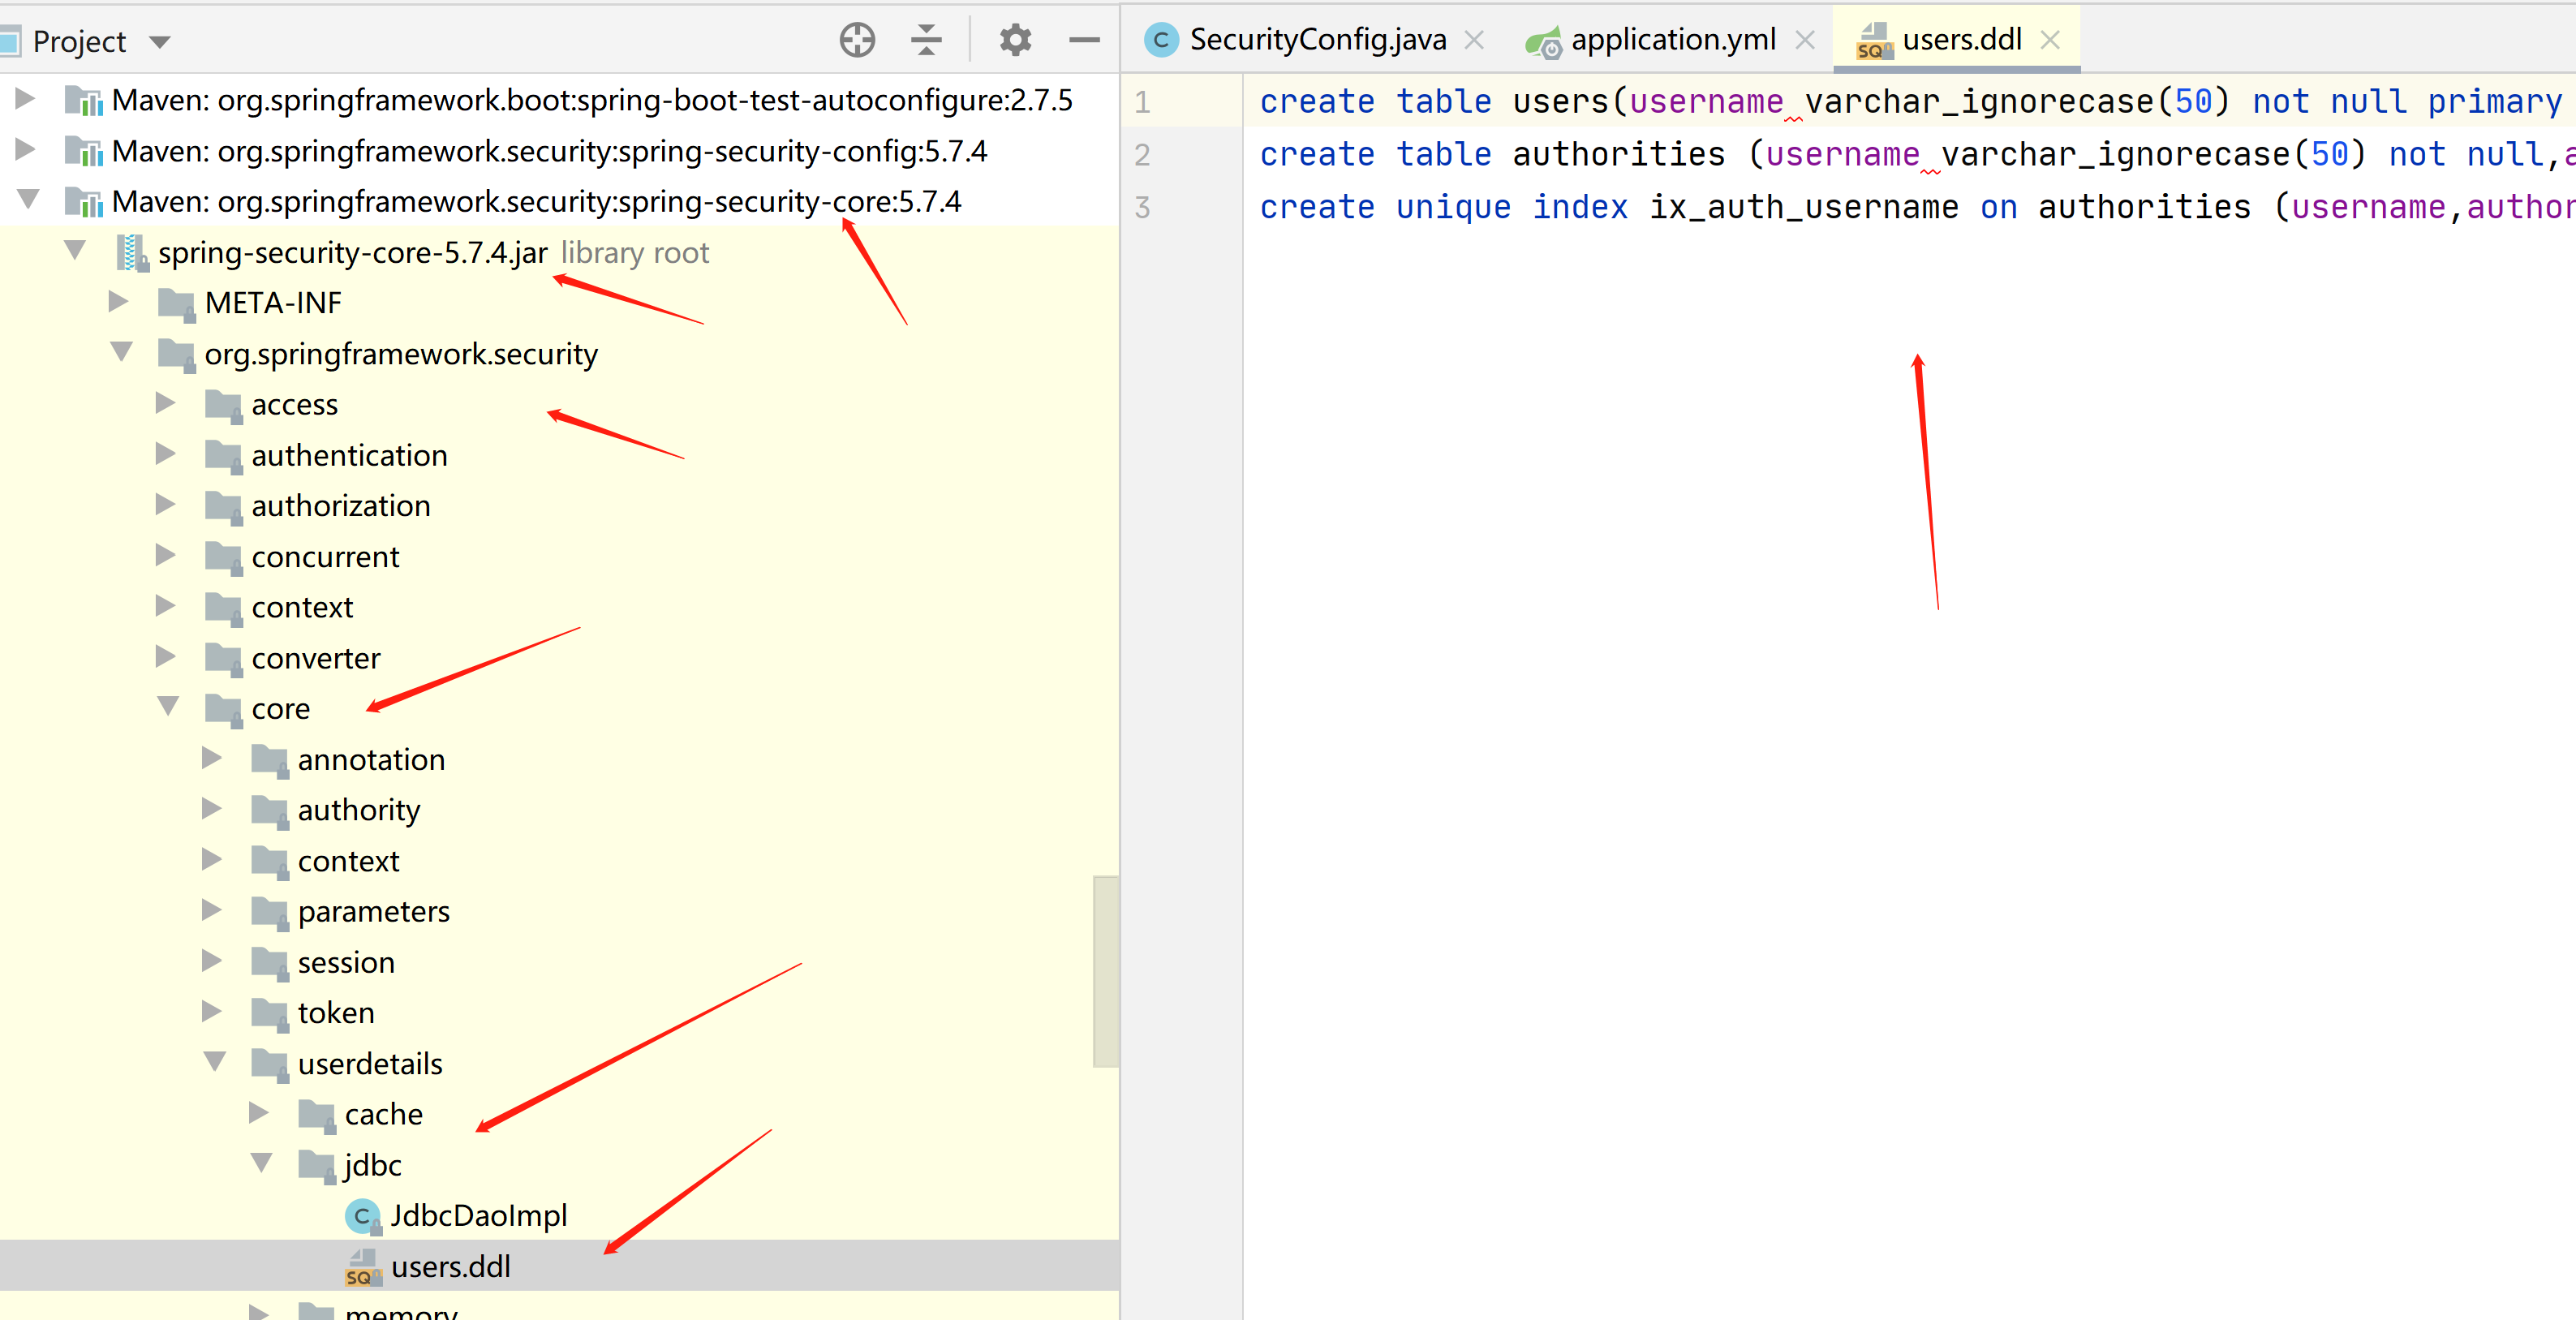
接下来我们在使用数据库
先创建用户表,和用户权限表
CREATE TABLE `users` (
  `username` varchar(50) NOT NULL,
  `PASSWORD` varchar(500) NOT NULL,
  `enabled` tinyint(1) NOT NULL,
  PRIMARY KEY (`username`)
) ENGINE=InnoDB DEFAULT CHARSET=utf8 COMMENT='用户表';
CREATE TABLE `authorities` (
`username` varchar(50) NOT NULL,
`authority` varchar(50) NOT NULL,
UNIQUE KEY `ix_auth_username` (`username`,`authority`),
CONSTRAINT `fk_authorities_users` FOREIGN KEY (`username`) REFERENCES `users` (`username`)
) ENGINE=InnoDB DEFAULT CHARSET=utf8 COMMENT='用户权限表';对应这个包的pgsql,要改成mysql的语法
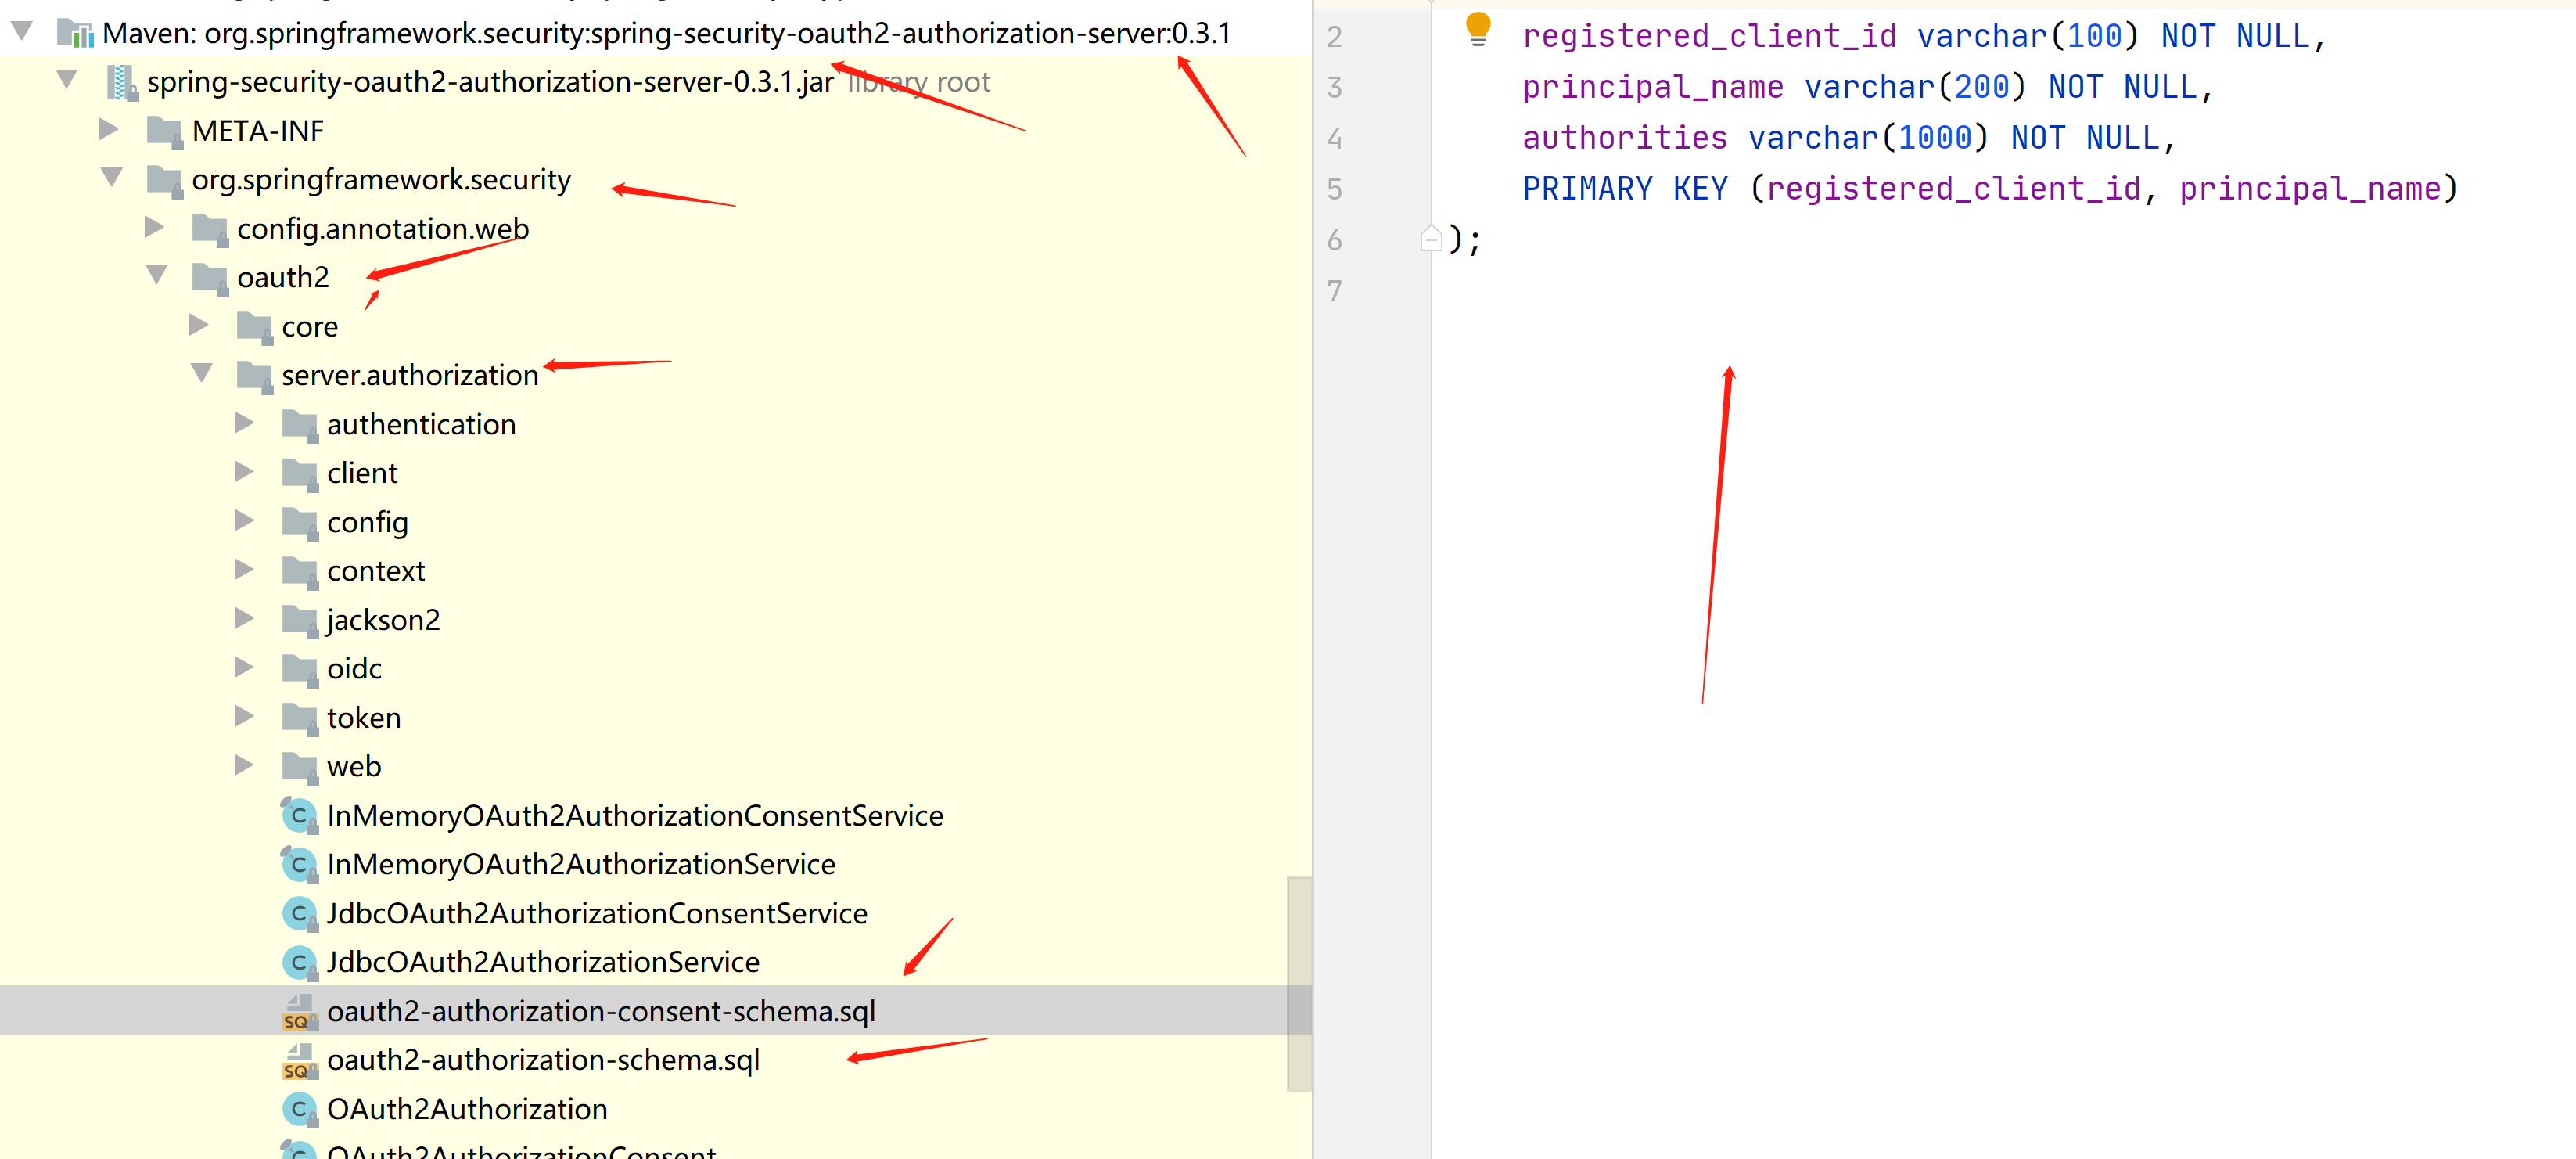
然后再创建用户手动确认授权同意书表
CREATE TABLE `oauth2_authorization_consent` (
  `registered_client_id` varchar(100) NOT NULL,
  `principal_name` varchar(200) NOT NULL,
  `authorities` varchar(1000) NOT NULL,
  PRIMARY KEY (`registered_client_id`,`principal_name`)
) ENGINE=InnoDB DEFAULT CHARSET=utf8 COMMENT='用户手动确认授权同意书';
创建客户端授权纪录表(包含授权码,JWT等信息)
CREATE TABLE `oauth2_authorization` (
`id` varchar(100) NOT NULL,
`registered_client_id` varchar(100) NOT NULL,
`principal_name` varchar(200) NOT NULL,
`authorization_grant_type` varchar(100) NOT NULL,
`attributes` blob,
`state` varchar(500) DEFAULT NULL,
`authorization_code_value` blob,
`authorization_code_issued_at` datetime DEFAULT NULL,
`authorization_code_expires_at` datetime DEFAULT NULL,
`authorization_code_metadata` blob,
`access_token_value` blob,
`access_token_issued_at` datetime DEFAULT NULL,
`access_token_expires_at` datetime DEFAULT NULL,
`access_token_metadata` blob,
`access_token_type` varchar(100) DEFAULT NULL,
`access_token_scopes` varchar(1000) DEFAULT NULL,
`oidc_id_token_value` blob,
`oidc_id_token_issued_at` datetime DEFAULT NULL,
`oidc_id_token_expires_at` datetime DEFAULT NULL,
`oidc_id_token_metadata` blob,
`refresh_token_value` blob,
`refresh_token_issued_at` datetime DEFAULT NULL,
`refresh_token_expires_at` datetime DEFAULT NULL,
`refresh_token_metadata` blob,
PRIMARY KEY (`id`)
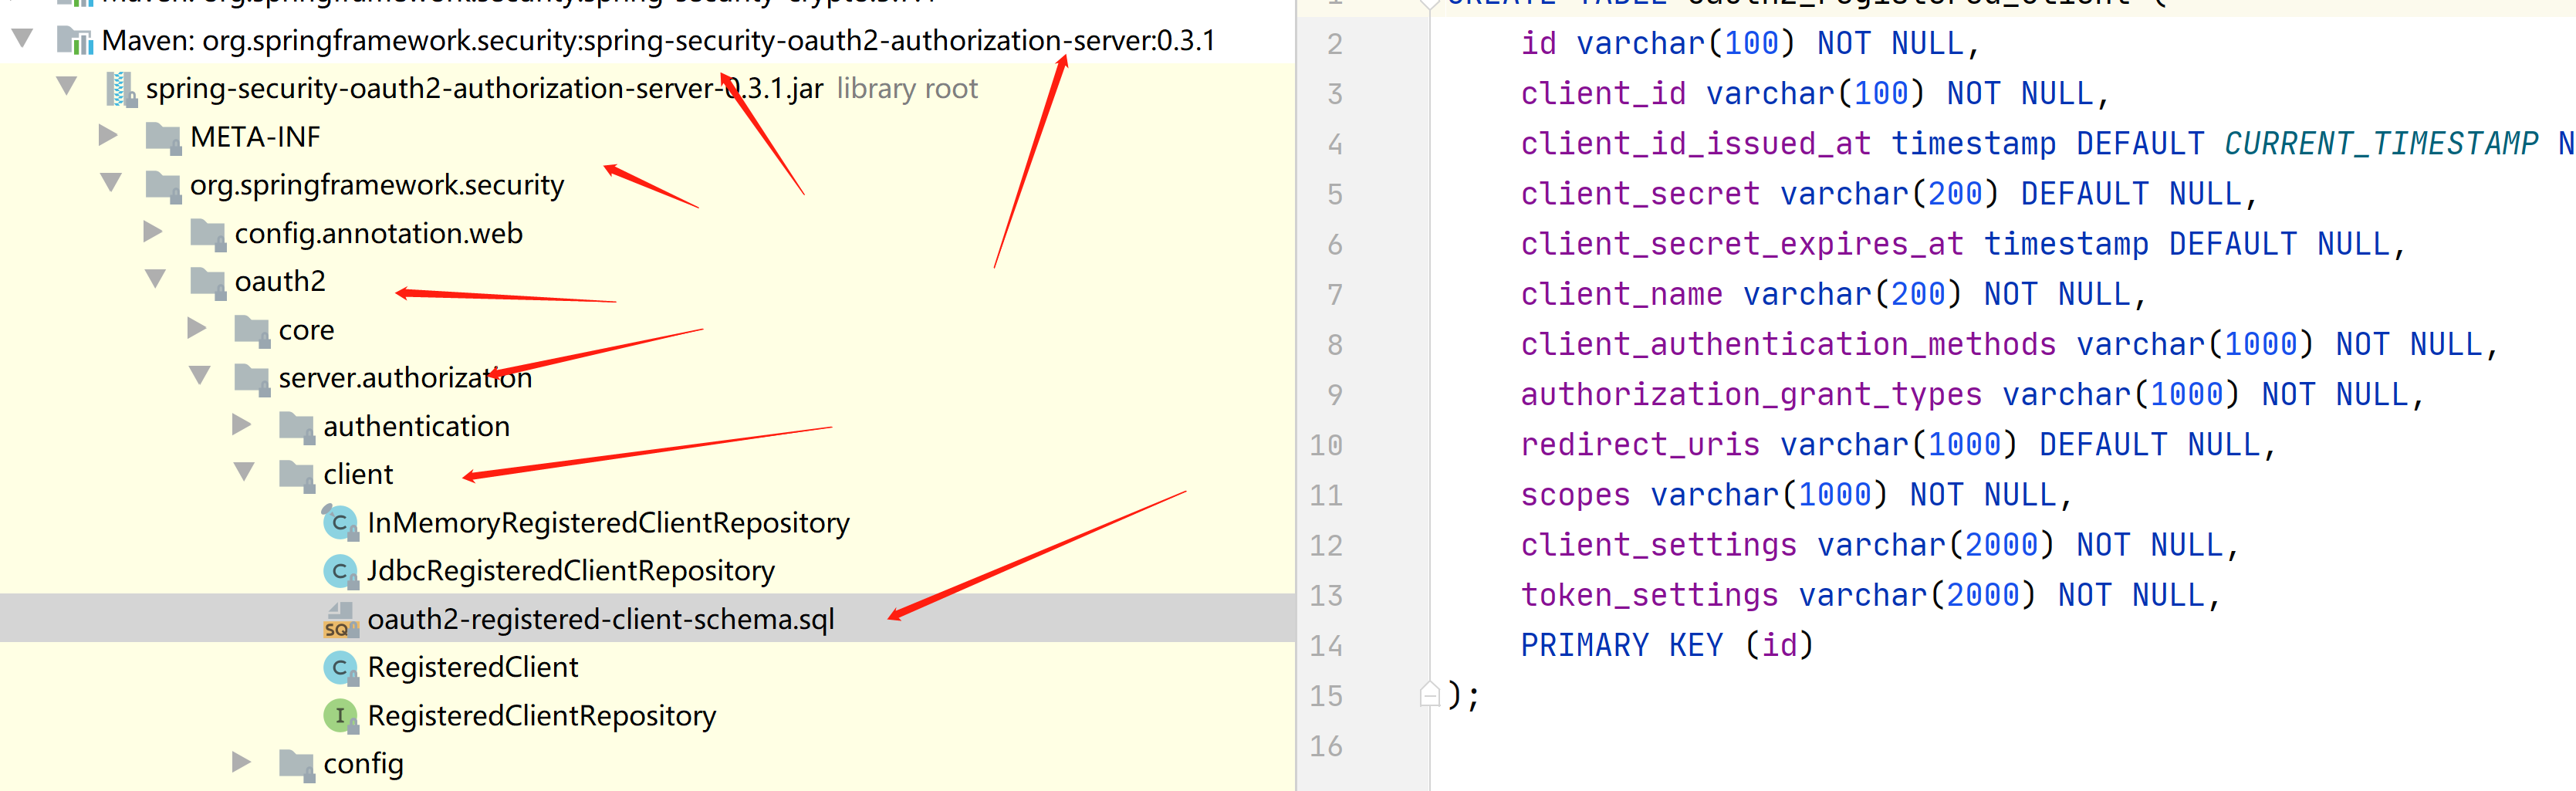
) ENGINE=InnoDB DEFAULT CHARSET=utf8 COMMENT='客户端授权纪录表(包含授权码,JWT等信息)';创建客户端注册信息表
CREATE TABLE `oauth2_registered_client` (
  `id` varchar(100) NOT NULL,
  `client_id` varchar(100) NOT NULL,
  `client_id_issued_at` datetime NOT NULL DEFAULT CURRENT_TIMESTAMP,
  `client_secret` varchar(200) DEFAULT NULL,
  `client_secret_expires_at` datetime DEFAULT NULL,
  `client_name` varchar(200) NOT NULL,
  `client_authentication_methods` varchar(1000) NOT NULL,
  `authorization_grant_types` varchar(1000) NOT NULL,
  `redirect_uris` varchar(1000) DEFAULT NULL,
  `scopes` varchar(1000) NOT NULL,
  `client_settings` varchar(2000) NOT NULL,
  `token_settings` varchar(2000) NOT NULL,
  PRIMARY KEY (`id`)
) ENGINE=InnoDB DEFAULT CHARSET=utf8 COMMENT='客户端注册信息表';
在源码的这个位置
然后在授权服务器加上这些包
        <!-- MySQL数据 -->
        <dependency>
            <groupId>mysql</groupId>
            <artifactId>mysql-connector-java</artifactId>
            <version>8.0.16</version>
        </dependency>

         <dependency>
            <groupId>org.springframework.boot</groupId>
            <artifactId>spring-boot-starter-jdbc</artifactId>
        </dependency>
然后在授权服务器 加上这些配置
logging:
  level:
    root: debug

mybatis-plus:
  configuration:
    log-impl: org.apache.ibatis.logging.stdout.StdOutImpl
  mapper-locations: classpath:mapper/*.xml
server:
  port: 8080
spring:
  application:
    name: auth-server
  datasource:
    driverClassName: com.mysql.cj.jdbc.Driver
    password: 123456
    url: jdbc:mysql://192.168.23.131:13306/db2?serverTimezone=Asia/Shanghai&useUnicode=true&characterEncoding=utf-8&useSSL=true
    username: root
然后再授权服务器的安全配置类,修改用户和客户端查询数据库
package com.example.authserver.security;

import com.nimbusds.jose.jwk.JWKSet;
import com.nimbusds.jose.jwk.RSAKey;
import com.nimbusds.jose.jwk.source.ImmutableJWKSet;
import com.nimbusds.jose.jwk.source.JWKSource;
import com.nimbusds.jose.proc.SecurityContext;
import org.springframework.beans.factory.annotation.Autowired;
import org.springframework.context.annotation.Bean;
import org.springframework.context.annotation.Configuration;
import org.springframework.core.annotation.Order;
import org.springframework.jdbc.core.JdbcTemplate;
import org.springframework.security.config.Customizer;
import org.springframework.security.config.annotation.web.builders.HttpSecurity;
import org.springframework.security.config.annotation.web.configuration.EnableWebSecurity;
import org.springframework.security.config.annotation.web.configuration.OAuth2AuthorizationServerConfiguration;
import org.springframework.security.core.userdetails.UserDetailsService;
import org.springframework.security.oauth2.server.authorization.*;
import org.springframework.security.oauth2.server.authorization.client.JdbcRegisteredClientRepository;
import org.springframework.security.oauth2.server.authorization.client.RegisteredClientRepository;
import org.springframework.security.oauth2.server.authorization.config.ProviderSettings;
import org.springframework.security.provisioning.JdbcUserDetailsManager;
import org.springframework.security.web.SecurityFilterChain;
import org.springframework.security.web.authentication.LoginUrlAuthenticationEntryPoint;
import javax.sql.DataSource;
import java.security.KeyPair;
import java.security.KeyPairGenerator;
import java.security.interfaces.RSAPrivateKey;
import java.security.interfaces.RSAPublicKey;
import java.util.UUID;

@Configuration
//开启web安全 应用在web环境下
// 1: 加载了WebSecurityConfiguration配置类, 配置安全认证策略
// 2: 加载了AuthenticationConfiguration, 配置了认证信息
@EnableWebSecurity
public class SecurityConfig {

    @Autowired
    private DataSource dataSource;
    @Autowired
    private JdbcTemplate jdbcTemplate;


    /**
     *
     * 授权服务安全过滤器链
     * 第一个进来
     * @param
     * @return
     * @throws Exception
     */
    @Order(1)
    @Bean
    public SecurityFilterChain authorizedServiceSecurityFilterChain(HttpSecurity http) throws Exception {
        //授权服务配置 应用默认安全性 简化配置,在源码给你都配置好了
        OAuth2AuthorizationServerConfiguration.applyDefaultSecurity(http);
        http.   //异常处理
                exceptionHandling().
                //设置默认的登陆界面
                authenticationEntryPoint(new LoginUrlAuthenticationEntryPoint("/login"));
        return http.build();
    }

    /**
     * 默认安全过滤器链
     * 用于身份认证
     * 第二个进入
     * @param
     * @return
     * @throws Exception
     */
    @Order(2)
    @Bean
    public SecurityFilterChain defaultSecurityFilterChain(HttpSecurity http) throws Exception {
        //必须认证才能登陆
        http.authorizeHttpRequests()
                .anyRequest()
                .authenticated()
                .and()
                //采用表单认证方式登陆
                .formLogin(Customizer.withDefaults());
        return http.build();
    }


    /**
     *
     * 配置用户信息 从数据库查询 实现用户的crud操作
     * @param
     * @return
     * @throws Exception
     */
    @Bean
    public UserDetailsService userDetailsService(){
        return new JdbcUserDetailsManager(dataSource);
    }


    /**
     *
     *  用于第三方认证
     *  主要管理第三方的客户端
     *  已注册客户端存储库
     * @param
     * @return
     * @throws Exception
     */
    @Bean
    public RegisteredClientRepository registeredClientRepository(){
        //从数据库查询已经注册的客户端信息
        return new JdbcRegisteredClientRepository(jdbcTemplate);
//        RegisteredClient registeredClient=RegisteredClient.withId(UUID.randomUUID().toString())
//                //客户端id
//                .clientId("showDoc")
//                //{noop}不加密,客户端密码
//                .clientSecret("{noop}123456")
//                //客户端认证方法  客户端安全基本 客户端通过客户端密码认证方式接入
//                .clientAuthenticationMethod(ClientAuthenticationMethod.CLIENT_SECRET_BASIC)
//                //客户端允许使用的授权模式,授权类型,授权码模式,刷新token,客户端模式
//                .authorizationGrantType(AuthorizationGrantType.AUTHORIZATION_CODE)
//                .authorizationGrantType(AuthorizationGrantType.REFRESH_TOKEN)
//                .authorizationGrantType(AuthorizationGrantType.CLIENT_CREDENTIALS)
//                //客户端允许跳转的uri注册地址,回调地址 登陆成功之后跳转的地址
//                .redirectUri("http://auth-server:8080/authorized")
//                .redirectUri("http://client:8082/login/oauth2/code/test")
//                //客户端允许使用的范围授权 如果对方写的不对 那么就没有权限进行登陆
//                .scope("read")
//                .scope("write")
//                //是否开启用户手动确认,false为自动确认 就是在授权界面 是否选择 复选框
//                .clientSettings(ClientSettings.builder().requireAuthorizationConsent(false).build())
//                .build();
//        //内存注册客户端存储  不查询数据库
//        return new InMemoryRegisteredClientRepository(registeredClient);
    }

    /**
     *
     * 通过非对称加密生成access_token(jwt)的签名部分
     * @param
     * @return
     * @throws Exception
     */
    @Bean
    public JWKSource<SecurityContext>jwkSource(){
        KeyPair keyPair = generateRsaKey();
        RSAPublicKey publicKey = (RSAPublicKey) keyPair.getPublic();
        RSAPrivateKey privateKey = (RSAPrivateKey) keyPair.getPrivate();
        RSAKey rsaKey = new RSAKey.Builder(publicKey)
                .privateKey(privateKey)
                .keyID(UUID.randomUUID().toString())
                .build();
        JWKSet jwkSet = new JWKSet(rsaKey);
        return new ImmutableJWKSet<>(jwkSet);
    }

    /**
     * ⽣成秘钥对,为jwkSource提供服务,私钥服务器⾃身持有,公钥对外开放。
     *
     * @return
     */
    private static KeyPair generateRsaKey() {
        KeyPair keyPair;
        try {
            KeyPairGenerator keyPairGenerator = KeyPairGenerator.getInstance("RSA");
            keyPairGenerator.initialize(2048);
            keyPair = keyPairGenerator.generateKeyPair();
        } catch (Exception ex) {
            throw new IllegalStateException(ex);
        }
        return keyPair;
    }

    /**
     *
     * 提供程序设置 默认配置
     * @param
     * @return
     * @throws Exception
     */
    @Bean
    public ProviderSettings providerSettings(){
        return ProviderSettings.builder().build();
    }

    /**
     *
     * 对应 oauth2_authorization表 授权服务
     * @param
     * @return
     * @throws Exception
     */
    @Bean
    public OAuth2AuthorizationService auth2AuthorizationService(){
        return new JdbcOAuth2AuthorizationService(jdbcTemplate,registeredClientRepository());
    }

    /**
     * 对应oauth2_authorization_consent表
     * 用户确认授权同意书
     * @param
     * @return
     * @throws Exception
     */
    @Bean
    public OAuth2AuthorizationConsentService auth2AuthorizationConsentService(){
        return new JdbcOAuth2AuthorizationConsentService(jdbcTemplate,registeredClientRepository());
    }
}
主要新增这4部分

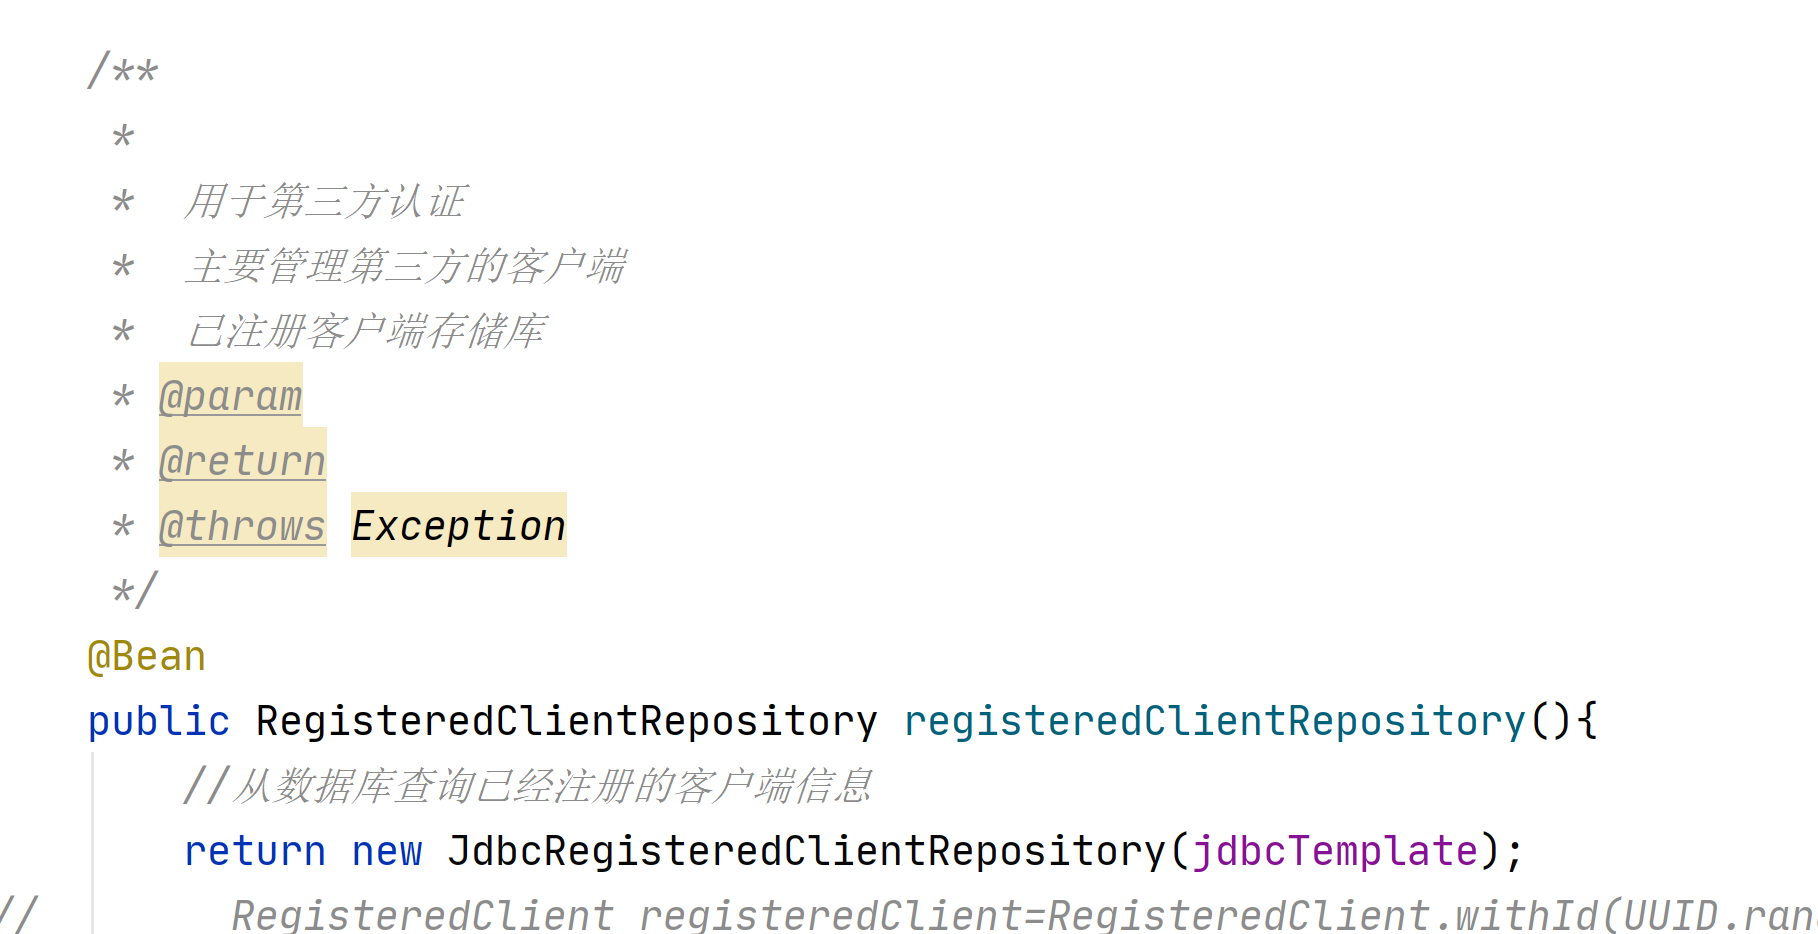
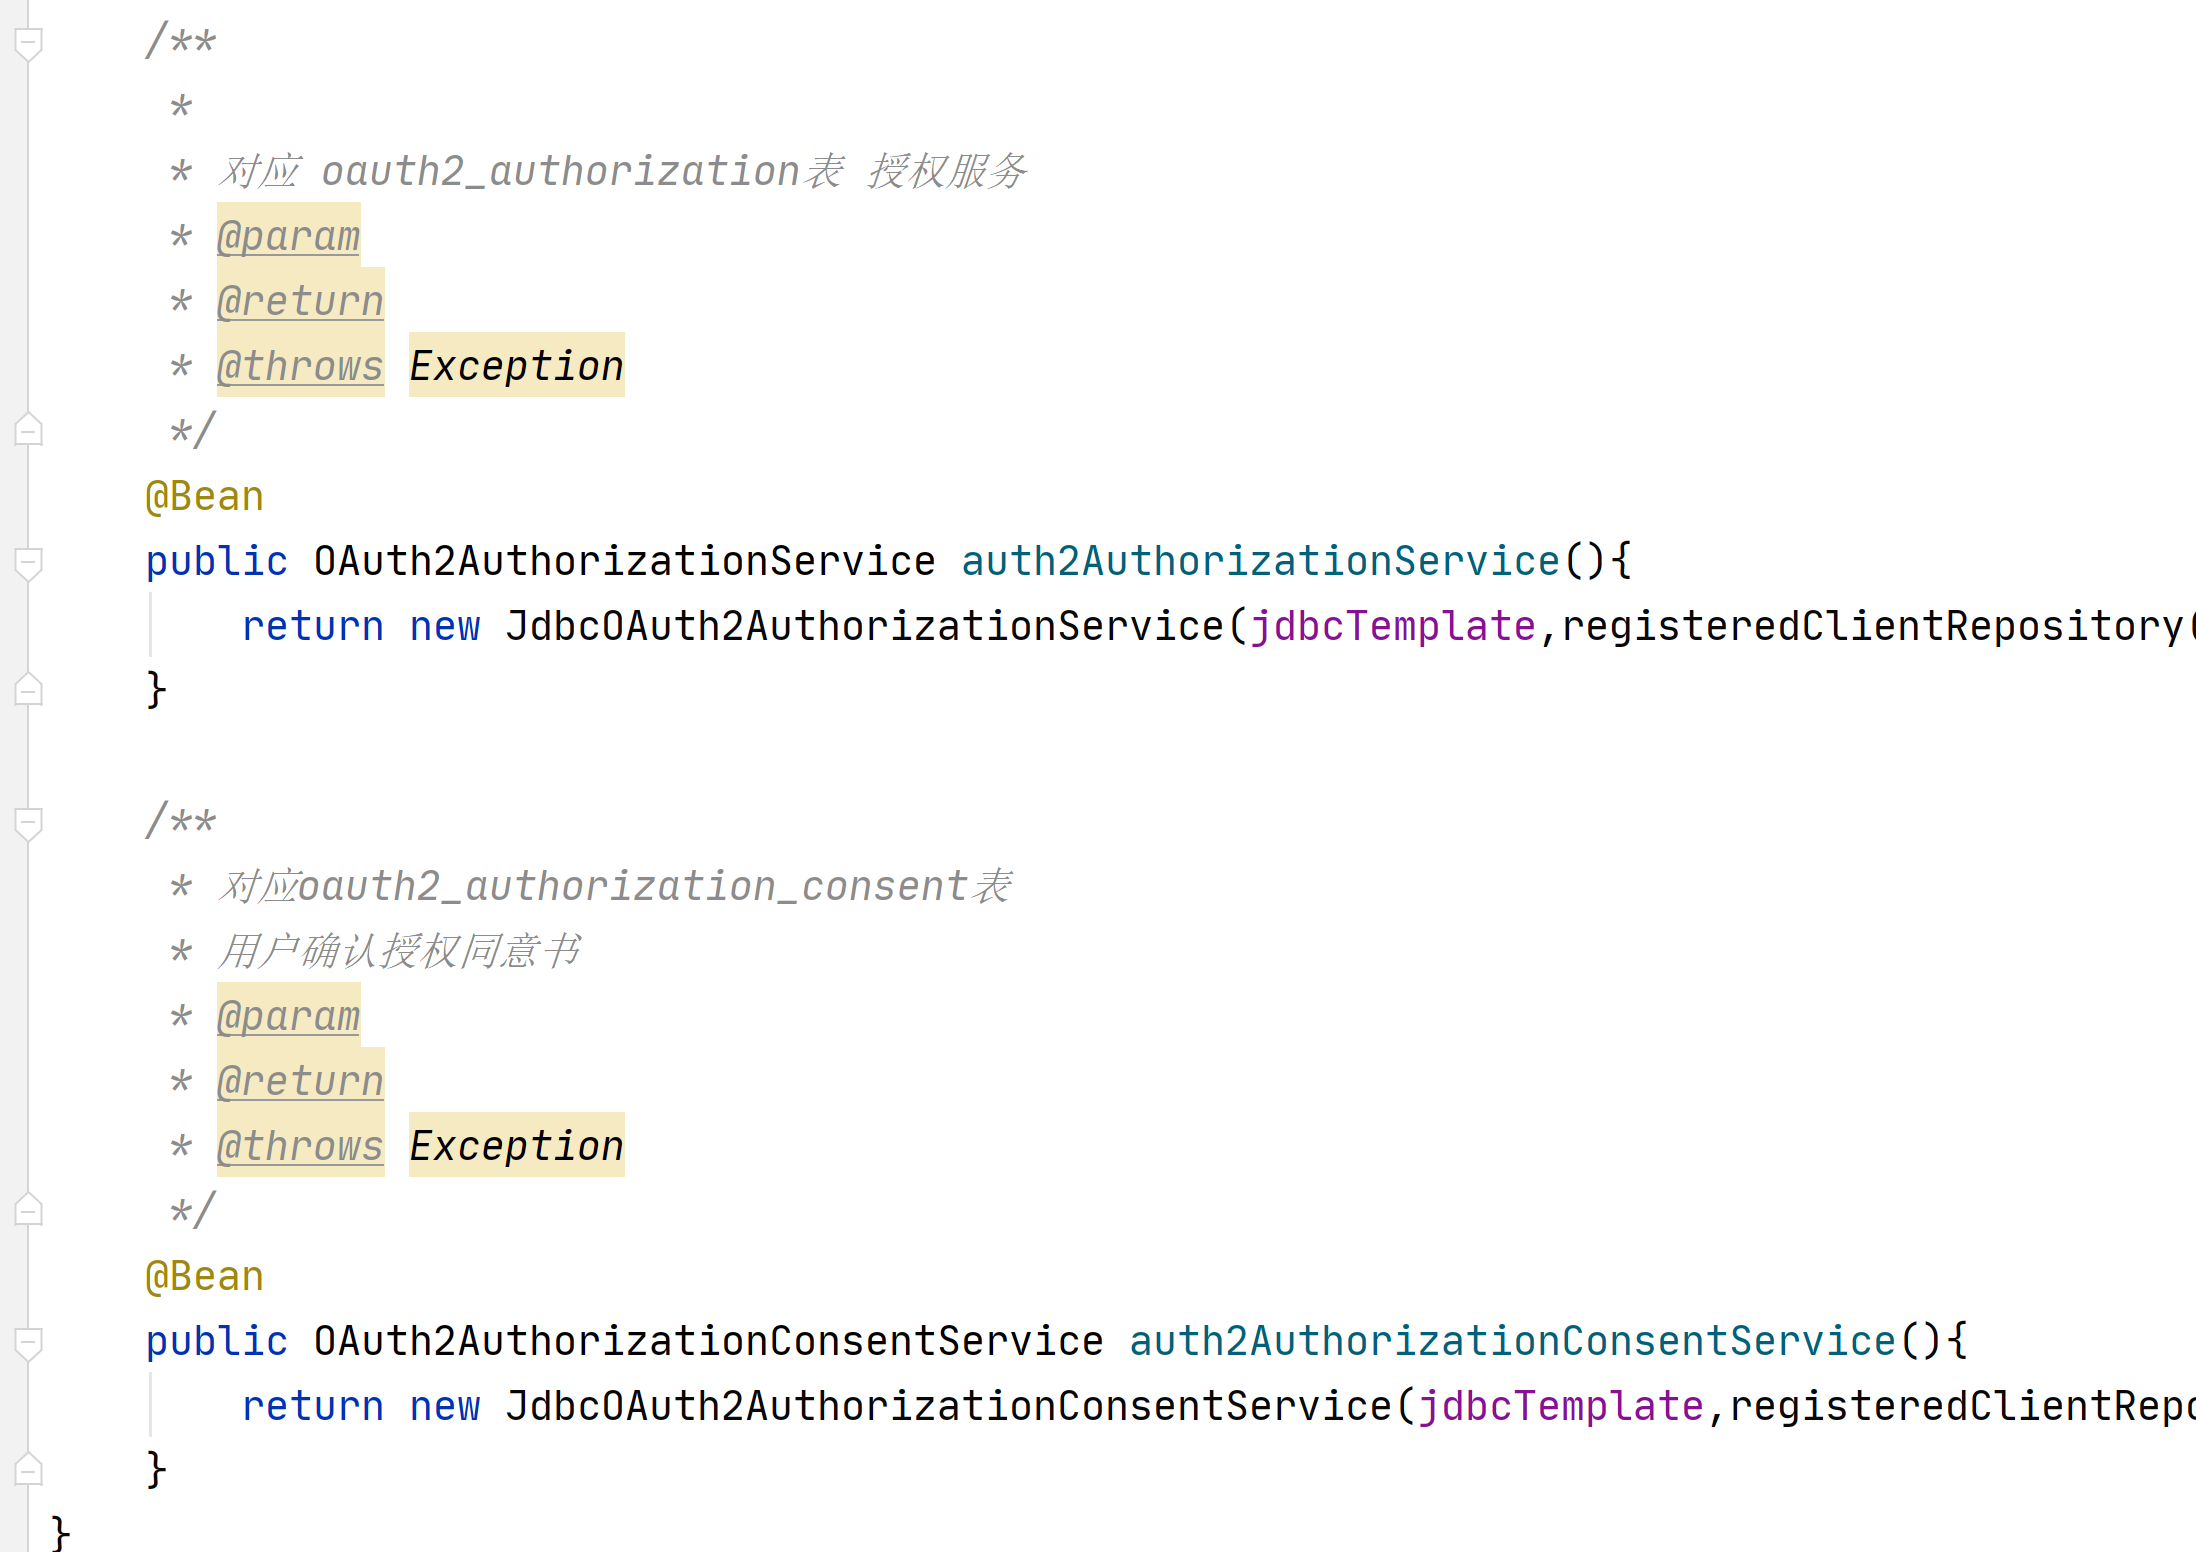
我们先授权服务器初始化 一个用户 一个客户端 在测试类
package com.example.authserver;

import org.junit.jupiter.api.Test;
import org.springframework.beans.factory.annotation.Autowired;
import org.springframework.boot.test.context.SpringBootTest;
import org.springframework.security.core.userdetails.User;
import org.springframework.security.core.userdetails.UserDetails;
import org.springframework.security.crypto.bcrypt.BCryptPasswordEncoder;
import org.springframework.security.oauth2.core.AuthorizationGrantType;
import org.springframework.security.oauth2.core.ClientAuthenticationMethod;
import org.springframework.security.oauth2.server.authorization.client.RegisteredClient;
import org.springframework.security.oauth2.server.authorization.client.RegisteredClientRepository;
import org.springframework.security.oauth2.server.authorization.config.ClientSettings;
import org.springframework.security.provisioning.UserDetailsManager;
import org.springframework.web.bind.annotation.GetMapping;
import org.springframework.web.bind.annotation.RestController;

import java.util.UUID;

@SpringBootTest
class AuthServerApplicationTests {
        @Autowired
        private UserDetailsManager userDetailsManager;
        @Autowired
        private RegisteredClientRepository registeredClientRepository;


        /**
         *
         * 创建用户
         * @param
         * @return
         * @throws Exception
         */
        @Test
        public void createUser(){
            //添加到用户表,和用户权限表中
            UserDetails userDetails= User.builder().passwordEncoder(
                    x->"{bcrypt}"+new BCryptPasswordEncoder().encode(x))
                    .username("zhangsan")
                    .password("123456")
                    .roles("USER")
                    .build();
            userDetailsManager.createUser(userDetails);
        }

        /**
         *
         * 注册客户端
         * @param
         * @return
         * @throws Exception
         */
        @Test
        public void registerClient(){
            RegisteredClient registeredClient=RegisteredClient.withId(UUID.randomUUID().toString())
                    //客户端id
                    .clientId("showDoc")
                    //客户端密码 加密
                    .clientSecret("{bcrypt}"+new BCryptPasswordEncoder().encode("123456"))
                    //客户端认证方法  客户端安全基本 客户端通过客户端密码认证方式接入
                    .clientAuthenticationMethod(ClientAuthenticationMethod.CLIENT_SECRET_BASIC)
                    //客户端允许使用的授权模式,授权类型,授权码模式,刷新token,客户端模式
                    .authorizationGrantType(AuthorizationGrantType.AUTHORIZATION_CODE)
                    .authorizationGrantType(AuthorizationGrantType.REFRESH_TOKEN)
                    .authorizationGrantType(AuthorizationGrantType.CLIENT_CREDENTIALS)
                    //客户端允许跳转的uri注册地址,回调地址 登陆成功之后跳转的地址
                    .redirectUri("http://auth-server:8080/authorized")
                    .redirectUri("http://client:8082/login/oauth2/code/test")
                    //客户端允许使用的范围授权 如果对方写的不对 那么就没有权限进行登陆
                    .scope("read")
                    .scope("write")
                    //是否开启用户手动确认,false为自动确认 就是在授权界面 是否选择 复选框
                    .clientSettings(ClientSettings.builder().requireAuthorizationConsent(true).build())
                    .build();
            //保存到oauth2_registered_client表里
            registeredClientRepository.save(registeredClient);
        }

    }
数据库就有数据了


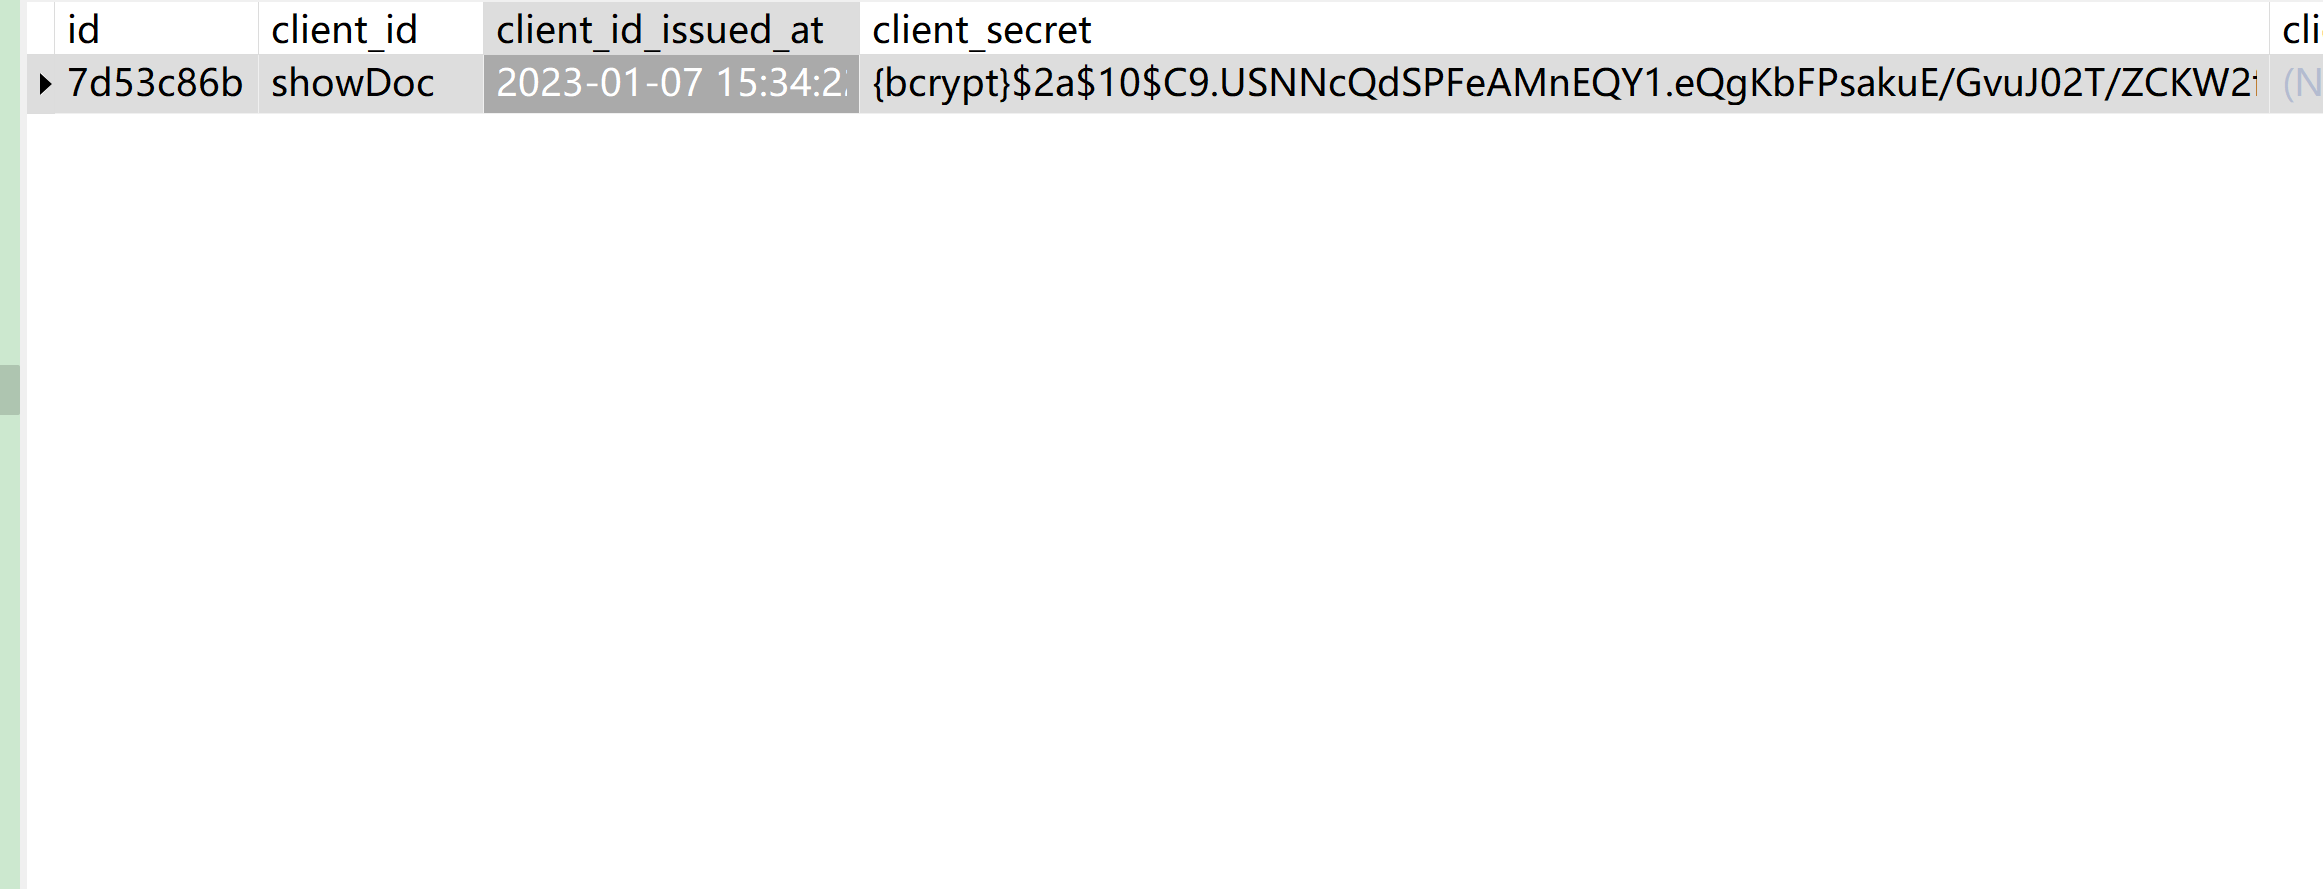
然后用zhangsan,密码123456来登陆,进行获取资源信息
http://client:8082/getResHello

授权之后下面的表也有数据了
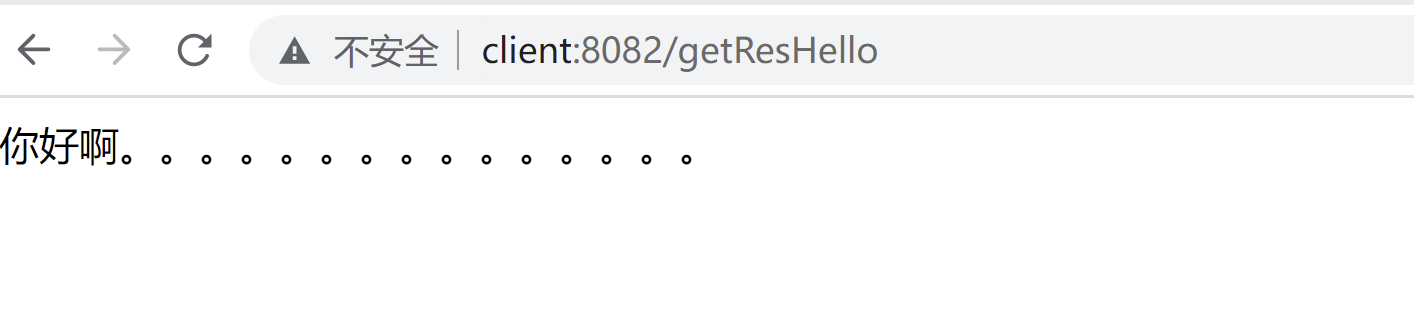

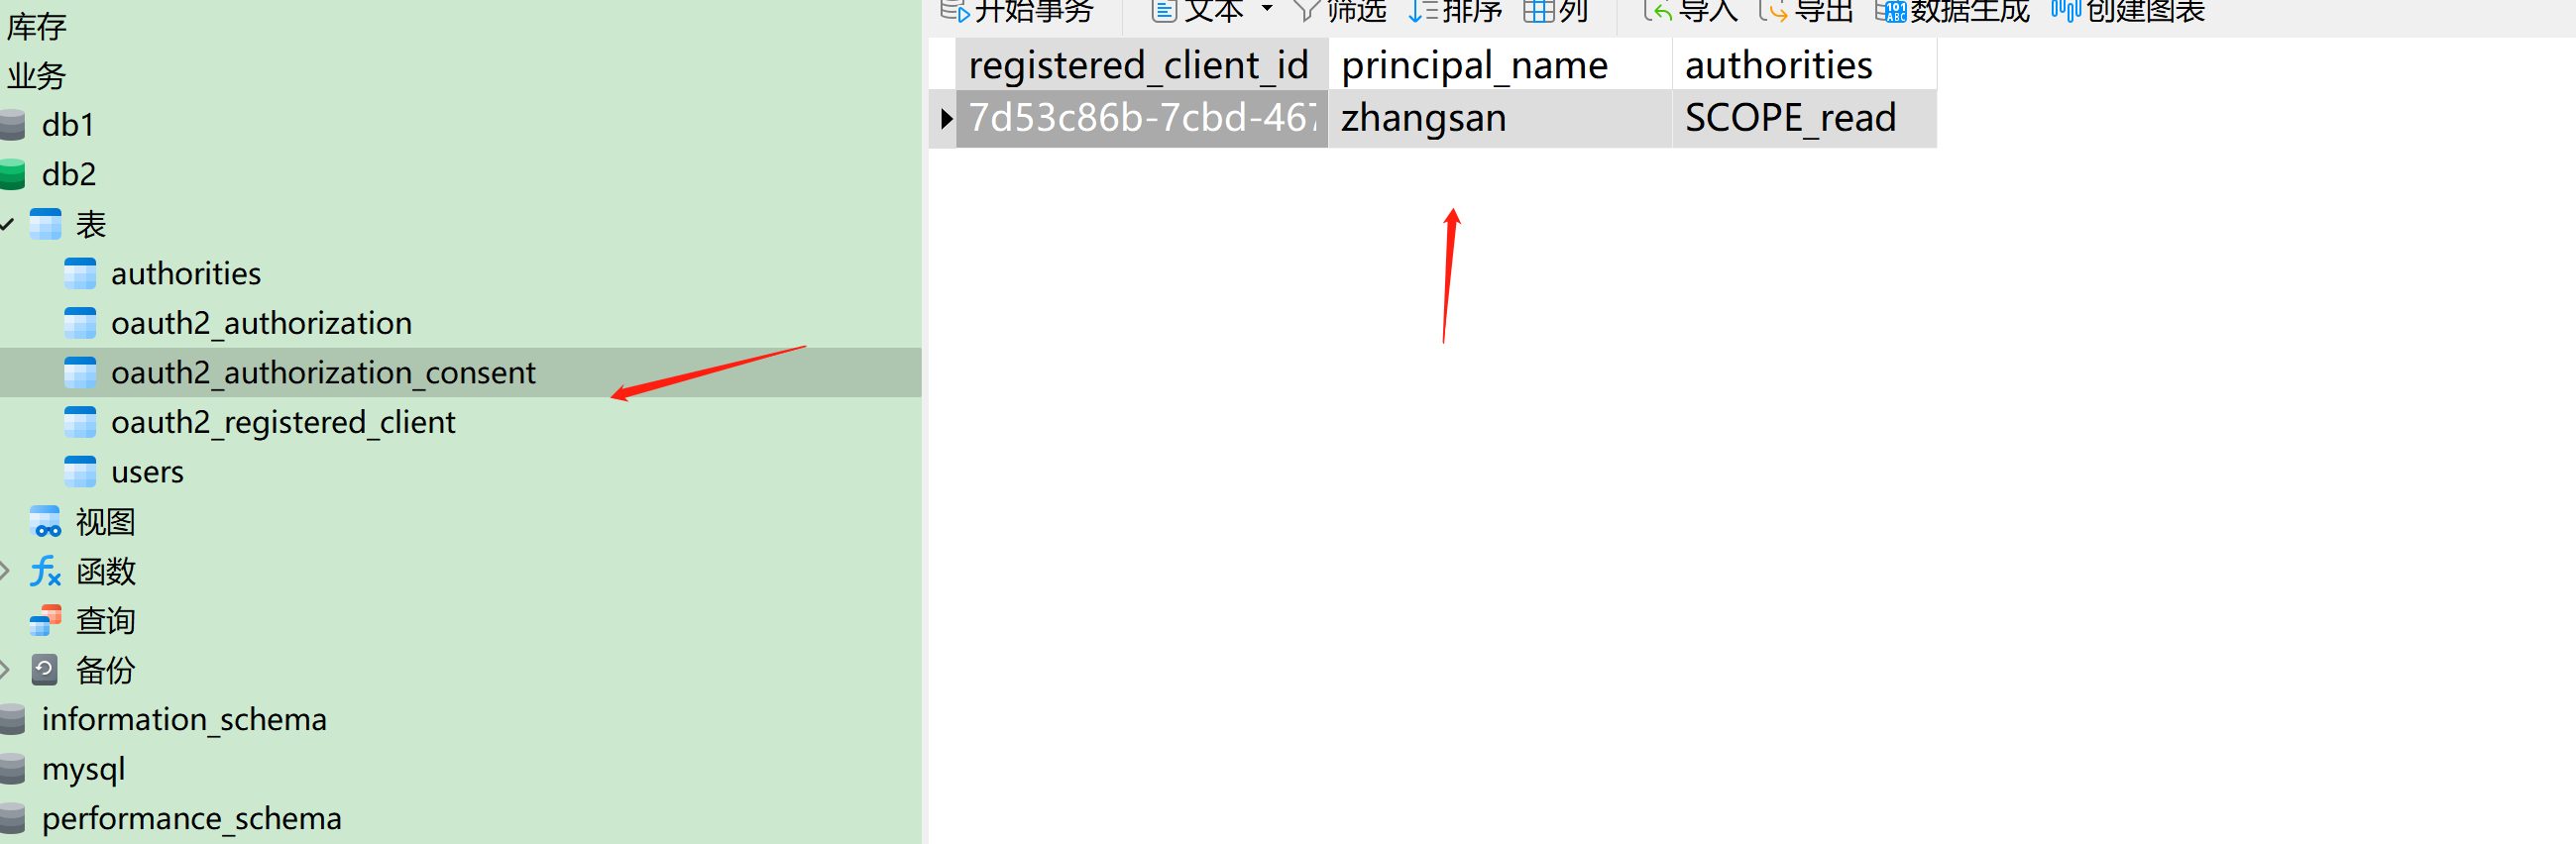
接下来我们看下客户端的scope
如果我们配置一个错误的scope,没有和授权服务器的一致
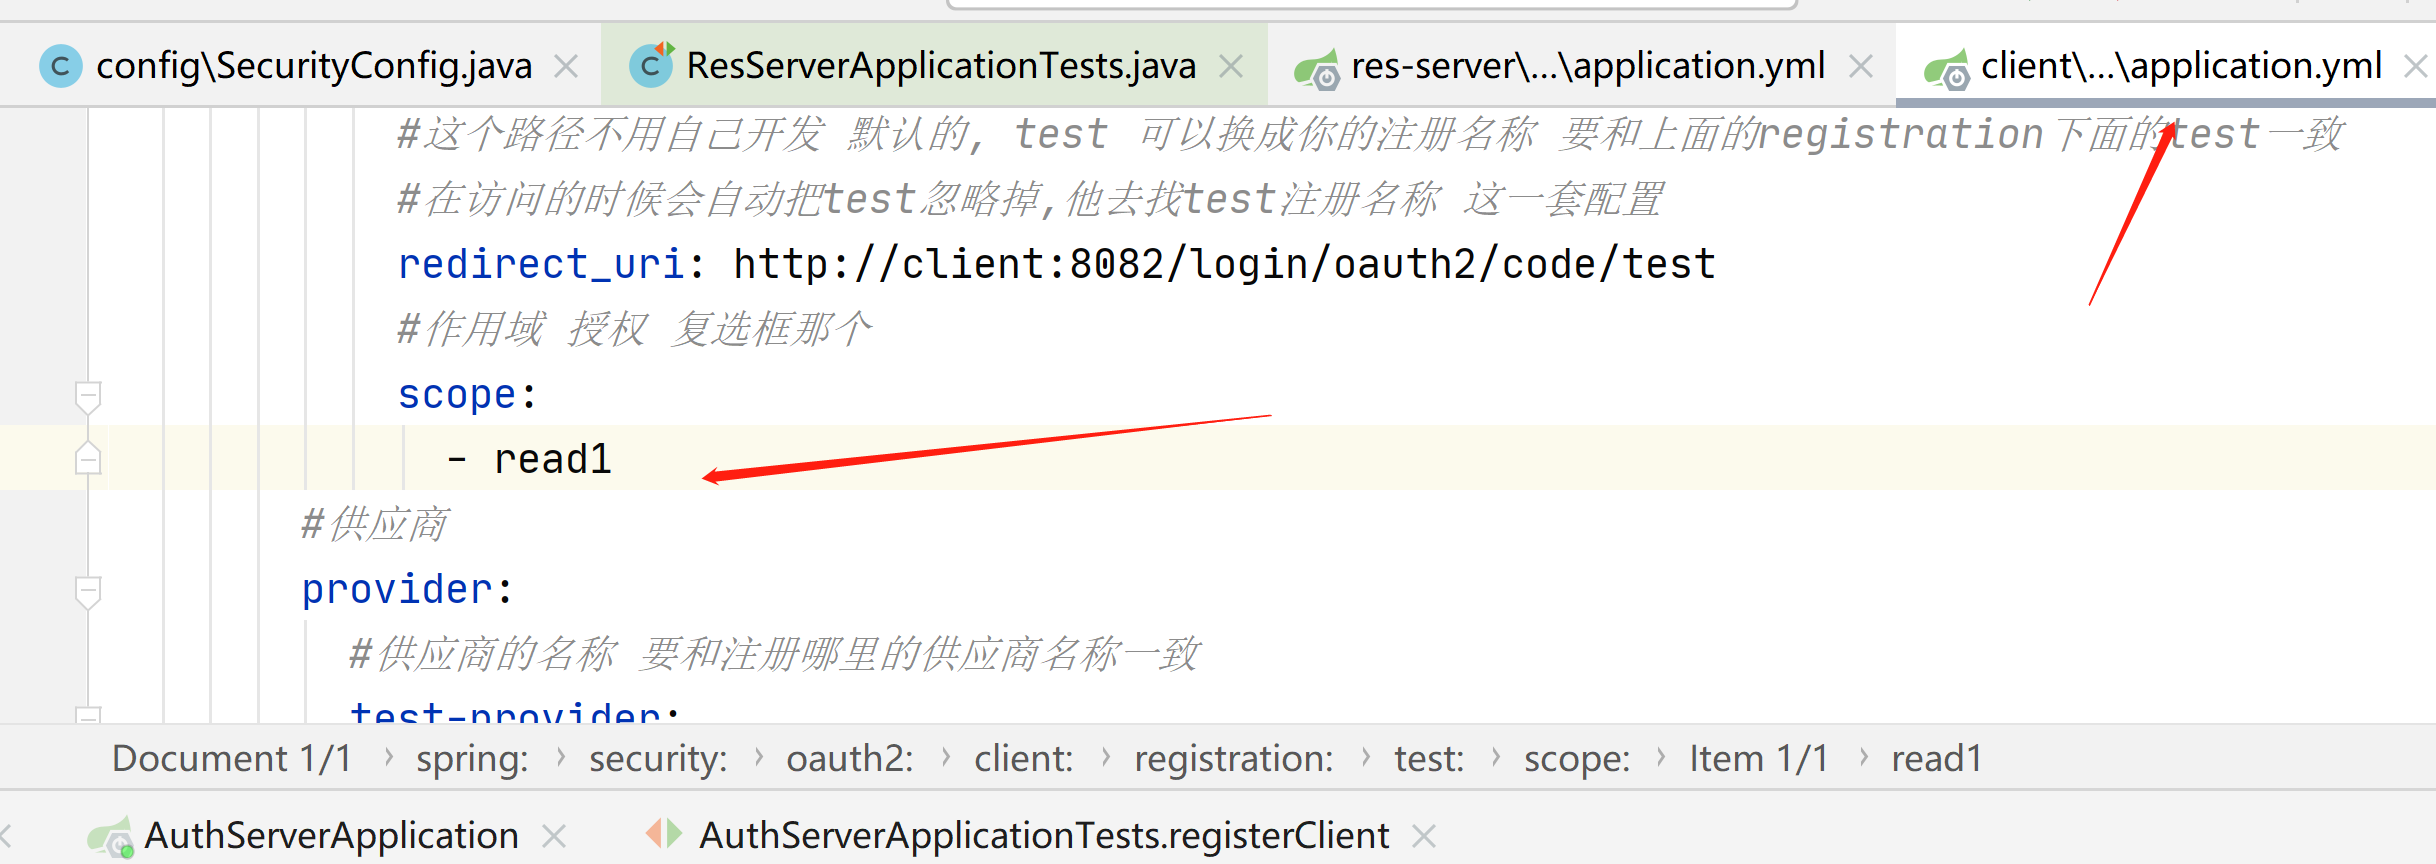
那么就会报下面的错误

我们对客户端的安全配置类改造
package com.example.client.config;

import org.springframework.context.annotation.Bean;
import org.springframework.context.annotation.Configuration;
import org.springframework.security.access.AccessDeniedException;
import org.springframework.security.config.annotation.web.builders.HttpSecurity;
import org.springframework.security.web.SecurityFilterChain;
import org.springframework.security.web.access.AccessDeniedHandler;

import javax.servlet.ServletException;
import javax.servlet.http.HttpServletRequest;
import javax.servlet.http.HttpServletResponse;
import java.io.IOException;

@Configuration
public class SecurityConfig {


    /**
     *
     * 安全过滤器链
     * @param
     * @return
     * @throws Exception
     */
    @Bean
    public SecurityFilterChain filterChain(HttpSecurity http) throws Exception {
        //异常处理
        http.exceptionHandling()
                //访问拒绝处理程序
                .accessDeniedHandler(new AccessDeniedHandler() {
                    @Override
                    public void handle(HttpServletRequest request, HttpServletResponse response, AccessDeniedException accessDeniedException) throws IOException, ServletException {
                        response.setContentType("application/json;charset=utf-8");
                        response.getWriter().println("{code:403,msg:没有访问权限}");
                    }
                });

        //拦截所有请求
        http.authorizeRequests()
                //对某一个接口做scope权限控制 SCOPE_固定前缀+作用域
                .mvcMatchers("/getResHello").access("hasAuthority('SCOPE_write')")
                .anyRequest()
                .authenticated()
                .and()
                //使用oauth2登陆,自动跳转到授权服务的登陆界面
                .oauth2Login();
        return http.build();
    }
}
设置一个没有配置的作用域

再次访问
http://client:8082/getResHello
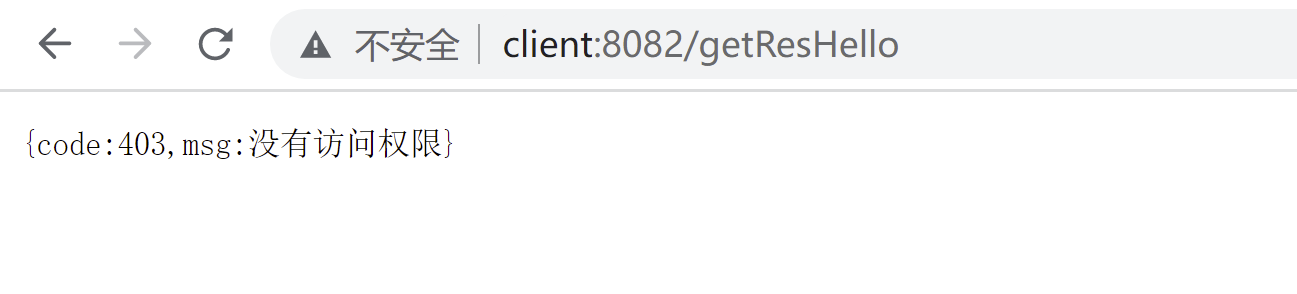
我们在客户端的yml加入作用域,一定要和授权服务器的作用域一样
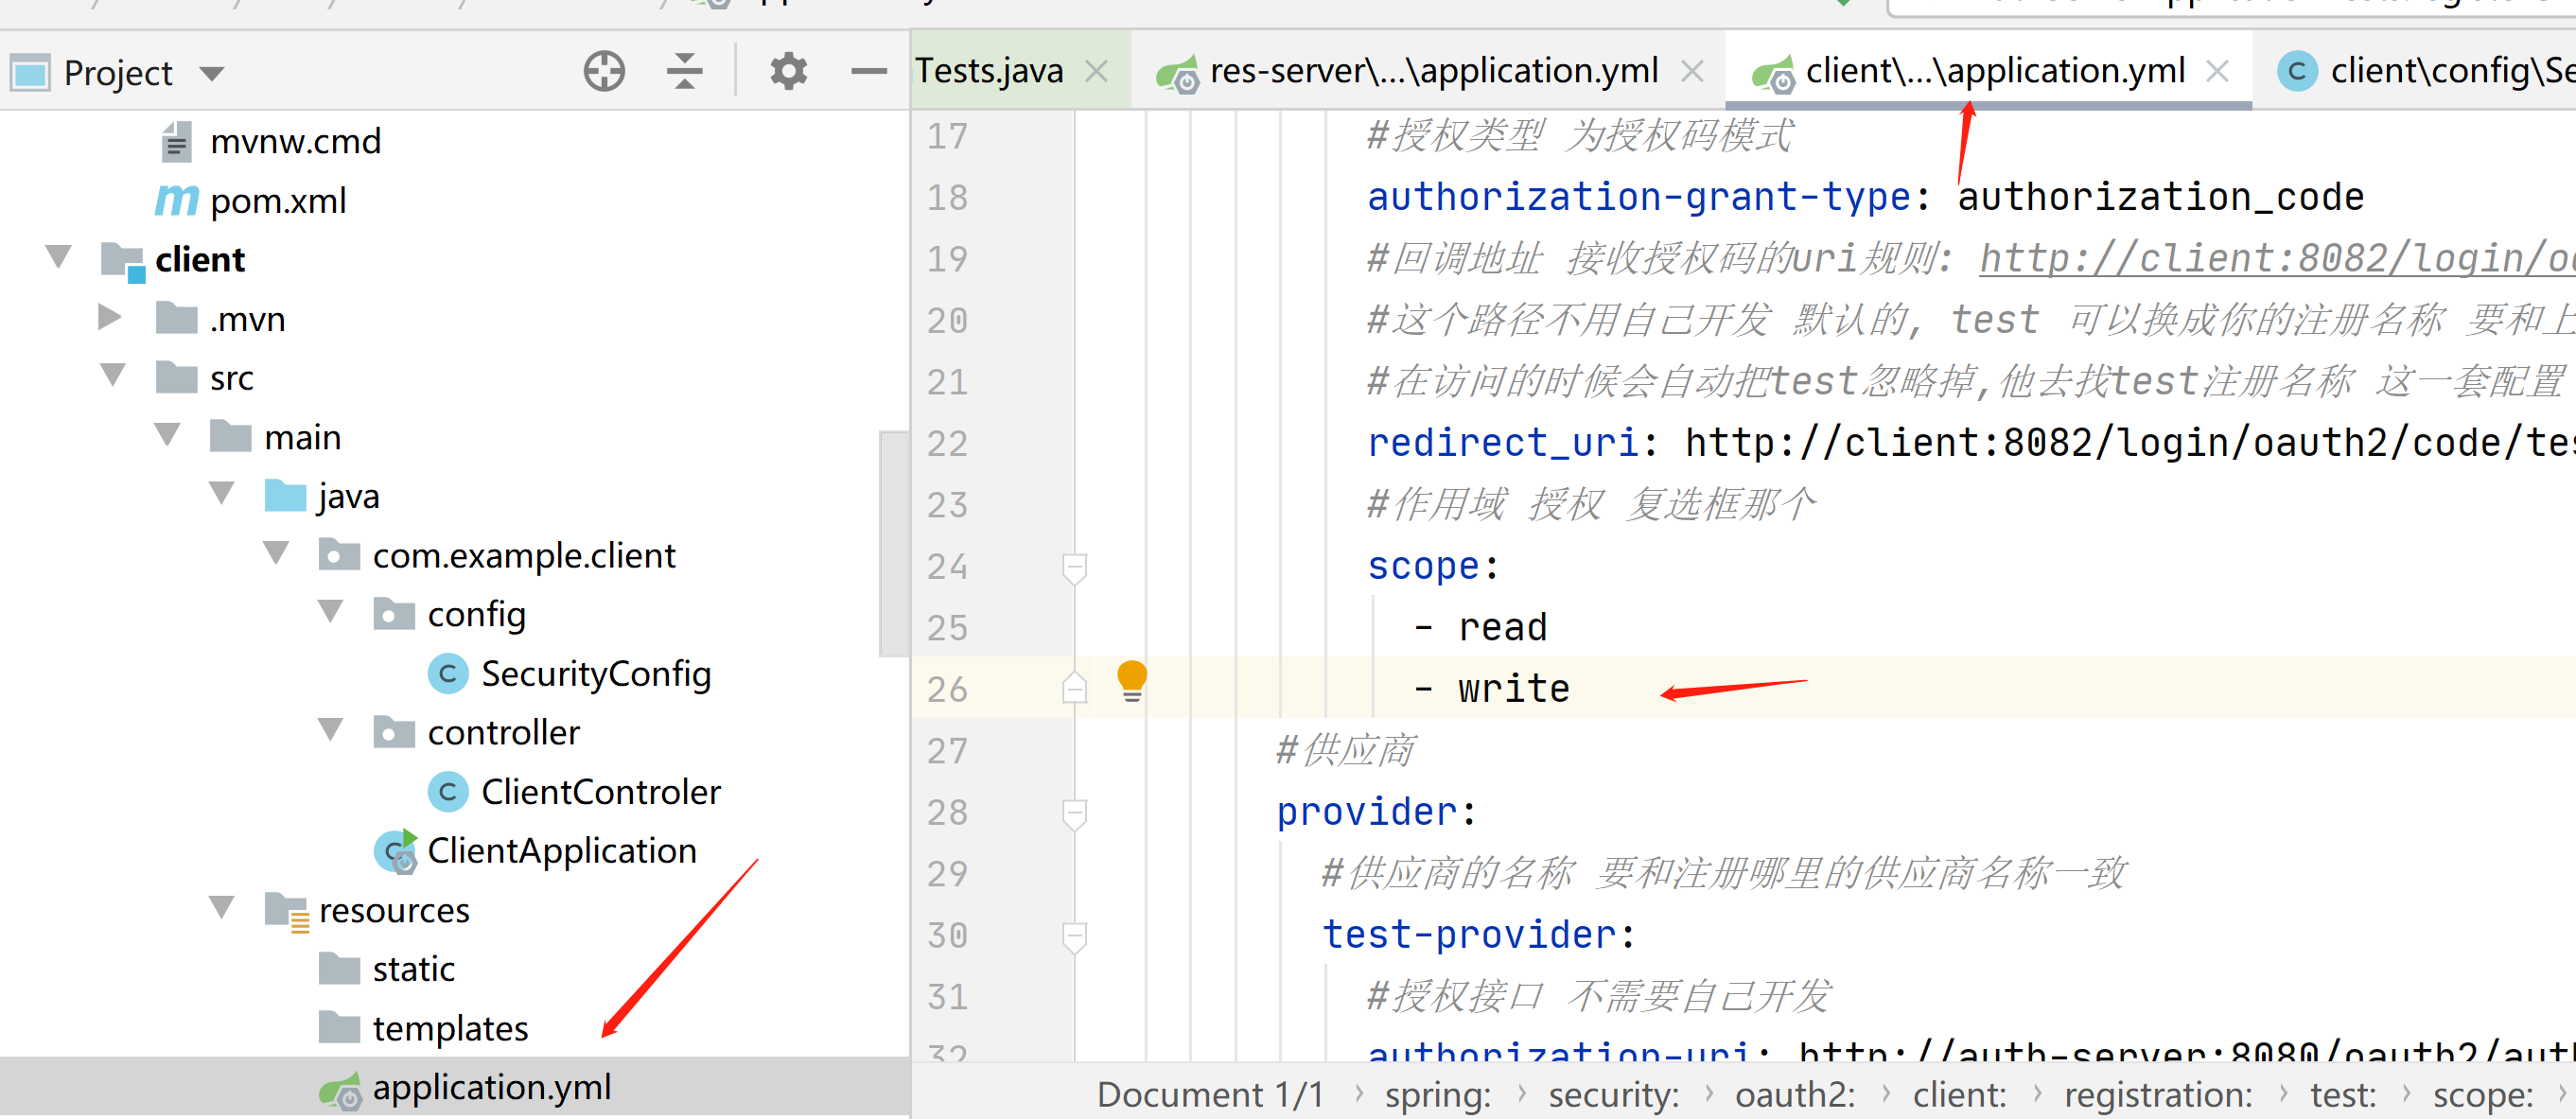
我们在来访问一遍,一定要把这2个都勾选上,要不然还没有权限
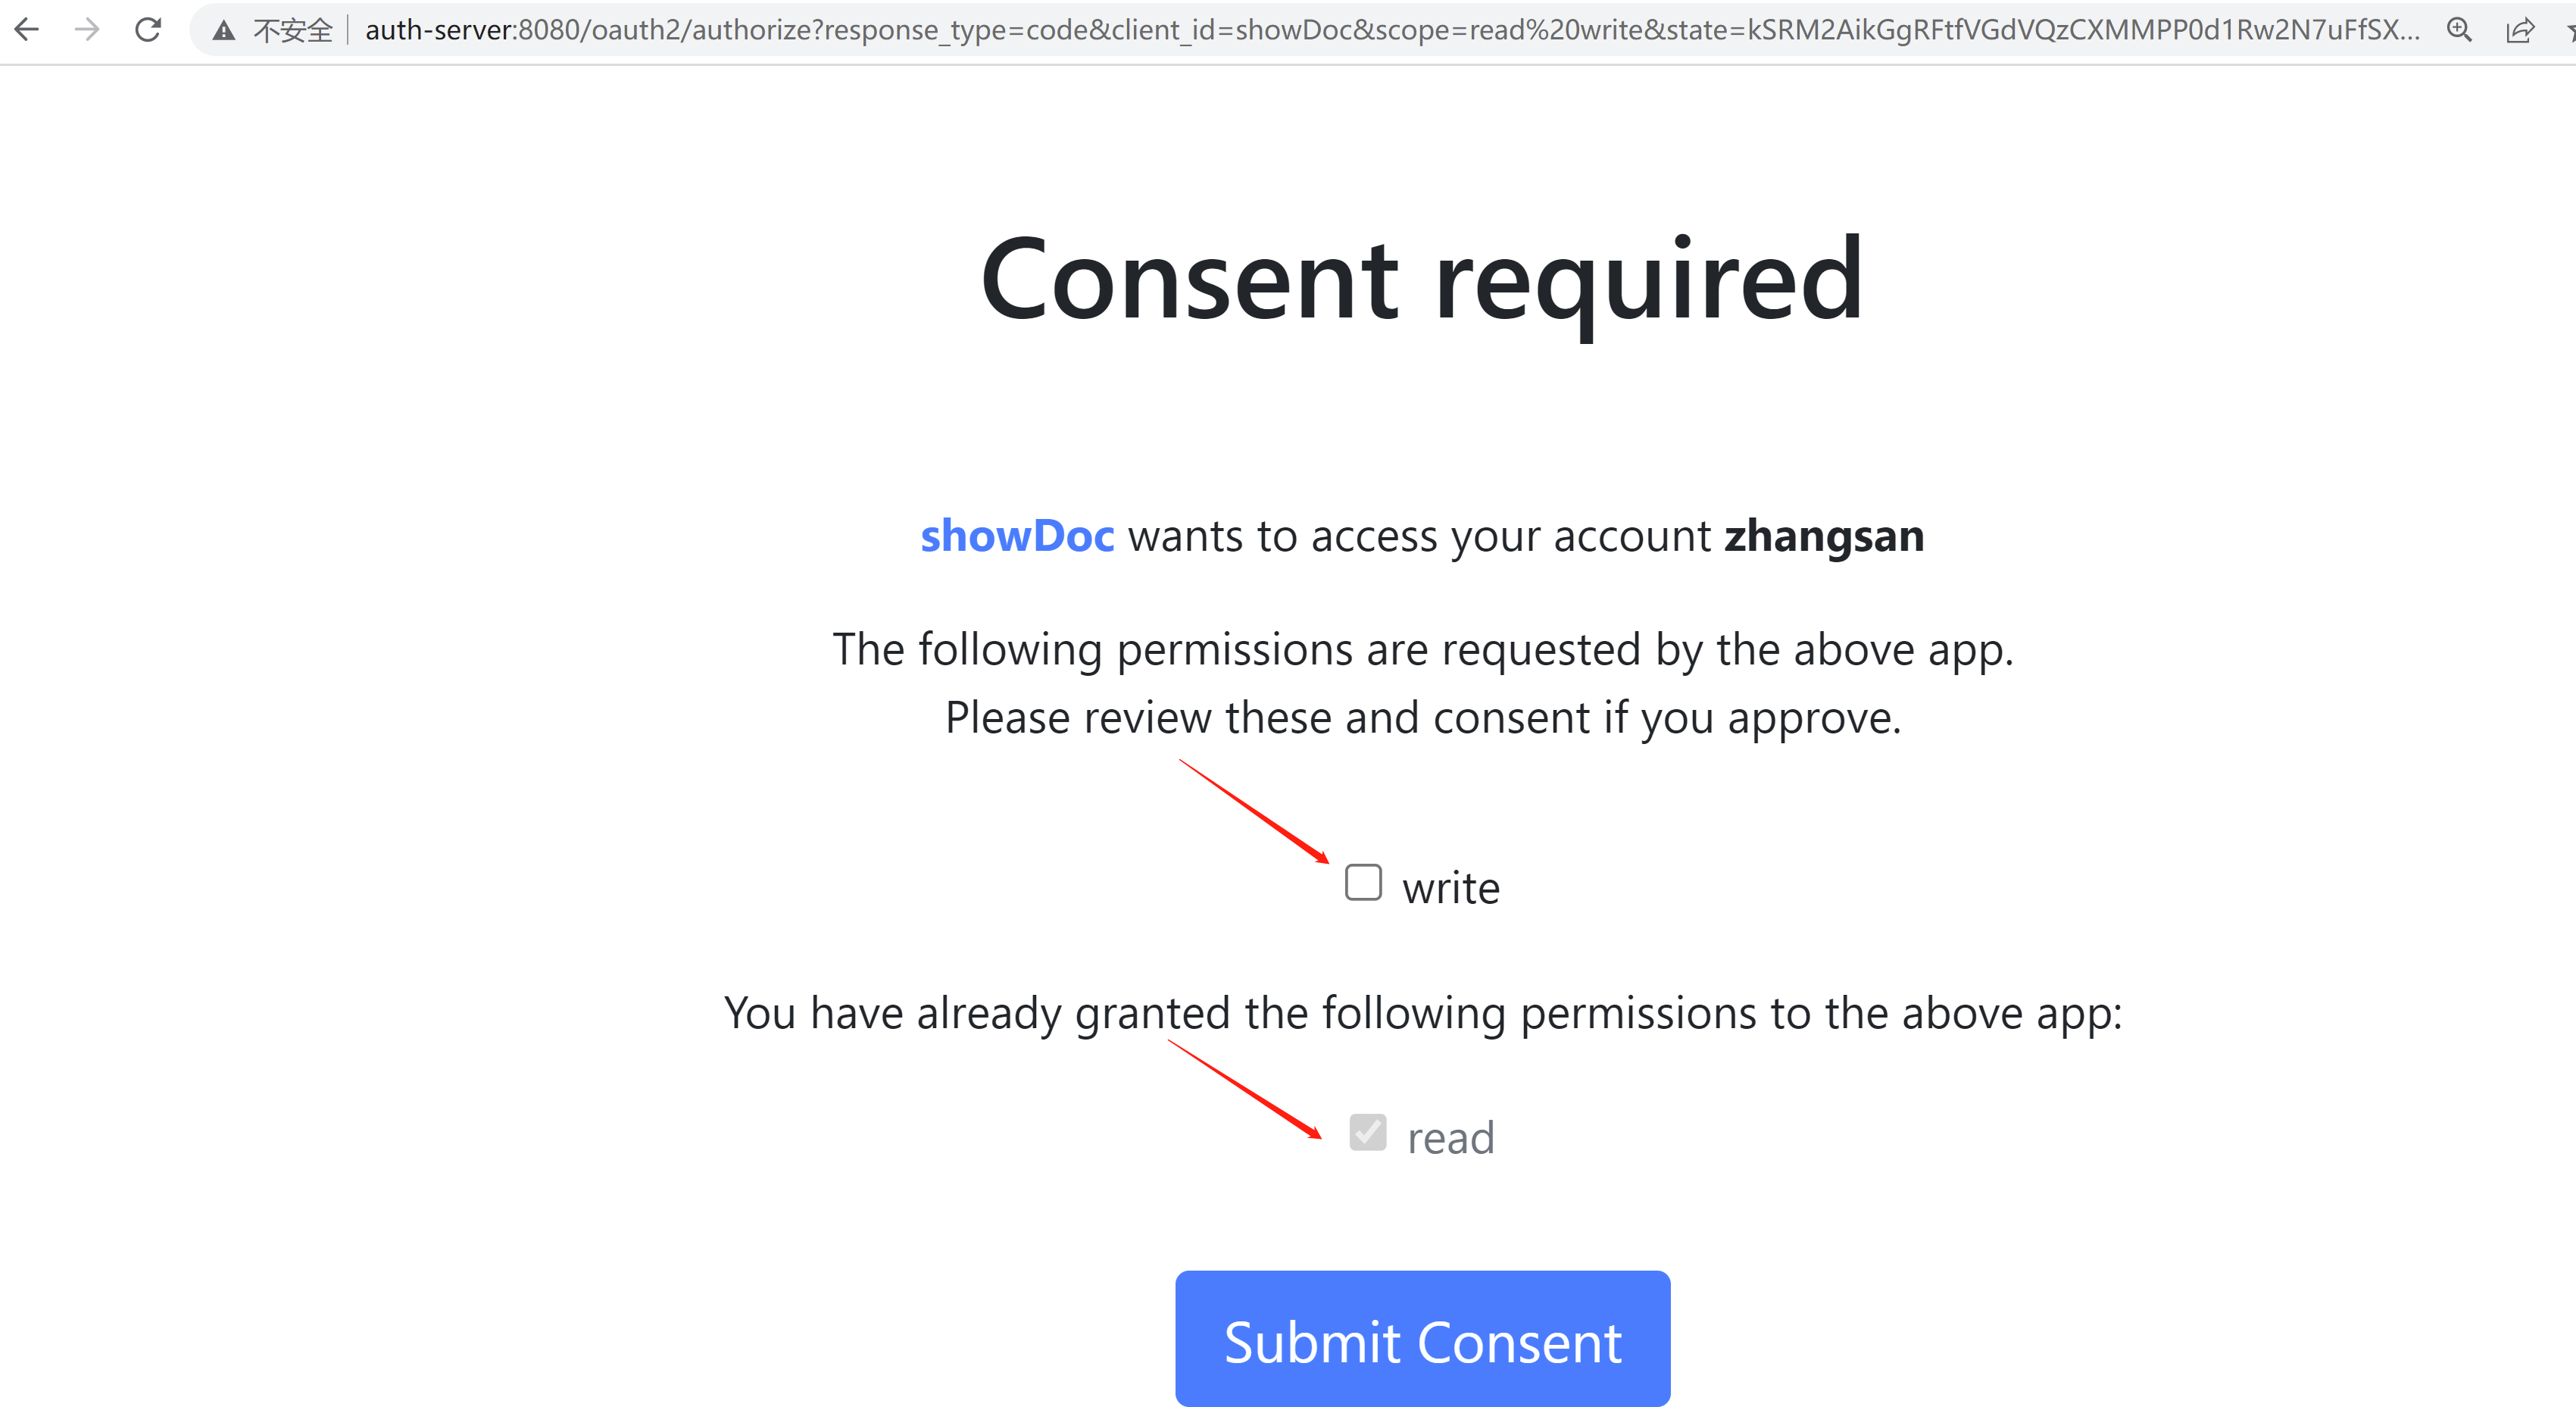
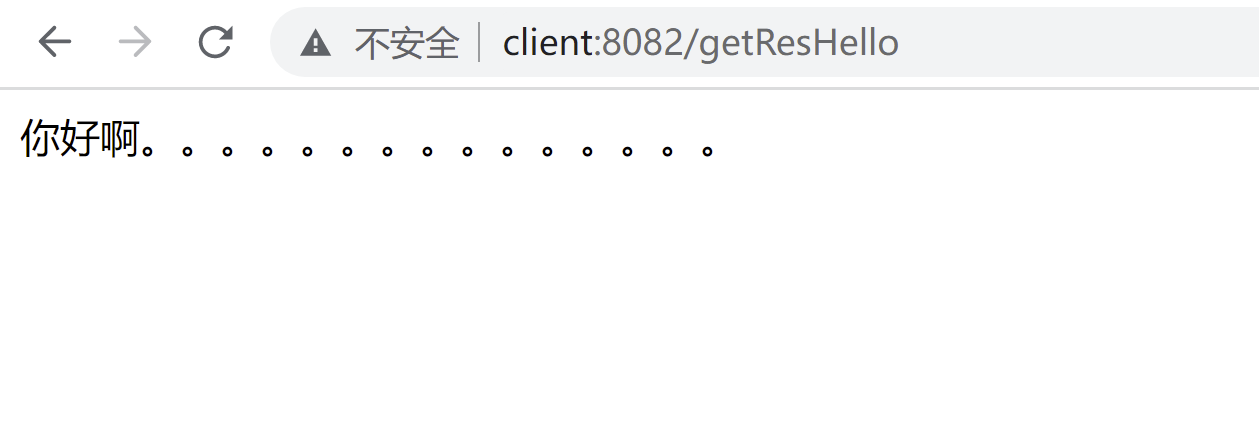
接下来我们看下向access_token附加角色roles信息
现在是jwt解析的access_token是没有角色信息的

我们在授权服务器加一下,加入这部分代码,将roles写入jwt

package com.example.authserver.security;

import com.nimbusds.jose.jwk.JWKSet;
import com.nimbusds.jose.jwk.RSAKey;
import com.nimbusds.jose.jwk.source.ImmutableJWKSet;
import com.nimbusds.jose.jwk.source.JWKSource;
import com.nimbusds.jose.proc.SecurityContext;
import org.springframework.beans.factory.annotation.Autowired;
import org.springframework.context.annotation.Bean;
import org.springframework.context.annotation.Configuration;
import org.springframework.core.annotation.Order;
import org.springframework.jdbc.core.JdbcTemplate;
import org.springframework.security.config.Customizer;
import org.springframework.security.config.annotation.web.builders.HttpSecurity;
import org.springframework.security.config.annotation.web.configuration.EnableWebSecurity;
import org.springframework.security.config.annotation.web.configuration.OAuth2AuthorizationServerConfiguration;
import org.springframework.security.core.Authentication;
import org.springframework.security.core.GrantedAuthority;
import org.springframework.security.core.userdetails.UserDetailsService;
import org.springframework.security.oauth2.core.OAuth2TokenType;
import org.springframework.security.oauth2.server.authorization.*;
import org.springframework.security.oauth2.server.authorization.client.JdbcRegisteredClientRepository;
import org.springframework.security.oauth2.server.authorization.client.RegisteredClientRepository;
import org.springframework.security.oauth2.server.authorization.config.ProviderSettings;
import org.springframework.security.oauth2.server.authorization.token.JwtEncodingContext;
import org.springframework.security.oauth2.server.authorization.token.OAuth2TokenCustomizer;
import org.springframework.security.provisioning.JdbcUserDetailsManager;
import org.springframework.security.web.SecurityFilterChain;
import org.springframework.security.web.authentication.LoginUrlAuthenticationEntryPoint;
import javax.sql.DataSource;
import java.security.KeyPair;
import java.security.KeyPairGenerator;
import java.security.interfaces.RSAPrivateKey;
import java.security.interfaces.RSAPublicKey;
import java.util.ArrayList;
import java.util.List;
import java.util.UUID;

@Configuration
//开启web安全 应用在web环境下
// 1: 加载了WebSecurityConfiguration配置类, 配置安全认证策略
// 2: 加载了AuthenticationConfiguration, 配置了认证信息
@EnableWebSecurity
public class SecurityConfig {

    @Autowired
    private DataSource dataSource;
    @Autowired
    private JdbcTemplate jdbcTemplate;


    /**
     *
     * 授权服务安全过滤器链
     * 第一个进来
     * @param
     * @return
     * @throws Exception
     */
    @Order(1)
    @Bean
    public SecurityFilterChain authorizedServiceSecurityFilterChain(HttpSecurity http) throws Exception {
        //授权服务配置 应用默认安全性 简化配置,在源码给你都配置好了
        OAuth2AuthorizationServerConfiguration.applyDefaultSecurity(http);
        http.   //异常处理
                exceptionHandling().
                //设置默认的登陆界面
                authenticationEntryPoint(new LoginUrlAuthenticationEntryPoint("/login"));
        return http.build();
    }

    /**
     * 默认安全过滤器链
     * 用于身份认证
     * 第二个进入
     * @param
     * @return
     * @throws Exception
     */
    @Order(2)
    @Bean
    public SecurityFilterChain defaultSecurityFilterChain(HttpSecurity http) throws Exception {
        //必须认证才能登陆
        http.authorizeHttpRequests()
                .anyRequest()
                .authenticated()
                .and()
                //采用表单认证方式登陆
                .formLogin(Customizer.withDefaults());
        return http.build();
    }


    /**
     *
     * 配置用户信息 从数据库查询 实现用户的crud操作
     * @param
     * @return
     * @throws Exception
     */
    @Bean
    public UserDetailsService userDetailsService(){
        return new JdbcUserDetailsManager(dataSource);
    }


    /**
     *
     *  用于第三方认证
     *  主要管理第三方的客户端
     *  已注册客户端存储库
     * @param
     * @return
     * @throws Exception
     */
    @Bean
    public RegisteredClientRepository registeredClientRepository(){
        //从数据库查询已经注册的客户端信息
        return new JdbcRegisteredClientRepository(jdbcTemplate);
//        RegisteredClient registeredClient=RegisteredClient.withId(UUID.randomUUID().toString())
//                //客户端id
//                .clientId("showDoc")
//                //{noop}不加密,客户端密码
//                .clientSecret("{noop}123456")
//                //客户端认证方法  客户端安全基本 客户端通过客户端密码认证方式接入
//                .clientAuthenticationMethod(ClientAuthenticationMethod.CLIENT_SECRET_BASIC)
//                //客户端允许使用的授权模式,授权类型,授权码模式,刷新token,客户端模式
//                .authorizationGrantType(AuthorizationGrantType.AUTHORIZATION_CODE)
//                .authorizationGrantType(AuthorizationGrantType.REFRESH_TOKEN)
//                .authorizationGrantType(AuthorizationGrantType.CLIENT_CREDENTIALS)
//                //客户端允许跳转的uri注册地址,回调地址 登陆成功之后跳转的地址
//                .redirectUri("http://auth-server:8080/authorized")
//                .redirectUri("http://client:8082/login/oauth2/code/test")
//                //客户端允许使用的范围授权 如果对方写的不对 那么就没有权限进行登陆
//                .scope("read")
//                .scope("write")
//                //是否开启用户手动确认,false为自动确认 就是在授权界面 是否选择 复选框
//                .clientSettings(ClientSettings.builder().requireAuthorizationConsent(false).build())
//                .build();
//        //内存注册客户端存储  不查询数据库
//        return new InMemoryRegisteredClientRepository(registeredClient);
    }

    /**
     *
     * 通过非对称加密生成access_token(jwt)的签名部分
     * @param
     * @return
     * @throws Exception
     */
    @Bean
    public JWKSource<SecurityContext>jwkSource(){
        KeyPair keyPair = generateRsaKey();
        RSAPublicKey publicKey = (RSAPublicKey) keyPair.getPublic();
        RSAPrivateKey privateKey = (RSAPrivateKey) keyPair.getPrivate();
        RSAKey rsaKey = new RSAKey.Builder(publicKey)
                .privateKey(privateKey)
                .keyID(UUID.randomUUID().toString())
                .build();
        JWKSet jwkSet = new JWKSet(rsaKey);
        return new ImmutableJWKSet<>(jwkSet);
    }

    /**
     * ⽣成秘钥对,为jwkSource提供服务,私钥服务器⾃身持有,公钥对外开放。
     *
     * @return
     */
    private static KeyPair generateRsaKey() {
        KeyPair keyPair;
        try {
            KeyPairGenerator keyPairGenerator = KeyPairGenerator.getInstance("RSA");
            keyPairGenerator.initialize(2048);
            keyPair = keyPairGenerator.generateKeyPair();
        } catch (Exception ex) {
            throw new IllegalStateException(ex);
        }
        return keyPair;
    }

    /**
     *
     * 提供程序设置 默认配置
     * @param
     * @return
     * @throws Exception
     */
    @Bean
    public ProviderSettings providerSettings(){
        return ProviderSettings.builder().build();
    }

    /**
     *
     * 对应 oauth2_authorization表 授权服务
     * @param
     * @return
     * @throws Exception
     */
    @Bean
    public OAuth2AuthorizationService auth2AuthorizationService(){
        return new JdbcOAuth2AuthorizationService(jdbcTemplate,registeredClientRepository());
    }

    /**
     * 对应oauth2_authorization_consent表
     * 用户确认授权同意书
     * @param
     * @return
     * @throws Exception
     */
    @Bean
    public OAuth2AuthorizationConsentService auth2AuthorizationConsentService(){
        return new JdbcOAuth2AuthorizationConsentService(jdbcTemplate,registeredClientRepository());
    }

    /**
     *
     * jwt编码上下文oauth2令牌自定义程序
     * @param
     * @return
     * @throws Exception
     */
    @Bean
    public OAuth2TokenCustomizer<JwtEncodingContext>jwtEncodingContextOAuth2TokenCustomizer(){
        return context -> {
          //判断jwt的类型是否是access_token
          if(context.getTokenType()== OAuth2TokenType.ACCESS_TOKEN){
                //获得认证对象,当前用户信息
              Authentication principal = context.getPrincipal();
              List<String>roles=new ArrayList<>();
              //得到该用户的权限信息 role角色 放入集合
              for (GrantedAuthority authority : principal.getAuthorities()) {
                  roles.add(authority.getAuthority());
              }
              //写入jwt
              context.getClaims().claim("roles",roles);
          }

        };
    }
}
然后再资源服务器加入角色转换器,解析jwt中传过来的角色信息
package com.example.resserver.config;

import org.springframework.core.convert.converter.Converter;
import org.springframework.security.core.GrantedAuthority;
import org.springframework.security.core.authority.SimpleGrantedAuthority;
import org.springframework.security.oauth2.jwt.Jwt;
import org.springframework.util.CollectionUtils;

import java.util.ArrayList;
import java.util.Collection;
import java.util.List;

/**
 *
 * 角色转换器
 * @param
 * @return
 * @throws Exception
 */
public class RoleConverter implements Converter<Jwt, Collection<GrantedAuthority>> {

    @Override
    public Collection<GrantedAuthority> convert(Jwt jwt) {
        //从jwt拿到角色信息
        List<String> roles = (List<String>) jwt.getClaims().get("roles");
        if(CollectionUtils.isEmpty(roles)){
            return new ArrayList<>();
        }
        List<GrantedAuthority>list=new ArrayList<>();
        for (String x : roles) {
            //把角色放入授予的权限集合中
            list.add(new SimpleGrantedAuthority(x));
        }
        return list;
    }
}
然后再资源服务器,修改安全配置类,使得角色转换器生效,并加了一个角色的权限
package com.example.resserver.config;

import org.springframework.context.annotation.Bean;
import org.springframework.context.annotation.Configuration;
import org.springframework.security.access.AccessDeniedException;
import org.springframework.security.config.annotation.web.builders.HttpSecurity;
import org.springframework.security.oauth2.server.resource.authentication.JwtAuthenticationConverter;
import org.springframework.security.web.SecurityFilterChain;
import org.springframework.security.web.access.AccessDeniedHandler;

import javax.servlet.ServletException;
import javax.servlet.http.HttpServletRequest;
import javax.servlet.http.HttpServletResponse;
import java.io.IOException;

/**
 *
 * 安全配置类
 * @param
 * @return
 * @throws Exception
 */
@Configuration
public class SecurityConfig {


    /**
     *
     * 安全过滤器链
     * @param
     * @return
     * @throws Exception
     */
    @Bean
    public SecurityFilterChain filterChain(HttpSecurity http) throws Exception {
        //异常处理
        http.exceptionHandling()
                //访问拒绝处理程序
                .accessDeniedHandler(new AccessDeniedHandler() {
                    @Override
                    public void handle(HttpServletRequest request, HttpServletResponse response, AccessDeniedException accessDeniedException) throws IOException, ServletException {
                        response.setContentType("application/json;charset=utf-8");
                        response.getWriter().println("{code:403,msg:没有访问权限}");
                    }
                });
        //启用角色转换器解析roles 并完成授权      jwt身份验证转换器
        JwtAuthenticationConverter jwtAuthenticationConverter=new JwtAuthenticationConverter();
        //设置jwt授权机构转换为角色转换器
        jwtAuthenticationConverter.setJwtGrantedAuthoritiesConverter(new RoleConverter());

        //拦截所有请求
        http.authorizeRequests()
                    //测试转换器解析的角色 是否有这个权限
                    .mvcMatchers("/hello").access("hasRole('USER')")
                    .anyRequest()
                    .authenticated()
                    .and()
                    //oauth2资源服务器 使用jwt 带着jwt的token访问资源服务器
                    .oauth2ResourceServer().jwt()
                    //使转换器生效
                    .jwtAuthenticationConverter(jwtAuthenticationConverter);
            return http.build();
    }

}
当我们在jwt中加了角色之后,可以看到这里已经显示出来了
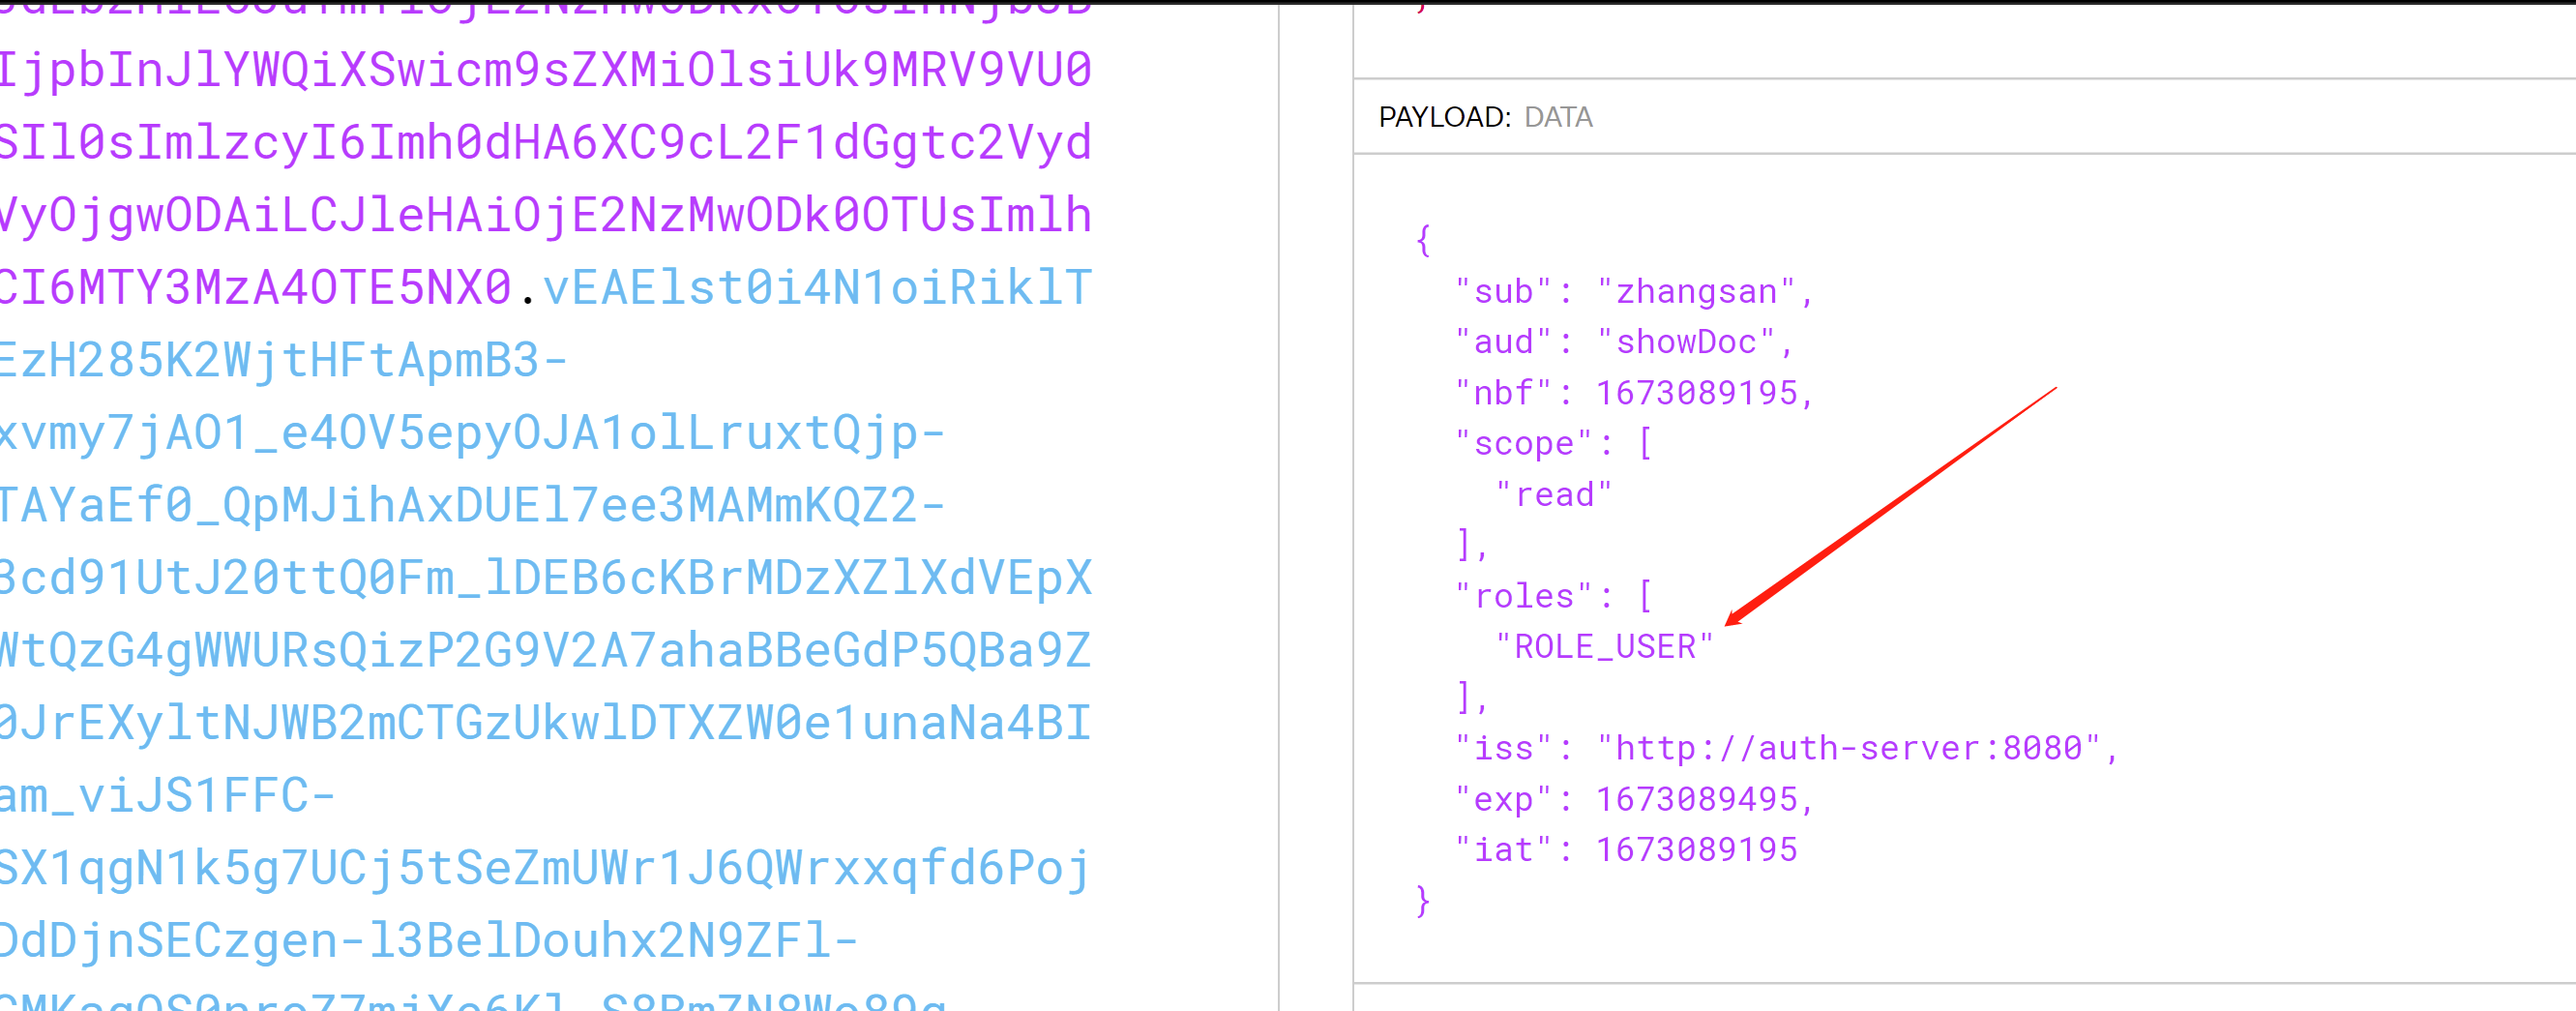
我们在访问这个接口,看看能不能访问
http://client:8082/getResHello
我们现在是有权限,可以访问
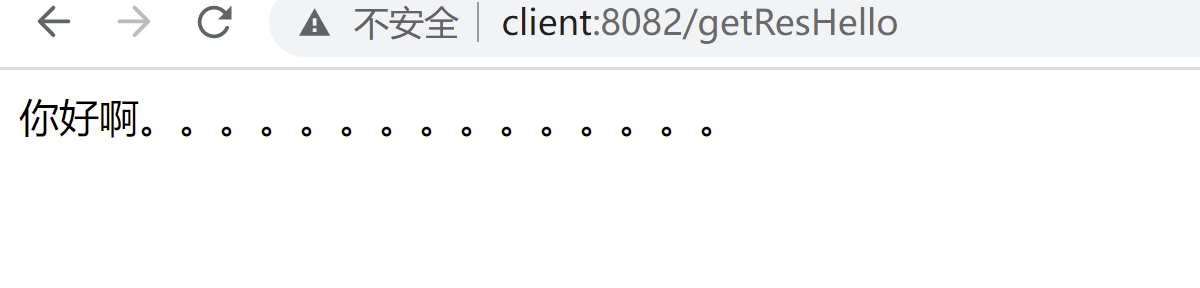
我们设置一个没有权限了,看看是啥效果,把USER改成USER1
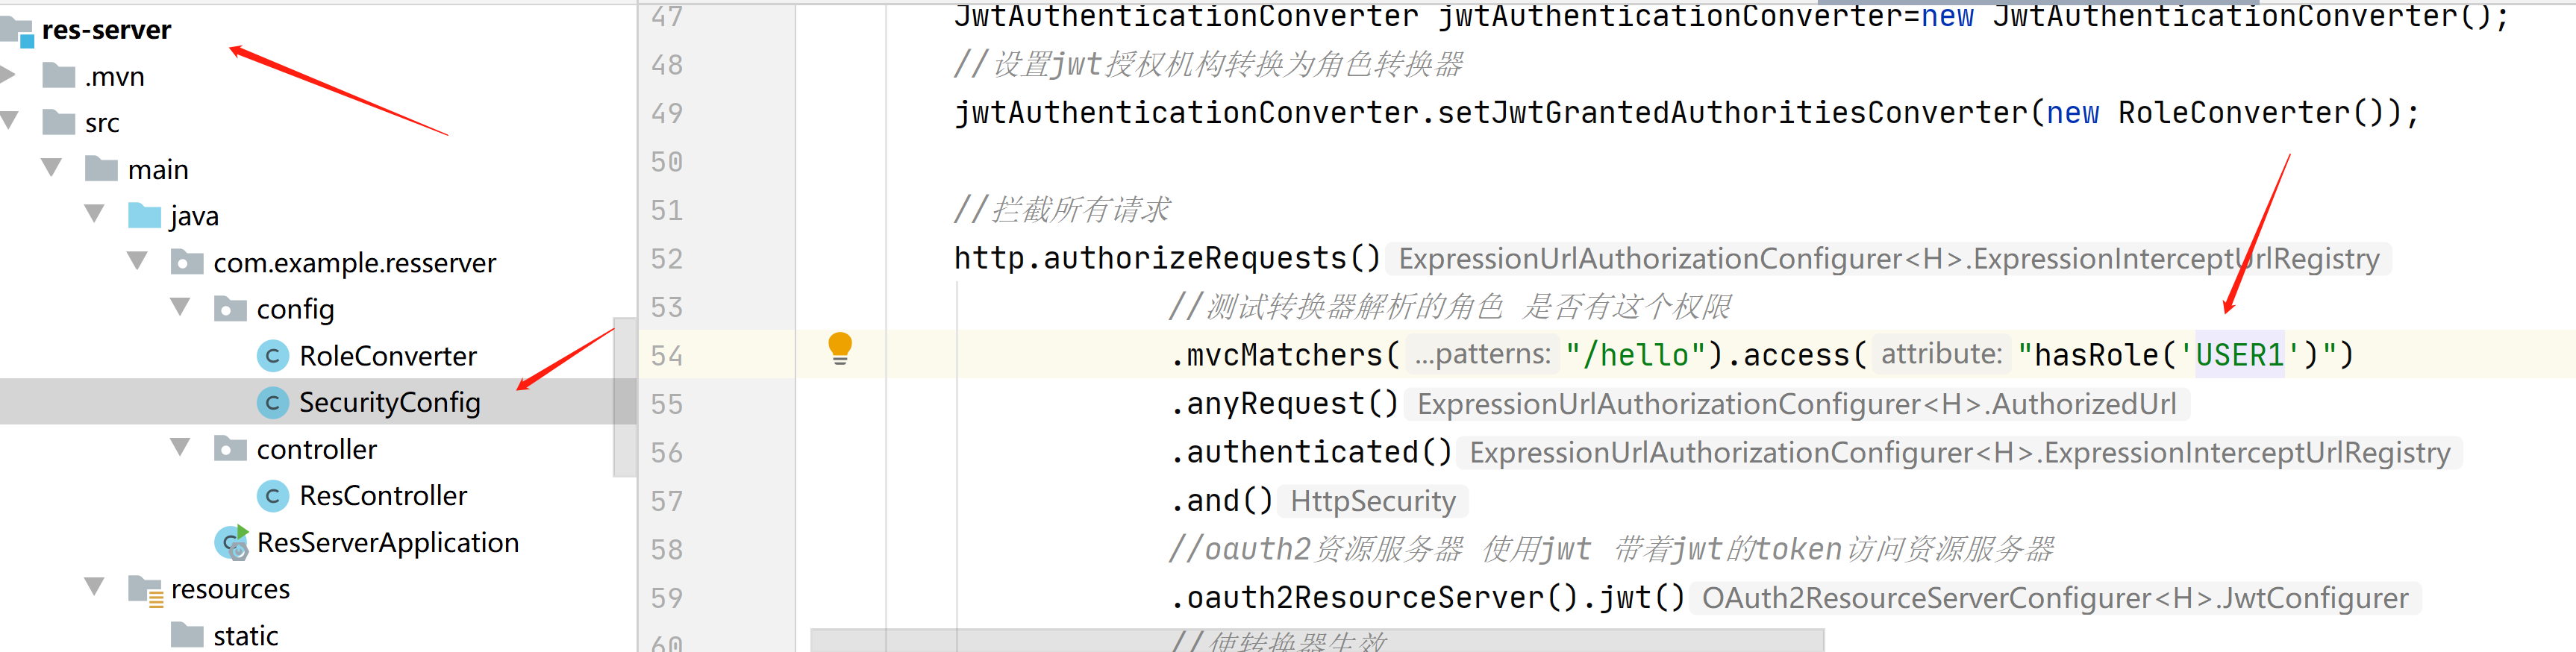
可以看到没有权限访问

接下来我们在看下RBAC角色权限控制
用户和角色是多对多的关系
角色和权限是绑定的
在资源服务器加入这些依赖
 <!-- 添加MyBatisPlus的依赖 -->
        <dependency>
            <groupId>com.baomidou</groupId>
            <artifactId>mybatis-plus-boot-starter</artifactId>
            <version>3.5.1</version>
        </dependency>
        <!-- MySQL数据 -->
        <dependency>
            <groupId>mysql</groupId>
            <artifactId>mysql-connector-java</artifactId>
            <version>8.0.16</version>
        </dependency>
        <!-- druid  连接池-->
        <dependency>
            <groupId>com.alibaba</groupId>
            <artifactId>druid</artifactId>
            <version>1.1.14</version>
        </dependency>
        <dependency>
            <groupId>org.projectlombok</groupId>
            <artifactId>lombok</artifactId>
            <optional>true</optional>
        </dependency>
修改资源服务器配置文件
server:
  port: 8081
logging:
  level:
    root: debug
spring:
  security:
    oauth2:
      resourceserver:
        jwt:
          #获取公钥路径 用于重新拿着公钥和base64加密出来的签名  和传过来的签名进行对比 防止篡改 这样保证了数据的安全
          jwk-set-uri: http://auth-server:8080/oauth2/jwks
  datasource:
    driverClassName: com.mysql.cj.jdbc.Driver
    password: 123456
    type: com.alibaba.druid.pool.DruidDataSource
    url: jdbc:mysql://192.168.23.131:13306/db3?serverTimezone=Asia/Shanghai&useUnicode=true&characterEncoding=utf-8&useSSL=true
    username: root

mybatis-plus:
  configuration:
    log-impl: org.apache.ibatis.logging.stdout.StdOutImpl
  mapper-locations: classpath:mapper/*.xml
在资源服务器加入自定义决策器
package com.example.resserver.config;

import com.example.resserver.entity.RolePerVo;
import com.example.resserver.mapper.RolePerMapper;
import lombok.extern.slf4j.Slf4j;
import org.springframework.beans.factory.annotation.Autowired;
import org.springframework.security.access.AccessDecisionVoter;
import org.springframework.security.access.ConfigAttribute;
import org.springframework.security.core.Authentication;
import org.springframework.security.core.GrantedAuthority;
import org.springframework.security.web.FilterInvocation;
import org.springframework.stereotype.Component;
import org.springframework.util.AntPathMatcher;

import java.util.Collection;
import java.util.List;

/**
 *
 * 角色投票 决策器
 * @param
 * @return
 * @throws Exception
 */
@Slf4j
@Component
public class MyRoleVoter implements AccessDecisionVoter<Object> {

    @Autowired
    private RolePerMapper rolePerMapper;

    @Override
    public boolean supports(ConfigAttribute attribute) {
        return true;
    }

    @Override
    public boolean supports(Class<?> clazz) {
        return true;
    }

    /**
     *
     * 选票
     * @param
     * @return
     * @throws Exception
     */
    @Override
    public int vote(Authentication authentication, Object object,
                    Collection<ConfigAttribute> attributes) {
        //如果用户还没有认证,则直接拒绝
        if(authentication==null){
            //-1 表示拒绝访问
            return -1;
        }
        //获取已经授权过的角色对象
        Collection<? extends GrantedAuthority> authorities = authentication.getAuthorities();
        //采用ant语法规则的匹配器
        AntPathMatcher antPathMatcher=new AntPathMatcher();
        String requestUri=((FilterInvocation)object).getRequest().getRequestURI();
        //TODO 我这里查询的所有的角色权限,你可以改成根据当前用户获取对应的角色权限信息
        List<RolePerVo> list = rolePerMapper.getList();
        log.info("角色权限信息:{}",list);
        log.info("接口路径uri:{}",requestUri);
        for (RolePerVo rolePerVo : list) {
            //判断这个接口,在没在数据库中,这个人有没有这个接口的权限
            //注意这里匹配的是资源服务器的路径,不是你浏览器那个路径 是浏览器远程访问到资源服务器的那个接口
            if(antPathMatcher.match(rolePerVo.getUrl(),requestUri)){
                log.info("当前路径匹配,可以往下执行");
                for (GrantedAuthority authority : authorities) {
                    //因为角色code 在spring oauth2中 固定以ROLE_开头,所以要拼接 才能匹配上
                    String roleName="role_"+rolePerVo.getRoleCode().toLowerCase();
                    if(roleName.equals(authority.getAuthority().toLowerCase())){
                        //因为传过来的数据是大写的,所以要转换成小写 来匹配
                        //有一个角色匹配上了 那么就放行
                        //1表示 访问授权的
                        return 1;
                    }
                }
            }
        }
        log.info("没有访问权限");
        //-1 表示拒绝访问
        return -1;
    }
}
在资源服务器修改安全配置类,加入决策器生效
package com.example.resserver.config;

import com.fasterxml.jackson.databind.ObjectMapper;
import org.springframework.beans.factory.annotation.Autowired;
import org.springframework.context.annotation.Bean;
import org.springframework.context.annotation.Configuration;
import org.springframework.security.access.AccessDecisionManager;
import org.springframework.security.access.AccessDecisionVoter;
import org.springframework.security.access.AccessDeniedException;
import org.springframework.security.access.vote.AuthenticatedVoter;
import org.springframework.security.access.vote.UnanimousBased;
import org.springframework.security.config.annotation.web.builders.HttpSecurity;
import org.springframework.security.oauth2.server.resource.authentication.JwtAuthenticationConverter;
import org.springframework.security.web.SecurityFilterChain;
import org.springframework.security.web.access.AccessDeniedHandler;
import org.springframework.security.web.access.expression.WebExpressionVoter;

import javax.servlet.ServletException;
import javax.servlet.http.HttpServletRequest;
import javax.servlet.http.HttpServletResponse;
import java.io.IOException;
import java.io.PrintWriter;
import java.util.ArrayList;
import java.util.HashMap;
import java.util.List;
import java.util.Map;

/**
 *
 * 安全配置类
 * @param
 * @return
 * @throws Exception
 */
@Configuration
public class SecurityConfig {

    @Autowired
    private MyRoleVoter myRoleVoter;

    /**
     *
     * 安全过滤器链
     * @param
     * @return
     * @throws Exception
     */
    @Bean
    public SecurityFilterChain filterChain(HttpSecurity http) throws Exception {
        //异常处理
        http.exceptionHandling()
                //访问拒绝处理程序
                .accessDeniedHandler(new AccessDeniedHandler() {
                    @Override
                    public void handle(HttpServletRequest request, HttpServletResponse response, AccessDeniedException accessDeniedException) throws IOException, ServletException {
                        //返回json格式
                        response.setContentType("application/json;charset=utf-8");
                        //没有登陆 直接访问其他接口 就报401
                        response.setStatus(403);
                        Map<String,Object> map=new HashMap<>();
                        map.put("code",403);
                        map.put("msg","没有访问权限");
                        ObjectMapper objectMapper=new ObjectMapper();
                        String s=objectMapper.writeValueAsString(map);
                        //把json数据 写入 返回给前端
                        PrintWriter writer=response.getWriter();
                        writer.write(s);
                        writer.flush();
                        writer.close();
                    }
                });
        //启用角色转换器解析roles 并完成授权      jwt身份验证转换器
        JwtAuthenticationConverter jwtAuthenticationConverter=new JwtAuthenticationConverter();
        //设置jwt授权机构转换为角色转换器
        jwtAuthenticationConverter.setJwtGrantedAuthoritiesConverter(new RoleConverter());

        //使决策器生效 拦截所有请求 动态匹配数据库的 角色权限信息
        http.authorizeRequests()
                .accessDecisionManager(accessDecisionManager())
                .anyRequest().authenticated();

        //oauth2资源服务器 使用jwt 带着jwt的token访问资源服务器
        http.oauth2ResourceServer().jwt()
                    //使转换器生效 解析jwt里面的roles 角色信息
                    .jwtAuthenticationConverter(jwtAuthenticationConverter);
            return http.build();
    }

    /**
     * 实例化决策器对象
     * @param
     * @return
     * @throws Exception
     */
    @Bean
    public AccessDecisionManager accessDecisionManager(){
        List<AccessDecisionVoter<? extends Object>> decisionVoters=
                new ArrayList<>();
        //固定写法 网络表达投票器
        decisionVoters.add(new WebExpressionVoter());
        //传入自定义的决策器 投票器
        decisionVoters.add(myRoleVoter);
        //固定写法 经过身份验证的投票者
        decisionVoters.add(new AuthenticatedVoter());
        //基于一致性
        return new UnanimousBased(decisionVoters);
    }

}
核心在这部分

创建角色表,权限表,角色权限关联表
CREATE TABLE `sys_permission` (
  `id` int(11) NOT NULL AUTO_INCREMENT,
  `url` varchar(255) DEFAULT NULL COMMENT '权限路径',
  `per_name` varchar(255) DEFAULT NULL COMMENT '权限名称',
  PRIMARY KEY (`id`) USING BTREE
) ENGINE=InnoDB AUTO_INCREMENT=4 DEFAULT CHARSET=utf8 COMMENT='权限表';


INSERT INTO `sys_permission` (`id`, `url`, `per_name`) VALUES (1, '/hello', '你好接口');
INSERT INTO `sys_permission` (`id`, `url`, `per_name`) VALUES (2, '/getUser', '获取用户解决');
INSERT INTO `sys_permission` (`id`, `url`, `per_name`) VALUES (3, '/admin', '获取管理员接口');
CREATE TABLE `sys_role` (
  `id` int(11) NOT NULL AUTO_INCREMENT,
  `role_name` varchar(255) DEFAULT NULL COMMENT '角色名称',
  `role_code` varchar(255) DEFAULT NULL COMMENT '角色编码',
  PRIMARY KEY (`id`) USING BTREE
) ENGINE=InnoDB AUTO_INCREMENT=3 DEFAULT CHARSET=utf8 COMMENT='角色表';


INSERT INTO `sys_role` (`id`, `role_name`, `role_code`) VALUES (1, '普通员工', 'USER');
INSERT INTO `sys_role` (`id`, `role_name`, `role_code`) VALUES (2, '管理员', 'ADMIN');
CREATE TABLE `sys_role_per` (
  `id` int(11) NOT NULL AUTO_INCREMENT COMMENT '主键',
  `role_id` int(11) DEFAULT NULL COMMENT '角色id',
  `per_id` int(11) DEFAULT NULL COMMENT '权限id',
  PRIMARY KEY (`id`) USING BTREE
) ENGINE=InnoDB AUTO_INCREMENT=5 DEFAULT CHARSET=utf8 COMMENT='角色权限关联表';


INSERT INTO `sys_role_per` (`id`, `role_id`, `per_id`) VALUES (1, 1, 1);
INSERT INTO `sys_role_per` (`id`, `role_id`, `per_id`) VALUES (2, 2, 2);
INSERT INTO `sys_role_per` (`id`, `role_id`, `per_id`) VALUES (3, 2, 3);
INSERT INTO `sys_role_per` (`id`, `role_id`, `per_id`) VALUES (4, 1, 2);
我们改造一下客户端的控制层
package com.example.client.controller;

import lombok.extern.slf4j.Slf4j;
import org.springframework.beans.factory.annotation.Autowired;
import org.springframework.http.HttpEntity;
import org.springframework.http.HttpHeaders;
import org.springframework.http.HttpMethod;
import org.springframework.http.ResponseEntity;
import org.springframework.security.oauth2.client.OAuth2AuthorizedClient;
import org.springframework.security.oauth2.client.annotation.RegisteredOAuth2AuthorizedClient;
import org.springframework.web.bind.annotation.GetMapping;
import org.springframework.web.bind.annotation.RestController;
import org.springframework.web.client.HttpClientErrorException;
import org.springframework.web.client.RestTemplate;

@Slf4j
@RestController
public class ClientControler {

    @Autowired
    private RestTemplate restTemplate;

    /**
     *
     * 获取资源服务器的接口
     *
     * RegisteredOAuth2AuthorizedClient 注册在授权服务器的客户端
     * @param
     * @return
     * @throws Exception
     */
    @GetMapping("/getResHello")
    public String getResUser(@RegisteredOAuth2AuthorizedClient OAuth2AuthorizedClient client){
        HttpHeaders headers=new HttpHeaders();
        //从授权客户端拿到token
        String token=client.getAccessToken().getTokenValue();
        log.info("令牌为:{}",token);
        //把token 放入请求头中 ,token类型为Bearer
        //在源码里面this.set("Authorization", "Bearer " + token) 自动拼接Bearer空格
        headers.setBearerAuth(token);
        HttpEntity<String>request=new HttpEntity<>("",headers);

        try {
            //拿着令牌去获取资源服务器的接口
            ResponseEntity<String>responseEntity=restTemplate
                    .exchange("http://res-server:8081/hello",
                            HttpMethod.GET,request,String.class);
            log.info("============",responseEntity);
            String body=responseEntity.getBody();
            return body;
        }catch (HttpClientErrorException e){
            return e.getMessage();
        }
    }
}
3个服务都启动
我们在访问有权限的情况
http://client:8082/getResHello
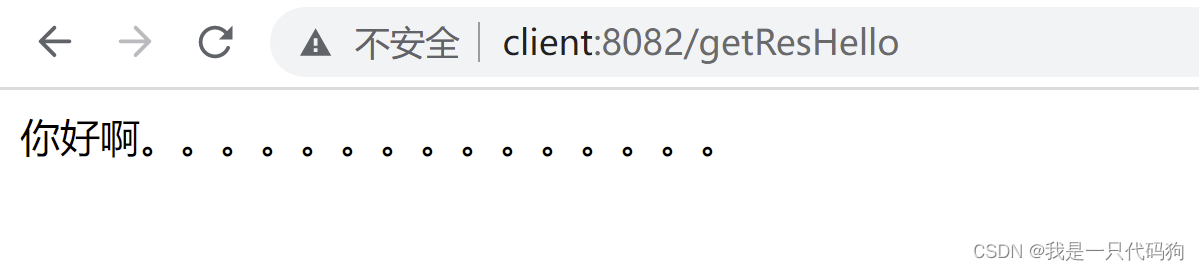
我们把数据权限删除,模拟没权限的场景
把这个4,1删除掉,在次访问


接下来我们看下刷新token
回到授权服务器初始化客户端哪里
package com.example.authserver;

import org.junit.jupiter.api.Test;
import org.springframework.beans.factory.annotation.Autowired;
import org.springframework.boot.test.context.SpringBootTest;
import org.springframework.security.core.userdetails.User;
import org.springframework.security.core.userdetails.UserDetails;
import org.springframework.security.crypto.bcrypt.BCryptPasswordEncoder;
import org.springframework.security.oauth2.core.AuthorizationGrantType;
import org.springframework.security.oauth2.core.ClientAuthenticationMethod;
import org.springframework.security.oauth2.server.authorization.client.RegisteredClient;
import org.springframework.security.oauth2.server.authorization.client.RegisteredClientRepository;
import org.springframework.security.oauth2.server.authorization.config.ClientSettings;
import org.springframework.security.oauth2.server.authorization.config.TokenSettings;
import org.springframework.security.provisioning.UserDetailsManager;
import org.springframework.web.bind.annotation.GetMapping;
import org.springframework.web.bind.annotation.RestController;

import java.time.Duration;
import java.util.UUID;

@SpringBootTest
class AuthServerApplicationTests {
        @Autowired
        private UserDetailsManager userDetailsManager;
        @Autowired
        private RegisteredClientRepository registeredClientRepository;


        /**
         *
         * 创建用户
         * @param
         * @return
         * @throws Exception
         */
        @Test
        public void createUser(){
            //添加到用户表,和用户权限表中
            UserDetails userDetails= User.builder().passwordEncoder(
                    x->"{bcrypt}"+new BCryptPasswordEncoder().encode(x))
                    .username("zhangsan1")
                    .password("123456")
                    .roles("USER")
                    .build();
            userDetailsManager.createUser(userDetails);
        }

        /**
         *
         * 注册客户端
         * @param
         * @return
         * @throws Exception
         */
        @Test
        public void registerClient(){
            RegisteredClient registeredClient=RegisteredClient.withId(UUID.randomUUID().toString())
                    //客户端id
                    .clientId("showDoc")
                    //客户端密码 加密
                    .clientSecret("{bcrypt}"+new BCryptPasswordEncoder().encode("123456"))
                    //客户端认证方法  客户端安全基本 客户端通过客户端密码认证方式接入
                    .clientAuthenticationMethod(ClientAuthenticationMethod.CLIENT_SECRET_BASIC)
                    //客户端允许使用的授权模式,授权类型,授权码模式,刷新token,客户端模式
                    .authorizationGrantType(AuthorizationGrantType.AUTHORIZATION_CODE)
                    //如果要刷新token 必须要有这个选择
                    .authorizationGrantType(AuthorizationGrantType.REFRESH_TOKEN)
                    .authorizationGrantType(AuthorizationGrantType.CLIENT_CREDENTIALS)
                    //客户端允许跳转的uri注册地址,回调地址 登陆成功之后跳转的地址
                    .redirectUri("http://auth-server:8080/authorized")
                    .redirectUri("http://client:8082/login/oauth2/code/test")
                    //客户端允许使用的范围授权 如果对方写的不对 那么就没有权限进行登陆
                    .scope("read")
                    .scope("write")
                    //是否开启用户手动确认,false为自动确认 就是在授权界面 是否选择 复选框
                    .clientSettings(ClientSettings.builder().requireAuthorizationConsent(true).build())
                    //设置access_token
                    .tokenSettings(TokenSettings.builder()
                            //accessToken 生存时间
                            .accessTokenTimeToLive(Duration.ofSeconds(10))
                            //刷新token 生存时间
                            .refreshTokenTimeToLive(Duration.ofSeconds(15))
                            .build())
                    .build();
            //保存到oauth2_registered_client表里
            registeredClientRepository.save(registeredClient);
        }

    }
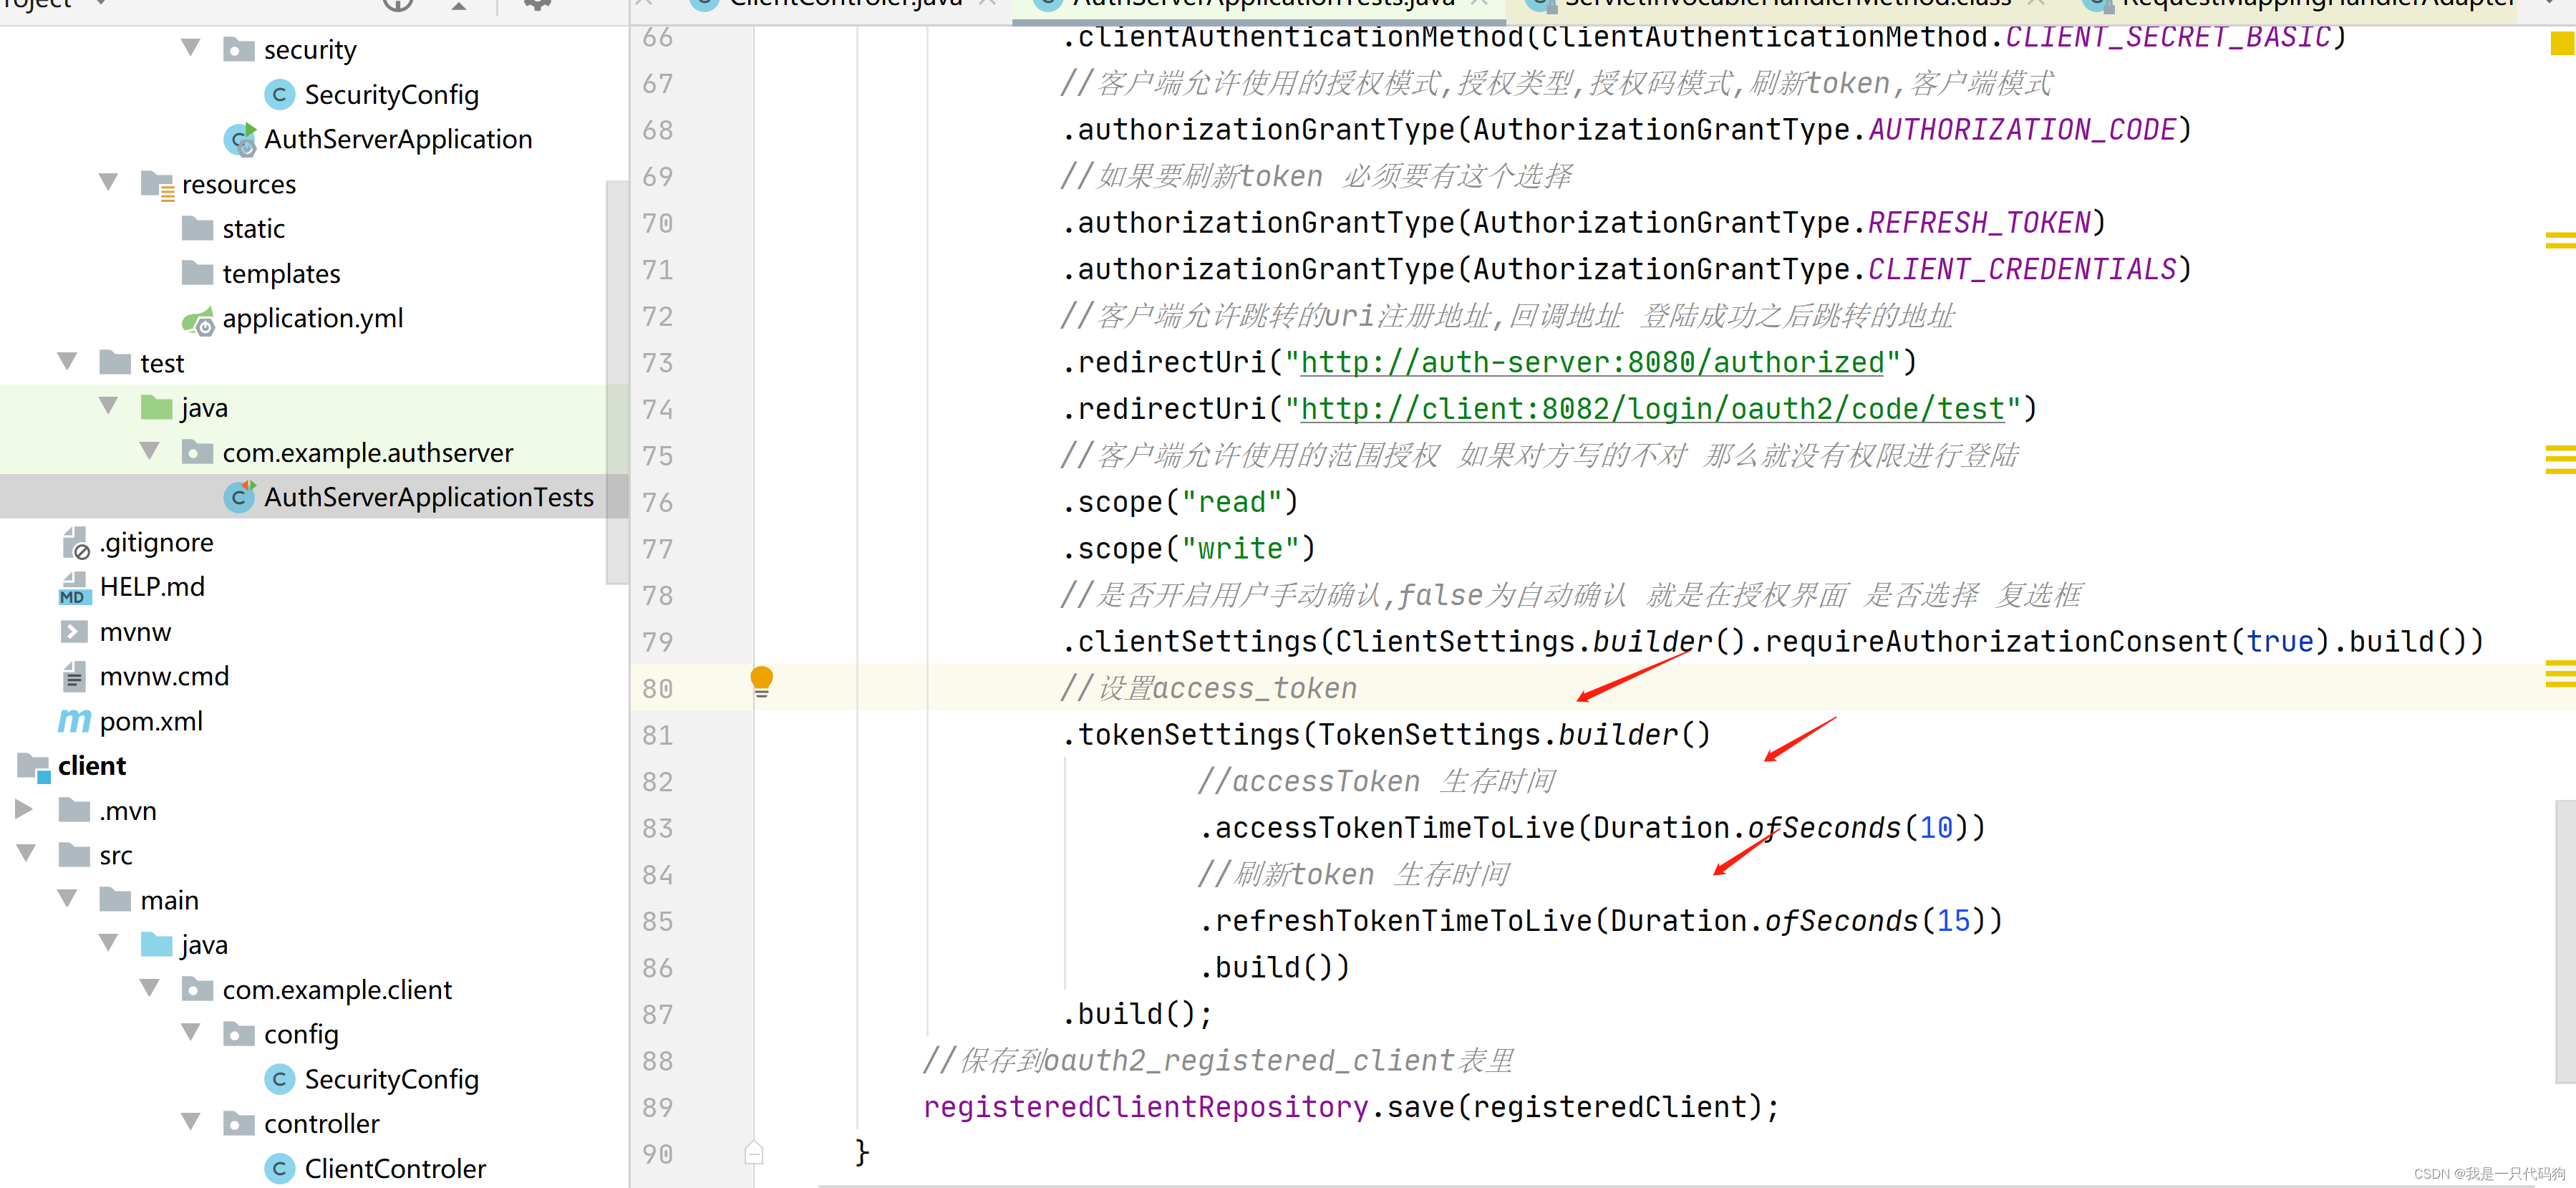
先把数据库的3张数据删除了,在初始化

存在数据库这个字段中
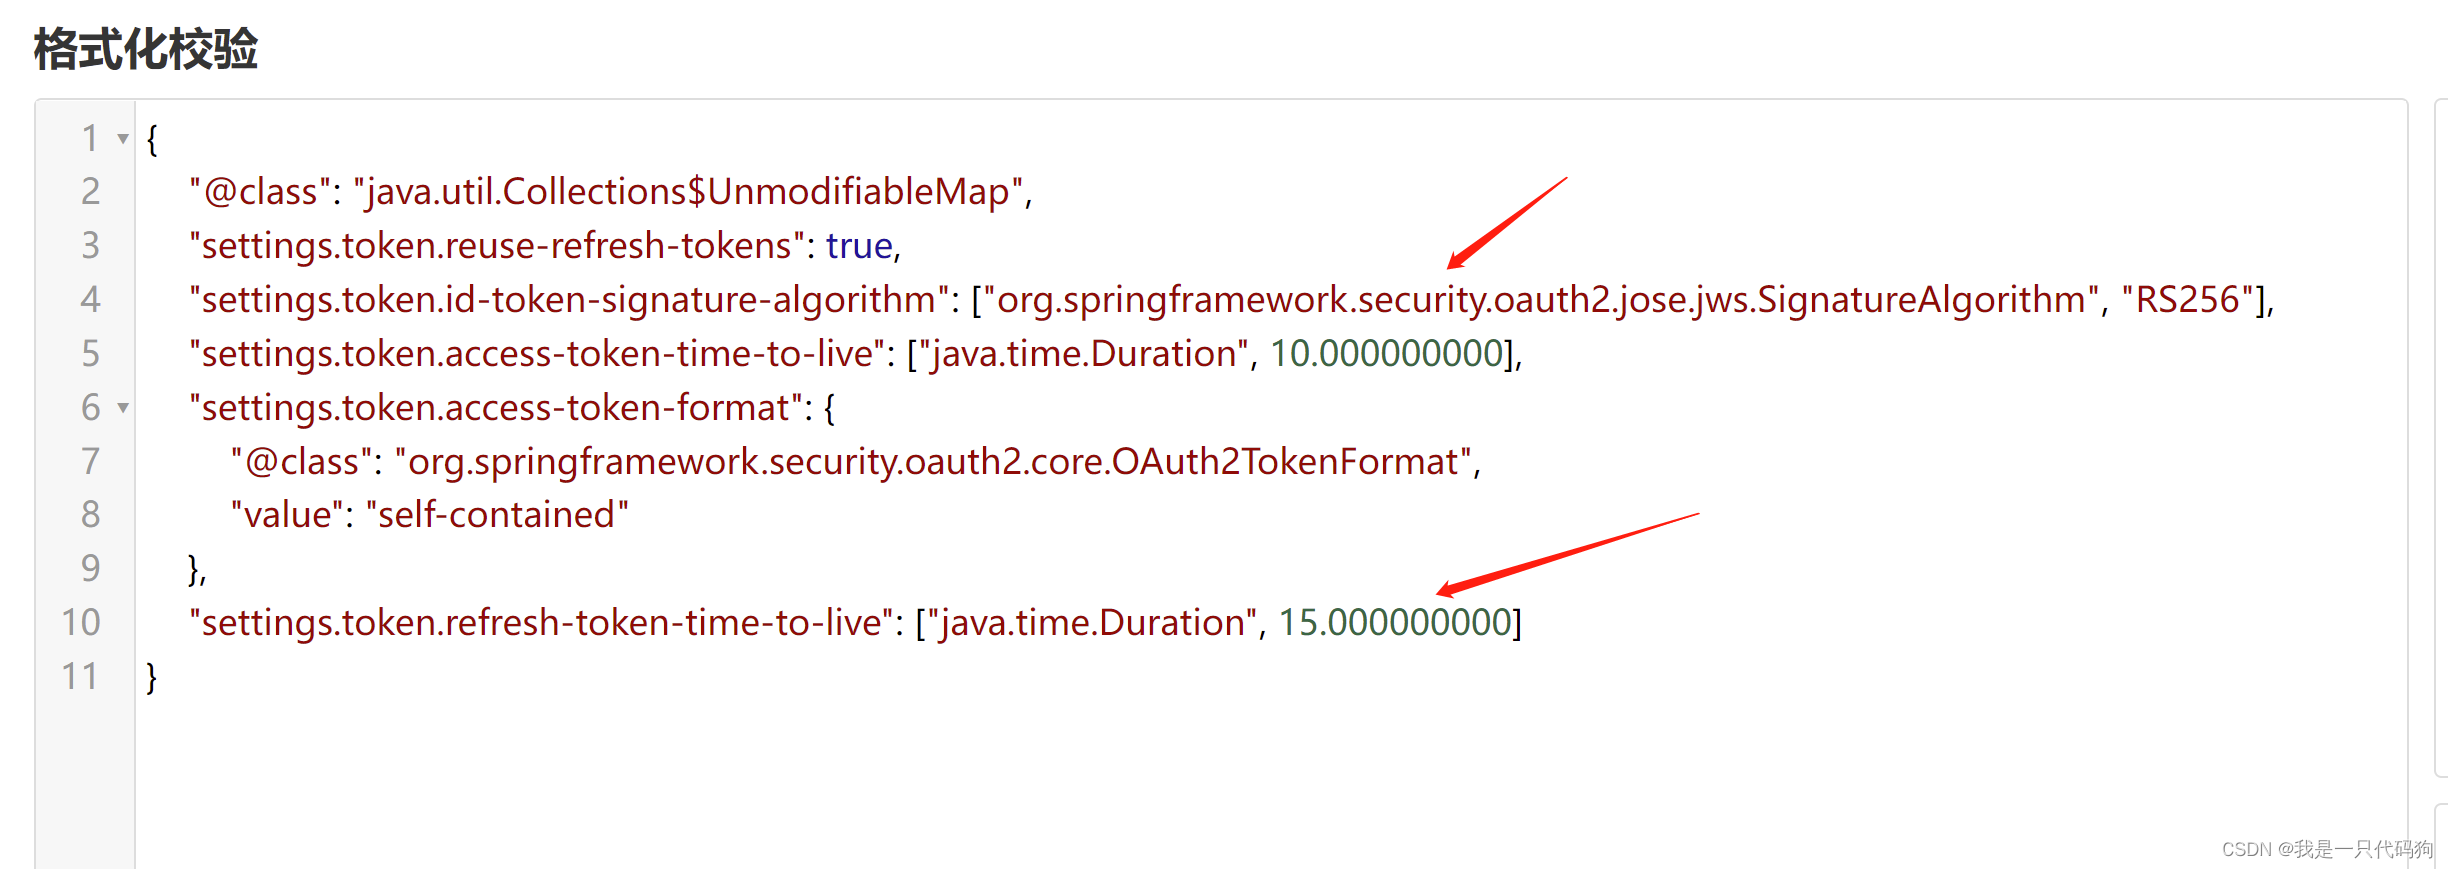
我们再次访问
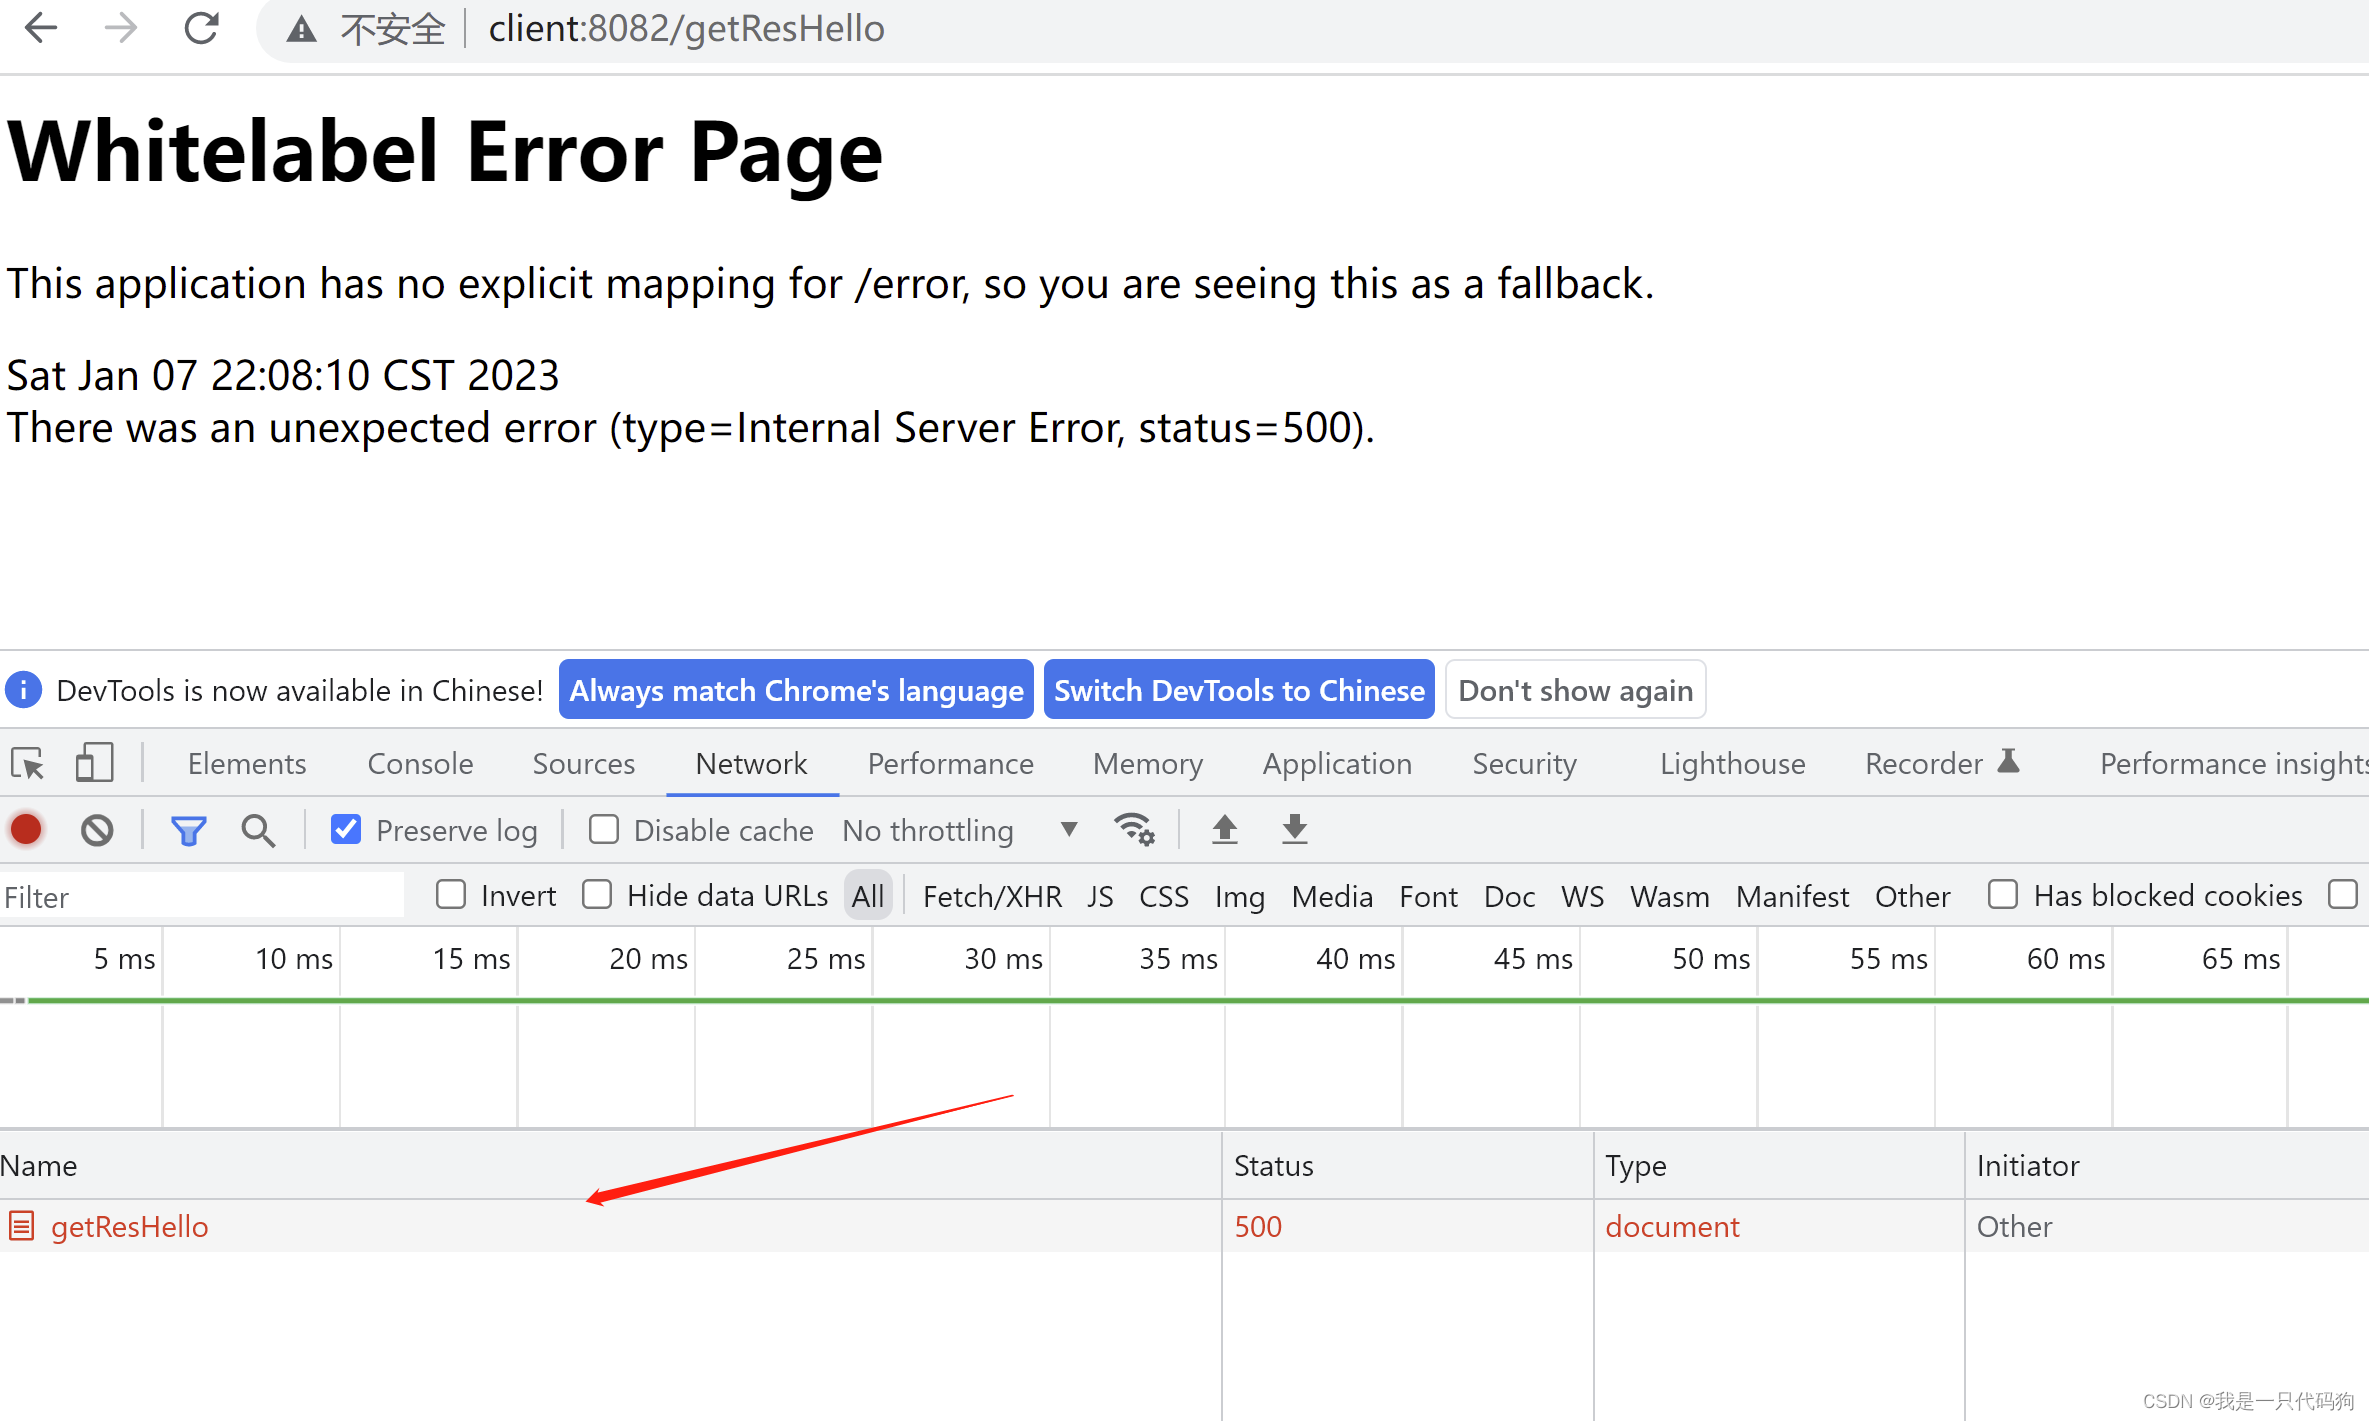
当过期时间到了之后,又再次请求了一次授权,这就是刷新token
设置多长时间过期由你来控制


 669
669


 被折叠的 条评论
为什么被折叠?
被折叠的 条评论
为什么被折叠?
 到【灌水乐园】发言


