mit6.s081 - lab2 system calls

本文为本人完成6.s081 2021fall时的一些记录,仅作为备忘录使用。

代码仓库地址:代码

task 1: System call tracing (moderate)

题意描述

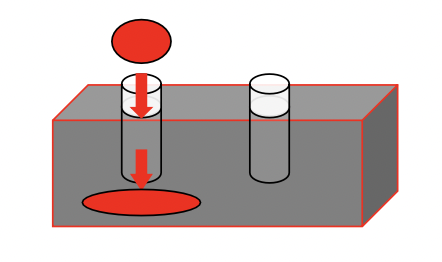
In this assignment you will add a system call tracing feature that may help you when debugging later labs. You’ll create a new trace system call that will control tracing. It should take one argument, an integer “mask”, whose bits specify which system calls to trace. For example, to trace the fork system call, a program calls trace(1 << SYS_fork), where SYS_fork is a syscall number from kernel/syscall.h. You have to modify the xv6 kernel to print out a line when each system call is about to return, if the system call’s number is set in the mask. The line should contain the process id, the name of the system call and the return value; you don’t need to print the system call arguments. The trace system call should enable tracing for the process that calls it and any children that it subsequently forks, but should not affect other processes.

通过一个mask跟踪一个程序调用了那些系统调用,将其进程PID、系统调用名、系统调用返回值打印输出。(其中,mask中的每一位代表一个系统调用号,通过内核对应的系统调用号对应类似于权限机制rwx的机制)

1
2
3
4
5
6
7
8
9
// System call numbers(kernel/syscall.h)
#define SYS_fork 1
#define SYS_exit 2
#define SYS_wait 3
#define SYS_pipe 4
#define SYS_read 5
#define SYS_kill 6
// ...
#define SYS_close 21

样例:其中 1 << 5 = 32 ,因此代表跟踪read系统调用的执行。

1
2
3
4
5
$ trace 32 grep hello README
3: syscall read -> 1023
3: syscall read -> 966
3: syscall read -> 70
3: syscall read -> 0

解决思路

首先要大致理解xv6的系统调用过程。系统调用时用户进入内核的一种手段(一般是受限直接执行(Limited Direct Execution, LDE)机制)。

step 1: 寻找系统调用的入口

要想理清楚xv6系统调用过程,就必须从用户态程序开始入手,下面以lab1下用户态程序 sleep.c 为例,其c程序如下(调用了sleep系统调用):

1
2
3
4
5
6
7
8
9
10
11
12
13
14
15
int
main(int argc, char *argv[])
{
int ticks_num;

if(argc != 2){
fprintf(2, "Usage: sleep times\n");
exit(1);
}

ticks_num = atoi(argv[1]);
sleep(ticks_num);

exit(0);
}

在shell中执行编译命令 make qemu 后,可以看到 sleep.c 生成了对应的 sleep.asm 文件,查看之,有如下代码片段:

1
2
3
4
5
6
7
8
9
000000000000034c <sleep>:
.global sleep
sleep:
li a7, SYS_sleep
34c: 48b5 li a7,13
ecall
34e: 00000073 ecall
ret
352: 8082 ret

其中 ECALL 是RISC-V中的一个专门的指令,可以让应用程序将控制权转移给内核(Entering Kernel)。

ECALL 接收一个数字参数(a7),当一个用户程序想要将程序执行的控制权转移到内核,它只需要执行 ECALL 指令,并传入一个数字。这里的数字参数代表了应用程序想要调用的System Call。

ps: 对应的,x86中就是int 0x80

如下图所示:

step 2: 即然ecall是系统调用的入口,那这段代码哪里来的呢?

这段汇编程序是通过 usys.pl 生成,上述c程序在编译过程中链接该段代码(可以理解为该perl脚本生成了 sleep 等系统调用接口的汇编代码):

1
2
3
4
5
6
7
8
9
10
11
12
sub entry {
my $name = shift;
print ".global $name\n";
print "${name}:\n";
print " li a7, SYS_${name}\n";
print " ecall\n";
print " ret\n";
}

entry("fork");
entry("exit");
...

该脚本运行后,生成一个 usys.S 文件,内容如下:

1
2
3
4
5
6
7
8
9
10
11
12
13
# generated by usys.pl - do not edit
#include "kernel/syscall.h"
.global fork
fork:
li a7, SYS_fork
ecall
ret
.global exit
exit:
li a7, SYS_exit
ecall
ret
# ...
step 3: 执行 ecall 指令时发生了什么呢?ecall 使程序跳转到哪里呢?

首先要了解Risc-v下的一些控制状态寄存器:

image-20230309141453777

Risc-v中有一个STVEC 寄存器,这是一个只能在supervisor mode下读写的特权寄存器。在从内核空间进入到用户空间之前,内核会设置好STVEC寄存器指向内核希望trap代码运行的位置。

Xv6在内核页表和每个用户页表中的同一个虚拟地址上映射了 trampoline pageSTVEC 寄存器保存的地址是 trampoline page 的起始位置,主要执行一些保护用户态寄存器的操作。trampoline pageuservec 函数的起始位置。

安全吗?

trampoline page 是在用户地址空间的user page table完成的映射,用户态代码不能写它,因为这些page对应的PTE并没有设置PTE_u标志位。

总结一下,ecall 调用时发生了什么 :

  1. ecall 将代码从user mode改到supervisor mode。
  2. ecall 将程序计数器的值保存在了 SEPC 寄存器。
  3. ecall 会跳转到 STVEC 寄存器指向的指令。
step 4: uservec 函数

trampoline page 中的 uservec 函数主要执行以下几个功能:

  1. 保存用户寄存器的内容至 trapframe(xv6在每个user page table映射了 trapframe page,每个进程都有自己的trapframe page,定义可见kernel/proc.h:44) ,此时需要使用 sscratch 以一定技巧腾出 a0 寄存器。

    Figure-2.3
  2. 恢复内核栈、内核页表,刷新TLB,设置下一步trap处理函数 usertrap 的地址。

  3. 跳转至 usertrap 函数执行。

uservec 函数代码如下:

1
2
3
4
5
6
7
8
9
10
11
12
13
14
15
16
17
18
19
20
21
22
23
24
25
26
27
28
29
30
31
32
33
34
35
36
37
38
39
40
41
42
43
44
45
46
47
48
	.section trampsec
.globl trampoline
trampoline:
.align 4
.globl uservec
uservec:
#
# trap.c sets stvec to point here, so
# traps from user space start here,
# in supervisor mode, but with a
# user page table.
#
# sscratch points to where the process's p->trapframe is
# mapped into user space, at TRAPFRAME.
#

# swap a0 and sscratch
# so that a0 is TRAPFRAME
csrrw a0, sscratch, a0

# save the user registers in TRAPFRAME
sd ra, 40(a0)
# ...
sd t6, 280(a0)

# save the user a0 in p->trapframe->a0
csrr t0, sscratch
sd t0, 112(a0)

# restore kernel stack pointer from p->trapframe->kernel_sp
ld sp, 8(a0)

# make tp hold the current hartid, from p->trapframe->kernel_hartid
ld tp, 32(a0)

# load the address of usertrap(), p->trapframe->kernel_trap
ld t0, 16(a0)

# restore kernel page table from p->trapframe->kernel_satp
ld t1, 0(a0)
csrw satp, t1
sfence.vma zero, zero

# a0 is no longer valid, since the kernel page
# table does not specially map p->tf.

# jump to usertrap(), which does not return
jr t0
step 5: usertrap 函数

usertrap 的作用是确定trap的原因,处理它,然后返回(kernel/ trap.c:37)。若是系统调用,其 scause 寄存器值为8,usertrap 函数调用 syscall 函数进行处理。

1
2
3
4
5
6
7
8
9
10
11
12
13
14
15
16
17
18
19
20
21
22
23
24
25
26
27
28
29
30
31
32
33
34
35
36
37
38
39
40
41
42
43
44
45
46
47
48
49
50
51
52
53
//
// handle an interrupt, exception, or system call from user space.
// called from trampoline.S
//
void
usertrap(void)
{
int which_dev = 0;

if((r_sstatus() & SSTATUS_SPP) != 0)
panic("usertrap: not from user mode");

// send interrupts and exceptions to kerneltrap(),
// since we're now in the kernel.
w_stvec((uint64)kernelvec);

struct proc *p = myproc();

// save user program counter.
p->trapframe->epc = r_sepc();

if(r_scause() == 8){
// system call

if(p->killed)
exit(-1);

// sepc points to the ecall instruction,
// but we want to return to the next instruction.
p->trapframe->epc += 4;

// an interrupt will change sstatus &c registers,
// so don't enable until done with those registers.
intr_on();

syscall();
} else if((which_dev = devintr()) != 0){
// ok
} else {
printf("usertrap(): unexpected scause %p pid=%d\n", r_scause(), p->pid);
printf(" sepc=%p stval=%p\n", r_sepc(), r_stval());
p->killed = 1;
}

if(p->killed)
exit(-1);

// give up the CPU if this is a timer interrupt.
if(which_dev == 2)
yield();

usertrapret();
}
step 6: syscall 函数

经过种种艰辛,终于来到了系统调用的处理函数。

  • 用户态代码在调用系统调用时,将系统调用函数的参数放在寄存器a0a1 等寄存器中中,并将系统调用号放在a7中。
  • syscall(kernel/syscall.c:133)从 trapframe 中的 a7 中得到系统调用号,并其作为索引在 syscalls 查找相应函数。对于系统调用sleep,其a7寄存器值为13(SYS_sleep),这会让 syscall 函数调用 sleep 系统调用的实现函数 sys_sleep
  • 当系统调用函数返回时,syscall 将其返回值记录在 p->trapframe->a0 中。

其代码如下:

1
2
3
4
5
6
7
8
9
10
11
12
13
14
15
16
17
void
syscall(void)
{
int num;
struct proc *p = myproc();

num = p->trapframe->a7; // a7是系统调用号
if(num > 0 && num < NELEM(syscalls) && syscalls[num]) {
// 查表得到函数指针,然后通过函数指针调用对应系统调用的实际实现。
// a0为系统调用函数的返回值
p->trapframe->a0 = syscalls[num]();
} else {
printf("%d %s: unknown sys call %d\n",
p->pid, p->name, num);
p->trapframe->a0 = -1;
}
}

然后内核执行对应的系统调用:

1
2
3
4
5
6
7
8
9
10
11
12
13
14
15
16
17
18
19
20
uint64
sys_sleep(void)
{
int n;
uint ticks0;

if(argint(0, &n) < 0)
return -1;
acquire(&tickslock);
ticks0 = ticks;
while(ticks - ticks0 < n){
if(myproc()->killed){
release(&tickslock);
return -1;
}
sleep(&ticks, &tickslock);
}
release(&tickslock);
return 0;
}

实现

通过1.2的过程我们大概知道了一个系统调用是如何执行的,这样在回顾要实现trace的需求,就会觉得很简单了。

通过一个mask跟踪一个程序调用了那些系统调用,将其进程PID、系统调用名、系统调用返回值打印输出。。

step 1: trace 系统调用设置相应的mask

内核添加一个 trace 系统调用的实现,将mask放入pcb中。

1
2
3
4
5
6
7
8
uint64
sys_trace(void) {
int mask;
if(argint(0, &mask) < 0)
return -1;
myproc()->trace_mask = mask;
return 0;
}

在os的执行过程中,对这个mask有以下几个操作(crud):

  • 创建进程时,初始化为0。
  • trace 系统调用进行设置、更改到指定的值。
  • fork 时子进程复制父进程的mask。

系统调用已经实现,因此还需要添加初始化和复制两个操作:

分配进程(添加初始化为0):(proc.c@allocproc)

1
2
3
4
5
6
7
8
9
10
11
12
13
14
15
16
17
18
19
20
21
22
23
24
// Look in the process table for an UNUSED proc.
// If found, initialize state required to run in the kernel,
// and return with p->lock held.
// If there are no free procs, or a memory allocation fails, return 0.
static struct proc*
allocproc(void)
{
// ...
found:
p->pid = allocpid();
p->state = USED;
p->trace_mask = 0;

// Allocate a trapframe page.
if((p->trapframe = (struct trapframe *)kalloc()) == 0){
freeproc(p);
release(&p->lock);
return 0;
}

// ...

return p;
}

fork 时添加复制:(proc.c@fork)

1
2
3
4
5
6
7
8
9
10
11
12
13
14
15
16
17
18
19
20
21
22
23
24
25
26
27
28
29
30
31
32
33
// Create a new process, copying the parent.
// Sets up child kernel stack to return as if from fork() system call.
int
fork(void)
{
// ...
// Copy user memory from parent to child.
if(uvmcopy(p->pagetable, np->pagetable, p->sz) < 0){
freeproc(np);
release(&np->lock);
return -1;
}
np->sz = p->sz;

// copy trace mask
np->trace_mask = p->trace_mask;

// copy saved user registers.
*(np->trapframe) = *(p->trapframe);

// Cause fork to return 0 in the child.
np->trapframe->a0 = 0;

// increment reference counts on open file descriptors.
for(i = 0; i < NOFILE; i++)
if(p->ofile[i])
np->ofile[i] = filedup(p->ofile[i]);
np->cwd = idup(p->cwd);

// ...

return pid;
}
step 2: syscall 根据mask输出所要跟踪的系统调用

因为系统调用最后都会落实到 syscall 函数,而 syscall 函数中就有对应的进程PID、系统调用号、系统调用返回值。此时再建立一个系统调用号到系统调用名的映射即可。

核心代码如下:

1
2
3
4
5
6
7
8
9
10
11
12
13
14
15
16
17
18
19
20
21
22
23
24
25
26
27
28
29
30
31
32
33
34
35
36
37
38
39
40
41
42
43
static char *syscalls_name[] = {
[SYS_fork] "fork",
[SYS_exit] "exit",
[SYS_wait] "wait",
[SYS_pipe] "pipe",
[SYS_read] "read",
[SYS_kill] "kill",
[SYS_exec] "exec",
[SYS_fstat] "fstat",
[SYS_chdir] "chdir",
[SYS_dup] "dup",
[SYS_getpid] "getpid",
[SYS_sbrk] "sbrk",
[SYS_sleep] "sleep",
[SYS_uptime] "uptime",
[SYS_open] "open",
[SYS_write] "write",
[SYS_mknod] "mknod",
[SYS_unlink] "unlink",
[SYS_link] "link",
[SYS_mkdir] "mkdir",
[SYS_close] "close",
[SYS_trace] "trace",
};

void
syscall(void)
{
int num;
struct proc *p = myproc();

num = p->trapframe->a7;
if(num > 0 && num < NELEM(syscalls) && syscalls[num]) {
p->trapframe->a0 = syscalls[num]();
if ((p->trace_mask & (1 << num)) != 0) {
printf("%d: syscall %s -> %d\n", p->pid, syscalls_name[num], p->trapframe->a0);
}
} else {
printf("%d %s: unknown sys call %d\n",
p->pid, p->name, num);
p->trapframe->a0 = -1;
}
}

task 2: Sysinfo (moderate)

题意描述

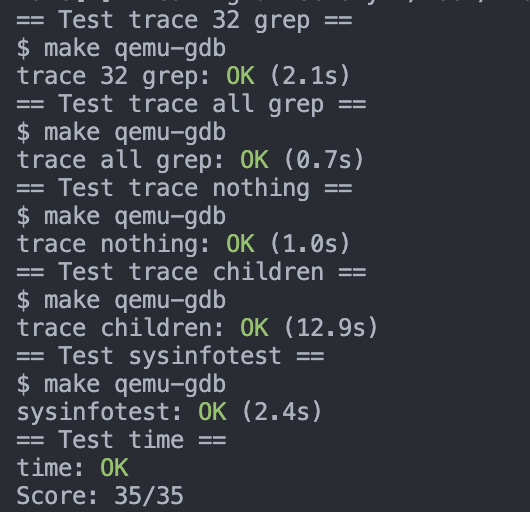
In this assignment you will add a system call, sysinfo, that collects information about the running system. The system call takes one argument: a pointer to a struct sysinfo (see kernel/sysinfo.h). The kernel should fill out the fields of this struct: the freemem field should be set to the number of bytes of free memory, and the nproc field should be set to the number of processes whose state is not UNUSED. We provide a test program sysinfotest; you pass this assignment if it prints “sysinfotest: OK”.

实现一个sysinfo 系统调用,用来收集空闲内存和运行进程数量信息。

其定义如下(接受一个 sysinfo 结构体指针,sysinfo 系统调用需要将运行时状态结果从内核复制进这个用户态地址):

1
int sysinfo(struct sysinfo*);

其中 struct sysinfo ( kernel/sysinfo.h) 定义为:

1
2
3
4
struct sysinfo {
uint64 freemem; // amount of free memory (bytes)
uint64 nproc; // number of process
};

解决思路

sysinfo 系统调用要做的事就是收集空闲内存和运行进程数量信息。

  • 空闲内存:体现在内存空闲链表(freelist)中,其一个节点的大小为一个PGSIZE,遍历空闲链表得到链表节点个数即可。
1
2
3
4
struct {
struct spinlock lock;
struct run *freelist;
} kmem;
  • 运行进程数量:体现在进程数组(proc)中,是进程数组中所有UNUSED状态的进程数。
1
struct proc proc[NPROC];

实现

按照系统调用的实现流程操作,然后实现sys_sysinfo函数:需要注意的是内核数据给用户态不能直接复制,要用 copyout 函数:

  • kcollect 函数收集空闲内存空间大小
  • pcollect 函数收集运行进程数量
1
2
3
4
5
6
7
8
9
10
11
12
13
14
15
16
uint64
sys_sysinfo(void)
{
uint64 st; // user pointer to struct sysinfo

if(argaddr(0, &st) < 0)
return -1;

struct sysinfo info;
info.freemem = kcollect();
info.nproc = pcollect();
if(copyout(myproc()->pagetable, st, (char *)&info, sizeof(info)) < 0) {
return -1;
}
return 0;
}

然后就是实现 kcollect 函数去收集空闲内存空间大小:

1
2
3
4
5
6
7
8
9
10
11
12
13
uint64
kcollect(void) {
struct run *r;
int cnt = 0;
acquire(&kmem.lock);
r = kmem.freelist;
while (r) {
r = r->next;
++cnt;
}
release(&kmem.lock);
return cnt * PGSIZE;
}

实现 pcollect 函数去收集运行进程数量

1
2
3
4
5
6
7
8
9
10
11
uint64
pcollect(void) {
int cnt = 0;
struct proc *p;
for(p = proc; p < &proc[NPROC]; p++){
if(p->state != UNUSED) {
++cnt;
}
}
return cnt;
}

测试结果

执行 make grade 进行评分:

image-20230309104414246

代码仓库地址:代码

  • 0
    点赞
  • 0
    收藏
    觉得还不错? 一键收藏
  • 0
    评论

“相关推荐”对你有帮助么?

  • 非常没帮助
  • 没帮助
  • 一般
  • 有帮助
  • 非常有帮助
提交
评论
添加红包

请填写红包祝福语或标题

红包个数最小为10个

红包金额最低5元

当前余额3.43前往充值 >
需支付:10.00
成就一亿技术人!
领取后你会自动成为博主和红包主的粉丝 规则
hope_wisdom
发出的红包
实付
使用余额支付
点击重新获取
扫码支付
钱包余额 0

抵扣说明:

1.余额是钱包充值的虚拟货币,按照1:1的比例进行支付金额的抵扣。
2.余额无法直接购买下载,可以购买VIP、付费专栏及课程。

余额充值