


主机分配:
| 主机名 | IP地址 |
|---|---|
| MGR-node1 | 192.168.182.100 |
| MOR-node2 | 192.168.182.101 |
| MGR-node3 | 192.168.182.102 |
一 环境准备
编辑三台主机的hosts文件:重点:一定要注意设置好主机名以及hosts文件要不然mysql会找不到对应的机器
192.168.182.100 MGR-node1
192.168.182.101 MGR-node2
192.168.182.102 MGR-node3
系统版本查看
[root@MGR-node1 ~]# cat /etc/redhat-release
CentOS Linux release 7.6.1810 (Core)
为了方便实验,关闭所有节点的防火墙
[root@MGR-node1 ~]# systemctl stop firewalld
[root@MGR-node1 ~]# firewall-cmd --state
not running
[root@MGR-node1 ~]# cat /etc/sysconfig/selinux |grep "SELINUX=disabled"
SELINUX=disabled
[root@MGR-node1 ~]# setenforce 0
setenforce: SELinux is disabled
[root@MGR-node1 ~]# getenforce
Disabled
二 在三个节点上安装Mysql5.7
下载mysql官方源
[root@MGR-node1 ~]# yum localinstall https://dev.mysql.com/get/mysql57-community-release-el7-8.noarch.rpm
安装MySQL 5.7
[root@MGR-node1 ~]# yum install -y mysql-community-server
启动MySQL服务器和MySQL的自动启动
[root@MGR-node1 ~]# systemctl start mysqld.service
[root@MGR-node1 ~]# systemctl enable mysqld.service
核对三台主机的mysql版本
[root@MGR-node1 ~]# mysql -V
mysql  Ver 14.14 Distrib 5.7.31, for Linux (x86_64) using  EditLine wrapper
查看初始密码并登录
[root@MGR-node1 ~]# cat /var/log/mysqld.log|grep 'A temporary password'
2020-07-18T06:54:38.562194Z 1 [Note] A temporary password is generated for root@localhost: <Ezzv8w+pX7,
使用上面查看的密码<Ezzv8w+pX7, 登录mysql,并重置密码为123456
[root@MGR-node1 ~]# mysql -p'<Ezzv8w+pX7,'
进入数据库设置简单密码策略
mysql> set global validate_password_policy=0;
Query OK, 0 rows affected (0.00 sec)

mysql> set global validate_password_length=1;
Query OK, 0 rows affected (0.00 sec)

mysql> set password=password("123456");
Query OK, 0 rows affected, 1 warning (0.00 sec)

mysql> flush privileges;
Query OK, 0 rows affected (0.00 sec)
三、MGR组复制环境部署 (多写模式)
这里有几个命令大家可能会用到,在部署环境命令错误时,需要初始化mysql。
# systemctl  stop  mysqld
# rm -rf /var/lib/mysql
# systemctl start mysqld
执行完,需要重新查看初始密码登入并修改密码
注意:3台节点的操作略有不同,不建议克隆操作
1) MGR-node1 配置
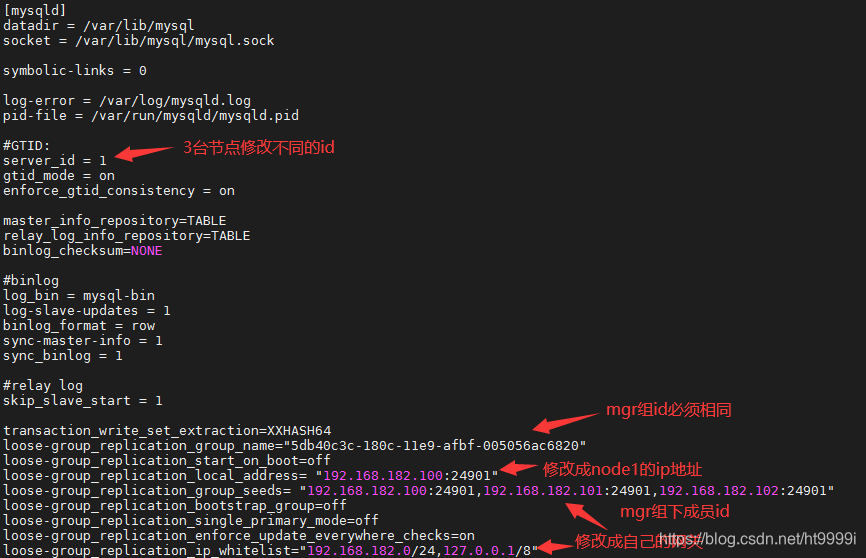
[root@MGR-node1 ~]# cp /etc/my.cnf /etc/my.cnf.bak
[root@MGR-node1 ~]# >/etc/my.cnf
[root@MGR-node1 ~]# vim /etc/my.cnf
[mysqld]
datadir = /var/lib/mysql
socket = /var/lib/mysql/mysql.sock

symbolic-links = 0

log-error = /var/log/mysqld.log
pid-file = /var/run/mysqld/mysqld.pid

#GTID:
server_id = 1
gtid_mode = on
enforce_gtid_consistency = on

master_info_repository=TABLE
relay_log_info_repository=TABLE
binlog_checksum=NONE

#binlog
log_bin = mysql-bin
log-slave-updates = 1
binlog_format = row
sync-master-info = 1
sync_binlog = 1

#relay log
skip_slave_start = 1

transaction_write_set_extraction=XXHASH64
loose-group_replication_group_name="5db40c3c-180c-11e9-afbf-005056ac6820"
loose-group_replication_start_on_boot=off
loose-group_replication_local_address= "192.168.182.100:24901"
loose-group_replication_group_seeds= "192.168.182.100:24901,192.168.182.101:24901,192.168.182.102:24901"
loose-group_replication_bootstrap_group=off
loose-group_replication_single_primary_mode=off
loose-group_replication_enforce_update_everywhere_checks=on
loose-group_replication_ip_whitelist="192.168.182.0/24,127.0.0.1/8"
注意下图的几点:
修改完成后保存
重启mysql服务
[root@MGR-node1 ~]# systemctl restart mysqld
登录mysql进行相关设置操作
[root@MGR-node1 ~]# mysql -p123456
mysql> SET SQL_LOG_BIN= 最低0.47元/天 解锁文章


 1165
1165

 被折叠的 条评论
为什么被折叠?
被折叠的 条评论
为什么被折叠?
 到【灌水乐园】发言


