


 文章介绍了如何创建一个优化的轮播图组件,包括实现图片的无缝衔接切换,即第一张接最后一张,最后一张接第一张,并添加了拖拽切换功能,以及自动轮播的逻辑。组件通过CSS布局和JavaScript控制切换动画,确保视觉上的平滑过渡。
此轮播图在普通轮播图的基础上优化,增加第一张切上一张接最后一张,最后一张切下一张接第一张,且无缝衔接的功能。增加拖拽切换功能;
原理
1.排版
轮播图分三层结构。最外层相对定位并且配合css样式溢出隐藏,使轮播图视口只能显示一张图片。轮播图第二层为可移动元素,配合css绝对定位并且使用css3过度效果实现切换时的动画。第三层是轮播图的各个图片,这里让每一个子项的display属性值是inline-block。让其父级的font-zise:0;消除内联块受字体大小影响而不在一条直线上(既inline-bolock元素受font-size其vertical-align的影响排版)。再让其父元素white-space: nowrap;让所有子项不换行。
计算轮播图视口的宽度,令每个轮播子项宽度和视口宽度一致。这样显示的张数的style left的值和第n张绑定。
2.无缝衔接
在第一张前面复制最后一张的拷贝,在最后一张复制第一张的拷贝。默认显示最终的第二张(实际上是第一张)
比如轮播图传入三张图片,分别是图片一、二、三。则轮播图初始状态如下图;
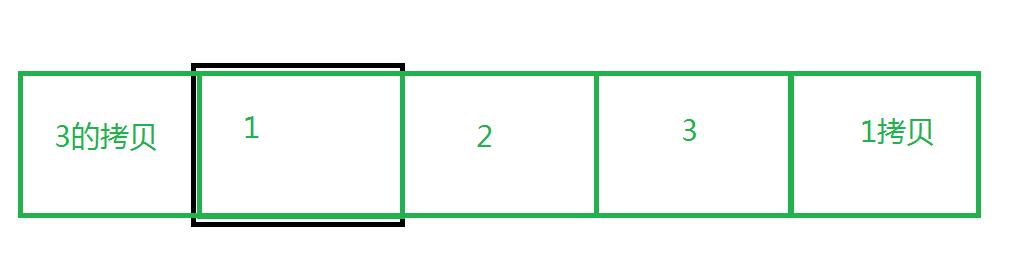
当轮播图显示的是第一张,此时切上一张时。会切到3拷贝这一张,并在切换完成后迅速变为第三张(这里控制css样式使过度失效)。这样肉眼看上去就是1无缝切到3。同理3切到1时也一样。
3.拖拽切换
记录鼠标点下去时候的x值,和抬起来的值只差。如果超过一定范围则调用轮播切换的方法即可。
4.自动轮播
略..
代码
使用引入组件
<template>
  <div id="app">
    <mySwiper :imgArr="imgArr"/>
  </div>
</template>
<script>
import mySwiper from './components/MySwiper'
export default {
  name: 'App',
  data(){
    return {
      imgArr:[
        require('./assets/images/1.jpg'),
        require('./assets/images/2.jpg'),
        require('./assets/images/3.jpg'),
        require('./assets/images/4.jpg'),
      ]
    }
  },
  components: {
    mySwiper
  }
}
</script>
<style>
</style>
组件代码
html
<template>
<div>
  <!-- 轮播图 -->
  <div class="swiper" ref="swip" @mousedown="seipBodyMouseDowen($event)" @mouseleave="mLeave" @mouseenter="mEnter">
    <!-- 可移动的轮播图盒子 -->
    <div class="swiperBody" :style="{
      'left': trueLeft + 'px',
      'transition': runtime && jb ?  'left 1s ease' : 'none'
    }">
    <!-- 图片位置 -->
        <template v-for="item,index in imgArr1">
            <div class="sitem" :style="{
              'backgroundImage':'url('+item+')',
              'width':swipWidth+'px'}"
              :key="index"></div>
        </template>
    </div>
    <!-- 小圆点 -->
      <div class="pointer" ref="pointer">
        <template v-for="item,index in imgArr">
          <span class="span" :class="{'active': runNun1==index}" :key="index" @click="setSwip(index)"></span>
        </template>
      </div>
  </div>
  <!-- 切换按钮(测试) -->
  <button  @click="run('-')">上一张</button>
  <button @click="run('+')">下一张</button>
</div>
</template>
js
<script>
  export default {
    name: 'MySwiper',
    data(){
        return {
            timmer1: null,//该定时器配合runtime使用
            timmer2: null,//自动轮播
            runtime:false,//避免短时间内多次重复点击
            imgArr1:[],//使用imgArr1重新编排传入的imgArr图片数组,用于无缝衔接切换
            runNun: 0,//
            runNun1: 0,//用于控制小圆点聚焦(如果使用runNun则无缝衔接时聚焦有延迟)
            swipWidth: 0,//轮播图宽度
            trueLeft: 0,//
            muveNum: 0,//鼠标每次拖拽的距离
            jb: true//无缝衔接时的不需要动画
        }
    },
    props: {
      imgArr:{
        type: Array,
        require: true,
      }
    },
    computed:{
      computLeft(){
          return - this.swipWidth * (this.runNun+1);
      }
    },
    beforeMount(){
      // 无缝衔接精髓
      this.imgArr1 = this.imgArr.concat([]);
      this.imgArr1.push(this.imgArr[0]);
      this.imgArr1.unshift(this.imgArr[this.imgArr.length-1]);
    },
    mounted(){
      this.swip = this.$refs.swip;
      this.swipWidth = this.swip.offsetWidth;
      document.addEventListener('mouseup',this.mouseupControl)

      this.swiperAuto();
    },
    methods:{
      run(tag){//切换
        this.jb = true;
        if(this.runtime) return;
        if(tag=='+'){//下一张
          this.runNun++;
          this.runNun1++;
          if(this.runNun==this.imgArr.length){//最后一张
            this.runNun1 = 0;
            setTimeout(()=>{//无缝精髓
              this.jb = false;
              this.runtime = false;
              this.runNun = 0;
            },1000);
            //
          }
        }else if(tag=='-'){//上一张
          this.runNun--;
          this.runNun1--;
          if(this.runNun==-1){//第一张
            this.runNun1 = this.imgArr.length-1;
            setTimeout(()=>{//无缝精髓
              this.jb = false;
              this.runtime = false;
              this.runNun = this.imgArr.length-1;
            },1000);
          }
        }else{
           this.trueLeft = this.computLeft;
           this.runTimeControl();
        }
      },
      setSwip(index){//点击小圆点
        this.runNun = index;
        this.runNun1 = index;
      },
      seipBodyMouseDowen(e){//拖拽切换
        if(this.runtime){
          this.swip.onmousemove = null;
          return '';
        }
        var dowenPositionX = e.screenX;
        this.swip.onmousemove = (e1)=>{

          var movePositionX = e1.screenX;
          this.muveNum = movePositionX - dowenPositionX;
          this.trueLeft = this.computLeft + this.muveNum;
        }
      },
      runTimeControl(){//轮播图动画切换中
        this.runtime = true;
        clearTimeout(this.timmer1);
        this.timmer1 = setTimeout(()=>{
          this.runtime = false;
        }, 1000);
      },
      mouseupControl(){
        this.swip.onmousemove = null;
        if(this.muveNum>0 && this.muveNum > this.swipWidth*0.2){
          this.run('-')
        }else if(this.muveNum < 0 && this.muveNum*-1 > this.swipWidth*0.2){
          this.run('+')
        }else{
           this.run()
        }
      },
      mLeave(){
       this.swiperAuto();
      },
      mEnter(){
        clearInterval(this.timmer2);
      },
      swiperAuto(){
        this.timmer2 = setInterval(()=>{
          this.run('+')
        },3500);
      }
    },
    beforeDestroy(){
      document.onmouseup = null;
    },
    watch:{
      computLeft(newVal){//使用trueLeft控制轮播图而不是computLeft,是因为拖拽时会冲突
        this.trueLeft = newVal;
        this.runTimeControl();
      }
    }
  }
</script>
css
<style scoped>
  .swiper{
    position: relative;
    width: 100%;
    margin: 20px auto;
    height: 400px;
    overflow: hidden;
    border: 1px solid #ccc;
    box-sizing: border-box;
    user-select: none;
  }
  .swiperBody{
    position: absolute;
    left: 0;
    top: 0;
    height: 100%;
    white-space: nowrap;
    min-width: 100%;
  }
  .swiperBody .sitem{
    display: inline-block;
    height: 100%;
    background-position: center center;
    background-origin: padding-box;
    background-size: 100% 100%;
    background-repeat: no-repeat;
  }
  .pointer{
    height: 6px;
    width: 100%;
    position: absolute;
    left: 0;
    bottom: 20px;
    z-index: 2;
    text-align: center;
    font-size: 0;
  }
  .pointer .span{
    display: inline-block;
    width: 12px;
    height: 12px;
    background-color: #fff;
    border-radius: 50%;
    margin: 0 10px;
    cursor: pointer;
  }
  .pointer .span.active{
    background-color: rgb(248, 123, 7);
  }
</style>


 2万+
2万+

 被折叠的 条评论
为什么被折叠?
被折叠的 条评论
为什么被折叠?
 到【灌水乐园】发言


