 构建HUAWEIOSArkTSUI导航栏与列表示例


目录
1、概述
构建一个带有底部四个菜单的导航栏,首页显示一个列表,并添加测试数据,及点击事件。
1.1、需要用到的组件
1.1.1、List
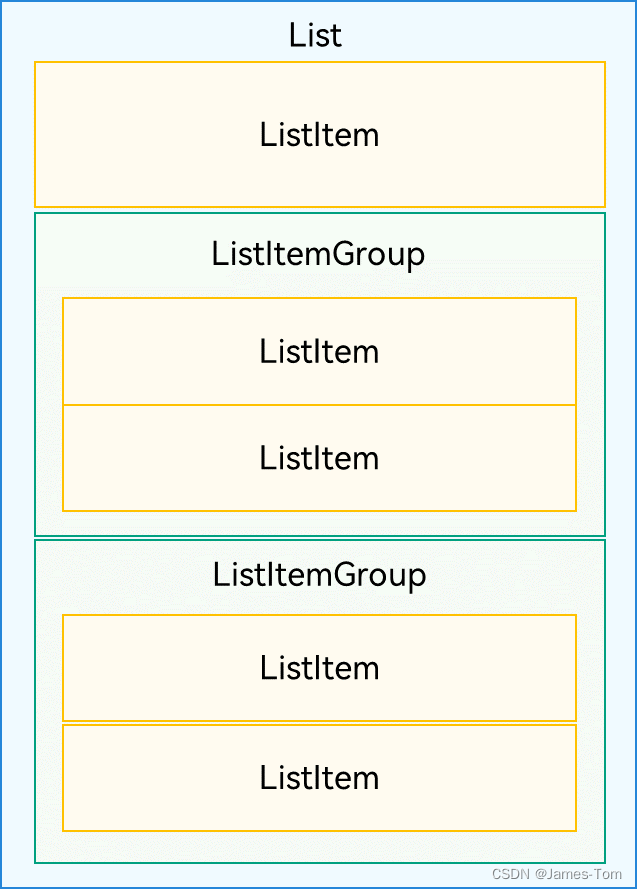
列表(List)是一种复杂的容器,当列表项达到一定数量,内容超过屏幕大小时,可以自动提供滚动功能。
列表的组件及子组件的关系,如下图所示:
1.1.2、Tabs
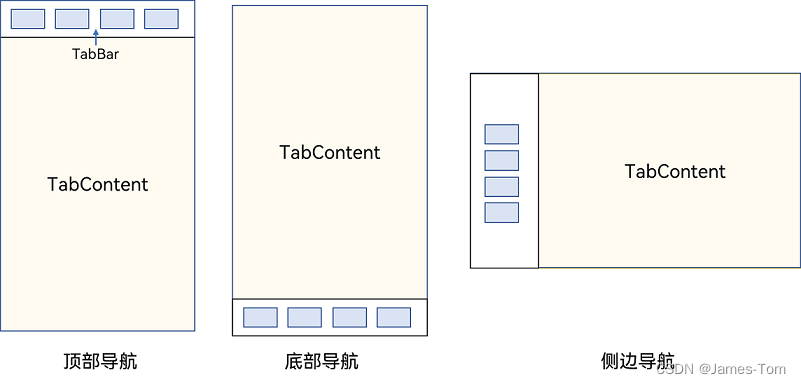
Tabs组件的页面组成包含两个部分,分别是TabContent和TabBar。可以用来制作底部菜单导航栏。
Tabs支持不同位置的导航,如下图所示:
1.2、用到新的关键字及语法
1.2.1、ForEach语句
ForEach(
  arr: any[],
  itemGenerator: (item: any, index?: number) => void,
  keyGenerator?: (item: any, index?: number) => string
)
arr:必须是数组,允许设置为空数组; itemGenerator:数据项,即ltem的布局;
keyGenerator:指定列表项的唯一键,布局视图复用,避免重复渲染,提升性能。
1.2.2、@Builder装饰器
自定义构建函数,有这个注解的地函数可以直接被调用,如
//调用tabMe
TabContent() .tabBar(this.tabMe)

//自建的带注解的函数
@Builder tabSub() {
    Column() {
    }
}
其中CustomBuilder就支持这种写法。
1.2.3、import 导入类
import { News } from '../pages/News';
注意:可使用as 关键字进行重命名
import { News as NewInfo } from '../pages/News';
也可以导入指定类的函数,对应的函数天机export 关键字
export function testFun(name: string): void {
  console.log('this is a export fun');
}
调用导出的函数:
import { testFun} from './MyClassName.ets';
// 调用导入的函数
testFun('Alice');
2、创建首页
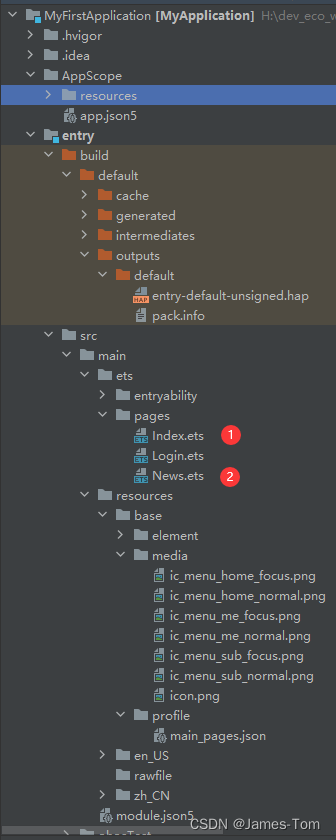
创建首页文件Index.ets,及自定义一个测试类,用于构造测试数据,包目录如下图所示:
3、编写代码
Index.ets文件内容如下:
import prompt from '@ohos.promptAction'
//引入自定义类
import { News } from '../pages/News';
@Entry
@Component
struct Index {
private tabsController = new TabsController();
@State index: number = 0; // 选项卡下标,默认为第一个
private newsList = [
new News('title1', 'abstract', $r("app.media.app_icon")),
new News('title2', 'abstract', $r("app.media.app_icon")),
new News('title3', 'abstract', $r("app.media.app_icon")),
new News('title4', 'abstract', $r("app.media.app_icon"))
]
@Builder tabHome() {
Column() {
Image(this.index == 0 ? $r('app.media.ic_menu_home_focus') : $r('app.media.ic_menu_home_normal'))
.size({ width: 25, height: 25 }).margin({ top: 5, bottom: 5 })
Text("首页").fontSize(16).fontColor(this.index == 0 ? "#2a58d0" : "#6b6b6b")
}.width('100%').height('100%').onClick(() => {
this.index = 0;
this.tabsController.changeIndex(this.index)
})
}
@Builder tabSub() {
Column() {
Image(this.index == 1 ? $r('app.media.ic_menu_sub_focus') : $r('app.media.ic_menu_sub_normal'))
.size({ width: 25, height: 25 }).margin({ top: 5, bottom: 5 })
Text("订阅").fontSize(16).fontColor(this.index == 1 ? "#2a58d0" : "#6b6b6b")
}.width('100%').height('100%').onClick(() => {
this.index = 1;
this.tabsController.changeIndex(this.index)
})
}
@Builder tabMe() {
Column() {
Image(this.index == 2 ? $r('app.media.ic_menu_me_focus') : $r('app.media.ic_menu_me_normal'))
.size({ width: 25, height: 25 }).margin({ top: 5, bottom: 5 })
Text("我的").fontSize(16).fontColor(this.index == 2 ? "#2a58d0" : "#6b6b6b")
}.width('100%').height('100%').onClick(() => {
this.index = 2;
this.tabsController.changeIndex(this.index)
})
}
build() {
Column() {
Tabs({ controller: this.tabsController }) {
TabContent() {
Column() {
List({ space: 10, initialIndex: 0 }) {
ForEach(this.newsList, (item: News, index: number) => {
// 循环渲染ListItem
ListItem() {
Row() {
Image(item.icon).width(40).height(40).margin(10)
Column() {
Text(item.title).fontSize(16).fontColor($r("app.color.color_list_title"))
Text(item.abstract).fontSize(14).fontColor($r("app.color.color_list_abstract"))
}.width('100%').alignItems(HorizontalAlign.Start)
}.width('100%').justifyContent(FlexAlign.Start)
.onClick(() => {
//选项单击事件
prompt.showToast({ message: this.newsList[index].title, duration: 2000 })
})
}
}, item => item.id)
}.width("100%").listDirection(Axis.Vertical).scrollBar(BarState.Auto)
}.width('100%').height('100%').justifyContent(FlexAlign.Start).backgroundColor("#eeeeee")
}.tabBar(this.tabHome())
TabContent() {
Column() {
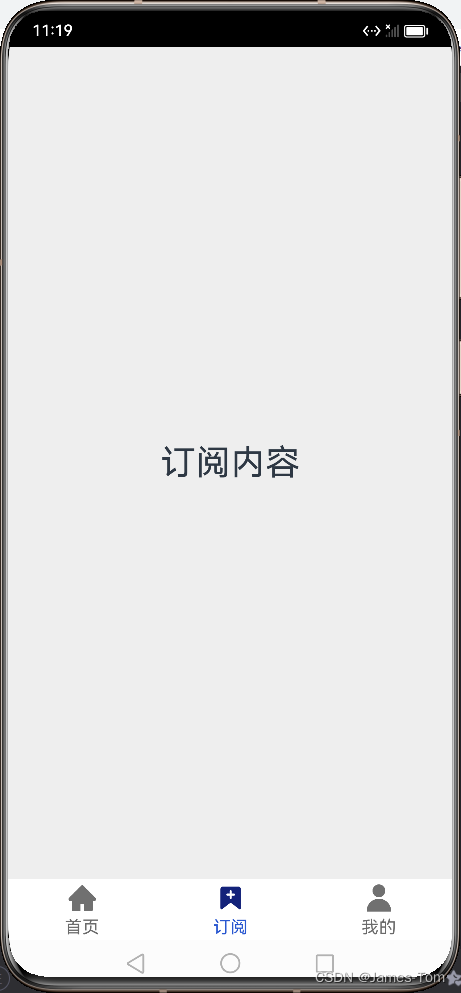
Text("订阅内容").fontSize(32)
}.width('100%').height('100%').justifyContent(FlexAlign.Center).backgroundColor("#eeeeee")
}.tabBar(this.tabSub)
TabContent() {
Column() {
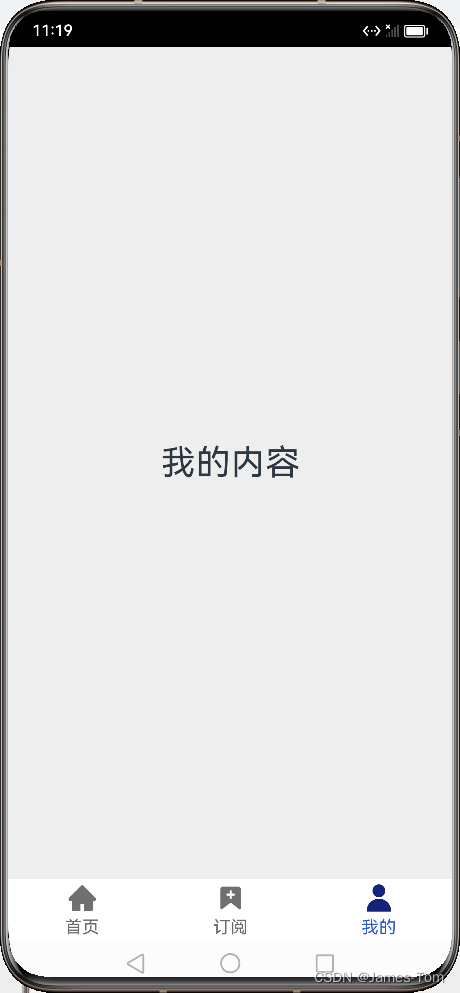
Text("我的内容").fontSize(32)
}.width('100%').height('100%').justifyContent(FlexAlign.Center).backgroundColor("#eeeeee")
}.tabBar(this.tabMe)
}.barPosition(BarPosition.End)
}.width('100%').height('100%')
}
}
自定义的News.ets实体类,内容如下:
import util from '@ohos.util';
//创建一个实体类
export class News {
  id: string = util.generateRandomUUID(true);
  title: string;
  abstract: string;
  icon: Resource;

  constructor(title: string, abstract: string, icon: Resource) {
    this.title = title;
    this.abstract = abstract;
    this.icon = icon;
  }
}
BarState.Auto表示按需显示滚动条;
Axis.Horizontal表示水平滚动列表。
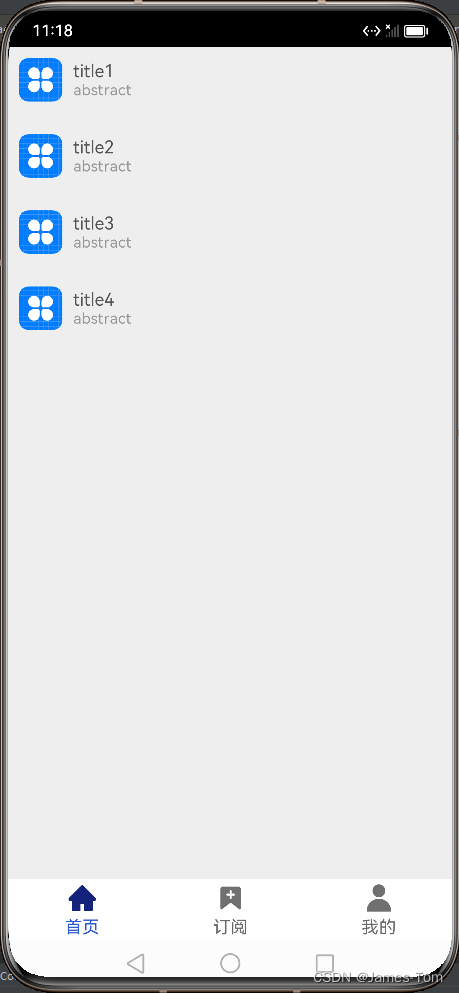
4、运行效果
最终执行的效果图如下:
后续继续完善这个测试项目
5、参考文档:
ArkTS UI文档:
https://developer.huawei.com/consumer/cn/doc/harmonyos-guides-V2/arkts-rendering-control-foreach-0000001524537153-V2
原创不易,求个关注。

微信公众号:一粒尘埃的漫旅
里面有很多想对大家说的话,就像和朋友聊聊天。
写代码,做设计,聊生活,聊工作,聊职场。
我见到的世界是什么样子的?
搜索关注我吧。
公众号与博客的内容不同。


 2720
2720

 被折叠的 条评论
为什么被折叠?
被折叠的 条评论
为什么被折叠?
 到【灌水乐园】发言


