


SpringMVC进阶
一,异步调用
1,接收异步请求参数
-
[外链图片转存失败,源站可能有防盗链机制,建议将图片保存下来直接上传(img-W067j28J-1595503697081)(C:\Users\HUANGHAI\AppData\Roaming\Typora\typora-user-images\1595331917074.png)]
-
名称:@RequestBody
-
类型:形参注解
-
位置:处理器类中的方法形参前方
-
作用:将异步提交数据组织成标准请求参数格式,并赋值给形参
-
@RequestMapping("/ajaxController") public String ajaxController(@RequestBody String message){ System.out.println(message); return "page.jsp"; } -
注解添加到pojo参数前方时,封装的异步提交数据按照pojo的属性格式进行关系映射
-
@RequestMapping("/ajaxPojoToController") public String ajaxPojoToController(@RequestBody User user){ System.out.println("controller pojo :"+user); return "page.jsp"; } -
注解添加到集合参数前方时,封装的异步提交数据按照集合的存储结果进行关系映射
-
@RequestMapping("/ajaxListToController")
public String ajaxListToController(@RequestBody List<User> userList){
System.out.println("controller list :"+userList);
return "page.jsp"; }
2,异步请求接收响应数据
-
名称:@ResponseBody
-
类型:方法注解,返回值注解
-
位置:处理器类中的方法前方
-
作用:将异步提交数据组织成标准请求参数格式,并复制给形参
-
@RequestMapping("/ajaxReturnString") @ResponseBody public String ajaxReturnString(){ System.out.println("controller return string ..."); return "page.jsp"; } -
方法返回值为pojo时,自动封装数据成json对象数据
-
@RequestMapping("/ajaxReturnJson") @ResponseBody public User ajaxReturnJson(){ System.out.println("controller return json pojo..."); User user = new User(); user.setName("Jockme"); user.setAge(40); return user; } -
方法返回值为List时,自动封装数据成json对象数组数据
-
@RequestMapping("/ajaxReturnJsonList")
public @ResponseBody List<User> ajaxReturnJsonList(){
User user = new User();
user.setName("tom");
user.setAge(3);
User user2 = new User();
user2.setName("Jerry");
user2.setAge(5);
List<User> userList = new ArrayList<User>();
userList.add(user);
userList.add(user2);
return userList;
}
3,跨域访问
- 协议
- 地址(ip)
- 端口
- 以上其中一个不同就视为跨域
-
谁导致的跨域问题: 浏览器,后端代码直接网络调用不会出现跨域
-
解决什么问题:多项目之间的相互调用会存在跨域问题
-
@CrossOrigin -
异步调用中接收异步请求参数和异步请求接收响应数据代码演示
-
spring-mvc.xml
-
<?xml version="1.0" encoding="UTF-8"?> <beans xmlns="http://www.springframework.org/schema/beans" xmlns:context="http://www.springframework.org/schema/context" xmlns:mvc="http://www.springframework.org/schema/mvc" xmlns:xsi="http://www.w3.org/2001/XMLSchema-instance" xsi:schemaLocation="http://www.springframework.org/schema/beans http://www.springframework.org/schema/beans/spring-beans.xsd http://www.springframework.org/schema/mvc http://www.springframework.org/schema/mvc/spring-mvc.xsd http://www.springframework.org/schema/context http://www.springframework.org/schema/context/spring-context.xsd"> <context:component-scan base-package="com.itheima"/> <mvc:resources mapping="/js/**" location="/js/"/> <mvc:annotation-driven/> </beans> -
<%@page pageEncoding="UTF-8" language="java" contentType="text/html;UTF-8" %> <a href="javascript:void(0);" id="testAjax">访问springmvc后台controller</a><br/> <a href="javascript:void(0);" id="testAjaxPojo">访问springmvc后台controller,传递Json格式POJO</a><br/> <a href="javascript:void(0);" id="testAjaxList">访问springmvc后台controller,传递Json格式List</a><br/> <a href="javascript:void(0);" id="testAjaxReturnString">访问springmvc后台controller,返回字符串数据</a><br/> <a href="javascript:void(0);" id="testAjaxReturnJson">访问springmvc后台controller,返回Json数据</a><br/> <a href="javascript:void(0);" id="testAjaxReturnJsonList">访问springmvc后台controller,返回Json数组数据</a><br/> <br/> <a href="javascript:void(0);" id="testCross">跨域访问</a><br/> <script type="text/javascript" src="${pageContext.request.contextPath}/js/jquery-3.3.1.min.js"></script> <script type="text/javascript"> $(function () { //为id="testAjax"的组件绑定点击事件 $("#testAjax").click(function(){ //发送异步调用 $.ajax({ //请求方式:POST请求 type:"POST", //请求的地址,不用加/,他会自动给你加 url:"ajaxController", //请求参数(也就是请求内容)也就是要传给后端的请求数据 data:'ajax message', //响应正文类型 dataType:"text", //请求正文的MIME类型 contentType:"application/text", }); }); //为id="testAjaxPojo"的组件绑定点击事件 $("#testAjaxPojo").click(function(){ $.ajax({ type:"POST", url:"ajaxPojoToController", data:'{"name":"Jock","age":39}', dataType:"text", contentType:"application/json", }); }); //为id="testAjaxList"的组件绑定点击事件 $("#testAjaxList").click(function(){ $.ajax({ type:"POST", url:"ajaxListToController", data:'[{"name":"Jock","age":39},{"name":"Jockme","age":40}]', dataType:"text", contentType:"application/json", }); }); //为id="testAjaxReturnString"的组件绑定点击事件 $("#testAjaxReturnString").click(function(){ //发送异步调用 $.ajax({ type:"POST", url:"ajaxReturnString", //回调函数 success:function(data){ //打印返回结果 alert(data); } }); }); //为id="testAjaxReturnJson"的组件绑定点击事件 $("#testAjaxReturnJson").click(function(){ //发送异步调用 $.ajax({ type:"POST", url:"ajaxReturnJson", //回调函数 success:function(data){ alert(data); alert(data['name']+" , "+data['age']); } }); }); //为id="testAjaxReturnJsonList"的组件绑定点击事件 $("#testAjaxReturnJsonList").click(function(){ //发送异步调用 $.ajax({ type:"POST", url:"ajaxReturnJsonList", //回调函数 success:function(data){ alert(data); alert(data.length); alert(data[0]["name"]); alert(data[1]["age"]); } }); }); //为id="testCross"的组件绑定点击事件 $("#testCross").click(function(){ //发送异步调用 $.ajax({ type:"POST", url:"http://www.jock.com/cross", //回调函数 success:function(data){ alert("跨域调用信息反馈:"+data['name']+" , "+data['age']); } }); }); }); </script> -
标准类是User
-
控制类是AjaxController
-
package com.itheima.controller;
import com.itheima.domain.User;
import org.springframework.stereotype.Controller;
import org.springframework.web.bind.annotation.CrossOrigin;
import org.springframework.web.bind.annotation.RequestBody;
import org.springframework.web.bind.annotation.RequestMapping;
import org.springframework.web.bind.annotation.ResponseBody;
import javax.servlet.http.HttpServletRequest;
import java.util.ArrayList;
import java.util.List;

@Controller
public class AjaxController {

//    @RequestMapping("/ajaxController")
//    public String ajaxController(){
//        System.out.println("ajax request is running...");
//        return "page.jsp";
//    }


    @RequestMapping("/ajaxController")
    //使用@RequestBody注解,可以将请求体内容封装到指定参数中
    public String ajaxController(@RequestBody String message){
        System.out.println("ajax request is running..."+message);
        return "page.jsp";
    }

    @RequestMapping("/ajaxPojoToController")
    //如果处理参数是POJO,且页面发送的请求数据格式与POJO中的属性对应,@RequestBody注解可以自动映射对应请求数据,封装到POJO中
    //注意:POJO中的属性如果请求数据中没有,属性值为null,POJO中没有的属性如果请求数据中有,不进行映射
    public String  ajaxPojoToController(@RequestBody User user){
        System.out.println("controller pojo :"+user);
        return "page.jsp";
    }

    @RequestMapping("/ajaxListToController")
    //如果处理参数是List集合且封装了POJO,且页面发送的数据是JSON格式的对象数组,数据将自动映射到集合参数中
    public String  ajaxListToController(@RequestBody List<User> userList){
        System.out.println("controller list :"+userList);
        return "page.jsp";
    }

    //使用注解@ResponseBody可以将返回的页面不进行解析,直接返回字符串,该注解可以添加到方法上方或返回值前面
    @RequestMapping("/ajaxReturnString")
    //@ResponseBody
    public @ResponseBody String ajaxReturnString(){
        System.out.println("controller return string ...");
        return "page.jsp";
    }


    @RequestMapping("/ajaxReturnJson")
    @ResponseBody
    //基于jackon技术,使用@ResponseBody注解可以将返回的POJO对象转成json格式数据
    public User ajaxReturnJson(){
        System.out.println("controller return json pojo...");
        User user = new User();
        user.setName("Jockme");
        user.setAge(39);
        return user;
    }

    @RequestMapping("/ajaxReturnJsonList")
    @ResponseBody
    //基于jackon技术,使用@ResponseBody注解可以将返回的保存POJO对象的集合转成json数组格式数据
    public List ajaxReturnJsonList(){
        System.out.println("controller return json list...");
        User user1 = new User();
        user1.setName("Tom");
        user1.setAge(3);

        User user2 = new User();
        user2.setName("Jerry");
        user2.setAge(5);

        ArrayList al = new ArrayList();
        al.add(user1);
        al.add(user2);

        return al;
    }

    @RequestMapping("/cross")
    @ResponseBody
    //使用@CrossOrigin开启跨域访问
    //标注在处理器方法上方表示该方法支持跨域访问
    //标注在处理器类上方表示该处理器类中的所有处理器方法均支持跨域访问
    @CrossOrigin
    public User cross(HttpServletRequest request){
        System.out.println("controller cross..."+request.getRequestURL());
        User user = new User();
        user.setName("Jockme");
        user.setAge(39);
        return user;
    }

}
二,拦截器
1,拦截器简介
-
[外链图片转存失败,源站可能有防盗链机制,建议将图片保存下来直接上传(img-NYdWPJ7u-1595503697096)(E:\每日讲课笔记\Spring\springMVCmd笔记\img2\1595379595083.png)]
-
[外链图片转存失败,源站可能有防盗链机制,建议将图片保存下来直接上传(img-vydsQP0w-1595503697101)(E:\每日讲课笔记\Spring\springMVCmd笔记\img2\1595379624173.png)]
-
拦截器与过滤器的区别
- 归属不同:Filter属于Servlet技术,Interceptor属于Springnvc技术。
- 拦截内容不同:Filter对所有访问进行增强,Interceptor仅针对springnvc的访问进行增强。
2,自定义拦截器开发过程
-
先配置拦截在何时生效(记得xml中放行login请求让系统中有token初始值,方便后面做安全校验)
-
<?xml version="1.0" encoding="UTF-8"?> <beans xmlns="http://www.springframework.org/schema/beans" xmlns:context="http://www.springframework.org/schema/context" xmlns:mvc="http://www.springframework.org/schema/mvc" xmlns:xsi="http://www.w3.org/2001/XMLSchema-instance" xsi:schemaLocation="http://www.springframework.org/schema/beans http://www.springframework.org/schema/beans/spring-beans.xsd http://www.springframework.org/schema/mvc http://www.springframework.org/schema/mvc/spring-mvc.xsd http://www.springframework.org/schema/context http://www.springframework.org/schema/context/spring-context.xsd"> <mvc:annotation-driven/> <context:component-scan base-package="com.itheima"/> <!--开启拦截器使用--> <mvc:interceptors> <!--开启具体的拦截器的使用,可以配置多个--> <mvc:interceptor> <!--设置拦截器的拦截路径,支持*通配--> <!--/** 表示拦截所有映射--> <!--/* 表示拦截所有/开头的映射--> <!--/user/* 表示拦截所有/user/开头的映射--> <!--/user/add* 表示拦截所有/user/开头,且具体映射名称以add开头的映射--> <!--/user/*All 表示拦截所有/user/开头,且具体映射名称以All结尾的映射--> <mvc:mapping path="/*"/> <mvc:mapping path="/**"/> <mvc:mapping path="/handleRun*"/> <!--设置拦截排除的路径,配置/**或/*,达到快速配置的目的--> <mvc:exclude-mapping path="/login"/> <!--指定具体的拦截器类--> <bean class="com.itheima.interceptor.MyInterceptor"/> </mvc:interceptor> <!--配置多个拦截器,配置顺序即为最终运行顺序--> <mvc:interceptor> <mvc:mapping path="/*"/> <bean class="com.itheima.interceptor.MyInterceptor2"/> </mvc:interceptor> <mvc:interceptor> <mvc:mapping path="/*"/> <bean class="com.itheima.interceptor.MyInterceptor3"/> </mvc:interceptor> <mvc:interceptor> <mvc:mapping path="/*"/> <bean class="com.itheima.interceptor.MyInterceptor4"/> </mvc:interceptor> </mvc:interceptors> </beans> -
自定义拦截器类(模拟了处理器运行之前带上token参数进行安全校验)
-
package com.itheima.interceptor; import org.springframework.web.servlet.HandlerInterceptor; import org.springframework.web.servlet.ModelAndView; import javax.servlet.http.HttpServletRequest; import javax.servlet.http.HttpServletResponse; //自定义拦截器需要实现HandleInterceptor接口 public class MyInterceptor implements HandlerInterceptor { //处理器运行之前执行 @Override //就是你控制器中自己写的handleRun方法 public boolean preHandle(HttpServletRequest request, HttpServletResponse response, Object handler) throws Exception { System.out.println("前置运行----a1"); //返回值为false将拦截原始处理器的运行 //如果配置多拦截器,返回值为false将终止当前拦截器后面配置的拦截器的运行 String token= request.getParameter("token");//记得地址栏敲请求时带上参数,不然token为null Object sys=request.getSession().getAttribute("token"); if (sys!=null&& sys.equals(token)){ return true; } return false;/*这里面可以做权限,或者是否登录,安全校验*/ } //处理器运行之后执行 @Override public void postHandle(HttpServletRequest request, HttpServletResponse response, Object handler, ModelAndView modelAndView) throws Exception { System.out.println("后置运行----b1"); request.getSession().setAttribute("token","123"); response.getWriter().println("123"); } //所有拦截器的后置执行全部结束后,执行该操作 @Override public void afterCompletion(HttpServletRequest request, HttpServletResponse response, Object handler, Exception ex) throws Exception { System.out.println("完成运行----c1"); } //三个方法的运行顺序为 preHandle -> postHandle -> afterCompletion //如果preHandle返回值为false,三个方法仅运行preHandle } -
控制器运行
-
package com.itheima.controller; import org.springframework.stereotype.Controller; import org.springframework.web.bind.annotation.RequestMapping; import org.springframework.web.bind.annotation.ResponseBody; import org.springframework.web.servlet.config.annotation.EnableWebMvc; import javax.servlet.http.HttpServletRequest; @Controller public class InterceptorController { @RequestMapping("/handleRun") public String handleRun() { System.out.println("业务处理器运行------------main"); return "page.jsp"; } @RequestMapping("/login") @ResponseBody public String login(HttpServletRequest request){ request.getSession().setAttribute("token","123"); System.out.println("yunxing"); return "123"; } } -
这里流程是先发送login请求后,session域中存储有token值,然后再次发送/handleRun?token=123,这样带着token参数去访问就可以进行比对,如果不对应就返回false,进行拦截,请求发送不到控制器类中的handRun请求(记得xml中放行login请求让系统中有token初始值)
-
请求必须携带token(随机字符串)
-
token是每次后端响应给用户
- 实现步骤
- 后端存储token在session
- 前端传token在request的parameter中
-
目的: 请求任何的业务方法必须携带token
-
login:不能够拦截放行,然后在session中存入token, 返回token给前端
- 存token到session
- token响应给前端
-
后续所有业务方法必须写带token
3,拦截器配置与方法参数
-
[外链图片转存失败,源站可能有防盗链机制,建议将图片保存下来直接上传(img-v0dk1CHJ-1595503697109)(E:\每日讲课笔记\Spring\springMVCmd笔记\img2\1595380705397.png)]
-
[外链图片转存失败,源站可能有防盗链机制,建议将图片保存下来直接上传(img-WMBPe1NB-1595503697110)(E:\每日讲课笔记\Spring\springMVCmd笔记\img2\1595380766733.png)]
-
[外链图片转存失败,源站可能有防盗链机制,建议将图片保存下来直接上传(img-xnTAiG2k-1595503697113)(E:\每日讲课笔记\Spring\springMVCmd笔记\img2\1595380844692.png)]
-
[外链图片转存失败,源站可能有防盗链机制,建议将图片保存下来直接上传(img-TW9WqhFS-1595503697114)(E:\每日讲课笔记\Spring\springMVCmd笔记\img2\1595380869756.png)]
-
[外链图片转存失败,源站可能有防盗链机制,建议将图片保存下来直接上传(img-xWBpgnSe-1595503697115)(E:\每日讲课笔记\Spring\springMVCmd笔记\img2\1595380896073.png)]
4,多拦截器配置
-
[外链图片转存失败,源站可能有防盗链机制,建议将图片保存下来直接上传(img-cYcvNKE3-1595503697117)(E:\每日讲课笔记\Spring\springMVCmd笔记\img2\1595380930157.png)]
-
责任链模式是一种行为模式
三,异常处理
1,异常处理器
- 作用:处理全局异常,不给用户返回没必要的信息,根据异常的种类不同,进行分类处理,返回不同的信息
2,注解开发异常处理器
-
名称:@ControllerAdvice
-
类型:类注解
-
位置:异常处理器类上方
-
作用:设置当前类为异常处理类
-
@Component @ControllerAdvice public class ExceptionAdvice { } -
名称:@ExceptionHandler
-
类型:方法注解
-
位置:异常处理类中针对指定异常进行处理的方法上方
-
@ExceptionHandler(Exception.class) @ResponseBody public String doOtherException(Exception ex){ return " "; } -
处理器方法可以设定多个
-
注解处理器比非注解处理器拦截还要早,可以拦截到参数类型转换异常
3,异常处理解决方案
-
项目异常处理方法
- 业务异常:
- 规范的用户行为产生的异常
- 不规范的用户行为产生的异常
- 处理:发送对应消息传递给用户,提醒规范操作
- 系统异常:
- 项目运行过程中可以预计且无法避免的异常
- 操作:发送固定消息传递给用户,发送特定消息给运维人员,提醒维护,记录日志
- 其他异常:
- 编程人员未预期到的异常
- 处理:发送特定消息给编程人员,提醒维护,记录日志
- 业务异常:
-
代码演示:
-
页面时错误跳转页面和ajax异步请求
-
<%@page pageEncoding="UTF-8" language="java" contentType="text/html;UTF-8" %> <a href="javascript:void(0);" id="testException">访问springmvc后台controller,传递Json格式POJO</a><br/> <script type="text/javascript" src="${pageContext.request.contextPath}/js/jquery-3.3.1.min.js"></script> <script type="text/javascript"> $(function () { $("#testException").click(function(){ $.ajax({ contentType:"application/json", type:"POST", url:"save", /*通过修改data中的参数,激活自定义异常的出现*/ // name长度低于8位出现业务异常 // age小于0出现业务异常 // age大于100出现系统异常 // age类型如果无法匹配将转入其他类别异常 data:'{"name":"Jock","age":"111"}', dataType:"text", //回调函数 success:function(data){ alert(data); } }); }); }); </script> -
<%--异常消息展示页面--%> <%@page pageEncoding="UTF-8" language="java" contentType="text/html;UTF-8" %> ${msg} -
定义控制器类,接收请求
-
package com.itheima.controller; import com.itheima.domain.User; import com.itheima.exception.BusinessException; import com.itheima.exception.SystemException; import org.springframework.stereotype.Controller; import org.springframework.web.bind.annotation.RequestBody; import org.springframework.web.bind.annotation.RequestMapping; import org.springframework.web.bind.annotation.ResponseBody; import java.util.ArrayList; import java.util.List; @Controller public class UserController { @RequestMapping("/save") @ResponseBody public List<User> save(@RequestBody User user) { System.out.println("user controller save is running ..."); //对用户的非法操作进行判定,就是把这些出现的异常包装成自定义异常对象到具体分类处理,便于统一管理 if(user.getName().trim().length() < 8){ throw new BusinessException("对不起,用户名长度不满足要求,请重新输入!"); } if(user.getAge() < 0){ throw new BusinessException("对不起,年龄必须是0到100之间的数字!"); } if(user.getAge() > 100){ throw new SystemException("服务器连接失败,请尽快检查处理!"); } User u1 = new User(); u1.setName("Tom"); u1.setAge(3); User u2 = new User(); u2.setName("Jerry"); u2.setAge(5); ArrayList<User> al = new ArrayList<User>(); al.add(u1); al.add(u2); return al; } } -
处理抛出的不同异常类(错误页面显示{msg}消息)
-
package com.itheima.exception; import org.springframework.stereotype.Component; import org.springframework.ui.Model; import org.springframework.web.bind.annotation.ControllerAdvice; import org.springframework.web.bind.annotation.ExceptionHandler; import org.springframework.web.bind.annotation.ResponseBody; //这个是返回页面,前端处理不了,所以建议用ExceptionAdvice这个类这种返回json数据。 //@Component //@ControllerAdvice public class ProjectExceptionAdvice { @ExceptionHandler(BusinessException.class) public String doBusinessException(Exception ex, Model m){ //使用参数Model将要保存的数据传递到页面上,功能等同于ModelAndView //业务异常出现的消息要发送给用户查看 m.addAttribute("msg",ex.getMessage()); return "error.jsp"; } @ExceptionHandler(SystemException.class) public String doSystemException(Exception ex, Model m){ //系统异常出现的消息不要发送给用户查看,发送统一的信息给用户看 m.addAttribute("msg","服务器出现问题,请联系管理员!"); //实际的问题现象应该传递给redis服务器,运维人员通过后台系统查看 //实际的问题显现更应该传递给redis服务器,运维人员通过后台系统查看 return "error.jsp"; } @ExceptionHandler(Exception.class) public String doException(Exception ex, Model m){ m.addAttribute("msg",ex.getMessage()); //将ex对象保存起来 return "error.jsp"; } } -
第二种方案
-
控制器抛出不同种类异常,然后自定义异常处理类分别处理各类异常,然后返回给前端数据
-
domain中定义GeneralResult类
-
package com.itheima.domain; public class GeneralResult<T> { private String msg; private T data; private Boolean flag; private Integer code; get,set方法省略 } -
异常抛出类抛出异常
-
package com.itheima.controller; import com.itheima.domain.User; import com.itheima.exception.BusinessException; import com.itheima.exception.SystemException; import org.springframework.stereotype.Controller; import org.springframework.web.bind.annotation.RequestBody; import org.springframework.web.bind.annotation.RequestMapping; import org.springframework.web.bind.annotation.ResponseBody; import java.util.ArrayList; import java.util.List; @Controller public class UserController { @RequestMapping("/save") @ResponseBody public List<User> save(@RequestBody User user) { System.out.println("user controller save is running ..."); //模拟业务层发起调用产生了异常 // int i = 1/0; // String str = null; // str.length(); //对用户的非法操作进行判定,就是把这些出现的异常包装成自定义异常对象到具体分类处理,便于统一管理 if(user.getName().trim().length() < 8){ throw new BusinessException("对不起,用户名长度不满足要求,请重新输入!"); } if(user.getAge() < 0){ throw new BusinessException("对不起,年龄必须是0到100之间的数字!"); } if(user.getAge() > 100){ throw new SystemException("服务器连接失败,请尽快检查处理!"); } User u1 = new User(); u1.setName("Tom"); u1.setAge(3); User u2 = new User(); u2.setName("Jerry"); u2.setAge(5); ArrayList<User> al = new ArrayList<User>(); al.add(u1); al.add(u2); return al; } } -
自定义异常处理类
-
package com.itheima.exception;

import com.itheima.domain.GeneralResult;
import org.springframework.stereotype.Component;
import org.springframework.web.bind.annotation.ControllerAdvice;
import org.springframework.web.bind.annotation.ExceptionHandler;
import org.springframework.web.bind.annotation.ResponseBody;

@Component
//使用注解开发异常处理器,以后都使用注解方式来处理异常,因为他的加载时机比自定义异常处理类那个早点
//声明该类是一个Controller的通知类,声明后该类就会被加载成异常处理器
@ControllerAdvice
public class ExceptionAdvice {

    //类中定义的方法携带@ExceptionHandler注解的会被作为异常处理器,后面添加实际处理的异常类型
    @ExceptionHandler(Exception.class)
    @ResponseBody
    public GeneralResult doNullException(Exception ex){
        GeneralResult result=new GeneralResult();
        result.setFlag(false);
        result.setMsg(ex.getMessage());
        result.setCode(5001);
        return result; //这样就可以返回给前端具体的json数据,前端根据result中的具体数据就可以做对应的处理
    }

    @ExceptionHandler(ArithmeticException.class)
    @ResponseBody
    public String doArithmeticException(Exception ex){
        return "ArithmeticException";
    }

    @ExceptionHandler(Exception.class)
    @ResponseBody
    public String doException(Exception ex){
        return "all";
    }

}
四,实用技术
1,文件上传
-
[外链图片转存失败,源站可能有防盗链机制,建议将图片保存下来直接上传(img-23ACtXJJ-1595503697119)(E:\每日讲课笔记\Spring\springMVCmd笔记\img2\1595402252528.png)]
-
MultipartResolver接口
-
MultipartResolver接口定义了文件上传过程中的相关操作,并对通用性操作进行了封装
-
MultipartResolver接口底层实现类CommonMultipartResovler
-
CommonMultipartResovler并没有自主实现文件上传下载对应的功能,而是调用了apache的文件上传下载组件
<dependency>
    <groupId>commons-fileupload</groupId>
    <artifactId>commons-fileupload</artifactId>
    <version>1.4</version>
</dependency>
-
-
-
文件上传下载实现代码演示
-
页面表单
-
<%@page pageEncoding="UTF-8" language="java" contentType="text/html;UTF-8" %> <form action="/fileupload" method="post" enctype="multipart/form-data"> <%--文件上传表单的name属性值一定要与controller处理器中方法的参数对应,否则无法实现文件上传--%> 上传LOGO:<input type="file" name="file"/><br/> 上传照片:<input type="file" name="file1"/><br/> 上传任意文件:<input type="file" name="file2"/><br/> <input type="submit" value="上传"/> </form> -
spring-mvc.xml配置
-
<?xml version="1.0" encoding="UTF-8"?> <beans xmlns="http://www.springframework.org/schema/beans" xmlns:context="http://www.springframework.org/schema/context" xmlns:mvc="http://www.springframework.org/schema/mvc" xmlns:xsi="http://www.w3.org/2001/XMLSchema-instance" xsi:schemaLocation="http://www.springframework.org/schema/beans http://www.springframework.org/schema/beans/spring-beans.xsd http://www.springframework.org/schema/mvc http://www.springframework.org/schema/mvc/spring-mvc.xsd http://www.springframework.org/schema/context http://www.springframework.org/schema/context/spring-context.xsd"> <mvc:annotation-driven/> <context:component-scan base-package="com.itheima"/> <!--配置文件上传处理器--> <bean id="multipartResolver" class="org.springframework.web.multipart.commons.CommonsMultipartResolver"> <property name="maxUploadSize" value="1024000000"/> </bean> </beans> -
控制器Controller类中
-
package com.itheima.controller;
import org.springframework.stereotype.Controller;
import org.springframework.web.bind.annotation.RequestMapping;
import org.springframework.web.multipart.MultipartFile;
import org.springframework.web.multipart.MultipartResolver;
import javax.servlet.http.HttpServletRequest;
import java.io.File;
import java.io.IOException;

@Controller
public class FileUploadController {

    @RequestMapping(value = "/fileupload")
    //参数中定义MultipartFile参数,用于接收页面提交的type=file类型的表单,要求表单名称与参数名相同
    public String fileupload(MultipartFile file,MultipartFile file1,MultipartFile file2, HttpServletRequest request) throws IOException {
        System.out.println("file upload is running ..."+file);
//        MultipartFile参数中封装了上传的文件的相关信息
//        System.out.println(file.getSize());
//        System.out.println(file.getBytes().length);
//        System.out.println(file.getContentType());
//        System.out.println(file.getName());
//        System.out.println(file.getOriginalFilename());
//        System.out.println(file.isEmpty());
        //首先判断是否是空文件,也就是存储空间占用为0的文件
        if(!file.isEmpty()){
            //如果大小在范围要求内正常处理,否则抛出自定义异常告知用户(未实现)
            //获取原始上传的文件名,可以作为当前文件的真实名称保存到数据库中备用
            String fileName = file.getOriginalFilename();

            //设置保存的路径(通常设置在项目创建的专门的images包中)
            String realPath = request.getServletContext().getRealPath("/images");
            //保存文件的方法,指定保存的位置和文件名即可,通常文件名使用随机生成策略产生,避免文件名冲突问题
            file.transferTo(new File(realPath,file.getOriginalFilename()));
        }


        //测试一次性上传多个文件
        if(!file1.isEmpty()){
            String fileName = file1.getOriginalFilename();
            //可以根据需要,对不同种类的文件做不同的存储路径的区分,修改对应的保存位置即可
            String realPath = request.getServletContext().getRealPath("/images");
            file1.transferTo(new File(realPath,file1.getOriginalFilename()));
        }
        if(!file2.isEmpty()){
            String fileName = file2.getOriginalFilename();
            String realPath = request.getServletContext().getRealPath("/images");
            file2.transferTo(new File(realPath,file2.getOriginalFilename()));
        }
        return "page.jsp";
    }
}
2,文件上传注意事项
-
[外链图片转存失败,源站可能有防盗链机制,建议将图片保存下来直接上传(img-TbrC8q9u-1595503697122)(E:\每日讲课笔记\Spring\springMVCmd笔记\img2\1595403273526.png)]
-
[外链图片转存失败,源站可能有防盗链机制,建议将图片保存下来直接上传(img-o5cJDMtg-1595503697123)(E:\每日讲课笔记\Spring\springMVCmd笔记\img2\1595403335527.png)]
3,Restful开发入门
-
Rest(REpresentstional State Transfer)一种网络资源的访问风格,定义了网络资源的访问方式
- 传统风格访问路径
- http:localhost/user/get?id=1
- http://localhost/deleteUser?id=1
- Rest风格访问路径
- http://localhost/user/1
- 传统风格访问路径
-
Restful是按照Rest风格访问网络资源
-
Restful行为约定方式
-
⚫ GET (查询) http://localhost/user/1 GET
⚫ POST (保存) http://localhost/user POST
⚫ PUT (更新) http://localhost/user PUT
⚫ DELETE (删除) http://localhost/user DELETE
-
4,Restful风格配置
5,postman工具安装与使用
-
控制器类中
-
package com.itheima.controller;
import org.springframework.stereotype.Controller;
import org.springframework.web.bind.annotation.*;

//@Controller
//@ResponseBody
//设置rest风格的控制器
@RestController
//设置公共访问路径,配合下方访问路径使用
@RequestMapping("/user/")
public class UserController {

    //rest风格访问路径完整书写方式
    @RequestMapping("/user/{id}")
    //使用@PathVariable注解获取路径上配置的具名变量,该配置可以使用多次
    public String restLocation(@PathVariable Integer id){
        System.out.println("restful is running ....");
        return "success.jsp";
    }

    //rest风格访问路径简化书写方式,配合类注解@RequestMapping使用
    @RequestMapping("{id}")
    public String restLocation2(@PathVariable Integer id){
        System.out.println("restful is running ....get:"+id);
        return "success.jsp";
    }

    //接收GET请求配置方式
    //@RequestMapping(value = "{id}",method = RequestMethod.GET)
    //接收GET请求简化配置方式
    @GetMapping("{id}")
    public String get(@PathVariable Integer id){
        System.out.println("restful is running ....get:"+id);
        return "success.jsp";
    }

    //接收POST请求配置方式
   // @RequestMapping(value = "{id}",method = RequestMethod.POST)
    //接收POST请求简化配置方式
    @PostMapping("{id}")
    public String post(@PathVariable Integer id){
        System.out.println("restful is running ....post:"+id);
        return "success.jsp";
    }


    //接收PUT请求简化配置方式
   // @RequestMapping(value = "{id}",method = RequestMethod.PUT)
    //接收PUT请求简化配置方式
    @PutMapping("{id}")
    public String put(@PathVariable Integer id){
        System.out.println("restful is running ....put:"+id);
        return "success.jsp";
    }

    //接收DELETE请求简化配置方式
   // @RequestMapping(value = "{id}",method = RequestMethod.DELETE)
    //接收DELETE请求简化配置方式
    @DeleteMapping("{id}")
    public String delete(@PathVariable Integer id){
        System.out.println("restful is running ....delete:"+id);
        return "success.jsp";
    }


}
return “success.jsp”;
}//接收POST请求配置方式 // @RequestMapping(value = "{id}",method = RequestMethod.POST) //接收POST请求简化配置方式 @PostMapping("{id}") public String post(@PathVariable Integer id){ System.out.println("restful is running ....post:"+id); return "success.jsp"; } //接收PUT请求简化配置方式 // @RequestMapping(value = "{id}",method = RequestMethod.PUT) //接收PUT请求简化配置方式 @PutMapping("{id}") public String put(@PathVariable Integer id){ System.out.println("restful is running ....put:"+id); return "success.jsp"; } //接收DELETE请求简化配置方式 // @RequestMapping(value = "{id}",method = RequestMethod.DELETE) //接收DELETE请求简化配置方式 @DeleteMapping("{id}") public String delete(@PathVariable Integer id){ System.out.println("restful is running ....delete:"+id); return "success.jsp"; }}
- postman中发送请求,然后控制器这里就可以接收到请求作出相应的响应。 - 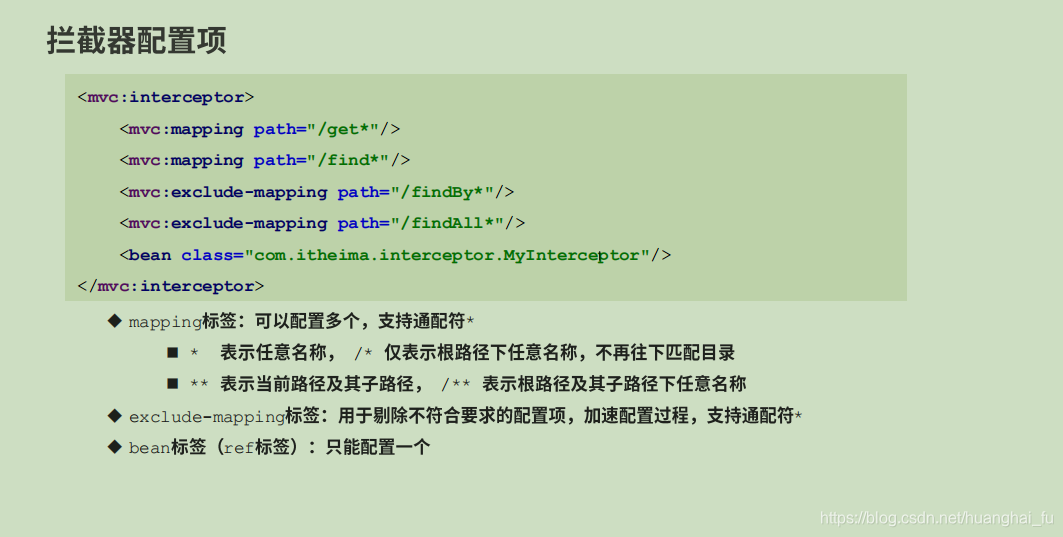 -


 365
365


 被折叠的 条评论
为什么被折叠?
被折叠的 条评论
为什么被折叠?
 到【灌水乐园】发言


