


<script type="text/javascript"> </script> <script type="text/javascript"> </script> <script type="text/javascript"> </script> <script src="http://pagead2.googlesyndication.com/pagead/show_ads.js" type="text/javascript"></script>
还记得上一篇中的FoodList么?我们简单的用了一个UILabel把所有的食物列举出来,不得不说,这太丑陋了。
iPhone为我们提供了一个强有力的控件,来帮助我们显示数据,就是TableView!
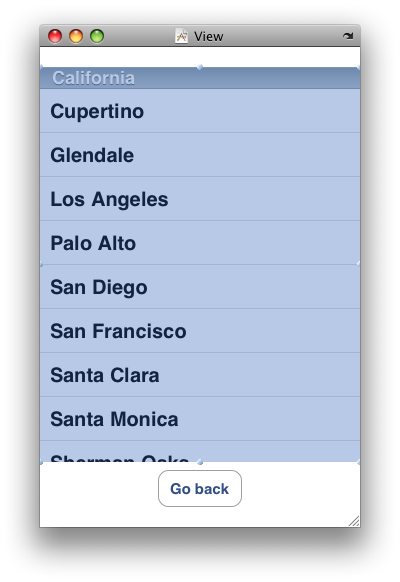
下面这个gmail的界面就是使用TableView制作的。

好了,言归正传,我们来看看如何在FoodList这个程序中使用TableView来显示所有的食物列表。
首先,我们来复习一下Protocol。所谓的Protocol就是接口,类似于Java中的Interface或者C++ 中的纯虚类。如果我们自己定义的类声明遵循某个Protocol的话,那么就意味着要去实现这个Protocol中的方法。比如,在Objective-C中,常常看到这样的类声明:
@interface class1 : baseClass <Protocol1, Protocol2> {
}
这就是说,Class1声明遵循两个Protocol,所以在它的实现中,就必须实现Protocol1和Protocol2中的相应的方法。
其次,再来复习一下delegate的概念。在“我们的第一个iPhone程序 ”中,我曾经提到过delegate的概念。下面再来简要的介绍一下:假如我们有两个类,A和B。B声明自己是A的delegate(代表),那么就意味着B要实现一些A中的方法,使得A在工作的时候,当它(A)需要调用某些方法的时候,可以去询问它的代言人─B。
这种模式在iPhone程序设计中非常的常见。继续用上面的例子做比方:往往A类都是iPhone提供的SDK,它隐藏了很多的实现细节,可是为了给程序员提供足够的灵活性,A又提供了一些接口方法,程序员通过实现这些接口方法,可以控制A类的某些行为。而实现这些接口方法往往都是通过delegate来完成的。一般来说,都是声明一个类B,使它成为A的delegate,然后在B中实现某些接口方法。这样,在A工作的时候,它就会去调用B中的对应的函数,来完成程序员指定的任务。
我们再看一个具体的例子:- (void)applicationDidFinishLaunching:(UIApplication *)application {}
上面这个函数是UIApplicationDelegate 中的方法。每当我们创建一个自己的工程的时候,都会在ProjectName AppDelegate(注:ProjectName就是我们给工程起的名字)这个类里面看到这个方法。实际上,ProjectNameAppDelegate就是UIApplication的一个delegate;当UIApplication完成装载资源的任务后,它就会去调用它的delegate─ProjectNameAppDelegate─中的这个函数。
<script type="text/javascript"> </script> <script src="http://pagead2.googlesyndication.com/pagead/show_ads.js" type="text/javascript"></script>
好了,在熟悉完上面的两个概念之后,我们就可以开始编码了。我们在上次程序的基础上进行修改。这里,我们仅仅需要把原来用UILabel展示的数据变成用UITableView来展示,所以在代码方面需要做修改的,就仅仅是FoodListController这个类。
在FoodListController.h中:
#import <UIKit/UIKit.h>
@interface FoodListController : UIViewController <UITableViewDelegate, UITableViewDataSource> {
// IBOutlet UILabel * label;
IBOutlet UITableView * table;
NSMutableArray * list;
}
//@property (nonatomic, retain) IBOutlet UILabel * label;
@property (nonatomic, retain) IBOutlet UITableView * table;
@property (nonatomic, retain) NSMutableArray * list;
- (IBAction) switchToWelcome;
@end
在这里,新声明了一个UITableView的对象和一个NSMutableArray对象。UITableView是要和Table View控件对应起来的,而NSMutableArray是存放被显示数据的地方(在这里就是存放我们的Food List)。
NSMutableArray可以理解为C++ 中的vector,可以动态的加入元素、删除元素等。
同时,我们将FoodListController这个类声明为遵循UITableViewDelegate和UITableViewDataSource这两个协议。其中,UITableViewDelegate是用来控制Table View的显示以及与用户之间的交互,而UITableViewDataSource则为Table View提供了后台的数据。
FoodListController这个类,就变成了UITableView的Delegate类。
在FoodListController.m中:
@implementation FoodListController
//@synthesize label;
@synthesize table;
@synthesize list;
... ...
- (void)viewDidLoad {
list = [[NSMutableArray alloc] init];
[list addObject:@"beef"];
[list addObject:@"pork"];
[list addObject:@"fish"];
[list addObject:@"tomato"];
[list addObject:@"salad"];
// NSString * list = [[NSString alloc] initWithFormat:@"beef/npork/nfish/ntomato/npotato/nsalad/n"];
// label.text = list;
// [list release];
[super viewDidLoad];
}
... ...
- (void)dealloc {
// [label release];
[list release];
[super dealloc];
}
- (NSInteger) numberOfSectionsInTableView : (UITableView*)tableView {
return 1;
}
- (NSInteger) tableView: (UITableView*)tableView numberOfRowsInSection: (NSInteger)section {
return [list count];
}
- (NSString*) tableView: (UITableView*)tableView titleForHeaderInSection: (NSInteger)section {
return @"Food List";
}
- (UITableViewCell*) tableView: (UITableView*)tableView cellForRowAtIndexPath: (NSIndexPath*)indexPath {
// NSUInteger section = [indexPath section];
NSUInteger row = [indexPath row];
static NSString * identifier = @"identifier";
UITableViewCell * cell = [tableView dequeueReusableCellWithIdentifier:identifier];
if( cell == nil )
cell = [[[UITableViewCell alloc] initWithFrame:CGRectZero reuseIdentifier: identifier] autorelease];
cell.text = [list objectAtIndex:row];
return cell;
}
在viewDidLoad中,我们初始化了list的内容,用于Table的显示。
然后下面的4个方法:numberOfSectionsInTableView,tableView: numberOfRowsInSection,tableView: titleForHeaderInSection,tableView: cellForRowAtIndexPath,就是我们实现的delegate的方法。iPhone程序在现实Table View的时候,会在恰当的时候调用这几个方法。具体怎么调用我们不需要关系(这是被隐藏起来的实现细节),我们作为程序员只需要在delegate中实现这些方法,完成我们所需要的功能。下面一一来解释:
1)numberOfSectionsInTableView:这个方法的参数是UITableView*,也就是说,我们允许在一个View中有若干个Table View,可以为每个Table View分别设定section的数量。那么什么是section呢?参见下图。下图的Table View中一共有2个section。
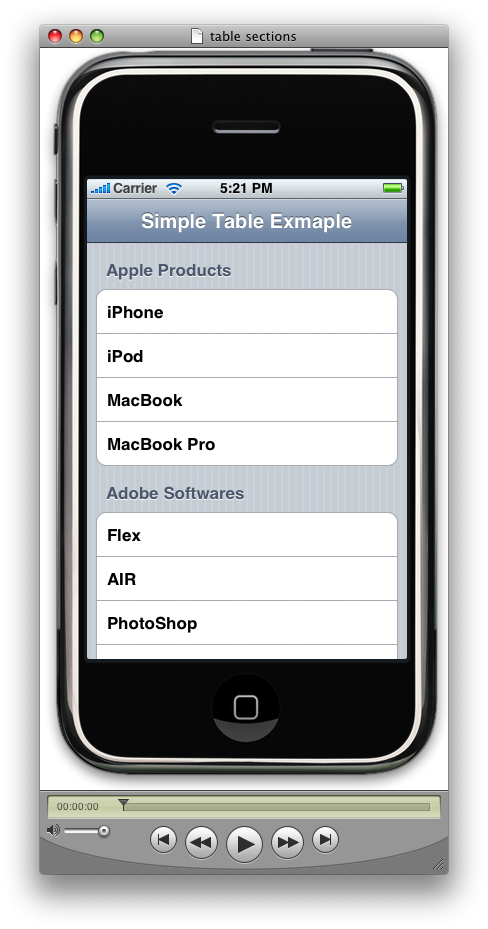
这里,我们只需要一个section,所以函数直接返回1。
2)tableView: numberOfRowsInSection:这里有两个参数,第一个是UITableView*,第二个是section的index。也就是说它可以指定某个table view中的某个section的行数。这里,由于我们只有一个table view,并且在这个table view里面只有一个section,所以直接返回food list的长度。
3)tableView: titleForHeaderInSection:这里有两个参数,第一个是UITableView*,第二个是section的index。也就是说它可以指定某个table view中的某个section的标题。这里我们直接返回"Food List"。
4)tableView: cellForRowAtIndexPath:这个函数是用来返回Table View中每一行(每一个cell)的内容。它有两个参数,第一个是UITableView*,第二个是IndexPath*。IndexPath包含了该行所在的section的序号和它的行序号。我们可以通过[indexPath section]和[indexPath row]就可以得到该单元所在的section序号和行序号。
因为每一行唯一的区别就是显示的文本不同,所以为了节约资源,iPhone允许我们重用UITableViewCell的资源。
首先,使用[tableView dequeueReusableCellWithIdentifier: identifier] 来查看一下UITableViewCell是否已经存在了。如果还没有存在,cell == nil ,那么我们需要构造一个;如果已经存在了,那么我们需要做的就是根据它的行号,设置所需要显示的文本内容。
好了,到这里,我们就完成了编码的工作。下面我们双击FoodListView.xib,来修改这里的内容。原来,我们在这里放置了一个UILabel的控件,现在,我们将它替换成UITableView。如下图所示:
接下来,我们要将UITableView的delegate和data source都指定为File's Owner。如下图所示

这样,程序在运行时,就会知道要去FoodListController中寻找接口函数了。
最后,再将UITableView * table和控件联系起来。
<script type="text/javascript"> </script> <script src="http://pagead2.googlesyndication.com/pagead/show_ads.js" type="text/javascript"></script>
好了!编译运行吧!你应该能看到:
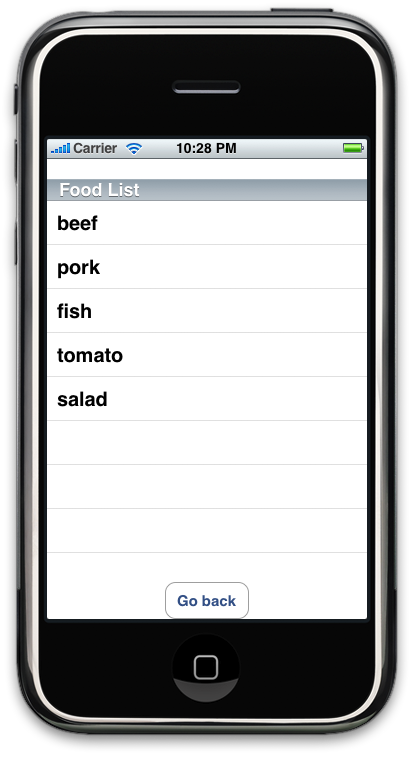
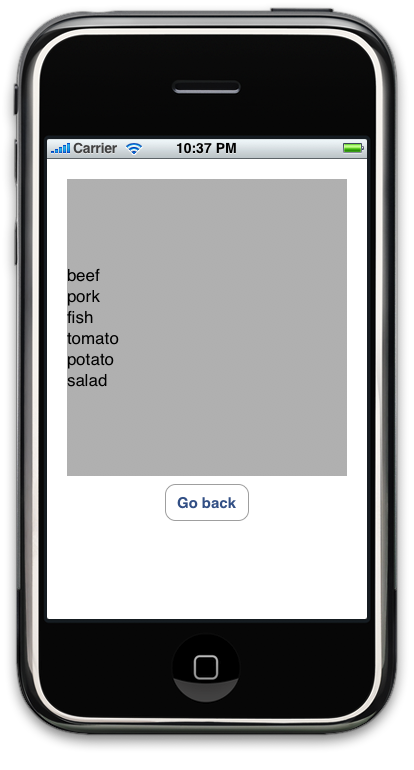
怎么样,这个效果比之前我们看到的UILabel要好很多吧:)
之后,我们还会看到如何和UITableView进行一些交互,如何实现search的功能等等。


 190
190

 被折叠的 条评论
为什么被折叠?
被折叠的 条评论
为什么被折叠?
 到【灌水乐园】发言


