


这篇博客小编介绍Hibernate的经典内容:对象关系映射。主要介绍映射的基本概念,映射的分类,映射文件。
概念
   ORM(Object Relational Mapping),即对象关系映射。
   它的作用就是在关系型数据库和对象之间做了一个映射。从对象(Object)映射到关系(Relation),再从关系映射到对象。相信很多人跟小编一个毛病,看到概念就头疼,下面小编画了一张图加深理解。
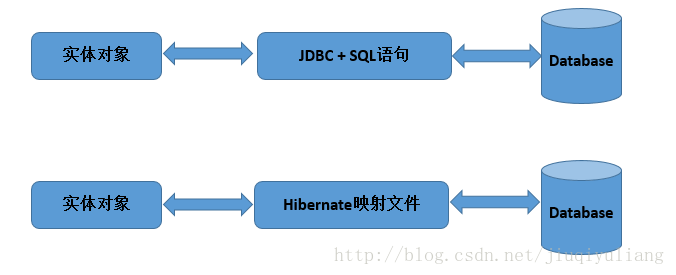
这张图特别简单:原来,没有Hibernate时,我们需要通过JDBC+手动写SQL语句来操作数据库,现在,有了Hibernate,它将JDBC+SQL进行了高度封装,我们不需要再去和复杂SQL打交道,只要像操作对象一样操作数据库就可以了。
ORM的实现思想就是将数据库中表的数据映射成对象,Hibernate可以使我们采用对象化的思维操作关系型数据库。
映射文件
Hibernate在实现ORM功能的时候主要用到的文件有:
1、 映射类(*.Java):它是描述数据库表的结构,表中的字段在类中被描述成属性,将来就可以实现把表中的记录映射成为该类的对象了。
2、映射文件(*.hbm.xml):它是指定数据库表和映射类之间的关系,包括映射类和数据库表的对应关系、表字段和类属性类型的对应关系以及表字段和类属性名称的对应关系等。

3、 hibernate核心配置文件(*.properties/*.cfg.xml):它指定hibernate的一些核心配置,包含与数据库连接时需要的连接信息,比如连接哪种数据库、登录数据库的用户名、登录密码以及连接字符串等。映射文件的地址信息也放在这里。
分类
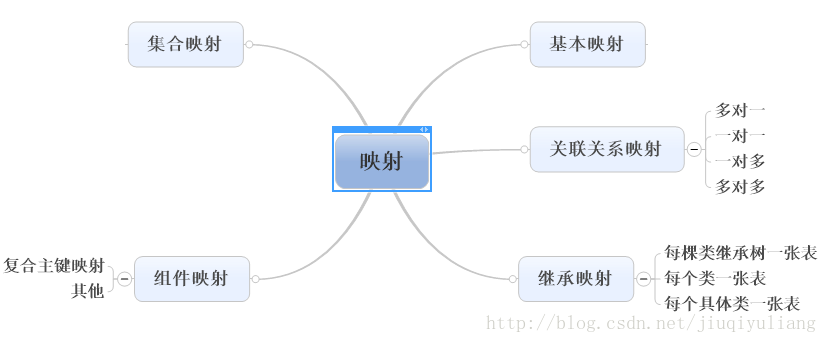
上面的内容看上去挺多,其实特别少,基本映射很简单,我们主要学习关联关系映射,其他几种映射一般不会用,只需要了解即可,用的时候看一下相关资料会做就好。
基本映射
上篇博文我们已经实现了一个基本映射,是使用XML方式配置映射,如下所示:
<span style="font-size:12px;"><?xml version="1.0"?>
<!DOCTYPE hibernate-mapping PUBLIC
    "-//Hibernate/Hibernate Mapping DTD 3.0//EN"
    "http://hibernate.sourceforge.net/hibernate-mapping-3.0.dtd">
<hibernate-mapping>
    <class name="com.liang.hibernate.User" >
        <id name="id">
            <!-- 算法的核心思想是结合机器的网卡、当地时间、一个随机数来生成GUID -->
            <generator class="uuid"></generator>
        </id>
        <property name="name"></property>
        <property name="password"></property>
        <property name="createTime" type="date"></property>
        <property name="expireTime" type="date"></property>
    </class>
</hibernate-mapping></span>
除了XML方式配置映射外,还可以通过给类文件添加注解的方式配置映射,在上篇博文的基础之上,我们稍加修改。
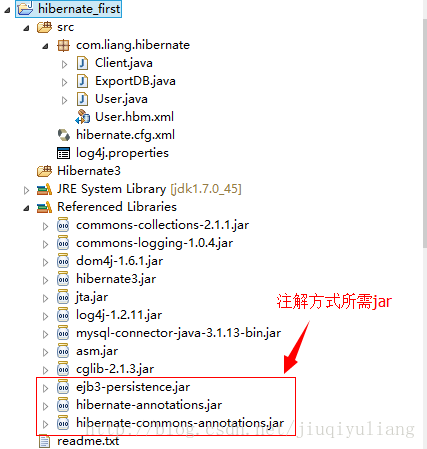
1、加入hibernate annotion支持包
*hibernate-annotations.jar
*hibernate-commons-annotations.jar
*ejb3-persistence.jar
2、建立实体类User,采用注解完成映射
package com.liang.hibernate;

import java.util.Date;

import javax.persistence.Column;
import javax.persistence.Entity;
import javax.persistence.GeneratedValue;
import javax.persistence.GenerationType;
import javax.persistence.Id;
import javax.persistence.Temporal;
import javax.persistence.TemporalType;

@Entity //不写Table默认为user,@Table(name="t_user")
public class User {

    @Id //主键
    @GeneratedValue(strategy=GenerationType.AUTO)//采用数据库自增方式生成主键
    //JPA提供的四种标准用法为TABLE,SEQUENCE,IDENTITY,AUTO.
    //TABLE:使用一个特定的数据库表格来保存主键。
    //SEQUENCE:根据底层数据库的序列来生成主键,条件是数据库支持序列。
    //IDENTITY:主键由数据库自动生成(主要是自动增长型)
    //AUTO:主键由程序控制。
    private int id;

    private String name;
    private String password;

    @Temporal(TemporalType.DATE)//生成yyyy-MM-dd类型的日期
    private Date createTime;
    @Temporal(TemporalType.DATE)//生成yyyy-MM-dd类型的日期
    private Date expireTime;


    public int getId() {
        return id;
    }
    public void setId(int id) {
        this.id = id;
    }
    @Column(name="name",unique=true,nullable=false) //字段为name,不允许为空,用户名唯一
    public String getName() {
        return name;
    }
    public void setName(String name) {
        this.name = name;
    }
    public String getPassword() {
        return password;
    }
    public void setPassword(String password) {
        this.password = password;
    }
    public Date getCreateTime() {
        return createTime;
    }
    public void setCreateTime(Date createTime) {
        this.createTime = createTime;
    }
    public Date getExpireTime() {
        return expireTime;
    }
    public void setExpireTime(Date expireTime) {
        this.expireTime = expireTime;
    }

}
注:由于主键改成了自增长,所以数据类型修改成了int类型
3、提供hibernate.cfg.xml文件,将实体类User加入到hibernate.cfg.xml配置文件中,完成基本配置
<span style="font-size:12px;"><!DOCTYPE hibernate-configuration PUBLIC
"-//Hibernate/Hibernate Configuration DTD 3.0//EN"
"http://hibernate.sourceforge.net/hibernate-configuration-3.0.dtd">
<hibernate-configuration>
<session-factory>
<!-- 驱动 -->
<property name="hibernate.connection.driver_class">com.mysql.jdbc.Driver</property>
<!-- 数据库URL -->
<property name="hibernate.connection.url">jdbc:mysql://localhost:3306/hibernate_first</property>
<!-- 数据库用户名 -->
<property name="hibernate.connection.username">root</property>
<!-- 数据库密码 -->
<property name="hibernate.connection.password">123456</property>
<!-- mysql的方言 -->
<property name="hibernate.dialect">org.hibernate.dialect.MySQLDialect</property>
<!-- 映射文件 -->
<!-- <mapping resource="com/liang/hibernate/User.hbm.xml"/> -->
<!-- 由原来的映射文件,改成实体类 -->
<mapping class="com.liang.hibernate.User"/>
</session-factory>
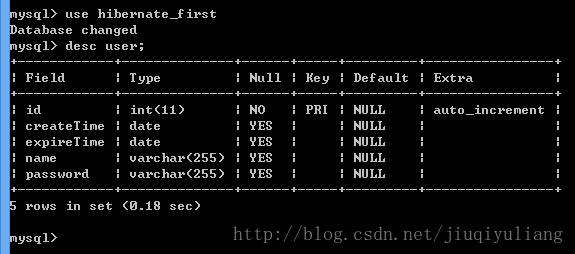
</hibernate-configuration></span> 4、编写工具类ExportDB.java,注解生成ddl,必须采用AnnotationConfiguration类
<span style="font-size:12px;">package com.liang.hibernate;
import org.hibernate.cfg.AnnotationConfiguration;
import org.hibernate.cfg.Configuration;
import org.hibernate.tool.hbm2ddl.SchemaExport;
/**
* 将hbm生成ddl
* @author liang
*
*/
public class ExportDB{
public static void main(String[]args){
//默认读取hibernate.cfg.xml文件
Configuration cfg = new AnnotationConfiguration().configure();
SchemaExport export = new SchemaExport(cfg);
export.create(true, true);
}
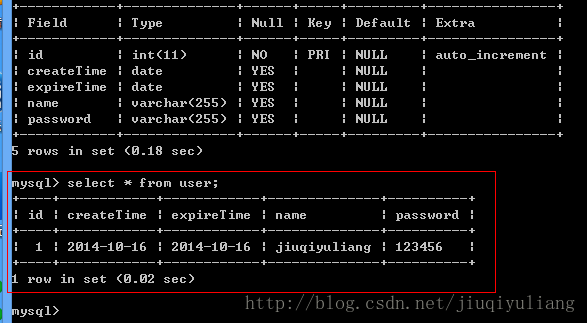
}</span> 数据库生成表如图所示:
5、建立客户端类Client,添加用户数据到MySQL
package com.liang.hibernate;

import java.util.Date;

import org.hibernate.Session;
import org.hibernate.SessionFactory;

import org.hibernate.cfg.AnnotationConfiguration;
import org.hibernate.cfg.Configuration;

public class Client {
    public static void main(String[]args){
        //读取hibernate.cfg.xml文件
        Configuration cfg = new AnnotationConfiguration().configure();
        //建立SessionFactory
        SessionFactory factory =cfg.buildSessionFactory();

        //取得session
        Session session = null;

        try{
            //开启session
            session = factory.openSession();
            //开启事务
            session.beginTransaction();

            User user = new User();
            user.setName("jiuqiyuliang");
            user.setPassword("123456");
            user.setCreateTime(new Date());
            user.setExpireTime(new Date());
            //保存User对象
            session.save(user);

            //提交事务
            session.getTransaction().commit();

        }catch(Exception e){
            e.printStackTrace();
            //回滚事务
            session.getTransaction().rollback();
        }finally{
            if(session != null){
                if(session.isOpen()){
                    //关闭session
                    session.close();
                }
            }
        }
    }
}
运行之后,数据库表生成的数据,如下图所示:
总结:
注解和xml文件的优缺点,网上有很多,有兴趣可以查一下,小编就不再累述了,但是小编认为,学习初期最好不要使用注解,不易于理解Hibernate的原理,并且注解对于程序的可扩展性而言,太差了。


 357
357

 被折叠的 条评论
为什么被折叠?
被折叠的 条评论
为什么被折叠?
 到【灌水乐园】发言


