


1.总结ansible常用的一些模块和基本的示例
一、准备工作:
1. 安装ansible-core: ubuntu系统
	sudo apt-add-repository -y ppa:ansible/ansible
	sudo apt update
	sudo apt install -y ansible-core
2. 生成并修改配置文件:
	#使用命令生成配置文件
	ansible-config init -t all --disabled > /etc/ansible/ansible.cfg
	#为简化自动化流程,禁用主机密钥检查
	host_key_checking = false
	#指定Python解释器, 消除执行命令时的warning信息(1,Inventory文件中指定;2. Playbook中指定;3. ansible.cfg配置文件中指定)
	#此次选cfg文件中指定
	[defaults]
	interpreter_python = /usr/bin/python3.10
3. 编辑主机清单:
	[root@k8s-master01: ~]# vim /etc/ansible/hosts
	[master]
	master ansible_ssh_host=10.0.0.200
	[nodes]
	node01 ansible_ssh_host=10.0.0.201
	node02 ansible_ssh_host=10.0.0.202
	node03 ansible_ssh_host=10.0.0.203
4. Rocky8.9 安装python3.10 ( ubuntu2204 系统自带Python3.10.12)
	#安装编译环境和常用软件、下载源码
	sudo dnf install -y gcc openssl-devel bzip2-devel libffi-devel zlib-devel make
	wget https://www.python.org/ftp/python/3.10.12/Python-3.10.12.tgz
	tar -xzf Python-3.10.12.tgz -C /usr/local/src/
	cd /usr/local/src/Python-3.10.12/
	#编译和安装
	./configure --enable-optimizations --prefix=/usr/local
	make -j $(nproc) && make install
	#检查环境变量
	echo $PATH
	python3 --version		#验证安装完成(编译安装后已经创建软链接,python3)
二、Ansible 常用模块
1、command模块:
在远程主机上执行 shell 命令,但有些操作不支持,比如管道,重定向,通配符等。此模块不具有幂等性
	常用选项:
	- chdir=dir 		 ——执行命令前,先切换至目录dir
	- creates=file		—— 当file不存在时才会执行
	- removes=file ——当file存在时才会执行
范例:
ansible 10.0.0.202 -m command -a "chdir=/root/test creates=/root/test/abc touch abc"
10.0.0.202 | CHANGED | rc=0 >>
2、shell 模块
和command模块类似,支持的命令比command模块多,不具有幂等性
	常用选项:
	- chdir=dir 		#执行命令前,先切换至目录dir
	- creates=file		#当file不存在时才会执行
	- removes=file      #当file存在时才会执行
范例:
ansible 10.0.0.202 -m shell -a "echo 1+2|bc"
10.0.0.202 | CHANGED | rc=0 >>
3
3、script 模块
在远程主机上运行ansible主机上的脚本(shell,php,py等),不具有幂等性
	常用选项:
	- chdir=dir 		#执行命令前,先切换至目录dir
	- creates=file	    #当file不存在时才会执行
	- removes=file      #当file存在时才会执行
范例:
#创建脚本
#!/bin/bash
hostname -I >/tmp/ansible-script.log
hostname -I
#测试
[root@k8s-master01: ansible]# ansible all -m script -a "./hostname.sh"
4、copy 模块
将ansible主机上的文件复制到远程主机,此模块具有幂等性
	#常用选项
	src=/path/file 	#ansible主机文件路径
	dest=/path/file #远程主机文件路径
	owner=UNAME 	#新文件属主
	group=GNAME 	#新文件属组
	mode=777		#新文件权限
	backup=yes|no 	#是否备份,默认no
	content=str 	#使用str生成新文件
	remote_src=yes|no #no是默认值,表示src文件在ansible主机,yes表示src文件在远程主机
范例:
ansible 10.0.0.201 -m copy -a "src=/data/ansible/hostname.sh dest=/tmp/hostname.sh.bak"
5、get_url 模块
将网络上的资源下载到指定主机,支持http, https, ftp 协议
	#常用选项
	url=http://www.a.com/b.txt 		#下载文件URL
	dest=/tmp/c.txt 				#保存文件路径(绝对路径)
	owner=UNAME 					#指定属主
	group=GNAME 					#指定属组
	mode=777 						#指定权限
	force=yes|no	 				#默认yes,如果目标文件存在,则覆盖, no 表示只有目标不存在才下载
	checksum="algorithm:str" 		#指定目标文件摘要值,下载完成后算出文件摘要再对比,确
	认文件是否完整
范例:
ansible 10.0.0.203 -m get_url -a 'url=https://q6.itc.cn/q_70/images03/20240414/fca52ece70a441b1a4de8bdb64983224.jpeg dest=/tmp/touxiang.jpeg checksum="sha256:0612769d7c7de3feab7c2c19158de6dad309ea7f5136a1450e9686052ed0b878"'
6、fetch 模块
从远程主机提取文件到ansible的主控端,与copy相反,不支持目录
	#常用选项
	src=/path/file 			#远程主机上的文件路径
	fail_on_missing=yes|no 	#默认yes,无法获取远程主机文件时,显示失败
	dest=/path 				#ansible主机上的保存路径,不存在会自动创建
范例:
ansible "10.0.0.202 10.0.0.203" -m fetch -a "src=/tmp/test.txt dest=/data/ansible/fetch"
7、file 模块
提供文件管理功能,创建文件和目录,修改文件和目录,设置文件权限和属性,设置链接等
	#常用选项
	path=/path/file 	#目标文件路径
	owner=USER 			#属主
	group=GROUP 		#属组
	mode=777 			#权限
	state=file|touch|directory|link|hard|absent 	#具体操作,如果是 link,源用 src指定
	recurse=yes|no 		#yes表示递归操作,仅在 state=directory时生效
范例:
ansible 10.0.0.201 -m file -a "path=/ansible/test state=directory"
8、stat 模块
用来获取目标文件的状态,对于windows主机要使用win_stat模块
	#常用选项
	path=/path/file 		#指定目标文件路径
	follow=true|false 		#是否跟随链接,默认 false,不跟随
范例:
ansible 10.0.0.201 -m stat -a "path=/etc/issue"
9、unarchive 模块
unarchive 模块主要用来解压缩或解包,将 ansible 主机或其它主机上的压缩包复制到指定主机,再解压到某个目录
	#常用选项
	src=/path/file 		#包文件路径,可以是ansible主机上的包文件,也可以是远程主机上的文件
	(也可以是第三方主机)
	dest=/pth/dir 		#目标路径
	remote_src=yes|no 	#yes表示包文件在远程主机或第三方主机上,no表示包文件在ansible	主机上,默认值为no
	creates=/path/file 	#此文件不存在才执行
	mode=777 			#设置目标权限
	owner=USER 			#设置目标属主
	group=GROUP 		#设置目标属组
范例:
ansible 10.0.0.201 -m unarchive -a "src=/data/ansible/test.tar.gz dest=/tmp/test-dir owner=mage" #远程主机的目录和属主用户必须存在
10、archive 模块
archive 模块在远程主机上执行压缩打包命令,此模块的源和目标都在远程主机上
	#常用选项
	path=/path/dir #源目录或文件路径
	dest=/pth/file #目标的文件路径
	remove=false|true #是否删除源文件,默认 false
	mode=777 #设置目标权限
	owner=USER #设置目标属主
	group=GROUP #设置目标属组
	format=bz2|gz|tar|xz|zip #指定压缩算法,默认 gz
范例:
#安装模块
ansible-galaxy collection install community.general --no-cache
#打包远程主机上/root/test/目录,到tmp目录下生成test.zip
ansible 10.0.0.202 -m archive -a "path=/root/test/ dest=/tmp/test.zip format=zip mode=600"
11、hostname 模块
此模块主要用于修改远程主机的主机名,修改后永久生效
范例:
ansible 10.0.0.201 -m hostname -a "name=test-name"
12、cron 模块
cron 模块用于管理远程主机上的 crontab 定时任务
	#常用选项
	name=str 				#任务名称
	job=/path/cmd args	 	#具体任务命令
	disabled=yes|no 		#是否禁用,默认 false
	state=absent|present 	#absent 删除,默认present
	env=yes|no				#yes设置环境变量,no 设置定时任务,默认 no
	special_time=annually|daily|hourly|monthly|reboot|weekly|yearly 	#指定特殊时间
	user=UNAME 			 	#指定任务用户
	minute= 				#指定分钟参数
	hour= 					#小时参数
	day= 					#自然天参数
	month= 					#自然月参数
	weekday= 				#星期参数
范例:
#给远程主机创建一个计划任务
ansible 10.0.0.201 -m cron -a 'job="/usr/bin/wall test-crontab2" minute=*/5 hour=12 day=10,20,30 month=3,4,5 weekday=1-5 name=test-crontab2'
13、yum 模块 和 apt 模块
用于在远程主机上管理软件包
yum 模块
	#常用选项
	name=packagename 		#指定包名 name1,name2
	state=absent|installed|latest|present|removed 	#absent|removed 删除,installed|present 安装,latest 升级到最新版
	list=packagename|installed|updates|available|repos
							#此选项与name选项互斥,
							#写具体包名是相当于执行 yum list --
	showduplicates packagename
	download_dir=/path 		#指定下载目录
	download_only=yes|no 	#只下载不安装,默认 no
	update_only=yes|no 		#yes 仅更新,默认no
	use_backend=auto|yum|yum4|dnf	 #指定真实执行的命令,默认 auto
	autoremove=yes|no 		#卸载依赖,仅在卸载时生效,默认no
	disablerepo=repoid 		#排除某些仓库 repoid1,repoid2
	enablerepo=repoid 		#从指定仓库中安装 repoid1,repoid2
	validate_certs=yes|no 	#是否对包进行校验,默认yes
	disable_gpg_check=yes|no 		#是否不对包进行校验,默认no
	update_only=yes|no 		#只更新不安装,默认no
范例
#卸载
ansible 10.0.0.161 -m yum -a 'name=sos state=removed'
#从指定源安装
ansible 10.0.0.161 -m yum -a 'name=sos enablerepo=baseos'
apt 模块
	#常用选项
	name=packagename 		#指定包名,可用通配符
	autoclean=yes|no 		#清除本地安装包,只删除己卸载的软件的 deb包
	deb=/path/file.deb 		#指定deb包,可以是本地的,也可以是网络的
	autoremove=yes|no 		#卸载依赖包,默认no
	only_upgrade=yes|no 	#仅更新,不安装
	state=absent|build-dep|latest|present|fixed #absent 卸载,build-dep 安装依赖包,latest 安装或升级到最新版,#present 安装,fixed 修复
	update_cache=yes|no 	#更新索引
范例:
#更新索引
ansible 10.0.0.201 -m apt -a "update_cache=yes"
#清除缓存
ansible 10.0.0.201 -m apt -a "autoclean=yes"
#安装指定版本
apt-cache policy redis-server #获取可用的版本信息
ansible 10.0.0.202 -m apt -a "name=redis-server=5:6.0.16-1ubuntu1 state=present"
#卸载
ansible 10.0.0.202 -m apt -a "name=redis* state=absent"
14、yum_repository 模块
此模块用来对远程主机上的 yum 仓库配置进行管理
	#常用选项
	name=repoid 		#repoid
	description=desc 	#描述信息
	baseurl=url 		#仓库地址
	enabled=yes|no 		#是否启用
	gpgcheck=yes|no 	#是否启用gpgcheck,没有默认值,默认跟随 /etc/yum.conf 中的全局配置
	gpgkey=/path/key 	#gpgkey路径
	state=absent|present 	#absent删除, present安装,默认present
	timeout=30 			#超时时长,默认30s
范例:
#添加yum 源
ansible 10.0.0.161 -m yum_repository -a 'name=nginx description=nginx-desc baseurl="http://nginx.org/packages/centos/$releasever/$basearch/" gpgcheck=1 enabled=1 gpgkey=https://nginx.org/keys/nginx_signing.key'
#删除yum 源
ansible 10.0.0.161 -m yum_repository -a 'name=nginx state=absent'
15、service 模块
service 模块主要用于对远程主机的服务进行管理
	#常用选项
	name=servicename 		#服务名
	enabled=yes|no 			#是否是开机启动
	state=reloaded|restarted|started|stopped 	#具体操作
	args=val 				#参数
范例
#控制远程主机的nginx服务,停止、启动、重载、开机启动
ansible 10.0.0.161 -m service -a 'name=nginx state=stopped'
ansible 10.0.0.161 -m service -a 'name=nginx state=started'
ansible 10.0.0.161 -m service -a 'name=nginx state=reloaded'
ansible 10.0.0.161 -m service -a 'name=nginx enabled=yes'
16、user 模块
此模块用于对远程主机进行用户管理
	#常用选项
	name=USERNAME 				#指定用户名
	comment=str					#用户描述信息
	create_home=yes|no 			#是否创建家目录,默认yes
	group=GROUPNAME 			#指定私有组
	groups=group1,group2... 	#指定附加组
	home=/path 					#指定家目录路径
	shell=SHELL 				#指定shell
	password=str 				#设置密码,必须是加密后的字符串
	state=absent|present 		#absent 删除用户,present 创建用户,默认 present
	system=yes|no			    #是否创建系统账号,默认 no
	uid=UID 					#手动指定uid
	umask=UMASK 				#指定umask
	remove=yes|no 				#是否删除家目录,默认 no
	generate_ssh_key=yes|no 	#是否创建私钥,默认 no
	ssh_key_bits=2048 			#指定私钥位数
	ssh_key_file=/path/file 	#指定文件位置,默认 .ssh/id_rsa
范例:
#创建用户
ansible 10.0.0.161 -m user -a 'name=user888 comment="ansible user" uid=8888 home=/user888/'
#删除用户
ansible 10.0.0.161 -m user -a 'name=user888 remove=yes state=absent'
17、group 模块
此模块用于对远程主机的组管理
	#常用选项
	name=GROUPNAME #指定组名
	gid=GID #指定组ID
	state=absent|present #absent 删除,present 创建,默认present
	system=yes|no #是否是系统组,默认no
范例:
#创建组、系统组;删除组
ansible 10.0.0.161 -m group -a 'name=vipp gid=9999'
ansible 10.0.0.161 -m group -a 'name=naxx gid=333 system=yes'
ansible 10.0.0.161 -m group -a 'name=vipp state=absent'
18、lineinfile 模块
主要用于修改远程主机上的文件,对文件单行进行替换修改。
	#常用选项
	path=/path/file 			#远程主机文件路径
	regexp= 					#正则,用来锚定要被修改的内容
	insertafter= 				#正则,在指定内容后的新行中增加line里面的内容,与regex同时使用时,只有regex没匹配才生效
	insertbefore= 				#正则,在指定内容前的新行中增加line里面的内容,与regex同时使用时,只有regex没匹配才生效
	line=str 					#修改后的内容
	state=absent|present 		#absent 删除,present 不存在先创建
	backup=yes|no 				#修改前先备份,默认no
	create=yes|no 				#不存在先创建,默认no
	backrefs=yes|no 			#是否支持引用,默认no不支持
	mode=666 					#设置权限
	owner=USER 					#指定属主
	group=GROUP 				#指定属组
#使用 regexp 配合正则表达式来锚定要被修改的内容时,如果有多行被匹配,则只有最后一行会被替换,如果删除,则匹配到的行都会被删除
范例:
#文件不存在,创建新文件
ansible 10.0.0.161 -m lineinfile -a 'path=/root/test.txt line="aaaa" create=yes owner=nginx mode=755'
#追加一行
ansible 10.0.0.161 -m lineinfile -a 'path=/root/test.txt line="PS1=XXX"'
ansible 10.0.0.161 -m lineinfile -a 'path=/root/test.txt insertbefore="^PS" line="newline2"'
#替换
ansible 10.0.0.161 -m lineinfile -a 'path=/root/test.txt regexp="^ccc" line="CCC"'	#多行被匹配到,但只替换最后一行匹配的
#删除
ansible 10.0.0.161 -m lineinfile -a 'path=/root/test.txt regexp="^ddd" state=absent'	#删除时,匹配到的所有行都会被删除
19、replace 模块
是基于正则匹配的模式来修改文件,replace 模块用于多行匹配和修改
	#常用选项
	path=/path/file 	#远程主机文件路径
	regexp= 			#正则,用来锚定要被修改的内容
	replace=STR			#用来替换的内容
	after=STR 			#从STR之后开始处理
	before=STR 			#处理到STR之前
	backup=yes|no 		#修改前是否备份,默认 no
	mode=666 			#设置权限
	owner=USER 			#指定属主
	group=GROUP 		#指定属组
范例:
#替换3个小写字母开头的行
ansible 10.0.0.161 -m replace -a "path=/root/test.txt regexp='^([a-z]{3})$' replace='\1----\1' backup=yes"
20、selinux 模块
selinux 模块用作对远程主机的 selinux 机制进行管理
#安装模块:ansible-galaxy collection install ansible.posix --no-cache
	#常用选项
	configfile=/path/file 				#selinux 配置文件路径,默认/etc/selinux/config
	policy=targeted|minimum|mls 		#在state值不为 disabled 时必选
	state=disabled|enforcing|permissive #具体设置
范例:
#关闭远程主机的SELINUX,远程主机需要重启后生效
ansible 10.0.0.161 -m selinux -a 'state=disabled policy=targeted'
21、reboot 模块
主要用于对远程主机进行重启操作
	#常用选项
	msg=str 			#广播重启提示消息,默认为空
	test_command=str 	#重启后执行验证命令,默认 whoami
	reboot_timeout=600 	#超时时长,默认600S
	pre_reboot_delay=0 	#执行重启前等待时长,如果小于60S,此字段会被置0,也就是无效
	post_reboot_delay=0 #重启后等待一个时长后再验证是否重启完成
范例:
#重启远程主机
ansible 10.0.0.161 -m reboot -a 'pre_reboot_delay=65 msg="system will be reboot"'
22、mount 模块
mount 模块用于管理远程主机的挂载
	#常用选项
	src=/path/device 		#要挂载的设备路径,可以是网络地址
	path=/path/point 		#挂载点
	state=absent|mounted|present|unmounted|remounted
				#absent 取消挂载,并删除永久挂载中的配置
				#mounted 永久挂载,立即生效,挂载点不存在会自动创建
				#present 永久挂载,写配置文件,但不会立即生效
				#unmounted 临时取消挂载,不改变配置文件
				#remounted 重新挂载,但不会改变配置文件
	fstab=/path/file 		#指定挂载配置文件路径,默认 /etc/fstab
	fstype=str 				#设备文件系统 xfs|ext4|swap|iso9660...
	opts=str 				#挂载选项
范例:
#挂载光盘,永久挂载,并立即生效
ansible 10.0.0.161 -m mount -a 'src=/dev/sr0 path=/mnt/ state=mounted stype=iso9660'
23、setup 模块
用来从远程主机上收集相关信息在 ansible 主机上显示,由于需要收集的信息较多,此模块执行较慢。
	#常用选项
	filter=filed,filed2 	#只显示指定字段,可以用通配符,可以写多个,可以用! 取反
	gather_timeout=10		#超时时长,默认10S
范例:
#显示远程主机的信息,过滤出主机名和ipv4地址
ansible 10.0.0.161 -m setup -a 'filter=ansible_hostname,all_ipv4_addresses'
24、debug 模块
此模块可以用于输出信息,并且通过 msg 定制输出的信息内容,功能类似于 echo 命令
	#常用选项
	msg=str 			#输出消息内容,默认 Hello world!
	var=val 			#指定变量名,和 msg 互斥
	verbosity=0|1|2|3 	#指定调试级别,verbosity=2 则表示仅在 -vv|-vvv|-vvvv 的级别下显示
ansible 10.0.0.161 -m debug -a 'msg="This is test-msg" verbosity=2' -vv
25、sysctl 模块
sysctl 模块用来修改远程主机上的内核参数
	#常用选项
	name=str	 			#参数名称
	val=str 				#参数值
	reload=yes|no 			#默认yes,调用 /sbin/sysctl -p 生效
	state=present|absent 	#是否保存到文件,默认present
	sysctl_file=/path/file 	#指定保存文件路径,默认 /etc/sysctl.conf
	sysctl_set=yes|no 		#是否使用systctl -w 校验,默认no
ansible 10.0.0.161 -m sysctl -a 'name=net.ipv4.ip_forward value=1'
26、apt_repository 模块
此模块实现 apt 仓库的配置管理,仅于用 debian 系列的环境中
	#常用选项
	repo=str 				#具体源
	filename=/path/file 	#具体文件名,默认加到 /etc/apt/sources.list 中
	state=absent|present 	#absent 删除,present 新增,默认 present
	update_cache=yes|no	    #yes 更新源,相当于执行 apt-get update
范例:
ansible 10.0.0.201 -m apt_repository -a 'repo="deb http://dl.google.com/linux/chrome/deb/ stable main" filename="chrome" update_cache=no'
27、apt_key 模块
此模块实现 apt 仓库的key 的配置管理,仅于用 debian 系列的环境中
	#常用选项
	url=URL #key文件路径
	validate_certs=yes|no #是否校验https 的 ssl 证书,默认yes
	state=absent|present #absent 删除,present 新增,默认 present
范例:
#添加key
ansible 10.0.0.201 -m apt_key -a 'url=https://download.ceph.com/keys/release.asc state=present'
2.编写一个playbook实现Nginx的两种安装过程,安装方式可通过变量传入控制,编译安装和yum安装
一、环境准备
1、服务端:hostname: test-srv ——IP:10.0.0.161 ——OS:rocky8.9
	#安装ansible:
		yum install -y ansible

	#准备主机清单
		cat /etc/ansible/hosts
		[rocky]
		10.0.0.163
		10.0.0.164

	#新建项目目录:
		mkdir -pv /data/ansible/nginx/{files,tasks,templates}

	#准备service文件
		cp /lib/systemd/system/nginx.service /data/ansible/nginx/files/

	#打通ssh-key验证:
		ssh-copy-id 10.0.0.163
		ssh-copy-id 10.0.0.164
2、客户机:
	hostname: r163  ——  IP:10.0.0.163  —— OS:rocky8.9
	hostname: r164  ——  IP:10.0.0.164  —— OS:rocky8.9
二、编写 playbook
说明:通过变量 INSTALL_METHOD判定是包安装还是编译安装
[root@test-srv nginx]# cat install_nginx2.yaml
- hosts: rocky
  gather_facts: yes
  become: yes
  vars:
    nginx_version: "1.24.0"
    install_method: "{{ INSTALL_METHOD }}"

  tasks:
    - name: Ensure EPEL repository is available
      yum:
        name: epel-release
        state: present
      when: install_method == 'yum'

    - name: Install Nginx using yum
      yum:
        name: nginx
        state: latest
        enablerepo: epel
      when: install_method == 'yum'

    - name: Create group for Nginx
      group:
        name: nginx
        system: yes
        gid: 931
        state: present
      when: install_method == 'compile'

    - name: Create user for Nginx
      user:
        name: nginx
        group: nginx
        uid: 931
        shell: /sbin/nologin
        system: yes
        create_home: no
        state: present
      when: install_method == 'compile'

    - name: Download and extract Nginx source code
      unarchive:
        src: "https://nginx.org/download/nginx-{{ nginx_version }}.tar.gz"
        dest: /usr/local/src
        remote_src: yes
      when: install_method == 'compile'

    - name: Install dependencies for compiling Nginx
      yum:
        name:
          - gcc
          - make
          - pcre-devel
          - zlib-devel
          - openssl-devel
          - bzip2-devel
          - libffi-devel
        state: present
      when: install_method == 'compile'

    - name: Configure, compile, and install Nginx from source
      shell: |
        cd /usr/local/src/nginx-{{ nginx_version }}
        mkdir -p /var/cache/nginx
        chown -R nginx.nginx /var/cache/nginx
        ./configure --prefix=/etc/nginx --sbin-path=/usr/sbin/nginx --conf-path=/etc/nginx/nginx.conf --error-log-path=/var/log/nginx/error.log --http-log-path=/var/log/nginx/access.log --pid-path=/var/run/nginx.pid --lock-path=/var/run/nginx.lock --http-client-body-temp-path=/var/cache/nginx/client_temp --http-proxy-temp-path=/var/cache/nginx/proxy_temp --http-fastcgi-temp-path=/var/cache/nginx/fastcgi_temp --http-uwsgi-temp-path=/var/cache/nginx/uwsgi_temp --http-scgi-temp-path=/var/cache/nginx/scgi_temp --user=nginx --group=nginx --with-compat --with-file-aio --with-threads --with-http_addition_module --with-http_auth_request_module --with-http_dav_module --with-http_flv_module --with-http_gunzip_module --with-http_gzip_static_module --with-http_mp4_module --with-http_random_index_module --with-http_realip_module --with-http_secure_link_module --with-http_slice_module --with-http_ssl_module --with-http_stub_status_module --with-http_sub_module --with-http_v2_module --with-mail --with-mail_ssl_module --with-stream --with-stream_realip_module --with-stream_ssl_module --with-stream_ssl_preread_module --with-cc-opt='-O2' --with-ld-opt='-Wl,-rpath,/usr/local/lib'
        make
        make install
      when: install_method == 'compile'

    - name: Copy service file
      copy:
        src: files/nginx.service
        dest: /lib/systemd/system/
        owner: root
        group: root
        mode: '0644'
      when: install_method == 'compile'

    - name: Ensure Nginx service is enabled and started
      service:
        name: nginx
        enabled: yes
        state: started
      notify:
        - nginx status

  handlers:
    - name: nginx status
      service:
        name: nginx
        state: started
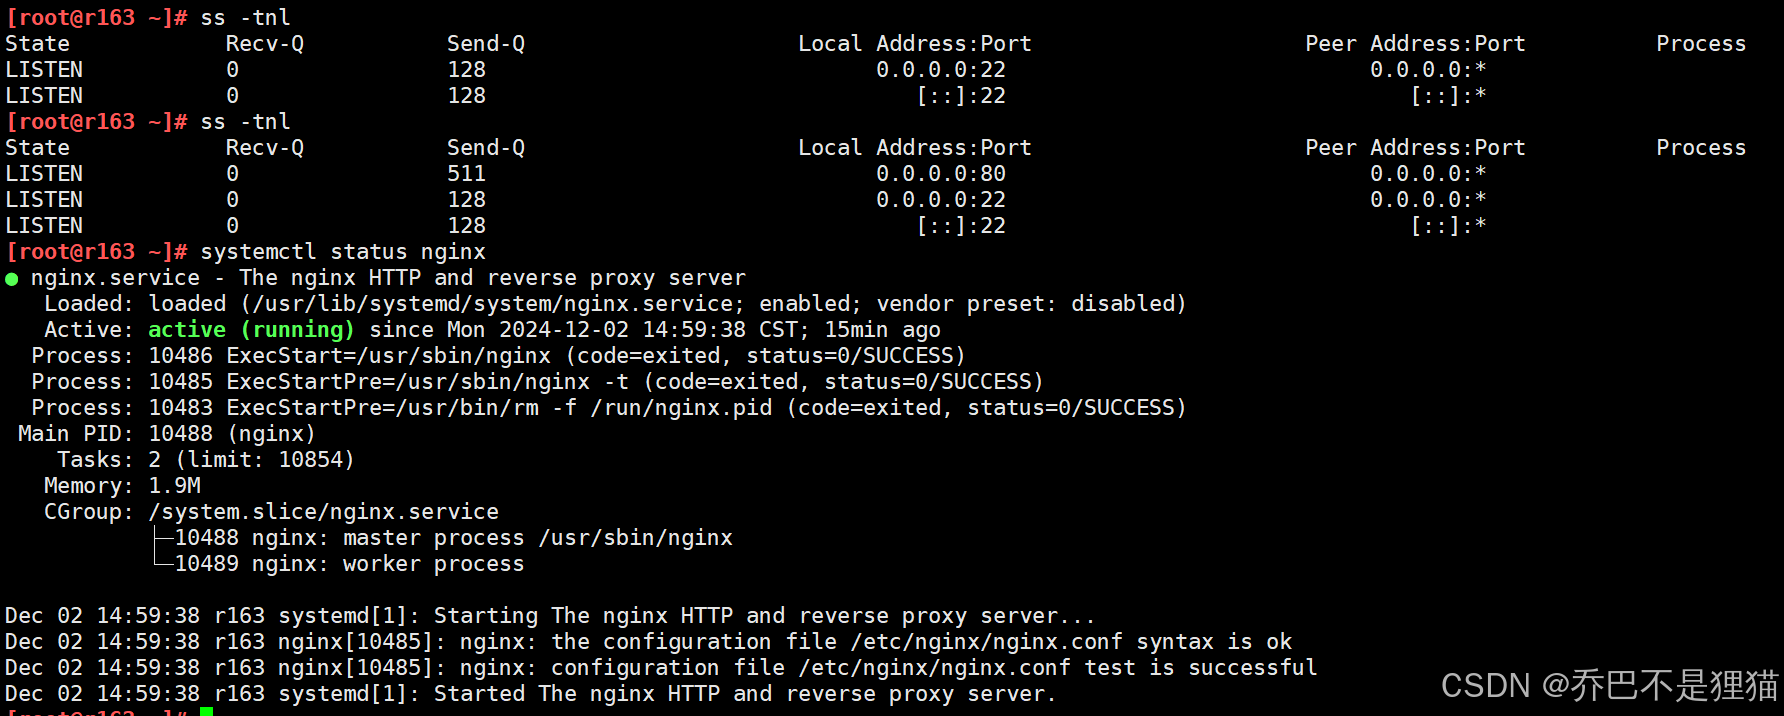
三、运行调试和验证
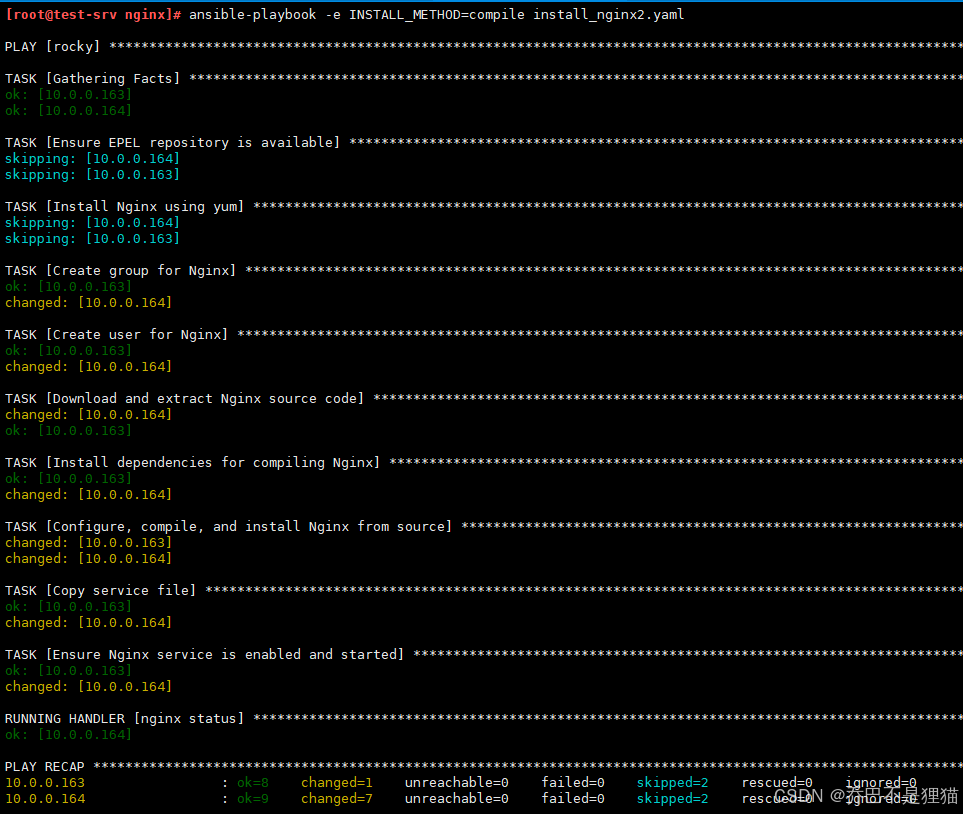
1、编译安装:通过 -e 传参给 INSTALL_METHOD
ansible-playbook -e INSTALL_METHOD=compile install_nginx2.yaml
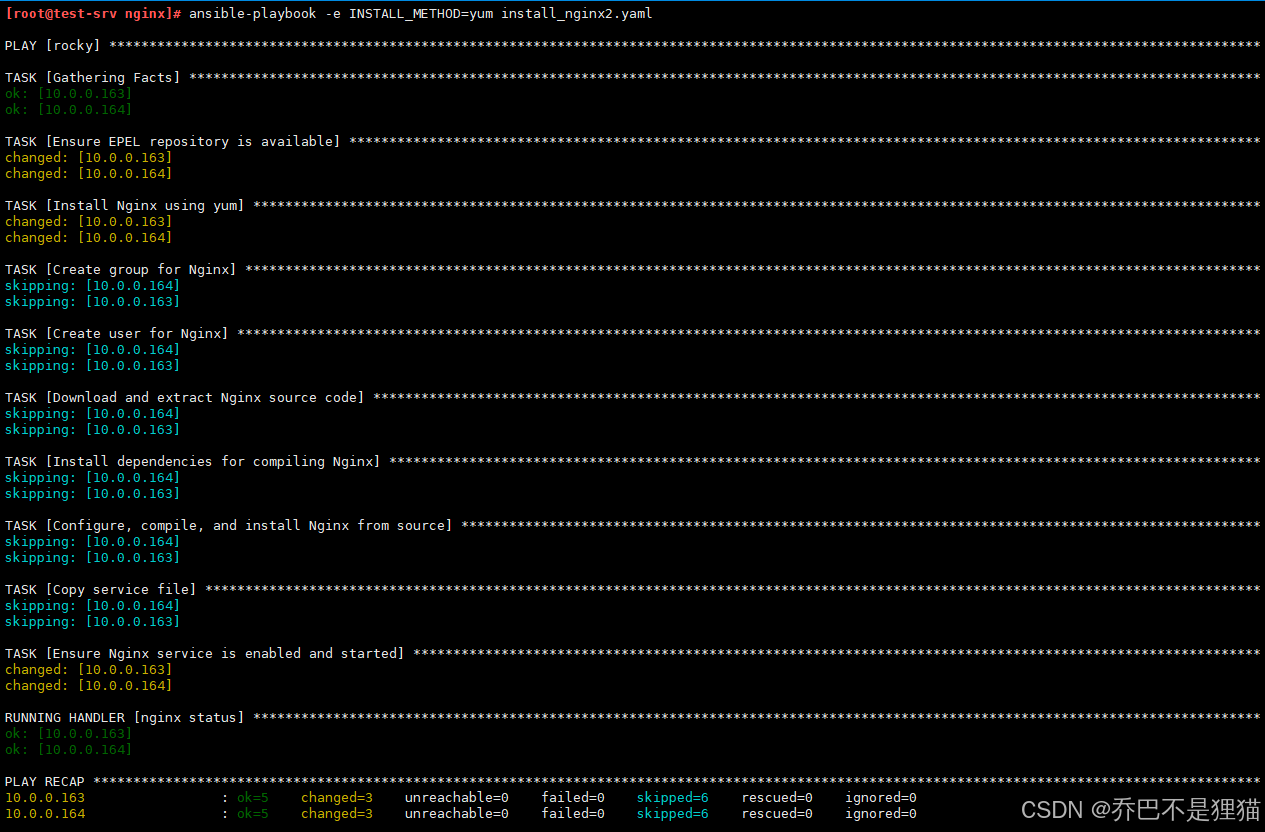
1、包安装:通过 -e 传参给 INSTALL_METHOD
ansible-playbook -e INSTALL_METHOD=yum install_nginx2.yaml
3.编写一个初始化主机的playbook,变量指定系统类型,rocky需要关闭selinux,ubuntu不需要
要求:
1. 初始化主机名
2. 替换yum源或apt源
3. 安装时间同步服务器,指向国内的服务器
4. 关闭防火墙,清理相关规则
5. 安装基本软件 vim 等
6. 修改时区为Asia/Shanghai
7. 初始化一个mage用户,拥有sudo权限 ALL=(ALL) NOPASSWD: ALL
环境准备:
#创建项目目录
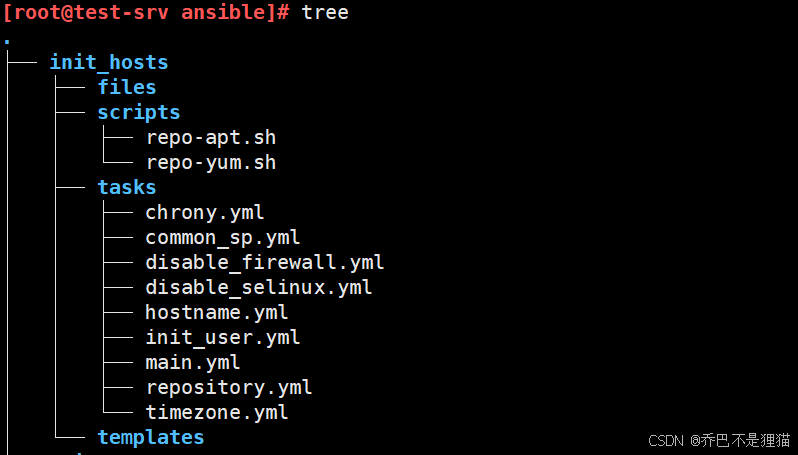
mkdir /data/ansible/init_hosts/{files,scripts,tasks,templates}
根据要求编写yml文件,最后使用main.yml 合并执行,目录结构如下:
[root@test-srv tasks]# cat main.yml
- name: Initialize hosts (Seven steps)
  hosts: all
- import_playbook: hostname.yml
- import_playbook: init_user.yml
- import_playbook: repository.yml
- import_playbook: chrony.yml
- import_playbook: timezone.yml
- import_playbook: common_sp.yml
- import_playbook: disable_firewall.yml
1、初始化主机名:系统名+IP地址最后一段(rocky163)
[root@test-srv tasks]# cat hostname.yml
- name: Set hostname with IP Address
  hosts: all
  gather_facts: yes
  become: yes
  tasks:
    - name: Extract the last octet of the IP address
      set_fact:
        last_octet: "{{ ansible_default_ipv4.address.split('.')[-1] }}"

    - name: Create the new hostname
      set_fact:
        new_hostname: "{{ ansible_distribution | lower }}{{ last_octet }}"

    - name: Set the hostname
      hostname:
        name: "{{ new_hostname }}"
2、初始化用户mage,拥有sudo权限 ALL=(ALL) NOPASSWD: ALL
[root@test-srv tasks]# cat init_user.yml
- name: Create User <mage> and add to sudousers
  hosts: all
  become: yes
  vars:
    new_user: "mage"
    new_user_password: "123456"
  tasks:
    - name: Create a new user
      ansible.builtin.user:
        name: "{{ new_user }}"
        password: "{{ new_user_password | password_hash('sha512', salt_size=8) }}"
        shell: /bin/bash
        state: present

    - name: Add the user to the wheel group (for RedHat/CentOS/Rocky)
      ansible.builtin.user:
        name: "{{ new_user }}"
        groups: wheel
        append: yes
      when: ansible_os_family == 'RedHat'

    - name: Add the user to the sudo group (for Debian/Ubuntu)
      ansible.builtin.user:
        name: "{{ new_user }}"
        groups: sudo
        append: yes
      when: ansible_os_family == 'Debian'

    - name: Ensure the sudoers file is configured
      ansible.builtin.lineinfile:
        path: /etc/sudoers
        state: present
        regexp: '^{{ new_user }} ALL=$ALL$ NOPASSWD: ALL$'
        line: '{{ new_user }} ALL=(ALL) NOPASSWD: ALL'
        validate: 'visudo -cf %s'
3、替换yum源或apt源
[root@test-srv tasks]# cat repository.yml
- name: Update yum or apt repository (script)
  hosts: all
  gather_facts: yes
  become: yes
  vars:
    os: "{{ ansible_distribution }}"
  tasks:
    - name: Run the script Update repo for Ubuntu
      script: ../scripts/repo-apt.sh
      when: os == "Ubuntu"

    - name: Run the script Update repo for Rocky
      script: ../scripts/repo-yum.sh
      when: os == "Rocky"

*******************     repo-apt.sh     ******************************
[root@test-srv tasks]# cat ../scripts/repo-apt.sh
#!/bin/bash
sed -i 's/https:\/\/mirrors.aliyun.com/http:\/\/mirrors.cloud.aliyuncs.com/g' /etc/apt/sources.list

*******************     repo-yum.sh     ******************************
[root@test-srv tasks]# cat ../scripts/repo-yum.sh
#!/bin/bash
sed -e 's|^mirrorlist=|#mirrorlist=|g' \
	    -e 's|^#baseurl=http://dl.rockylinux.org/$contentdir|baseurl=https://mirrors.aliyun.com/rockylinux|g' \
	        -i.bak \
		    /etc/yum.repos.d/Rocky-*.repo

dnf makecache
4、安装时间同步服务器,指向国内阿里云NTP服务器
[root@test-srv tasks]# cat chrony.yml
- name: Install chrony and Update NTP Server
  hosts: all
  gather_facts: yes
  become: yes
  vars:
    os: "{{ ansible_distribution }}"

  tasks:
    - name: Install chrony
      package:
        name: chrony
        state: present

    - name: Backup Ubuntu existing chrony configuration
      copy:
        src: /etc/chrony/chrony.conf
        dest: /etc/chrony/chrony.conf.bak
        remote_src: yes
      when: os == "Ubuntu"

    - name: Backup Rocky existing chrony configuration
      copy:
        src: /etc/chrony.conf
        dest: /etc/chrony.conf.bak
        remote_src: yes
      when: os == "Rocky"
      notify: restart chronyd

    - name: Update chronyd configuration for Ubuntu
      blockinfile:
        path: /etc/chrony/chrony.conf
        marker: "# {mark} ANSIBLE MANAGED BLOCK - Aliyun NTP Servers"
        block: |
          # Use Aliyun's public NTP servers
          server ntp1.aliyun.com iburst
          server ntp2.aliyun.com iburst
          server ntp3.aliyun.com iburst
          server ntp4.aliyun.com iburst
          server ntp5.aliyun.com iburst
          server ntp6.aliyun.com iburst
          server ntp7.aliyun.com iburst
      when: os == "Ubuntu"

    - name: Comment out lines starting with pool
      shell:
        cmd: sed -i '/^pool/s/^/#/' /etc/chrony.conf
      when: os == "Rocky"

    - name: Update chronyd configuration for Rocky
      blockinfile:
        path: /etc/chrony.conf
        marker: "# {mark} ANSIBLE MANAGED BLOCK - Aliyun NTP Servers"
        block: |
          # Use Aliyun's public NTP servers
          server ntp1.aliyun.com iburst
          server ntp2.aliyun.com iburst
          server ntp3.aliyun.com iburst
          server ntp4.aliyun.com iburst
          server ntp5.aliyun.com iburst
          server ntp6.aliyun.com iburst
          server ntp7.aliyun.com iburst
      when: os == "Rocky"
      notify: restart chronyd

  handlers:
    - name: restart chronyd
      service:
        name: chronyd
        state: restarted
5、修改改时区为Asia/Shanghai
[root@test-srv tasks]# cat timezone.yml
- name: Set Timezone in Asia/Shanghai
  hosts: all
  become: yes
  tasks:
    - name: Ensure the timezone is set to Asia/Shanghai
      ansible.builtin.file:
        src: /usr/share/zoneinfo/Asia/Shanghai
        dest: /etc/localtime
        state: link
        force: yes

    - name: Update /etc/timezone file (for Debian/Ubuntu)
      ansible.builtin.copy:
        content: "Asia/Shanghai\n"
        dest: /etc/timezone
      when: ansible_os_family == 'Debian'

    - name: Set the timezone using timedatectl
      ansible.builtin.command: timedatectl set-timezone Asia/Shanghai
      changed_when: true
      when: ansible_os_family == 'RedHat'
6、安装基本软件(vim curl wget git unzip zip htop tree net-tools lrzsz)
[root@test-srv tasks]# cat common_sp.yml
- name: Install common software packages
  hosts: all
  gather_facts: yes
  become: yes

  tasks:
    - name: Ensure EPEL repository is available
      yum:
        name: epel-release
        state: present
      when: ansible_os_family == "RedHat"

    - name: Update apt cache (Ubuntu)
      ansible.builtin.apt:
        update_cache: yes
      when: ansible_os_family == 'Debian'

    - name: Install common software packages
      package:
        name:
          - curl
          - wget
          - git
          - vim
          - htop
          - net-tools
          - tree
          - unzip
          - zip
          - lrzsz
        state: present
7、关闭防火墙,清理相关规则
[root@test-srv tasks]# cat disable_firewall.yml
- name: Close Firewall Clean iptables Disable SELINUX
  hosts: all
  gather_facts: yes
  become: yes
  vars:
    os: "{{ ansible_distribution }}"
  tasks:
    - name: Disable and stop firewalld
      ansible.builtin.service:
        name: firewalld
        state: stopped
        enabled: false
      when: os == 'Rocky'

    - name: Clear iptables rules
      ansible.builtin.shell:
        cmd: |
          iptables -F
          iptables -X
          iptables -t nat -F
          iptables -t nat -X
          iptables -t mangle -F
          iptables -t mangle -X
          iptables -P INPUT ACCEPT
          iptables -P FORWARD ACCEPT
          iptables -P OUTPUT ACCEPT

    - name: Save iptables rules
      ansible.builtin.command: iptables-save
      ignore_errors: true

    - name: Stop UFW service
      ansible.builtin.service:
        name: ufw
        state: stopped
      when: os == 'Ubuntu'

    - name: Disable UFW service from starting on boot
      ansible.builtin.systemd:
        name: ufw
        enabled: false
        state: stopped
      when: os == 'Ubuntu'

    - name: Disable_selinux
      include_tasks: disable_selinux.yml
      when: os == 'Rocky'

***********  Disable_selinux (执行成功后会重启远程主机)****************

[root@test-srv tasks]# cat disable_selinux.yml
- name: Check current SELinux mode
  ansible.builtin.command: getenforce
  register: selinux_mode

- name: Set SELinux to permissive mode (temporarily)
  ansible.builtin.command: setenforce 0
  when: selinux_mode.stdout == 'Enforcing'

- name: Set SELinux to disabled in /etc/selinux/config
  ansible.builtin.lineinfile:
    path: /etc/selinux/config
    regexp: '^SELINUX='
    line: 'SELINUX=disabled'
    state: present

- name: Reboot the system to apply changes
  ansible.builtin.reboot:
    msg: 'Rebooting to apply SELinux changes'
    reboot_timeout: 300
  register: reboot_result

- name: Wait for the system to come back online
  ansible.builtin.wait_for_connection:
  when: reboot_result.changed
8、执行主文件
[root@test-srv tasks]# ansible-playbook main.yml

PLAY [Initialize hosts (Seven steps)] ***********************************************************************************************************************

TASK [Gathering Facts] **************************************************************************************************************************************
ok: [10.0.0.205]
ok: [10.0.0.164]
ok: [10.0.0.163]

PLAY [Set hostname with IP Address] *************************************************************************************************************************

TASK [Gathering Facts] **************************************************************************************************************************************
ok: [10.0.0.205]
ok: [10.0.0.164]
ok: [10.0.0.163]

TASK [Extract the last octet of the IP address] *************************************************************************************************************
ok: [10.0.0.164]
ok: [10.0.0.163]
ok: [10.0.0.205]

TASK [Create the new hostname] ******************************************************************************************************************************
ok: [10.0.0.164]
ok: [10.0.0.163]
ok: [10.0.0.205]

TASK [Set the hostname] *************************************************************************************************************************************
changed: [10.0.0.205]
changed: [10.0.0.163]
changed: [10.0.0.164]

PLAY [Create User <mage> and add to sudousers] **************************************************************************************************************

TASK [Gathering Facts] **************************************************************************************************************************************
ok: [10.0.0.205]
ok: [10.0.0.163]
ok: [10.0.0.164]

TASK [Create a new user] ************************************************************************************************************************************
[DEPRECATION WARNING]: Encryption using the Python crypt module is deprecated. The Python crypt module is deprecated and will be removed from Python 3.13.
Install the passlib library for continued encryption functionality. This feature will be removed in version 2.17. Deprecation warnings can be disabled by
setting deprecation_warnings=False in ansible.cfg.
changed: [10.0.0.205]
changed: [10.0.0.164]
changed: [10.0.0.163]

TASK [Add the user to the wheel group (for RedHat/CentOS/Rocky)] ********************************************************************************************
skipping: [10.0.0.205]
changed: [10.0.0.163]
changed: [10.0.0.164]

TASK [Add the user to the sudo group (for Debian/Ubuntu)] ***************************************************************************************************
skipping: [10.0.0.164]
skipping: [10.0.0.163]
ok: [10.0.0.205]

TASK [Ensure the sudoers file is configured] ****************************************************************************************************************
changed: [10.0.0.205]
changed: [10.0.0.164]
changed: [10.0.0.163]

PLAY [Update yum or apt repository (script)] ****************************************************************************************************************

TASK [Gathering Facts] **************************************************************************************************************************************
ok: [10.0.0.163]
ok: [10.0.0.205]
ok: [10.0.0.164]

TASK [Run the script Update repo for Ubuntu] ****************************************************************************************************************
skipping: [10.0.0.164]
skipping: [10.0.0.163]
changed: [10.0.0.205]

TASK [Run the script Update repo for Rocky] *****************************************************************************************************************
skipping: [10.0.0.205]
changed: [10.0.0.164]
changed: [10.0.0.163]

PLAY [Install chrony and Update NTP Server] *****************************************************************************************************************

TASK [Gathering Facts] **************************************************************************************************************************************
ok: [10.0.0.205]
ok: [10.0.0.163]
ok: [10.0.0.164]

TASK [Install chrony] ***************************************************************************************************************************************
ok: [10.0.0.164]
ok: [10.0.0.163]
changed: [10.0.0.205]

TASK [Backup Ubuntu existing chrony configuration] **********************************************************************************************************
skipping: [10.0.0.164]
skipping: [10.0.0.163]
changed: [10.0.0.205]

TASK [Backup Rocky existing chrony configuration] ***********************************************************************************************************
skipping: [10.0.0.205]
changed: [10.0.0.163]
changed: [10.0.0.164]

TASK [Update chronyd configuration for Ubuntu] **************************************************************************************************************
skipping: [10.0.0.164]
skipping: [10.0.0.163]
changed: [10.0.0.205]

TASK [Comment out lines starting with pool] *****************************************************************************************************************
skipping: [10.0.0.205]
changed: [10.0.0.164]
changed: [10.0.0.163]

TASK [Update chronyd configuration for Rocky] ***************************************************************************************************************
skipping: [10.0.0.205]
changed: [10.0.0.164]
changed: [10.0.0.163]

RUNNING HANDLER [restart chronyd] ***************************************************************************************************************************
changed: [10.0.0.164]
changed: [10.0.0.163]

PLAY [Set Timezone in Asia/Shanghai] ************************************************************************************************************************

TASK [Gathering Facts] **************************************************************************************************************************************
ok: [10.0.0.205]
ok: [10.0.0.163]
ok: [10.0.0.164]

TASK [Ensure the timezone is set to Asia/Shanghai] **********************************************************************************************************
ok: [10.0.0.205]
changed: [10.0.0.163]
changed: [10.0.0.164]

TASK [Update /etc/timezone file (for Debian/Ubuntu)] ********************************************************************************************************
skipping: [10.0.0.164]
skipping: [10.0.0.163]
ok: [10.0.0.205]

TASK [Set the timezone using timedatectl] *******************************************************************************************************************
skipping: [10.0.0.205]
changed: [10.0.0.163]
changed: [10.0.0.164]

PLAY [Install common software packages] *********************************************************************************************************************

TASK [Gathering Facts] **************************************************************************************************************************************
ok: [10.0.0.205]
ok: [10.0.0.163]
ok: [10.0.0.164]

TASK [Ensure EPEL repository is available] ******************************************************************************************************************
skipping: [10.0.0.205]
changed: [10.0.0.163]
changed: [10.0.0.164]

TASK [Update apt cache (Ubuntu)] ****************************************************************************************************************************
skipping: [10.0.0.164]
skipping: [10.0.0.163]
changed: [10.0.0.205]

TASK [Install common software packages] *********************************************************************************************************************
ok: [10.0.0.205]
changed: [10.0.0.163]
changed: [10.0.0.164]

PLAY [Close Firewall Clean iptables Disable SELINUX] ********************************************************************************************************

TASK [Gathering Facts] **************************************************************************************************************************************
ok: [10.0.0.163]
ok: [10.0.0.205]
ok: [10.0.0.164]

TASK [Disable and stop firewalld] ***************************************************************************************************************************
skipping: [10.0.0.205]
ok: [10.0.0.163]
ok: [10.0.0.164]

TASK [Clear iptables rules] *********************************************************************************************************************************
changed: [10.0.0.205]
changed: [10.0.0.164]
changed: [10.0.0.163]

TASK [Save iptables rules] **********************************************************************************************************************************
changed: [10.0.0.205]
changed: [10.0.0.163]
changed: [10.0.0.164]

TASK [Stop UFW service] *************************************************************************************************************************************
skipping: [10.0.0.164]
skipping: [10.0.0.163]
changed: [10.0.0.205]

TASK [Disable UFW service from starting on boot] ************************************************************************************************************
skipping: [10.0.0.164]
skipping: [10.0.0.163]
changed: [10.0.0.205]

TASK [Disable_selinux] **************************************************************************************************************************************
skipping: [10.0.0.205]
included: /data/ansible/init_hosts/tasks/disable_selinux.yml for 10.0.0.164, 10.0.0.163

TASK [Check current SELinux mode] ***************************************************************************************************************************
changed: [10.0.0.164]
changed: [10.0.0.163]

TASK [Set SELinux to permissive mode (temporarily)] *********************************************************************************************************
skipping: [10.0.0.164]
skipping: [10.0.0.163]

TASK [Set SELinux to disabled in /etc/selinux/config] *******************************************************************************************************
ok: [10.0.0.164]
ok: [10.0.0.163]

TASK [Reboot the system to apply changes] *******************************************************************************************************************
changed: [10.0.0.163]
changed: [10.0.0.164]

TASK [Wait for the system to come back online] **************************************************************************************************************
ok: [10.0.0.164]
ok: [10.0.0.163]

PLAY RECAP **************************************************************************************************************************************************
10.0.0.163                 : ok=32   changed=17   unreachable=0    failed=0    skipped=9    rescued=0    ignored=0
10.0.0.164                 : ok=32   changed=17   unreachable=0    failed=0    skipped=9    rescued=0    ignored=0
10.0.0.205                 : ok=26   changed=12   unreachable=0    failed=0    skipped=9    rescued=0    ignored=0
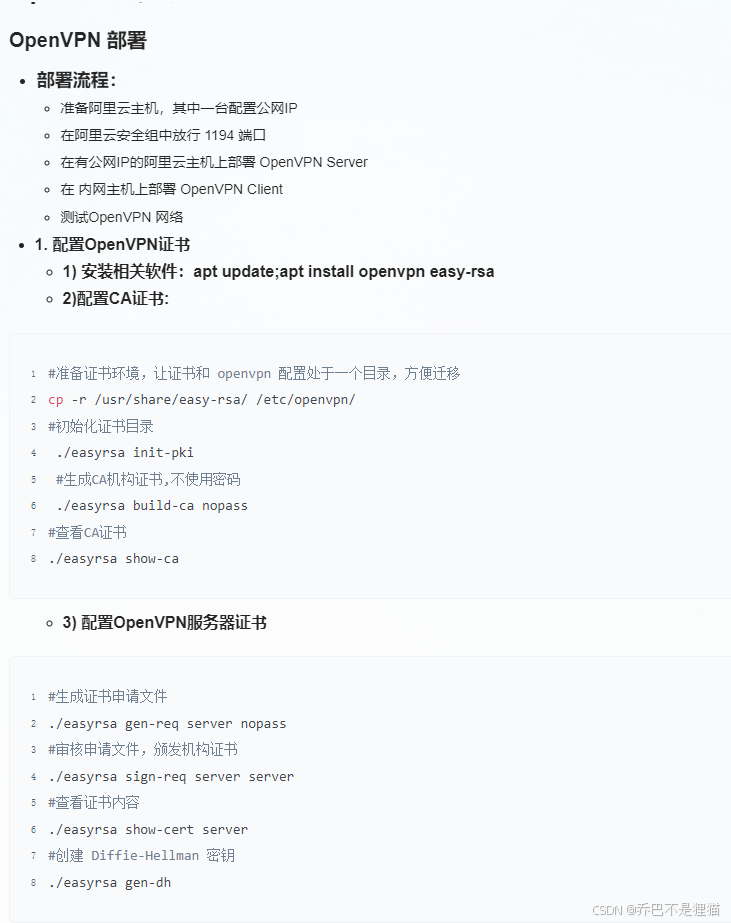
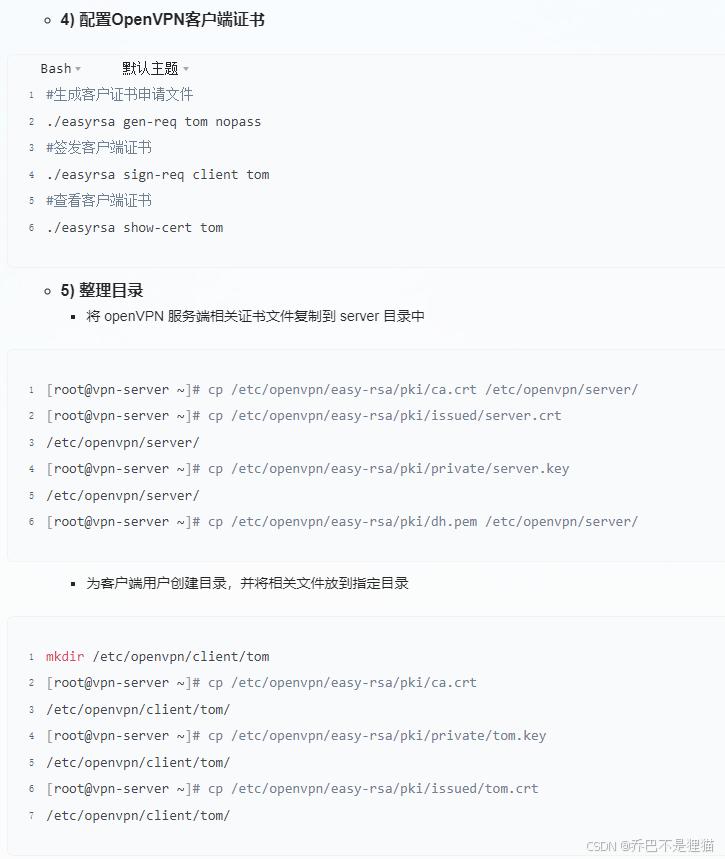
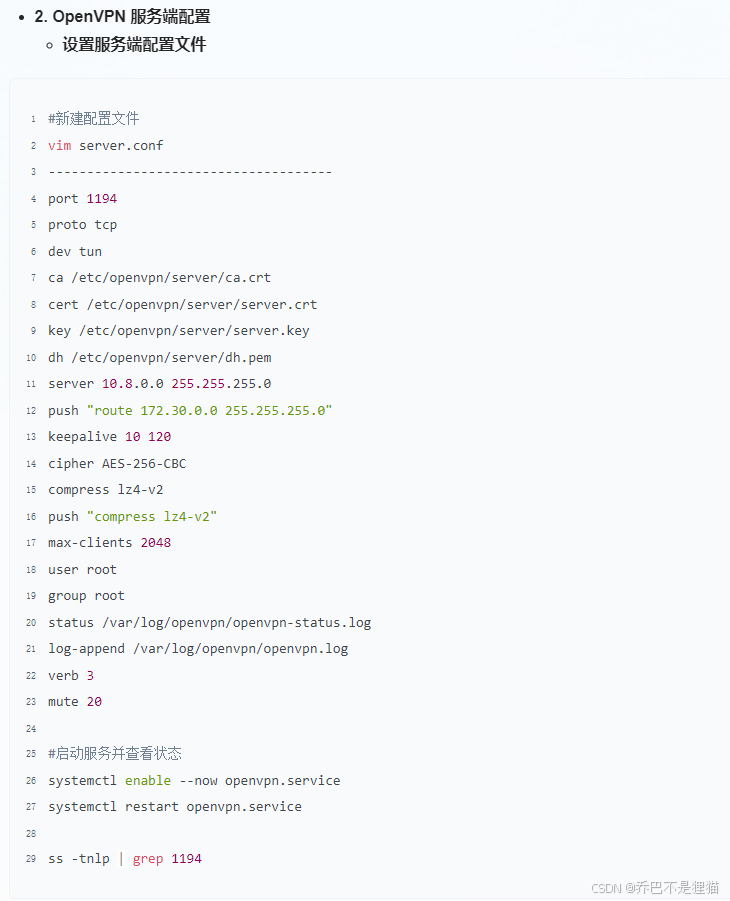
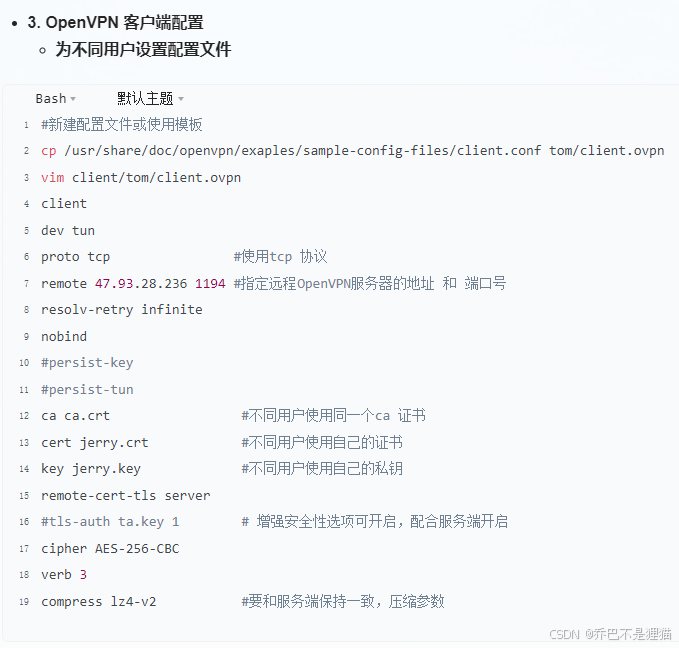
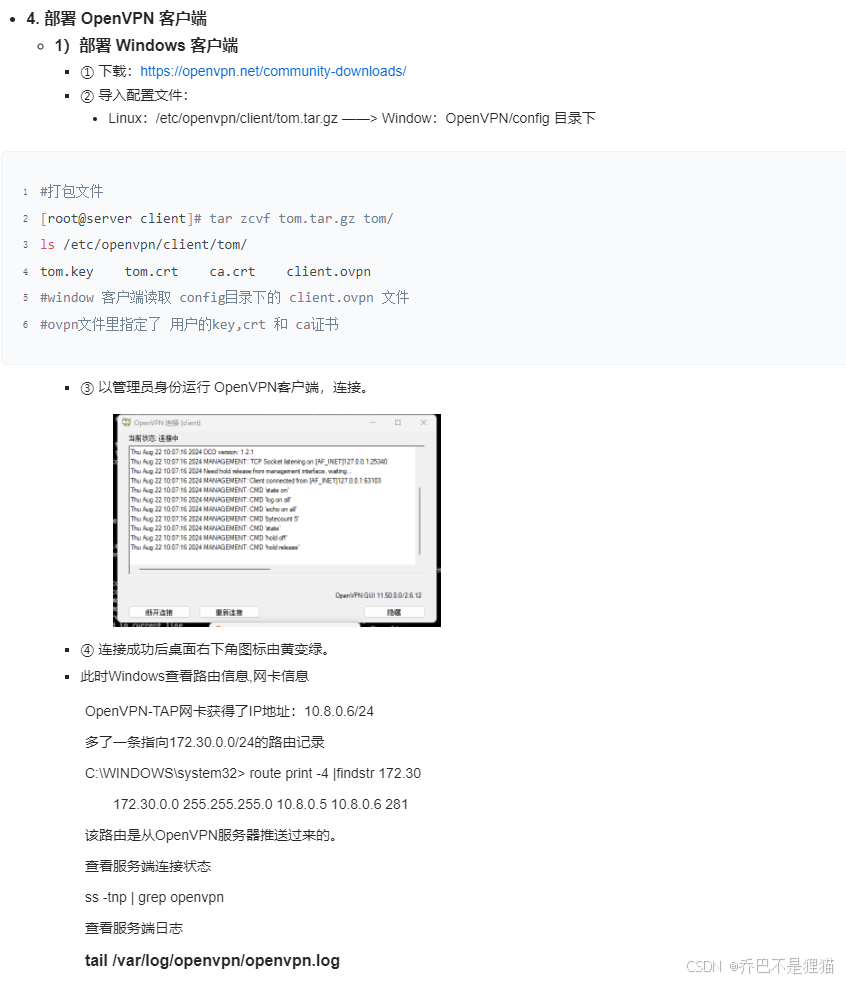
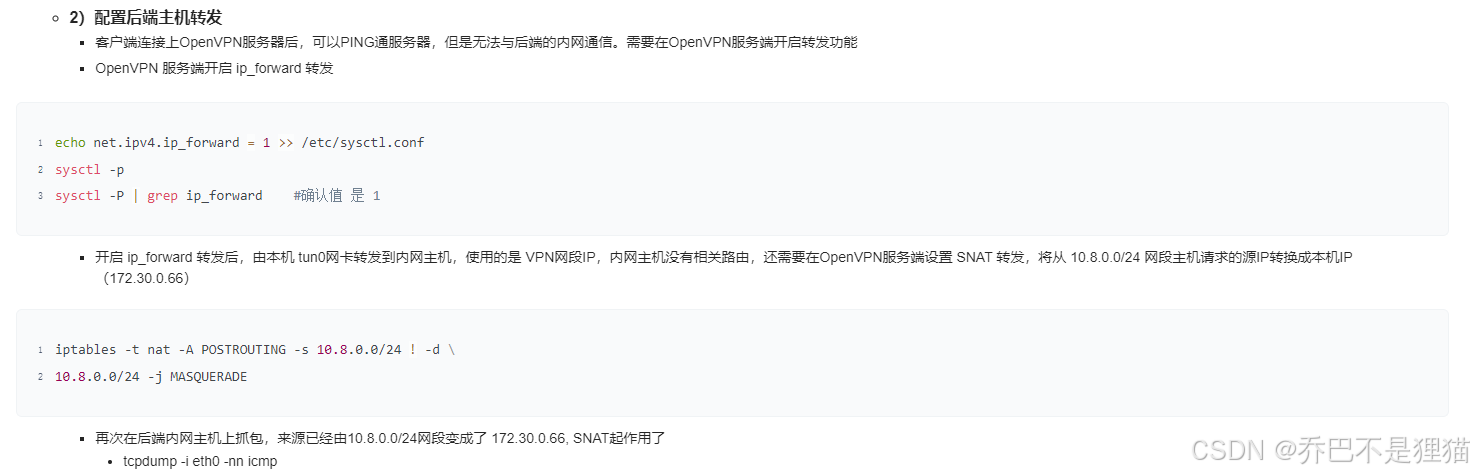
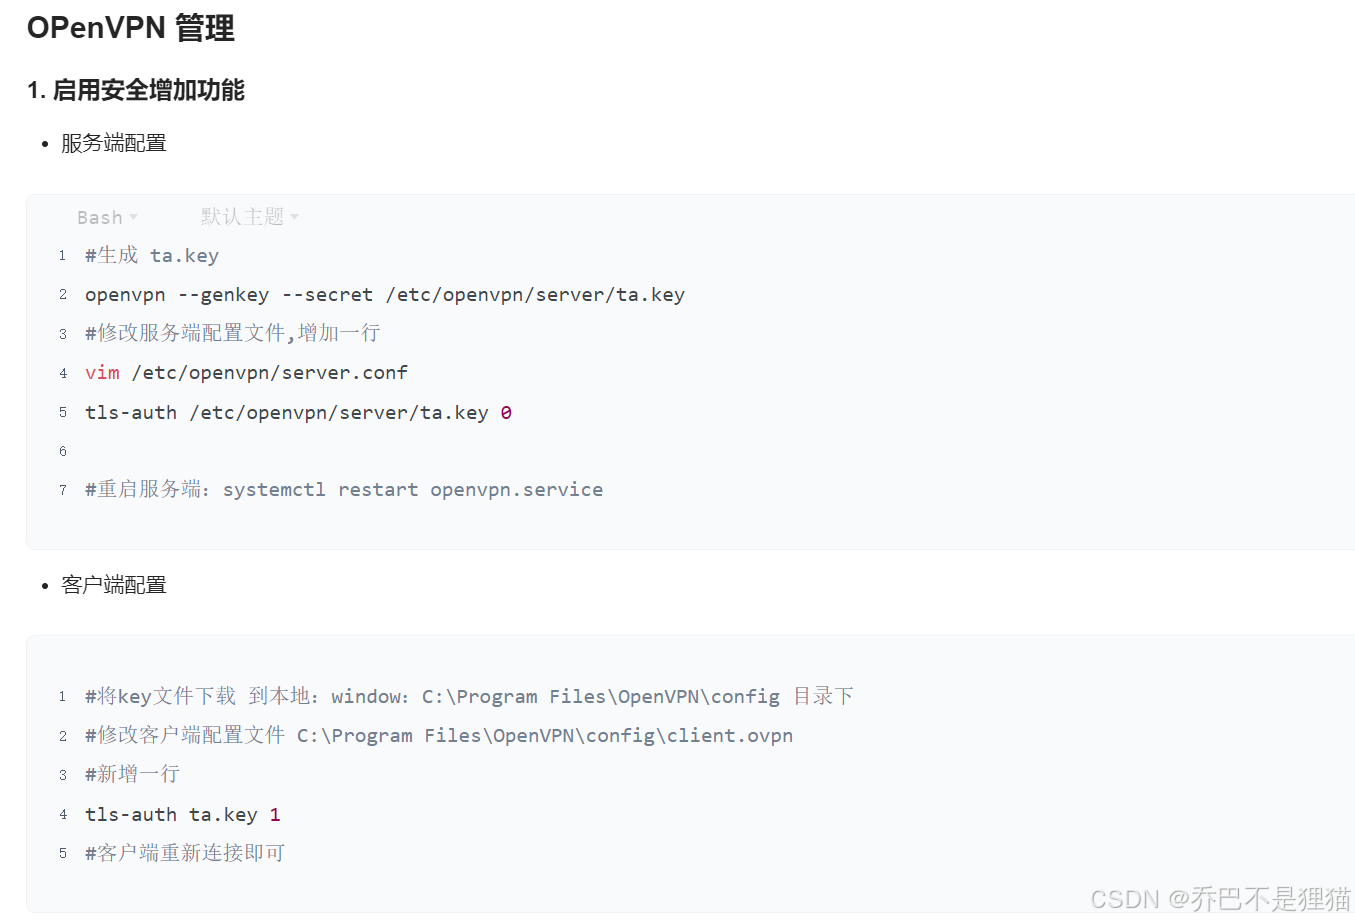
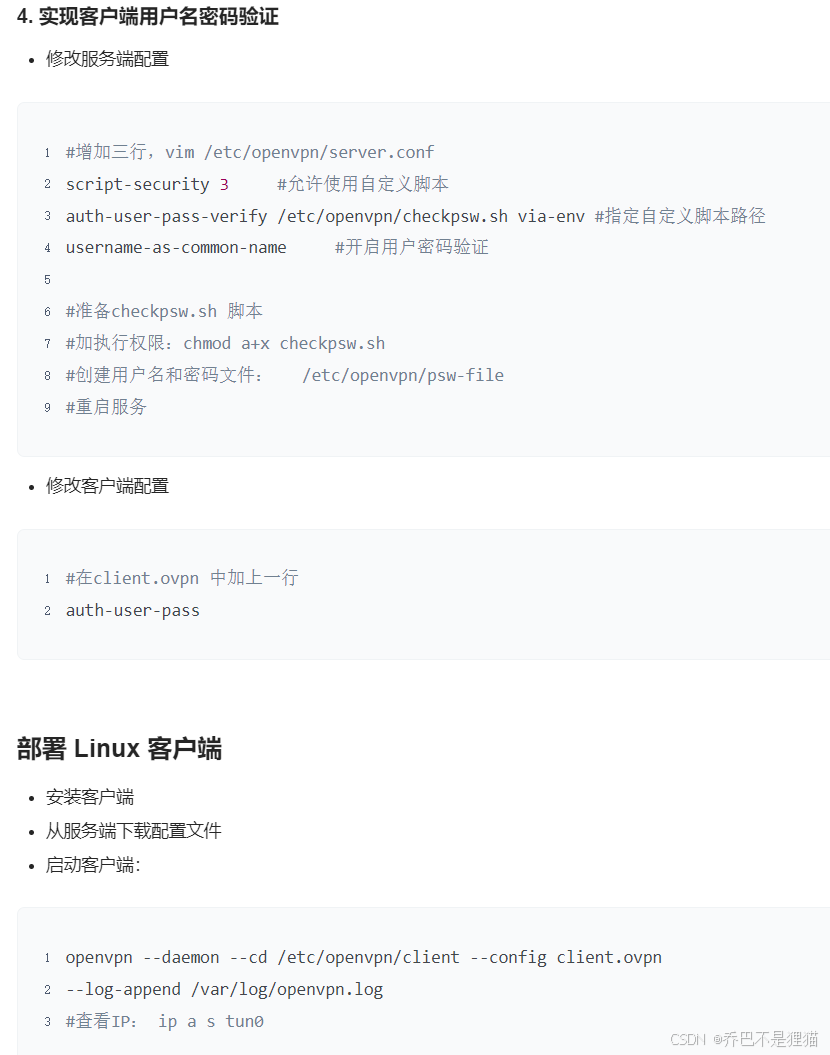
4.总结Open-VPN的部署安装过程和基本使用


 被折叠的 条评论
为什么被折叠?
被折叠的 条评论
为什么被折叠?
 到【灌水乐园】发言


