


Java RMI学习
闲来无事,看了《Hadoop技术内幕》中关于java rmi的介绍,觉得挺有意思的。因此想详细的了解相关的知识。在网上找了一些相关的资料学习一下。本文主要参考JavaRMI中的相关内容。
RMI简介
Java远程方法调用,即Java RMI(Java Remote Method Invocation)是Java编程语言里,一种用于实现远程过程调用的应用程序编程接口。它使客户机上运行的程序可以调用远程服务器上的对象。远程方法调用特性使Java编程人员能够在网络环境中分布操作。RMI全部的宗旨就是尽可能简化远程接口对象的使用。
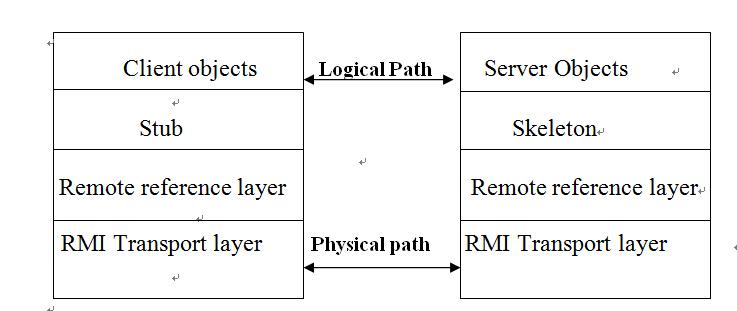
Java RMI极大地依赖于接口。在需要创建一个远程对象的时候,程序员通过传递一个接口来隐藏底层的实现细节。客户端得到的远程对象句柄正好与本地的根代码连接,由后者负责透过网络通信。这样一来,程序员只需关心如何通过自己的接口句柄发送消息。Rmi的架构图如下所示:
开发步骤
- 定义一个远程服务接口,需要注意有两点:
- 该接口必须继承
java.rmi.Remote - 方法必须抛出
java.rmi.RemoteException
- 该接口必须继承
package com.bupt.rmi.learning;
import java.rmi.Remote;
import java.rmi.RemoteException;

public interface RemoteInterface extends Remote{
    public String sayHello(String s) throws RemoteException;
}- 编写实现远程接口的类,该类必须满足
- 继承
UnicastRemoteObject,实现接口中定义的方法。 - 必须包含一个构造方法,在该方法中调用
UnicastRemoteObject的构造方法。 - 该类也可以包含其他方法,但只有远程服务接口中的方法才能参与远程方法的调用。
- 继承
package com.bupt.rmi.learning;

import java.rmi.RemoteException;
import java.rmi.server.UnicastRemoteObject;

public class RemoteImpl extends UnicastRemoteObject implements RemoteInterface {
    //    构造方法
    public RemoteImpl() throws RemoteException {
        super();
    }
    //  rmi需要调用的方法
    @Override
    public String sayHello(String s) throws RemoteException {
        return "Hello" + s;
    }
    //    普通方法
    public void print(String string) {
        System.out.println(string);
    }
}- 首先在idea中编译整个包,然后运行
rmic命令,产生stub以及skeleton,对于idea工程,需要进入/target/scala-2.10/classes目录下,运行
rmic com.bupt.rmi.learning.Server生成RemoteImpl_Stub.class文件
- 启动一个rmi注册表,以便驻留这些服务,在rmi中注册表中注册服务:
运行 rmiregistry运行Server类
package com.bupt.rmi.learning;

import java.net.MalformedURLException;
import java.rmi.AlreadyBoundException;
import java.rmi.Naming;
import java.rmi.RemoteException;
import java.rmi.registry.LocateRegistry;

public class Server {
    public static void main(String[] args) throws RemoteException, AlreadyBoundException, MalformedURLException {
        LocateRegistry.createRegistry(1098);
        Naming.bind("rmi://localhost:1098/RemoteInterface",new RemoteImpl());
    }
}
- 客户端查找远程对象,并调用远程对象。
package com.bupt.rmi.learning;

import java.net.MalformedURLException;
import java.rmi.Naming;
import java.rmi.NotBoundException;
import java.rmi.RemoteException;

public class Client {

    public static void main(String[] args) throws RemoteException, NotBoundException, MalformedURLException {

        RemoteInterface remoteInterface = (RemoteInterface)Naming.lookup("rmi://localhost:1098/RemoteInterface");
        System.out.println(remoteInterface.sayHello(" rmi"));
    }
}
运行结果如下所示:

Java8 RMI调用
有上述过程可知,java 8之前的rmi调用时非常繁琐的,需要手动生成stub文件,当源文件发生变化的时候需要重新生成,使用起来非常的不方便。因此Java 8以后生成和使用骨架和静态存根已经过时,骨架不在是必须的,并且静态存根由动态存根替代。
使用流程
- 定义接口
package example.hello;

import java.rmi.Remote;
import java.rmi.RemoteException;

public interface Hello extends Remote {
    String sayHello() throws RemoteException;
}- 编写Remote接口的实现
package example.hello;

import java.rmi.registry.Registry;
import java.rmi.registry.LocateRegistry;
import java.rmi.RemoteException;
import java.rmi.server.UnicastRemoteObject;

public class Server implements Hello {
    public Server() {}
    public String sayHello() {
        return "Hello, world!";
    }
    public static void main(String args[]) {
        try {
            Server obj = new Server();
            Hello stub = (Hello) UnicastRemoteObject.exportObject(obj, 0);

            // Bind the remote object's stub in the registry
            Registry registry = LocateRegistry.getRegistry();
            registry.bind("Hello", stub);

            System.err.println("Server ready");
        } catch (Exception e) {
            System.err.println("Server exception: " + e.toString());
            e.printStackTrace();
        }
    }
}- Client的调用
package example.hello;

import java.rmi.registry.LocateRegistry;
import java.rmi.registry.Registry;

public class Client {

    private Client() {}

    public static void main(String[] args) {

        String host = (args.length < 1) ? null : args[0];
        try {
            Registry registry = LocateRegistry.getRegistry(host);
            Hello stub = (Hello) registry.lookup("Hello");
            String response = stub.sayHello();
            System.out.println("response: " + response);
        } catch (Exception e) {
            System.err.println("Client exception: " + e.toString());
            e.printStackTrace();
        }
    }
}
可以看到Java8的RMI的调用时非常简单的。


 690
690

 被折叠的 条评论
为什么被折叠?
被折叠的 条评论
为什么被折叠?
 到【灌水乐园】发言


