


- GridLayout网格布局
- TabLayout切换卡布局
- Spinner下拉列表
ScrollView滚动条
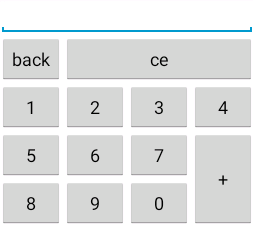
1. GridLayout网格布局
网格布局,又叫九宫格图。常见属性如下:
布局方式:

<GridLayout xmlns:android="http://schemas.android.com/apk/res/android"
    xmlns:tools="http://schemas.android.com/tools"
    android:layout_width="wrap_content"
    android:layout_height="wrap_content"
    android:columnCount="4"
    android:rowCount="7"
    tools:context="${relativePackage}.${activityClass}" >

    <EditText
        android:layout_columnSpan="4"
        android:layout_gravity="fill_horizontal" />

    <Button android:text="back" />

    <Button
        android:layout_columnSpan="3"
        android:layout_gravity="fill_horizontal"
        android:text="ce" />

    <Button android:text="1" />

    <Button android:text="2" />

    <Button android:text="3" />

    <Button android:text="4" />

    <Button android:text="5" />

    <Button android:text="6" />

    <Button android:text="7" />

    <Button
        android:layout_gravity="fill"
        android:layout_rowSpan="2"
        android:text="+" />

    <Button android:text="8" />

    <Button android:text="9" />

    <Button android:text="0" />

</GridLayout>
运行效果:
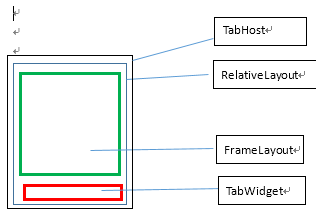
2. TabLayout切换卡布局
3.0之后不推荐使用了
继承TabActivity
布局结构如下:
示例1:
布局文件:
<TabHost xmlns:android="http://schemas.android.com/apk/res/android"
    xmlns:tools="http://schemas.android.com/tools"
    android:id="@android:id/tabhost"
    android:layout_width="match_parent"
    android:layout_height="match_parent"
    tools:context="${relativePackage}.${activityClass}" >

    <RelativeLayout
        android:layout_width="match_parent"
        android:layout_height="match_parent" >

        <TabWidget
            android:id="@android:id/tabs"
            android:layout_width="match_parent"
            android:layout_height="wrap_content"
            android:layout_alignParentBottom="true" />

        <FrameLayout
            android:layout_above="@android:id/tabs"
            android:id="@android:id/tabcontent"
            android:layout_width="match_parent"
            android:layout_height="match_parent" >

            <ImageView
                android:id="@+id/imgv1"
                android:layout_width="match_parent"
                android:layout_height="match_parent"
                android:src="@drawable/img1" />
            <ImageView
                android:id="@+id/imgv2"
                android:layout_width="match_parent"
                android:layout_height="match_parent"
                android:src="@drawable/img2" />

            <ImageView
                android:id="@+id/imgv3"
                android:layout_width="match_parent"
                android:layout_height="match_parent"
                android:src="@drawable/img3" />
        </FrameLayout>
    </RelativeLayout>
</TabHost>
java实现:
        //获取整个切换卡布局对象
        TabHost th = this.getTabHost();
        //新建选项条的3个选项
        TabSpec tab1 = th.newTabSpec("tag1");
        TabSpec tab2 = th.newTabSpec("tag2");
        TabSpec tab3 = th.newTabSpec("tag3");
        //设置选项的显示信息
        tab1.setIndicator("喵1",null);
        tab2.setIndicator("喵2",null);
        tab3.setIndicator("喵3",null);
        //设置选项的动作
        tab1.setContent(R.id.imgv1);
        tab2.setContent(R.id.imgv2);
        tab3.setContent(R.id.imgv3);
        th.addTab(tab1);
        th.addTab(tab2);
        th.addTab(tab3);
        //设置默认显示内容
        th.setCurrentTab(0);
运行效果:

示例2:
下面选项卡的信息可以为文字,也可以设置为图片,设置方式如下:
        tab1.setIndicator(null,this.getResources().getDrawable(R.drawable.img1));
        tab2.setIndicator(null,this.getResources().getDrawable(R.drawable.img2));
        tab3.setIndicator(null,this.getResources().getDrawable(R.drawable.img3));
运行效果:

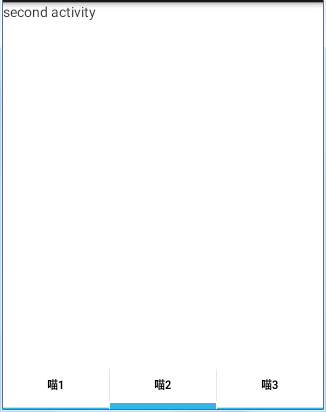
示例3:
每个选项卡激活后的显示内容也可以为Activity,如点击第2个选项卡的时候显示SecondActivity的内容:
    <TextView
        android:id="@+id/textView1"
        android:layout_width="wrap_content"
        android:layout_height="wrap_content"
        android:text="second activity" />
修改tab2的设置:
Intent intent = new Intent(this,SecondActivity.class);
tab2.setContent(intent);
注意:新建的Activity必须在AndroidMainfest.xml中进行注册:
运行效果:
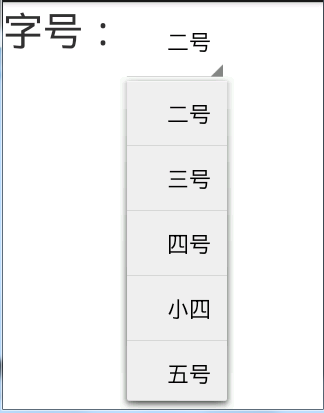
3. Spinner下拉列表
使用ArrayAdapter适配数据,(也可以自定义适配器,参考ListView,不再作介绍)
布局:
<RelativeLayout xmlns:android="http://schemas.android.com/apk/res/android"
    xmlns:tools="http://schemas.android.com/tools"
    android:layout_width="wrap_content"
    android:layout_height="wrap_content" >
    <TextView
        android:id="@+id/textView1"
        android:layout_width="wrap_content"
        android:layout_height="wrap_content"
        android:layout_alignParentLeft="true"
        android:textSize="40sp"
        android:text="字号:" />
    <Spinner
        android:id="@+id/spinner"
        android:layout_toRightOf="@id/textView1"
        android:layout_width="wrap_content"
        android:layout_height="wrap_content"     />
</RelativeLayout>
实现:
public class SpinnerActivity extends Activity implements OnItemSelectedListener{
    String[] strs = {"一号","二号","三号","四号","小四","五号","小五"};
    @Override
    protected void onCreate(Bundle savedInstanceState) {
        super.onCreate(savedInstanceState);
        setContentView(R.layout.spinnerview);
        ArrayAdapter<String> adapter = new ArrayAdapter<String>(this, android.R.layout.simple_expandable_list_item_1, strs);
        Spinner spinner = (Spinner) this.findViewById(R.id.spinner);
        spinner.setAdapter(adapter);
    }
    //Spinner的选中事件
    @Override
    public void onItemSelected(AdapterView<?> parent, View view, int position, long id) {
        String str=parent.getItemAtPosition(position).toString();
        Toast.makeText(this, "你选择的字号是:"+str, 0).show();
    }
    @Override
    public void onNothingSelected(AdapterView<?> parent) {
    }
}
运行效果:
4. ScrollView滚动条
ScrollView滚动视图是指当拥有很多内容,屏幕显示不完时,需要通过滚动跳来显示的视图。ScrollView只支持垂直滚动。水平滚动需要使用HorizontalSrollView 。
ScrollView和HorizontalSrollView可以相互嵌套。
注意:ScrollView或者HorizontalSrollView出于最外层时,内层有且只能有一种布局


 1276
1276


 被折叠的 条评论
为什么被折叠?
被折叠的 条评论
为什么被折叠?
 到【灌水乐园】发言


