


刚刚学到fragment的一点小内容,决定把学到的内容写下来,以后希望可以继续完善
这一部分是看了鸿洋大神的一篇博客而学到的一点,以下为链接
http://blog.csdn.net/lmj623565791/article/details/37970961
AndroidStudio 1.5 sdk 22
因为他没有提供完整的代码,所以自己添加
提前先添加了两张图片,作为下边bottombar的图标
touxiang.png 和 group.png (重复使用了)
先layout中创建一个bottombar.xml
<?xml version="1.0" encoding="utf-8"?>
<LinearLayout xmlns:android="http://schemas.android.com/apk/res/android"
    android:orientation="horizontal"
    android:layout_width="match_parent"
    android:layout_height="match_parent">
    <ImageButton
        android:background="@drawable/touxiang"
        android:id="@+id/id_Imagebtn_friend"
        android:layout_width="wrap_content"
        android:layout_height="match_parent"
        android:scaleType="fitCenter"
        android:layout_weight="1"/>
    <ImageButton
        android:background="@drawable/group"
        android:id="@+id/id_Imagebtn_group"
        android:layout_width="wrap_content"
        android:layout_height="match_parent"
        android:scaleType="fitCenter"
        android:layout_weight="1"/>
    <ImageButton
        android:background="@drawable/touxiang"
        android:layout_width="wrap_content"
        android:layout_height="match_parent"
        android:scaleType="centerInside"
        android:layout_weight="1"/>
    <ImageButton
        android:background="@drawable/group"
        android:layout_width="wrap_content"
        android:layout_height="match_parent"
        android:scaleType="centerInside"
        android:layout_weight="1"/>
</LinearLayout>
参考的博客里面是使用Linearlayout取代我这里的ImageButton的,这里没有太大问题。只是为了演示,所以只制作两个fragment,所以也只在前两个imagebutton添加了id。
创建 fragment_friend.xml
<?xml version="1.0" encoding="utf-8"?>
<LinearLayout xmlns:android="http://schemas.android.com/apk/res/android"
android:orientation="vertical"
android:layout_width="match_parent"
android:layout_height="match_parent">
<TextView
android:layout_width="match_parent"
android:layout_height="match_parent"
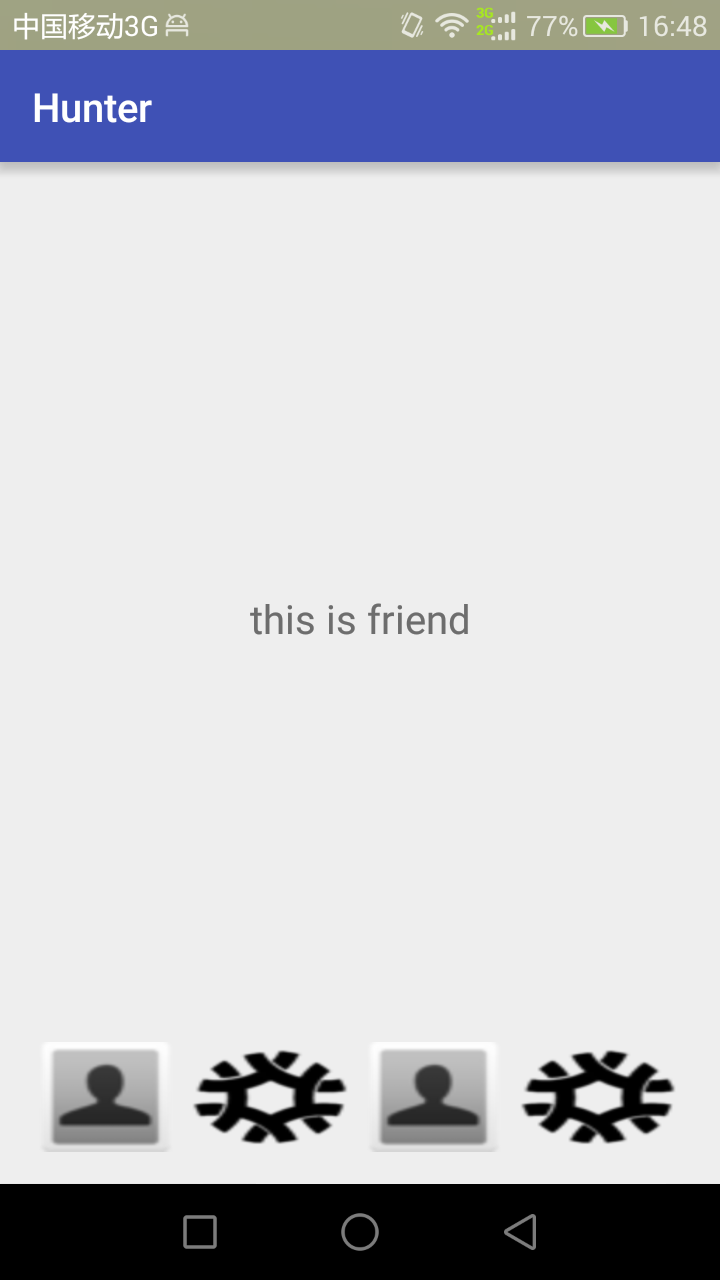
android:text="this is friend"
android:textSize="20dp"
android:gravity="center" />
</LinearLayout>以及 fragment_group.xml
<?xml version="1.0" encoding="utf-8"?>
<LinearLayout xmlns:android="http://schemas.android.com/apk/res/android"
android:orientation="vertical"
android:layout_width="match_parent"
android:layout_height="match_parent">
<TextView
android:layout_width="match_parent"
android:layout_height="match_parent"
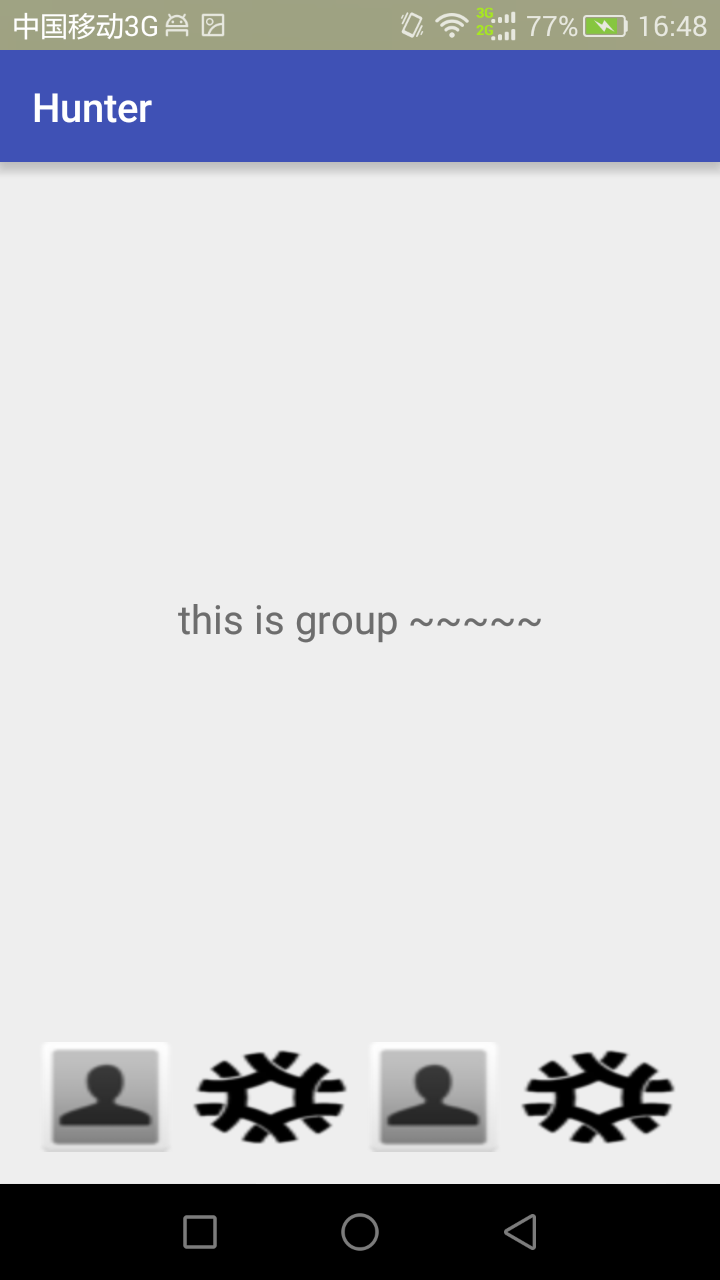
android:text="this is group ~~~~~"
android:textSize="20dp"
android:gravity="center" />
</LinearLayout>这里两个fragment很简单,只添加了textview用于区别
顺便把两个fragment的java文件创建出来
FriendFragment.java
package com.hunter.hunter.fragement;

import android.app.Fragment;
import android.os.Bundle;
import android.support.annotation.Nullable;
import android.view.LayoutInflater;
import android.view.View;
import android.view.ViewGroup;

import com.hunter.hunter.R;

/**
 * Created by Admin on 2016/2/29.
 */
public class FriendFragment extends Fragment {
    @Override
    public View onCreateView(LayoutInflater inflater, ViewGroup container, Bundle savedInstanceState) {
        return inflater.inflate(R.layout.fragment_friend,container,false);
    }
}
GroupFragment.java
package com.hunter.hunter.fragement;

import android.app.Fragment;
import android.os.Bundle;
import android.view.LayoutInflater;
import android.view.View;
import android.view.ViewGroup;

import com.hunter.hunter.R;

/**
 * Created by Admin on 2016/2/29.
 */
public class GroupFragment extends Fragment{
    @Override
    public View onCreateView(LayoutInflater inflater, ViewGroup container, Bundle savedInstanceState) {
        return inflater.inflate(R.layout.fragment_group,container,false);
    }
}
这两个都是继承了Fragment,并重写了其中的onCreateView的方法
再修改main_activity.xml中的内容
<?xml version="1.0" encoding="utf-8"?>
<RelativeLayout xmlns:android="http://schemas.android.com/apk/res/android"
    xmlns:tools="http://schemas.android.com/tools"
    android:layout_width="match_parent"
    android:layout_height="match_parent"
    android:paddingBottom="@dimen/activity_vertical_margin"
    android:paddingLeft="@dimen/activity_horizontal_margin"
    android:paddingRight="@dimen/activity_horizontal_margin"
    android:paddingTop="@dimen/activity_vertical_margin"
    tools:context="com.hunter.hunter.MainActivity">

    <include
        android:id="@+id/id_ly_bottombar"
        android:layout_width="match_parent"
        android:layout_height="55dp"
        android:layout_alignParentBottom="true"
        layout="@layout/bottombar"></include>

    <FrameLayout
        android:id="@+id/id_content"
        android:layout_width="match_parent"
        android:layout_height="match_parent"
        android:layout_above="@+id/id_ly_bottombar"></FrameLayout>
</RelativeLayout>
这里是仿那篇博客里面修改的,FrameLayout是用于存放fragment的include节点是将bottombar(即是底下的那横条)添加到主界面中的。
准备完毕了,需要MainActivity.java中进行整合。
package com.hunter.hunter;

import android.app.FragmentManager;
import android.app.FragmentTransaction;
import android.os.Bundle;
import android.support.v7.app.AppCompatActivity;
import android.view.View;
import android.widget.ImageButton;

import com.hunter.hunter.fragement.FriendFragment;
import com.hunter.hunter.fragement.GroupFragment;

public class MainActivity extends AppCompatActivity implements View.OnClickListener{

    private ImageButton mLinearFriend ;
    private ImageButton mLinearGroup ;

    private FriendFragment mFriend;
    private GroupFragment mGroup ;

    @Override
    protected void onCreate(Bundle savedInstanceState) {
        super.onCreate(savedInstanceState);
       // requestWindowFeature(Window.FEATURE_NO_TITLE);
        setContentView(R.layout.activity_main);

        mLinearFriend = (ImageButton) findViewById(R.id.id_Imagebtn_friend);
        mLinearGroup = (ImageButton) findViewById(R.id.id_Imagebtn_group);
        mLinearFriend.setOnClickListener(this);
        mLinearGroup.setOnClickListener(this);

        setDefaultFragment();
    }

    private void setDefaultFragment() {
        FragmentManager fm = getFragmentManager();
        FragmentTransaction transaction = fm.beginTransaction();
        mFriend = new FriendFragment();
        transaction.replace(R.id.id_content,mFriend);
        transaction.commit();
    }

    @Override
    public void onClick(View v) {
        FragmentManager fm = getFragmentManager();
        FragmentTransaction transaction = fm.beginTransaction();
        switch (v.getId()){
            case R.id.id_Imagebtn_friend:
                if(mFriend==null){
                    mFriend = new FriendFragment();
                }
                transaction.replace(R.id.id_content,mFriend);
                transaction.commit();
                break;
            case R.id.id_Imagebtn_group:
                if (mGroup==null){
                    mGroup = new GroupFragment();
                }
                transaction.replace(R.id.id_content,mGroup);
                transaction.commit();
                break;
        }
    }
}
mLinearFriend和mLinearGroup这两个是指向bottombar中那两个imagebutton,并处理点击事件。mFriend和mGroup则是存两个fragment的,可以在framelayout中进行切换的。
setDefaultFragment();这个是设置默认出现的fragment
onclick方法,则是处理点击事件的。这里面都同样的用到一段代码
        FragmentManager fm = getFragmentManager();
        FragmentTransaction transaction = fm.beginTransaction();
        mFriend = new FriendFragment();
        transaction.replace(R.id.id_content,mFriend);
        transaction.commit();
这一段,大概的意思就是将mFriend装入id_content中,(id_content其实就是activity_main.xml中的framelayout)
这一部分是照抄鸿洋大神的代码的(还不懂,只是知道是什么作用)不过记得最后一定要commit()。
这样一来效果就有了,点击下方bottombar的图标,就可以切换fragment了。
效果图
最后说一下:
由于个人目前安卓水平比较低,这次还是遇到了不少问题的,因为用的是AndroidStudio(个人感觉对开发能提升速度,但是对于新手可能有点磕绊)上面的标题栏,使用了
requestWindowFeature(Window.FEATURE_NO_TITLE);之后就会报错,无法运行
在运行鸿洋大神博客的静态fragment时只能将其屏蔽,所以就会出现两个标题栏的尴尬界面。
另外,关于inflate和fragmentmanager,现在也是知其然不知其所以然,知之甚少,希望以后能有机会学会,再写其他的博客,将这些详细写出来。
如果这篇博文有问题的,还烦请为新人指点指点。


 710
710

 被折叠的 条评论
为什么被折叠?
被折叠的 条评论
为什么被折叠?
 到【灌水乐园】发言


