


邮件的发送
例子:
<project xmlns="http://maven.apache.org/POM/4.0.0" xmlns:xsi="http://www.w3.org/2001/XMLSchema-instance"
    xsi:schemaLocation="http://maven.apache.org/POM/4.0.0 http://maven.apache.org/xsd/maven-4.0.0.xsd">
    <modelVersion>4.0.0</modelVersion>
    <groupId>com.et</groupId>
    <artifactId>SpringBoot-SendMail</artifactId>
    <version>0.0.1-SNAPSHOT</version>
    <!-- springboot的配置 -->
    <parent>
        <groupId>org.springframework.boot</groupId>
        <artifactId>spring-boot-starter-parent</artifactId>
        <version>1.5.9.RELEASE</version>
    </parent>
    <dependencyManagement>
        <dependencies>
            <dependency>
                <groupId>org.springframework.cloud</groupId>
                <artifactId>spring-cloud-dependencies</artifactId>
                <version>Dalston.SR4</version>
                <type>pom</type>
                <scope>import</scope>
            </dependency>
        </dependencies>
    </dependencyManagement>
    <dependencies>
        <dependency>
            <groupId>org.springframework.boot</groupId>
            <artifactId>spring-boot-starter-web</artifactId>
        </dependency>
        <!-- 发送邮件配置 -->
        <dependency>
            <groupId>org.springframework.boot</groupId>
            <artifactId>spring-boot-starter-mail</artifactId>
        </dependency>
        <!-- 将发送邮件的为服务注册到eureka注册中心的配置 -->
        <dependency>
            <groupId>org.springframework.cloud</groupId>
            <artifactId>spring-cloud-starter-eureka</artifactId>
        </dependency>
</project>
import org.springframework.boot.SpringApplication;
import org.springframework.boot.autoconfigure.SpringBootApplication;
/**
* @author Administrator
*
*/
@SpringBootApplication
public class Main {
public static void main(String[] args) {
SpringApplication.run(Main.class, args);
}
}package com.et;
import org.springframework.beans.factory.annotation.Autowired;
import org.springframework.mail.SimpleMailMessage;
import org.springframework.mail.javamail.JavaMailSender;
import org.springframework.web.bind.annotation.GetMapping;
import org.springframework.web.bind.annotation.RestController;
@RestController
public class MailController {
@Autowired
private JavaMailSender jms;
@GetMapping("/send")
public String send(){
SimpleMailMessage sm=new SimpleMailMessage();
//谁发的
sm.setFrom("hyp2549882772@126.com");
//发给谁
sm.setTo("2549882772@qq.com");
sm.setSubject("测试邮件");
sm.setText("测试");
jms.send(sm);
return "1";
}
}spring.mail.host=smtp.126.com
spring.mail.username= hyp2549882772
#授权密码
spring.mail.password= yyz123456
#smtp默认端口25
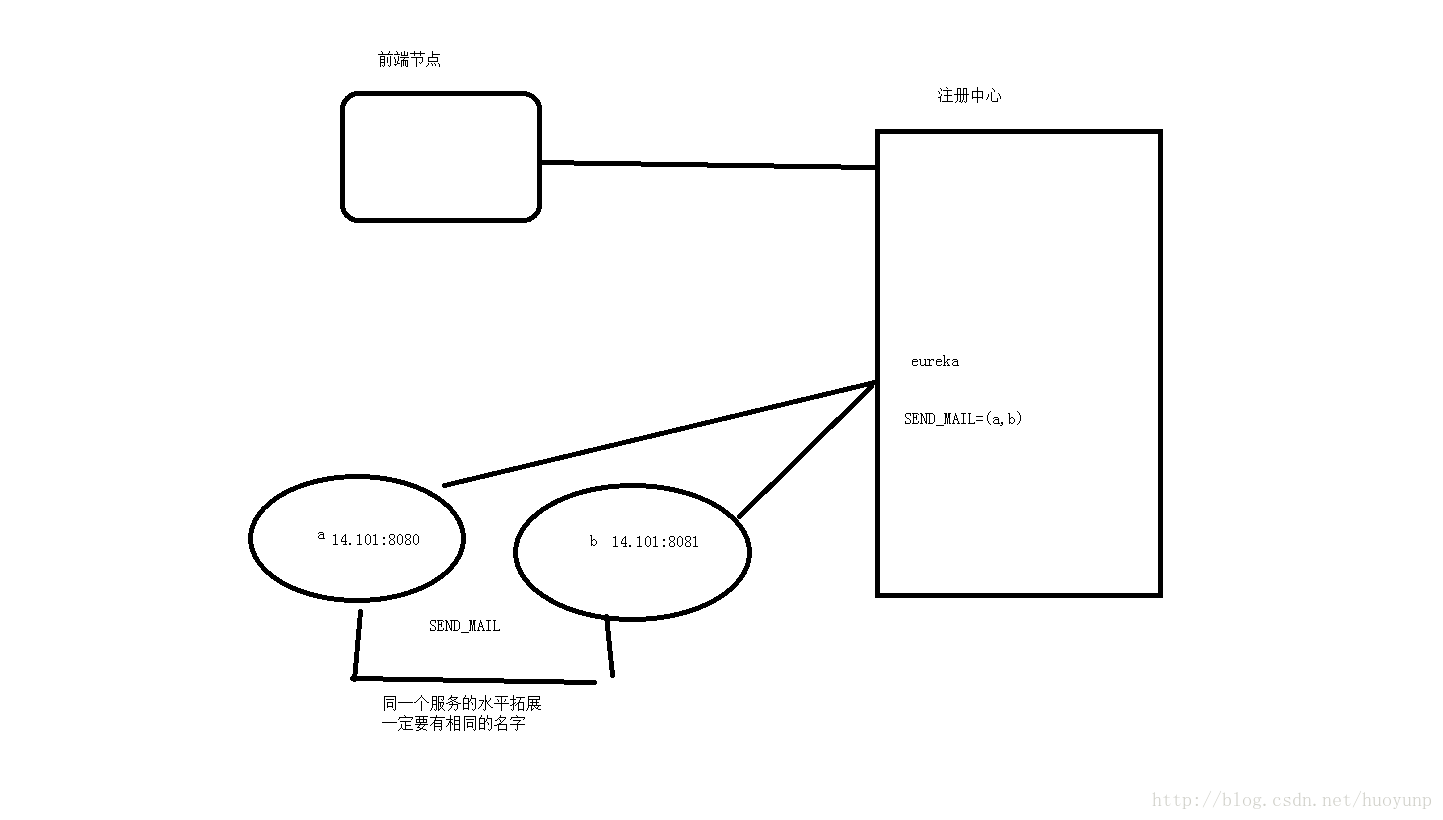
spring.mail.port= 25服务注册和发现原理图
Spring Cloud是一个基于Spring Boot实现的云应用开发工具,它为基于JVM的云应用开发中的配置管理、服务发现、断路器、智能路由、微代理、控制总线、全局锁、决策竞选、分布式会话和集群状态管理等操作提供了一种简单的开发方式。
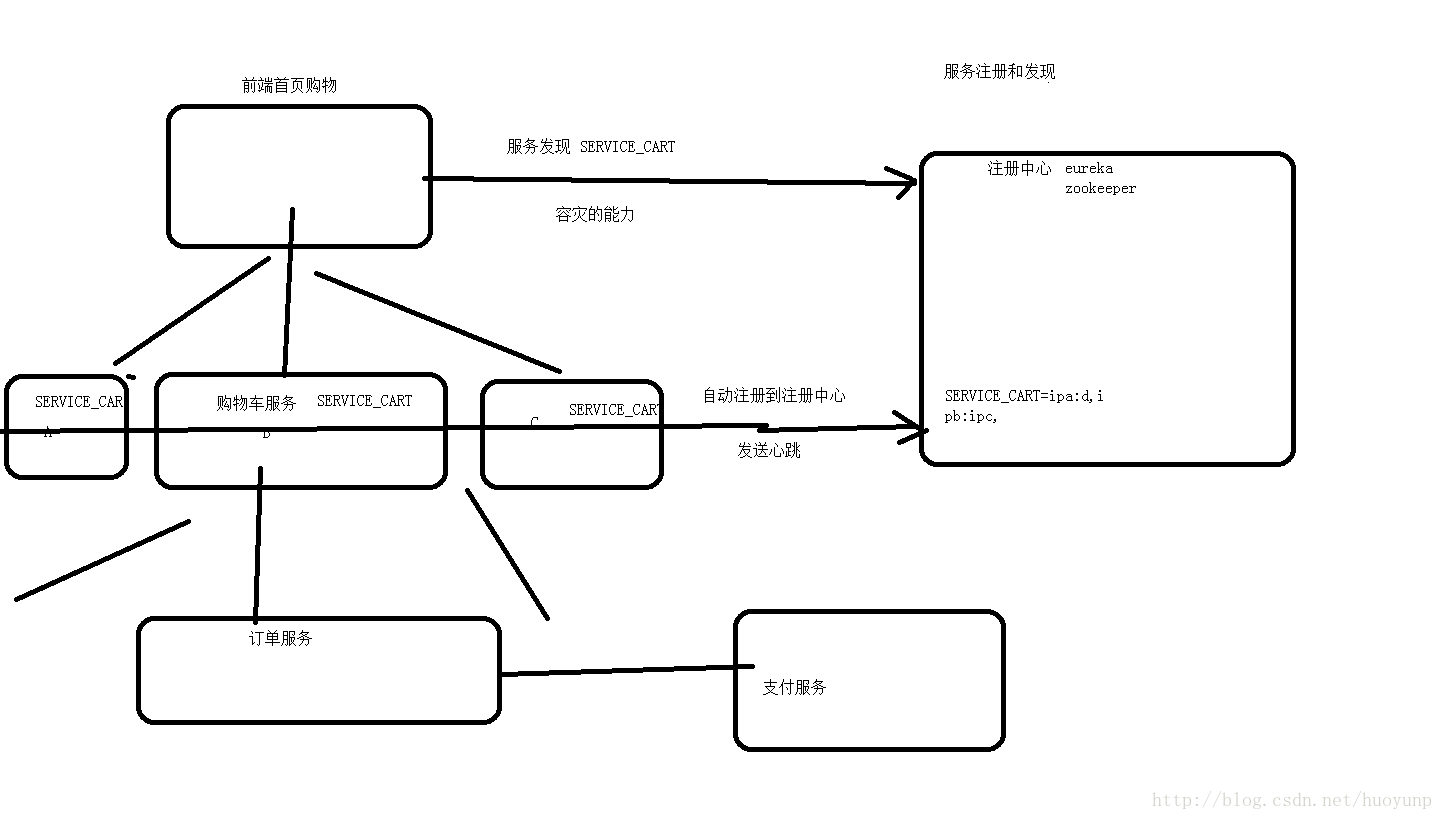
Spring Cloud包含了多个子项目(针对分布式系统中涉及的多个不同开源产品),比如:Spring Cloud Config、Spring Cloud Netflix、Spring Cloud CloudFoundry、Spring Cloud AWS、Spring Cloud Security、Spring Cloud Commons、Spring Cloud Zookeeper、Spring Cloud CLI等项目。Spring cloud的服务注册及发现,不仅仅只有eureka,还支持Zookeeper和Consul。默认情况下是eureka,spring 封装了eureka,使其非常简单易用,只需要比传统应用增加一行代码就可以使用了,这一行代码就是一个注解。我们按以下步骤实现服务注册和发现功能。
1)首选需要建立eureka服务器
创建spring cloud eureka服务器和创建之前那个配置文件服务器类似,你只需要创建一个空的maven工程,并引入spring boot的相关starter即可,然后创建一个执行类
package com.et;

import org.springframework.boot.SpringApplication;
import org.springframework.boot.autoconfigure.SpringBootApplication;
import org.springframework.cloud.netflix.eureka.server.EnableEurekaServer;
@SpringBootApplication
@EnableEurekaServer
public class Main {
    public static void main(String[] args) {

        SpringApplication.run(Main.class, args);
    }
}<project xmlns="http://maven.apache.org/POM/4.0.0" xmlns:xsi="http://www.w3.org/2001/XMLSchema-instance" xsi:schemaLocation="http://maven.apache.org/POM/4.0.0 http://maven.apache.org/xsd/maven-4.0.0.xsd">
<modelVersion>4.0.0</modelVersion>
<groupId>com.et</groupId>
<artifactId>SpringCloud-EurekaServer</artifactId>
<version>0.0.1-SNAPSHOT</version>
<!-- springboot的配置 -->
<parent>
<groupId>org.springframework.boot</groupId>
<artifactId>spring-boot-starter-parent</artifactId>
<version>1.5.9.RELEASE</version>
</parent>
<dependencyManagement>
<dependencies>
<dependency>
<groupId>org.springframework.cloud</groupId>
<artifactId>spring-cloud-dependencies</artifactId>
<version>Dalston.SR4</version>
<type>pom</type>
<scope>import</scope>
</dependency>
</dependencies>
</dependencyManagement>
<dependencies>
<!-- 注册中心的配置-->
<dependency>
<groupId>org.springframework.cloud</groupId>
<artifactId>spring-cloud-starter-eureka-server</artifactId>
</dependency>
</dependencies>
</project>可以看到只需要使用@EnableEurekaServer注解就可以让应用变为Eureka服务器,这是因为spring boot封装了Eureka Server,让你可以嵌入到应用中直接使用。至于真正的EurekaServer是Netflix公司的开源项目,也是可以单独下载使用的。
在application.properties配置文件中使用如下配置:
server:
port: 8761
eureka:
instance:
hostname: localhost
client:
registerWithEureka: false
fetchRegistry: false
serviceUrl:
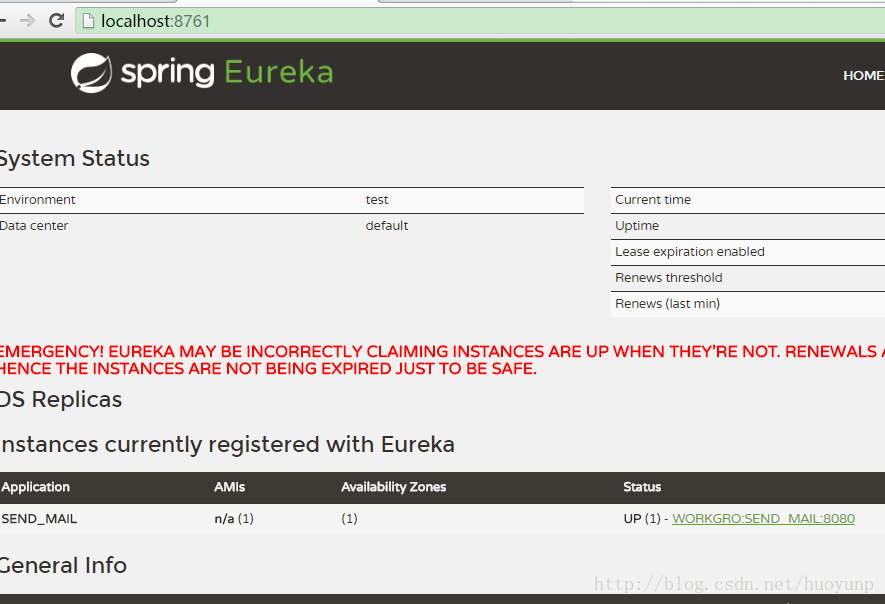
defaultZone: http://${eureka.instance.hostname}:${server.port}/eureka/8761是eureka默认的管理端口通过管理界面看到有哪些微服务注册到注册中心
hostname: localhost 告诉当前服务器这台主机的主机名linux需要配置属性名windows不需要
从中可以看到,registerWithEureka表示是否注册自身到eureka服务器,因为当前这个应用就是eureka服务器,没必要注册自身,所以这里是false。fetchRegistry表示是否从eureka服务器获取注册信息,同上,这里不需要
defaultZone: http://${eureka.instance.hostname}:${server.port}/eureka/ 为服务注册到注册中心的地址application.properties中必须用空格隔开 不可用tab键 例如:
server:
port: 8761注册中心访问的界面路径http://localhost:8761/
效果显示:
2)让服务使用eureka服务器
让服务使用eureka服务器,只需添加@EnableEurekaClient注解就可以了。回到我们在上篇文章中实现的发送邮件的微服务应用。在main方法所在的Application类中,添加@EnableEurekaClient注解。然后在配置文件中添加:
在application.properties中
eureka.client.serviceUrl.defaultZone= http://localhost:8761/eureka/
spring.application.name=SEND_MAIL
server.port=8080
其中defaultZone是指定eureka服务器的地址,无论是注册还是发现服务都需要这个地址。application.name是指定进行服务注册时该服务的名称。这个名称就是后面调用服务时的服务标识符(这是服务发现的功能,我们在后面章节具体介绍)。当然,pom文件也需要增加:
<!-- 将发送邮件的为服务注册到eureka注册中心的配置 -->
<dependency>
    <groupId>org.springframework.cloud</groupId>
    <artifactId>spring-cloud-starter-eureka</artifactId>
</dependency>
package com.et;
import org.springframework.beans.factory.annotation.Autowired;
import org.springframework.mail.SimpleMailMessage;
import org.springframework.mail.javamail.JavaMailSender;
import org.springframework.web.bind.annotation.GetMapping;
import org.springframework.web.bind.annotation.RestController;
@RestController
public class MailController {
@Autowired
private JavaMailSender jms;
@GetMapping("/send")
public String send(){
SimpleMailMessage sm=new SimpleMailMessage();
//谁发的
sm.setFrom("hyp2549882772@126.com");
//发给谁
sm.setTo("2549882772@qq.com");
sm.setSubject("测试邮件");
sm.setText("测试");
jms.send(sm);
return "1";
}
}package com.et;
import org.springframework.boot.SpringApplication;
import org.springframework.boot.autoconfigure.SpringBootApplication;
import org.springframework.cloud.netflix.eureka.EnableEurekaClient;
/**
* @EnableEurekaClient自动注册到注册中心
* @author Administrator
*
*/
@SpringBootApplication
@EnableEurekaClient
public class Main {
public static void main(String[] args) {
SpringApplication.run(Main.class, args);
}
}


 804
804


 被折叠的 条评论
为什么被折叠?
被折叠的 条评论
为什么被折叠?
 到【灌水乐园】发言


