转自:http://www.cocoachina.com/bbs/read.php?tid=43852
解析在iPhone应用中NSThread创建Run Loop
在iPhone应用中NSThread创建Run Loop是本文要介绍的内容,虽然iphone为我们提供了很多简单易于操作的线程方法。
IPhone多线程编程提议用NSOperation和NSOperationQueue,这个确实很好用。
但是有些情况下,我们还是在运行一些长线任务或者复杂任务的时候需要用比较原始的NSThread。这就需要为NSThread创建一个run loop.
[pre]
- NSThread *thread1 = [[NSThread alloc] initWithTarget:self selector:@selector(playerThread: ) object:nil];
- [thread start]; //如果要利用NSOperation,原理类似。只需要加入到queue里面去就好了。。queue会在合适的时机调用方法,下面代码作为参考。
- - (void) playerThread: (void*)unused {
- audioRunLoop = CFRunLoopGetCurrent();//子线程的runloop引用 NSAutoreleasePool *pool = [[NSAutoreleasePool alloc] init];//子线程的
- run loop [self initPlayer]; CFRunLoopRun(); //运行子线程的 run loop,这里就会停住了。 [pool release];
- } // 实现一个timer,用于检查子线程的工作状态,并在合适的时候做任务切换。或者是合适的时候停掉自己的
- run loop-(void) initPlayer { // 在这里你可以初始化一个工作类,比如声音或者视频播放
- NSTimer *stateChange = [NSTimer scheduledTimerWithTimeInterval:0.5 target:self selector: @selector(checkStatuserInfo:nil repeats:YES];
- } -(void) checkState:(NSTimer*) timer
- { if(需要退出自线程了) {
- //释放子线程里面的资源 CFRunLoopStop( CFRunLoopGetCurrent());//结束子线程任务
- } }
[iOS]深入浅出 iOS 之多线程 NSThread
iOS 支持多个层次的多线程编程,层次越高的抽象程度越高,使用起来也越方便,也是苹果最推荐使用的方法。
下面简要说明这三种不同范式:
Thread 是这三种范式里面相对轻量级的,但也是使用起来最负责的,你需要自己管理thread的生命周期,线程之间的同步。线程共享同一应用程序的部分内存空间,它们拥有对数据相同的访问权限。
你得协调多个线程对同一数据的访问,一般做法是在访问之前加锁,这会导致一定的性能开销。在 iOS 中我们可以使用多种形式的 thread:
Cocoa threads: 使用NSThread 或直接从 NSObject 的类方法 performSelectorInBackground:withObject: 来创建一个线程。如果你选择thread来实现多线程,那么 NSThread 就是官方推荐优先选用的方式。
POSIX threads: 基于 C 语言的一个多线程库,
Cocoa operations是基于 Obective-C实现的,类 NSOperation 以面向对象的方式封装了用户需要执行的操作,我们只要聚焦于我们需要做的事情,而不必太操心线程的管理,同步等事情,
因为NSOperation已经为我们封装了这些事情。 NSOperation 是一个抽象基类,我们必须使用它的子类。iOS 提供了两种默认实现:NSInvocationOperation 和 NSBlockOperation。
Grand Central Dispatch : iOS4 才开始支持,它提供了一些新的特性,以及运行库来支持多核并行编程,它的关注点更高:如何在多个 cpu 上提升效率。
有了上面的总体框架,我们就能清楚地知道不同方式所处的层次以及可能的效率,便利性差异。下面我们先来看看 NSThread 的使用,包括创建,启动,同步,通信等相关知识。这些与 win32/Java 下的 thread 使用非常相似。
线程创建与启动
NSThread的创建主要有两种直接方式:
[NSThread detachNewThreadSelector:@selector(myThreadMainMethod:) toTarget:self withObject:nil];
和
NSThread* myThread = [[NSThread alloc] initWithTarget:self
selector:@selector(myThreadMainMethod:)
object:nil];
[myThread start];
这两种方式的区别是:前一种一调用就会立即创建一个线程来做事情;而后一种虽然你 alloc 了也 init了,但是要直到我们手动调用 start 启动线程时才会真正去创建线程。
这种延迟实现思想在很多跟资源相关的地方都有用到。后一种方式我们还可以在启动线程之前,对线程进行配置,比如设置 stack 大小,线程优先级。
还有一种间接的方式,更加方便,我们甚至不需要显式编写 NSThread 相关代码。那就是利用 NSObject 的类方法 performSelectorInBackground:withObject: 来创建一个线程:
[myObj performSelectorInBackground:@selector(myThreadMainMethod) withObject:nil];
其效果与 NSThread 的 detachNewThreadSelector:toTarget:withObject: 是一样的。
线程同步
线程的同步方法跟其他系统下类似,我们可以用原子操作,可以用 mutex,lock等。
iOS的原子操作函数是以 OSAtomic开头的,比如:OSAtomicAdd32, OSAtomicOr32等等。这些函数可以直接使用,因为它们是原子操作。
iOS中的 mutex 对应的是 NSLock,它遵循 NSLooking协议,我们可以使用 lock, tryLock, lockBeforeData:来加锁,用 unLock来解锁。使用示例:
BOOL moreToDo = YES;
NSLock *theLock = [[NSLock alloc] init];
...
while (moreToDo) {
/* Do another increment of calculation */
/* until there’s no more to do. */
if ([theLock tryLock]) {
/* Update display used by all threads. */
[theLock unlock];
}
}
我们可以使用指令 @synchronized 来简化 NSLock的使用,这样我们就不必显示编写创建NSLock,加锁并解锁相关代码。
- (void)myMethod:(id)anObj
{
@synchronized(anObj)
{
// Everything between the braces is protected by the @synchronized directive.
}
}
还有其他的一些锁对象,比如:循环锁NSRecursiveLock,条件锁NSConditionLock,分布式锁NSDistributedLock等等,在这里就不一一介绍了,大家去看官方文档吧。
用NSCodition同步执行的顺序
NSCodition 是一种特殊类型的锁,我们可以用它来同步操作执行的顺序。它与 mutex 的区别在于更加精准,等待某个 NSCondtion 的线程一直被 lock,直到其他线程给那个 condition 发送了信号。
下面我们来看使用示例:某个线程等待着事情去做,而有没有事情做是由其他线程通知它的。
[cocoaCondition lock];
while (timeToDoWork <= 0)
[cocoaCondition wait];
timeToDoWork--;
// Do real work here.
[cocoaCondition unlock];
其他线程发送信号通知上面的线程可以做事情了:
[cocoaCondition lock];
timeToDoWork++;
[cocoaCondition signal];
[cocoaCondition unlock];
线程间通信
线程在运行过程中,可能需要与其它线程进行通信。我们可以使用 NSObject 中的一些方法:
在应用程序主线程中做事情:
performSelectorOnMainThread:withObject:waitUntilDone:
performSelectorOnMainThread:withObject:waitUntilDone:modes:
在指定线程中做事情:
performSelector:onThread:withObject:waitUntilDone:
performSelector:onThread:withObject:waitUntilDone:modes:
在当前线程中做事情:
performSelector:withObject:afterDelay:
performSelector:withObject:afterDelay:inModes:
取消发送给当前线程的某个消息
cancelPreviousPerformRequestsWithTarget:
cancelPreviousPerformRequestsWithTarget:selector:object:
如在我们在某个线程中下载数据,下载完成之后要通知主线程中更新界面等等,可以使用如下接口:- (void)myThreadMainMethod
{
NSAutoreleasePool *pool = [[NSAutoreleasePool alloc] init];
// to do something in your thread job
...
[self performSelectorOnMainThread:@selector(updateUI) withObject:nil waitUntilDone:NO];
[pool release];
}
RunLoop
说到 NSThread 就不能不说起与之关系相当紧密的 NSRunLoop。Run loop 相当于 win32 里面的消息循环机制,它可以让你根据事件/消息(鼠标消息,键盘消息,计时器消息等)来调度线程是忙碌还是闲置。
系统会自动为应用程序的主线程生成一个与之对应的 run loop 来处理其消息循环。在触摸 UIView 时之所以能够激发 touchesBegan/touchesMoved 等等函数被调用,
就是因为应用程序的主线程在 UIApplicationMain 里面有这样一个 run loop 在分发 input 或 timer 事件。
performSelector:withObject:afterDelay:
这段代码中@selector 搜索setMake方法 并返回SEL类型的变量。
格式如下:
SEL 变量名 = @selector(方法名: 第二个参数名 : 参数);
[myCar2performSelector:carMethod withObject:@"11111" withObject:@"2222"afterDelay:10];
这句话将搜索到的SEL类型的消息 发送给 myCar2对象。performSelector关键字可以调用到SEL类型的变量。延迟十秒执行。
其语句格式如下:
[消息接受者 performSelector:SEL类型的变量 withObject: 第一个参数 withObject: 第二个参数 afterDelay :秒数];
请问performSelectorInBackGround和NSThread中的detachNewThreadSelector有什么区别
如题:请问performSelectorInBackGround和NSThread中的detachNewThreadSelector还有performSelectorOnMainThread有什么区别,为什么有的地方要用[self performSelectorOnMainThread:@seletor(displayThread1Counts:withObject:myNumber waitUntialDone:YES),不直接用[self displayThread1Counts:]],还有那个waiUntilDone:YES代表什么意思detachNewThreadSelector还有performSelectorOnMainThread前者是开启一个线程,后者是回到主线程(更新UI的话必须到主线程)。
timer,runloop,thread,task小总结
对这几个也算不上有很深的理解,只是平时用到些许timer,thread。
想起有次去baidu笔试遇到runloop和timer等的区别,当时就不会。
两三月过去了,如今终于稍微整理了下。
有不对的地方盼指正。
(版权所有哦)
· NSThread:常见的线程
每个进程里都有多个线程,我们一般如下实用thread:
[NSThread detachNewThreadSelector:@selector(myThreadMainMethod:) toTarget:self withObject:nil];
如果函数需要输入参数,那么可以从object传进去。你也可以这样实现
NSThread* myThread = [[NSThread alloc] initWithTarget:self selector:@selector(myThreadMainMethod:) object:nil];
[myThread start]; // Actually create the thread
(from apple: threading PG)
你的对象也可以直接使用线程:
[myObj performSelectorInBackground:@selector(doSomething) withObject:nil];
· NSTimer:定时器
等待一定时间后,触发某个事件发生,可循环触发。默认是添加到当前runloop。你也可以添加到自己新建的runloop里去,注意如果添加的话runloop会retain timer,你应当release timer而将timer交给runloop,就像将operation加入operationQueue中一样。
可以很简单的调用:
[NSTimer scheduledTimerWithTimeInterval:2 target:self selector:@selector(addLabel) userInfo:nil repeats:YES];
- (void)addLabel
{
label.text = [NSString stringWithFormat:@"%d",num++];
}
每隔2秒,就触发定时器,向self发送addLabel消息。
· NSRunLoop
当有输入信号(input source,比如键盘鼠标的操作、),NSPort和NSConnection对象时,runloop提供了一个程序接口,即等待输入。但是我们从来都不需要去创建或者去管理一个runloop。在每个进程中都相应的有runloop,不管时当前的主进程还是你新建的进程。如果需要访问当前进程的runloop可以调用类方法:+ (NSRunLoop *)currentRunLoop。
[[NSRunLoop currentRunLoop] performSelector:@selector(addLabel2)
target:self
argument:nil
order:0
modes:[NSArray arrayWithObjects:@"NSDefaultRunLoopMode",nil]]
//举个例子而已,一般不会这样用
一般需要使用runloop也就是对于netservice,stream等对象以某种模式schedule在当前的runloop,如:
[[_session inputStream] scheduleInRunLoop:[NSRunLoop currentRunLoop] forMode:NSDefaultRunLoopMode];。
Runloop的作用在于当有事情要做时它使当前的thread工作,没有事情做时又使thread 休眠sleep。注意Runloop并不是由系统自动控制的,尤其是对那些你新建的次线程你需要对其进行显示的控制。
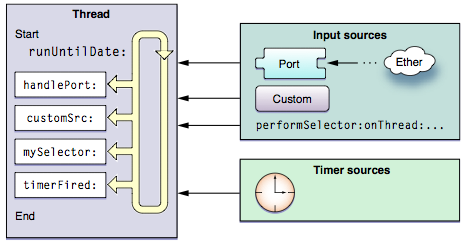
Runloop顾名思义就是一个不停的循环,不断的去check输入,如下图。

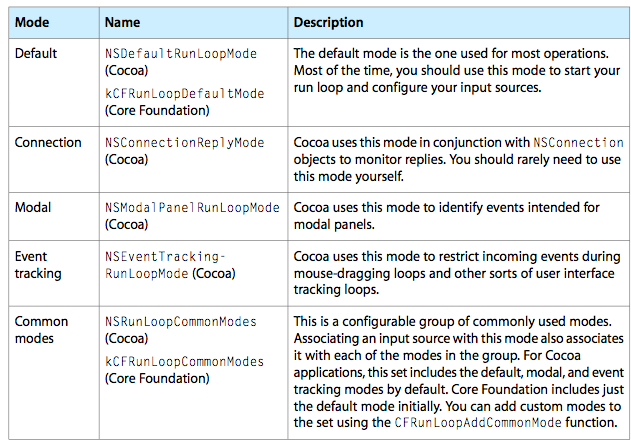
我们需要了解runloop modes这对判断事件来源以及添加到runloop时很有必要。

正如之前我们所说,只有创建了次线程才需要我们管理runloop,但是也并不是创建了次线程就一定需要管理runloop,仅当:
o Use ports or custom input sources to communicate with other threads.
o Use timers on the thread.
o Use any of the performSelector... methods in a Cocoa application.
o Keep the thread around to perform periodic tasks.
你还可以注册runloop,这样可以使用kvo。
· NSTask:
使用task你可以运行其它程序作为当前程序的子进程,并监控它的运行。它和线程的不同之处在于它并不何创建它的进程(父进程)共享内存。可以说是“完全”独立的一个东西。
创建NSThread 的 run loop
虽然iphone为我们提供了很多简单易于操作的线程方法。IPhone多线程编程提议用NSOperation和NSOperationQueue,这个确实很好用。但是有些情况下,我们还是在运行一些长线任务或者复杂任务的时候需要用比较原始的NSThread。这就需要为NSThread创建一个run loop.
NSThread *thread1 = [[NSThread alloc] initWithTarget:self selector:@selector(playerThread: ) object:nil];
[thread start];
//如果要利用NSOperation,原理类似。只需要加入到queue里面去就好了。。queue会在合适的时机调用方法,下面代码作为参考。
[pre]- (void) playerThread:(void*)unused { audioRunLoop = CFRunLoopGetCurrent();//子线程的runloop引用。 NSAutoreleasePool *pool = [[NSAutoreleasePool alloc] init];//子线程的run loop [self initPlayer]; CFRunLoopRun(); //运行子线程的run loop,这里就会停住了。 [pool release]; }
// 实现一个timer,用于检查子线程的工作状态,并在合适的时候做任务切换。或者是合适的时候停掉自己的run loop
-(void) initPlayer{ // 在这里你可以初始化一个工作类。比如声音或者视频播放。NSTimer *stateChange = [NSTimer scheduledTimerWithTimeInterval:0.5 target:self selector:@selector(checkStatuserInfo:nil repeats:YES]; }
-(void) checkState:(NSTimer*) timer{ if(需要退出自线程了) { //释放子线程里面的资源。 CFRunLoopStop( CFRunLoopGetCurrent());//结束子线程任务 }}[/pre]
iPhone SDK中多线程的使用方法以及注意事项
虽然现在大部分PC应用程序都支持多线程/多任务的开发方式,但是在iPhone上,Apple并不推荐使用多线程的编程方式。但是多线程编程毕竟是发展的趋势,而且据说即将推出的iPhone OS4将全面支持多线程的处理方式。所以说掌握多线程的编程方式,在某些场合一定能挖掘出iPhone的更大潜力
从例子入手
先从一个例程入手,具体的代码参考了这里。还有例程可以下载。多线程程序的控制模型可以参考这里,一般情况下都是使用 管理者/工人模型, 这里,我们使用iPhone SDK中的 NSThread 来实现它。
首先创建一个新的 View-based application 工程,名字为 "TutorialProject" 。界面如下图所示,使用UILabel实现两部分的Part(Thread Part和Test Part),Thread Part中包含一个UIProgressView和一个UIButton;而Test Part包含一个值和一个UISlider。

接下来,在 TutorialProjectViewController.h 文件中创建各个UI控件的 IBOutlets.
@interface TutorialProjectViewController : UIViewController {
// ------ Tutorial code starts here ------
// Thread part
IBOutlet UILabel *threadValueLabel;
IBOutlet UIProgressView *threadProgressView;
IBOutlet UIButton *threadStartButton;
// Test part
IBOutlet UILabel *testValueLabel;
// ------ Tutorial code ends here ------
}
同时,也需要创建outlets变量的property.
@property (nonatomic, retain) IBOutlet UILabel *threadValueLabel;
@property (nonatomic, retain) IBOutlet UIProgressView *threadProgressView;
@property (nonatomic, retain) IBOutlet UIProgressView *threadStartButton;
@property (nonatomic, retain) IBOutlet UILabel *testValueLabel;
接下来定义按钮按下时的动作函数,以及slider的变化函数。
- (IBAction) startThreadButtonPressed:(UIButton *)sender;
- (IBAction) testValueSliderChanged:(UISlider *)sender;
然后在 TutorialProjectViewController.m 文件中synthesize outlets,并在文件为实现dealloc释放资源。
@synthesize threadValueLabel, threadProgressView, testValueLabel, threadStartButton;
...
- (void)dealloc {
// ------ Tutorial code starts here ------
[threadValueLabel release];
[threadProgressView release];
[threadStartButton release];
[testValueLabel release];
// ------ Tutorial code ends here ------
[super dealloc];
}
现在开始线程部分的代码,首先当 thread button 被按下的时候,创建新的线程.
- (IBAction) startThreadButtonPressed:(UIButton *)sender {
threadStartButton.hidden = YES;
threadValueLabel.text = @"0";
threadProgressView.progress = 0.0;
[NSThread detachNewThreadSelector:@selector(startTheBackgroundJob) toTarget:self withObject:nil];
}
该按钮被按下后,隐藏按钮以禁止多次创建线程。然后初始化显示值和进度条,最后创建新的线程,线程的函数为 startTheBackgroundJob。具体的 startTheBackgroundJob 函数定义如下.
- (void)startTheBackgroundJob {
NSAutoreleasePool *pool = [[NSAutoreleasePool alloc] init];
// 线程开始后先暂停3秒(这里只是演示暂停的方法,你不是必须这么做的)
[NSThread sleepForTimeInterval:3];
[self performSelectorOnMainThread:@selector(makeMyProgressBarMoving) withObject:nil waitUntilDone:NO];
[pool release];
}
在第1行,创建了一个 NSAutoreleasePool 对象,用来管理线程中自动释放的对象资源。这里 NSAutoreleasePool 在线程退出的时候释放。这符合 Cocoa GUI 应用程序的一般规则。最后一行,阻塞调用(waitUntilDone状态是ON)函数 makeMyProgressBarMoving。
- (void)makeMyProgressBarMoving {
float actual = [threadProgressView progress];
threadValueLabel.text = [NSString stringWithFormat:@"%.2f", actual];
if (actual < 1) {
threadProgressView.progress = actual + 0.01;
[NSTimer scheduledTimerWithTimeInterval:0.5 target:self selector:@selector(makeMyProgressBarMoving) userInfo:nil repeats:NO];
}
else threadStartButton.hidden = NO;
}
这里计算用于显示的进度条的值,利用 NSTimer ,每0.5秒自增0.01,当值等于1的时候,进度条为100%,退出函数并显示刚才被隐藏的按钮。
最后,添加 UISlider 的实现函数,用来更改主线程中 Test Part 中的 label 值。
- (IBAction) testValueSliderChanged:(UISlider *)sender {
testValueLabel.text = [NSString stringWithFormat:@"%.2f", sender.value];
}
编译执行,按下线程开始按钮,你将看到进度条的计算是在后台运行。

使用线程的注意事项
线程的堆栈大小
iPhone设备上的应用程序开发也是属于嵌入式设备的开发,同样需要注意嵌入式设备开发时的几点问题,比如资源上限,处理器速度等。
iPhone 中的线程应用并不是无节制的,官方给出的资料显示iPhone OS下的主线程的堆栈大小是1M,第二个线程开始都是512KB。并且该值不能通过编译器开关或线程API函数来更改。
你可以用下面的例子测试你的设备,这里使用POSIX Thread(pthread),设备环境是 iPhone 3GS(16GB)、SDK是3.1.3。
#include "pthread.h"
void *threadFunc(void *arg) {
void* stack_base = pthread_get_stackaddr_np(pthread_self());
size_t stack_size = pthread_get_stacksize_np(pthread_self());
NSLog(@"Thread: base:%p / size:%u", stack_base, stack_size);
return NULL;
}
- (void)applicationDidFinishLaunching:(UIApplication *)application {
void* stack_base = pthread_get_stackaddr_np(pthread_self());
size_t stack_size = pthread_get_stacksize_np(pthread_self());
struct rlimit limit;
getrlimit(RLIMIT_STACK, &limit);
NSLog(@"Main thread: base:%p / size:%u", stack_base, stack_size);
NSLog(@" rlimit-> soft:%llu / hard:%llu", limit.rlim_cur, limit.rlim_max);
pthread_t thread;
pthread_create(&thread, NULL, threadFunc, NULL);
// Override point for customization after app launch
[window addSubview:viewController.view];
[window makeKeyAndVisible];
}
结果如下:
模拟器
Main thread: base:0xc0000000 / size:524288
rlimit-> soft:8388608 / hard:67104768
Thread: base:0xb014b000 / size:524288
设备
Main thread: base:0x30000000 / size:524288
rlimit-> soft:1044480 / hard:1044480
Thread: base:0xf1000 / size:524288
由此可见,当你测试多线程的程序时,模拟器和实际设备的堆栈大小是不一样的。如果有大量递归函数调用可要注意了。
Autorelease
如果你什么都不考虑,在线程函数内调用 autorelease 、那么会出现下面的错误:
NSAutoReleaseNoPool(): Object 0x********* of class NSConreteData autoreleased with no pool in place ….
一般,在线程中使用内存的模式是,线程最初
NSAutoreleasePool *pool = [[NSAutoreleasePool alloc]init];
而在线程结束的时候 [pool drain] 或 [pool release]。
子线程中描画窗口
多线程编程中普遍遵循一个原则,就是一切与UI相关的操作都有主线程做,子线程只负责事务,数据方面的处理。那么如果想在子线程中更新UI时怎么做呢?如果是在windows下,你会 PostMessage 一个描画更新的消息,在iPhone中,需要使用performSelectorOnMainThread 委托主线程处理。
比如,如果在子线程中想让 UIImageView 的 image 更新,如果直接在线程中
imageView.image = [UIImage imageNamed:@"Hoge.png"];
这么做,什么也不会出现的。需要将该处理委托给主线程来做,像下面:
[delegate performSelectorOnMainThread:@selector(theProcess:) withObject:nil waitUntilDone:YES];
就OK了!
iphone开发-多线程的使用
多线程之NSInvocationOperation
多线程编程是防止主线程堵塞,增加运行效率等等的最佳方法。而原始的多线程方法存在很多的毛病,包括线程锁死等。在Cocoa中,Apple提供了NSOperation这个类,提供了一个优秀的多线程编程方法。
本次介绍NSOperation的子集,简易方法的NSInvocationOperation:
@implementationMyCustomClass
-(void)launchTaskWithData:(id)data
{
//创建一个NSInvocationOperation对象,并初始化到方法
//在这里,selector参数后的值是你想在另外一个线程中运行的方法(函数,Method)
//在这里,object后的值是想传递给前面方法的数据
NSInvocationOperation* theOp = [[NSInvocationOperation alloc]initWithTarget:self
selector:@selector(myTaskMethod:)object:data];
// 下面将我们建立的操作“Operation”加入到本地程序的共享队列中(加入后方法就会立刻被执行)
// 更多的时候是由我们自己建立“操作”队列
[[MyAppDelegate sharedOperationQueue]addOperation:theOp];
}
// 这个是真正运行在另外一个线程的“方法”
-(void)myTaskMethod:(id)data
{
// Perform thetask.
}
@end一个NSOperationQueue 操作队列,就相当于一个线程管理器,而非一个线程。因为你可以设置这个线程管理器内可以并行运行的的线程数量等等。下面是建立并初始化一个操作队列:
@interface MyViewController : UIViewController{
NSOperationQueue*operationQueue;
//在头文件中声明该队列
}
@end
@implementationMyViewController
-(id)init
{
self = [superinit];
if (self){
operationQueue = [[NSOperationQueue alloc] init];//初始化操作队列
[operationQueuesetMaxConcurrentOperationCount:1];
//在这里限定了该队列只同时运行一个线程
//这个队列已经可以使用了
}
returnself;
}
-(void)dealloc
{
[operationQueuerelease];
//正如Alan经常说的,我们是程序的好公民,需要释放内存!
[superdealloc];
}
@end简单介绍之后,其实可以发现这种方法是非常简单的。很多的时候我们使用多线程仅仅是为了防止主线程堵塞,而NSInvocationOperation就是最简单的多线程编程,在iPhone编程中是经常被用到的。
///
1 在主线程里加入一个loading画面……
2 {
3 [windowaddSubview:view_loading];
4[NSThread detachNewThreadSelector:@selector(init_backup:)toTarget:self withObject:nil];
5}
可以通过performSelectorOhMainThread更新UI元素,比如设置进度条等等。最后消除loading画面,载入主View。
7 -(void)init_backup:(id)sender
8{
9 NSAutoreleasePool *pool =[[NSAutoreleasePool alloc]init];
10
11 // ...
12 int i =status;
13 [selfperformSelectorOnMainThread:@selector(show_loading:)withObject:[NSNumber numberWithInt:i] waitUntilDone:NO];
14
15 [view_loadingremoveFromSuperview];
16 [windowaddSubview:tabcontroller_main.view];
17[pool release];
18 }
///
利用iphone的多线程实现和线程同步
从接口的定义中可以知道,NSThread和大多数iphone的接口对象一样,有两种方式可以初始化:
一种使用initWithTarget :(id)targetselector:(SEL)selectorobject:(id)argument,但需要负责在对象的retaincount为0时调用对象的release方法清理对象。
另一种则使用所谓的convenientmethod,这个方便接口就是detachNewThreadSelector,这个方法可以直接生成一个线程并启动它,而且无需为线程的清理负责。
#import<UIKit/UIKit.h>
@interfaceSellTicketsAppDelegate : NSObject<UIApplicationDelegate>{
inttickets;
intcount;
NSThread*ticketsThreadone;
NSThread*ticketsThreadtwo;
NSCondition*ticketsCondition;
UIWindow *window;
}
@property (nonatomic, retain) IBOutlet UIWindow*window;
@end
然后在实现中添加如下代码:
// SellTicketsAppDelegate.m
// SellTickets
//
// Created by sun dfsun2009 on09-11-10.
// Copyright __MyCompanyName__ 2009. All rightsreserved.
//
#import"SellTicketsAppDelegate.h"
@implementationSellTicketsAppDelegate
@synthesizewindow;
-(void)applicationDidFinishLaunching:(UIApplication *)application{
tickets =100;
count =0;
// 锁对象
ticketCondition = [[NSCondition alloc]init];
ticketsThreadone = [[NSThread alloc] initWithTarget:selfselector:@selector(run)object:nil];
[ticketsThreadonesetName:@"Thread-1"];
[ticketsThreadonestart];
ticketsThreadtwo = [[NSThread alloc] initWithTarget:selfselector:@selector(run)object:nil];
[ticketsThreadtwosetName:@"Thread-2"];
[ticketsThreadtwostart];
//[NSThread detachNewThreadSelector:@selector(run) toTarget:selfwithObject:nil];
// Override point for customization after applicationlaunch
[windowmakeKeyAndVisible];
}
-(void)run{
while (TRUE){
// 上锁
[ticketsConditionlock];
if(tickets >0)
{
[NSThreadsleepForTimeInterval:0.5];
count = 100 -tickets;
NSLog(@"当前票数是:%d,售出:%d,线程名:%@",tickets,count,[[NSThreadcurrentThread]name]);
tickets--;
}else
{
break;
}
[ticketsConditionunlock];
}
}
- (void)dealloc{
[ticketsThreadonerelease];
[ticketsThreadtworelease];
[ticketsConditionrelease];
[windowrelease];
[superdealloc];
}
@end
-------------------------------------------------------------------------------------
// 定义
#import<UIKit/UIKit.h>
@interface ThreadSyncSampleViewController : UIViewController{
int_threadCount;
NSCondition*_myCondition;
}
@end
//实现文件如下:
#import "ThreadSyncSampleViewController.h"
@implementation ThreadSyncSampleViewController
// Implement viewDidLoad to do additional setup after loadingthe view, typically from a nib.
-(void)viewDidLoad{
[superviewDidLoad];
//
//_myCondition =nil;
//
_myCondition = [[NSCondition alloc]init];
//
NSTimer *timer = [NSTimerscheduledTimerWithTimeInterval:30
target:self
selector:@selector(threadTester)
userInfo:nil
repeats:YES];
[timerfire];
}
-(void)threadTester{
[_myConditionlock];
_threadCount =-2;
//如果有n个要等待的thread,这里置成 -n
[_myConditionunlock];
//
NSLog(@"");
NSLog(@"------------------------------------------------------------------------------");
[NSThreaddetachNewThreadSelector:@selector(threadOne) toTarget:selfwithObject:nil];
[NSThreaddetachNewThreadSelector:@selector(threadTwo) toTarget:selfwithObject:nil];
[NSThreaddetachNewThreadSelector:@selector(threadThree) toTarget:selfwithObject:nil];
return;
}
-(void)threadOne{
NSLog(@"@@@In thread 111111start.");
[_myConditionlock];
int n = rand()%5 +1;
NSLog(@"@@@Thread 111111 Will sleep %d seconds ,now _threadCount is :%d",n,_threadCount);
sleep(n);
//[NSThreadsleepForTimeInterval:n];
_threadCount++ ;
NSLog(@"@@@Thread 111111 has sleep %d seconds ,now _threadCount is :%d",n,_threadCount);
[_myConditionsignal];
NSLog(@"@@@Thread 1111111 has signaled ,now _threadCount is :%d",_threadCount);
[_myConditionunlock];
NSLog(@"@@@In thread onecomplete.");
[NSThreadexit];
return;
}
-(void)threadTwo{
NSLog(@"###In thread 2222222start.");
[_myConditionlock];
int n = rand()%5 +1;
NSLog(@"###Thread 2222222 Will sleep %d seconds ,now _threadCount is :%d",n,_threadCount);
sleep(n);
// [NSThreadsleepForTimeInterval:n];
_threadCount++ ;
NSLog(@"###Thread 2222222 has sleep %d seconds ,now _threadCount is :%d",n,_threadCount);
[_myConditionsignal];
NSLog(@"###Thread 2222222 has signaled ,now _threadCount is :%d",_threadCount);
[_myConditionunlock];
//_threadCount++ ;
NSLog(@"###In thread 2222222complete.");
[NSThreadexit];
return;
}
-(void)threadThree{
NSLog(@"<<<In thread 333333start.");
[_myConditionlock];
while(_threadCount < 0){
[_myConditionwait];
}
NSLog(@"<<<In thread 333333 ,_threadCount now is %d ,will startwork.",_threadCount);
[_myConditionunlock];
NSLog(@"<<<In thread 333333complete.");
[NSThreadexit];
return;
}
- (void)didReceiveMemoryWarning{
// Releases theview if it doesn't have asuperview.
[superdidReceiveMemoryWarning];
// Release any cached data, images,etc that aren't in use.
}
- (void)viewDidUnload{
// Release anyretained subviews of the mainview.
// e.g.self.myOutlet = nil;
}
- (void)dealloc{
[_myConditionrelease];
[super dealloc];
}
@end
多参数selector
Selector是Objective-C一个非常强大的特性,合理使用Selector可以大大简化实现并避免重复代码。但NSObject提供 的performSelector最多只支持两个参数,
对于两个以上的参数就没有能力为力了。一番调查后针对NSObject增加了如下扩展,使得 performSelector可以支持传入参数数组。多个参数就不再是问题了。
@interface NSObject (Addition)
- (id)performSelector:(SEL)selector withObjects:(NSArray *)objects;
@end
@implementation NSObject (Addition)
- (id)performSelector:(SEL)selector withObjects:(NSArray *)objects {
NSMethodSignature *signature = [self methodSignatureForSelector:selector];
if (signature) {
NSInvocation* invocation = [NSInvocation invocationWithMethodSignature:signature];
[invocation setTarget:self];
[invocation setSelector:selector];
for(int i = 0; i < [objects count]; i++){
id object = [objects objectAtIndex:i];
[invocation setArgument:&object atIndex: (i + 2)];
}
[invocation invoke];
if (signature.methodReturnLength) {
id anObject;
[invocation getReturnValue:&anObject];
return anObject;
} else {
return nil;
}
} else {
return nil;
}
}
@end
[self performSelector:@selector(addShrinkImg) withObject:self afterDelay:2.0f];//performSelector: withObject:afterDelay://线程的使用 延迟函数


 896
896

 被折叠的 条评论
为什么被折叠?


