ES与Spring Boot整合&性能优化

目录


1、前言

2、集成准备工作

2.1 依赖坐标

2.2 数据实体

2.3 数据交互接口

2.4 服务启动类

2.5 springboot配置文件

2.6 测试类

3、ES基本操作

3.1 索引操作

3.2 新增/更新文档

3.2 删除文档

3.3 查询文档

4、ES性能优化

4.1 批量提交

4.2 复杂组合查询

4.3 优化存储设备

4.4 加大tranlog flush间隔

4.5 增加index refresh间隔

4.5 锁定交换分区


1、前言

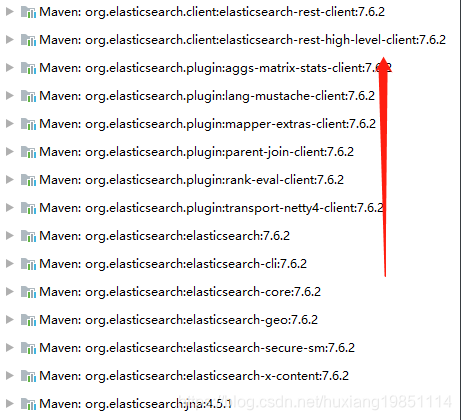
首先说明,springboot和elasticsearch的兼容性并不是很好,主要是因为elasticsearch的版本之间API差异太大。向后兼容性不强,特别是es6和es7,差异巨大!所以大家一定要注意自己服务器es的版本和springboot的依赖坐标版本对应,如我本地es版本为7,所以我导入的依赖坐标如下:

watermark,type_ZmFuZ3poZW5naGVpdGk,shadow_10,text_aHR0cHM6Ly9ibG9nLmNzZG4ubmV0L2h1eGlhbmcxOTg1MTExNA==,size_16,color_FFFFFF,t_70

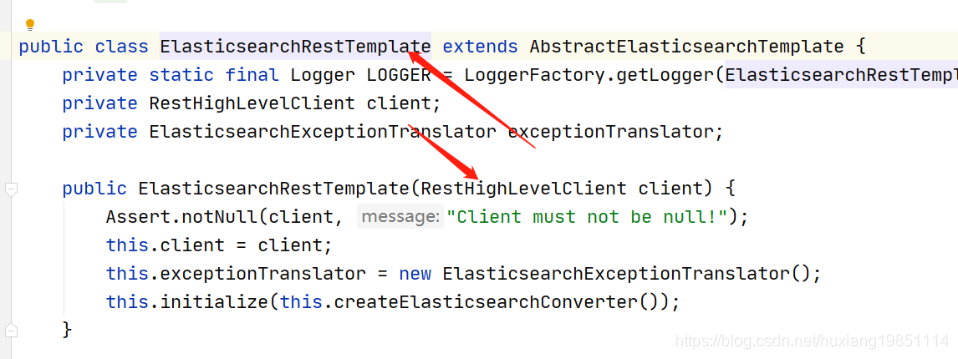
es7后操作模板使用ElasticsearchRestTemplate,已经集成了高级API!

watermark,type_ZmFuZ3poZW5naGVpdGk,shadow_10,text_aHR0cHM6Ly9ibG9nLmNzZG4ubmV0L2h1eGlhbmcxOTg1MTExNA==,size_16,color_FFFFFF,t_70

2、集成准备工作

2.1 依赖坐标

<dependencies>
        <dependency>
            <groupId>org.springframework.boot</groupId>
            <artifactId>spring-boot-starter</artifactId>
        </dependency>
​
        <dependency>
            <groupId>org.springframework.boot</groupId>
            <artifactId>spring-boot-starter-data-elasticsearch</artifactId>
        </dependency>
​
        <dependency>
            <groupId>org.springframework.boot</groupId>
            <artifactId>spring-boot-starter-test</artifactId>
            <scope>test</scope>
            <exclusions>
                <exclusion>
                    <groupId>org.junit.vintage</groupId>
                    <artifactId>junit-vintage-engine</artifactId>
                </exclusion>
            </exclusions>
        </dependency>
    </dependencies>

2.2 数据实体

package com.ydt.springboot.elasticsearch.domain;
​
import org.springframework.data.annotation.Id;
import org.springframework.data.elasticsearch.annotations.Document;
import org.springframework.data.elasticsearch.annotations.Field;
import org.springframework.data.elasticsearch.annotations.FieldType;
​
//@Document 文档对象 (索引信息、文档类型 )
/*Spring Data通过注解来声明字段的映射属性,有下面的三个注解:
​
        - `@Document` 作用在类,标记实体类为文档对象,一般有四个属性
        - indexName:对应索引库名称
        - type:对应在索引库中的类型   在ElasticSearch7.x中取消了type的概念
        - shards:分片数量,默认5
        - replicas:副本数量,默认1
        - `@Id` 作用在成员变量,标记一个字段作为id主键
        - `@Field` 作用在成员变量,标记为文档的字段,并指定字段映射属性:
        - type:字段类型,取值是枚举:FieldType
        - index:是否设置分词,布尔类型,默认是true
        - store:是否存储,布尔类型,默认是false
        - analyzer:分词器名称:ik_max_word
        - createIndex 不创建默认是standard标准分词器索引库,否则会出现异常*/
@Document(indexName="blog5",type="_doc",createIndex = false)
public class Article {
    //@Id 文档主键 唯一标识
    @Id
    //@Field
    // index:是否设置分词 analyzer:存储时使用的分词器
    // searchAnalyze:搜索时使用的分词器 store:是否存储 type: 数据类型
    @Field(store=true, index = false,type = FieldType.Integer)
    private Integer id;
    @Field(index=true,analyzer="ik_max_word",store=true,searchAnalyzer="ik_max_word",type = FieldType.Text)
    private String title;
    @Field(index=true,analyzer="ik_max_word",store=true,searchAnalyzer="ik_max_word",type = FieldType.Text)
    private String content;
​
    public Integer getId() {
        return id;
    }
​
    public void setId(Integer id) {
        this.id = id;
    }
​
    public String getTitle() {
        return title;
    }
​
    public void setTitle(String title) {
        this.title = title;
    }
​
    public String getContent() {
        return content;
    }
​
    public void setContent(String content) {
        this.content = content;
    }
​
    @Override
    public String toString() {
        return "Article [id=" + id + ", title=" + title + ", content=" + content + "]";
    }
}

2.3 数据交互接口

package com.ydt.springboot.elasticsearch.dao;
​
import com.ydt.springboot.elasticsearch.domain.Article;
import org.springframework.data.elasticsearch.repository.ElasticsearchRepository;
import org.springframework.stereotype.Repository;
​
@Repository
public interface ArticleRepository extends ElasticsearchRepository<Article, Integer> {
}

2.4 服务启动类

package com.ydt.springboot.elasticsearch;
​
import org.springframework.boot.SpringApplication;
import org.springframework.boot.autoconfigure.EnableAutoConfiguration;
import org.springframework.boot.autoconfigure.SpringBootApplication;
import org.springframework.boot.autoconfigure.data.elasticsearch.ElasticsearchDataAutoConfiguration;
import org.springframework.data.elasticsearch.repository.config.EnableElasticsearchRepositories;
​
@SpringBootApplication
//开启数据接口层,设置基本包路径
@EnableElasticsearchRepositories(basePackages = {"com.ydt.springboot.elasticsearch.dao"})
public class SpringbootElasticsearchApplication {
​
    public static void main(String[] args) {
        SpringApplication.run(SpringbootElasticsearchApplication.class, args);
    }
}
​

2.5 springboot配置文件

#开启elasticsearch 数据接口层功能
spring.data.elasticsearch.repositories.enabled=true 
#连接elasticsearch
spring.elasticsearch.rest.uris=http://192.168.223.128:9200

2.6 测试类

@SpringBootTest
public class SpringbootElasticsearchApplicationTests {
​
    //注入es操作模板,注意使用ElasticsearchRestTemplate
    @Autowired
    private ElasticsearchRestTemplate elasticsearchTemplate;
​
    //注入自定义数据交互接口
    @Autowired
    private ArticleRepository articleRepository;
}

3、ES基本操作

3.1 索引操作

 @Test
    public void test1() {
        //弃用方法
        /*elasticsearchTemplate.createIndex(Article.class);
        elasticsearchTemplate.putMapping(Article.class);*/
​
        //推荐使用index方式
        //1、创建单个索引库(带type映射)
        IndexOperations indexOps = elasticsearchTemplate.indexOps(Article.class);
        indexOps.create();
        indexOps.putMapping(indexOps.createMapping());
​
        //2、创建单个索引库(不带type映射)
        /*IndexOperations indexOperations
            = elasticsearchTemplate.indexOps(IndexCoordinates.of("blog5","blog4"));//多个并没有什么卵用
        indexOperations.create();*/
​
        //3、创建单个索引库,并往里面来一条文档数据
        /*Article2 article = new Article2();
        article.setId(123);
        article.setTitle("hello");
        article.setContent("hello es world");
        IndexQuery indexQuery = new IndexQueryBuilder()
                .withId(article.getId()+"")
                .withObject(article)
                .build();
        elasticsearchTemplate.index(indexQuery,IndexCoordinates.of("blog2","blog3"));
*/
        //删除索引
        //elasticsearchTemplate.deleteIndex("blog2");
    }

3.2 新增/更新文档

//新增单条文档数据
    @Test
    public void test2() {
        Article article = new Article();
        article.setId(1);
        article.setTitle("1hello");
        article.setContent("1hello es world");
        articleRepository.save(article);
    }
​
    //批量新增文档数据
    @Test
    public void test3(){
        List<Article> list = new ArrayList<>();
        for (int i = 0; i < 49; i++) {
            Article article = new Article();
            article.setId(i);
            article.setTitle(i + "hello");
            article.setContent(i + "hello es world");
            list.add(article);
        }
        Iterator<Article> iterator = list.iterator();
        Iterable iterable = new Iterable() {
            @Override
            public Iterator iterator() {
                return iterator;
            }
        };
        articleRepository.saveAll(iterable);
    }

3.2 删除文档

//删除文档
    @Test
    public void test4(){
        //根据ID删除
        articleRepository.deleteById(0);
        //删除所有
        //articleRepository.deleteAll();
    }

3.3 查询文档

//查询文档
    @Test
    public void test5(){
        //根据ID查询
        /*Optional<Article> article = articleRepository.findById(1);
        System.out.println(article.get());*/
​
        //查询所有
        /*Iterable<Article> articles = articleRepository.findAll();
        Iterator<Article> iterator = articles.iterator();
        while (iterator.hasNext()){
            System.out.println(iterator.next());
        }*/
​
        //根据ID集合查询所有
        /*Iterable iterable = new Iterable() {
            @Override
            public Iterator iterator() {
                List<Integer> list = new ArrayList<>();
                list.add(1);
                list.add(2);
                list.add(3);
                return list.iterator();
            }
        };
        Iterable<Article> allById = articleRepository.findAllById(iterable);
        Iterator<Article> iterator = allById.iterator();
        while (iterator.hasNext()){
            System.out.println(iterator.next());
        }*/
​
        //查询所有并排序,这个自带的排序有点恶心,是进位补齐的方式排序
        /*Iterable<Article> articles = articleRepository.findAll(Sort.by("id").descending());
        Iterator<Article> iterator = articles.iterator();
        while (iterator.hasNext()){
            System.out.println(iterator.next());
        }*/
​
        //分页查询所有(Pageable.unpaged()不分页,默认10条不生效)
        Pageable pageable = PageRequest.of(0,12,Sort.by("id").ascending());
        Page<Article> all = articleRepository.findAll(pageable);
        Iterator<Article> iterator = all.iterator();
        while (iterator.hasNext()){
            System.out.println(iterator.next());
        }
​
        //自定义条件查询(类似于JPA Repository)
        /*List<Article> articleList = articleRepository.findByTitleAndContent("6hello","6hello");
        for (Article article : articleList) {
            System.out.println(article);
        }*/
    }


4、ES性能优化

ElasticsearchRepository里面有几个特殊的search方法,这些是ES特有的,和普通的JPA区别的地方,用来构建一些ES查询的。主要是看QueryBuilder和SearchQuery两个参数,要完成一些特殊查询就主要看构建这两个参数

我们先来看看它们之间的类关系

watermark,type_ZmFuZ3poZW5naGVpdGk,shadow_10,text_aHR0cHM6Ly9ibG9nLmNzZG4ubmV0L2h1eGlhbmcxOTg1MTExNA==,size_16,color_FFFFFF,t_70

4.1 批量提交

前面讲过Repository的saveAll方法可以批量插值,当然也可以用ES自带的bulk,可以迅速插入百万级的数据。在ElasticSearchTemplate里提供了对应的方法:

@Test
    public void test61(){
        int counter = 0;
        List<IndexQuery> queries = new ArrayList<>();
        long startTime = System.currentTimeMillis();
        for (int i = 0; i < 1000000; i++) {
            Article article = new Article();
            article.setId(i);
            article.setTitle(i + "hello");
            article.setContent(i + "hello es world");
            IndexQuery indexQuery = new IndexQuery();
            indexQuery.setId(article.getId()+"");
            indexQuery.setObject(article);
            queries.add(indexQuery);
            if (counter % 10000 == 0) {
                elasticsearchTemplate.bulkIndex(queries,IndexCoordinates.of("blog1"));
                queries.clear();
                System.out.println("bulkIndex counter : " + counter);
            }
            counter++;
        }
        if (queries.size() > 0) {
            elasticsearchTemplate.bulkIndex(queries,IndexCoordinates.of("blog1"));
        }
        long endTime = System.currentTimeMillis();
        System.out.println("总耗时:" + (endTime-startTime));
    }
​
    @Test
    public void test62(){
        int counter = 0;
        List<Article> queries = new ArrayList<>();
        long startTime = System.currentTimeMillis();
        for (int i = 0; i < 10000000; i++) {
            Article article = new Article();
            article.setId(i);
            article.setTitle(i + "hello");
            article.setContent(i + "hello es world");
            queries.add(article);
            if (counter % 10000 == 0) {
                articleRepository.saveAll(queries);
                queries.clear();
                System.out.println("bulkIndex counter : " + counter);
            }
            counter++;
        }
        if (queries.size() > 0) {
            articleRepository.saveAll(queries);
        }
        long endTime = System.currentTimeMillis();
        System.out.println("总耗时:" + (endTime-startTime));
    }

这里是创建了100万个Article对象,每到10000就用bulkIndex插入一次,快速插入了百万数据。

PS:每次提交的数据量为多少时,能达到最优的性能,主要受到文件大小、网络情况、数据类型、集群状态等因素影响。

通用的策略如下:一般建议是1000-5000个文档,如果你的文档很大,可以适当减少队列,大小建议是5-15MB,默认不能超过100M。数据条数一般是根据文档的大小和服务器性能而定的,但是单次批处理的数据大小应从 5MB~15MB 逐渐增加,当性能没有提升时,把这个数据量作为最大值

可以在elasticsearch.yml中配置限制:

http.max_content_length: 100mb


4.2 复杂组合查询

能够组合查询的尽可能组合查询,减少ES的连接操作并且ES会将结果进行缓存到缓冲区,下次查询就不需要去索引进行查询了

Test
    public void test7(){
        long startTime = System.currentTimeMillis();
        //查询条件
        MatchQueryBuilder matchQueryBuilder = QueryBuilders.matchQuery("title", "111");
        //字段排序
        FieldSortBuilder fieldSortBuilder = SortBuilders.fieldSort("id");
        //分页查询
        Pageable pageable = PageRequest.of(0,10);
        //高亮显示
        HighlightBuilder.Field field = new HighlightBuilder.Field("title").preTags("<span style='color:red'>").postTags("</span>");
        NativeSearchQuery nativeSearchQuery =
                new NativeSearchQueryBuilder().withQuery(matchQueryBuilder)
                        .withSort(fieldSortBuilder).withPageable(pageable)
                        .withHighlightFields(field).build();//可以指定多个字段高亮
        SearchHits<Article> hits = elasticsearchTemplate.search(nativeSearchQuery, Article.class, IndexCoordinates.of("blog1"));
        if(hits.getTotalHits() > 0){
            List<SearchHit<Article>> searchHits = hits.getSearchHits();
            for (SearchHit<Article> searchHit : searchHits) {
                System.out.println(searchHit.getContent());
                System.out.println(searchHit.getHighlightFields());
            }
        }
        long endTime = System.currentTimeMillis();
        System.out.println("总耗时:" + (endTime-startTime));
    }

第二次查询比第一次查询要更快,因为ES已经自动缓存到内存了,而没有走磁盘搜索。

缓存是在节点级别进行管理的,默认最大大小为堆的1%。可以使用以下命令在elasticsearch.yml 文件中进行更改:

indices.requests.cache.size:2%
index.requests.cache.expire:60000

4.3 优化存储设备

4.3.1 存储设备意义

ES 是一种密集使用磁盘的应用,在段合并的时候会频繁操作磁盘,所以对磁盘要求较高,当磁盘速度提升之后,集群的整体性能会大幅度提高。

磁盘的选择,提供以下几点建议:

  • 使用固态硬盘(Solid State Disk)替代机械硬盘。SSD 与机械磁盘相比,具有高效的读写速度和稳定性。

  • 使用 RAID 0。RAID 0 条带化存储,可以提升磁盘读写效率。

    RAID 0又称为Stripe或Striping,它代表了所有RAID级别中最高的存储性能。RAID 0提高存储性能的原理是把连续的数据分散到多个磁盘上存取,这样,系统有数据请求就可以被多个磁盘并行的执行,每个磁盘执行属于它自己的那部分数据请求。这种数据上的并行操作可以充分利用总线的带宽,显著提高磁盘整体存取性能----相当于物理磁盘矩阵,需要专业的系统运维,而且要主板支撑
  • 在 ES 的服务器上挂载多块硬盘。使用多块硬盘同时进行读写操作提升效率,在配置文件 ES 中设置多个存储路径,避免使用 NFS(Network File System)等远程存储设备,网络的延迟对性能的影响是很大的。---相当于虚拟磁盘矩阵

下面我们只讲多磁盘挂载操作:

4.3.2 VMware虚拟机添加新磁盘


watermark,type_ZmFuZ3poZW5naGVpdGk,shadow_10,text_aHR0cHM6Ly9ibG9nLmNzZG4ubmV0L2h1eGlhbmcxOTg1MTExNA==,size_16,color_FFFFFF,t_70

watermark,type_ZmFuZ3poZW5naGVpdGk,shadow_10,text_aHR0cHM6Ly9ibG9nLmNzZG4ubmV0L2h1eGlhbmcxOTg1MTExNA==,size_16,color_FFFFFF,t_70

watermark,type_ZmFuZ3poZW5naGVpdGk,shadow_10,text_aHR0cHM6Ly9ibG9nLmNzZG4ubmV0L2h1eGlhbmcxOTg1MTExNA==,size_16,color_FFFFFF,t_70

4.3.3 虚拟磁盘进行分区

watermark,type_ZmFuZ3poZW5naGVpdGk,shadow_10,text_aHR0cHM6Ly9ibG9nLmNzZG4ubmV0L2h1eGlhbmcxOTg1MTExNA==,size_16,color_FFFFFF,t_70

进行分区:

watermark,type_ZmFuZ3poZW5naGVpdGk,shadow_10,text_aHR0cHM6Ly9ibG9nLmNzZG4ubmV0L2h1eGlhbmcxOTg1MTExNA==,size_16,color_FFFFFF,t_70

输入:m 查看帮助

watermark,type_ZmFuZ3poZW5naGVpdGk,shadow_10,text_aHR0cHM6Ly9ibG9nLmNzZG4ubmV0L2h1eGlhbmcxOTg1MTExNA==,size_16,color_FFFFFF,t_70

输入:n 进行主分区选择

20210129165809427.png

接下来继续输入:p和1即可,最后输入w保存!

再次使用fdisk -l即可看到新增的磁盘已经分了一个sdb1的分区

watermark,type_ZmFuZ3poZW5naGVpdGk,shadow_10,text_aHR0cHM6Ly9ibG9nLmNzZG4ubmV0L2h1eGlhbmcxOTg1MTExNA==,size_16,color_FFFFFF,t_70

4.3.4 分区格式化

对新建的分区进行格式化:格式化成ext4的文件系统

#格式化ext4系统命令
[root@ydt1 ~]# mkfs -t ext4 /dev/sdb1
mke2fs 1.42 (29-Nov-2011)
文件系统标签=
OS type: Linux
块大小=4096 (log=2)
分块大小=4096 (log=2)
Stride=0 blocks, Stripe width=0 blocks
6553600 inodes, 26214144 blocks
1310707 blocks (5.00%) reserved for the super user
第一个数据块=0
Maximum filesystem blocks=4294967296
800 block groups
32768 blocks per group, 32768 fragments per group
8192 inodes per group
Superblock backups stored on blocks: 
        32768, 98304, 163840, 229376, 294912, 819200, 884736, 1605632, 2654208, 
        4096000, 7962624, 11239424, 20480000, 23887872
​
​
Allocating group tables: 完成                            
正在写入inode表: 完成                            
Creating journal (32768 blocks): 完成
Writing superblocks and filesystem accounting information: l完成 

4.3.5 挂载和设置访问权限

#要挂载的目录
mount /dev/sdb1  /home/sdb1 
#用户访问授权
chown root /home/sdb1 -R 
#操作权限
chmod 777 /home/sdb1 

4.3.6 多磁盘挂载配置

#我这里配置了主磁盘和挂载磁盘
path.data:/var/lib/elasticsearch,/home/sdb1/var/lib/elasticsearch

4.4 加大tranlog flush间隔

tranlog flush:当向elasticsearch发送创建document文档添加请求的时候,document数据会先进入到buffer,与此同时会将操作记录在translog之中,当发生refresh时(数据从index buffer中进入filesystem cache的过程)translog中的操作记录并不会被清除,而当数据从os cache中被写入磁盘之后才会将translog中清空。这个将os cache的索引文件(segment file)持久化到磁盘的过程就是flush

降低写阻塞
默认每个请求都flush
index.translog.durability: request
改为:
index.translog.durability: async
设置为async表示translog的刷盘策略按sync_interval配置指定的时间周期进行。
index.translog.sync_interval: 120s
加大translog刷盘间隔时间。默认为5s,不可低于100ms。

index.translog.flush_threshold_size: 1024mb
超过这个大小会导致refresh操作,产生新的Lucene分段。默认值为512MB。

例:
PUT /blog1/_settings
{
  "index.translog.durability":"async",
  "index.translog.sync_interval":"120s",
  "index.translog.flush_threshold_size":"1024mb"
}

4.5 增加index refresh间隔

降低IO,降低segement merge(分片合并),默认情况下索引的refresh_interval为1秒,这意味着数据写1秒后就可以被搜索到,每次索引的refresh会产生一个新的Lucene段,这会导致频繁的segment merge行为,如果不需要这么高的搜索实时性,应该降低索引refresh周期,这个时候数据是保存在系统内存缓冲区中

PUT blog1/_settings
{
  "index.refresh_interval":"120s"
}

测试代码:你会发现要120S后才能查询到,因为120秒后才会合并到内存缓冲区

@Test
    public void test8() throws InterruptedException {
        /*Article article = new Article();
        article.setId(10);
        article.setTitle("10hello");
        article.setContent("10hello es world");
        elasticsearchTemplate.save(article);*/
        List<Article> byTitleOrContent = articleRepository.findByTitleOrContent("10hello", "10hello es world");
        System.out.println(byTitleOrContent);
    }


4.5 锁定交换分区

在ES运行起来后锁定ES所能使用的堆内存大小,锁定内存大小一般为可用内存的一半左右;锁定内存后就不会使用交换分区,如果不打开此项,当系统物理内存空间不足,ES将使用交换分区,ES如果使用交换分区,会导致硬盘频繁读,那么ES的性能将会变得很差

# elasticsearch.yml增加配置如下
bootstrap.memory_lock: true

#启动报错如下:
[1]: memory locking requested for elasticsearch process but memory is not locked

#需要修改系统配置,开启操作用户对内存锁的限制。如下:
vim /etc/security/limits.conf 
#增加配置:
root soft nofile 65536

root hard nofile 65536

root soft nproc 32000

root hard nproc 32000

root hard memlock unlimited

root soft memlock unlimited

vim /etc/systemd/system.conf
#修改如下配置:
DefaultLimitNOFILE=65536

DefaultLimitNPROC=32000

DefaultLimitMEMLOCK=infinity

#重启服务器即可


  • 2
    点赞
  • 19
    收藏
    觉得还不错? 一键收藏
  • 0
    评论

“相关推荐”对你有帮助么?

  • 非常没帮助
  • 没帮助
  • 一般
  • 有帮助
  • 非常有帮助
提交
评论
添加红包

请填写红包祝福语或标题

红包个数最小为10个

红包金额最低5元

当前余额3.43前往充值 >
需支付:10.00
成就一亿技术人!
领取后你会自动成为博主和红包主的粉丝 规则
hope_wisdom
发出的红包
实付
使用余额支付
点击重新获取
扫码支付
钱包余额 0

抵扣说明:

1.余额是钱包充值的虚拟货币,按照1:1的比例进行支付金额的抵扣。
2.余额无法直接购买下载,可以购买VIP、付费专栏及课程。

余额充值