


为了测试与W801的蓝牙通信,找了微信小程序的蓝牙例程来阅读,作为一个没有 JavaScript基础的人,读小程序源码一头雾水。后来看到一个大一新生“前端小刘不怕牛牛”写的小程序介绍文章,清晰易懂。微 信小程序(黑马)专栏
现在做一篇笔记记录一下。
网友cwlgoodman作品 微信小程序源码这个仓库有4个工程,我们用的是第一个:
1.bluetooth_demo
2.bluetooth_lock
3.glucometer
4.wechat_api
改动后的源代码。
这篇文章可以配合另外一篇一起阅读:《从微信小程序的角度来分析W801的蓝牙通信源码(indicate方式)》
1.导入小程序的第一个界面(开发工具的界面)
这里假设读者已经安装好《微信开发者工具》,且会导入已有的工程实例。
直接上图: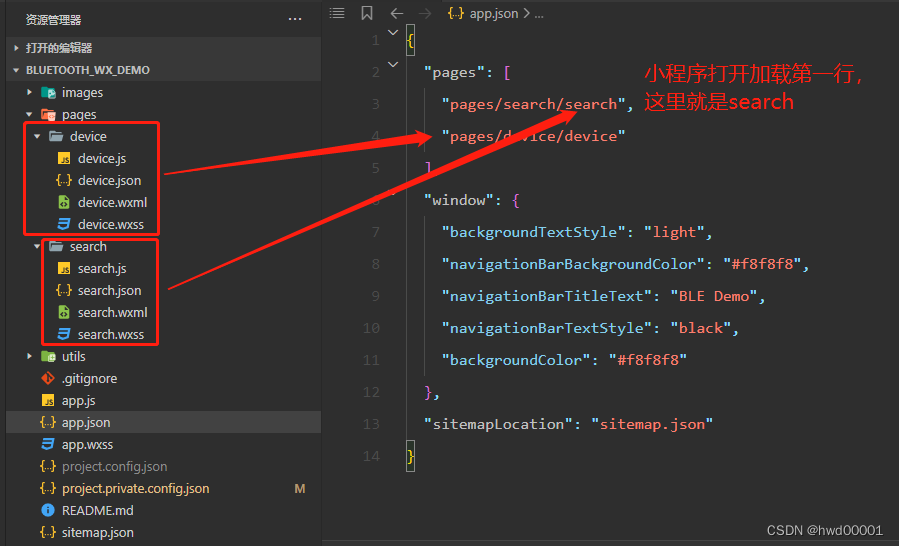
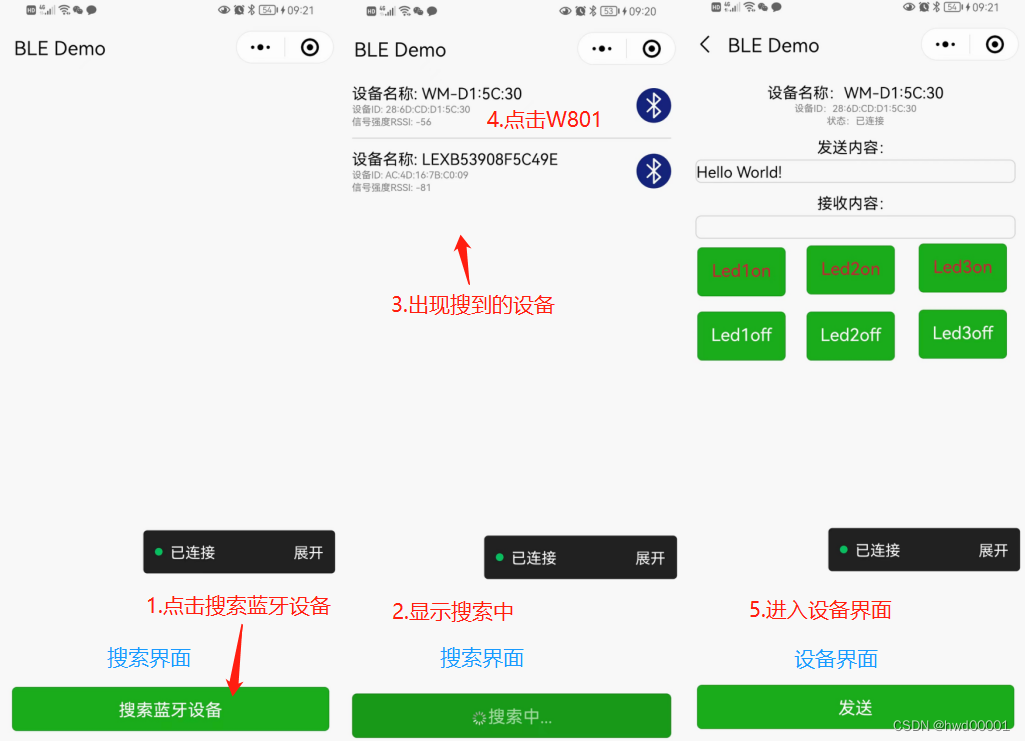
左边的资源管理器是工程文件结构,这个工程有2个界面,一是搜索界面;二是设备界面。搜索界面包含搜索到的设备信息列表;点击设备信息后,就进入设备界面。操作流程如下图:
小程序控制LED视频:
微信小程序控制LED
2.搜索界面的代码分析
每一个页面在pages中以单独的子文件夹存在,文件夹内的文件由四部分构成
js类型文件,构建页面的逻辑
wxml类型文件,类似html文件,设计页面结构
json类型文件,设置该页面的配置
wxss类型文件,类型css文件,设置页面的样式
这里我们只关注两个文件:《search.wxml》《search.js》.
《search.wxml》:
<view class="container">
  <scroll-view scroll-y style="width:690rpx;height:{{list_height}}rpx">
    <block wx:for="{{devicesList}}" wx:key="deviceId">
<!-- 搜索到的设备列表内容,单击列表项,绑定函数 “Connect”  -->
      <view class="list-item" id="{{item.deviceId}}" bindtap="Connect">
        <view style="display:flex;flex-direction:column;width:80%">
          <text style="font-size:medium;word-break:break-all">设备名称: {{item.name}}</text>
          <text style="font-size:x-small;color:gray;word-break:break-all">设备ID: {{item.deviceId}}</text>
          <text style="font-size:x-small;color:gray;word-break:break-all">信号强度RSSI: {{item.RSSI}}</text>
        </view>
        <image style="width:36px;height:36px" mode="aspectFit" src="/images/bluetooth.png"></image>
      </view>
    </block>
  </scroll-view>
  <!--  按键 绑定函数 “Search”,根据变量 searching 的值显示不同的内容 -->
  <button type="primary" class="button" loading="{{searching}}" bindtap="Search">{{searching?"搜索中...":"搜索蓝牙设备"}}</button>
</view>
《search.js》 内容过多,就不放源代码,只看函数列表:
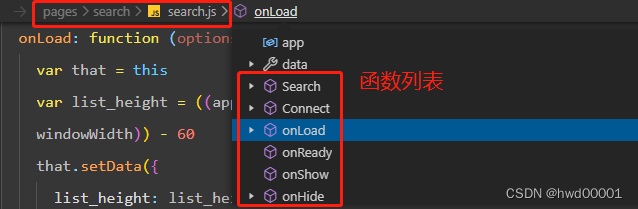
- 打开小程序,首先加载 搜索页面,此时回调用 onLoad函数。
- 点击 搜索蓝牙设备按键,调用search函数。
- 已经搜索到蓝牙设备,此时界面会显示设备的相关信息,点击设备信息,将调用Connect函数,开始连接设备;只有连接蓝牙成功后,才能导航到设备页面。
3.设备页面代码分析
设备页面的文件结构和搜索页面一样,由4个文件组成,这里我们也只关注两个文件:《device.wxml》《device.js》.
《device.wxml》:(对应的页面效果见第二张图-操作流程图右侧)
<view class="container">
  <text style="font-size:medium;word-break:break-all">设备名称:{{name}}</text>
  <text style="font-size:x-small;color:gray;word-break:break-all">设备ID:{{connectedDeviceId}}</text>
  <text style="font-size:x-small;color:gray">状态:{{connected?"已连接":"已断开"}}</text>
  <text style="font-size:medium;margin-top:10px">发送内容:</text>
  <input class="input" value="{{inputText}}" bindinput="bindInput"/>
  <text style="font-size:medium;margin-top:10px">接收内容:</text>
  <input class="input" disabled value="{{receiveText}}"/>
  <button type="primary" class="button" bindtap="Send">发送</button>
<!--  下面6个按键是我增加的,用于控制3个LED的亮灭  -->
<button type="primary" style="width: 193rpx; height: 108rpx; display: block; box-sizing: border-box; left: -249rpx; top: 19rpx; position: relative; color: crimson" class="button" bindtap="onLed1on">Led1on</button>
<button type="primary" style="width: 193rpx; height: 108rpx; display: block; box-sizing: border-box; left: -249rpx; top: 54rpx; position: relative" class="button" bindtap="onLed1off">Led1off</button>
<button type="primary"  style="width: 193rpx; height: 108rpx; display: block; box-sizing: border-box; left: -12rpx; top: -199rpx; position: relative; color: crimson" class="button" bindtap="onLed2on">Led2on</button>
<button type="primary"  style="width: 193rpx; height: 108rpx; display: block; box-sizing: border-box; left: -12rpx; top: -162rpx; position: relative" class="button" bindtap="onLed2off">Led2off</button>
<button type="primary"  style="width: 193rpx; height: 108rpx; display: block; box-sizing: border-box; left: 235rpx; top: -415rpx; position: relative; color: crimson" class="button" bindtap="onLed3on">Led3on</button>
<button type="primary"  style="width: 193rpx; height: 108rpx; display: block; box-sizing: border-box; left: 235rpx; top: -378rpx; position: relative" class="button" bindtap="onLed3off">Led3off</button>
</view>
《device.js》 函数列表:
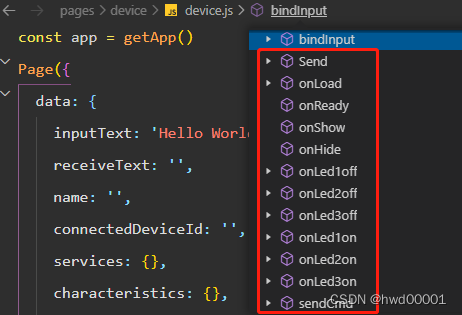
能进入设备界面的前提是连接设备成功。从搜索界面进入设备界面,首先调用onLoad函数。
- onLoad函数,要查询特征值(Characteristic)的属性,如果是具有写(write)的属性,那么向这个特征值写入二进制值就会发送到W801;如果有指示(indicate)的属性,那么监听这个特征值的数值变化就可以读取W801发过来的信息。
- 读取W801发过来的数据是通过监听indicate自动完成。
- 按键分别绑定对应的函数。


 1420
1420

 被折叠的 条评论
为什么被折叠?
被折叠的 条评论
为什么被折叠?
 到【灌水乐园】发言


