一、初识注解入门使用:
PS:先导入junit-4.11.jar和hamcrest-core-1.3.jar两个包,缺一不可!!!(两个jar包在IDEA的安装目录的lib文件夹下都有,无需重新下载!)
1、测试类注解:(@Test)
import org.junit.Test;

public class test {
    @Test
    public void Test(){
        System.out.println("这是一个测试类");
    }
}
PS:此注解也可以加属性使用(@Test(timeout = 1000)),这个意思是如果注解里面的内容执行时长超过1000ms,就报错。
@Test(timeout = 1000)
public void test01() throws InterruptedException {
    Thread.sleep(1100);
    System.out.println("测试");
}

报错内容如下:

org.junit.runners.model.TestTimedOutException: test timed out after 1000 milliseconds

	at java.lang.Thread.sleep(Native Method)
	at com.hwt.test.TestAnnotation.test01(TestAnnotation.java:17)
	at sun.reflect.NativeMethodAccessorImpl.invoke0(Native Method)
	at sun.reflect.NativeMethodAccessorImpl.invoke(NativeMethodAccessorImpl.java:62)
	at sun.reflect.DelegatingMethodAccessorImpl.invoke(DelegatingMethodAccessorImpl.java:43)
	at java.lang.reflect.Method.invoke(Method.java:498)
	at org.junit.runners.model.FrameworkMethod$1.runReflectiveCall(FrameworkMethod.java:50)
	at org.junit.internal.runners.model.ReflectiveCallable.run(ReflectiveCallable.java:12)
	at org.junit.runners.model.FrameworkMethod.invokeExplosively(FrameworkMethod.java:47)
	at org.junit.internal.runners.statements.InvokeMethod.evaluate(InvokeMethod.java:17)
	at org.junit.internal.runners.statements.FailOnTimeout$CallableStatement.call(FailOnTimeout.java:298)
	at org.junit.internal.runners.statements.FailOnTimeout$CallableStatement.call(FailOnTimeout.java:292)
	at java.util.concurrent.FutureTask.run(FutureTask.java:266)
	at java.lang.Thread.run(Thread.java:748)
2、服务器注解:(@WebServlet("/类名") )
@WebServlet("/LoginServlet")
public class LoginServlet extends HttpServlet {
    @Override
    protected void doGet(HttpServletRequest req, HttpServletResponse resp) throws ServletException, IOException {
        System.out.println("登录验证服务器");
    }

    @Override
    protected void doPost(HttpServletRequest req, HttpServletResponse resp) throws ServletException, IOException {
        doGet(req, resp);
    }
}
3、监听类注册注解:(@WebListener)
@WebListener
public class MyServletContextListener implements ServletContextListener {
    /**
     * 初始化时调用
     * @param servletContextEvent
     */
    @Override
    public void contextInitialized(ServletContextEvent servletContextEvent) {
        System.out.println("servletContext初始化了!");
    }

    /**
     * 销毁时调用
     * @param servletContextEvent
     */
    @Override
    public void contextDestroyed(ServletContextEvent servletContextEvent) {
        System.out.println("servletContext销毁了!");
    }
4、过滤器注册注解:(@WebFilter(urlPatterns = "/*" , filterName = "类名"))
@WebFilter(urlPatterns = "/*", filterName = "FilterDemo")
public class FilterDemo implements Filter {
    public void destroy() {
    }

    public void doFilter(ServletRequest req, ServletResponse resp, FilterChain chain) throws ServletException, IOException {
        System.out.println("来到过滤器!");
        chain.doFilter(req, resp);
    }

    public void init(FilterConfig config) throws ServletException {

    }

}
过滤器多个url注解(@WebFilter(urlPatterns = {"/...","/...","/..." }, filterName = "类名"))Ps:...处为要添加过滤器的地址
@WebFilter(urlPatterns = {"/jsp/cart.jsp","/jsp/order_info.jsp","/jsp/order_list.jsp"}, filterName = "PriviledgeFilter")
public class PriviledgeFilter  implements Filter {

    public void destroy() {
    }

    public void doFilter(ServletRequest req, ServletResponse resp, FilterChain chain) throws ServletException, IOException {
        System.out.println("来到过滤器!");
        chain.doFilter(req, resp);
    }

    public void init(FilterConfig config) throws ServletException {

    }

}
二、Spring中的注解使用:
1、在配置文件beans.xml中开启注解
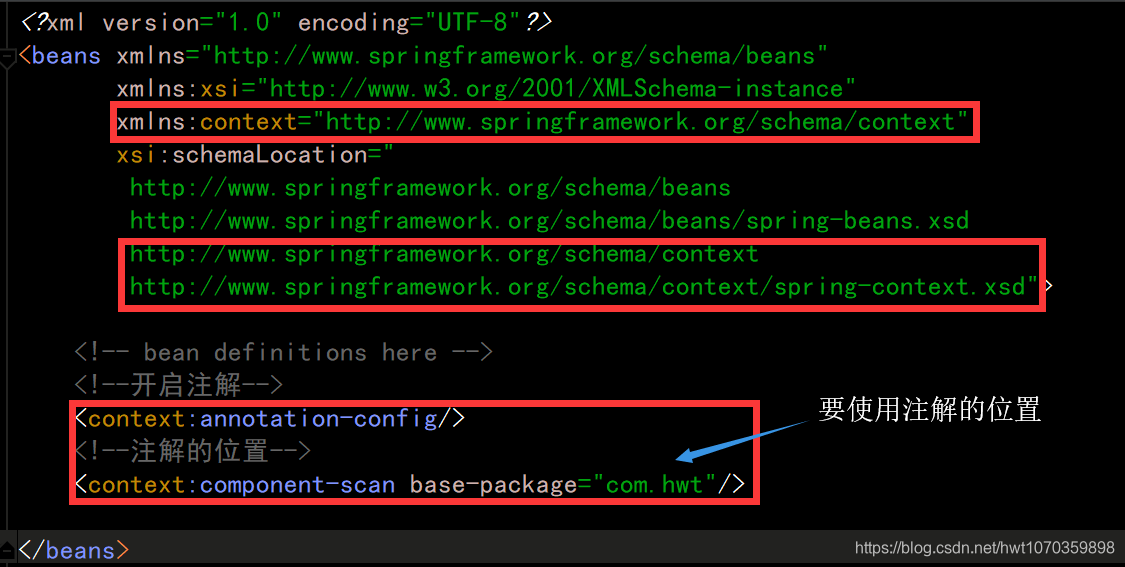
<?xml version="1.0" encoding="UTF-8"?>
<beans xmlns="http://www.springframework.org/schema/beans"
       xmlns:xsi="http://www.w3.org/2001/XMLSchema-instance"
       xmlns:context="http://www.springframework.org/schema/context"
       xsi:schemaLocation="
        http://www.springframework.org/schema/beans
        http://www.springframework.org/schema/beans/spring-beans.xsd
        http://www.springframework.org/schema/context
        http://www.springframework.org/schema/context/spring-context.xsd">

    <!-- bean definitions here -->
    <!--开启注解-->
    <context:annotation-config/>
    <!--注解的位置-->
    <context:component-scan base-package="com.hwt"></context:component-scan>

</beans>
2、注解使用:
①bean注解:@Component或者@Component(“id”)
作用:取代beans.xml中的配置<bean class=" ">
@Component
public class Test {

    public void test() {
        System.out.println("测试注解!");
    }

}
@Component("test")
public class Test {

    public void test() {
        System.out.println("测试注解!");
    }

}
②dao层注解:@Repository或者@Repository(“id”)
@Repository
public class UserDaoImp implements UserDao {
    @Override
    public void add(User user) {
        System.out.println("dao层:添加方法:"+user);
    }
}
③Service层注解:@Service或者@Service(“id”)
@Service
public class UserServiceImp implements UserService {
    @Autowired
    private UserDao userDao;

    @Override
    public void add(User user) {
        System.out.println("UserService添加用户:"+user);
        userDao.add(user);
    }
}
④Web层注解:@Controller或者@Controller(“id”)
@Controller
public class UserAction {
    @Autowired
    private UserService userService;
    public void add(User user){
        System.out.println("action层,添加方法:"+user);
        userService.add(user);
    }
}
⑤自动注入属性值注解:@Autowired
    @Autowired
    private UserDao userDao;
⑥根据指定的id注入属性值注解:@Qualifier("id")
    @Autowired
    @Qualifier("myUserService")
    private UserDao userDao;
⑦根据指定id自动注入属性值注解:@Resource(name = "id")
    //@Autowired
    //@Qualifier("myUserService")

    @Resource(name = "myUserService")//等效于前面两行代码
    private UserDao userDao;
三、SpringBoot中注解使用:
1、声明Rest风格的控制器:@RestController
2、自动配置,相当于写了spring的配置文件:@EnableAutoConfiguration
3、声明访问路径:@RequestMapping("/hello/{name}")
4、声明返回json格式数据:@ResponseBody
5、将URL中占位符参数{xxx}绑定到处理器类的方法形参中:@PathVariable(“xxx“)或者@PathVariable()
@RestController//声明Rest风格的控制器
@EnableAutoConfiguration//自动配置,相当于写了spring的配置文件
public class HelloController {

    @RequestMapping("/hello/{name}")
    @ResponseBody
    public String hello(@PathVariable()String name){
        return name+",Hello,Spring Boot";
    }
}
6、声明控制器切面:@ControllerAdvice
7、声明拦截异常:@ExceptionHandler(RuntimeException.class),RuntimeException.class表示运行时异常
@ControllerAdvice
public class GlobalExceptionHandler {
    @ResponseBody
    @ExceptionHandler(RuntimeException.class)
    public Map<String,Object> exceptionHandler(){
        Map<String,Object> map = new HashMap<>();
        map.put("errorCode","101");
        map.put("errorMsg","系统错误!");
        return map;
    }
}
边学边更新。。。。


 1884
1884

 被折叠的 条评论
为什么被折叠?
被折叠的 条评论
为什么被折叠?
 到【灌水乐园】发言


