


在工业视觉检测与自动化领域,康耐视(Cognex)的 VisionPro 是一款功能强大的视觉开发工具,而 C# 凭借其简洁性与高效性,成为许多开发者的首选编程语言。本文将详细介绍如何通过 C# 与 VisionPro 联合编程实现相机连接,为后续的视觉检测应用开发奠定基础。
一、环境准备
1.1 安装 VisionPro
首先确保已安装康耐视 VisionPro 软件。安装过程中,注意勾选相关的开发工具包(如 Cognex.VisionPro.ToolBlock 等),这些工具包将为后续编程提供关键支持。
1.1 创建vpp项目连接相机
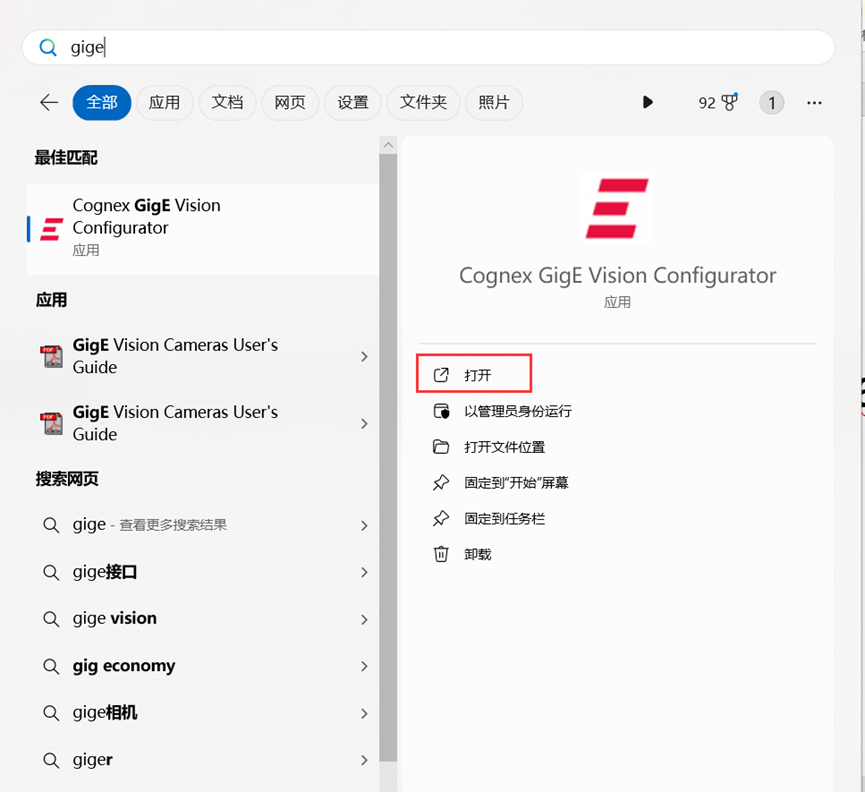
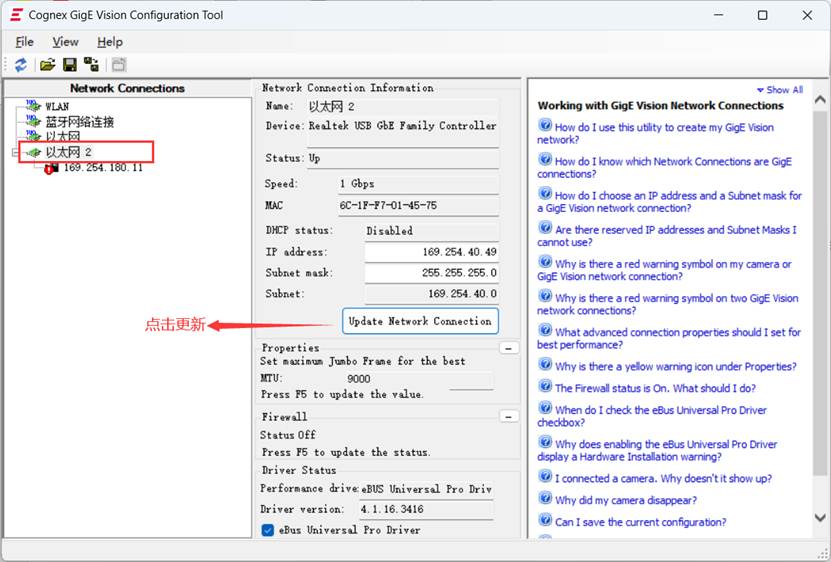
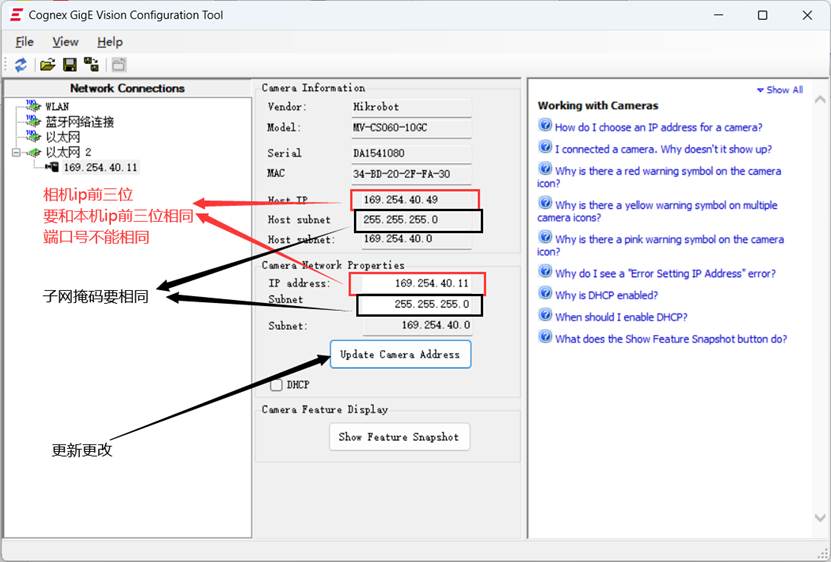
搜索Cognex Gige
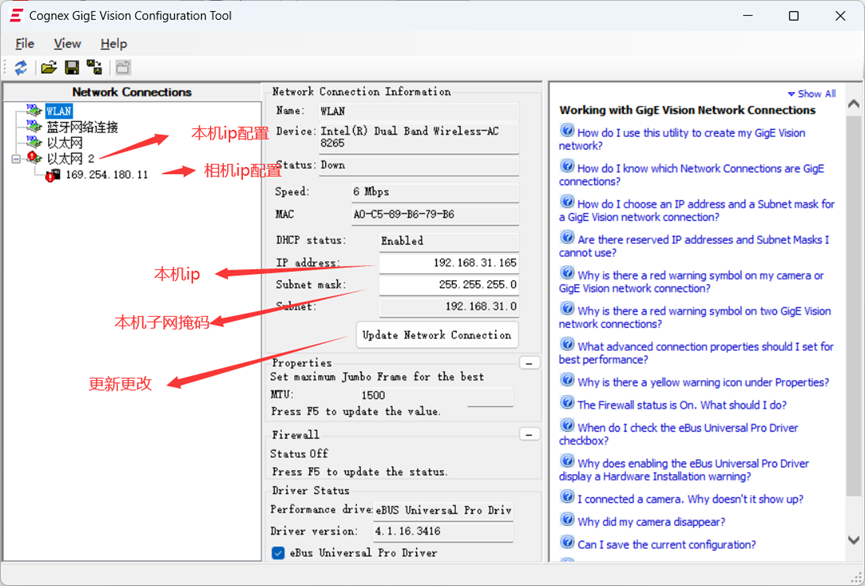
更改本机和相机ip配置
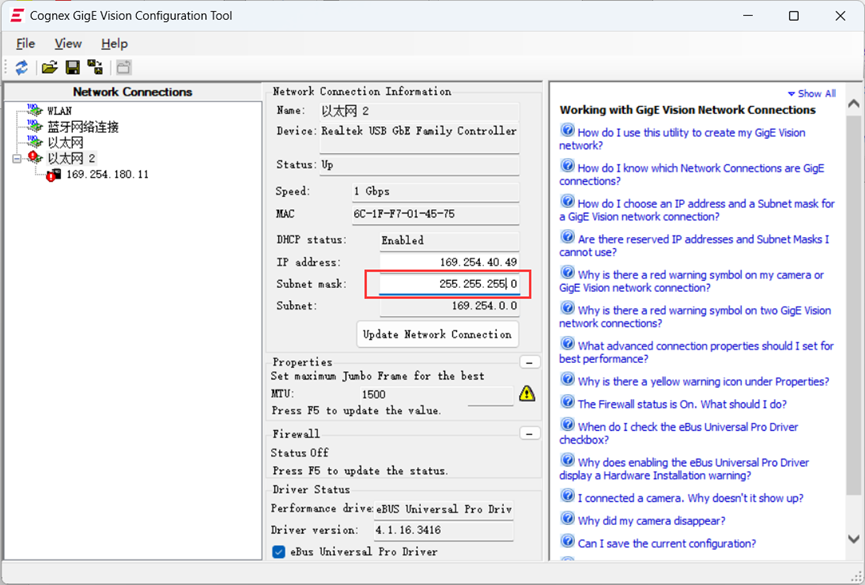
修改子网掩码为255.255.255.0
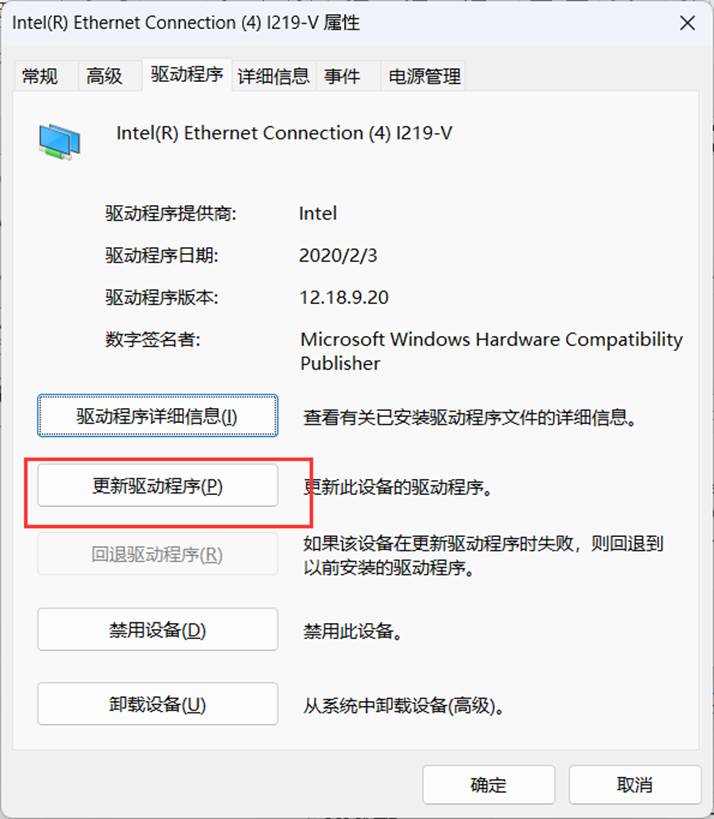
配置驱动程序
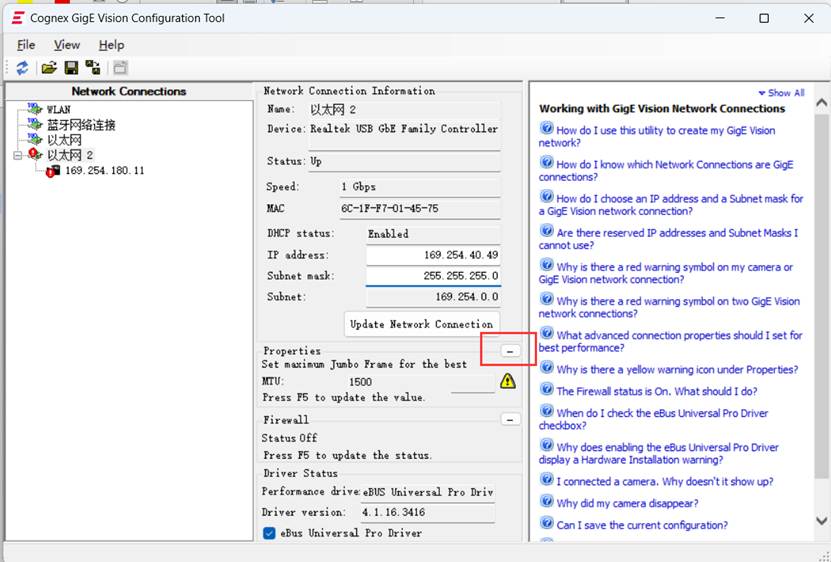
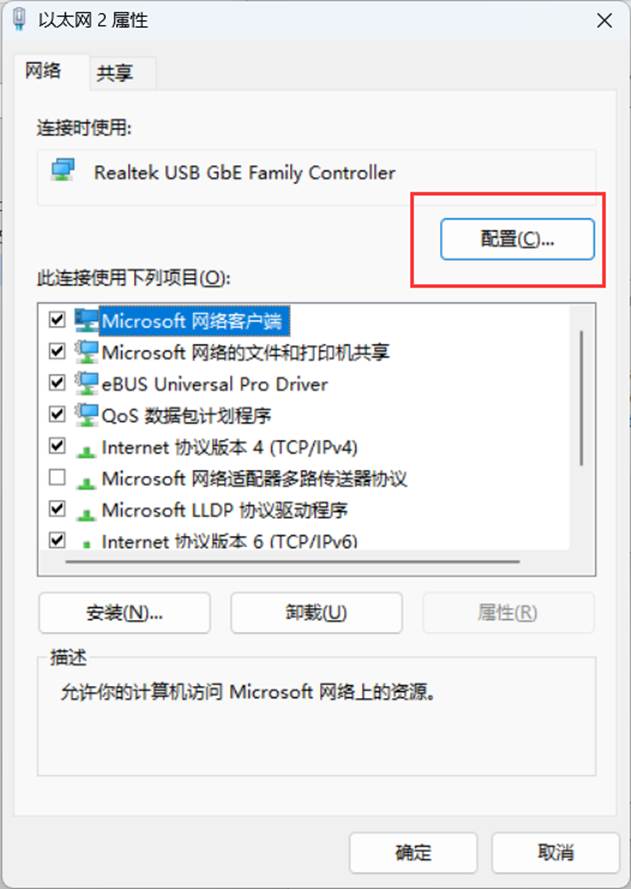
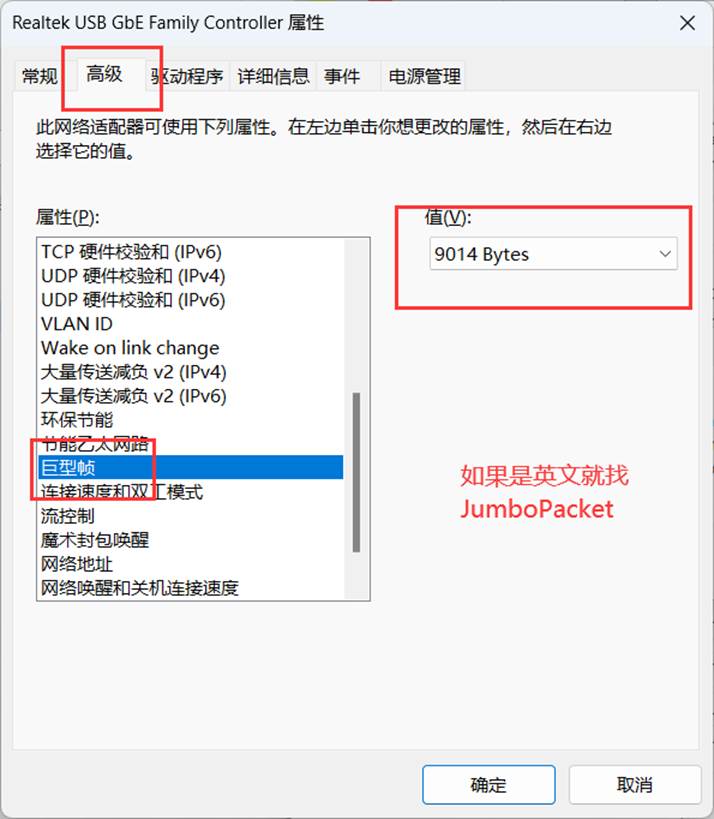
更新驱动(如果能够选择9014Bytes,跳过此步骤)

更新更改
相机ip配置:注意Host IP 和IP address 第四位不能相同
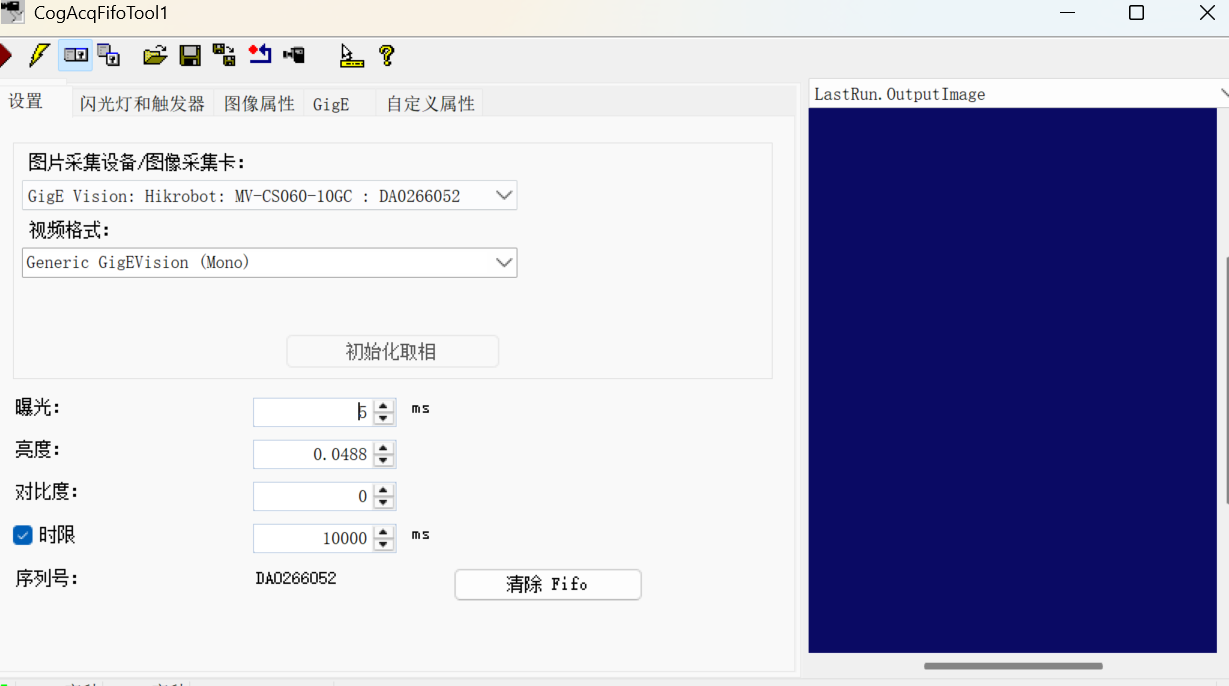
打开visionPro
选择照相机,生成vpp文件并保存
1.3新建 C# 项目
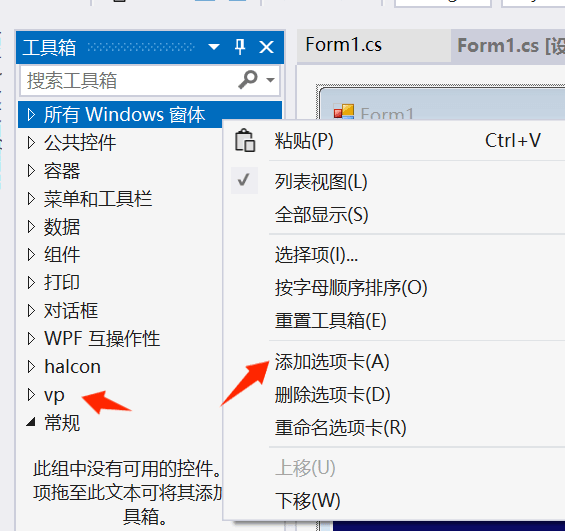
打开 Visual Studio,创建一个新的 Windows 桌面应用程序(.NET Framework) 项目(也可根据需求选择其他类型,如 WPF,但本文以 WinForms 为例)。打开项目工具箱
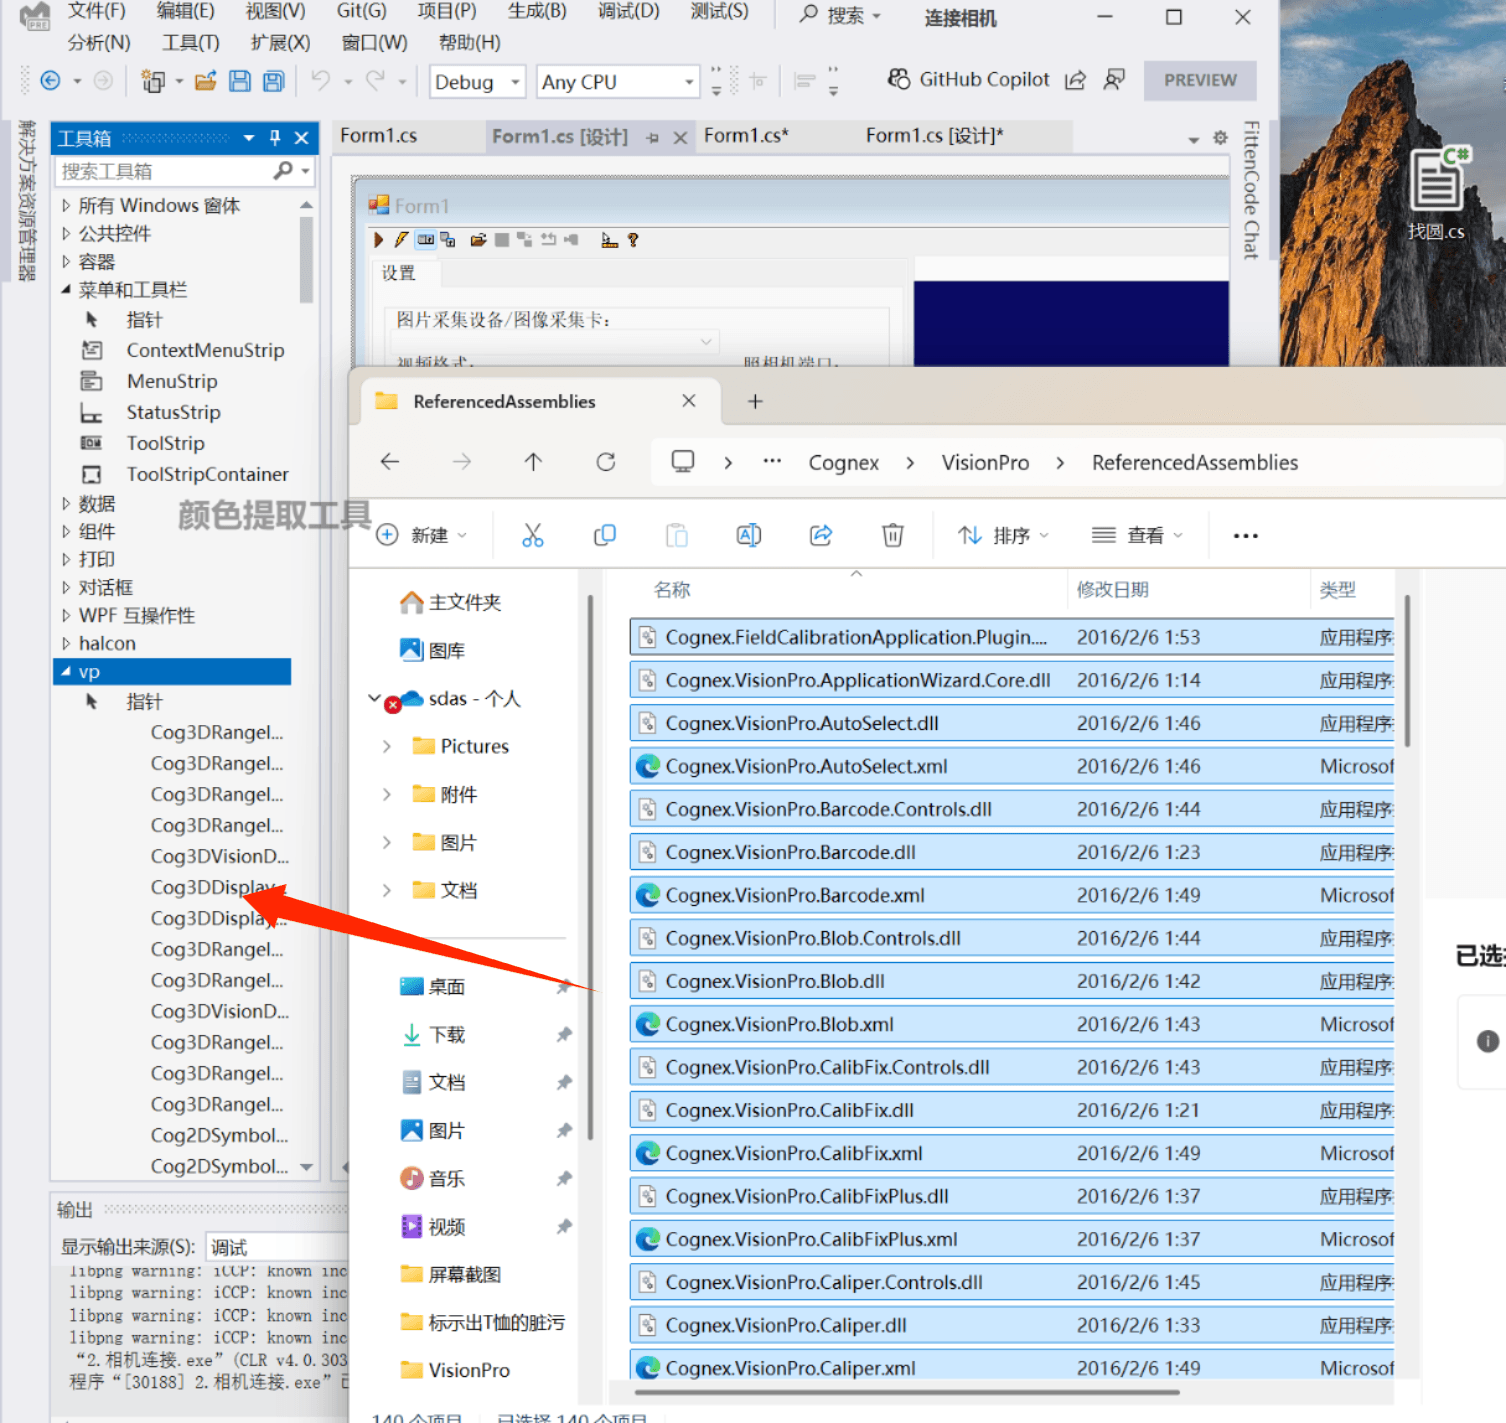
然后打开VisionPro的ReferencedAssemblies文件夹
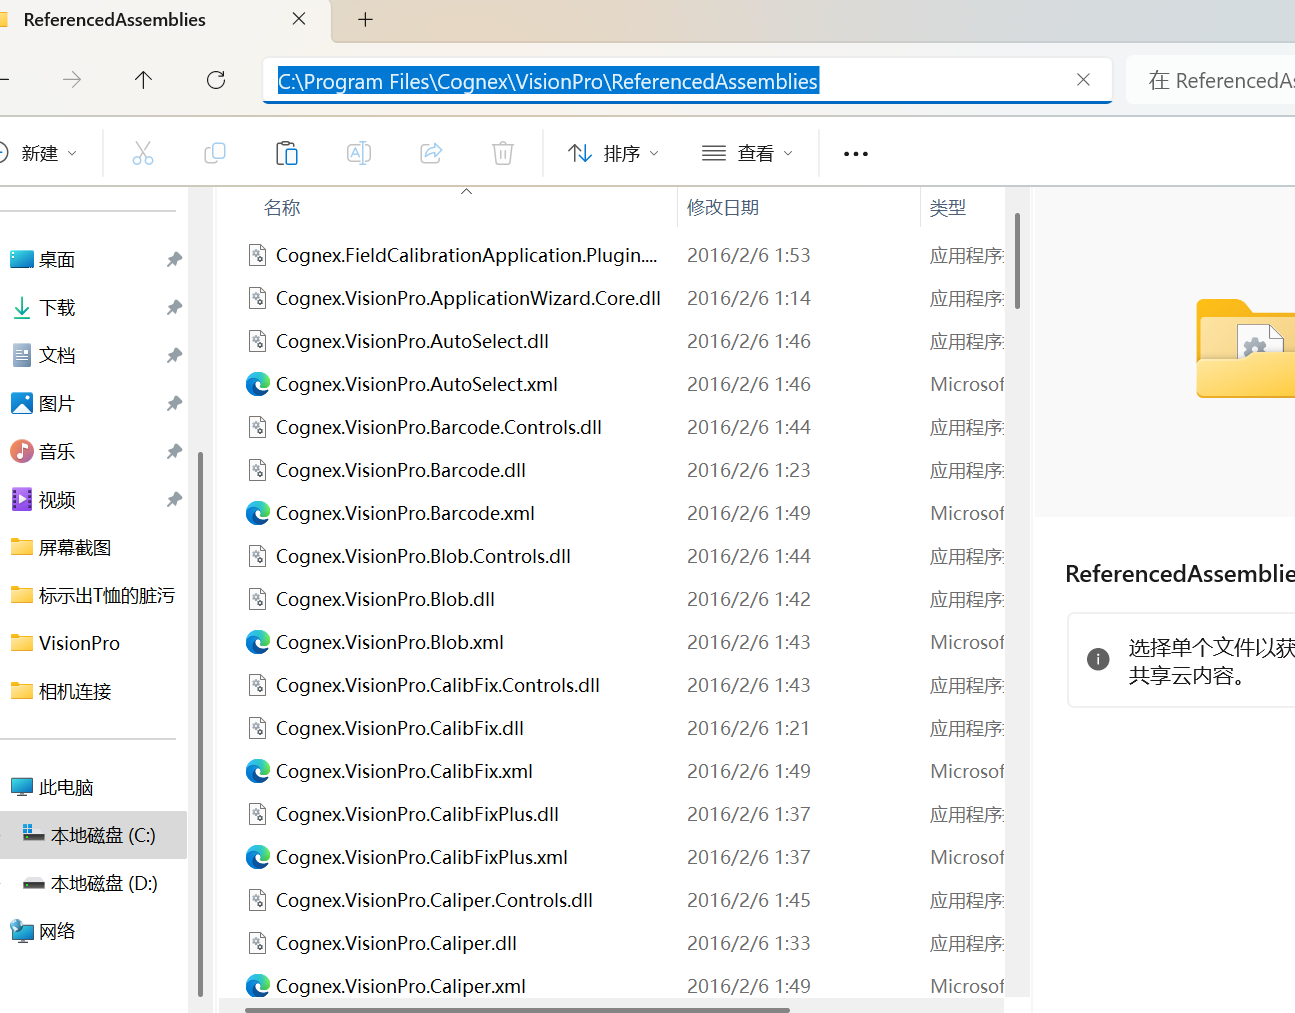
Ctrl+A全选,并将其直接拖入vp选项卡下
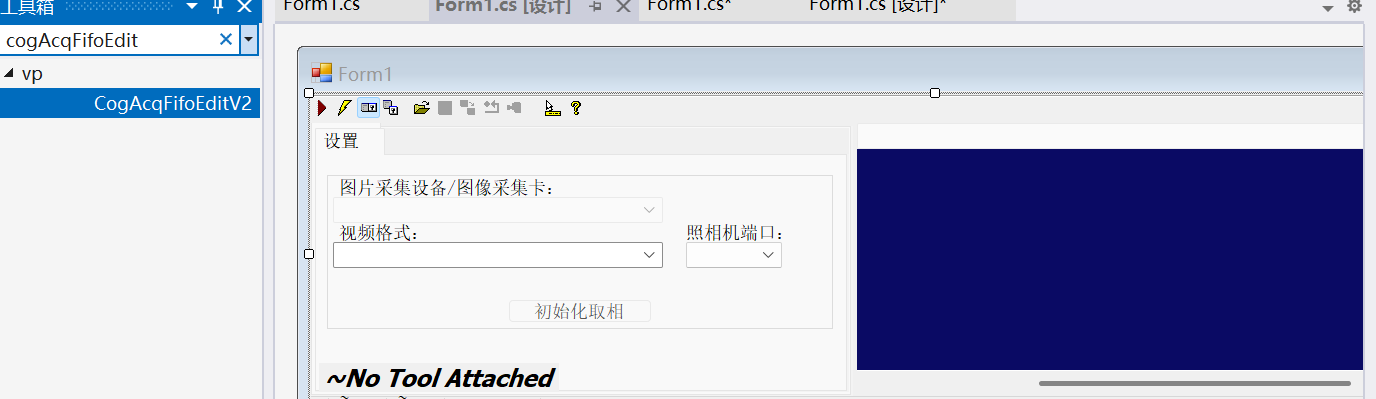
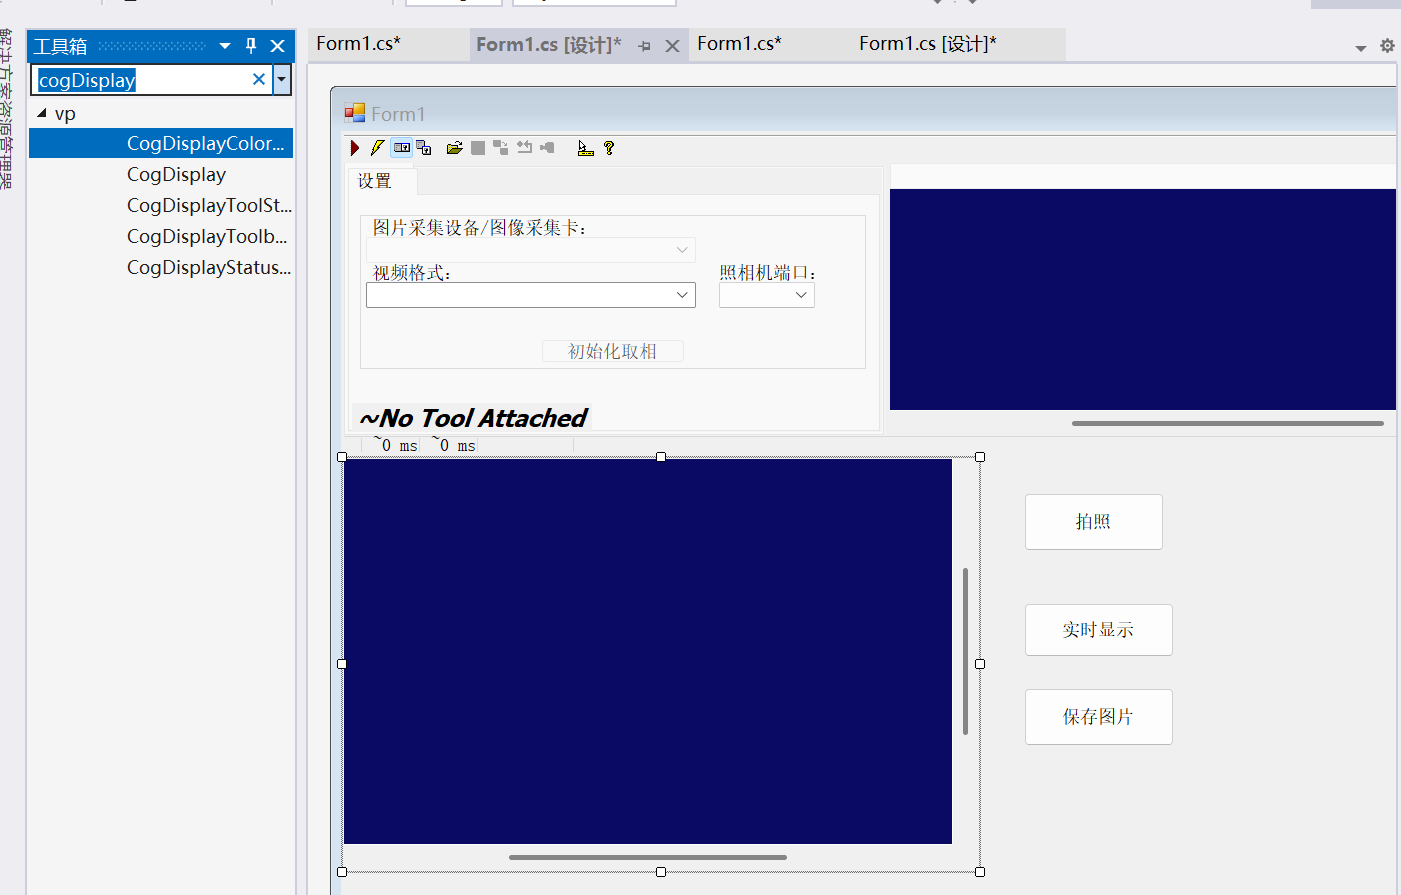
搜索cogAcqFifoEdit,将其加入From1窗体
同理,并加入三个按钮
右键单击项目点击属性
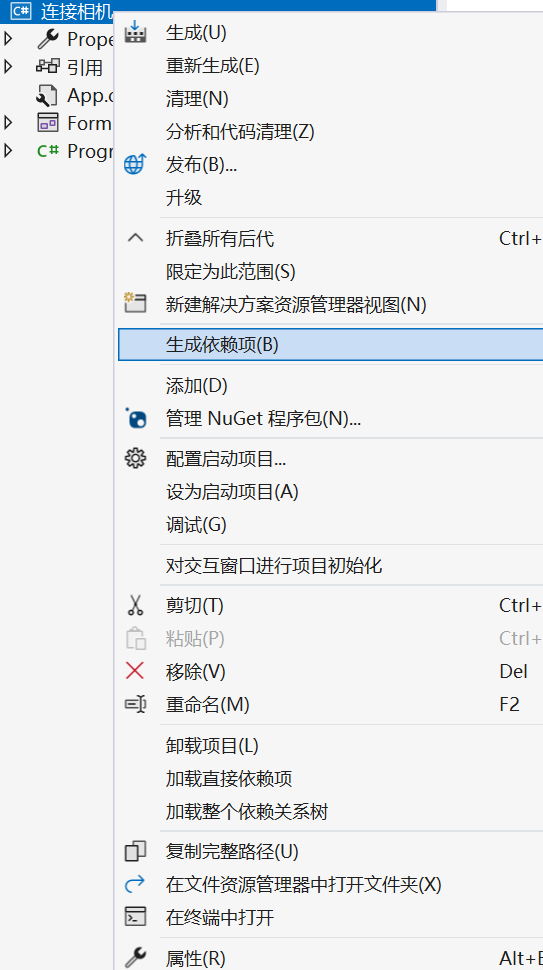
选择x64
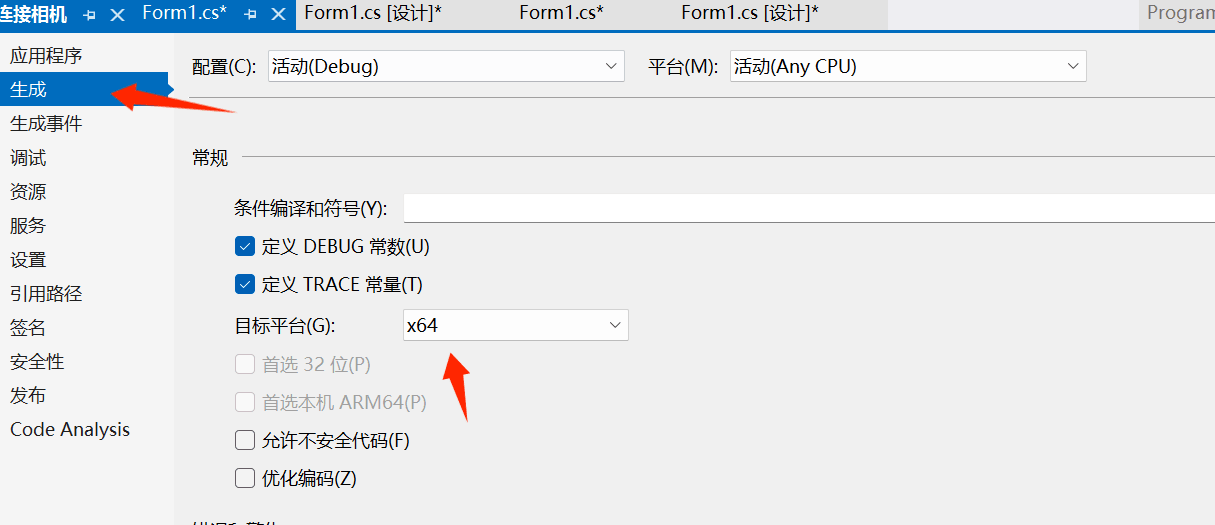
点击重新生成解决方案

二、代码部分
接下来详细解析代码中各个方法的实现及其作用:
引入Cognex头文件
using Cognex.VisionPro;
using Cognex.VisionPro.ImageFile;
using System;
using System.Collections.Generic;
using System.ComponentModel;
using System.Data;
using System.Drawing;
using System.IO;
using System.Linq;
using System.Text;
using System.Threading.Tasks;
using System.Windows.Forms;
加载相机配置
private void Form1_Load(object sender, EventArgs e)
{
    // 加载相机配置
    string path = @"C:\Users\15783\Desktop\VisionPro\连接相机\连接相机\bin\相机连接.vpp";
    // 必须要保证vpp中有CogAcqFifoTool才可以
    cogAcqFifoTool = CogSerializer.LoadObjectFromFile(path) as CogAcqFifoTool;
    cogAcqFifoEditV21.Subject = cogAcqFifoTool;
}
在窗体加载时,此方法从指定路径加载 VisionPro 的配置文件(.vpp)。通过 CogSerializer.LoadObjectFromFile 方法将文件内容加载并转换为 CogAcqFifoTool 对象。确保 .vpp 文件中包含 CogAcqFifoTool,否则转换会失败。最后将加载的 cogAcqFifoTool 设置为 cogAcqFifoEditV21 控件的 Subject,以便通过该控件对相机采集工具进行配置和监控。
执行拍照操作
private void button1_Click(object sender, EventArgs e)
{
    // 拍照
    if (cogAcqFifoTool == null)
    {
        cogAcqFifoTool = new CogAcqFifoTool();
    }
    if (cogAcqFifoTool.Operator == null)
    {
        MessageBox.Show("相机连接有问题");
        return;
    }
    cogAcqFifoTool.Run();
    cogDisplay1.Image = cogAcqFifoTool.OutputImage;
    cogDisplay1.Fit();
}
当点击拍照按钮时,首先检查 cogAcqFifoTool 是否为空,若为空则创建一个新的 CogAcqFifoTool 实例。接着验证 cogAcqFifoTool.Operator 是否存在,若不存在则弹出提示 “相机连接有问题” 并返回。若连接正常,调用 cogAcqFifoTool.Run() 执行拍照。拍照完成后,将获取的图像 cogAcqFifoTool.OutputImage 显示在 cogDisplay1 控件上,并通过 cogDisplay1.Fit() 方法让图像适配显示区域。
释放相机资源
private void Form1_FormClosing(object sender, FormClosingEventArgs e)
{
    // 获取当前的所有相机资源
    CogFrameGrabbers cogFrame = new CogFrameGrabbers();
    foreach (ICogFrameGrabber item in cogFrame)
    {
        item.Disconnect(false);
    }
}
在窗体关闭时,此方法用于释放所有与相机相关的资源。首先创建 CogFrameGrabbers 对象来获取当前所有的相机帧采集器,然后通过循环遍历每个 ICogFrameGrabber 项,调用 Disconnect 方法断开与相机的连接,参数 false 表示在断开连接时不等待正在进行的操作完成。
切换实时显示
private void button2_Click(object sender, EventArgs e)
{
    if (button2.Text == "实时显示")
    {
        button2.Text = "停止实时显示";
        cogDisplay1.StartLiveDisplay(cogAcqFifoTool.Operator, false);
    }
    else
    {
        button2.Text = "实时显示";
        cogDisplay1.StopLiveDisplay();
    }
}
该方法实现了实时显示的切换功能。当按钮文本为 “实时显示” 时,点击按钮将文本改为 “停止实时显示”,并调用 cogDisplay1.StartLiveDisplay 方法启动实时显示,传入 cogAcqFifoTool.Operator 作为相机操作对象,参数 false 表示不使用缓存。反之,当按钮文本为 “停止实时显示” 时,点击按钮将文本改回 “实时显示”,并调用 cogDisplay1.StopLiveDisplay 方法停止实时显示。
存储拍摄的图片
private void button3_Click(object sender, EventArgs e)
{
    // 存储图片
    string path = Directory.GetCurrentDirectory() + @"\ImageDir";
    if (!Directory.Exists(path))
    {
        Directory.CreateDirectory(path);
    }
    // 定义文件路径
    string imageName = $"{DateTime.Now.ToString("HHmmss")}.bmp";
    // 保存图片
    ICogImage image = cogAcqFifoTool.OutputImage;
    // 文件存储工具(读写)
    CogImageFileTool fileTool = new CogImageFileTool();
    fileTool.InputImage = image;
    fileTool.Operator.Open($"{path}\\{imageName}", CogImageFileModeConstants.Write);
    fileTool.Run();
}
点击存储图片按钮时,首先确定存储目录 path,通过 Directory.GetCurrentDirectory() 获取当前应用程序目录并拼接上 \ImageDir 作为存储路径。检查该目录是否存在,若不存在则使用 Directory.CreateDirectory(path) 创建目录。然后生成文件名 imageName,以当前时间(格式为 HHmmss)命名并加上 .bmp 后缀。接着获取当前拍摄的图像 cogAcqFifoTool.OutputImage,创建 CogImageFileTool 对象 fileTool,将获取的图像设置为 fileTool 的 InputImage。再通过 fileTool.Operator.Open 方法打开指定路径和文件名的文件,设置为写入模式(CogImageFileModeConstants.Write),最后调用 fileTool.Run() 执行存储操作,将图像保存到指定位置。
通过以上代码,实现了相机配置加载、拍照、实时显示控制以及图片存储等功能,为基于 VisionPro 和 C# 的工业视觉应用开发提供了基础的相机操作支持。在实际应用中,还可以根据需求进一步扩展和优化,例如添加更丰富的相机参数设置界面、完善图像预处理逻辑或实现与其他业务系统的数据交互等。
完整代码
using Cognex.VisionPro;
using Cognex.VisionPro.ImageFile;
using System;
using System.Collections.Generic;
using System.ComponentModel;
using System.Data;
using System.Drawing;
using System.IO;
using System.Linq;
using System.Text;
using System.Threading.Tasks;
using System.Windows.Forms;namespace 连接相机
{public partial class Form1 : Form
{
CogAcqFifoTool cogAcqFifoTool = null;
public Form1()
{
InitializeComponent();
}private void Form1_Load(object sender, EventArgs e)
{
//加载相机配置
string path = @"C:\Users\15783\Desktop\VisionPro\连接相机\连接相机\bin\相机连接.vpp";
//必须要保证vpp中有CogAcqFifoTool才可以
cogAcqFifoTool = CogSerializer.LoadObjectFromFile(path) as CogAcqFifoTool;
cogAcqFifoEditV21.Subject = cogAcqFifoTool;
}private void button1_Click(object sender, EventArgs e)
{
//拍照
if (cogAcqFifoTool == null)
{
cogAcqFifoTool = new CogAcqFifoTool();
}
if(cogAcqFifoTool.Operator== null)
{
MessageBox.Show("相机连接有问题");
return;
}
cogAcqFifoTool.Run();
cogDisplay1.Image = cogAcqFifoTool.OutputImage;
cogDisplay1.Fit();
}private void Form1_FormClosing(object sender, FormClosingEventArgs e)
{
//获取当前的所有相机资源
CogFrameGrabbers cogFrame = new CogFrameGrabbers();
foreach(ICogFrameGrabber item in cogFrame)
{
item.Disconnect(false);
}
}private void button2_Click(object sender, EventArgs e)
{
if (button2.Text == "实时显示")
{
button2.Text = "停止实时显示";
cogDisplay1.StartLiveDisplay(cogAcqFifoTool.Operator,false);}
else
{
button2.Text = "实时显示";
cogDisplay1.StopLiveDisplay();
}
}private void button3_Click(object sender, EventArgs e)
{
//存储图片
string path = Directory.GetCurrentDirectory() + @"\ImageDir";
if (!Directory.Exists(path))
{
Directory.CreateDirectory(path);
}
//定义文件路径
string imageName = $"{DateTime.Now.ToString("HHmmss")}.bmp";
//保存图片
ICogImage image =cogAcqFifoTool.OutputImage;
//文件存储工具(读写)
CogImageFileTool fileTool = new CogImageFileTool();
fileTool.InputImage = image;
fileTool.Operator.Open($"{path}\\{imageName}", CogImageFileModeConstants.Write);
fileTool.Run();
}
}
}


 238
238

 被折叠的 条评论
为什么被折叠?
被折叠的 条评论
为什么被折叠?
 到【灌水乐园】发言


