


目录
引言
随着Kubernetes在容器编排领域的持续火热,如何高效地管理和部署Kubernetes应用成为了一个重要议题。Helm,作为Kubernetes的包管理器,为我们提供了一个简洁、优雅的方式来打包、分发、安装和升级Kubernetes应用。本文将带你深入了解Helm的魅力和使用方法。
一、Helm概述
1.Helm价值概述
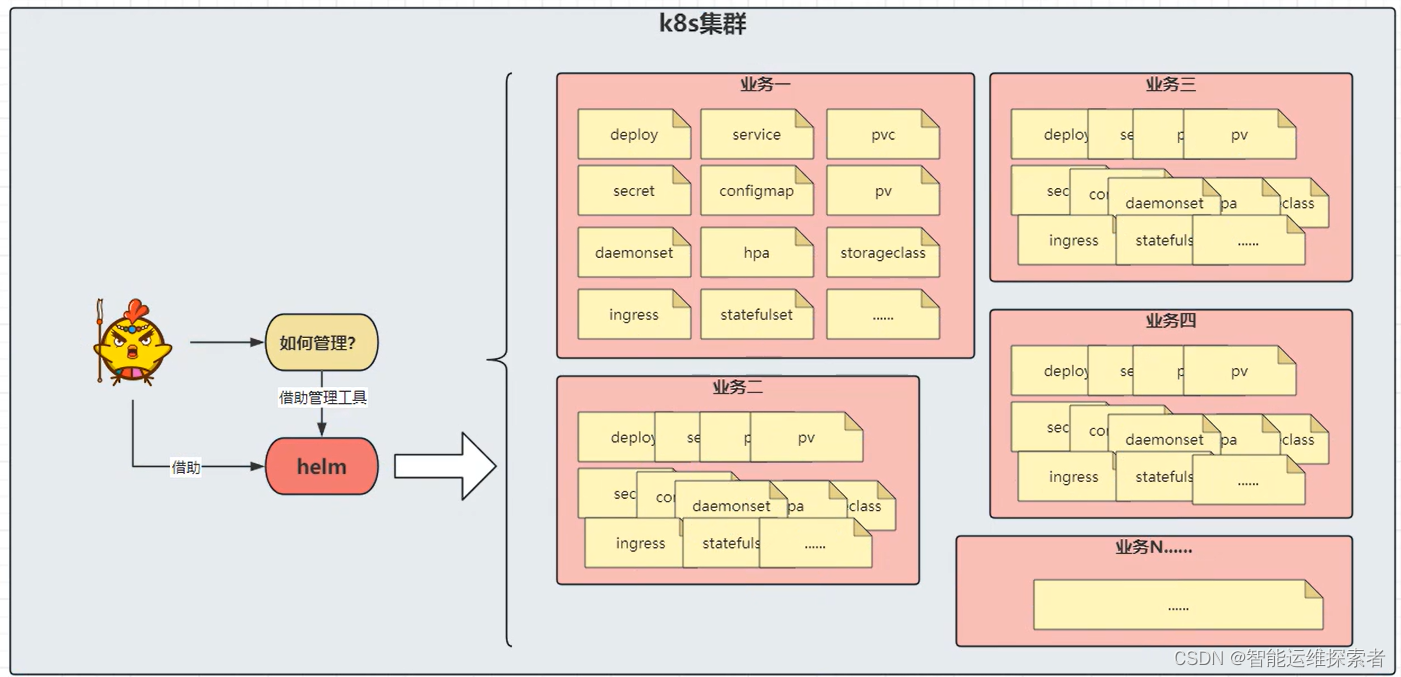
在一个企业中,可能会存在多个不同的业务,每个业务中,可能存在几个甚至几十个资源清单。那么对于运维与研发人员来讲,这么多的清单资源通过人力辨别相当吃力。所以需要借助资源清单管理工具,进行以业务为单位的资源清单管理,通过一些手段来实现业务的升级、回滚等等操作在一个文件上(通过helm的values.yaml文件),一个文件就能管理一套业务体系,进而压缩、减轻了运维人员的压力,实现高效的管理业务的目的
2.Helm的基本概念
Helm是一个开源的Kubernetes包管理器,它可以帮助你定义、安装和升级Kubernetes应用。Helm使用了一种名为Charts的打包格式,Charts可以看作是一组预配置的Kubernetes资源文件,这些文件描述了应用的所有Kubernetes资源。
定义:Helm是Kubernetes的包管理器,类似于Linux系统中的APT或YUM。它允许用户定义、安装和升级Kubernetes应用程序的预定义包,这些包通常称为charts。
目标:Helm旨在简化Kubernetes应用程序的部署和管理过程,使其更加可重复和可维护。
3.Helm名词介绍
Helm 是官方提供的类似于 YUM 的包管理器,是部署环境的流程封装。
Helm 有三个重要的概念:Chart 、Release和Repository
Chart
Chart是Helm的打包格式,包含了一组描述Kubernetes应用程序的资源模板文件,以及一些可配置的参数。
Chart可以被认为是一个可复用的应用程序模板,可以快速部署到Kubernetes集群中。Release
Release是Chart的一个特定实例,在Kubernetes集群中运行。
每个Release都有一个唯一的名称,可以通过Helm进行部署、升级或删除。Repository
Repository是一组打包好的Chart的存储位置。
Helm允许用户从一个或多个仓库中查找、下载和安装Chart。
二、安装Helm
1.下载二进制包
[root@master01 k8s]#mkdir /data/helm
#创建工作目录
[root@master01 k8s]#cd /data/helm/
[root@master01 helm]#wget https://get.helm.sh/helm-v3.6.0-linux-amd64.tar.gz
......
#获取安装包
[root@master01 helm]#ls
helm-v3.6.0-linux-amd64.tar.gz
2.部署Helm环境
[root@master01 helm]#tar xf helm-v3.6.0-linux-amd64.tar.gz
#解压数据包
[root@master01 helm]#ls
helm-v3.6.0-linux-amd64.tar.gz linux-amd64
[root@master01 helm]#cd linux-amd64/
[root@master01 linux-amd64]#ls
helm LICENSE README.md
[root@master01 linux-amd64]#cp helm /usr/local/sbin/
常用参数
| completion | 生成 bash、zsh 或 fish shell 的自动补全脚本。 |
| create | 创建一个新的 Helm chart。 例如,helm create mychart 会创建一个名为 mychart 的新 chart。 |
| dependency | 管理 Helm chart 的依赖项。 例如,helm dependency update 会更新 chart 的依赖项。 |
| env | 显示 Helm 的环境信息, 例如当前的 Helm home、namespace 等。 |
| get | 获取已发布 release 的信息。 例如,helm get manifest myrelease 会显示 myrelease release 的 manifest。 |
| help | 显示帮助信息。可以与其他命令一起使用以获取该命令的详细信息 例如 helm help install。 |
| history | 显示 release 的历史版本。 例如,helm history myrelease 会显示 myrelease 的所有版本。 |
| install | 安装一个新的 Helm chart。 例如,helm install release mychart/ 会安装 mychart 目录中的 chart,并命名为 release |
| lint | 检查 Helm chart 是否有潜在问题。 |
| list | 列出所有已发布的 release。 |
| package | 将 chart 目录打包成一个 chart 归档文件(.tgz)。 |
| plugin | 安装、列表、更新或删除 Helm 插件。 |
| pull | 从 Helm chart 仓库下载 chart 并解压到本地目录。 |
| repo | 添加、删除、更新和列出 Helm chart 仓库。 |
| rollback | 回滚到 release 的先前版本。 例如,helm rollback myrelease 1 会将 myrelease 回滚到版本 1。 |
| search | 在 Helm chart 仓库中搜索 chart。 |
| show | 显示 chart 的信息, 例如 helm show chart mychart/ 会显示 mychart 的 chart 信息。 |
| status | 显示 release 的状态信息。 |
| template | 本地渲染 chart 的 Kubernetes manifest 文件,但不实际安装。 |
| test | 运行 release 中的测试。这些测试在 chart 的 tests/ 目录中定义。 |
| uninstall | 删除一个已发布的 release。 |
| upgrade | 升级已发布的 release 到新的 chart 版本。 |
| verify | 验证 chart 的签名。 |
| version | 显示 Helm 的版本信息。 |
3.添加补全信息
[root@master01 linux-amd64]#echo "source <(helm completion bash)" >>~/.bashrc
#添加补全信息
[root@master01 linux-amd64]#bash
#更新bash环境
三、使用Helm部署服务
安装服务的流程梳理
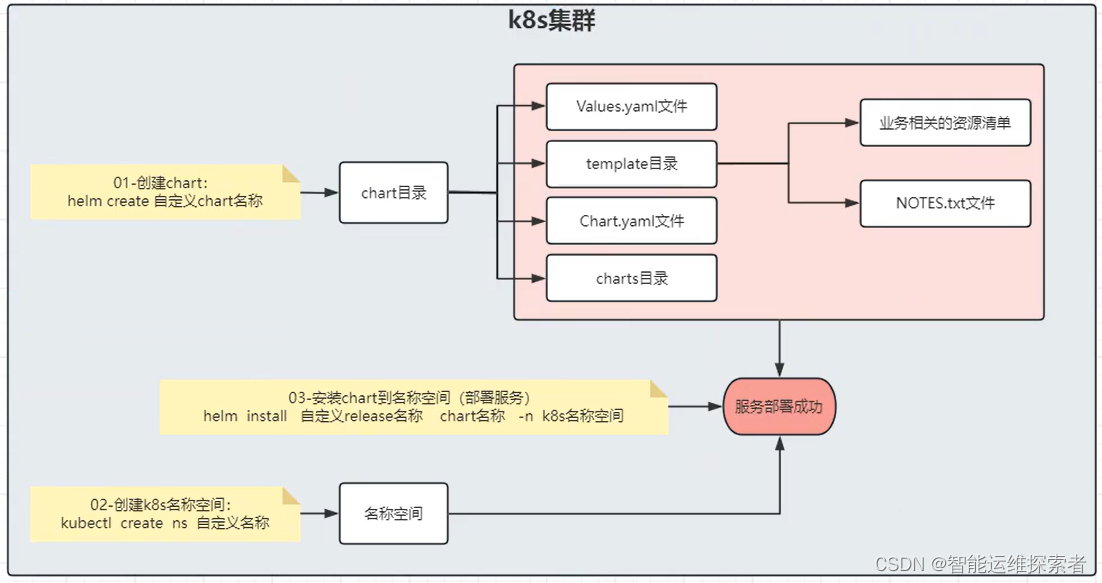
第一步先使用helm create命令创建chart
第二步创建名称空间
第三步根据chart目录下的文件内容,安装到指定的名称空间,完成服务部署
1.创建chart
[root@master01 ~]#mkdir /helm
[root@master01 ~]#cd /helm
[root@master01 helm]#helm create nginx
Creating nginx
[root@master01 helm]#ls
nginx
[root@master01 helm]#ll nginx/
总用量 8
drwxr-xr-x 2 root root    6 6月  11 15:27 charts
-rw-r--r-- 1 root root 1141 6月  11 15:27 Chart.yaml
drwxr-xr-x 3 root root  162 6月  11 15:27 templates
-rw-r--r-- 1 root root 1872 6月  11 15:27 values.yaml
--------------------------------------------------------------------------------------
charts: 存放子chart的目录。子chart允许将一个大的、复杂的chart分解为多个小的、可管理的部分
Chart.yaml: 这是 chart 的元数据文件。它包含了 chart 的名称、版本、描述、关键字等基本信息
templates: 包含了Kubernetes资源的YAML模板文件。Helm使用Go模板语言来渲染这些模板,并生成可以在 Kubernetes集群上运行的YAML文件
values.yaml
这个文件包含了 chart 的配置值。你可以通过修改这个文件来定制你的应用部署。Helm 在渲染模板时会使用这些值来替换模板中的占位符
2.查看文件信息
2.1 查看Chart.yaml文件
[root@master01 helm]#cd nginx/
[root@master01 nginx]#egrep -v "^$|^#" Chart.yaml
apiVersion: v2
name: nginx
description: A Helm chart for Kubernetes
type: application
version: 0.1.0
appVersion: "1.16.0"
--------------------------------------------------------------------------------------
apiVersion: 指定了Helm chart API的版本。
name: chart 的名称
description: 对chart的简短描述。
type: chart的类型。application表示这个chart用于部署一个应用程序。其他可能的值还包括 library等
version:  chart 的版本号。0.1.0 表示这是chart的第一个次要版本
appVersion: 由chart部署的应用程序的版本。
2.2 查看values.yaml文件
values.yaml文件中的内容,本质意义上就是变量集,一个行字段就是一个键值对形式的变量。这些变量定义好之后,在template目录下的资源清单文件中引用
[root@master01 nginx]#egrep -v "^$|.*#"  values.yaml
replicaCount: 1                 #部署release的数量
image:
  repository: nginx             #镜像名称
  pullPolicy: IfNotPresent      #镜像拉取策略
  tag: ""                       #镜像标签
imagePullSecrets: []
nameOverride: ""
fullnameOverride: ""
serviceAccount:
  create: true
  annotations: {}
  name: ""
podAnnotations: {}
podSecurityContext: {}
securityContext: {}
service:
  type: ClusterIP               #type类型为ClusterIP
  port: 80
ingress:                        #ingress信息
  enabled: false                #如果有ingress环境,可以开启此配置(true),来对外暴露
  className: ""
  annotations: {}
  hosts:
    - host: chart-example.local
      paths:
        - path: /
          pathType: ImplementationSpecific
  tls: []
resources: {}
autoscaling:
  enabled: false
  minReplicas: 1
  maxReplicas: 100
  targetCPUUtilizationPercentage: 80
nodeSelector: {}                 #亲和策略
tolerations: []
affinity: {}
2.3 查看template目录
[root@master01 templates]#ll
总用量 28
-rw-r--r-- 1 root root 1826 6月  11 15:27 deployment.yaml
-rw-r--r-- 1 root root 1762 6月  11 15:27 _helpers.tpl
-rw-r--r-- 1 root root  910 6月  11 15:27 hpa.yaml
-rw-r--r-- 1 root root 2075 6月  11 15:27 ingress.yaml
-rw-r--r-- 1 root root 1739 6月  11 15:27 NOTES.txt
-rw-r--r-- 1 root root  316 6月  11 15:27 serviceaccount.yaml
-rw-r--r-- 1 root root  355 6月  11 15:27 service.yaml
drwxr-xr-x 2 root root   34 6月  11 15:27 tests
---------------------------------------------------------------------------------------
deployment.yaml
这是一个 Deployment 资源的模板文件。它定义了如何运行你的应用容器。

_helpers.tpl
这个文件通常包含了一些 Go 模板的辅助函数,用于在其他模板文件中复用。

hpa.yaml
这是一个 HorizontalPodAutoscaler(HPA)资源的模板文件。它用于自动调整 Deployment 中 Pod 的数量,以匹配应用的工作负载。

ingress.yaml
这是一个 Ingress 资源的模板文件。它用于将外部流量路由到你的服务。

NOTES.txt
这个文件通常包含了关于如何访问或使用你的应用的说明。在 Helm 安装 chart 后,它会显示这些说明。

serviceaccount.yaml
这是一个 ServiceAccount 资源的模板文件。它定义了运行 Pod 时所使用的服务账户。

service.yaml
这是一个 Service 资源的模板文件。它定义了如何在 Kubernetes 集群内部和外部访问你的应用。

tests/
这个目录包含了用于测试 chart 部署的测试文件。在这个例子中,它包含了一个名为 test-connection.yaml 的文件,可能用于测试应用是否可以成功响应请求
例如查看一下deployment.yaml文件
在 templates 目录下 yaml 文件模板中的变量(go template语法)的值默认是在 nginx/values.yaml 中定义的,只需要修改 nginx/values.yaml 的内容,也就完成了 templates 目录下 yaml 文件的配置
比如在 deployment.yaml 中定义的容器镜像
[root@master01 templates]#cat deployment.yaml |grep image:
          image: "{{ .Values.image.repository }}:{{ .Values.image.tag | default .Chart.AppVersion }}"
#此字段就是在values.yaml文件中定义的
#.Values表示所在chart目录下的Values.yaml文件
#.image表示Values.yaml文件中的image字段
#.repository与.tag表示image字段下的参数
[root@master01 templates]#cat /helm/nginx/values.yaml | grep repository
  repository: nginx
#以上变量值是在 create chart 的时候就自动生成的默认值,可以根据实际情况进行修改
3.安装chart
创建命名空间
[root@master01 helm]#kubectl create ns helm-test
namespace/helm-test created
[root@master01 helm]#kubectl get ns helm-test
NAME        STATUS   AGE
helm-test   Active   9s
创建chart到指定命名空间
[root@master01 helm]#helm install nginx01 nginx/ -n helm-test
NAME: nginx01
LAST DEPLOYED: Tue Jun 11 16:22:38 2024
NAMESPACE: helm-test
STATUS: deployed
REVISION: 1
NOTES:
1. Get the application URL by running these commands:
  export POD_NAME=$(kubectl get pods --namespace helm-test -l "app.kubernetes.io/name=nginx,app.kubernetes.io/instance=nginx01" -o jsonpath="{.items[0].metadata.name}")
  export CONTAINER_PORT=$(kubectl get pod --namespace helm-test $POD_NAME -o jsonpath="{.spec.containers[0].ports[0].containerPort}")
  echo "Visit http://127.0.0.1:8080 to use your application"
  kubectl --namespace helm-test port-forward $POD_NAME 8080:$CONTAINER_PORT
#NOTES字段一下内容为提示信息,存放在NODES.txt文件中

------------------------------------------------------------------------------
helm:命令工具
install:命令参数,表示安装
nginx01:自定义新的release的名称
nginx/:Helm chart的路径。Helm 将从这个目录中读取 chart 的定义和模板
-n helm-test:指定安装的命名空间
--------------------------------------------------------------------------------
查看实例
[root@master01 helm]#kubectl get pod -n helm-test -o wide
NAME                       READY   STATUS    RESTARTS   AGE   IP            NODE     NOMINATED NODE   READINESS GATES
nginx01-84cdb88747-6qntg   1/1     Running   0          1m32s   10.244.2.34   node02   <none>           <none>
[root@master01 helm]#helm ls -n helm-test
NAME   	NAMESPACE	REVISION	UPDATED                                	STATUS  	CHART      	APP VERSION
nginx01	helm-test	1       	2024-06-11 16:22:38.727204295 +0800 CST	deployed	nginx-0.1.0	1.16.0
[root@master01 helm]#curl -I 10.244.2.34
HTTP/1.1 200 OK
Server: nginx/1.16.0
Date: Tue, 11 Jun 2024 08:55:35 GMT
Content-Type: text/html
Content-Length: 612
Last-Modified: Tue, 23 Apr 2019 10:18:21 GMT
Connection: keep-alive
ETag: "5cbee66d-264"
Accept-Ranges: bytes
-----------------------------------------------------------------------------
[root@master01 helm]#helm ls -n helm-test
NAME:         Helm release 的名称,这里是 nginx01。
NAMESPACE:    Kubernetes 命名空间,这里是 helm-test。
REVISION:     Helm release 的修订版本,从输出看,这是第一次安装(1 表示第一次修订)。
UPDATED:      Helm release 最后一次更新的时间戳。
STATUS:       Helm release 的状态,这里是 deployed,表示已经成功部署。
CHART:        Helm chart 的名称和版本,这里是 nginx-0.1.0。
APP VERSION:  Helm chart 中定义的 Kubernetes 应用版本,这里是 1.16.0。
4.卸载chart
使用uninstall参数,进行卸载
查看已有的资源
[root@master01 helm]#helm ls -n helm-test
NAME   	NAMESPACE	REVISION	UPDATED                                	STATUS  	CHART        	APP VERSION
nginx01	helm-test	1       	2024-06-11 16:22:38.727204295 +0800 CST	deployed	nginx-0.1.0	1.16.0
[root@master01 helm]#kubectl get pod,svc -n helm-test
NAME                           READY   STATUS    RESTARTS   AGE
pod/nginx01-84cdb88747-6qntg   1/1     Running   0          6h13m

NAME              TYPE        CLUSTER-IP      EXTERNAL-IP   PORT(S)        AGE
service/nginx01   ClusterIP   10.96.100.163   <none>        80/TCP         6h13m
卸载chart
[root@master01 helm]#helm uninstall nginx01 -n helm-test
release "nginx01" uninstalled
[root@master01 helm]#helm ls -n helm-test
NAME	NAMESPACE	REVISION	UPDATED	STATUS	CHART	APP VERSION
[root@master01 helm]#kubectl get pod,svc -n helm-test
No resources found in a namespace.
5.自定义chart服务部署
自定义配置文件后,将chart打包,使用install指令直接安装
例如修改配置文件,使其以nodePort的方式对外暴露
4.1 修改文件
修改Chart.yaml文件
[root@master01 nginx]#vim Chart.yaml
[root@master01 nginx]#egrep -v "^$|^#" Chart.yaml
apiVersion: v2
name: nginx
description: A Helm chart for Kubernetes
type: application
version: 0.1.1           #修改chart版本
appVersion: "1.18.0"     #修改application部署版本
修改values.yaml文件(设置变量)
修改该文件,在本质意义上就是设置变量
[root@master01 nginx]#vim values.yaml
......
  5 replicaCount: 1
  6
  7 image:
  8   repository: nginx
  9   pullPolicy: IfNotPresent
 10   # Overrides the image tag whose default is the chart appVersion.
 11   tag: "1.18.0"       #指定拉取的镜像版本
......

 39 service:
 40   type: NodePort      #指定类型为NodePort,对外暴露
 41   port: 80
 42   nodePort: 30001     #指定暴露端口为30001
......
 59 resources: {}         #资源限制,开启时删除{},并取消注释
......
 65   #   cpu: 100m
 66   #   memory: 128Mi
 67   # requests:
 68   #   cpu: 100m
 69   #   memory: 128Mi
在资源清单文件中引用变量
[root@master01 helm]#cat nginx/templates/deployment.yaml
apiVersion: apps/v1
kind: Deployment
metadata:
  name: {{ include "nginx.fullname" . }}
  labels:
    {{- include "nginx.labels" . | nindent 4 }}
spec:
  {{- if not .Values.autoscaling.enabled }}
  replicas: {{ .Values.replicaCount }}   #引用变量,设置副本数量
  {{- end }}
  selector:
    matchLabels:
......
[root@master01 nginx]#vim /helm/nginx/templates/service.yaml
[root@master01 nginx]#cat /helm/nginx/templates/service.yaml
apiVersion: v1
kind: Service
metadata:
  name: {{ include "nginx.fullname" . }}
  labels:
    {{- include "nginx.labels" . | nindent 4 }}
spec:
  type: {{ .Values.service.type }}              #引用变量,指定type类型
  ports:
    - port: {{ .Values.service.port }}
      targetPort: http
      protocol: TCP
      name: http
      nodePort: {{ .Values.service.nodePort }}  #引用变量,指定nodePort端口
  selector:
    {{- include "nginx.selectorLabels" . | nindent 4 }}
[root@master01 nginx]#
4.2 打包chart
[root@master01 helm]#ls
nginx
[root@master01 helm]#helm lint nginx/      #检查依赖和模版配置是否正确
==> Linting nginx/
[INFO] Chart.yaml: icon is recommended

1 chart(s) linted, 0 chart(s) failed
[root@master01 helm]#helm package nginx/   #打包chart,会在当前目录下生成压缩包
Successfully packaged chart and saved it to: /helm/nginx-0.1.1.tgz
[root@master01 helm]#ls
nginx  nginx-0.1.1.tgz
4.3 安装chart
[root@master01 helm]#helm install nginx02 nginx-0.1.1.tgz -n helm-test
NAME: nginx02
LAST DEPLOYED: Tue Jun 11 22:03:05 2024
NAMESPACE: helm-test
STATUS: deployed
REVISION: 1
NOTES:
1. Get the application URL by running these commands:
  export NODE_PORT=$(kubectl get --namespace helm-test -o jsonpath="{.spec.ports[0].nodePort}" services nginx02)
  export NODE_IP=$(kubectl get nodes --namespace helm-test -o jsonpath="{.items[0].status.addresses[0].address}")
  echo http://$NODE_IP:$NODE_PORT
#通过执行NOTES中的变量语句,设置环境变量,同样可获取节点IP地址与对外暴露端口
[root@master01 helm]#kubectl get --namespace helm-test -o jsonpath="{.spec.ports[0].nodePort}" services nginx02
30001
[root@master01 helm]#kubectl get nodes --namespace helm-test -o jsonpath="{.items[0].status.addresses[0].address}"
192.168.83.30
[root@master01 helm]#curl 192.168.83.30:30001 -I   #访问指定的30001端口
HTTP/1.1 200 OK
Server: nginx/1.18.0
Date: Tue, 11 Jun 2024 14:05:08 GMT
Content-Type: text/html
Content-Length: 612
Last-Modified: Tue, 21 Apr 2020 14:09:01 GMT
Connection: keep-alive
ETag: "5e9efe7d-264"
Accept-Ranges: bytes
查看信息
[root@master01 helm]#kubectl get pod,svc -n helm-test
NAME                           READY   STATUS    RESTARTS   AGE
pod/nginx02-5647bf678-ghzzp    1/1     Running   0          11m

NAME              TYPE        CLUSTER-IP      EXTERNAL-IP   PORT(S)        AGE
service/nginx02   NodePort    10.96.236.149   <none>        80:30001/TCP   11m
[root@master01 helm]#helm ls -n helm-test
NAME   	NAMESPACE	REVISION	UPDATED                                	STATUS  	CHART      	APP VERSION
nginx02	helm-test	1       	2024-06-11 22:03:05.602926554 +0800 CST	deployed	nginx-0.1.1	1.18.0
6.版本升级
[root@master01 helm]#cat -n nginx/values.yaml
     5	replicaCount: 1
     6
     7	image:
     8	  repository: nginx
     9	  pullPolicy: IfNotPresent
    10	  # Overrides the image tag whose default is the chart appVersion.
    11	  tag: "1.20.2"      #修改版本
......
    38
    39	service:
    40	  type: NodePort
    41	  port: 80
    42	  nodePort: 30002    #修改暴露端口
......
修改Chart.yaml文件
[root@master01 helm]#egrep -v "^#|^$" nginx/Chart.yaml
apiVersion: v2
name: nginx
description: A Helm chart for Kubernetes
type: application
version: 0.1.1
appVersion: "1.20.2"   #修改版本号
升级版本
命令格式为:helm upgrade release_name chart_name [-n namespace]
[root@master01 helm]#helm upgrade nginx02 nginx -n helm-test
Release "nginx02" has been upgraded. Happy Helming!
Release "nginx02" has been upgraded. Happy Helming!
NAME: nginx02
LAST DEPLOYED: Wed Jun 12 08:20:20 2024
NAMESPACE: helm-test
STATUS: deployed
REVISION: 2
NOTES:
1. Get the application URL by running these commands:
  export NODE_PORT=$(kubectl get --namespace helm-test -o jsonpath="{.spec.ports[0].nodePort}" services nginx02)
  export NODE_IP=$(kubectl get nodes --namespace helm-test -o jsonpath="{.items[0].status.addresses[0].address}")
  echo http://$NODE_IP:$NODE_PORT

[root@master01 helm]#helm history nginx02 -n helm-test
REVISION	UPDATED                 	STATUS    	CHART        	APP VERSION	DESCRIPTION
1       	Tue Jun 11 22:03:05 2024	superseded	nginx-0.1.1  	1.18.0     	Install complete
2       	Wed Jun 12 08:31:20 2024	deployed  	nginx-0.1.1  	1.20.2     	Upgrade complete
#版本变更为1.20.2
[root@master01 helm]#helm ls -n helm-test
NAME   	NAMESPACE	REVISION	UPDATED                                	STATUS  	CHART        	APP VERSION
nginx02	helm-test	2       	2024-06-12 08:20:06.892724134 +0800 CST	deployed	nginx01-0.1.1	1.18.0
[root@master01 helm]#kubectl get pod,svc -n helm-test
NAME                           READY   STATUS    RESTARTS   AGE
pod/nginx02-6557784db9-z5czg   1/1     Running   0          65s

NAME              TYPE       CLUSTER-IP     EXTERNAL-IP   PORT(S)        AGE
service/nginx02   NodePort   10.96.52.251   <none>        80:30002/TCP   65s
#暴露端口更改为30002
客户端访问
//访问节点IP的30002端口,查看版本号
[root@master01 helm]#curl 192.168.83.30:30002 -I
HTTP/1.1 200 OK
Server: nginx/1.20.2
Date: Wed, 12 Jun 2024 00:37:47 GMT
Content-Type: text/html
Content-Length: 612
Last-Modified: Tue, 16 Nov 2021 14:44:02 GMT
Connection: keep-alive
ETag: "6193c3b2-264"
Accept-Ranges: bytes
7.版本回滚
使用history指令查看历史版本,而后根据编号进行回滚
#查看历史版本
[root@master01 helm]#helm history nginx02 -n helm-test
REVISION	UPDATED                 	STATUS    	CHART        	APP VERSION	DESCRIPTION
1       	Tue Jun 11 22:03:05 2024	superseded	nginx-0.1.1  	1.18.0     	Install complete
2       	Wed Jun 12 08:31:20 2024	deployed  	nginx-0.1.1  	1.20.2     	Upgrade complete

#回滚版本,根据release版本回滚
[root@master01 helm]#helm rollback nginx02 1 -n helm-test
Rollback was a success! Happy Helming!
[root@master01 helm]#helm ls -n helm-test
NAME   	NAMESPACE	REVISION	UPDATED                                	STATUS  	CHART      	APP VERSION
nginx02	helm-test	3       	2024-06-12 08:41:34.997904357 +0800 CST	deployed	nginx-0.1.1	1.18.0
[root@master01 helm]#helm history nginx02 -n helm-test
REVISION	UPDATED                 	STATUS    	CHART        	APP VERSION	DESCRIPTION
1       	Tue Jun 11 22:03:05 2024	superseded	nginx-0.1.1  	1.18.0      Install complete
2       	Wed Jun 12 08:31:20 2024	superseded	nginx-0.1.1  	1.20.2 	    Upgrade complete
3       	Wed Jun 12 08:41:34 2024	deployed  	nginx-0.1.1  	1.18.0      Rollback to 1
[root@master01 helm]#kubectl get pod,svc -n helm-test
NAME                          READY   STATUS    RESTARTS   AGE
pod/nginx02-5647bf678-bn9gh   1/1     Running   0          42s

NAME              TYPE       CLUSTER-IP     EXTERNAL-IP   PORT(S)        AGE
service/nginx02   NodePort   10.96.52.251   <none>        80:30001/TCP   11m
客户端访问
[root@master01 helm]#curl 192.168.83.30:30001 -I
HTTP/1.1 200 OK
Server: nginx/1.18.0
Date: Wed, 12 Jun 2024 00:47:18 GMT
Content-Type: text/html
Content-Length: 612
Last-Modified: Tue, 21 Apr 2020 14:09:01 GMT
Connection: keep-alive
ETag: "5e9efe7d-264"
Accept-Ranges: bytes
四、公有仓库安装chart
公有仓库中,具有较多的chart模板文件,只需要通过helm命令,就可以直接进行安装
1.添加常用的chart仓库
[root@master01 ~]#helm repo add stable http://mirror.azure.cn/kubernetes/charts
"stable" has been added to your repositories
[root@master01 ~]#helm repo add aliyun https://kubernetes.oss-cn-hangzhou.aliyuncs.com/charts
"aliyun" has been added to your repositories
[root@master01 ~]#helm repo add bitnami https://charts.bitnami.com/bitnami
"bitnami" has been added to your repositories
[root@master01 helm]#helm repo ls         #列出添加的仓库
NAME   	URL
bitnami	https://charts.bitnami.com/bitnami
stable 	http://mirror.azure.cn/kubernetes/charts
aliyun 	https://kubernetes.oss-cn-hangzhou.aliyuncs.com/charts
2.查看仓库可用的charts列表
[root@master01 helm]#helm search repo stable
NAME                                 	CHART VERSION	APP VERSION            	DESCRIPTION
stable/acs-engine-autoscaler         	2.2.2        	2.1.1                  	DEPRECATED Scales worker nodes within agent pools
stable/aerospike                     	0.3.5        	v4.5.0.5               	DEPRECATED A Helm chart for Aerospike in Kubern...
stable/airflow                       	7.13.3       	1.10.12                	DEPRECATED - please use: https://github.com/air...
stable/ambassador                    	5.3.2        	0.86.1                 	DEPRECATED A Helm chart for Datawire Ambassador
stable/anchore-engine                	1.7.0        	0.7.3                  	Anchore container analysis and policy evaluatio...
stable/apm-server                    	2.1.7        	7.0.0                  	DEPRECATED The server receives data from the El...
stable/ark                           	4.2.2        	0.10.2                 	DEPRECATED A Helm chart for ark
stable/artifactory                   	7.3.2        	6.1.0                  	DEPRECATED Universal Repository Manager support...
......
3.更新仓库
[root@master01 helm]#helm repo update
Hang tight while we grab the latest from your chart repositories...
...Successfully got an update from the "aliyun" chart repository
...Successfully got an update from the "stable" chart repository
...Successfully got an update from the "bitnami" chart repository
Update Complete. ⎈Happy Helming!⎈
4.查看指定chart的基本信息
[root@master01 helm]#helm show chart bitnami/apache
annotations:
  category: Infrastructure
  images: |
    - name: apache
      image: docker.io/bitnami/apache:2.4.59-debian-12-r6
    - name: apache-exporter
      image: docker.io/bitnami/apache-exporter:1.0.7-debian-12-r9
    - name: git
      image: docker.io/bitnami/git:2.45.2-debian-12-r0
  licenses: Apache-2.0
apiVersion: v2
appVersion: 2.4.59
dependencies:
- name: common
  repository: oci://registry-1.docker.io/bitnamicharts
  tags:
  - bitnami-common
  version: 2.x.x
description: Apache HTTP Server is an open-source HTTP server. The goal of this project
  is to provide a secure, efficient and extensible server that provides HTTP services
  in sync with the current HTTP standards.
home: https://bitnami.com
icon: https://bitnami.com/assets/stacks/apache/img/apache-stack-220x234.png
keywords:
- apache
- http
- https
- www
- web
- reverse proxy
maintainers:
- name: Broadcom, Inc. All Rights Reserved.
  url: https://github.com/bitnami/charts
name: apache
sources:
- https://github.com/bitnami/charts/tree/main/bitnami/apache
version: 11.2.3
5.安装chart
[root@master01 helm]#helm install my-apache bitnami/apache -n helm-test
NAME: my-apache
LAST DEPLOYED: Wed Jun 12 16:18:53 2024
NAMESPACE: helm-test
STATUS: deployed
REVISION: 1
TEST SUITE: None
NOTES:
CHART NAME: apache
CHART VERSION: 11.2.3
APP VERSION: 2.4.59

** Please be patient while the chart is being deployed **

1. Get the Apache URL by running:

** Please ensure an external IP is associated to the my-apache service before proceeding **
** Watch the status using: kubectl get svc --namespace helm-test -w my-apache *
......
[root@master01 helm]#helm ls -n helm-test
NAME     	NAMESPACE	REVISION	UPDATED                                	STATUS  	CHART        	APP VERSION
my-apache	helm-test	1       	2024-06-12 16:18:53.188727012 +0800 CST	deployed	apache-11.2.3	2.4.59
nginx02  	helm-test	8       	2024-06-12 08:41:34.997904357 +0800 CST	deployed	nginx-0.1.1  	1.18.0
[root@master01 helm]#helm status my-apache -n helm-test
#查看指定的 release 状态
6.查看chart文件
[root@master01 helm]#helm pull bitnami/apache        #获取apache的数据包
[root@master01 helm]#ls
apache-11.2.3.tgz  nginx  nginx01-0.1.1.tgz
[root@master01 helm]#tar xf apache-11.2.3.tgz
[root@master01 helm]#ls
apache  apache-11.2.3.tgz  nginx  nginx01-0.1.1.tgz
[root@master01 helm]#cd apache/
[root@master01 apache]#ls
Chart.lock  charts  Chart.yaml  files  README.md  templates  values.schema.json  values.yaml
#解压之后的文件,重要文件,与自己创建的chart的文件相同
#同样包含charts、templates目录与Chart.yaml、values.yaml文件
7.删除仓库
[root@master01 helm]#helm repo ls
NAME   	URL
bitnami	https://charts.bitnami.com/bitnami
stable 	http://mirror.azure.cn/kubernetes/charts
aliyun 	https://kubernetes.oss-cn-hangzhou.aliyuncs.com/charts
[root@master01 helm]#helm repo remove stable        #删除stable仓库
"stable" has been removed from your repositories
[root@master01 helm]#helm repo ls
NAME   	URL
bitnami	https://charts.bitnami.com/bitnami
aliyun 	https://kubernetes.oss-cn-hangzhou.aliyuncs.com/charts
五、搭建Helm仓库
helm 可以使用 harbor 作为本地仓库,将自定义的 chart 推送至 harbor 仓库。
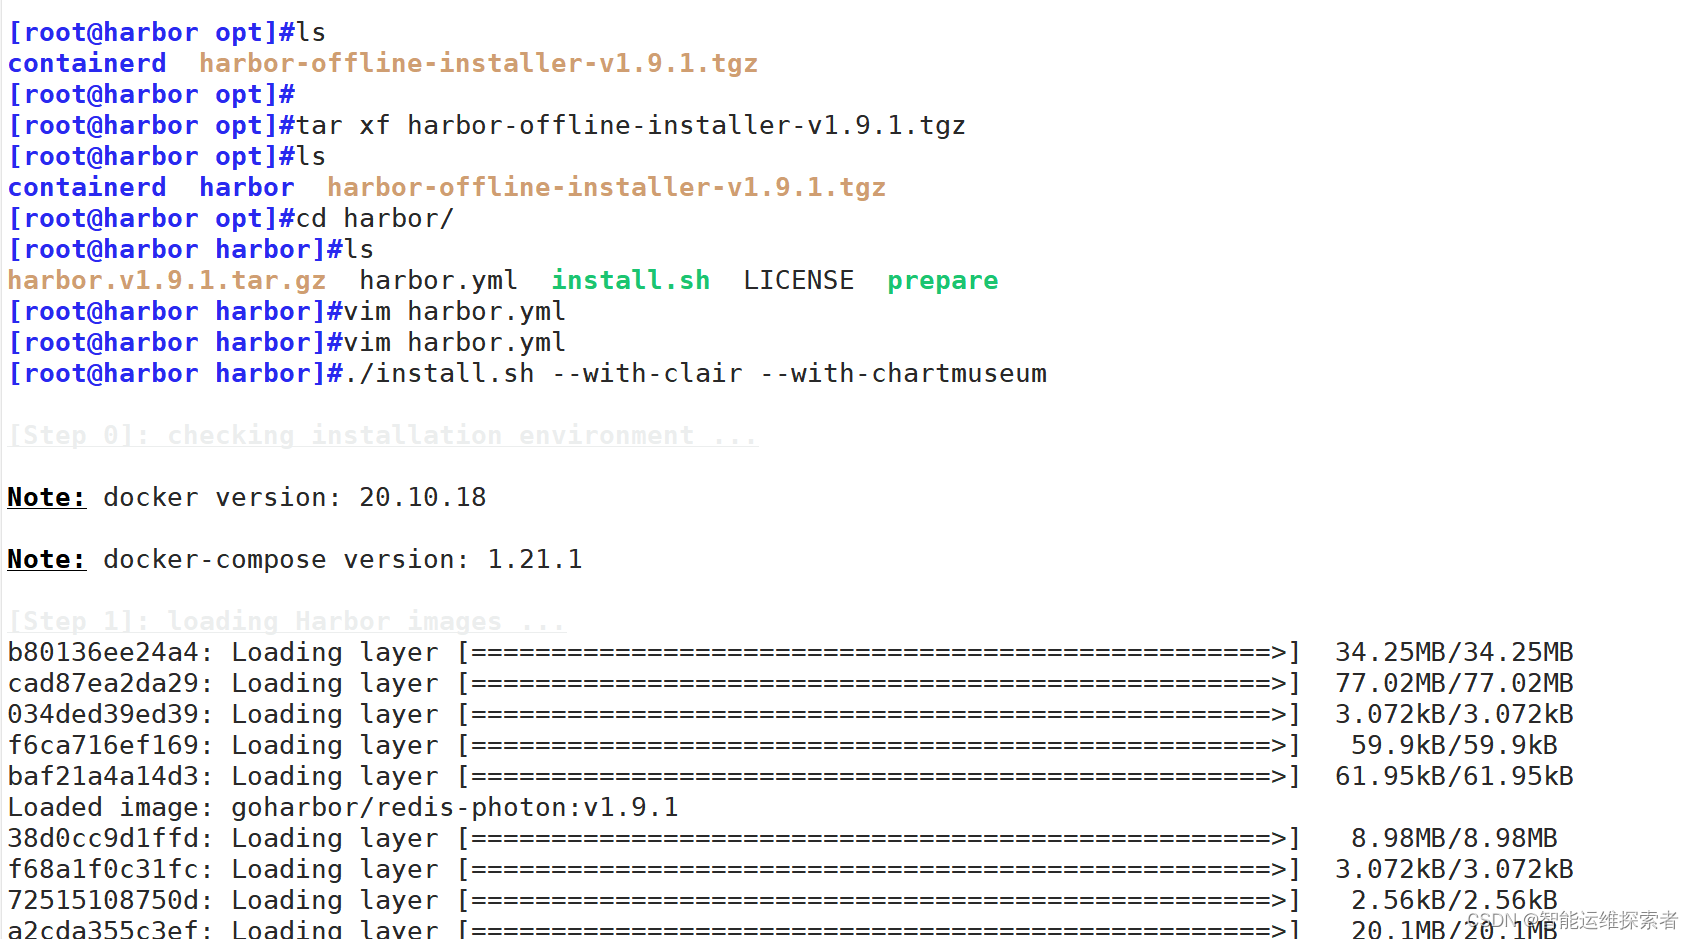
1.搭建harbor仓库
首先在新的主机上搭建harbor私有仓库
[root@harbor opt]#ls docker-compose
docker-compose
[root@harbor opt]#chmod +x docker-compose
[root@harbor opt]#mv docker-compose /usr/local/sbin
[root@harbor opt]#wget https://storage.googleapis.com/harbor-releases/release-1.9.0/harbor-offline-installer-v1.9.1.tgz
[root@harbor opt]#ls harbor-offline-installer-v1.9.1.tgz
harbor-offline-installer-v1.9.1.tgz
[root@harbor opt]#tar xf harbor-offline-installer-v1.9.1.tgz
#解压数据包
[root@harbor opt]#ls
containerd  harbor  harbor-offline-installer-v1.9.1.tgz
[root@harbor opt]#cd harbor/
[root@harbor harbor]#ls
harbor.v1.9.1.tar.gz  harbor.yml  install.sh  LICENSE  prepare
[root@harbor harbor]#vim harbor.yml  #修改配置文件
......
hostname = 192.168.83.60             #修改为本地主机的IP地址
harbor_admin_password = Harbor12345  #admin用户初始密码
data_volume: /harbor/data            #数据存储路径,自动创建
chart:
  absolute_url: enabled              #在chart中启用绝对url
......
安装harbor
[root@harbor harbor]#./install.sh --with-clair --with-chartmuseum
#安装带有 Clair service 和 chart 仓库服务的 Harbor
[Step 0]: checking installation environment ...

Note: docker version: 20.10.18

Note: docker-compose version: 1.21.1
......
[root@harbor harbor]#docker-compose ps
      Name                     Command                  State                      Ports
--------------------------------------------------------------------------------------------------------
chartmuseum         /docker-entrypoint.sh            Up (healthy)   9999/tcp
clair               /docker-entrypoint.sh            Up (healthy)   6060/tcp, 6061/tcp
......
2.安装push插件
在master节点上安装push插件
#获取数据包
[root@master01 push]#wget https://github.com/chartmuseum/helm-push/releases/download/v0.8.1/helm-push_0.8.1_linux_amd64.tar.gz
[root@master01 push]#tar xf helm-push_0.8.1_linux_amd64.tar.gz
[root@master01 push]#ls
bin  helm-push_0.8.1_linux_amd64.tar.gz  LICENSE  plugin.yaml
[root@master01 push]#ls bin/
helmpush
[root@master01 push]#mv bin/helmpush /usr/local/sbin/
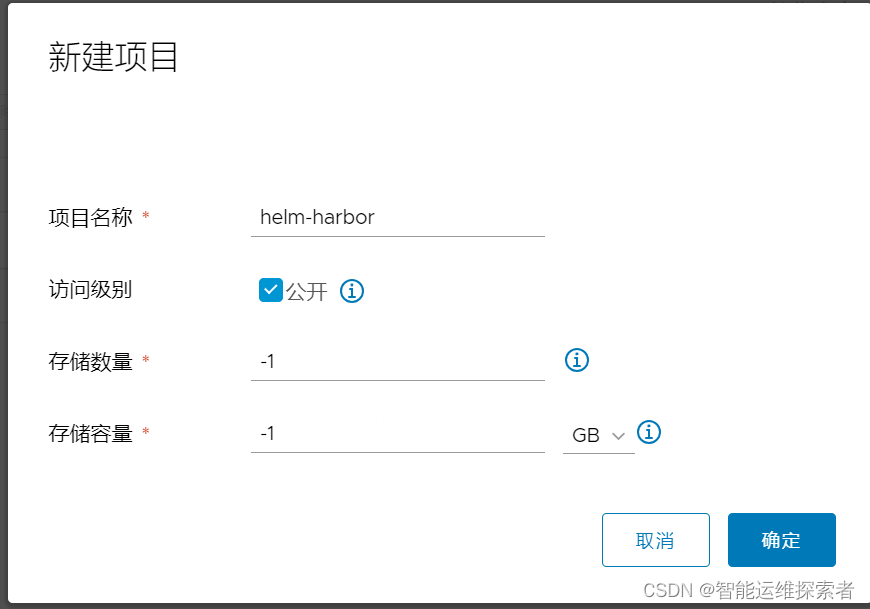
3.创建项目
浏览器访问harbor仓库服务器的IP地址
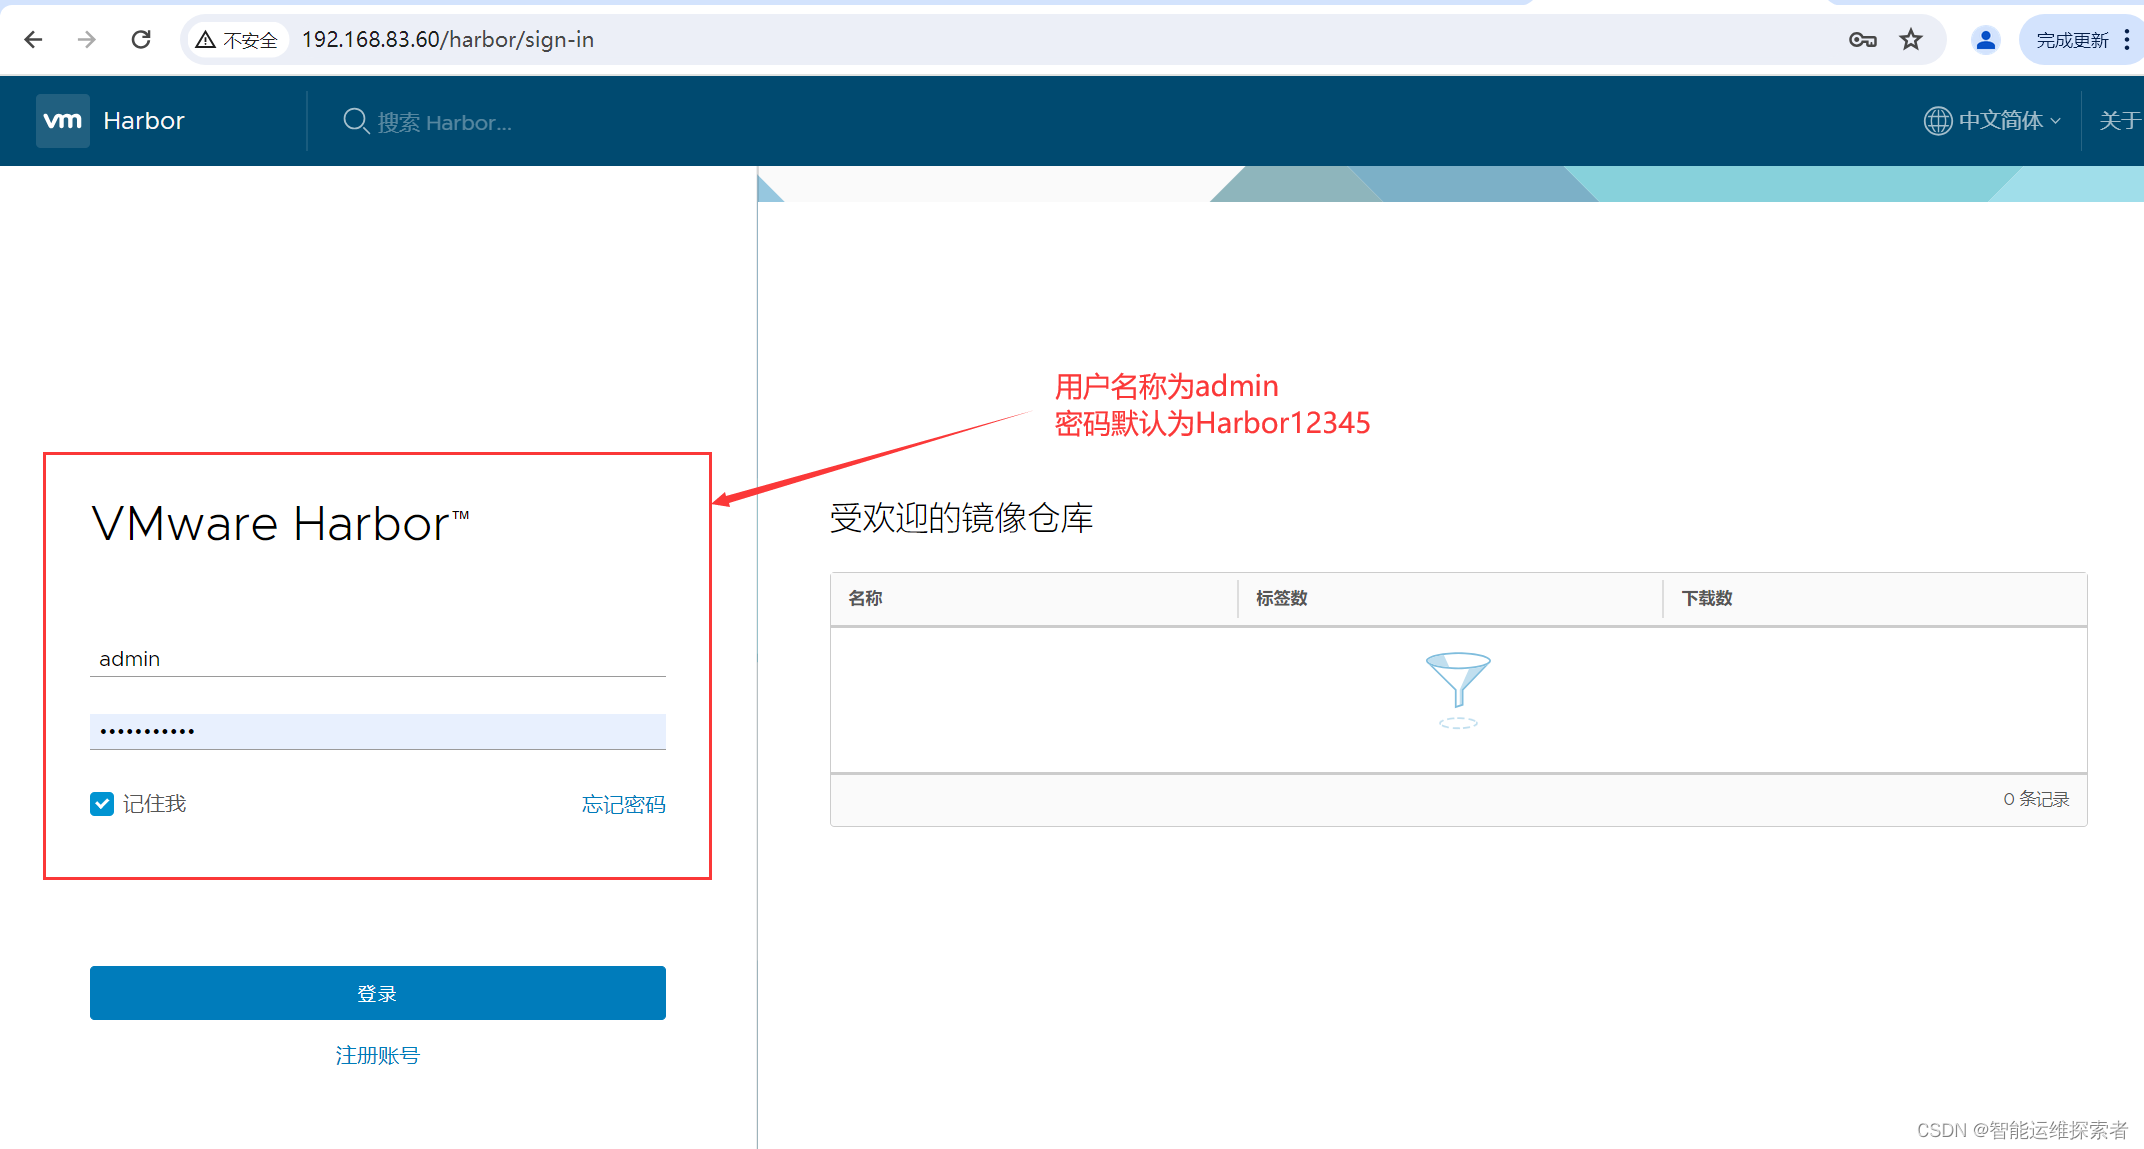
点击新建项目
4.添加私有仓库
在master主机添加私有仓库
[root@master01 push]#helm repo add harbor http://192.168.83.60/chartrepo/helm-harbor/ --username=admin --password=Harbor12345
"harbor" has been added to your repositories
#这里的repo的地址是<Harbor URL>/chartrepo/<项目名称>
#Harbor 中每个项目是分开的 repo。如果不提供项目名称, 则默认使用 library 这个项目。
[root@master01 push]#helm repo ls
NAME   	URL
bitnami	https://charts.bitnami.com/bitnami
aliyun 	https://kubernetes.oss-cn-hangzhou.aliyuncs.com/charts
harbor 	http://192.168.83.60/chartrepo/helm-harbor/
5.推送chart
[root@master01 helm]#ls
nginx  nginx01-0.1.1.tgz
[root@master01 helm]#helmpush nginx harbor
Pushing nginx-0.1.1.tgz to harbor...
Done.
#使用helmpush插件,将chart上传到harbor仓库
在harbor仓库的web界面中查看
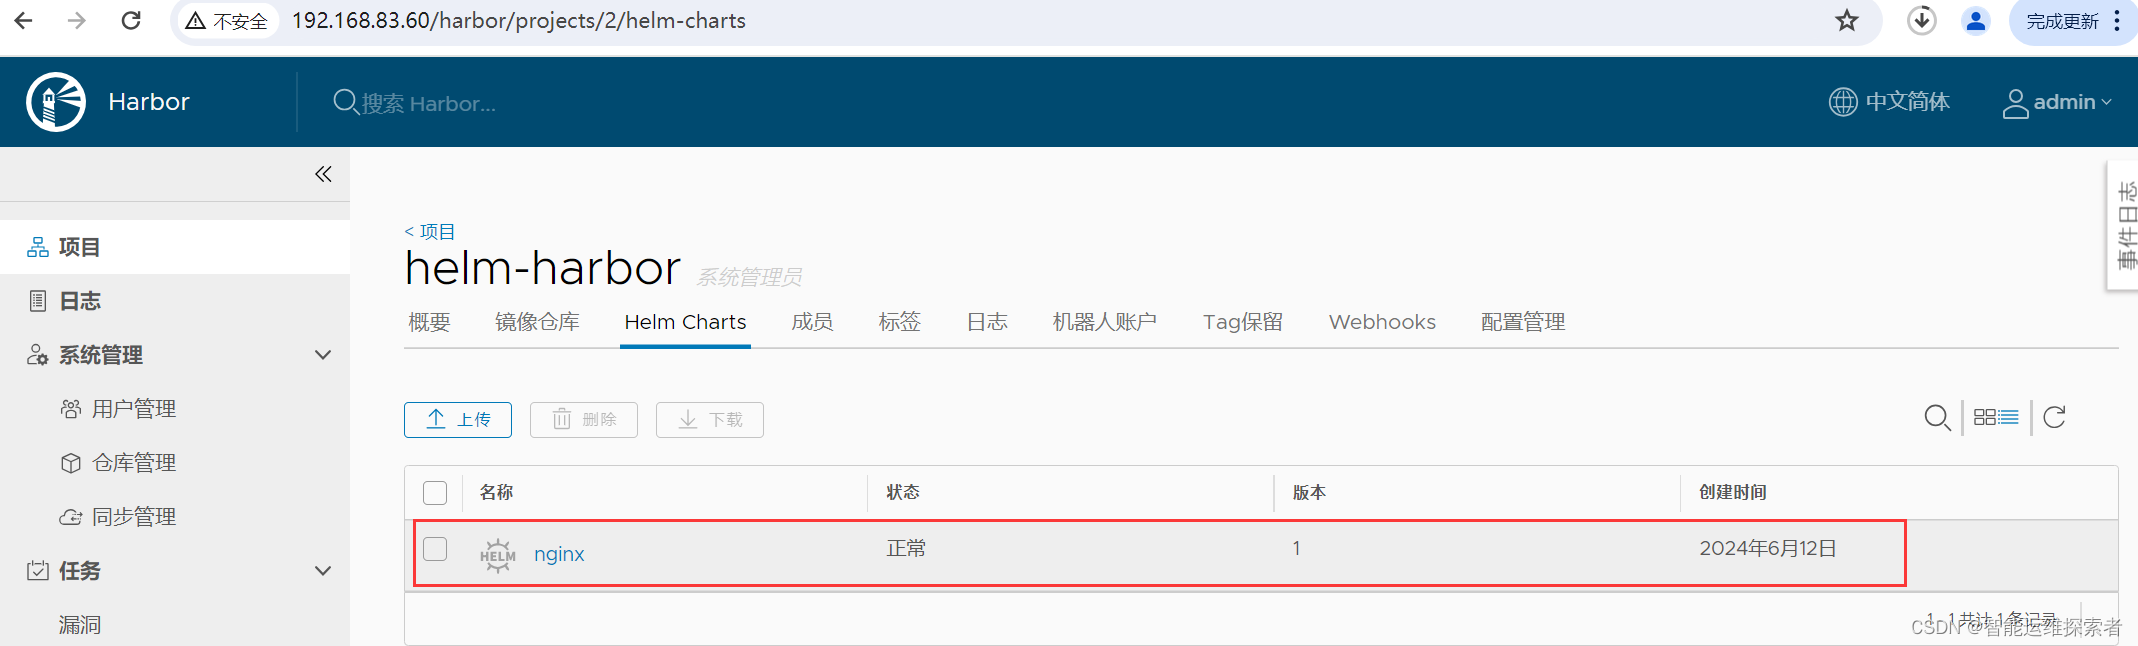
6.使用helm仓库部署服务
卸载之前安装的release
[root@master01 helm]#helm ls -n helm-test
NAME     	NAMESPACE	REVISION	UPDATED                                	STATUS  	CHART        	APP VERSION
my-apache	helm-test	1       	2024-06-12 16:18:53.188727012 +0800 CST	deployed	apache-11.2.3	2.4.59
nginx02  	helm-test	8       	2024-06-12 08:41:34.997904357 +0800 CST	deployed	nginx-0.1.1  	1.18.0
[root@master01 helm]#helm uninstall nginx02 -n helm-test
release "nginx02" uninstalled
[root@master01 helm]#helm uninstall my-apache -n helm-test
release "my-apache" uninstalled
[root@master01 helm]#helm ls -n helm-test
NAME	NAMESPACE	REVISION	UPDATED	STATUS	CHART	APP VERSION
使用helm仓库安装release
[root@master01 helm]#helm install harbor-nginx harbor/nginx -n helm-test
NAME: harbor-nginx
LAST DEPLOYED: Wed Jun 12 16:31:56 2024
NAMESPACE: helm-test
STATUS: deployed
REVISION: 1
NOTES:
1. Get the application URL by running these commands:
  export NODE_PORT=$(kubectl get --namespace helm-test -o jsonpath="{.spec.ports[0].nodePort}" services harbor-nginx)
  export NODE_IP=$(kubectl get nodes --namespace helm-test -o jsonpath="{.items[0].status.addresses[0].address}")
  echo http://$NODE_IP:$NODE_PORT
[root@master01 helm]#helm ls -n helm-test
NAME        	NAMESPACE	REVISION	UPDATED                                	STATUS  	CHART      	APP VERSION
harbor-nginx	helm-test	1       	2024-06-12 16:31:56.640962792 +0800 CST	deployed	nginx-0.1.1	1.20.2
阶段总结
Helm在Kubernetes生态系统中扮演着关键角色,其主要作用体现在以下几个方面
简化部署流程:Helm通过将一组相关的Kubernetes资源打包到一个Chart中,极大地简化了应用程序的部署过程。这种方法减少了手动操作和配置的复杂性,使得部署变得更加简便。
自动化管理:Helm提供了一组命令和操作,可以自动化地管理Chart的安装、升级、回滚等过程。这不仅提高了部署效率,还增强了部署的可靠性。
组织和共享:Helm允许开发人员和运维人员将应用程序打包成Chart,并通过Chart Repository进行共享和组织。这种方式方便了应用程序的管理和分发,促进了团队协作和知识共享。
版本化机制:Helm提供了版本化机制,确保可以跟踪和重用新版本的Chart。这有助于管理应用程序的生命周期,包括更新、回滚和恢复等操作。
自定义逻辑和注释:Helm提供了Hook的机制,允许在部署生命周期的某些点执行自定义逻辑,如加载配置前执行job或在删除资源前备份数据等。此外,Helm还支持注释机制,允许将元数据附加到资源对象上。
存储后端和安全性:Helm默认使用Kubernetes内建的存储机制来存储发布版本的元数据,但也可以配置使用第三方存储后端如CloudStorage。同时,Helm还提供了基于角色的访问控制(RBAC)等安全功能,确保只有授权的用户才能执行相关操作。


 1023
1023

 被折叠的 条评论
为什么被折叠?
被折叠的 条评论
为什么被折叠?
 到【灌水乐园】发言


