


本人小白一枚,初次使用springmvc框架,在使用过程中引入了shiro框架,MyBatis框架... 为了方便自己学习特意整理了shiro部分的使用资料也希望可以帮助到同样刚刚开始使用这些东西的小白,对于书写有误或误导的地方敬请谅解并帮忙指出,本资料只对使用流程上的东西进行梳理且只介绍了认证这个过程,对于使用过程中接合的其他技术及内部实现不再展开,以下涉及到的代码只是作为配合描述使用。
另外文档里引用了各热心网友分享的知识,在这里列出链接表示感谢,如有不妥的地方请联系我给予删除
Apache Shiro权限框架理论介绍_端碗吹水的技术博客_51CTO博客
Java 权限框架 Shiro 实战二:与spring集成、filter机制 - digdeep - 博客园
一、我们为什么要使用框架
就我自己根据在工作中遇到的问题进行总结,提出以下几点供参考
1、框架经过大量实际生产环境的使用考验后,框架设计变得更加合理,性能更加稳定、可靠,安全性及扩展性也进一步提高
2、框架对于大部分的底层实现都进行了封装对于专做业务层的开发者来说开发变得更加快捷、方便(如果底层有BUG也是头疼的事情)
3、对于公司内部用统一的框架开发不同的项目,方便不同项目开发者接手公司的各种项目,只要熟悉下业务流程,不再需要 研究各种五花八门的技术实现方式(头疼)
4、各公司都采用主流框架后,碰到不同公司应用平台之间需要进行数据互通场景的时候,可以减少一些技术匹配上的沟通,方便开发人员做接口对接
5、可以在使用框架中学习借签大师们的设计思想,帮助提高自己的设计能力
二、shiro框架的作用及组成
这部分摘录来自 Apache Shiro权限框架理论介绍_端碗吹水的技术博客_51CTO博客
Apache Shiro是一个简单易用且强大而灵活的开源Java安全框架。可以处理身份认证、功能授权以及企业会话管理和加密并且支持数据库及缓存操作,其组成如下图所示。
Shiro的功能框架图
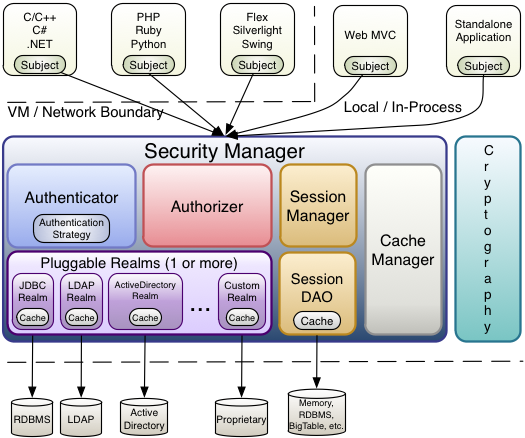
从上图中可以看到 Shiro 的四大核心部分:
- Authentication(身份验证):简称为“登录”,即通过用户名及密码证明用户是谁当然也还有其他登陆组合方式。
- Authorization(授权):访问控制的过程,即决定是否有权限去访问受保护的资源。
- Session Management(会话管理):管理用户特定的会话,即使在非 Web 或 EJB 应用程序。
- Cryptography(加密):通过使用加密算法保持数据安全
其中 Shiro 还提供了以下扩展:
- Web Support:主要针对web应用提供一些常用功能。
- Caching:缓存可以使应用程序运行更有效率。
- Concurrency:多线程相关功能。
- Testing:帮助我们进行测试相关功能
- "Run As":一个允许用户假设为另一个用户身份(如果允许)的功能,有时候在管理脚本很有用。
- "Remember Me" :记住用户身份。
Shiro 概念层架构的 3 个核心组件图: -
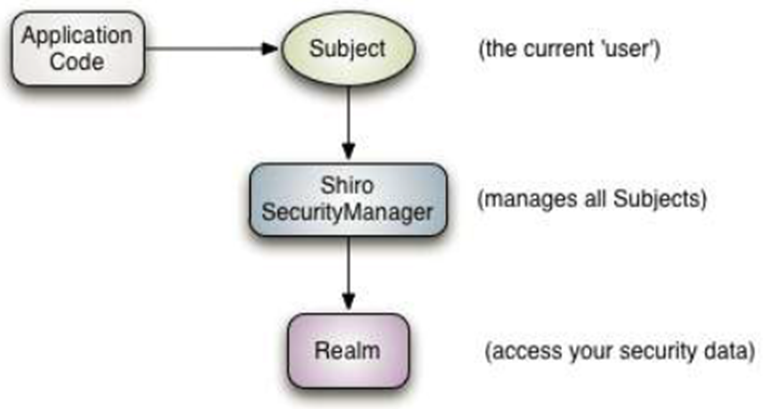
- Subject :正与系统进行交互的人,或某一个第三方服务。所有 Subject 实例都被绑定到(且这是必须的)一个SecurityManager 上。
- SecurityManager:Shiro 架构的心脏,用来协调内部各安全组件,管理内部组件实例,并通过它来提供安全管理的各种服务。当 Shiro 与一个 Subject 进行交互时,实质上是幕后的 SecurityManager 处理所有繁重的Subject 安全操作,可以将其概念比作为是SpringMVC中的前端控制器。
- Realms :本质上是一个特定安全的 DAO。当配置 Shiro 时,必须指定至少一个 Realm 用来进行身份验证或授权。Shiro 提供了多种可用的 Realms 来获取安全相关的数据。如关系数据库(JDBC),INI 及属性文件等。可以定义自己 Realm 实现来代表自定义的数据源
三、我以带着几个疑问的方式进行记录自己如何了解和使用shiro框架
使用shiro框架前我给自己提了以下的几个问题
1、shiro框架是怎么启动的?
2、用户的登录信息是怎么传给shiro框架的?
3、框架是怎么认证用户及对具体的权限进行授权管理的?
4、应用平台是怎么从shiro框架中获取登录状态信息的?
针对第一个问题“shiro框架是怎么启动的?”的整理:
1、 在web.xml中配置了一个名为shiroFilter的spring代理过滤器,这个名称必须与shiroFilter的配置文件中的
<bean id="shiroFilter" class="org.apache.shiro.spring.web.ShiroFilterFactoryBean"> 这行中的bean id="shiroFilter"一致。
<filter>
<filter-name>shiroFilter</filter-name>
<filter-class>org.springframework.web.filter.DelegatingFilterProxy</filter-class>
<init-param>
<param-name>targetFilterLifecycle</param-name>
<!-- 该值缺省为false,表示生命周期由SpringApplicationContext管理,设置为true则表示由ServletContainer管理
-->
<param-value>true</param-value>
</init-param>
</filter>
<filter-mapping>
<filter-name>shiroFilter</filter-name>
<url-pattern>/*</url-pattern>
</filter-mapping>
2、配置shiro的管理文件
A、配置代理过滤器指向的shiroFilter的拦截器(注意过滤器的名字一定要与在WEB.xml中描述的一致)
<bean id="shiroFilter" class="org.apache.shiro.spring.web.ShiroFilterFactoryBean">
<property name="securityManager" ref="securityManager" />
<property name="successUrl" value="/main.jsp" />
<!-- 登录成功默认跳转页面,不配置则跳转至”/”。如果登陆前点击的一个需要登录的页面,则在登录自动跳转到那个需要登录的页面。不跳转到此。 -->
<property name="loginUrl" value="/login" />
<!-- 登录时请求认证的页面,在没有登录时访问任何页面都会跳转到本页面。默认的是webroot下的login.jsp页面 -->
<!注意--loginUrl这个地方我刚开始时理解错了,配置成登录展示的一个页面了,需要指向那个登录验证用的@control 类似下面所示
@Controller
public class CheckLogin {
@RequestMapping("/login")
} -->
<property name="unauthorizedUrl" value="/index.jsp" />
<!-- 认证未通过访问的页面,即经过认证但是没有相应的权限时跳转的页面 -->
<!-- 基本系统级别权限配置-->
<property name="filterChainDefinitions">
<value>
<!-- # static file chains -->
/css/**=anon
/images/**=anon
/js/**=anon
/WEB-INF/**=anon
/index.jsp=anon
/**=authc
<!-- # user chain -->
</value>
</property>
</bean>
B、配置安全管理
<bean id="securityManager" class="org.apache.shiro.web.mgt.DefaultWebSecurityManager">
<property name="realm" ref="MyRealm" />
<property name="sessionManager" ref="sessionManager" />
<property name="cacheManager" ref="cacheManager" />
</bean>
注意,realm 是必须项,其他可以任意选择 如果指定了其他配置项,那在配置文件中必须都要配置全了
注意MyRealm所在的包一定要被spring能扫描到
<bean id="MyRealm" class="sysapp.drv.shiro.MyRealm">
<!-- <property name="cachingEnabled" value="true" />
<property name="authenticationCachingEnabled" value="true" />
<property name="authenticationCacheName" value="authenticationCache" />
<property name="authorizationCachingEnabled" value="true" />
<property name="authorizationCacheName" value="authorizationCache" /> -->
</bean>
C、缓存配置
<!--ehcache-->
    <bean id="ehcacheManager" class="org.springframework.cache.ehcache.EhCacheManagerFactoryBean">
        <property name="configLocation" value="classpath:ehcache.xml"/>
    </bean>
    <bean id="springCacheManager" class="org.springframework.cache.ehcache.EhCacheCacheManager">
        <property name="cacheManager" ref="ehcacheManager"/>
    </bean>
    <!-- 缓存管理器 -->
    <bean id="cacheManager" class="com.ems.shiro.SpringCacheManagerWrapper">
        <property name="cacheManager" ref="springCacheManager"/>
    </bean>
至此Shiro可以正常启动及进行工作
针对第二个问题“用户的登录信息是怎么传给shiro框架的?“进行整理:
从前面的两个框图可以看出,应用层与框架通过一个叫Subject的东西作为桥梁连接,Subject的功能及定义前面已经提到,这里 再说明一下Subject :正与系统进行交互的人,或某一个第三方服务。所有 Subject 实例都被绑定到(且这是必须的)一个SecurityManager 上。
A、由于在web.xml中设置了过滤器,所以只要有外部请求,容器(我自己这里是tomcat) 会根据过滤器的配置进行拦截,再根据shiroFilter中的配置 <property name="loginUrl" value="/login" /> shiroFilter 如果检测到自己还是未认证状态就会去调用login
B、在login中 通过Shiro框架提供的SecurityUtils抽象类的getSubject()方法获取shiro框架中配置的全局唯一SecurityManager对象进行数据交互处理。
/* 获取当前的 Subject. 调用 SecurityUtils.getSubject();*/
Subject currentUser = SecurityUtils.getSubject();
// 测试当前的用户是否已经被认证. 即是否已经登录.
// 调动 Subject 的 isAuthenticated()
if (!currentUser.isAuthenticated()) {
// 把用户名和密码封装为 UsernamePasswordToken 对象
UsernamePasswordToken token = new UsernamePasswordToken(email, password);
// rememberme
// 执行登录,把数据交给了shiro中的Security Manager
currentUser.login(token);
C、 完成B的操作后,就会触发MyReaml中的
protected AuthenticationInfo doGetAuthenticationInfo( AuthenticationToken token) throws AuthenticationException {
//用户名
String username = (String) token.getPrincipal();
//密码
String password = new String((char[])token.getCredentials());
//然后根据配置的的方式(采用数据源、缓存....)其他方式进行数据处理
}
针对第三个问题“框架是怎么认证用户及对具体的权限进行授权管理的?“进行整理:
shiro提供了一个Realm组件,其有以下特性:
- Realm:访问应用程序安全数据(如用户、角色及权限)的组件。
- Realm 通常和数据源是一对一的对应关系,如关系数据库、文件系统或其他类似资源。Realm 实质上就是一个访问安全数据的 DAO。
- 数据源通常存储身份验证数据(如密码的凭证)以及授权数据(如角色或权限),所以每个Realm 都能够执行身份验证和授权操作。
根据上述描述,Shiro 的认证过程由 Realm 执行,当外部应用层调用Subject.login(token)时,SecurityManager 会调用org.apache.shiro.realm.Realm的getAuthenticationInfo(AuthenticationToken token)方法,这个外部应用层自己需要实现一个具体的实现类,满足自己具体的业务需求,例如下面说列举的。
public class MyRealm extends AuthorizingRealm{ - }
自己实现的Realm类继承shiro 中的 AuthorizingRealm类 重写下面两个方法
protected AuthorizationInfo doGetAuthorizationInfo(PrincipalCollection principals)
{
//我们可以通过用户名从数据库获取权限/角色信息
在这个地方,可以与缓存接合,首次获取某个用户的相关信息时从数据库中获取,以后就可以从缓存中获取了
问题:权限临时变更后,这个同步到缓存中的操作 是否在授权管理的地方直接操作
}
protected AuthenticationInfo doGetAuthenticationInfo( AuthenticationToken token)
{
//从数据库或缓存中获取用户名密码进行匹配
在这个地方,可以与缓存接合,首次获取某个用户的相关信息时从数据库中获取,以后就可以从缓存中获取了
问题:用户权限变更后,这个同步到缓存中的操作 是否在授权管理的地方直接操作
}
}
在本文档中,对缓存的管理不再具体展开, Shiro 自身不实现缓存,而是提供缓存接口,让其他第三方实现,默认支持EhCache和MapCache缓存
针对第四个问题“应用平台是怎么从shiro框架中获取登录状态信息的?“进行整理:
D、 login怎么获取shiro的登录结果状态
String exceptionClassName = (String) request.getAttribute("shiroLoginFailure");
if(exceptionClassName!=null){
if (UnknownAccountException.class.getName().equals(exceptionClassName)) {
System.out.println("账号不存在");
} else if (IncorrectCredentialsException.class.getName().equals(
exceptionClassName)) {
System.out.println("用户名/密码错误");
} else if("randomCodeError".equals(exceptionClassName)){
System.out.println("验证码错误");
} else{
System.out.println("未知错误");
}
}
至此应用层可以委托Shiro框架进行认证管理的处理了
四、重要节点分析
为了能够更好的了解整个框架的使用流程,特从开始到结束列举了几个重要节点进行分析
1、web.xml中配置的代理过滤器
DelegatingFilterProxy就是一个对于servlet filter的代理,用这个类的好处主要是通过Spring容器来管理servlet filter 的 生命周期,还有就是如果filter中需要一些Spring容器的实例,可以通过spring直接注入,另外读取一些配置文件这些 便利的操作都可以通过Spring来配置实现,在这里它会将实际的工作交给spring配置文件中 id="shiroFilter" 的bean来处理
下面比较粗流程的列一下这个代理过滤器的工作过程 摘录来自
Java 权限框架 Shiro 实战二:与spring集成、filter机制 - digdeep - 博客园
public class DelegatingFilterProxy extends GenericFilterBean {
private String contextAttribute;
private WebApplicationContext webApplicationContext;
private String targetBeanName;
private boolean targetFilterLifecycle = false;
private volatile Filter delegate;
private final Object delegateMonitor = new Object();
@Override
protected void initFilterBean() throws ServletException {
synchronized (this.delegateMonitor) {
if (this.delegate == null) {
// If no target bean name specified, use filter name.
if (this.targetBeanName == null) {
this.targetBeanName = getFilterName();
}
// Fetch Spring root application context and initialize the delegate early,
// if possible. If the root application context will be started after this
// filter proxy, we'll have to resort to lazy initialization.
WebApplicationContext wac = findWebApplicationContext();
if (wac != null) {
this.delegate = initDelegate(wac);
}
}
}
}
public abstract class GenericFilterBean implements
Filter, BeanNameAware, EnvironmentAware, ServletContextAware, InitializingBean, DisposableBean {
@Override
public final void init(FilterConfig filterConfig) throws ServletException {
Assert.notNull(filterConfig, "FilterConfig must not be null");
if (logger.isDebugEnabled()) {
logger.debug("Initializing filter '" + filterConfig.getFilterName() + "'");
}
this.filterConfig = filterConfig;
// Set bean properties from init parameters.
try {
PropertyValues pvs = new FilterConfigPropertyValues(filterConfig, this.requiredProperties);
BeanWrapper bw = PropertyAccessorFactory.forBeanPropertyAccess(this);
ResourceLoader resourceLoader = new ServletContextResourceLoader(filterConfig.getServletContext());
bw.registerCustomEditor(Resource.class, new ResourceEditor(resourceLoader, this.environment));
initBeanWrapper(bw);
bw.setPropertyValues(pvs, true);
}
catch (BeansException ex) {
String msg = "Failed to set bean properties on filter '" +
filterConfig.getFilterName() + "': " + ex.getMessage();
logger.error(msg, ex);
throw new NestedServletException(msg, ex);
}
// Let subclasses do whatever initialization they like.
initFilterBean();
if (logger.isDebugEnabled()) {
logger.debug("Filter '" + filterConfig.getFilterName() + "' configured successfully");
}
}
initFilterBean();
Filter 接口的 init 方法调用 initFilterBean(), 而该方法在子类中进行实现,它先获得 this.targetBeanName = getFilterName(); bean的名称,也就是id,然后对其进行初始化:this.delegate = initDelegate(wac); 其实就是从bean工厂中根据bean的名称找到bean.
    protected Filter initDelegate(WebApplicationContext wac) throws ServletException {
        Filter delegate = wac.getBean(getTargetBeanName(), Filter.class);
        if (isTargetFilterLifecycle()) {
            delegate.init(getFilterConfig());
        }
        return delegate;
    }
2、securityManager 级相关配置
我们知道securityManager是shiro的顶层对象,它管理和调用其它所有子系统,负责系统的安全,它是通过什么方式与应用层建立连接的呢?
原来在 Shiro 中有一个 SecurityUtils 抽象类。并且没有任何子类。在其中声明了一个静态属性,并且通过setSecurityManager方法把SecurityManager 传递给 SecurityUtils
静态属性 securityManager
private static SecurityManager securityManager;
用来存储当前应用中全局唯一的一个SecurityManager。
有两个静态方法是为此静态属性服务器,也就是下面这两个:
public static void setSecurityManager(SecurityManager securityManager) {
    SecurityUtils.securityManager = securityManager;
}

public static SecurityManager getSecurityManager() throws UnavailableSecurityManagerException {
    SecurityManager securityManager = ThreadContext.getSecurityManager();
    if (securityManager == null) {
        securityManager = SecurityUtils.securityManager;
    }
    if (securityManager == null) {
        String msg = "No SecurityManager accessible to the calling code, either bound to the " +
                ThreadContext.class.getName() + " or as a vm static singleton.  This is an invalid application " +
                "configuration.";
        throw new UnavailableSecurityManagerException(msg);
    }
    return securityManager;
}
我们再来看shiro配置文件中是如何配置securityManager的:
 <!-- 相当于调用SecurityUtils.setSecurityManager(securityManager) -->
    <bean class="org.springframework.beans.factory.config.MethodInvokingFactoryBean">
        <property name="staticMethod" value="org.apache.shiro.SecurityUtils.setSecurityManager"/>
        <property name="arguments" ref="securityManager"/>
    </bean>
上面的配置相当于调用SecurityUtils.setSecurityManager(securityManager) ,来注入了下面配置的 securityManager(DefaultWebSecurityManager) :
<!-- 安全管理器 -->
<bean id="securityManager" class="org.apache.shiro.web.mgt.DefaultWebSecurityManager">
<property name="realm" ref="userRealm"/> <property name="cacheManager" ref="cacheManager"/>
<property name="rememberMeManager" ref="rememberMeManager"/> </bean>
应用层正是通过 SecurityUtils.getSubject(); 获取到 securityManager的subject 然后通过 .login(token) 交给shiro框架进行认证处理。
它默认使用的session管理器是 ServletContainerSessionManager,所以上面没有配置,所以就使用默认值。配置了就会覆盖下面的默认值:
    public DefaultWebSecurityManager() {
        super();
        ((DefaultSubjectDAO) this.subjectDAO).setSessionStorageEvaluator(new DefaultWebSessionStorageEvaluator());
        this.sessionMode = HTTP_SESSION_MODE;
        setSubjectFactory(new DefaultWebSubjectFactory());
        setRememberMeManager(new CookieRememberMeManager());
        setSessionManager(new ServletContainerSessionManager());
    }

显然 securityManager 最重要的工作就是用户登录认证和获得用户的权限等相关信息,所以 realm 是其最重要的依赖:
要理解上面userRealm的配置,就的先理解 UserRealm 的继承体系:
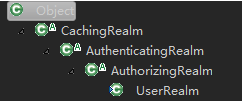
UserRealm 继承 AuthorizingRealm 显然是为了获取权限信息,对用户进行访问控制;继承AuthenticatingRealm显然是为了获得用户的认证信息,对用户进行认证。而 credentialsMatcher 就是 AuthenticatingRealm 使用来进行密码验证的依赖的组件:
public abstract class AuthenticatingRealm extends CachingRealm implements Initializable {/**
     * Credentials matcher used to determine if the provided credentials match the credentials stored in the data store.
     */
    private CredentialsMatcher credentialsMatcher;
再看其credentialsMatcher bean的配置:
    <!-- 凭证匹配器(验证登录密码是否正确) -->
    <bean id="credentialsMatcher" class="com.ems.shiro.RetryLimitHashedCredentialsMatcher">
        <constructor-arg ref="cacheManager"/>
        <property name="hashAlgorithmName" value="SHA-256"/>
        <property name="hashIterations" value="2"/>
        <property name="storedCredentialsHexEncoded" value="true"/>
    </bean>
配置就是 hash加密的相关参数:hash算法,hash迭代次数等。到这里 shiro 登录验证的配置就完了。至于获取用户信息和用户的权限的信息,都在userRealm中实现了。
3、shiro缓存的管理
Shiro支持在2个地方定义缓存管理器,既可以在SecurityManager中定义,也可以在Realm中定义,任选其一即可。
通常我们都会自定义Realm实现,例如将权限数据存放在数据库中,那么在Realm实现中定义缓存管理器再合适不过了。
举个例子,我们扩展了org.apache.shiro.realm.jdbc.JdbcRealm,在其中定义一个缓存组件。
以下摘录来自 https://www.cnblogs.com/nuccch/p/8044226.html
第一:为什么Shiro要设计成既可以在Realm,也可以在SecurityManager中设置缓存管理器呢?
第二:分别在Realm和SecurityManager定义的缓存管理器,他们有什么区别或联系吗?
下面,我们追踪一下org.apache.shiro.mgt.RealmSecurityManage的源码实现:
protected void applyCacheManagerToRealms() {
    CacheManager cacheManager = getCacheManager();
    Collection<Realm> realms = getRealms();
    if (cacheManager != null && realms != null && !realms.isEmpty()) {
        for (Realm realm : realms) {
            if (realm instanceof CacheManagerAware) {
                ((CacheManagerAware) realm).setCacheManager(cacheManager);
            }
        }
    }
}
这下终于真相大白了吧!其实在SecurityManager中设置的CacheManager组中都会给Realm使用,即:真正使用CacheManager的组件是Realm。
本文档中使用Ehcache做缓存,可以将数据存储到磁盘中,也可以存到内存中
同样需要配置文件:ehcache.xml
两种创建方式
首先有两种方式来创建缓存实列:
一、 Spring 创建方式。
<bean id="cacheManagerFactory" class="org.springframework.cache.ehcache.EhCacheManagerFactoryBean"
p:configLocation="classpath:ehcache.xml"></bean>
<!-- 声明cacheManager -->
<bean id="shiroEhcacheManager" class="org.springframework.cache.ehcache.EhCacheCacheManager"
p:cacheManager-ref="cacheManagerFactory" ></bean>
注意:不同的方式,”内存中保持的对象数量“ 这个属性对应的字段名称是不一样的 (maxEntriesLocalHeap 或 maxElementsInMemory )
二、Bean创建方式。
<!-- shiro的缓存管理器,然后需要将缓存管理器注入到安全管理其中 -->
<bean id="shiroEhcacheManager" class="org.apache.shiro.cache.ehcache.EhCacheManager">
<!--classpath是缓存属性的配置文件 -->
<property name="cacheManagerConfigFile" value="classpath:config/ehcache-shiro.xml" />
</bean>
另外我在项目中采用Bean创建方式
<!-- 用户授权信息Cache, 采用EhCache -->
<bean id="cacheManager" class="org.apache.shiro.cache.ehcache.EhCacheManager" >
<property name="cacheManagerConfigFile" value="classpath:ehcache.xml"/>
</bean>
<bean id="securityManager" class="org.apache.shiro.web.mgt.DefaultWebSecurityManager">
<property name="realm" ref="MyRealm" />
<property name="sessionManager" ref="sessionManager" />
<!-- 注入缓存管理器 -->
<property name="cacheManager" ref="cacheManager" />
</bean>
对认证数据、授权数据 哪些进行缓存 ? 需要在Realm中 配置,前面提到过缓存就是给Realm用的
<bean id="MyRealm" class="sysapp.drv.shiro.MyRealm">
<property name="cachingEnabled" value="true" />
<property name="authenticationCachingEnabled" value="true" />
<property name="authenticationCacheName" value="authenticationCache" />
<property name="authorizationCachingEnabled" value="true" />
<property name="authorizationCacheName" value="authorizationCache" />
</bean>
注意:对于缓存的对象必须实现serizable接口
shiro的缓存是被shiro的缓存管理器所管理的,即CacheManage
Shiro内部相应的组件(DefaultSecurityManager)会自动检测相应的对象(如Realm)是否实现了CacheManagerAware并自动注入相应的CacheManager。
shiro中提供了对认证信息和授权信息的缓存。shiro默认是关闭认证信息缓存的,对于授权信息的缓存shiro默认开启的。主要研究授权信息缓存,因为授权的数据量大。
第一次检查权限时:realm会从数据库中查询 并把结果缓存起来,当第二次再检查权限时,就会直接在缓存中查询。
我们在登录的时候,如果用户名为username,密码为password,那么我们可以不用自己写登录的代码,FormAuthenticationFilter这个过滤器会自动帮我们进行登陆验证。
如果名称不一样,一种是重新配置form认证方式指定属性
另外一种loginurl 就指到空的,然后把login权限改成允许访问,然后在login获取用户名及密码 手动调用认证代码
在测试shiro框架的时候,也都没问题。
但是后来在实际项目开发中,突然发现FormAuthenticationFilter不起作用了,后来才发现原因:在测试的时候,filterChainDefinitions中配置了/** = authc ,表示所有访问地址都有经过FormAuthenticationFilter过滤,但是在实际项目的时候,并没有这么配置,因此失效了。
解决方案:filterChainDefinitions下配置加上/login = authc,此处的/login就是你登录的时候表单提交的路径。
提示:authc表示使用FormAuthenticationFilter来过滤
五、使用中的注意事项
1、 名称一定要检查仔细,该一致的地方必须一致
2、涉及到的包,必须要能被spring扫描到
3、loginUrl 一定要配置正确
4、ehcache版本问题
以上是自己在学习使用shiro框架过程中一点粗流程的记录,具体中间涉及到的技术细节需要查看shiro框架的具体应用方法
六、附录:shiro的各种相关参数
摘录来自
https://www.cnblogs.com/digdeep/archive/2015/07/04/4620471.html
Shiro 自带的filter:
Shiro自身提供了很多的默认filter 来供我们使用,主要分为两种:一是 登录认证相关的filter;一是权限访问控制相关的filter;
登录认证相关的filter有:
1)filter名称: anon, 实现类org.apache.shiro.web.filter.authc.AnonymousFilter,主要用于静态资源的访问,表示无需登录就可以访问;
2)filter名称: authc, 实现类org.apache.shiro.web.filter.authc.FormAuthenticationFilter,主要用于表单登录,没有登录则跳转登录url;
3)filter名称: user, 实现类org.apache.shiro.web.filter.authc.UserFilter,主要用于要求用户已经登录或者通过“记住我”功能登录了也行。
4)filter名称: logout, 实现类org.apache.shiro.web.filter.authc.LogoutFilter,主要用于用户登出
5)filter名称: authcBasic,authc的简化形式,略。
权限访问控制相关的filter有:
1)filter名称: roles, 实现类org.apache.shiro.web.filter.authc.RolesAuthorizationFilter,主要用于验证用户必须拥有某角色,才能继续访问;
2)filter名称: perms, 实现类org.apache.shiro.web.filter.authc.PermissionsAuthorizationFilter,主要用于验证用户必须拥有某权限,才能继续访问;
3)filter名称: ssl, 实现类org.apache.shiro.web.filter.authc.SslFilter,主要用于要求访问协议是https才能访问,不然跳转到https的443短裤;
4)filter名称: port rest noSessionCreation,略。


 6059
6059


 被折叠的 条评论
为什么被折叠?
被折叠的 条评论
为什么被折叠?
 到【灌水乐园】发言


