


一、工具准备
Eclipse
ant 环境(添加ant到环境变量)
Android SDK(添加android、adb等到环境变量)
Java 环境
待测APK(BBX司机端)
真机or夜神模拟器or雷电模拟器等等(本文使用夜神模拟器)
二、打开工具,配置好环境
添加adb环境变量
打开夜神模拟器--开发者模式--USB调试
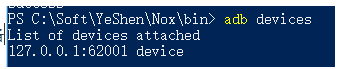
adb connect 127.0.0.1:62001 连接模拟器
adb devices命令可以出来设备
用命令安装apk:adb install -r C:\Users\zekyll\Desktop\资料\xxx-release.apk

打开夜神模拟器,可以看到软件已经安装完成

三、编写脚本
1、创建工程:
打开Eclipse软件--File--New--Java Project--输入工程名称--Finish

2、创建package

3、添加libs文件夹和设置UTF-8属性


4、添加uiautomator.jar和Android.jar这两个外部引用包


5、创建testcase(.java)


6、API熟悉:
该部分转自:https://blog.csdn.net/u013247461/article/details/81042763
UiDevice(基于设备操作)
概述:
UiDevice用与访问关设备状态的信息,也可以使用这个类来模拟用户在设备上的操作。可以通过下面的方法得到实例:
UiDevice mdevice = getUiDevice();
摘要:
| 函数返回值 | 函数体 | 说明 | 实例 |
|---|---|---|---|
| boolean | click(int x, int y) | 模拟用户在指定位置点击 | mdevice.click(200, 300) 点击屏幕的200,300坐标处 |
| String | getCurrentActivityName() | 获得的是应用程序在桌面上显示的名字 | 例如,在qq首页得到的是“QQ”,在微信登录页得到的是“微信”,注意,这个得到的不是Activity的名字 |
| String | getCurrentPackageName() | 获得当前显示的应用程序的包名 | 例如,在微信启动的时候,获得的是“com.tencent.mm” |
| int | getDisplayHeight() | 获得当前设备的屏幕分辨率的高 | 例如,我的手机1920*1080,得到的是 1920 |
| int | getDisplayWighth() | 获得当前设备的屏幕分辨率的宽 | 例如,我的手机1920*1080,得到的是 1080 |
| boolean | isScreenOn() | 判断手机当前是否灭屏 | 当手机灭屏的时候,得到是“false”,手机亮屏,得到的是“true” |
| void | wakeUp() | 点亮当前屏幕 | 调用后,相当于按下了电源键,如果手机设置了滑动锁屏,滑动锁屏还是在的,不会自动解开 |
| boolean | pressBack() | 点击back键 | |
| boolean | pressHome() | 点击home键 | |
| boolean | pressMenu() | 点击menu键 | |
| boolean | pressKeyCode(int keyCode) | 利用keycode值模拟一次按下事件 | 例如,需要按下数字1 数字1的keycode是 KEYCODE_NUMPAD_1,更多keycode可以在 http://developer.android.com/intl/zh-cn/reference/android/view/KeyEvent.html 进行查询 |
| boolean | swipe(int startX, int startY, int endX, int endY, int steps) | 用指定的步长,从A点滑动B点 | 例如,需要从(10, 10)点用两步滑动到(100, 200)点,则需要mdevice.swipe(10, 10, 100, 200, 2) |
| boolean | takeScreenshot(File storePath) | 截取当前屏幕,保存到文件 | 例如,File files = new File("/sdcard/res.jpg"); mdevice.takeScreenshot(files); 即可将截图保存到sd卡中了。 |
UiSelector(控件定位)
概述:
按照一定的条件(例如控件的text值,资源id),定位界面上的元素。UiSelector对象的最终目的是去构造一个UiObject对象。
摘要:
1、根据text构造:
| 函数返回值 | 函数体 | 说明 | 用法 |
|---|---|---|---|
| UiSelector | text(String text) | 根据“控件text属性的内容”构造出UiSelector对象 | 例如,一个控件text的值是“发现”,UiSelector s = new UiSelector().text("发现"); |
| UiSelector | textContains(String text) | 根据“控件text属性包含的内容”构造出UiSelector对象 | 同上例子:UiSelector s = new UiSelector().textContains("现"); |
| UiSelector | textMatches(String regex) | 根据“控件text属性正则表达式的内容”构造出UiSelector对象 | 正则表达式语法参考网上资料即可。 |
| UiSelector | textStartsWith(String text) | 根据“控件text属性开始的内容”构造出UiSelector对象 | 同上例子:UiSelector s = new UiSelector().textStartsWith("发"); |
比较常用,准确度也比较高,中文查找的时候,如果遇到 “UiOjbectNotFoundException” 的时候,记得把项目的编码格式改为utf-8。
2、根据description构造:
| UiSelector | description(String desc) | 根据“控件content-desc属性的内容”构造出UiSelector对象 |
|---|---|---|
| UiSelector | descriptionContains(String desc) | 包含** |
| UiSelector | descriptionMatches(String regex) | 正则 |
| UiSelector | descriptionStartsWith(String desc) | 以**开始 |
同text的用法基本一致,也是比较靠谱的一种方式。
3、根据资源id:
| UiSelector | resourceId(String id) | 根据资源id获取对象,例如:UiSelector s = new UiSelector().resourceId("com.tencent.mm:id/b8m") |
|---|---|---|
| UiSelector | resourceIdMatches(String regex) | 根据资源id的正则表达式获取对象 |
4、根据类:
UiSelector className(String className):
根据控件的类名来找到UiSelector对象。

但是呢?因为一般Android布局的时候,同样的控件类名都是一样的。
因此我在微信的登录界面调用: UiSelector s = new UiSelector().className("android.widget.TextView") 这句话,它得到的就是我左上开始算第一个class名称为“android.widget.TextView”的控件。
UiSelector instance (int instance):
上面提到的假如我们想获取屏幕上电话号码的那个TextView使用这样方法,就可以使用instance:
UiSelector s = new UiSelector().className("android.widget.TextView").instance(1);
UiSelector index(int index):
用法和上面的instance差不多,谷歌的原文说这个方法是unreliable的,推荐使用instance方法。
UiSelector childSelector(UiSelector selector):
有的时候假如子控件不好获得,而其父控件比较好获得的时候,我们通常采用这样的方式,例如下面:

我们目前选中的是LinearLayout,这个Android中的一种布局,它的里面嵌套了两个控件,一个是ImageView,另一个是EditText。这们这里就通过LinearLayout这个控件找到它的子控件。
很明显,父控件id已经给定。我们先得到父控件:UiSelector s_p = new UiSelector().resourceId("com.tencent.mm:id/axj");
其次 UiSelector s_c= s_p.childSelector( new UiSelector().className("android.widget.EditText") );
在它的父控件的childSelector方法中传入一个带有一定特征的UiSelector对象,即可得到子控件,这里 s_c 就是输入框的UiSelector对象。
UiSelector fromParent(UiSelector selector):
有的时候父控件也不好获得,而是同级的控件(同属一个parent)比较好获取,那么使用这样方法,还拿上面的举例:
我们先得到EditText的UiSelector对象:UiSelector s1 = new UiSelector().resourceId("com.tencent.mm:id/axc");
得到和它同样一个父控件的ImageView的UiSelector对象:UiSelector s2 = fromParent( new UiSelector().className("android.widget.ImageView") );
5、根据特有属性:
| UiSelector | checked(boolean val) | 根据是否可check来构造出UiSelector对象 |
|---|---|---|
| UiSelector | chickable(boolean val) | |
| UiSelector | enabled(boolean val) | |
| UiSelector | focusable(boolean val) | |
| UiSelector | longClickable(boolean val) | |
| UiSelector | scrollable(boolean val) | |
| UiSelector | selected(boolean val) |
举个简单的例如,假如当前的界面,只有一个checkbox是勾选状态,你就可以这样得到:UiSelector s2 = new UiSelector().checked(true)

UiCollection
概述: 用的不多,直接参考文档
摘要: http://android.toolib.net/tools/help/uiautomator/UiCollection.html
UiScrollable(滚动列表)
概述: 用的不多,直接参考文档
摘要: http://www.cnblogs.com/by-dream/p/4921701.html
UiObject(控件实例)
概述:可以理解为 直接操作界面ui元素的实例。
摘要:
| 返回值 | 函数 |
|---|---|
| void | ClearTextField() 在可以编辑处清除已经存在的文本内容 |
| boolean | click() 执行单击 |
| boolean | clickAndWaiForNewWindow(long timeout) 执行单击,等待窗口出现,等待时间参数中设置 |
| boolean | clickAndWaiForNewWindow() 点击等待一个新窗口的出现,默认等待时间 |
| boolean | clickBottomRight() 点击ui元素的右下方 |
| boolean | clickTopLeft() 点击ui元素的左上方 |
| boolean | exists() 检查ui 元素是否存在 |
| Rect | getBounds() 返回ui元素的坐标值 |
| UiObject | getChild(UiSelector selector) 通过参数中的对象,创建一个新的当前元素的子类ui元素的子类元素 |
| int | getChildCount() 获取对象下子类ui元素数量 |
| String | getContentDescription() 读取ui 元素的描述信息值 |
| UiObject | getFromParent(UiSelector selector) 根据当前参数对象从父类元素获取子类信息 |
| String | getPackageName() 读取Ui元素的包名称 |
| final UiSelector | getSelector() 获取selector用作帮助调试 |
| String | getText() 根据Ui元素获取文本值 |
| Rect | getVisibleBounds() 返回ui元素的可视范围 |
| boolean | isCheckable() 检查对象的checkable属性是否为true |
| boolean | isChecked() 检查对象的checked属性是否为true |
| boolean | isClickable() 检查对象的clickable属性是否为true |
| boolean | isEnabled() 检查对象的enabled属性是否为true |
| boolean | isFocusable() 检查对象的focusable属性是否为true |
| boolean | isFocused() 检查对象的focused属性是否为true |
| boolean | isLongClickable() 检查对象的longclickable属性是否为true |
| boolean | isScrollable() 检查对象的scrollable属性是否为true |
| boolean | isSelected() 检查对象的selected属性是否为true |
| boolean | longClick() 长按对象 |
| boolean | longClickBottomRight() 长按对象右下方 |
| boolean | longClickTopLeft() 长按对象左上方 |
| boolean | setText(String text) ui对象中输入文字 |
| boolean | swipeDown(int steps) 向下滑动steps个步长 |
| boolean | swipeLeft(int steps) 往左滑动step个步长 |
| boolean | swipeRight(int steps) 往右滑动steps个步长 |
| boolean | swipeUp(int steps) 向上滑动steps个步长 |
| boolean | waitForExists(long timeout) 等待对象出现 |
| boolean | waitUntilGone(long timeout) 等待对象消失 |
7、编写脚本
package com.bbx.testcase;

import java.io.File;

import com.android.uiautomator.core.UiDevice;
import com.android.uiautomator.core.UiObject;
import com.android.uiautomator.core.UiSelector;
import com.android.uiautomator.testrunner.UiAutomatorTestCase;

import android.widget.EditText;
import junit.framework.Assert;

public class LoginApp extends UiAutomatorTestCase {

	public void testCase() {
		UiDevice device=UiDevice.getInstance();
		try {
			//点击HOME,回到桌面
			device.pressHome();
			//定位桌面的“帮邦行司机”APP图标,并点击
			new UiObject(new UiSelector().text("xxxx应用")).clickAndWaitForNewWindow();
			//等待2秒
			Thread.sleep(2000);
			//输入手机号
			new UiObject(new UiSelector().text("输入手机号")).setText("15444444444");
			//输入密码
			new UiObject(new UiSelector().className(EditText.class.getName()).instance(1)).setText("123456");
			//点击登录
			new UiObject(new UiSelector().resourceId("com.xxx.mobile:id/login_tx_btn")).clickAndWaitForNewWindow();
			//等待2秒
			Thread.sleep(2000);
			//验证是否测试通过
			Assert.assertTrue(!new UiObject(new UiSelector().text("输入手机号")).exists());
		} catch (Exception e) {
			//获取当前系统时间戳
			long current = System.currentTimeMillis();
			//过程中若出现失败,则截图,并停止case执行
			device.takeScreenshot(new File("/sdcard/"+current+".png"));
			System.out.println("interrupt:\n "+e.getMessage()+"\n ScreenShot at :/sdcard/"+current+".png");
			e.printStackTrace();
		}

	}
}
8、编译为可执行文件.jar
首先,获取Android list值,一般为1

其次,打开cmd命令窗口,输入:android create uitest-project -n jar包名称自定义 -t androidlist值 -p 当前工程地址。以我这边为例:
android create uitest-project -n bbxtest -t 1 -p C:\DEV\eclipse-workspace\BBX

在eclipse刷新(File--Refresh)之后,可以看到多了个build.xml文件,双击打开并修改其中help字段为build

再次,cmd命令中cd到工程目录,执行ant命令

9、push到手机端,并且执行
使用push命令推送jar包到手机端:adb push C:\DEV\eclipse-workspace\BBX\bin\bbxtest.jar /data/local/tmp

使用命令调起uiaiutomotor:adb shell runtest uiautomator jar包名 -c package名+类名 --nohup
adb shell uiautomator runtest bbxtest.jar -c com.bbx.testcase.LoginApp --nohup


 5153
5153


 被折叠的 条评论
为什么被折叠?
被折叠的 条评论
为什么被折叠?
 到【灌水乐园】发言


