


0. 背景
笔者在开发的实践过程中对于控制台内容的输出情况有一些特殊的需求,然而,普通的console.log()函数不能提供很好的支持,因此需要探索一些自定义的实现方式,以便满足开发需求,一些开发需求如下:
- 输出内容统一管理,调整开启或关闭;
- 不同的开发阶段显示不同的输出样式,如:测试、调试、生产;
- 统一样式调整;
- ……
1. 实现
1.1 简单重写:使用变量保存console.log
let fun = console.log
console.log = function () {
	fun(...arguments)
}
1.2 简单重写:使用立即执行函数
console.log = (function (oriLogFunc) {
	return function () {
		oriLogFunc('debug : ', ...arguments)
	}
})(console.log)
1.3 自定义封装
export default {
  // 输出等级: 0-no, 1-error, 2-warning, 3-info, 4-debug, 5-log
  level: 5,
  // 输出模式: 0-default, 1-normal, 2-random
  mode: 1,
  // 是否输出图标
  hasIcon: false,
  // 是否打印函数名和所在文件行号
  isPrintLine: true,
  // 图标
  icons: ['🌵', '🎍', '🐾', '🌀', '🐚', '🥝', '🥜', '🥕', '🥒', '🌽', '🍒', '🍅', '🍑', '🍋', '🍈', '🌶', '🌰', '🍠', '🍆', '🍄', '🍐', '🍌', '🍍', '🍇', '🍏', '🍓', '🍎', '🍊', '🐴', '🐗', '🦄', '🐑', '🐶', '🐔', '🐼', '🐒', '🌝', '💄', '💋', '👠', '👗', '👙', '🧣', '🍰', '🍭', '🍳', '🎄', '🎱', '⚽', '🏀', '🎵', '🚄', '⭕', '❌', '❓', '❗', '💯'],
  // 标准颜色
  colors: {
    error: '#f7630c',
    warning: '#ca5010',
    info: '#0078d7',
    debug: '#13a10e',
    log: '#1f1f1f'
  },
  // 获取随机图标
  randomIcon: function () {
    return this.icons[Math.floor(Math.random() * this.icons.length)]
  },
  // 获取随机颜色
  randomColor: function () {
    const r = Math.floor(Math.random() * 256)
    const g = Math.floor(Math.random() * 256)
    const b = Math.floor(Math.random() * 256)
    // 返回随机生成的颜色
    return `rgb(${r}, ${g}, ${b})`
  },
  // 默认打印
  printDefault: function (tag, args) {
    console.log(tag, ...args)
  },
  // 标准打印
  printNormal: function (tag, args) {
    console.log(`%c ${tag} : `, `color: ${this.colors[tag]}`, ...args)
  },
  // 随机打印
  printRandom: function (tag, args) {
    const icon = this.randomIcon()
    const bgColor = this.randomColor()
    const color = this.randomColor()
    console.log(`%c ${icon}`, `font-size:20px;background-color: ${bgColor};color: ${color};`, tag + ' : ', ...args)
  },
  print: function (tag, args) {
    if (this.isPrintLine) {
      // 获取函数名和行号
      const err = new Error()
      // console.log(err.stack)
      const stack = err.stack.split('\n').slice(3).map(line => line.trim())
      const caller = stack[0].match(/at (.+) \(/) ? stack[0].match(/at (.+) \(/)[1] : stack[0].match(/at (.+):\d+:/)[1]
      const fileLine = stack[0].match(/\(.*\/(.+)\)/) ? stack[0].match(/\(.*\/(.+)\)/)[1] : stack[0].match(/(\d+:\d+)/)[1]
      // console.log(`${caller} (${fileLine}):\n`)

      args.push(`\n at : ${caller} (${fileLine})`)
    }

    switch (this.mode) {
      case 0: {
        this.printDefault(tag, args)
        break
      }
      case 1: {
        this.printNormal(tag, args)
        break
      }
      case 2: {
        this.printRandom(tag, args)
        break
      }
    }
  },
  error: (function (oriLogFunc) {
    return function (...args) {
      const tag = 'error'
      if (this.level >= 1) {
        // oriLogFunc.call(console, 'error : ', args)
        this.print(tag, args)
      }
    }
  })(console.log),

  warning: (function (oriLogFunc) {
    return function (...args) {
      const tag = 'warning'
      if (this.level >= 2) {
        // oriLogFunc.call(console, 'warning : ', args)
        this.print(tag, args)
      }
    }
  })(console.log),

  info: (function (oriLogFunc) {
    return function (...args) {
      const tag = 'info'
      if (this.level >= 3) {
        // oriLogFunc.call(console, 'info : ', args)
        this.print(tag, args)
      }
    }
  })(console.log),

  debug: (function (oriLogFunc) {
    return function (...args) {
      const tag = 'debug'
      if (this.level >= 4) {
        // oriLogFunc.call(console, 'debug : ', ...args)
        this.print(tag, args)
      }
    }
  })(console.log),

  log: (function (oriLogFunc) {
    return function (...args) {
      const tag = 'log'
      if (this.level >= 5) {
        // oriLogFunc.call(console, 'log : ', ...args)
        this.print(tag, args)
      }
    }
  })(console.log)
}
2. 测试
目录
- 新建一个
html文件
<!DOCTYPE html>
<html lang="en">
<head>
    <meta charset="UTF-8">
    <meta name="viewport" content="width=device-width, initial-scale=1.0">
    <title>Document</title>
</head>
<body>
    <div>123123123</div>
    <button id="logBtn">log</button>
    <script type="module">
        import iceLog from './iceLog.js'
        window.onload = () => {
            window.iceLog = iceLog
            iceLog.log('hello new log')
            iceLog.debug('hello new debug')
            iceLog.info('hello new info')
            iceLog.warning('hello new warning')
            iceLog.error('hello new error')
        }

        document.getElementById('logBtn').addEventListener('click', () => {
            iceLog.log('click log button')
        })
    </script>
</body>
</html>
- 结果
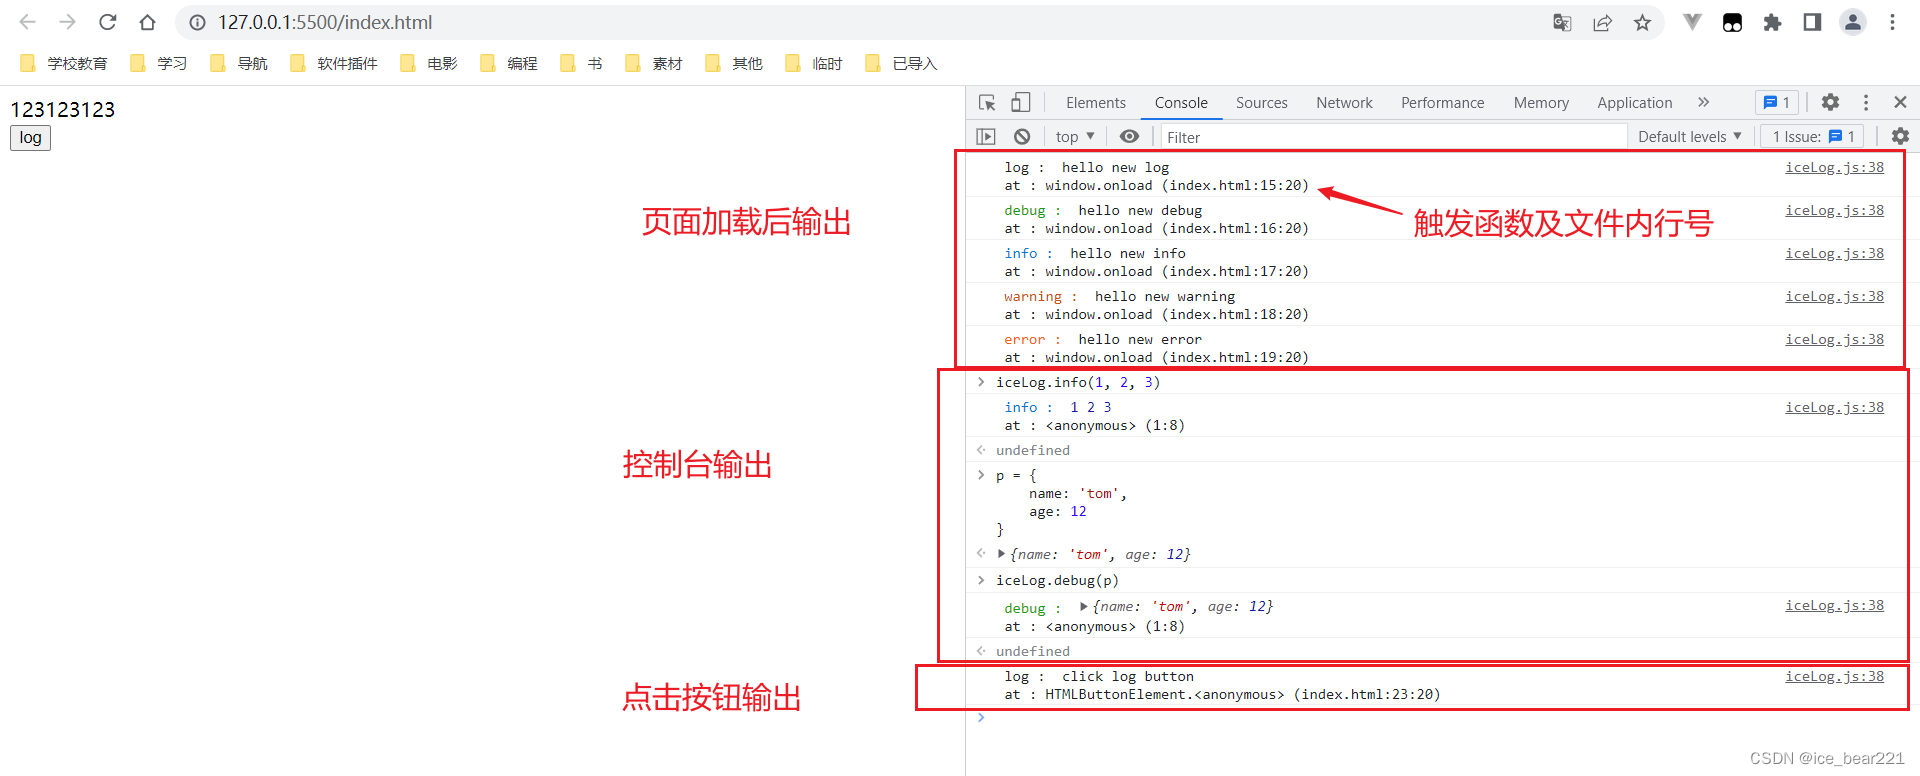


 460
460


 被折叠的 条评论
为什么被折叠?
被折叠的 条评论
为什么被折叠?
 到【灌水乐园】发言


