


0. 背景
在vue2项目中自定义console.log并输出文件名及行、列号
1. 实现
1.1 自定义console.log
export default {
// 输出等级: 0-no, 1-error, 2-warning, 3-info, 4-debug, 5-log
level: 5,
// 输出模式: 0-default, 1-normal, 2-random
mode: 1,
// 是否输出图标
hasIcon: false,
// 是否在vue内使用
isVue: true,
// 是否打印函数名和所在文件行号
isPrintLine: true,
// 图标
icons: ['🌵', '🎍', '🐾', '🌀', '🐚', '🥝', '🥜', '🥕', '🥒', '🌽', '🍒', '🍅', '🍑', '🍋', '🍈', '🌶', '🌰', '🍠', '🍆', '🍄', '🍐', '🍌', '🍍', '🍇', '🍏', '🍓', '🍎', '🍊', '🐴', '🐗', '🦄', '🐑', '🐶', '🐔', '🐼', '🐒', '🌝', '💄', '💋', '👠', '👗', '👙', '🧣', '🍰', '🍭', '🍳', '🎄', '🎱', '⚽', '🏀', '🎵', '🚄', '⭕', '❌', '❓', '❗', '💯'],
// 标准颜色
colors: {
error: '#f7630c',
warning: '#ca5010',
info: '#0078d7',
debug: '#13a10e',
log: '#1f1f1f'
},
// 获取随机图标
randomIcon: function () {
return this.icons[Math.floor(Math.random() * this.icons.length)]
},
// 获取随机颜色
randomColor: function () {
const r = Math.floor(Math.random() * 256)
const g = Math.floor(Math.random() * 256)
const b = Math.floor(Math.random() * 256)
// 返回随机生成的颜色
return `rgb(${r}, ${g}, ${b})`
},
// 默认打印
printDefault: function (tag, args) {
console.log(tag, ...args)
},
// 标准打印
printNormal: function (tag, args) {
console.log(`%c ${tag} : `, `color: ${this.colors[tag]}`, ...args)
},
// 随机打印
printRandom: function (tag, args) {
const icon = this.randomIcon()
const bgColor = this.randomColor()
const color = this.randomColor()
console.log(`%c ${icon}`, `font-size:20px;background-color: ${bgColor};color: ${color};`, tag + ' : ', ...args)
},
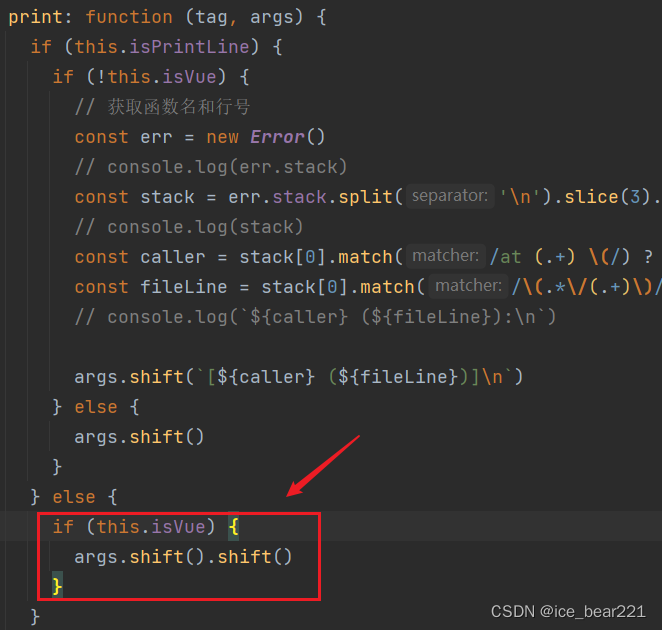
print: function (tag, args) {
if (this.isPrintLine) {
if (!this.isVue) {
// 获取函数名和行号
const err = new Error()
// console.log(err.stack)
const stack = err.stack.split('\n').slice(3).map(line => line.trim())
// console.log(stack)
const caller = stack[0].match(/at (.+) \(/) ? stack[0].match(/at (.+) \(/)[1] : stack[0].match(/at (.+):\d+:/)[1]
const fileLine = stack[0].match(/\(.*\/(.+)\)/) ? stack[0].match(/\(.*\/(.+)\)/)[1] : stack[0].match(/(\d+:\d+)/)[1]
// console.log(`${caller} (${fileLine}):\n`)
args.shift(`[${caller} (${fileLine})]\n`)
} else {
args.shift()
}
} else {
if (this.isVue) {
args.shift().shift()
}
}
switch (this.mode) {
case 0: {
this.printDefault(tag, args)
break
}
case 1: {
this.printNormal(tag, args)
break
}
case 2: {
this.printRandom(tag, args)
break
}
}
},
error: (function (oriLogFunc) {
return function (...args) {
const tag = 'error'
if (this.level >= 1) {
// oriLogFunc.call(console, 'error : ', args)
this.print(tag, args)
}
}
})(console.log),
warning: (function (oriLogFunc) {
return function (...args) {
const tag = 'warning'
if (this.level >= 2) {
// oriLogFunc.call(console, 'warning : ', args)
this.print(tag, args)
}
}
})(console.log),
info: (function (oriLogFunc) {
return function (...args) {
const tag = 'info'
if (this.level >= 3) {
// oriLogFunc.call(console, 'info : ', args)
this.print(tag, args)
}
}
})(console.log),
debug: (function (oriLogFunc) {
return function (...args) {
const tag = 'debug'
if (this.level >= 4) {
// oriLogFunc.call(console, 'debug : ', ...args)
this.print(tag, args)
}
}
})(console.log),
log: (function (oriLogFunc) {
return function (...args) {
const tag = 'log'
if (this.level >= 5) {
// oriLogFunc.call(console, 'log : ', ...args)
this.print(tag, args)
}
}
})(console.log)
}
1.2 webpack记录行号
添加自定义
loader

module.exports = function (content) {
  content = content.toString('utf-8')
  if (this.cacheable) this.cacheable()
  const { name = ['this.\\$iceLog.log'] } = this.query.config || {}
  const fileName = this.resourcePath.replaceAll('\\', '/').match(/(?<=\/)(src.*)/gm)[0]
  content = content
    .split('\n')
    .map((line, row) => {
      let loggerName = name[0]
      for (let i = 1; i < name.length; i++) {
        loggerName += '|' + name[i]
      }
      const re = new RegExp(`(${loggerName})\\((.*?)\\)`, 'g')
      let result
      let newLine = ''
      let cursor = 0
      while ((result = re.exec(line))) {
        const col = result.index
        newLine += line.slice(cursor, result.index) + `${result[1]}('[${fileName}:${row + 1}:${col + 1}]\\n', ` + result[2] + ')'
        cursor += col + result[0].length
      }
      newLine += line.slice(cursor)
      return newLine
    })
    .join('\n')

  return content
}
module.exports.raw = true
1.3 配置loader
修改
vue.config.js
const { defineConfig } = require('@vue/cli-service')
module.exports = defineConfig({
  transpileDependencies: true,
  lintOnSave: false,
  chainWebpack: config => {
    // config.devtool('eval-cheap-module-source-map')
    config.module
      .rule('vue')
      .use('vue-loader')
      .end()
      .rule('log-lineno')
      .use('./loaders/log-lineno.loader')
      .loader('./loaders/log-lineno.loader')
      .options({
        config: {
          name: [
            'this.\\$iceLog.error',
            'this.\\$iceLog.warning',
            'this.\\$iceLog.info',
            'this.\\$iceLog.debug',
            'this.\\$iceLog.log'
          ]
        }
      })
      .end()
  }
})
2. 测试
  created () {
    this.$iceLog.log(123)
    this.$iceLog.error(1, 2, 3, 4)
  },

3. 问题
3.1 .vue文件被编译多次,自定义log会输出两个目录
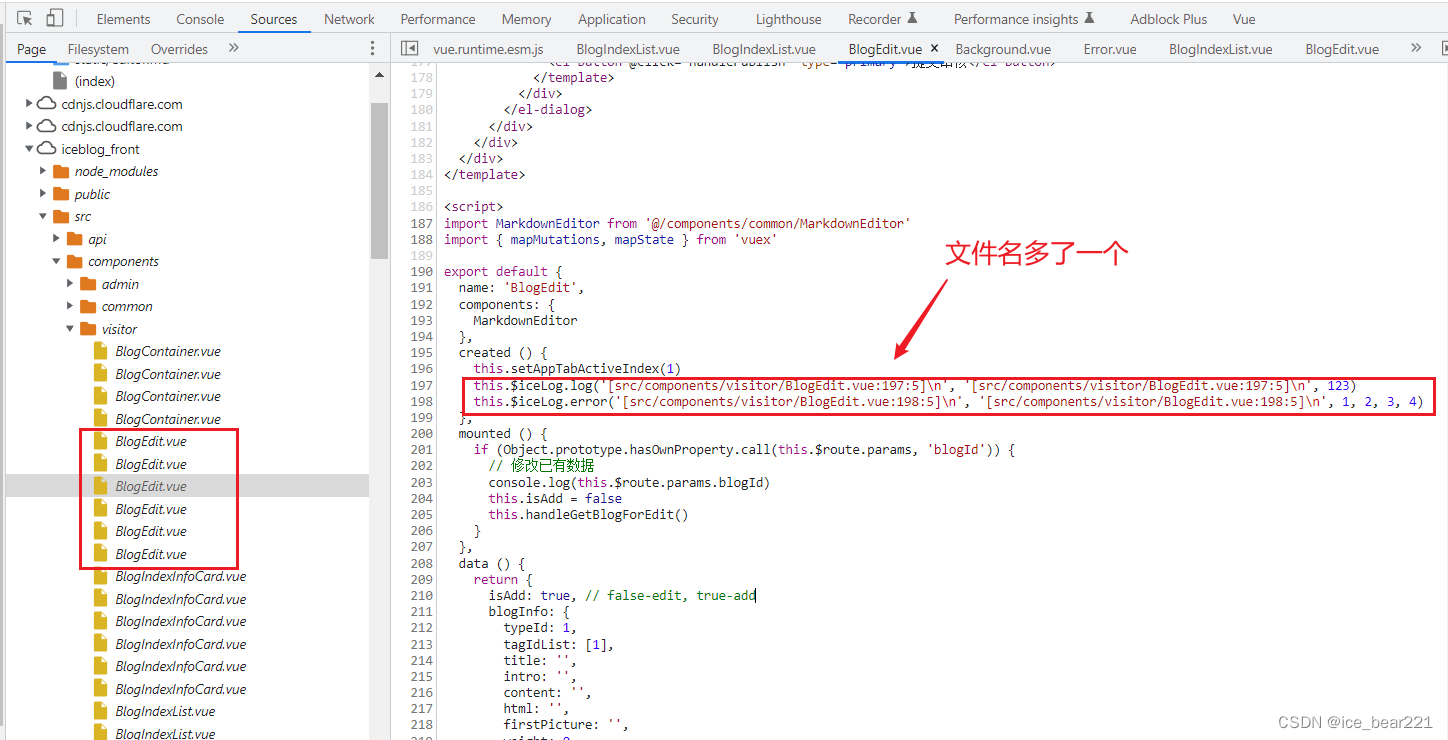
解决:
在自定义函数中移除一个参数:


 1044
1044


 被折叠的 条评论
为什么被折叠?
被折叠的 条评论
为什么被折叠?
 到【灌水乐园】发言


