


我们如果自己有网站,上面包含大量可以公开访问的图片,如果让用户可以快速的访问这些图片并且节省网站的浏览,这是一个对于网站运营极为重要的问题。
一方面,图片访问的速度直接关系到用户体验。但是如果我们为了提高用户访问速度,部署大量服务器,这又会大大的增加运营成本。有什么办法来实现图片访问加速呢?答案是肯定的,那就是通过Cloudflare CDN。
Cloudflare CDN 工作原理
核心概念
反向代理 + 全球缓存网络:Cloudflare 作为您网站和用户之间的智能中间层,通过全球分布的数据中心缓存和优化内容传输。
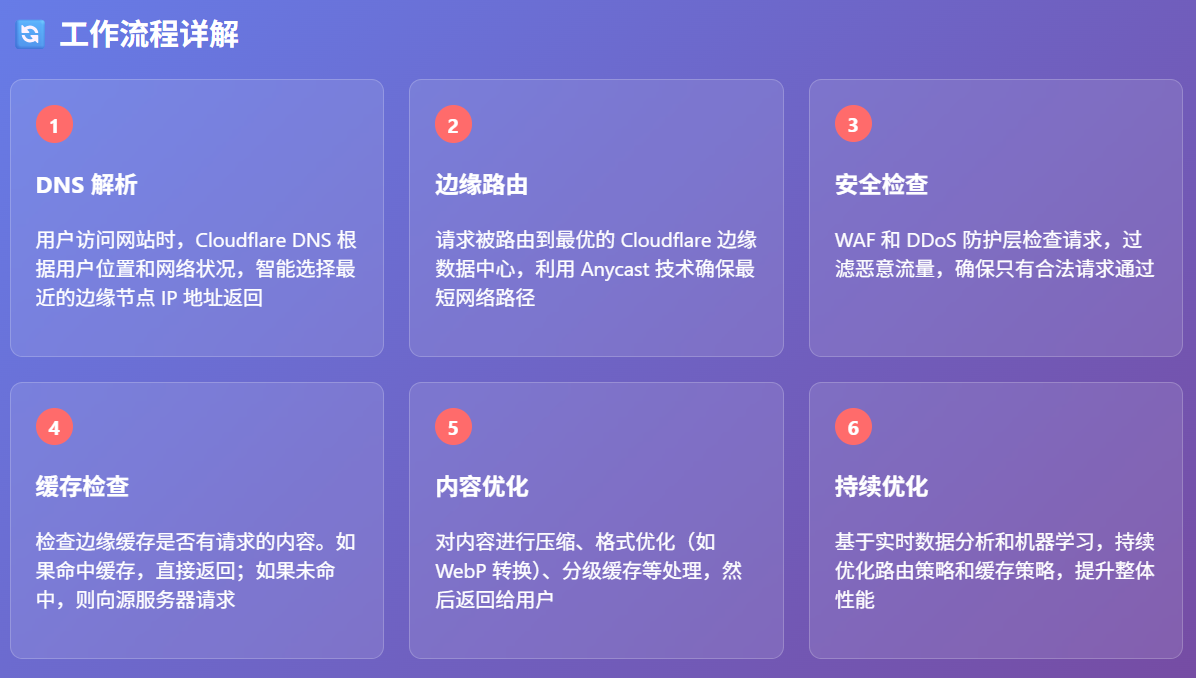
工作流程
- DNS 解析 → 2. 边缘路由 → 3. 缓存检查 → 4. 内容获取 → 5. 优化传输
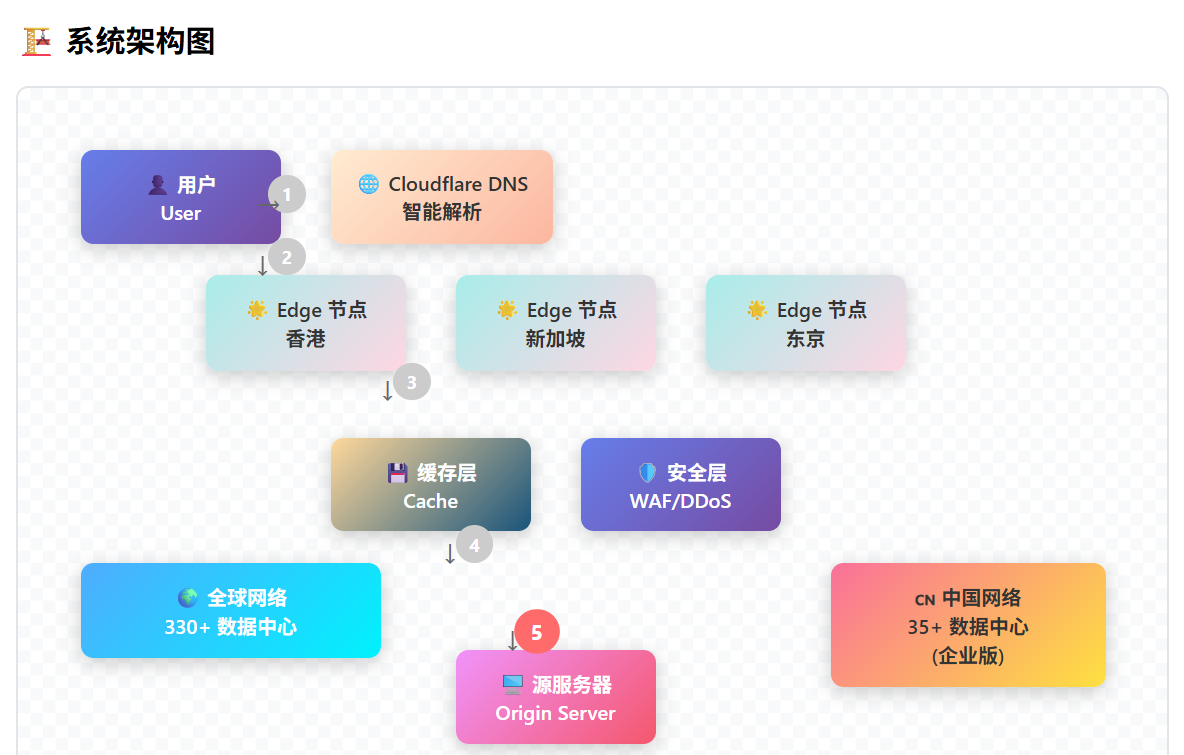
配置好Cloudflare CDN之后,用户首先会访问到Cloudflare的服务器获取图片,如果图片不在Cloudflare的服务器上时才会访问到原始服务器。这样我们原始的服务器接受到的用户访问会大大的减少,而且由于Cloudflare服务器在全球部署,它会智能的选择最接近用户的服务器来提供服务,所以用户访问图片的速度也是大大的加快了。最好的是这个Cloudflare CDN全球的服务是免费的,不幸的是在中国虽然可以使用免费服务,但是由于要绕行国外服务器,所以访问速度慢。如果想让中国用户获得满意的访问速度,需要加入Cloudflare的企业计划,那是需要付费的。
以下是Cloudflare CDN免费计划完整配置指南,仅供参考:
第一步:域名接入 Cloudflare
1.1 创建账号并添加域名
# API: 添加域名到 Cloudflare
curl -X POST "https://api.cloudflare.com/client/v4/zones" \
     -H "Authorization: Bearer YOUR_API_TOKEN" \
     -H "Content-Type: application/json" \
     --data '{
       "name": "example.com",
       "type": "full"
     }'
1.2 更改域名服务器
在您的域名注册商处,将 NS 记录更改为 Cloudflare 提供的名称服务器:
name1.cloudflare.com
name2.cloudflare.com
第二步:配置 DNS 记录(核心)
2.1 添加 A 记录指向您的源服务器
# API: 创建 DNS 记录
curl -X POST "https://api.cloudflare.com/client/v4/zones/ZONE_ID/dns_records" \
     -H "Authorization: Bearer YOUR_API_TOKEN" \
     -H "Content-Type: application/json" \
     --data '{
       "type": "A",
       "name": "example.com",
       "content": "YOUR_SERVER_IP",
       "proxied": true,
       "ttl": 1
     }'
关键参数说明:
"proxied": true- 启用 CDN 代理(橙色云朵)"proxied": false- 仅 DNS 解析(灰色云朵)
2.2 添加 www 子域名
curl -X POST "https://api.cloudflare.com/client/v4/zones/ZONE_ID/dns_records" \
     -H "Authorization: Bearer YOUR_API_TOKEN" \
     -H "Content-Type: application/json" \
     --data '{
       "type": "CNAME",
       "name": "www",
       "content": "example.com",
       "proxied": true,
       "ttl": 1
     }'
第三步:配置缓存规则(图片加速核心)
3.1 默认缓存的文件类型
Cloudflare 自动缓存以下静态文件:
- 图片:
.jpg,.jpeg,.png,.gif,.webp,.svg,.bmp,.tiff - 样式表:
.css - 脚本:
.js - 字体:
.woff,.woff2,.ttf,.eot - 文档:
.pdf,.txt
3.2 创建自定义缓存规则
# API: 创建缓存规则 - 缓存所有图片
curl -X POST "https://api.cloudflare.com/client/v4/zones/ZONE_ID/rulesets" \
     -H "Authorization: Bearer YOUR_API_TOKEN" \
     -H "Content-Type: application/json" \
     --data '{
       "name": "Cache Images Rule",
       "kind": "zone",
       "phase": "http_request_cache_settings",
       "rules": [
         {
           "expression": "(http.request.uri.path matches \".*\\.(jpg|jpeg|png|gif|webp|svg|bmp|tiff)$\")",
           "action": "set_cache_settings",
           "action_parameters": {
             "cache": true,
             "edge_ttl": {
               "mode": "override_origin",
               "default": 2592000
             }
           }
         }
       ]
     }'
3.3 缓存整个目录
# 缓存 /images/ 目录下的所有文件
curl -X POST "https://api.cloudflare.com/client/v4/zones/ZONE_ID/rulesets" \
     -H "Authorization: Bearer YOUR_API_TOKEN" \
     -H "Content-Type: application/json" \
     --data '{
       "name": "Cache Images Directory",
       "kind": "zone",
       "phase": "http_request_cache_settings",
       "rules": [
         {
           "expression": "(starts_with(http.request.uri.path, \"/images/\"))",
           "action": "set_cache_settings",
           "action_parameters": {
             "cache": true,
             "edge_ttl": {
               "mode": "override_origin",
               "default": 2592000
             }
           }
         }
       ]
     }'
第四步:源服务器配置
4.1 设置正确的缓存头
在您的 Web 服务器上配置缓存头:
Nginx 配置:
location ~* \.(jpg|jpeg|png|gif|webp|svg|css|js)$ {
    expires 30d;
    add_header Cache-Control "public, immutable";
    add_header Vary "Accept-Encoding";
}
Apache 配置:
<IfModule mod_expires.c>
    ExpiresActive On
    ExpiresByType image/jpg "access plus 30 days"
    ExpiresByType image/jpeg "access plus 30 days"
    ExpiresByType image/png "access plus 30 days"
    ExpiresByType image/gif "access plus 30 days"
    ExpiresByType image/webp "access plus 30 days"
</IfModule>
第五步:优化设置
5.1 启用 Brotli 压缩
# API: 启用 Brotli 压缩
curl -X PATCH "https://api.cloudflare.com/client/v4/zones/ZONE_ID/settings/brotli" \
     -H "Authorization: Bearer YOUR_API_TOKEN" \
     -H "Content-Type: application/json" \
     --data '{"value":"on"}'
5.2 启用 Auto Minify
# API: 启用自动压缩
curl -X PATCH "https://api.cloudflare.com/client/v4/zones/ZONE_ID/settings/minify" \
     -H "Authorization: Bearer YOUR_API_TOKEN" \
     -H "Content-Type: application/json" \
     --data '{
       "value": {
         "css": "on",
         "html": "on",
         "js": "on"
       }
     }'
5.3 开启 Rocket Loader
# API: 启用 Rocket Loader(异步加载 JS)
curl -X PATCH "https://api.cloudflare.com/client/v4/zones/ZONE_ID/settings/rocket_loader" \
     -H "Authorization: Bearer YOUR_API_TOKEN" \
     -H "Content-Type: application/json" \
     --data '{"value":"on"}'
第六步:缓存管理
6.1 清除缓存
# API: 清除所有缓存
curl -X POST "https://api.cloudflare.com/client/v4/zones/ZONE_ID/purge_cache" \
     -H "Authorization: Bearer YOUR_API_TOKEN" \
     -H "Content-Type: application/json" \
     --data '{"purge_everything":true}'

# API: 清除特定文件缓存
curl -X POST "https://api.cloudflare.com/client/v4/zones/ZONE_ID/purge_cache" \
     -H "Authorization: Bearer YOUR_API_TOKEN" \
     -H "Content-Type: application/json" \
     --data '{
       "files": [
         "https://example.com/images/photo1.jpg",
         "https://example.com/images/photo2.png"
       ]
     }'
6.2 查看缓存状态
# API: 获取缓存设置
curl -X GET "https://api.cloudflare.com/client/v4/zones/ZONE_ID/settings/cache_level" \
     -H "Authorization: Bearer YOUR_API_TOKEN"
第七步:监控和分析
7.1 获取分析数据
# API: 获取流量分析
curl -X GET "https://api.cloudflare.com/client/v4/zones/ZONE_ID/analytics/dashboard?since=-10080&until=0" \
     -H "Authorization: Bearer YOUR_API_TOKEN"
实际网站配置示例
情况:您有一个包含大量图片的网站
网站结构:
example.com/
├── index.html
├── images/
│   ├── gallery/
│   │   ├── photo1.jpg
│   │   ├── photo2.png
│   │   └── photo3.webp
│   └── thumbnails/
│       ├── thumb1.jpg
│       └── thumb2.jpg
└── css/
    └── style.css
最佳配置:
-
DNS 记录:
example.com→ A 记录 → 您的服务器 IP(代理开启)www.example.com→ CNAME →example.com(代理开启)
-
缓存规则:
- 图片文件:缓存 30 天
- CSS/JS:缓存 7 天
- HTML:不缓存或缓存 1 小时
-
服务器优化:
- 为静态资源设置正确的
Cache-Control头 - 启用 Gzip/Brotli 压缩
- 使用 WebP 格式图片
- 为静态资源设置正确的
完整的 Node.js 配置脚本
const CLOUDFLARE_API_BASE = 'https://api.cloudflare.com/client/v4';

class CloudflareCDNManager {
  constructor(apiToken, zoneId) {
    this.apiToken = apiToken;
    this.zoneId = zoneId;
  }

  async setupCDN() {
    // 1. 配置 DNS 记录
    await this.createDNSRecord('A', 'example.com', 'YOUR_SERVER_IP', true);
    await this.createDNSRecord('CNAME', 'www', 'example.com', true);

    // 2. 设置缓存规则
    await this.createImageCacheRule();

    // 3. 优化设置
    await this.enableOptimizations();

    console.log('CDN 配置完成!');
  }

  async createDNSRecord(type, name, content, proxied) {
    const response = await fetch(`${CLOUDFLARE_API_BASE}/zones/${this.zoneId}/dns_records`, {
      method: 'POST',
      headers: {
        'Authorization': `Bearer ${this.apiToken}`,
        'Content-Type': 'application/json'
      },
      body: JSON.stringify({
        type,
        name,
        content,
        proxied,
        ttl: 1
      })
    });

    return response.json();
  }

  async createImageCacheRule() {
    const rulesetData = {
      name: "Cache Images Rule",
      kind: "zone",
      phase: "http_request_cache_settings",
      rules: [{
        expression: "(http.request.uri.path matches \".*\\.(jpg|jpeg|png|gif|webp|svg|bmp|tiff)$\")",
        action: "set_cache_settings",
        action_parameters: {
          cache: true,
          edge_ttl: {
            mode: "override_origin",
            default: 2592000 // 30 天
          }
        }
      }]
    };

    const response = await fetch(`${CLOUDFLARE_API_BASE}/zones/${this.zoneId}/rulesets`, {
      method: 'POST',
      headers: {
        'Authorization': `Bearer ${this.apiToken}`,
        'Content-Type': 'application/json'
      },
      body: JSON.stringify(rulesetData)
    });

    return response.json();
  }

  async enableOptimizations() {
    // 启用 Brotli 压缩
    await this.updateSetting('brotli', 'on');

    // 启用自动压缩
    await this.updateSetting('minify', {
      css: 'on',
      html: 'on',
      js: 'on'
    });

    // 启用 Rocket Loader
    await this.updateSetting('rocket_loader', 'on');
  }

  async updateSetting(setting, value) {
    const response = await fetch(`${CLOUDFLARE_API_BASE}/zones/${this.zoneId}/settings/${setting}`, {
      method: 'PATCH',
      headers: {
        'Authorization': `Bearer ${this.apiToken}`,
        'Content-Type': 'application/json'
      },
      body: JSON.stringify({ value })
    });

    return response.json();
  }

  async purgeCache(files = null) {
    const body = files ? { files } : { purge_everything: true };

    const response = await fetch(`${CLOUDFLARE_API_BASE}/zones/${this.zoneId}/purge_cache`, {
      method: 'POST',
      headers: {
        'Authorization': `Bearer ${this.apiToken}`,
        'Content-Type': 'application/json'
      },
      body: JSON.stringify(body)
    });

    return response.json();
  }
}

// 使用示例
const cdnManager = new CloudflareCDNManager('YOUR_API_TOKEN', 'YOUR_ZONE_ID');
cdnManager.setupCDN();
验证配置是否生效
检查缓存状态
# 检查文件是否被缓存
curl -I https://example.com/images/photo.jpg

# 查看响应头中的:
# cf-cache-status: HIT (缓存命中)
# cf-ray: 请求 ID
测试工具推荐
- GTmetrix: 测试页面加载速度
- WebPageTest: 详细的性能分析
- Cloudflare Analytics: 官方分析工具
关键要点总结
- 不是存储服务: Cloudflare CDN 不存储您的原始文件,只是缓存和加速
- 需要源服务器: 您的图片必须先托管在自己的服务器上
- 自动缓存: 静态文件(图片、CSS、JS)会自动被缓存
- 全球分发: 缓存的内容会分发到全球 200+ 个数据中心
- 免费额度: 免费计划包含无限带宽的 CDN 服务
常见问题解答
Q: 图片更新后如何刷新缓存? A: 使用 Purge Cache API 清除特定文件缓存
Q: 可以缓存动态生成的图片吗? A: 可以,通过设置适当的缓存头和缓存规则
Q: 免费计划有带宽限制吗? A: 没有带宽限制,但有其他功能限制
这就是 Cloudflare CDN 免费计划的完整实现方案!您的图片将通过全球 CDN 网络快速分发给用户。


 1万+
1万+

 被折叠的 条评论
为什么被折叠?
被折叠的 条评论
为什么被折叠?
 到【灌水乐园】发言


