


UIPresentationController 是 iOS8 新增的一个 API,用来控制 controller 之间的跳转特效。比如希望实现一个特效,显示一个窗口,大小和位置都是自定义的,并且遮罩在原来的页面上。在之前,可以操作view的一些方法来实现。
实现自定义过渡
我们需要两个对象来实现自定义过渡,一个 UIPresentationController 的子类以及一个遵从 UIViewControllerAnimatedTransitioning 协议的类。
我们的 UIPresentationController 的子类是负责「被呈现」及「负责呈现」的 controller 以外的 controller 的,看着很绕口,说白了,在我们的例子中,它负责的仅仅是那个带渐变效果的黑色半透明背景 View。
这个弹出的,可以和用户交互的Controller叫做PresentedViewController,而后面那个被部分遮挡的UIViewController叫做PresentingViewController
一.自定义一个 UIPresentationController 的子类
.h中 代码如下:
#import <UIKit/UIKit.h>

@interface CustomPresentationVc : UIPresentationController

@property (nonatomic, strong)UIVisualEffectView *visualView;
@end
.m中:
在我们的 UIPresentationController 中,我们需要重写其中5个方法:
  presentationTransitionWillBegin
  presentationTransitionDidEnd:
 dismissalTransitionWillBegin
 dismissalTransitionDidEnd:
 frameOfPresentedViewInContainerView
.m中代码及注释:
#import "CustomPresentationVc.h"

@implementation CustomPresentationVc

//presentationTransitionWillBegin 是在呈现过渡即将开始的时候被调用的。我们在这个方法中把半透明黑色背景 View 加入到 containerView 中,并且做一个 alpha 从0到1的渐变过渡动画。
- (void) presentationTransitionWillBegin
{

    //使用UIVisualEffectView实现模糊效果
    UIBlurEffect *blur  = [UIBlurEffect effectWithStyle:UIBlurEffectStyleLight];
    _visualView = [[UIVisualEffectView alloc]initWithEffect:blur];
    _visualView.frame = self.containerView.bounds;
    _visualView.alpha = 0.4;
    _visualView.backgroundColor = [UIColor blackColor];

    [self.containerView addSubview:_visualView];

}


//presentationTransitionDidEnd: 是在呈现过渡结束时被调用的,并且该方法提供一个布尔变量来判断过渡效果是否完成。在我们的例子中,我们可以使用它在过渡效果已结束但没有完成时移除半透明的黑色背景 View。
-(void)presentationTransitionDidEnd:(BOOL)completed {

    // 如果呈现没有完成,那就移除背景 View
    if (!completed) {

        [_visualView removeFromSuperview];

    }

}


//以上就涵盖了我们的背景 View 的呈现部分,我们现在需要给它添加淡出动画并且在它消失后移除它。正如你预料的那样,dismissalTransitionWillBegin 正是我们把它的 alpha 重新设回0的地方。
-(void)dismissalTransitionWillBegin {

    _visualView.alpha = 0.0;

}


//我们还需要在消失完成后移除背景 View。做法与上面 presentationTransitionDidEnd: 类似,我们重载 dismissalTransitionDidEnd: 方法
-(void)dismissalTransitionDidEnd:(BOOL)completed{


    if (completed) {

        [_visualView removeFromSuperview];
    }
}


//还有最后一个方法需要重载。在我们的自定义呈现中,被呈现的 view 并没有完全完全填充整个屏幕,而是很小的一个矩形。被呈现的 view 的过渡动画之后的最终位置,是由 UIPresentationViewController 来负责定义的。我们重载 frameOfPresentedViewInContainerView 方法来定义这个最终位置
- (CGRect)frameOfPresentedViewInContainerView
{

        CGFloat windowH = [UIScreen mainScreen].bounds.size.height;

        CGFloat windowW = [UIScreen mainScreen].bounds.size.width;

        self.presentedView.frame = CGRectMake(0, windowH - 300, windowW, 300);


        return self.presentedView.frame;
}

@end
二.自定义一个controller(继承于UIViewController),这个controller中的内容是弹窗中所显示的内容,所以根据项目的实际情况进行内容的书写即可了。本项目中是需要弹窗一个列表类型的,所以我在这个controller中直接添加的tableView来进行实现的。即实现 PresentedViewController
代码如下:
#import <UIKit/UIKit.h>

@interface MyTabViewController : UIViewController

@end
#import "MyTabViewController.h"
#import "MyTableViewCell.h"
@interface MyTabViewController ()<UITableViewDataSource,UITableViewDelegate>{
NSIndexPath *_previousIndexPath;//用来记录上一次选中的那个cell
NSMutableDictionary *_isClickedDic;//用来记录每个cell的选中状态
}
@end
@implementation MyTabViewController
- (void)viewDidLoad {
[super viewDidLoad];
_previousIndexPath = [NSIndexPath indexPathForRow:1 inSection:0];//初始化
_isClickedDic = [[NSMutableDictionary alloc]init];
//可以根据需求封装任意大小的view
UITableView *tableView = [[UITableView alloc]initWithFrame:CGRectMake(0, 0, self.view.frame.size.width, 300)];
tableView.delegate = self;
tableView.dataSource = self;
tableView.tableHeaderView = [self tableViewHeaderView];
[self.view addSubview:tableView];
// Do any additional setup after loading the view.
}
-(UIView *)tableViewHeaderView
{
UIView * view = [[UIView alloc]initWithFrame:CGRectMake(0, 0, self.view.frame.size.width, 45)];
view.backgroundColor = [UIColor yellowColor];
UILabel *titleLabel = [[UILabel alloc]init];
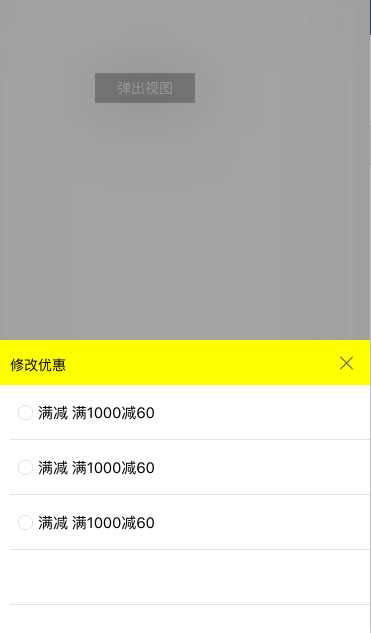
titleLabel.text = @"修改优惠";
titleLabel.textColor = [UIColor colorWithRed:51/255 green:51/255 blue:51/255 alpha:1.0];
titleLabel.font = [UIFont systemFontOfSize:14.0f];
titleLabel.textAlignment = NSTextAlignmentLeft;
titleLabel.frame = CGRectMake(view.frame.origin.x+15, view.frame.origin.y +10, 60, 30);
[view addSubview:titleLabel];
UIButton *button = [UIButton buttonWithType:UIButtonTypeCustom];
[button setImage:[UIImage imageNamed:@"t_close"] forState:UIControlStateNormal];
[button addTarget:self action:@selector(btnAction:) forControlEvents:UIControlEventTouchUpInside];
button.frame = CGRectMake(view.frame.size.width-31.5, view.frame.origin.y+15, 16.5, 16.5);
[view addSubview:button];
return view;
}
//x按钮:点击x按钮时,弹出界面消失
- (void)btnAction: (UIButton *)sender
{
[self dismissViewControllerAnimated:NO completion:^{
}];
}
#pragma mark - UITableViewDataSource
- (NSInteger) tableView:(UITableView *)tableView numberOfRowsInSection:(NSInteger)section
{
return 3;
}
- (UITableViewCell *) tableView:(UITableView *)tableView cellForRowAtIndexPath:(NSIndexPath *)indexPath
{
static NSString *ident = @"cell";
BOOL isReuse = NO;
if (!isReuse) {
UINib *nib = [UINib nibWithNibName:@"MyTableViewCell" bundle:nil];
[tableView registerNib:nib forCellReuseIdentifier:ident];
isReuse = YES;
}
MyTableViewCell *cell = [tableView dequeueReusableCellWithIdentifier:ident];
return cell;
}
- (CGFloat) tableView:(UITableView *)tableView heightForRowAtIndexPath:(NSIndexPath *)indexPath
{
return 55;
}
/**
* 确保每次只选中一个cell(用NSIndexPath记录下上一次点击的cell,并用字典记录下这个cell对应的状态,点击新的cell时将新的cell的图片改为选中状态并用字典记录下对应的状态,将上一次的cell的图片改为非选中状态同时还是用字典记录下对应的状态)
*/
-(void)tableView:(UITableView *)tableView didSelectRowAtIndexPath:(NSIndexPath *)indexPath
{
MyTableViewCell *cell = (MyTableViewCell *)[tableView cellForRowAtIndexPath:indexPath];//获取到当前选中的这个cell
cell.isClicked = [[_isClickedDic objectForKey:[NSString stringWithFormat:@"%ld",(long)indexPath.row]] boolValue];//从字典中取出这个选中的cell的对应的状态
if (!cell.isClicked) {//isClicked 在cell中初始化为no,即默认状态下显示为没选中的图标,点击后显示为选中了的图标
cell.myImage.image = [UIImage imageNamed:@"xuanz"];
//选中了新的cell后,之前选中的那个cell的图标改为未选中的状态,同时将改变后的状态赋值给相对应的字典
MyTableViewCell *LastCell =(MyTableViewCell *)[tableView cellForRowAtIndexPath:_previousIndexPath];
LastCell.myImage.image = [UIImage imageNamed:@"nox"];
LastCell.isClicked = NO;
NSNumber *number = [NSNumber numberWithBool:cell.isClicked];
[_isClickedDic setObject:number forKey:[NSString stringWithFormat:@"%ld",(long)_previousIndexPath.row]];
}else{
cell.myImage.image = [UIImage imageNamed:@"nox"];
}
//将新点击的cell赋值给_previousIndexPath
_previousIndexPath = indexPath;
//将新点击的这个cell的状态赋值给相对应的字典
cell.isClicked = !cell.isClicked;
NSNumber *number = [NSNumber numberWithBool:cell.isClicked];
[_isClickedDic setObject:number forKey:[NSString stringWithFormat:@"%ld",(long)indexPath.row]];
}
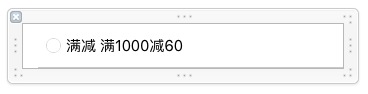
#import <UIKit/UIKit.h>

@interface MyTableViewCell : UITableViewCell


@property (nonatomic, assign) BOOL isClicked;

@property (strong, nonatomic) IBOutlet UIImageView *myImage;

@property (strong, nonatomic) IBOutlet UILabel *CouponMarkLabel;
@end
#import "MyTableViewCell.h"
@implementation MyTableViewCell
- (void)awakeFromNib {
_isClicked = NO;
self.selectionStyle = UITableViewCellSelectionStyleNone;
}xib截图
最后在被遮挡的UIVieController(即PresentingViewController)中进行功能的实现:
#import "ViewController.h"
#import "CustomPresentationVc.h"
#import "MyTabViewController.h"

@interface ViewController ()<UIViewControllerTransitioningDelegate>

@end

@implementation ViewController

- (void)viewDidLoad {

    [super viewDidLoad];
    UIButton *button = [UIButton buttonWithType:UIButtonTypeCustom];
    button.frame = CGRectMake(100, 100, 100, 30);
    [button setTitle:@"弹出视图" forState:UIControlStateNormal];
    button.titleLabel.textColor = [UIColor blueColor];
    button.titleLabel.font = [UIFont systemFontOfSize:14.0];
    [button addTarget:self action:@selector(buttonClicked:) forControlEvents:UIControlEventTouchUpInside];
    button.backgroundColor = [UIColor grayColor];
    [self.view addSubview:button];

    // Do any additional setup after loading the view, typically from a nib.
}


/**
 *  UIPresentationController 是 iOS8 新增的一个 API,用来控制 controller 之间的跳转特效。比如希望实现一个特效,显示一个窗口,大小和位置都是自定义的,并且遮罩在原来的页面上。在之前,可以操作view的一些方法来实现。
*/
-(void)buttonClicked:(UIButton *)btn
{

    MyTabViewController *tabVc = [[MyTabViewController alloc]init];

    tabVc.modalPresentationStyle = UIModalPresentationCustom;// 设置 动画样式
    tabVc.transitioningDelegate = self;// 此对象要实现 UIViewControllerTransitioningDelegate 协议
    [self presentViewController:tabVc animated:YES completion:^{
    }];

}

#pragma mark - UIViewControllerTransitioningDelegate
// 返回控制控制器弹出动画的对象
/**
 *  参数: presentedViewController     将要跳转到的目标控制器
 presentingViewController    跳转前的原控制器
 */
- (UIPresentationController *)presentationControllerForPresentedViewController:(UIViewController *)presented presentingViewController:(UIViewController *)presenting sourceViewController:(UIViewController *)source{

    return [[CustomPresentationVc alloc] initWithPresentedViewController:presented presentingViewController:presenting];

}


 588
588

 被折叠的 条评论
为什么被折叠?
被折叠的 条评论
为什么被折叠?
 到【灌水乐园】发言


