


《精通python网络爬虫》笔记
下面代码大部分来自此书,仅为本人笔记
urllib.request
urllib.request的使用以及将爬取内容保存html文件
代码示例:
import urllib.request

url = "http://www.baidu.com"
file = urllib.request.urlopen(url)
data = file.read()  #读取全部,赋予一个字符串变量
dataline = file.readline()  #读取一行
datalines = file.readlines() #读取全部,赋予一个列表变量

#打印data内容
print(data)

#将抓取到的内容保存到html文件(法1)
#步骤:将爬取内容赋值给变量--》以写入的方式打开本地文件,命名*.html--》让变量值写入文件--》关闭文件
fhandle = open("F:/htmls/1.html","wb")
fhandle.write(data)
fhandle.close()

#抓取内容写入文件(法2)urllib.request.urlretrieve(url,filename=本地保存路径)
filename = urllib.request.urlretrieve(url,filename = "F:/htmls/2.html")

#清除缓存
urllib.request.urlcleanup()

#返回与当前环境有关的信息
print("当前环境信息:" + str(file.info()))

#返回爬取网页状态码200表示正确
print("网页状态码:" + str(file.getcode()))

#返回网页url
print("网页url:" + str(file.geturl()))

#编码解码
#汉字和一些字符&等不符合URL标准,需要编码
print("编码解码:")
print(urllib.request.quote("http://www.sina.com.cn"))
print(urllib.request.unquote("http%3A//www.sina.com.cn"))
设置报头模拟浏览器访问
示例代码
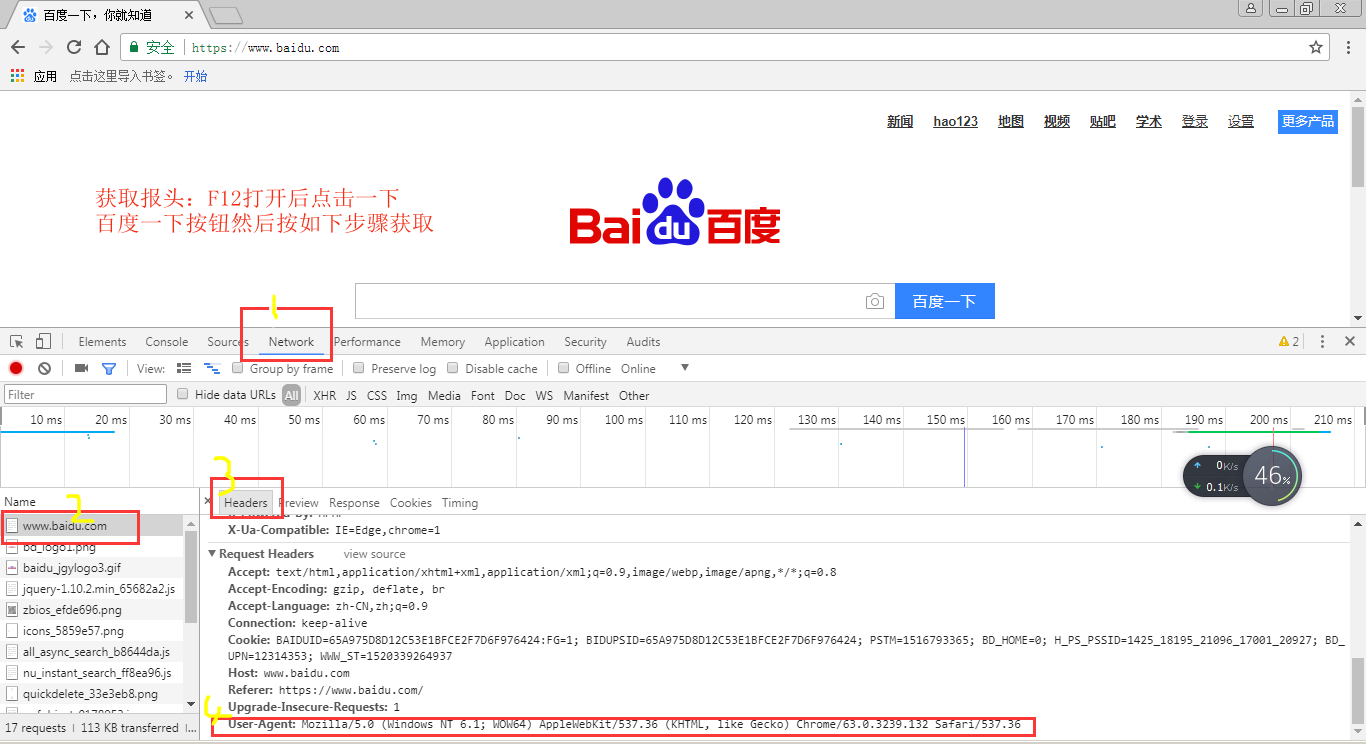
#爬虫模拟成浏览器访问
#有些网页无法爬取出现403错误

#方法1--使用builder_opener()修改报头

#由于urlopen()不支持一些HTTP的高级功能
#header = ("User-Agent",具体信息)

#过程:报头headers--》创建urllib.request.build_operder()对象opender--》opender.addheaders = [报头]设置报头--》
#对象.open(url).read  读取网页内容

import urllib.request

url = "http://blog.csdn.net/weiwei_pig/article/details/51178226"
headers = ("User-Agent","Mozilla/5.0 (Windows NT 6.1; WOW64) AppleWebKit/537.36 (KHTML, like Gecko) Chrome/49.0.2623.221 Safari/537.36 SE 2.X MetaSr 1.0")

opener = urllib.request.build_opener()
opener.addheaders = [headers]
data = opener.open(url).read()

fhandle = open("F:/htmls/3.html","wb")
fhandle.write(data)
fhandle.close()


#方法2:使用 add_header()添加报头

req = urllib.request.Request(url)
#注意两个参数;对象名.add_header(字段名,字段值)
req.add_header('User-Agent','Mozilla/5.0 (Windows NT 6.1; WOW64) AppleWebKit/537.36 (KHTML, like Gecko) Chrome/49.0.2623.221 Safari/537.36 SE 2.X MetaSr 1.0')
data2 = urllib.request.urlopen(req).read()
超时设置
#超时设置
import urllib.request

#设置timeout的值,单位-秒
file = urllib.request.urlopen("http://www.baidu.com",timeout=30)
HTTP协议请求
GET请求
- 构建相应的URL地址–包括GET请求的字段名和字段内容,且URL地址满足GET请求格式—->http://网址?字段名1=字段内容1&字段名2=字段内容2
- 以相应的URL为参数,构建Request对象
- 通过urlopen()打开构建的Request请求
- 按需求处理抓取的内容
打开百度输入 hello 点击百度一下–得到网址–https://www.baidu.com/s?wd=hello……
分析规律可通过GET请求利用爬虫自动在百度上搜索某个关键字
示例代码
import urllib.request

keywd = "hello"
url = "http://www.baidu.com/s?wd=" + keywd

req = urllib.request.Request(url)
data = urllib.request.urlopen(req).read()

fhandle = open("F:/htmls/4.html","wb")
fhandle.write(data)
fhandle.close()
示例代码
import urllib.request

url = "http://www.baidu.com/s?wd="
#如果key是中文则会出现编码问题
key = "你好"
key_code = urllib.request.quote(key)
url_all = url + key_code

req = urllib.request.Request(url_all)
data = urllib.request.urlopen(req).read()

fh = open("F:/htmls/5.html","wb")
fh.write(data)
fh.close()POST请求
- 设置好URL地址
- 构建表单数据,并使用urllib.parse.urlencode对数据精选编码处理
- 创建Request对象,参数包括URL地址和要传入的数据
- 使用add_header()添加头信息,模拟浏览器
- 使用urllib.request.urlopen()打开对应的Request对象,完成信息传递
- 后续处理。。。
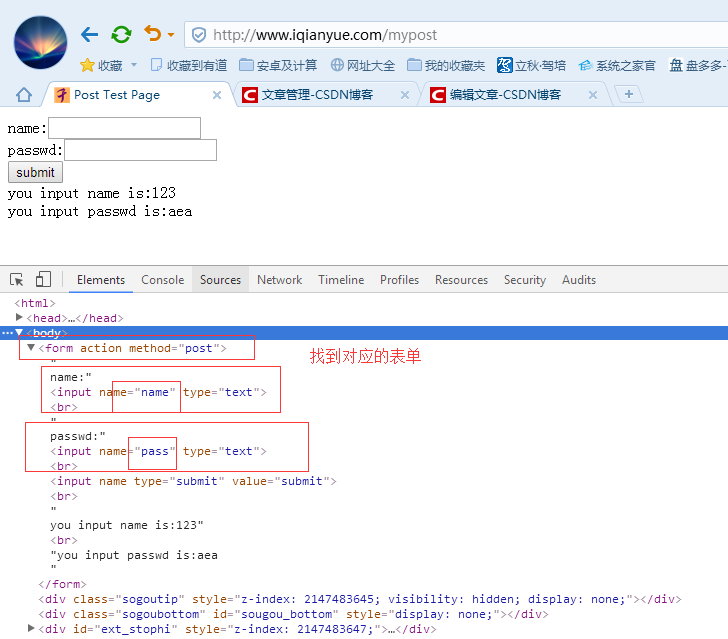
示例代码
#post请求--登录、注册等操作

import urllib.request
import urllib.parse

url = "http://www.iqianyue.com/mypost"
postdata = urllib.parse.urlencode({
    "name":"zran",
    "pass":"abcd"
}).encode('utf-8') #将数据使用urlencode编码处理后,使用encode()设置为utf-8编码

req = urllib.request.Request(url,postdata)
req.add_header('User-Agent','Mozilla/5.0 (Windows NT 6.1; WOW64) AppleWebKit/537.36 (KHTML, like Gecko) Chrome/49.0.2623.221 Safari/537.36 SE 2.X MetaSr 1.0')
data = urllib.request.urlopen(req).read()

fh = open("F:/htmls/6.html","wb")
fh.write(data)
fh.close()
代理服务器的使用
示例代码
#代理服务器的使用
def use_porxy(proxy_addr,url):
    import urllib.request
    proxy = urllib.request.ProxyHandler({'http':proxy_addr})
    opener = urllib.request.build_opener(proxy,urllib.request.HTTPHandler)
    urllib.request.install_opener(opener)
    data = urllib.request.urlopen(url).read().decode('utf-8')
    return data

#代理服务器地址,http://www.xicidaili.com/
proxy_addr = "118.212.137.135:31288"
data = use_porxy(proxy_addr,"http://www.baidu.com")
print(len(data))
调试log的打印
- 分别使用urllib.request.HTTPHander()和urllib.request.HTTPSHander()将debuglevel值设为1
- 使用urllib.request.build_opener()创建自定义的opener对象,并使用 1. 中设置的·值作为对象
- 用urllib.request.install_opener创建全局默认的opener对象,这样在使用urlopen时就会使用我们安装的opener对象
- 后续操作,如urlopene()等
#运行程序时打印调试log

import urllib.request

httphd = urllib.request.HTTPHandler(debuglevel=1)
httpshd = urllib.request.HTTPSHandler(debuglevel=1)
opener = urllib.request.build_opener(httphd,httpshd)
urllib.request.install_opener(opener)
data = urllib.request.urlopen("http://www.baidu.com")
异常处理URLError
未~


 297
297

 被折叠的 条评论
为什么被折叠?
被折叠的 条评论
为什么被折叠?
 到【灌水乐园】发言


