


Flume 安装与实战
日志采集框架Flume
一、安装
- 说明:
首先要安装 JDK 1.8+ 这里就不多介绍了
本次安装 Flume 版本为 cdh5.7.0
下载地址:CDH5

- 安装步骤:
下载好后上传到虚拟机CentOS6.7
解压: tar -zxvf flume-ng-1.6.0-cdh5.7.0.tar.gz

配置环境变量:
#vi /etc/profile
增加Flume环境变量:

刷新环境变量:source /etc/profile
查看:Flume 版本:flume-ng version

二、Flume 实战
实战一:从指定网络端口采集数据输出到控制台
进入 FLUME_HOME/conf/ 目录添加配置文件 example.conf
参看官网示例:FlumeUserGuide
本次配置文件内容如下:
a1.sources.r1.bind 注意修改为自己的主机名
# Name the components on this agent
a1.sources = r1
a1.sinks = k1
a1.channels = c1

# Describe/configure the source
a1.sources.r1.type = netcat
a1.sources.r1.bind = hadoop1
a1.sources.r1.port = 44444

# Describe the sink
a1.sinks.k1.type = logger

# Use a channel which buffers events in memory
a1.channels.c1.type = memory


# Bind the source and sink to the channel
a1.sources.r1.channels = c1
a1.sinks.k1.channel = c1
启动参数:
-
官网例子:
$ bin/flume-ng agent --conf conf --conf-file example.conf --name a1 -Dflume.root.logger=INFO,console -
按需要修改为我执行的命令:注意:
-Dflume.root.logger=INFO,console前面只有一个-
flume-ng agent --name a1 --conf $FLUME_HOME/conf --conf-file $FLUME_HOME/conf/example.conf -Dflume.root.logger=INFO,console
启动完成:
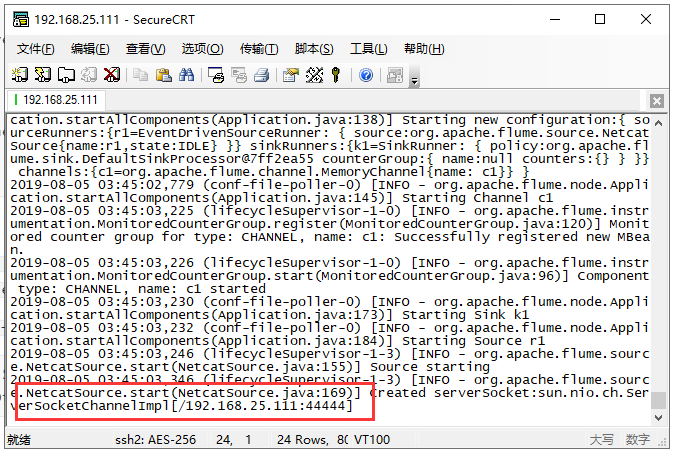
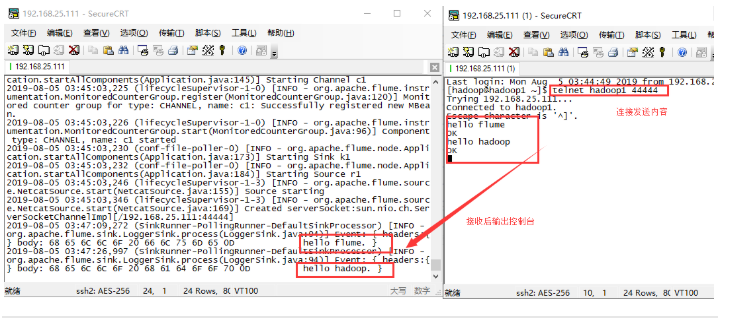
这时候不要关闭该控制台,在打开一个终端进行测试:
连接:telnet 主机名 44444
实战二:监控一个文件实时采集新增的数据输出到控制台
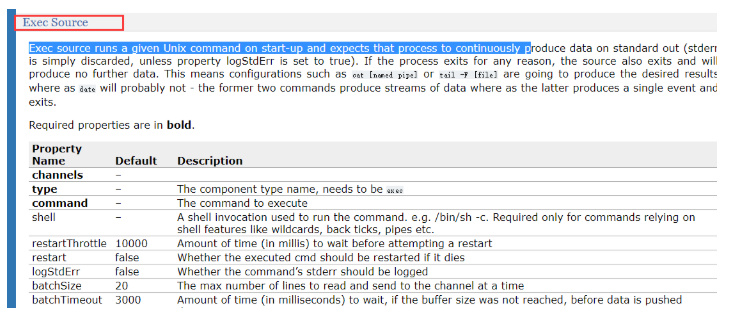
参看官网Exec Source 的配置:
编写配置文件:exec-memory-logger.conf
# Name the components on this agent
a1.sources = r1
a1.sinks = k1
a1.channels = c1

# Describe/configure the source
a1.sources.r1.type = exec
a1.sources.r1.command = tail -F /home/hadoop/data/data.log
a1.sources.r1.shell = /bin/bash -c

# Describe the sink
a1.sinks.k1.type = logger

# Use a channel which buffers events in memory
a1.channels.c1.type = memory


# Bind the source and sink to the channel
a1.sources.r1.channels = c1
a1.sinks.k1.channel = c1
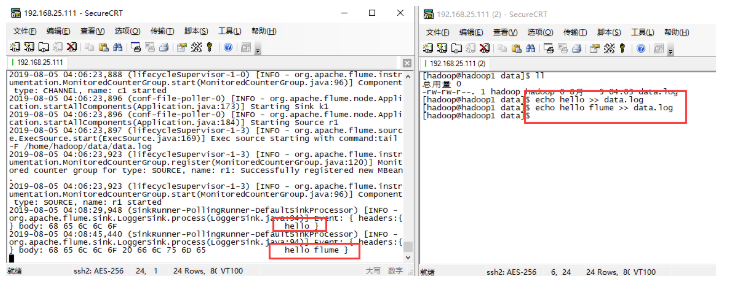
创建要监控的文件:/home/hadoop/data/data.log
启动Flume: 终端不要关闭
flume-ng agent --name a1 --conf $FLUME_HOME/conf --conf-file $FLUME_HOME/conf/exec-memory-logger.conf -Dflume.root.logger=INFO,console
再开启一个终端:往 /home/hadoop/data/data.log 文件追加内容:
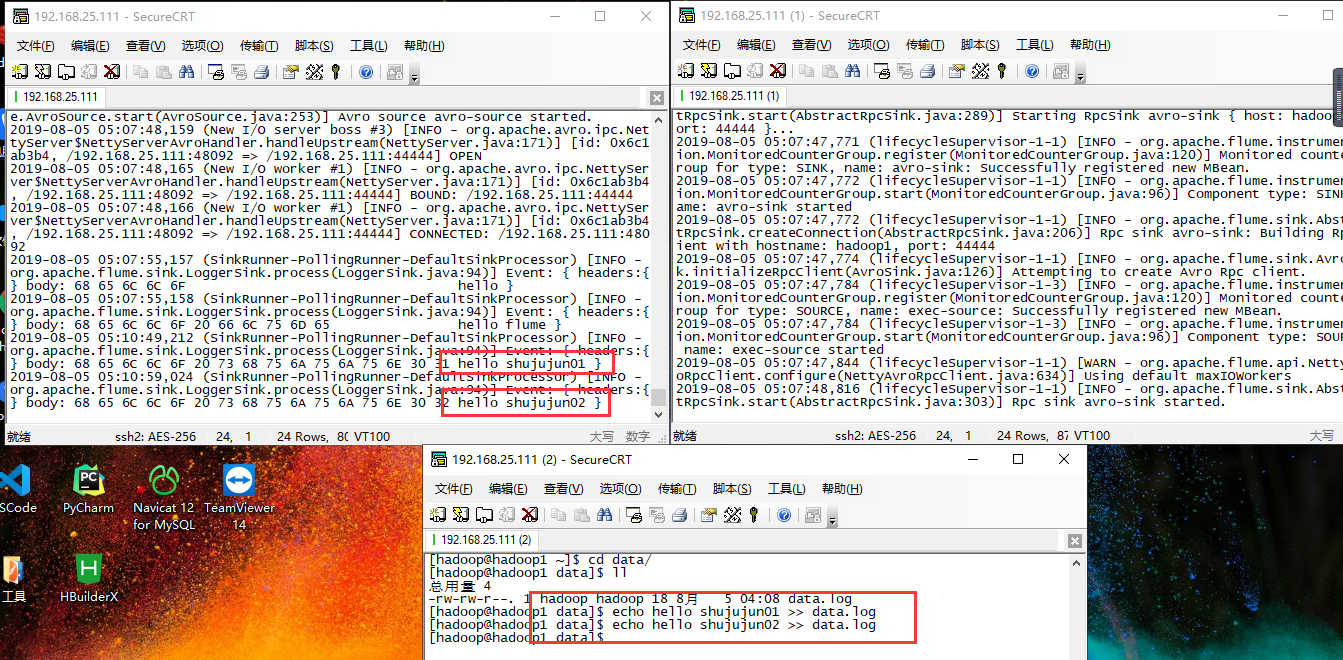
实战三:将服务器A上的日志实时采集到服务器B
技术选型:
exec source + memory channel + avro sink
avro source + memory channel + logger sink
配置文件1: exec-memory-avro.conf Exec Source
exec-memory-avro.sources = exec-source
exec-memory-avro.sinks = avro-sink
exec-memory-avro.channels = memory-channel


exec-memory-avro.sources.exec-source.type = exec
exec-memory-avro.sources.exec-source.command = tail -F /home/hadoop/data/data.log
exec-memory-avro.sources.exec-source.shell = /bin/bash -c

exec-memory-avro.sinks.avro-sink.type = avro
exec-memory-avro.sinks.avro-sink.hostname = hadoop1
exec-memory-avro.sinks.avro-sink.port = 44444


exec-memory-avro.channels.memory-channel.type = memory

exec-memory-avro.sources.exec-source.channels = memory-channel
exec-memory-avro.sinks.avro-sink.channel = memory-channel
配置文件2:avro-memory-logger.conf Avro Source
avro-memory-logger.sources = avro-source
avro-memory-logger.sinks = logger-sink
avro-memory-logger.channels = memory-channel


avro-memory-logger.sources.avro-source.type = avro
avro-memory-logger.sources.avro-source.bind = hadoop1
avro-memory-logger.sources.avro-source.port = 44444

avro-memory-logger.sinks.logger-sink.type = logger


avro-memory-logger.channels.memory-channel.type = memory

avro-memory-logger.sources.avro-source.channels = memory-channel
avro-memory-logger.sinks.logger-sink.channel = memory-channel
先启动:avro-memory-logger
flume-ng agent --name avro-memory-logger --conf $FLUME_HOME/conf --conf-file $FLUME_HOME/conf/avro-memory-logger.conf -Dflume.root.logger=INFO,console
再启动:exec-memory-avro
flume-ng agent --name exec-memory-avro --conf $FLUME_HOME/conf --conf-file $FLUME_HOME/conf/exec-memory-avro.conf -Dflume.root.logger=INFO,console


 182
182


 被折叠的 条评论
为什么被折叠?
被折叠的 条评论
为什么被折叠?
 到【灌水乐园】发言


