


1.Naming bean
id作为唯一身份标识,name可以作为该bean的别名。可以使用ref标志来引用其他bean。如果使用的是spring的@Component类似注解,并且没有指定bean的名字那么spring会调用java.beans.Introspector.decapitalize这个方法去解析bean的类然后自动生成相应的bean的名字。源码如下:
/**
     * Utility method to take a string and convert it to normal Java variable
     * name capitalization.  This normally means converting the first
     * character from upper case to lower case, but in the (unusual) special
     * case when there is more than one character and both the first and
     * second characters are upper case, we leave it alone.
     * <p>
     * Thus "FooBah" becomes "fooBah" and "X" becomes "x", but "URL" stays
     * as "URL".
     *
     * @param  name The string to be decapitalized.
     * @return  The decapitalized version of the string.
     */
    public static String decapitalize(String name) {
        if (name == null || name.length() == 0) {
            return name;
        }
        if (name.length() > 1 && Character.isUpperCase(name.charAt(1)) &&
                        Character.isUpperCase(name.charAt(0))){
            return name;
        }
        char chars[] = name.toCharArray();
        chars[0] = Character.toLowerCase(chars[0]);
        return new String(chars);
    }
可以看到在中间spring做了特殊的处理如果类的第一个字母和第二个字母都为大写则会按照classname返回,比如URL就会返回URL
实例化类
一般我们使用的是class的构造函数来直接生成bean,当然特殊情况下我们也可以指定工厂方法来创建bean。
注:关于静态内部类,我们可以使用加上$的方法来实现静态内部类的实例化。这里举一个Spring官方的例子
package com.example

public class SomeThing{
    public static class OtherThing {

    }
}
当我们想要生成OthertThing的时候可以使用 <bean id="otherThing" class="com.example.SomeThing$OtherThing"/>的形式
1.1实例化bean中的工厂方法
- 类自带工厂方法
xml代码
<bean id="clientService"
    class="examples.ClientService"
    factory-method="createInstance"/>
class代码
public class ClientService {
    private static ClientService clientService = new ClientService();
    private ClientService() {}

    public static ClientService createInstance() {
        return clientService;
    }
}
通过这种方式我们就可以调用类中自定的工厂方法来直接生成对象
- 使用外部工厂类的工厂方法
xml代码
<!-- the factory bean, which contains a method called createInstance() -->
<bean id="serviceLocator" class="examples.DefaultServiceLocator">
    <!-- inject any dependencies required by this locator bean -->
</bean>

<!-- the bean to be created via the factory bean -->
<bean id="clientService"
    factory-bean="serviceLocator"
    factory-method="createClientServiceInstance"/>
class代码
public class DefaultServiceLocator {

    private static ClientService clientService = new ClientServiceImpl();

    public ClientService createClientServiceInstance() {
        return clientService;
    }
}
注:以上来自官方实例
2.Dependency Injection(DI)
2.1DI的2种方式
之前我们有讲到如何在spring中注入bean,但是基本都是没有参数的情况,在本章会讲一下如何使用带有参数的构造函数或者工厂方法来注入bean。
- 基于构造函数
类
package x.y;

public class ThingOne {

    public ThingOne(ThingTwo thingTwo, ThingThree thingThree) {
        // ...
    }
}
xml配置
<beans>
    <bean id="beanOne" class="x.y.ThingOne">
        <constructor-arg ref="beanTwo"/>
        <constructor-arg ref="beanThree"/>
    </bean>

    <bean id="beanTwo" class="x.y.ThingTwo"/>

    <bean id="beanThree" class="x.y.ThingThree"/>
</beans>
其实可以把这种方式想像成直接new对象。如果两个参数之间具有继承关系,那么这个就需要考虑参数会给构造函数带来的影响了。
所以以下方法可以解决参数类型的问题
2.1.1使用构造函数
下面展示xml的统一类
package examples;

public class ExampleBean {

    // Number of years to calculate the Ultimate Answer
    private int years;

    // The Answer to Life, the Universe, and Everything
    private String ultimateAnswer;

    public ExampleBean(int years, String ultimateAnswer) {
        this.years = years;
        this.ultimateAnswer = ultimateAnswer;
    }
}
- 方法一
xml
<bean id="exampleBean" class="examples.ExampleBean">
    <constructor-arg type="int" value="7500000"/>
    <constructor-arg type="java.lang.String" value="42"/>
</bean>
- 方法二
当然spring也支持指定参数的顺序如下所示(同时这个方法也可以解决两个参数具有相同的问题)
<bean id="exampleBean" class="examples.ExampleBean">
    <constructor-arg index="0" value="7500000"/>
    <constructor-arg index="1" value="42"/>
</bean>
- 方法三
也可以指定根据参数名来指定
<bean id="exampleBean" class="examples.ExampleBean">
    <constructor-arg name="years" value="7500000"/>
    <constructor-arg name="ultimateAnswer" value="42"/>
</bean>
注:这种方法如果想要在上面那个类中实现,必须是在debug模式下。如果想要在正常环境中run则需要在类中加入@ConstructorProperties注解
package examples;

public class ExampleBean {

    // Fields omitted

    @ConstructorProperties({"years", "ultimateAnswer"})
    public ExampleBean(int years, String ultimateAnswer) {
        this.years = years;
        this.ultimateAnswer = ultimateAnswer;
    }
}
2.1.2使用setter方式
xml配置文件
<bean id="exampleBean" class="examples.ExampleBean">
    <!-- setter injection using the nested ref element -->
    <property name="beanOne">
        <ref bean="anotherExampleBean"/>
    </property>

    <!-- setter injection using the neater ref attribute -->
    <property name="beanTwo" ref="yetAnotherBean"/>
    <property name="integerProperty" value="1"/>
</bean>

<bean id="anotherExampleBean" class="examples.AnotherBean"/>
<bean id="yetAnotherBean" class="examples.YetAnotherBean"/>
类
public class ExampleBean {

    private AnotherBean beanOne;

    private YetAnotherBean beanTwo;

    private int i;

    public void setBeanOne(AnotherBean beanOne) {
        this.beanOne = beanOne;
    }

    public void setBeanTwo(YetAnotherBean beanTwo) {
        this.beanTwo = beanTwo;
    }

    public void setIntegerProperty(int i) {
        this.i = i;
    }
}
2.1.3使用工厂方法解决
xml
<bean id="exampleBean" class="examples.ExampleBean" factory-method="createInstance">
    <constructor-arg ref="anotherExampleBean"/>
    <constructor-arg ref="yetAnotherBean"/>
    <constructor-arg value="1"/>
</bean>

<bean id="anotherExampleBean" class="examples.AnotherBean"/>
<bean id="yetAnotherBean" class="examples.YetAnotherBean"/>
类
public class ExampleBean {

    // a private constructor
    private ExampleBean(...) {
        ...
    }

    // a static factory method; the arguments to this method can be
    // considered the dependencies of the bean that is returned,
    // regardless of how those arguments are actually used.
    public static ExampleBean createInstance (
        AnotherBean anotherBean, YetAnotherBean yetAnotherBean, int i) {

        ExampleBean eb = new ExampleBean (...);
        // some other operations...
        return eb;
    }
}
当然这种方法也可以使用非static的工厂方法注入,这就需要配合factory-bean属性,例如
<bean id="exampleBean" factory-bean="beanFactory" factory-method="createExampleBean">
这里的factory-bean是使用spring ioc机制注入的工厂bean
2.2总结
如果想要了解更多关于Spring bean注入的细节可以点击这里
虽然使用构造函数注入和使用setter的方式注入的效果是一样的,但是官方还是给出了相应的建议。在注入该bean必须的bean时使用构造函数,在注入那些可以选则的参数的时候使用setter 的方式。官方的话更加支持使用构造函数的方式
- 解决循环依赖注入问题
对于循环的依赖注入,Spring会在运行的时候查明,并且抛出BeanCurrentlyInCreationException。这个问题只有在使用构造器注入的时候有这个问题。所以Spring官方给出的解决方案是在setter注入的方式替代构造函数注入的方式。网上也有很多其他的方案,比如采用@Lazy的方式解决,读者也可以自行搜索。
测试类
//ClassA类
@Component
public class ClassA {
    ClassB classB;
     @Autowired
    public ClassA(ClassB classB){
         this.classB = classB;
     }
}
//ClassB类
@Component
public class ClassB {
    ClassA classA;

    @Autowired
    public ClassB(ClassA classA){
        this.classA = classA;
    }
}
报错信息,实际操作的时候使用的spring boot发现官方对报错信息提示做了优化如下所示
***************************
APPLICATION FAILED TO START
***************************

Description:

The dependencies of some of the beans in the application context form a cycle:

┌─────┐
|  classA defined in file [/文件位置]
↑     ↓
|  classB defined in file [/文件位置]
└─────┘
3.使用depends-on
<bean id="beanOne" class="ExampleBean" depends-on="manager"/>
<bean id="manager" class="ManagerBean" />
这个标签能够保证在加载beanOne之前一定会加载manager,如果有多个以来可以使用,或;或隔开
4.使用lazy-init
<bean id="lazy" class="com.something.ExpensiveToCreateBean" lazy-init="true"/>
如果使用上面的lazy-init="true"那么可以让bean稍后在使用的时候再加载,当然如果这个lazy-init的beanA是某一个不lazy-initbeanB的依赖的话,那么beanA会在容器初始化的时候就加载。
你也可以使用
<beans default-lazy-init="true">
    <!-- no beans will be pre-instantiated... -->
</beans>
这种方式在容器层面确定lazy-init
5.Method Injection
对于单例ClassA内注入原型模式的ClassB,在每次引用ClassA的时候希望注入不同的ClassB。对于这种情况上面的方式并不能满足,一个使用代码解决的方法是
// a class that uses a stateful Command-style class to perform some processing
package fiona.apple;

// Spring-API imports
import org.springframework.beans.BeansException;
import org.springframework.context.ApplicationContext;
import org.springframework.context.ApplicationContextAware;

public class CommandManager implements ApplicationContextAware {

    private ApplicationContext applicationContext;

    public Object process(Map commandState) {
        // grab a new instance of the appropriate Command
        Command command = createCommand();
        // set the state on the (hopefully brand new) Command instance
        command.setState(commandState);
        return command.execute();
    }

    protected Command createCommand() {
        // notice the Spring API dependency!
        return this.applicationContext.getBean("command", Command.class);
    }

    public void setApplicationContext(
            ApplicationContext applicationContext) throws BeansException {
        this.applicationContext = applicationContext;
    }
}
但是这样的话其实使业务代码和Spring FrameWork耦合了,这明显不是Spring团队所想要看到的,所以他们也提供了解决方案。
package fiona.apple;

// no more Spring imports!

public abstract class CommandManager {
    //method name can be any other
    public Object process(Object commandState) {
        // grab a new instance of the appropriate Command interface
        Command command = createCommand();
        // set the state on the (hopefully brand new) Command instance
        command.setState(commandState);
        return command.execute();
    }

    // okay... but where is the implementation of this method?
    protected abstract Command createCommand();
}
其中注入方法必须是如下形式
<public|protected> [abstract] <return-type> theMethodName(no-arguments);
xml配置
<!-- a stateful bean deployed as a prototype (non-singleton) -->
<bean id="myCommand" class="fiona.apple.AsyncCommand" scope="prototype">
    <!-- inject dependencies here as required -->
</bean>

<!-- commandProcessor uses statefulCommandHelper -->
<bean id="commandManager" class="fiona.apple.CommandManager">
    <lookup-method name="createCommand" bean="myCommand"/>
</bean>
当然现在现在基本不使用xml配置bean,Spring也提供了更加常用的注解形式
ByName
public abstract class CommandManager {
    //method name can be any other
    public Object process(Object commandState) {
        Command command = createCommand();
        command.setState(commandState);
        return command.execute();
    }

    @Lookup("myCommand")
    protected abstract Command createCommand();
}
ByType
public abstract class CommandManager {
    //method name can be any other
    public Object process(Object commandState) {
        MyCommand command = createCommand();
        command.setState(commandState);
        return command.execute();
    }

    @Lookup
    protected abstract MyCommand createCommand();
}
当然Spring使用CGLIB动态代理还是存在一些问题的,比如类不能为final类型,单元测试的时候需要自己编写实现类,还有该方法不能和工厂方法一起使用,尤其不能与@Configuration中的@Bean一起使用等,具体限制可以查看Spring官方文档,The IoC Container->Dependencies->Method Injection->Lookup Method Injection
除了这种方法还有其他方式能够帮助我们实现不同Scope的注入,可以查看相关官方文档。
1.Scoped Beans as Dependencies.
6.Bean Scopes
| scope | description |
|---|---|
| singleton | 单例模式(默认) |
| prototype | 原型模式 |
| request | 每个requets分配一个bean |
| session | 每个session分配一个bean |
| application | 在每个ServletContext分配一个bean |
| websocket | 每个WebSocket分配一个bean |
其中后面四个scope只在web-aware Spring ApplicationContext中存在。
注:Spring3.0之后新增了基于线程级的scope SimpleThreadScope,在Spring4.2之后新增了基于Transaction的scope SimpleTransactionScope
6.1singleton

这里的singleton和Gang of Four (GoF)提出的singleton不同,GoF提出的singleton是一个类一个实例,但是在spring中的是一个容器一个实例
注:GoF指的就是写《设计模式》那本书的四位作者
6.2Prototype 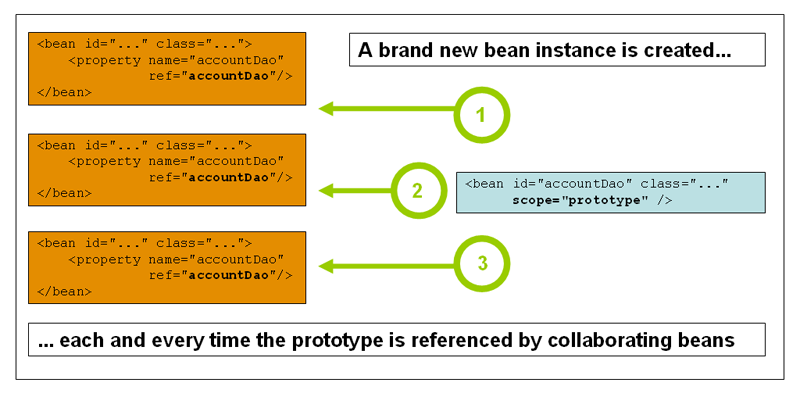
这张图片可以解释Prototype的在spring中的作用方式,每次使用getBean()方法或者直接注入的时候,容器会再创建一个bean来供使用。
Spring负责创建,初始化scope为Prototype的bean,但是不负责之后的销毁,所以如果bean当中有一些重要的资源,比如数据库链接,这就需要我们自己手动的去删除。详细可以看着
6.3关于如果在singleton中使用Prototype bean的问题
这个问题其实在Method Inject有提到。这里介绍一下理由:bean是是在容器初始化的时候注入的,所以对于singleton这种只初始化一次的bean,就算以来的bean的scope为Prototype那么对于singleton的bean而言以来的bean对他也是唯一的。所以如果想要实现singleton中的bean使用的Prototype的bean那么可以用之前提到的Method Inject方法。
6.4Request, Session, Application, and WebSocket Scopes
对于这些为web应用服务的bean scope我们需要一些特殊的配置才能使用,否则Spring会报错。对于Spring MVC而言使用的是DispatcherServlet,这方面配置已经完全由Spring本身提供,所以不需要配置,如果使用的是其他方式那么可以参考这里Initial Web Configuration
对于上面的所有此类型的bean都可以使用相应的注解实现
request
@RequestScope
@Component
public class LoginAction {
    // ...
}
session
@SessionScope
@Component
public class UserPreferences {
    // ...
}
application
@ApplicationScope
@Component
public class AppPreferences {
    // ...
}
application bean是基于ServletContext,所以在ServletContext只有唯一的一个bean,有点类似singleton,但是和singleton不同ServletContext中可以有很多的ApplicationContext,也就是说在一个ServletContext可以存在多个singleton实例,同时它是完全暴露的所以可以看作ServletContext的一个属性。
6.5定制自己的bean scope
代码如下
public class MyScope implements Scope {
    Logger LOGGER = LoggerFactory.getLogger(MyScope.class);
    @Override
    public Object get(String s, ObjectFactory<?> objectFactory) {
        LOGGER.info("here is myScope get()");
        return null;
    }

    @Override
    public Object remove(String s) {
        LOGGER.info("here is myScope remove");
        return null;
    }

    @Override
    public void registerDestructionCallback(String s, Runnable runnable) {
        LOGGER.info("here is myScope registerDestructionCallback");

    }

    @Override
    public Object resolveContextualObject(String s) {
        LOGGER.info("here is myScope resolveContextualObject");
        return null;
    }

    @Override
    public String getConversationId() {
        LOGGER.info("here is myScope getConversationId");
        return null;
    }
}
完成这个scope代码之后使用方法如下
@Component
@Scope("myScope")
public class MyScopeBean {
}
但是这样运行的话Spring boot会报如下错误
Caused by: java.lang.IllegalStateException: No Scope registered for scope name 'myScope'
所以我们需要让spring容器知道我们这个自定义scope,Spring官方提供了两种方法。
6.5.1方法一
设置ApplicationContext,将scope的名称和实现类设置进ApplicationContext中。Spring中存在一个接口ApplicationContextAware,实现接口方法可以对ApplicationContext做相应的设置。代码如下
//需要@Component的注解,spring在扫描包的时候发现是ApplicationContextAware的子类会做特殊处理
@Component
public class ApplicationAwareTest implements ApplicationContextAware {
    @Override
    public void setApplicationContext(ApplicationContext applicationContext) throws BeansException {
        ConfigurableBeanFactory configurableBeanFactory = (ConfigurableBeanFactory)applicationContext.getAutowireCapableBeanFactory();
        configurableBeanFactory.registerScope("myScope",new MyScope());
    }
}
为什么需要强转成ConfigurableBeanFactory是因为applicationContext.getAutowireCapableBeanFactory()返回的实际类型是AutowireCapableBeanFactory但是这个接口当中不存在registerScope("myScope",new MyScope()),那为什么可以如此强转,如果实际对象的类没有实现ConfigurableBeanFactory那么这个办法就是无效的。
我们基本上所有的bean都是基于AnnotationConfigServletWebServerApplicationContext(这里使用的Spring boot其他情况应该略有不同),所以在setApplicationContext(ApplicationContext applicationContext)中的参数的实际类应该是AnnotationConfigServletWebServerApplicationContext,这个可以通过在上面代码中增加System.out.println(applicationContext.getClass().toGenericString());可知。官方文档中提到了This method is declared on the ConfigurableBeanFactory interface, which is available through the BeanFactory property on most of the concrete ApplicationContext implementations that ship with Spring.。说明我们需要的BeanFactory为ApplicationContext的一个属性,然后Spring提供了获取这个属性的方法getAutowireCapableBeanFactory(),然后我们查看AnnotationConfigServletWebServerApplicationContext的官方文档发现该方法的具体实现是在GenericApplicationContext中,然后发现调用的是类中的抽象方法beanFactory,而这个类的类型是DefaultListableBeanFactory实现了ConfigurableBeanFactory接口所以我们这么实现是没有问题的。
6.5.2方法二
直接注入CustomScopeConfigurer的bean
@Configuration
public class ScopeConfig {
    @Bean
    public CustomScopeConfigurer create() {
        CustomScopeConfigurer customScopeConfigurer = new CustomScopeConfigurer();
        customScopeConfigurer.addScope("myScope", new MyScope());
        return customScopeConfigurer;
    }
}
7定制Bean的生命周期
7.1 callback函数
通过实现InitializingBean和DisposableBean这两个接口来实现bean的声明周期控制。当然spring这样的话就与Spring framework耦合,所以Spring的建议是使用JSR-250 @PostConstruct and @PreDestroy注解来实现生命周期的控制。当然也可以使用Xml的init-method,destroy-method参数来指定实现方法,@Bean的initMethod和``destroyMethod也能实现和xml配置一样的功能 当这些init方法或者destroy方法全部都指定的话那么Spring会按照如下顺序执行 initialization 1.@PostConstruct注解的方法 2.InitializingBean接口实现的 3.在xml中定义的init()`方法
Destroy和initialization的顺序相同:
- @PreDestroy注解的方法
DisposableBean接口的实现- xml指定的
destroy()
7.2 ApplicationContextAware函数以及BeanAware函数
在Spring framework2.5之前实现ApplicationContextAware可以实现对ApplicationContext的操作,但是在2.5之后不再建议这么做,因为这样的话会让你和spring框架代码耦合,可以使用@Autowired注解来实现对ApplicationContext操作。
BeanNameAware通过实现该接口可以得知spring容器中bean的名字
7.3 其他Aware函数
spring提供了相当多的Aware接口来对容器或者容器中的bean做操作。
| Name | injected Dependency | Explained in |
|---|---|---|
| ApplicationContextAware | 操作ApplicationContext | 说明 |
| ApplicationEventPublisherAware | ApplicationContext继承了ApplicationEventPublisher所以具备事件发布能力 | 说明 |
| BeanClassLoaderAware | 获取到类的类加载器 | 说明 |
| BeanFactoryAware | 获取到相应的BeanFactory | 说明 |
| BeanNameAware | 获取bean的名称 | 说明 |
| LoadTimeWeaverAware | 获取LoadTimeWeaver | 说明 |
| MessageSourceAware | 设置处理message的策略 | 说明 |
| NotificationPublisherAware | 处理spring JMX | 说明 |
| ResourceLoaderAware | 设置资源加载 | 说明 |
| ServletConfigAware | 只在web应用中使用 | 说明 |
| ServletContextAware | 只在web应用中使用 | 说明 |
上面的所有Aware接口可以实现spring的bean对于自身所在资源的特殊处理。但是使用这些接口会是应用和spring的代码耦合,所以官方建议是在某个作为基础设施的bean中实现。
8 bean的继承
对于有多个实现的上级接口,Spring可以根据参数的名字找到对应bean的名字相同的加载。
例如
实现类1
@Component
public class Phase1Order implements SmartLifecycle {
    public Phase1Order() {
        System.out.println("here is the order 1");
    }

    @Override
    public boolean isAutoStartup() {
        System.out.println("here is the order 1 isAutoStartup");
        return true;
    }
    @Override
    public int getPhase() {
        System.out.println("here is the order 1 getPhase");
        return 0;
    }


    @Override
    public void start() {
        System.out.println("here is the order 1 start");

    }

    @Override
    public void stop() {
        System.out.println("here is the order 1 stop");

    }

    @Override
    public boolean isRunning() {
        System.out.println("here is the order 1 isRunning");
        return true;
    }
}
实现类2
@Component
public class Phase2Order implements SmartLifecycle {
    public Phase2Order() {
        System.out.println("here is the order 2");
    }
    @Override
    public boolean isAutoStartup() {
        System.out.println("here is the order 2 isAutoStartup");
        return true;
    }
    @Override
    public int getPhase() {
        return 2;
    }
    @Override
    public void start() {
        System.out.println("here is the order 2 start");
    }

    @Override
    public void stop() {
        System.out.println("here is the order 2 stop");
    }

    @Override
    public boolean isRunning() {
        System.out.println("here is the order 2 isRunning");
        return true;
    }
}
注入类
@RestController
public class BeanLifeController {
    @Autowired
    BeanLifeCycle beanLifeCycle;
    @Autowired
    SmartLifecycle phase2Order;
    @Autowired
    ApplicationContext applicationContext;
    @GetMapping("bean")
    public String get(){
        System.out.println(beanLifeCycle.value);
        phase2Order.isAutoStartup();
        return applicationContext.getClass().toGenericString();
    }
}
如果我们的SmartLifecycle的名称是phase2Order则注入人的Phase2Order类,phase1Order则注入Phase1Order类,这个是根据bean的名称查找,如果bean的名称变化那么注入的变量名也应该变化
9 自定义容器扩展
9.1 在容器实例化bean之后设置bean使用BeanPostProcessor
一般而言BeanPostProcessor和Orderd接口会和在一起使用。使用Orderd接口的话就可以指定BeanPostProcessor的实现顺序。spring官方实例
9.2 在容器实例化bean之前对bean进行设置使用BeanFactoryPostProcessor
和BeanPostProcessor类似,实现BeanFactoryPostProcessor也可以对bean进行处理,但是后者会在bean实例化之前就可以改变bean的行为。
Spring提供了很多BeanFactoryPostProcessor的实现类,比如PropertyOverrideConfigurer和PropertyPlaceholderConfigurer
9.3 设置自己的FactoryBean
spring提供了超过50种的FactoryBean,但是如果这都满足不了你,可以自己实现FactoryBean接口。
注:如果想要获得FactoryBean对象需要在带哦用getBean()方法的时候在id前面加上&符号
10 基于Annotation的容器设置
10.1@Required
public class SimpleMovieLister {

    private MovieFinder movieFinder;

    @Required
    public void setMovieFinder(MovieFinder movieFinder) {
        this.movieFinder = movieFinder;
    }

    // ...
}
说明该参数在设置的时候必须注入,否则就会报错,可以避免NullPointerException这样的问题。但是官方还是建议使用断言(assert)来解决这种问题(所以spring Framework 5.1已经决定弃用)
10.2@Autowired
(这个注释可以使用JSR 330的@Inject代替)
public class MovieRecommender {

    private final CustomerPreferenceDao customerPreferenceDao;

    @Autowired
    public MovieRecommender(CustomerPreferenceDao customerPreferenceDao) {
        this.customerPreferenceDao = customerPreferenceDao;
    }

    // ...
}
自动注入构造函数中的参数(Spring Framework 4.3之后如果只存在一个构造函数那么@Autowired这个注释可以不需要)
在setter中应用
public class SimpleMovieLister {

    private MovieFinder movieFinder;

    @Autowired
    public void setMovieFinder(MovieFinder movieFinder) {
        this.movieFinder = movieFinder;
    }

    // ...
}
或者在某个方法中应用
public class MovieRecommender {

    private MovieCatalog movieCatalog;

    private CustomerPreferenceDao customerPreferenceDao;

    @Autowired
    public void prepare(MovieCatalog movieCatalog,
            CustomerPreferenceDao customerPreferenceDao) {
        this.movieCatalog = movieCatalog;
        this.customerPreferenceDao = customerPreferenceDao;
    }

    // ...
}
也可以在属性上运用
public class MovieRecommender {

    private final CustomerPreferenceDao customerPreferenceDao;

    @Autowired
    private MovieCatalog movieCatalog;

    @Autowired
    public MovieRecommender(CustomerPreferenceDao customerPreferenceDao) {
        this.customerPreferenceDao = customerPreferenceDao;
    }

    // ...
}
@Autowired使用的是byType注入,如果有多个备选的type可以将要注入的属性的名称改成bean的名称Spring也会识别对应的bean名称实现注入(只在spring boot中尝试过)
@Autowired中存在一个required参数可以设置注入是否必须,当然这个参数对于java8我们可以用以下方式实现
public class SimpleMovieLister {

    @Autowired
    public void setMovieFinder(Optional<MovieFinder> movieFinder) {
        ...
    }
}
当然对于spring5.0以上我们还可以使用JSR-305的注释实现上面的功能
public class SimpleMovieLister {

    @Autowired
    public void setMovieFinder(@Nullable MovieFinder movieFinder) {
        ...
    }
}
注意@Autowired, @Inject, @Resource, @Value这四个注解是基于Spring BeanPostProcessor实现的,所以我们不能将这些参数应用与自己编写的BeanPostProcessor或者 BeanFactoryPostProcessor中
10.3 @Primary注解
对于多个候选bean的情况我们可以使用@Primary注解来实现对应的功能
@Configuration
public class MovieConfiguration {

    @Bean
    @Primary
    public MovieCatalog firstMovieCatalog() { ... }

    @Bean
    public MovieCatalog secondMovieCatalog() { ... }

    // ...
}
那么在之后注入过程中会优先选择第一个注入
10.4 @Qualifier注解
@Qualifier的用法
1.用在参数上
public class MovieRecommender {

    @Autowired
    @Qualifier("main")
    private MovieCatalog movieCatalog;

    // ...
}
2.用在方法的参数上
public class MovieRecommender {

    private MovieCatalog movieCatalog;

    private CustomerPreferenceDao customerPreferenceDao;

    @Autowired
    public void prepare(@Qualifier("main")MovieCatalog movieCatalog,
            CustomerPreferenceDao customerPreferenceDao) {
        this.movieCatalog = movieCatalog;
        this.customerPreferenceDao = customerPreferenceDao;
    }

    // ...
}
@Qualifier()可以和@Autowired一起使用用于指定想要使用的bean,@Qualifier可以填入特定的参数来指定想要的bean,具体点击
10.5 使用范型实现注入
@Configuration
public class MyConfiguration {

    @Bean
    public StringStore stringStore() {
        return new StringStore();
    }

    @Bean
    public IntegerStore integerStore() {
        return new IntegerStore();
    }
}
@Autowired
private Store<String> s1; // <String> qualifier, injects the stringStore bean

@Autowired
private Store<Integer> s2; // <Integer> qualifier, injects the integerStore bean
实现特定的范型接口那么实际注入的时候可以根据实际的范型实现注入。如果注入的参数是List<Store<Integer>>那么只有实现Store<Integer>的才能注入到该List中
10.6 @Resource
类似与@Autowired,但是默认使用byname执行注入的,也就是说下面代码,他会现根据参数名customerPreferenceDao去匹配对应的dao
public class MovieRecommender {

    @Resource
    private CustomerPreferenceDao customerPreferenceDao;

    public MovieRecommender() {
    }

    // ...
}
10.7 @PostConstruct 和 @PreDestroy
之前有提到过,所以这里不再介绍


 1012
1012


 被折叠的 条评论
为什么被折叠?
被折叠的 条评论
为什么被折叠?
 到【灌水乐园】发言


