1. 简介
NSIS是一款帮助开发者创建Windows安装包的工具,NSIS通过NSIS脚本语言(NSIS Script)来配置安装过程中的信息,通过灵活的脚本方式,NSIS可以实现从最简单的文件拷包制作,到需要读写注册表、配置环境变量、以及网络安装等复杂的安装包制作。
2. NSIS脚本
NSIS脚本是一种简单的脚本语言,这种脚本语言主要面向安装包的制作,可以使用任何一种文本编辑器进行编写。
NSIS脚本中的每一行是一个命令,如果命令行过长,可以使用一个反斜杠’\’转到下一行,这两行在编译过程中会被视为一行处理,例如:
<code class="hljs mizar has-numbering" style="display: block; padding: 0px; color: inherit; box-sizing: border-box; font-family: 'Source Code Pro', monospace;font-size:undefined; white-space: pre; border-radius: 0px; word-wrap: normal; background: transparent;">Messagebox MB_OK  | MB_ICONINFORMATION \
"This <span class="hljs-keyword" style="color: rgb(0, 0, 136); box-sizing: border-box;">is</span> a sample <span class="hljs-keyword" style="color: rgb(0, 0, 136); box-sizing: border-box;">that</span> shows how to use line breaks <span class="hljs-keyword" style="color: rgb(0, 0, 136); box-sizing: border-box;">for</span> larger commands <span class="hljs-keyword" style="color: rgb(0, 0, 136); box-sizing: border-box;">in</span> NSIS scripts"</code><ul class="pre-numbering" style="box-sizing: border-box; position: absolute; width: 50px; top: 0px; left: 0px; margin: 0px; padding: 6px 0px 40px; border-right-width: 1px; border-right-style: solid; border-right-color: rgb(221, 221, 221); list-style: none; text-align: right; background-color: rgb(238, 238, 238);"><li style="box-sizing: border-box; padding: 0px 5px;">1</li><li style="box-sizing: border-box; padding: 0px 5px;">2</li></ul>
当在字符串中添加一个双引号”时,可以使用转义符号 $\”或者使用另外一种引号如`或者 ‘,二者都可以作为字符串的符号。
NSIS脚本文件的后缀是 .nsi, 头文件使用 .nsh后缀,通过头文件和脚本文件可以合理组织脚本语言(例如可以将公用的脚本放在头文件中,并使用 !include 引入)
<code class="hljs ruby has-numbering" style="display: block; padding: 0px; color: inherit; box-sizing: border-box; font-family: 'Source Code Pro', monospace;font-size:undefined; white-space: pre; border-radius: 0px; word-wrap: normal; background: transparent;">!<span class="hljs-keyword" style="color: rgb(0, 0, 136); box-sizing: border-box;">include</span> <span class="hljs-constant" style="box-sizing: border-box;">Sections</span>.nsh</code><ul class="pre-numbering" style="box-sizing: border-box; position: absolute; width: 50px; top: 0px; left: 0px; margin: 0px; padding: 6px 0px 40px; border-right-width: 1px; border-right-style: solid; border-right-color: rgb(221, 221, 221); list-style: none; text-align: right; background-color: rgb(238, 238, 238);"><li style="box-sizing: border-box; padding: 0px 5px;">1</li></ul>
3. NSIS脚本结构
一个NSIS脚本文件包括 安装属性(Installer Attributes)、区段(Sections)和函数(Functions),此外还可以使用编译命令来对编译过程进行控制。
3.1 安装属性
安装属性决定了安装包的行为以及安装包运行的风格和UI等内容。通过修改属性可以配置安装过程中出现的显示信息。
3.2 安装页
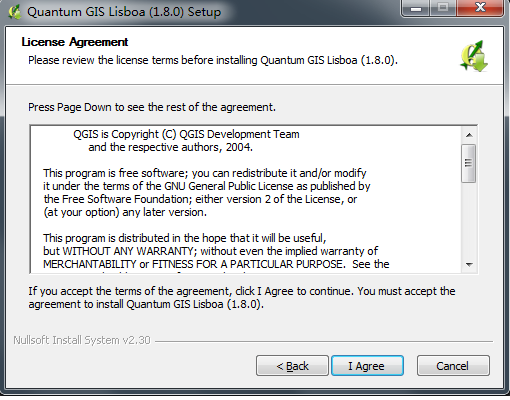
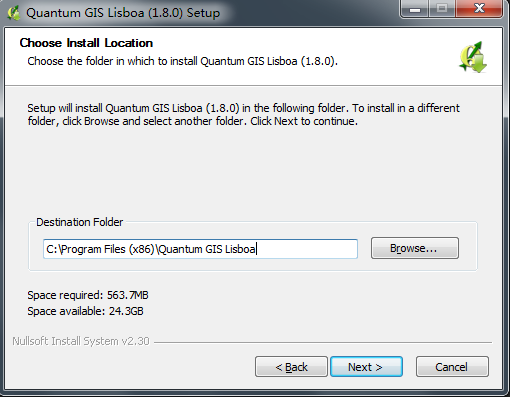
一个非静默安装的安装包一般会包含许多向导页面一步步引导用户完成安装过程,可以通过设置Page命令来显示或者隐藏向导页面,一般来说典型的安装页面包括:
- Page License
- Page components
- Page directory
- Page instfiles
- UnistPage uninstConfirm
- UninstPage instfiles
下面给出几张安装过程的页面:

3.3 区段(Sections)
在我们安装程序的过程中可以选择安装不同的部分,例如在安装Office套件的过程中,可以选择只安装word、excel而不去安装其他软件,当我们勾选安装部分之后,NSIS对应的脚本就会执行,这其中的每一项对应脚本文件中的一个区段。区段的名称会显示在安装选项中,例如上面所说安装Office的脚本类似于下面这种方式:
<code class="hljs r has-numbering" style="display: block; padding: 0px; color: inherit; box-sizing: border-box; font-family: 'Source Code Pro', monospace;font-size:undefined; white-space: pre; border-radius: 0px; word-wrap: normal; background: transparent;">Section <span class="hljs-string" style="color: rgb(0, 136, 0); box-sizing: border-box;">"Microsoft Word"</span>
<span class="hljs-keyword" style="color: rgb(0, 0, 136); box-sizing: border-box;">...</span> 具体的word安装代码
SectionEnd

Section <span class="hljs-string" style="color: rgb(0, 136, 0); box-sizing: border-box;">"Microsoft Excel"</span>
<span class="hljs-keyword" style="color: rgb(0, 0, 136); box-sizing: border-box;">...</span> 具体的excel安装代码
SectionEnd

Section <span class="hljs-string" style="color: rgb(0, 136, 0); box-sizing: border-box;">"Microsoft PowerPoint"</span>
<span class="hljs-keyword" style="color: rgb(0, 0, 136); box-sizing: border-box;">...</span> 具体的powerpoint安装代码
SectionEnd

Section <span class="hljs-string" style="color: rgb(0, 136, 0); box-sizing: border-box;">"Microsoft OneNote"</span>
<span class="hljs-keyword" style="color: rgb(0, 0, 136); box-sizing: border-box;">...</span> 具体的onenote安装代码
SectionEnd
</code><ul class="pre-numbering" style="box-sizing: border-box; position: absolute; width: 50px; top: 0px; left: 0px; margin: 0px; padding: 6px 0px 40px; border-right-width: 1px; border-right-style: solid; border-right-color: rgb(221, 221, 221); list-style: none; text-align: right; background-color: rgb(238, 238, 238);"><li style="box-sizing: border-box; padding: 0px 5px;">1</li><li style="box-sizing: border-box; padding: 0px 5px;">2</li><li style="box-sizing: border-box; padding: 0px 5px;">3</li><li style="box-sizing: border-box; padding: 0px 5px;">4</li><li style="box-sizing: border-box; padding: 0px 5px;">5</li><li style="box-sizing: border-box; padding: 0px 5px;">6</li><li style="box-sizing: border-box; padding: 0px 5px;">7</li><li style="box-sizing: border-box; padding: 0px 5px;">8</li><li style="box-sizing: border-box; padding: 0px 5px;">9</li><li style="box-sizing: border-box; padding: 0px 5px;">10</li><li style="box-sizing: border-box; padding: 0px 5px;">11</li><li style="box-sizing: border-box; padding: 0px 5px;">12</li><li style="box-sizing: border-box; padding: 0px 5px;">13</li><li style="box-sizing: border-box; padding: 0px 5px;">14</li><li style="box-sizing: border-box; padding: 0px 5px;">15</li><li style="box-sizing: border-box; padding: 0px 5px;">16</li></ul>
此外在卸载程序的过程中也会出现区段,区段的名称已un.开头,例如:
<code class="hljs bash has-numbering" style="display: block; padding: 0px; color: inherit; box-sizing: border-box; font-family: 'Source Code Pro', monospace;font-size:undefined; white-space: pre; border-radius: 0px; word-wrap: normal; background: transparent;">Section <span class="hljs-string" style="color: rgb(0, 136, 0); box-sizing: border-box;">"un.Uninstaller Section"</span>
SectionEnd</code><ul class="pre-numbering" style="box-sizing: border-box; position: absolute; width: 50px; top: 0px; left: 0px; margin: 0px; padding: 6px 0px 40px; border-right-width: 1px; border-right-style: solid; border-right-color: rgb(221, 221, 221); list-style: none; text-align: right; background-color: rgb(238, 238, 238);"><li style="box-sizing: border-box; padding: 0px 5px;">1</li><li style="box-sizing: border-box; padding: 0px 5px;">2</li></ul>
区段中使用的代码和安装属性中使用的代码有很大的不同,区段中的代码是在用户计算机上执行的,这些命令主要用来解压文件、读取和写入注册表、创建文件夹、创建快捷方式等。在区段中最重要的一个基本命令是 SetOutPath,用来将文件解压到指定的目录中。
3.4 函数
函数式可供调用的脚本块,函数主要分为两种类型:
- 用户自定义函数
- 回调函数
用户自定义的函数可以在区段或者其他函数中通过Call命令来调用,用户自定义的函数在调用它们的过程中被执行。
回调函数会被安装程序自动调用(在某个事件发生的时候:例如在安装过程开始的时候)回调函数在NSIS脚本中是可选的。经常使用的一个函数式.onInit,这个函数会在安装过程开始的时候被调用,例如可以做一个欢迎的画面:
<code class="hljs mathematica has-numbering" style="display: block; padding: 0px; color: inherit; box-sizing: border-box; font-family: 'Source Code Pro', monospace;font-size:undefined; white-space: pre; border-radius: 0px; word-wrap: normal; background: transparent;"><span class="hljs-keyword" style="color: rgb(0, 0, 136); box-sizing: border-box;">Function</span> .onInit
  MessageBox MB_YESNO <span class="hljs-string" style="color: rgb(0, 136, 0); box-sizing: border-box;">"This will install My Program. Do you wish to continue?"</span> IDYES gogogo
    <span class="hljs-keyword" style="color: rgb(0, 0, 136); box-sizing: border-box;">Abort</span>
  gogogo:
FunctionEnd
</code><ul class="pre-numbering" style="box-sizing: border-box; position: absolute; width: 50px; top: 0px; left: 0px; margin: 0px; padding: 6px 0px 40px; border-right-width: 1px; border-right-style: solid; border-right-color: rgb(221, 221, 221); list-style: none; text-align: right; background-color: rgb(238, 238, 238);"><li style="box-sizing: border-box; padding: 0px 5px;">1</li><li style="box-sizing: border-box; padding: 0px 5px;">2</li><li style="box-sizing: border-box; padding: 0px 5px;">3</li><li style="box-sizing: border-box; padding: 0px 5px;">4</li><li style="box-sizing: border-box; padding: 0px 5px;">5</li><li style="box-sizing: border-box; padding: 0px 5px;">6</li></ul>
3.5 脚本的编写方式
在脚本编写过程中可以使用StrCmp、IntCmp、IfErrors、Goto等来实现条件执行(类似C语言中的if…else)和循环执行(类似C语言中的while),但是可以通过 脚本库中提供的LogicLib来简单的编写代码,要是用LogicLib需要在脚本文件中包含头文件 !include LogicLib.nsh
变量的书写方式:
可以使用Var命令来定义变量,变量都是全局的变量,可以在区段和函数中使用,定义变量的方式如下:
Var BLA ;定义了一个BLA的变量
Section bla
StrCpy $BLA “123” ;使用BLA变量,将它赋值为123
Seciton End
在脚本编写过程中,脚本自身提供一个堆栈,可以通过Push将变量压入堆栈中,使用Pop可以弹出栈顶变量。
另外脚本语言提供了20个已经注册的全局变量,我们可以直接使用而不需要声明,这20个变量类似于(
0和
R0),可以使用堆栈配合这些变量使用,在使用它们之前把它们原来的值压入堆栈,使用之后再恢复它们原来的值,例如下面这个函数:
<code class="hljs avrasm has-numbering" style="display: block; padding: 0px; color: inherit; box-sizing: border-box; font-family: 'Source Code Pro', monospace;font-size:undefined; white-space: pre; border-radius: 0px; word-wrap: normal; background: transparent;">Function bla

  <span class="hljs-keyword" style="color: rgb(0, 0, 136); box-sizing: border-box;">Push</span> $<span class="hljs-built_in" style="color: rgb(102, 0, 102); box-sizing: border-box;">R0</span>
  <span class="hljs-keyword" style="color: rgb(0, 0, 136); box-sizing: border-box;">Push</span> $<span class="hljs-built_in" style="color: rgb(102, 0, 102); box-sizing: border-box;">R1</span>

    ..<span class="hljs-preprocessor" style="color: rgb(68, 68, 68); box-sizing: border-box;">.code</span>...

  <span class="hljs-keyword" style="color: rgb(0, 0, 136); box-sizing: border-box;">Pop</span> $<span class="hljs-built_in" style="color: rgb(102, 0, 102); box-sizing: border-box;">R1</span>
  <span class="hljs-keyword" style="color: rgb(0, 0, 136); box-sizing: border-box;">Pop</span> $<span class="hljs-built_in" style="color: rgb(102, 0, 102); box-sizing: border-box;">R0</span>

FunctionEnd
</code><ul class="pre-numbering" style="box-sizing: border-box; position: absolute; width: 50px; top: 0px; left: 0px; margin: 0px; padding: 6px 0px 40px; border-right-width: 1px; border-right-style: solid; border-right-color: rgb(221, 221, 221); list-style: none; text-align: right; background-color: rgb(238, 238, 238);"><li style="box-sizing: border-box; padding: 0px 5px;">1</li><li style="box-sizing: border-box; padding: 0px 5px;">2</li><li style="box-sizing: border-box; padding: 0px 5px;">3</li><li style="box-sizing: border-box; padding: 0px 5px;">4</li><li style="box-sizing: border-box; padding: 0px 5px;">5</li><li style="box-sizing: border-box; padding: 0px 5px;">6</li><li style="box-sizing: border-box; padding: 0px 5px;">7</li><li style="box-sizing: border-box; padding: 0px 5px;">8</li><li style="box-sizing: border-box; padding: 0px 5px;">9</li><li style="box-sizing: border-box; padding: 0px 5px;">10</li><li style="box-sizing: border-box; padding: 0px 5px;">11</li><li style="box-sizing: border-box; padding: 0px 5px;">12</li></ul>
可以使用MessageBoxes或者DetailPrint来获取脚本中变量的值,从而帮助调试脚本程序。
3.6 脚本的执行
当用户运行安装程序或者卸载程序的时候,定义在脚本文件中的页面区段代码(Sections)会被按定义在脚本中的顺序执行。除此之外如果定义了回调函数,那么在某些时候这些函数会被调用执行。
3.7 编译命令
在编译霍城中可以使用编译命令,编译命令中另一个常用的部分是宏(Macros),宏定义了一系列的执行动作,可以在脚本的其他地方调用,当编译脚本时这些宏被执行。
FROM: http://blog.csdn.net/csxiaoshui/article/details/45310135


 1027
1027


 被折叠的 条评论
为什么被折叠?
被折叠的 条评论
为什么被折叠?
 到【灌水乐园】发言


