


博客搬家啦——为了更好地经营博客,本人已经将博客迁移至www.ijavaboy.com。这里已经不再更新,给您带来的不便,深感抱歉!这篇文章的新地址:点击我
前一篇中,演示了如何开发一个Widget以及如何开发一个WidgetHost应用。有了这个基础,我们就知道,要想在桌面上添加Widget,那么需要完成两件事情:
1、将桌面应用实现为一个WidgetHost应用
2、CellLayout需要为每个添加的Widget分配足够大小的空间
但是,为了添加到桌面上的widget能够和application们一样,那就应该具备如下的功能:
3、Widget可以拖动
4、Widget能够在多屏幕之间滑动
5、widget能够从桌面移除
对于第一个问题,上一篇中已经介绍了,就是在应用中加几段代码就可以解决了。关键问题是第二个,前面我们面临的都是最小的只占一个单元格大小的Application和Shortcut。可是,现在面临的是Widget,其最明显的特征就是大小不一。第三个问题,拖动的功能交给了DragLayer负责,它屏蔽了桌面上具体被拖动的item是Application还是Widget,它只知道当前需要拖动的是一个ItemInfo(所有item的祖宗)。所以,这个基本不用添加任何代码就可以实现的;第四个问题,和第三个问题是同一个性质。第五个问题,也不用添加任何代码,其职责是由DragLayer和DeleteZone负责的,不涉及到Widget和Application的异处。
所以,接下来我们的核心就是解决第二个问题:CellLayout需要为每个添加的Widget分配足够大小的空间。
解决这个问题之前我们还是看一下类似添加Widget时候的流程。
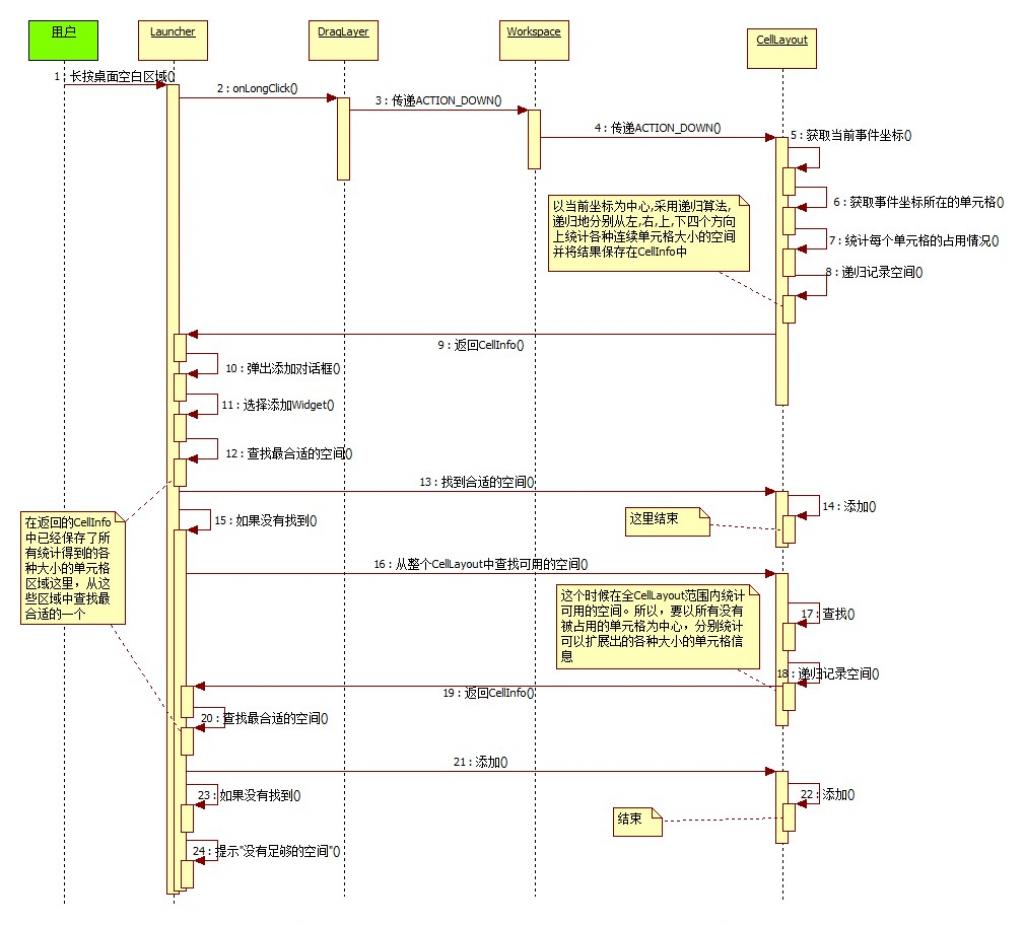
在这个流程中,我们看到其中向桌面添加一个Widget时,首先以当前用户长按的坐标点为中心向四周不断寻找各种大小的连续空间并记录,如果找到了,很好直接选择最合适的一个并添加。如果没有找到,则在整个CellLayout中寻找可以容纳的空间,如果找到,同样的选择一个最合适的。如果还没有找到,则提示用户,该屏幕已经没有足够大的空间来容纳。
有了上面的分析,下面我们按照上图的路线来分析,Launcher具体是如何完成每一个步的。
用户长按桌面的时候,MOTION_DOWN事件传递到了CellLayout,在CellLayout的onInterceptTouchEvent方法中进行了判断,判断当前长按的是否为空白区域,如果是,则将当前坐标转换为当前单元格,然后重新计算整个CellLayout中所有单元格的占用情况。这部分代码如下:
- if(!found){
- /**
- * 如果点击的位置是空白区域,则也需要保存当前的位置信息
- * 点击空白区域的时候,是需要做更多的处理,在外层弹出对话框添加应用,文件夹,快捷方式等,然后在桌面该
- * 位置处创建图标
- */
- int cellXY[] = mCellXY;
- pointToCellExact(x,y,cellXY); //得到当前事件所在的单元格
- Log.v(TAG, "Not Found the cellXY is =["+cellXY[0]+","+cellXY[1]+"]");
- //然后保存当前位置信息
- cellInfo.view = null;
- cellInfo.cellX = cellXY[0];
- cellInfo.cellY = cellXY[1];
- cellInfo.cellHSpan = 1;
- cellInfo.cellVSpan = 1;
- //这里需要计算哪些单元格被占用了
- final int xCount = mPortrait?mSortCells:mLongCells;
- final int yCount = mPortrait?mLongCells:mSortCells;
- final boolean[][] occupied = mOccupied;
- findOccupiedCells(xCount, yCount, occupied);
- //判断当前位置是否有效,这里不用再判断cellXY是否越界,因为在pointToCellExact已经进行了处理
- cellInfo.valid = !occupied[cellXY[0]][cellXY[1]];
- //这里其实我们需要以当前的cellInfo表示的单元格为中心,向四周递归开辟连续的最大空间
- //但是,这里还并不需要,只有当getTag()方法被调用的时候,才说明需要一块区域去放一个View
- //所以,将这个开辟的方法放在getTag()中调用
- //这里标记一下
- mTagFlag = true;
- }
- //将位置信息保存在CellLayout的tag中
- setTag(cellInfo);
			if(!found){
				/**
				 * 如果点击的位置是空白区域,则也需要保存当前的位置信息
				 * 点击空白区域的时候,是需要做更多的处理,在外层弹出对话框添加应用,文件夹,快捷方式等,然后在桌面该
				 * 位置处创建图标
				 */
				int cellXY[] = mCellXY;
				pointToCellExact(x,y,cellXY); //得到当前事件所在的单元格
				Log.v(TAG, "Not Found the cellXY is =["+cellXY[0]+","+cellXY[1]+"]");
				//然后保存当前位置信息
				cellInfo.view = null;
				cellInfo.cellX = cellXY[0];
				cellInfo.cellY = cellXY[1];
				cellInfo.cellHSpan = 1;
				cellInfo.cellVSpan = 1;

				//这里需要计算哪些单元格被占用了
				final int xCount = mPortrait?mSortCells:mLongCells;
				final int yCount = mPortrait?mLongCells:mSortCells;
				final boolean[][] occupied = mOccupied;

				findOccupiedCells(xCount, yCount, occupied);

				//判断当前位置是否有效,这里不用再判断cellXY是否越界,因为在pointToCellExact已经进行了处理
				cellInfo.valid = !occupied[cellXY[0]][cellXY[1]];

				//这里其实我们需要以当前的cellInfo表示的单元格为中心,向四周递归开辟连续的最大空间
				//但是,这里还并不需要,只有当getTag()方法被调用的时候,才说明需要一块区域去放一个View
				//所以,将这个开辟的方法放在getTag()中调用
				//这里标记一下
				mTagFlag = true;
			}

			//将位置信息保存在CellLayout的tag中
			setTag(cellInfo);
这里需要注意的是:在这里计算了CellLayout的单元格占用情况,同时,并没有在这个时候,就以当前事件所在单元格为中心向四周探索可用空间,而是将这个过程推迟到了getTag方法中。因为在onInterceptTouchEvent中我们还不需要这个值。当onInterceptTouchEvent返回之后,最后事件进入Launcher的onLongClick中,在这个方法里,我们调用了CellLayout的getTag方法:
- @Override
- public boolean onLongClick(View v) {
- //ActivityUtils.alert(getApplication(), "长按");
- if(!(v instanceof UorderCellLayout)){
- v = (View)v.getParent(); //如果当前点击的是item,得到其父控件,即UorderCellLayout
- }
- CellInfo cellInfo = (CellInfo)v.getTag(); //这里获取cellInfo信息
- if(cellInfo == null){
- Log.v(TAG, "CellInfo is null");
- return true;
- }
- //Log.v(TAG, ""+cellInfo.toString());
- /**
- * 注意,我们在CellLayout中获取当前位置信息的时候,就一并判断了当前位置上是否是item,如果是,则将
- * item保存在cellinfo.view中
- */
- if(cellInfo.view == null){
- //说明是空白区域
- Log.v(TAG, "onLongClick,cellInfo.valid:"+cellInfo.valid);
- if(cellInfo.valid){
- //如果是有效的区域
- addCellInfo = cellInfo;
- showPasswordDialog(REQUEST_CODE_SETUP, null);
- }
- }else{
- //处理拖拽
- mWorkspace.startDrag(cellInfo);
- }
- return true;
- }
	@Override
	public boolean onLongClick(View v) {
		//ActivityUtils.alert(getApplication(), "长按");
		if(!(v instanceof UorderCellLayout)){
			v = (View)v.getParent(); //如果当前点击的是item,得到其父控件,即UorderCellLayout
		}

		CellInfo cellInfo = (CellInfo)v.getTag(); //这里获取cellInfo信息

		if(cellInfo == null){
			Log.v(TAG, "CellInfo is null");
			return true;
		}

		//Log.v(TAG, ""+cellInfo.toString());
		/**
		 * 注意,我们在CellLayout中获取当前位置信息的时候,就一并判断了当前位置上是否是item,如果是,则将
		 * item保存在cellinfo.view中
		 */
		if(cellInfo.view == null){
			//说明是空白区域
			Log.v(TAG, "onLongClick,cellInfo.valid:"+cellInfo.valid);
			if(cellInfo.valid){
				//如果是有效的区域
				addCellInfo = cellInfo;
				showPasswordDialog(REQUEST_CODE_SETUP, null);
			}
		}else{
			//处理拖拽
			mWorkspace.startDrag(cellInfo);
		}
		return true;
	}
- public CellInfo getTag(){
- CellInfo info = (CellInfo)super.getTag();
- if(info.valid && mTagFlag){
- //这里就向四周扩展出一个尽可能大的连续区域
- //这里需要计算哪些单元格被占用了
- final int xCount = mPortrait?mSortCells:mLongCells;
- final int yCount = mPortrait?mLongCells:mSortCells;
- final boolean[][] occupied = mOccupied;
- findOccupiedCells(xCount, yCount, occupied);
- Log.e(TAG, "getTag中--:xCount:"+xCount+"yCount:"+yCount+",occupied:"+occupied.length);
- //以当前位置为中心向四周扩张大小
- findVacantCells(info, info.cellX, info.cellY, xCount, yCount, occupied);
- }
- return info;
- }
	public CellInfo getTag(){
		CellInfo info = (CellInfo)super.getTag();
		if(info.valid && mTagFlag){
			//这里就向四周扩展出一个尽可能大的连续区域
			//这里需要计算哪些单元格被占用了
			final int xCount = mPortrait?mSortCells:mLongCells;
			final int yCount = mPortrait?mLongCells:mSortCells;
			final boolean[][] occupied = mOccupied;
			findOccupiedCells(xCount, yCount, occupied);
			Log.e(TAG, "getTag中--:xCount:"+xCount+"yCount:"+yCount+",occupied:"+occupied.length);
			//以当前位置为中心向四周扩张大小
			findVacantCells(info, info.cellX, info.cellY, xCount, yCount, occupied);

		}

		return info;
	}
在getTag方法里面,我们调用了findVacantCells这个方法,这个方法就是以当前cellX和cellY指定的单元格为中心,不断向左,右,上,下,四个方向探索可用的连续空间。代码如下:
- public void findVacantCells(CellInfo info, int xCenter, int yCenter, int xCount, int yCount,
- boolean[][] occupied) {
- //首先需要释放掉info中维持的VacantCell
- info.clear();
- if(occupied[xCenter][yCenter]){
- //如果中心单元格被占用了,则直接返回
- return;
- }
- info.current.set(xCenter, yCenter, xCenter, yCenter);
- //以current为中心递归
- //findVacantCellsRecursive(info, info.current, xCount, yCount, occupied);
- findVacantCellsNonRecursive(info, info.current, xCount, yCount, occupied);
- }
	public void findVacantCells(CellInfo info, int xCenter, int yCenter, int xCount, int yCount,
			boolean[][] occupied) {
		//首先需要释放掉info中维持的VacantCell
		info.clear();

		if(occupied[xCenter][yCenter]){
			//如果中心单元格被占用了,则直接返回
			return;
		}

		info.current.set(xCenter, yCenter, xCenter, yCenter);

		//以current为中心递归
		//findVacantCellsRecursive(info, info.current, xCount, yCount, occupied);
		findVacantCellsNonRecursive(info, info.current, xCount, yCount, occupied);
	}
这个方法主要完成探索前的准备工作,真正完成探索的是findVacantCellsNonRecursive和findVacantCellsRecursive。这两个方法完成同样的功能。后者是系统实现的采用递归实现的;前者是本人实现的非递归方法;因为递归的方式对于系统Launcher中采用的4*4工作良好,但是,针对我需要在平板等大屏幕上,也许CellLayout是8*8等规格,导致的后果是性能及其低下并可能导致内存溢出。所以,用非递归的方式予以取代。我们首先看看递归的方式:
- public void findVacantCellsRecursive(CellInfo info, Rect current,
- int xCount, int yCount, boolean[][] occupied) {
- addVacantCell(current, info);
- if (current.left > 0) {
- if (isColumnEmpty(current.left - 1, current.top, current.bottom, occupied)) {
- current.left--;
- findVacantCellsRecursive(info, current, xCount, yCount, occupied);
- current.left++;
- }
- }
- if (current.right < xCount - 1) {
- if (isColumnEmpty(current.right + 1, current.top, current.bottom, occupied)) {
- current.right++;
- findVacantCellsRecursive(info, current, xCount, yCount, occupied);
- current.right--;
- }
- }
- if (current.top > 0) {
- if (isRowEmpty(current.top - 1, current.left, current.right, occupied)) {
- current.top--;
- findVacantCellsRecursive(info, current, xCount, yCount, occupied);
- current.top++;
- }
- }
- if (current.bottom < yCount - 1) {
- if (isRowEmpty(current.bottom + 1, current.left, current.right, occupied)) {
- current.bottom++;
- findVacantCellsRecursive(info, current, xCount, yCount, occupied);
- current.bottom--;
- }
- }
- }
	public void findVacantCellsRecursive(CellInfo info, Rect current,
			int xCount, int yCount, boolean[][] occupied) {

		addVacantCell(current, info);

        if (current.left > 0) {
            if (isColumnEmpty(current.left - 1, current.top, current.bottom, occupied)) {
                current.left--;
                findVacantCellsRecursive(info, current, xCount, yCount, occupied);
                current.left++;
            }
        }

        if (current.right < xCount - 1) {
            if (isColumnEmpty(current.right + 1, current.top, current.bottom, occupied)) {
                current.right++;
                findVacantCellsRecursive(info, current, xCount, yCount, occupied);
                current.right--;
            }
        }

        if (current.top > 0) {
            if (isRowEmpty(current.top - 1, current.left, current.right, occupied)) {
                current.top--;
                findVacantCellsRecursive(info, current, xCount, yCount, occupied);
                current.top++;
            }
        }

        if (current.bottom < yCount - 1) {
            if (isRowEmpty(current.bottom + 1, current.left, current.right, occupied)) {
                current.bottom++;
                findVacantCellsRecursive(info, current, xCount, yCount, occupied);
                current.bottom--;
            }
        }

	}
再来看看非递归的方式,本人算法不精,马马虎虎实现了非递归,仅供参考:
- public void findVacantCellsNonRecursive(CellInfo cellInfo, Rect current, int xCount
- ,int yCount,boolean[][] occupied){
- ArrayList<Rect> rectStack = new ArrayList<Rect>();
- rectStack.add(current);
- int centerLeft = current.left;
- //int centerRight = current.right;
- addVacantCell(current, cellInfo);
- /**
- * 向左向右扩展的时候需要入栈
- */
- //向左扩展,进栈
- while(isLeftEmpty(current, occupied)){
- current.left--;
- rectStack.add(0, new Rect(current)); //进栈
- addVacantCell(current, cellInfo);
- }
- int realLeft = current.left;
- //向右扩展
- current.left = centerLeft; //复原
- while(isRightEmpty(current, occupied, xCount)){
- current.right++;
- rectStack.add(0, new Rect(current));
- addVacantCell(current, cellInfo);
- //同时,需要将左边扩展的包含进来
- for(int left = centerLeft; left>=realLeft; left--){
- Rect rect = new Rect(left,current.top, current.right, current.bottom);
- rectStack.add(0, rect);
- addVacantCell(rect, cellInfo);
- }
- }
- int centerTop = current.top;
- /**
- * 向上向下扩展的时候需要出栈
- */
- while(rectStack.size()>0){
- //出栈
- current.set(rectStack.remove(0));
- //向上
- while(isTopEmpty(current, occupied)){
- current.top--;
- addVacantCell(current, cellInfo);
- }
- int realTop = current.top;
- //向下,
- current.top = centerTop;
- while(isBottomEmpty(current, occupied, yCount)){
- current.bottom++;
- addVacantCell(current, cellInfo);
- for(int top = centerTop; top >= realTop; top--){
- Rect rect = new Rect(current.left, top, current.right, current.bottom);
- addVacantCell(rect, cellInfo);
- }
- }
- }
- }
	public void findVacantCellsNonRecursive(CellInfo cellInfo, Rect current, int xCount
			,int yCount,boolean[][] occupied){
		ArrayList<Rect> rectStack = new ArrayList<Rect>();
		rectStack.add(current);
		int centerLeft = current.left;
		//int centerRight = current.right;
		addVacantCell(current, cellInfo);
		/**
		 * 向左向右扩展的时候需要入栈
		 */

		//向左扩展,进栈
		while(isLeftEmpty(current, occupied)){
			current.left--;
			rectStack.add(0, new Rect(current)); //进栈

			addVacantCell(current, cellInfo);
		}

		int realLeft = current.left;
		//向右扩展
		current.left = centerLeft; //复原
		while(isRightEmpty(current, occupied, xCount)){
			current.right++;
			rectStack.add(0, new Rect(current));
			addVacantCell(current, cellInfo);

			//同时,需要将左边扩展的包含进来
			for(int left = centerLeft; left>=realLeft; left--){
				Rect rect = new Rect(left,current.top, current.right, current.bottom);
				rectStack.add(0, rect);
				addVacantCell(rect, cellInfo);
			}
		}

		int centerTop = current.top;
		/**
		 * 向上向下扩展的时候需要出栈
		 */
		while(rectStack.size()>0){
			//出栈
			current.set(rectStack.remove(0));

			//向上
			while(isTopEmpty(current, occupied)){
				current.top--;
				addVacantCell(current, cellInfo);
			}

			int realTop = current.top;

			//向下,
			current.top = centerTop;
			while(isBottomEmpty(current, occupied, yCount)){
				current.bottom++;
				addVacantCell(current, cellInfo);

				for(int top = centerTop; top >= realTop; top--){
					Rect rect = new Rect(current.left, top, current.right, current.bottom);
					addVacantCell(rect, cellInfo);

				}
			}
		}


	}
这两个方法中都调用了addVacantCell(current, cellInfo);这个方法就是记录当前探索的连续区域,保存进cellInfo中。代码如下:
- private static void addVacantCell(Rect current, CellInfo cellInfo) {
- CellInfo.VacantCell cell = CellInfo.VacantCell.acquire();
- cell.cellX = current.left;
- cell.cellY = current.top;
- cell.cellHSpan = current.right - current.left + 1;
- cell.cellVSpan = current.bottom - current.top + 1;
- cellInfo.vacantCells.add(cell);
- }
    private static void addVacantCell(Rect current, CellInfo cellInfo) {
        CellInfo.VacantCell cell = CellInfo.VacantCell.acquire();

        cell.cellX = current.left;
        cell.cellY = current.top;
        cell.cellHSpan = current.right - current.left + 1;
        cell.cellVSpan = current.bottom - current.top + 1;

        cellInfo.vacantCells.add(cell);
    }
也许看到这里还是云里雾里,不晓得到底记录的到底是什么样的连续区域,下面对探索的一个递归过程进行一个简单的说明:

如上图,在这个桌面上,假设在中间的空白位置还剩四个单元格,我现在长按黄色标注的0位置。经过事件坐标到单元格的转换,我们知道了当前添加Widget的位置是在0号单元格,那么是如何以0单元格向四周探索空间的呢?以及保存哪些信息呢?
1、记录当前单元格,CellInfo保存0号单元格信息
2、首先向左方向—>判断3号单元格是空的,没有占用—>保存当前连续区域,注意,当前连续区域是0号单元格和3号单元格组成的-->继续向左-->左边单元格已经被MySpace占用了,向左结束探索
3、向右探索-->右边已经被Folder占用,停止右边探索
4、在当前连续区域(0,3)的基础上,向上探索-->判定1和2号单元格都是空,加入CellInfo中,此时连续空间变为[0,3,1,2];-->继续向上探索-->被占用了,停止向上探索
5、在当前连续区域[0,3,1,2]的基础上,向下探索,被占用了,停止向下探索,一次递归结束,返回上一层递归。
最终CellInfo中记录的连续区域是:[0],[0,3],[0,3,1,2],[0,1]。看到所有的连续区域肯定包含当前事件所在的单元格,也就是探索的中心单元格。也就是,以0单元格为中心的当前可用的各种大小的连续空间是[0],[0,3],[0,3,1,2],[0,1]
好了,这样在CellInfo中保存了当前可用的各种大小的空间,我们就可以很容易的判断我们的Widget是否有容身之地。在Launcher的onLongClick中我们getTag之后,就弹出了添加对话框,这些信息和添加Application是一样的,这里就带过了。如何调用系统自带选择Widget应用,在前一篇中已经介绍了,这里也不再介绍。
当我们选择了要添加的Widget之后,我们要做的是什么呢?根据前面的时序图看到,这个时候应该
1、 获取当前选择的Widget的大小信息
2、 将其大小信息转换为需要占用的单元格区域大小
3、 将当前Widget的大小和CellInfo中保存的各种大小进行比较,找到一个最合适的
4、 如果没有找到,则再在整个CellLayout中寻找所有大小的连续空间
5、 将当前Widget的大小和刚刚获取的所有大小的连续空间进行比较,找到最合适的一个
6、 如果没有找到,提示没有足够可用的空间
在Launcher中,获取Widget的大小信息,判断,并添加到桌面的代码如下:
- /**
- * 真正的创建一个Widget,将其添加到桌面上
- * @param data
- */
- private void createWidget(Intent data) {
- int widgetId = data.getIntExtra(AppWidgetManager.EXTRA_APPWIDGET_ID, -1);
- AppWidgetProviderInfo appWidget = mWidgetMananger.getAppWidgetInfo(widgetId);
- //计算当前widget所占据的单元格信息
- UorderCellLayout group = (UorderCellLayout)mWorkspace.getChildAt(addCellInfo.screen);
- int[] spans = group.computeOccupiedSpans(appWidget.minWidth, appWidget.minHeight);
- Log.e(TAG, "当前widget占据单元格:"+spans[0]+","+spans[1]);
- //这里需要在当前CellLayout中判断这个大小的区域能否满足,即是否有足够的空间来容纳
- int[] startCells = new int[2];
- if(!hasEnoughSpace(addCellInfo, spans[0], spans[1], startCells)){
- ActivityUtils.alert(getApplication(), "该桌面已经没有足够的空间");
- return;
- //如果有足够的空间,startCells保存了当前区域的起始单元格
- }
- Log.e(TAG, "添加widget-->startCells:"+startCells[0]+","+startCells[1]);
- //保存到数据库
- WidgetInfo widget = new WidgetInfo(widgetId);
- widget.screen = mWorkspace.getCurrentScreen();
- widget.cellX = startCells[0];
- widget.cellY = startCells[1];
- widget.spanX = spans[0];
- widget.spanY = spans[1];
- UorderDBUtils.saveItemInDB(this, widget);
- //根据AppWidgetProviderInfo创建HostView
- widget.hostView = mWidgetHost.createView(this, widgetId, appWidget);
- widget.hostView.setAppWidget(widgetId, appWidget);
- widget.hostView.setTag(widget);
- //添加到桌面
- mWorkspace.addInScreen(widget.hostView, mWorkspace.getCurrentScreen(), startCells[0], startCells[1], spans[0], spans[1], false);
- }
	/**
	 * 真正的创建一个Widget,将其添加到桌面上
	 * @param data
	 */
	private void createWidget(Intent data) {
		int widgetId = data.getIntExtra(AppWidgetManager.EXTRA_APPWIDGET_ID, -1);
		AppWidgetProviderInfo appWidget = mWidgetMananger.getAppWidgetInfo(widgetId);

		//计算当前widget所占据的单元格信息
		UorderCellLayout group = (UorderCellLayout)mWorkspace.getChildAt(addCellInfo.screen);
		int[] spans = group.computeOccupiedSpans(appWidget.minWidth, appWidget.minHeight);

		Log.e(TAG, "当前widget占据单元格:"+spans[0]+","+spans[1]);
		//这里需要在当前CellLayout中判断这个大小的区域能否满足,即是否有足够的空间来容纳
		int[] startCells = new int[2];

		if(!hasEnoughSpace(addCellInfo, spans[0], spans[1], startCells)){

			ActivityUtils.alert(getApplication(), "该桌面已经没有足够的空间");
			return;

			//如果有足够的空间,startCells保存了当前区域的起始单元格
		}

		Log.e(TAG, "添加widget-->startCells:"+startCells[0]+","+startCells[1]);
		//保存到数据库
		WidgetInfo widget = new WidgetInfo(widgetId);
		widget.screen = mWorkspace.getCurrentScreen();
		widget.cellX = startCells[0];
		widget.cellY = startCells[1];
		widget.spanX = spans[0];
		widget.spanY = spans[1];

		UorderDBUtils.saveItemInDB(this, widget);

		//根据AppWidgetProviderInfo创建HostView
		widget.hostView = mWidgetHost.createView(this, widgetId, appWidget);
		widget.hostView.setAppWidget(widgetId, appWidget);
		widget.hostView.setTag(widget);

		//添加到桌面
		mWorkspace.addInScreen(widget.hostView, mWorkspace.getCurrentScreen(), startCells[0], startCells[1], spans[0], spans[1], false);


	}
其中hasEnoughSpace就是为了比较当前Widget大小能否放置在桌面上的:
- private boolean hasEnoughSpace(CellInfo info, int spanX, int spanY, int[] startCells) {
- /**
- * 由于长按的时候调用CellLayout的getTag方法了
- * 在这个方法中调用的findVacantCells,填充了cellinfo的vacantCell,所以,这里可以
- * 直接先判断以当前长按的时候的位置向四周扩展,看能否找到一个合适的位置
- * 如果可以找到,返回真
- * 如果找不到,再从整个CellLayout中寻找可以容纳的区域
- */
- info.print();
- if(!info.findCellForSpan(startCells, spanX, spanY)){
- //找不到,从整个CellLayout来寻找一个
- UorderCellLayout group = mWorkspace.getCurrentCellLayout();
- //调用这个方法,就填充了info的vacantCells
- info = group.findAllVacantCells();
- if(!info.findCellForSpan(startCells, spanX, spanY)){
- //如果整个屏幕上都没有足够大的区域了,则直接返回false
- return false;
- }
- }
- return true;
- }
	private boolean hasEnoughSpace(CellInfo info, int spanX, int spanY, int[] startCells) {
		/**
		 * 由于长按的时候调用CellLayout的getTag方法了
		 * 在这个方法中调用的findVacantCells,填充了cellinfo的vacantCell,所以,这里可以
		 * 直接先判断以当前长按的时候的位置向四周扩展,看能否找到一个合适的位置
		 * 如果可以找到,返回真
		 * 如果找不到,再从整个CellLayout中寻找可以容纳的区域
		 */
		info.print();
		if(!info.findCellForSpan(startCells, spanX, spanY)){
			//找不到,从整个CellLayout来寻找一个
			UorderCellLayout group = mWorkspace.getCurrentCellLayout();
			//调用这个方法,就填充了info的vacantCells
			info = group.findAllVacantCells();
			if(!info.findCellForSpan(startCells, spanX, spanY)){
				//如果整个屏幕上都没有足够大的区域了,则直接返回false
				return false;
			}
		}

		return true;
	}
其中,首先从CellInfo已经保存的各种大小的单元格中寻找。注意,在getTag方法中,我们是以当前事件所在单元格为中心寻找的,所以,这里第一次调用CellInfo.findCellForSpan的时候,CellInfo中保存的是以当前事件发生的位置为中心的,如果没有找到合适的,则在整个CellLayout中寻找。
- public boolean findCellForSpan(int[] cellXY, int spanX, int spanY){
- //调用这个方法之前确保vacantCells已经有值了
- if(this.vacantCells == null || this.vacantCells.size()==0)return false;
- //@1:如果当前cellinfo保存的大小,应该是一个单元格的span,则不用找了
- //就用当前位置的这个
- if(this.cellHSpan >= spanX && this.cellVSpan >= spanY){
- cellXY[0] = this.cellX;
- cellXY[1] = this.cellY;
- return true;
- }
- final List<VacantCell> cells = this.vacantCells;
- final int count = cells.size();
- //@2:首先寻找大小正好合适的区域
- for(int i=0; i<count; i++){
- VacantCell cell = cells.get(i);
- if(cell.cellHSpan==spanX && cell.cellVSpan==spanY){
- cellXY[0] = cell.cellX;
- cellXY[1] = cell.cellY;
- this.clear(); //成功发现区域后,要将当前cellInfo的vacantCells清理掉
- return true;
- }
- }
- //@3:发现较大的一个
- for(int i=0; i<count; i++){
- VacantCell cell = cells.get(i);
- if(cell.cellHSpan >= spanX && cell.cellVSpan >= spanY){
- cellXY[0] = cell.cellX;
- cellXY[1] = cell.cellY;
- this.clear(); //成功发现区域后,要将当前cellInfo的vacantCells清理掉
- return true;
- }
- }
- return false;
- }
		public boolean findCellForSpan(int[] cellXY, int spanX, int spanY){
			//调用这个方法之前确保vacantCells已经有值了
			if(this.vacantCells == null || this.vacantCells.size()==0)return false;

			//@1:如果当前cellinfo保存的大小,应该是一个单元格的span,则不用找了
			//就用当前位置的这个
			if(this.cellHSpan >= spanX && this.cellVSpan >= spanY){
				cellXY[0] = this.cellX;
				cellXY[1] = this.cellY;
				return true;
			}


			final List<VacantCell> cells = this.vacantCells;
			final int count = cells.size();

			//@2:首先寻找大小正好合适的区域
			for(int i=0; i<count; i++){
				VacantCell cell = cells.get(i);
				if(cell.cellHSpan==spanX && cell.cellVSpan==spanY){
					cellXY[0] = cell.cellX;
					cellXY[1] = cell.cellY;
					this.clear(); //成功发现区域后,要将当前cellInfo的vacantCells清理掉
					return true;
				}
			}

			//@3:发现较大的一个
			for(int i=0; i<count; i++){
				VacantCell cell = cells.get(i);
				if(cell.cellHSpan >= spanX && cell.cellVSpan >= spanY){
					cellXY[0] = cell.cellX;
					cellXY[1] = cell.cellY;
					this.clear(); //成功发现区域后,要将当前cellInfo的vacantCells清理掉
					return true;
				}
			}

			return false;
		}
完成这一切,Widget就可以完美地添加到桌面上了,除了一些细节,整个添加Widget的大致过程就是这样。
但是,添加实现了,当你试图长按你的Widget试图拖拽的时候,你会发现有的Widget可以拖拽,有的则不行。这个主要是,如果Widget并没有可以获取焦点的控件就可以被拖拽,但是对于有焦点的,比如系统时钟小部件,你一长按它就会进入时钟的设置界面,对于这种情况,我们就需要重写AppWidgetHostView控件,在其中处理Widget的长按。同时,重写AppWidgetHost,使得创建的AppWidgetHostView是我们自定义的,而不是系统的。这两个类比较简单,这里不再粘贴代码,可以直接参考Launcher的LauncherAppWidgetHostView和LauncherAppWidgetHost两个类。
到此,我们的桌面上也可以完美的容纳各种大小的小部件了,同时,我们也对系统Launcher的递归处理方式进行了转换,运用了非递归的方式,这样当需要调整CellLayout的单元格数目的时候,不至于出现性能问题。
后话:
我们的Launcher现在和系统的Launcher功能上相差无几了。但是还有很多内容和细节,我们还没有考虑到。这些在系统Launcher中都做了很好的处理。比如,某些时刻状态的保存,异常情况发生时候,Launcher的稳定等等。但是,这些都是在不断调试,完善中完成的。虽然桌面看似简单,但是Launcher是个比较复杂的应用,完美的实现需要优秀的人才和时间。这一系列分析文章仅仅是本人为了研究Launcher而模拟了其从无到有的开发过程,真正需要Launcher应用的,可以在系统Launcher基础上进行一定的修改和扩展,而没有必要完全的从头开始。但是,修改和扩展的前提是对Launcher要有个既全面又深刻的研究。
至此,这一系列的分析就结束了。元旦快到了,希望新的一年里,圆我一个梦想...


 172
172


 被折叠的 条评论
为什么被折叠?
被折叠的 条评论
为什么被折叠?
 到【灌水乐园】发言


