


一:下载编译
编译出来的镜像位于 bin 目录下面
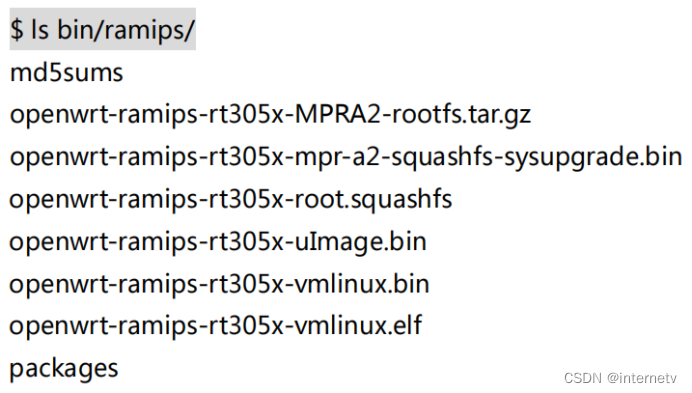
其中 openwrt-ramips-rt305x-mpr-a2-squashfs-sysupgrade.bin 这个就是我们要的镜像。烧写到板子上面即可启动。这样最简单的 OpenWrt 就可以启动了。
二:设置开发板的IP地址
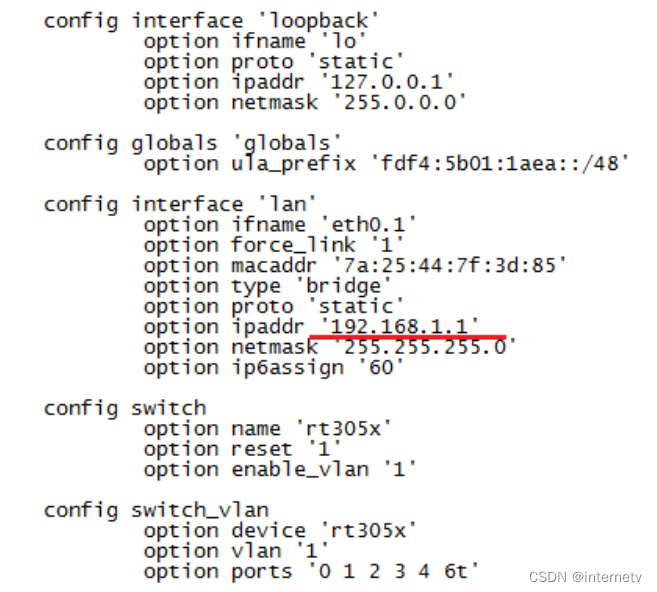
开发板中设置IP地址
在开发板上面,通过修改/etc/config 目录下的 network 配置文件,可以达到目的,首先输入一些命令
# cd /
# vi etc/config/network
在源码中设置IP地址
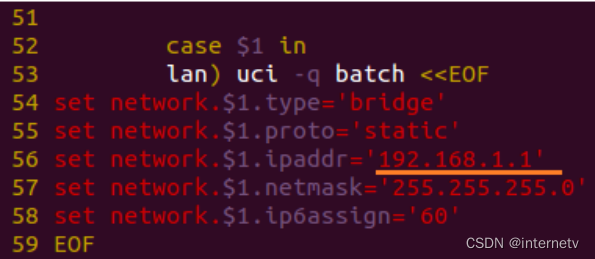
如果大家对OpenWrt系统的启动流程有一定的了解的话,我们就知道,系统在启动的时候,会通过运行uci-defaults.sh这个脚本程序来设置IP等基本参数。该脚本文件位于系统源码的openwrt/trunk/,package/base-files,/files/lib./unctions目录下,那么接下来我们就来修改该脚本文件,从而修改IP地址。
(注意:新版本的openwrt修改IP的地方在:openwrt/trunk/package/base-file/files/bin/目录下的config._generate文件)
首先打开配置文件
# cd openwrt/trunk/package/base-files/files/lib/functions
# vim uci-defaults.sh
新版本命令如下
# cd openwrt/trunk/package/base-file/files/bin/
# vim config_generate
三 WAN 与 LAN 的切换
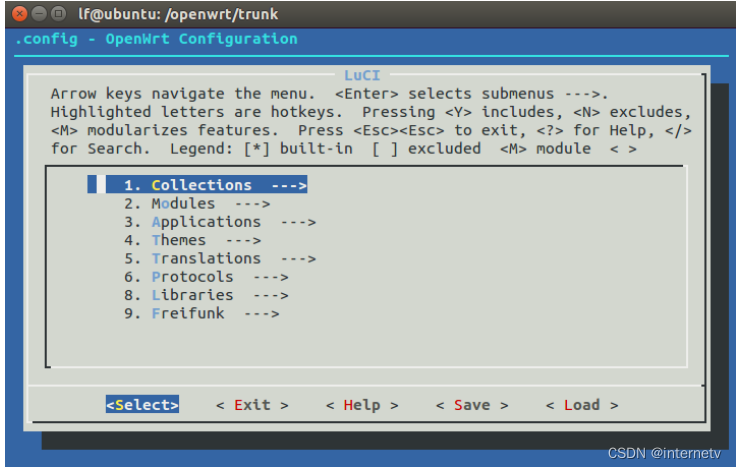
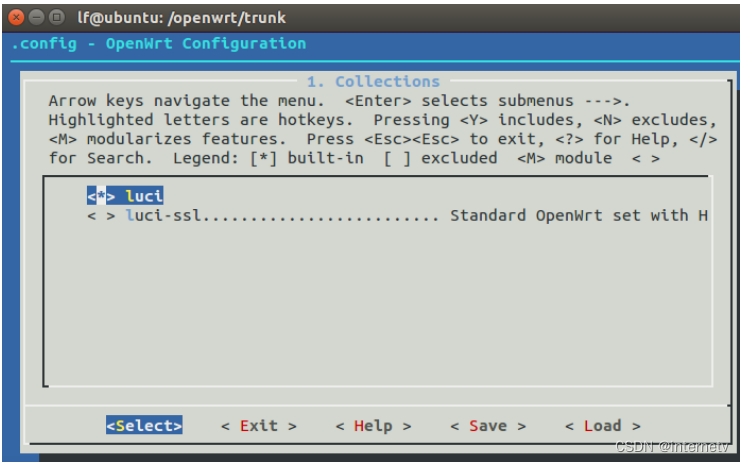
四 为 OpenWrt 配置支持 Web 界面
五 开发板做无线接入点、做站点、做中继器
六 开发板访问虚拟机Ubuntu文件
七 添加 OpenWrt 软件包概述
#
# Copyright (C) 2014-2016 OpenWrt.org
#
# This is free software, licensed under the GNU General Public License v2.
# See /LICENSE for more information.
#

include $(TOPDIR)/rules.mk

PKG_NAME:=acl
PKG_VERSION:=2.3.1
PKG_RELEASE:=$(AUTORELEASE)

PKG_SOURCE:=$(PKG_NAME)-$(PKG_VERSION).tar.gz
PKG_SOURCE_URL:=https://git.savannah.nongnu.org/cgit/acl.git/snapshot
PKG_HASH:=8cad1182cc5703c3e8bf7a220fc267f146246f088d1ba5dd72d8b02736deedcc
PKG_MAINTAINER:=Maxim Storchak <m.storchak@gmail.com>
PKG_LICENSE:=LGPL-2.1 GPL-2.0
PKG_LICENSE_FILES:=doc/COPYING doc/COPYING.LGPL

PKG_INSTALL:=1
PKG_FIXUP:=autoreconf

include $(INCLUDE_DIR)/package.mk

define Package/acl/Default
  TITLE:=Access control list (ACL) manipulation
  URL:=https://savannah.nongnu.org/projects/acl
  SUBMENU:=Filesystem
endef

define Package/acl/Default/description
  Access control list support
endef

define Package/acl
$(call Package/acl/Default)
  SECTION:=utils
  CATEGORY:=Utilities
  TITLE+=utils
  DEPENDS:=+libacl
endef

define Package/libacl
$(call Package/acl/Default)
  SECTION:=libs
  CATEGORY:=Libraries
  TITLE+=library
  DEPENDS:=+libattr
endef

define Package/libacl/description
$(call Package/acl/Default/description)
 This package provides libacl
endef

define Package/acl/description
$(call Package/acl/Default/description)
 This package provides ACL manipulation utilities
 - chacl
 - getfacl
 - setfacl
endef

CONFIGURE_ARGS += --enable-static --enable-shared

define Package/acl/install
	$(INSTALL_DIR) $(1)/usr/bin
	$(INSTALL_BIN) $(PKG_INSTALL_DIR)/usr/bin/* $(1)/usr/bin/
endef

define Package/libacl/install
	$(INSTALL_DIR) $(1)/usr/lib
	$(CP) $(PKG_INSTALL_DIR)/usr/lib/*.so* $(1)/usr/lib/
endef

define Build/InstallDev
	mkdir -p $(1)/usr/include
	mkdir -p $(1)/usr/lib/pkgconfig
	$(CP) $(PKG_INSTALL_DIR)/usr/{include,lib} $(1)/usr/
endef

$(eval $(call BuildPackage,acl))
$(eval $(call BuildPackage,libacl))
1). 应用程序编译包定义
2). 内核驱动模块包定义
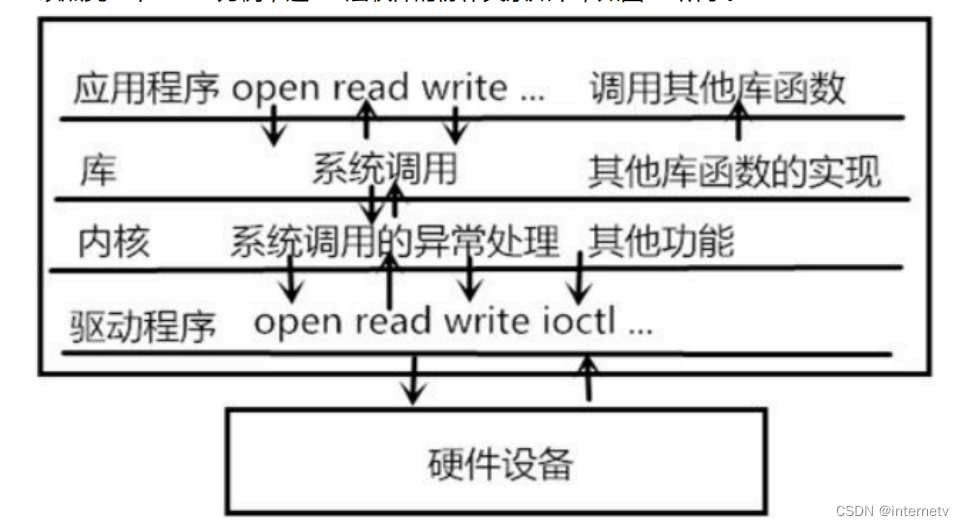
八 字符设备驱动
九 字符设备驱动框架介绍与实现
/*
 * @description	: 驱动入口函数
 * @param 		: 无
 * @return 		: 0 成功;其他 失败
 */
static int __init chrdevbase_init(void)
{
	int retvalue = 0;

	/* 注册字符设备驱动
	   主设备号
	   设备名
	   指针指向实现的file_operations结构体 */
	retvalue = register_chrdev(CHRDEVBASE_MAJOR, CHRDEVBASE_NAME, &chrdevbase_fops);
	if(retvalue < 0){
		printk("chrdevbase driver register failed\r\n");
	}
	printk("chrdevbase init!\r\n");
	return 0;
}

/*
 * @description	: 驱动出口函数
 * @param 		: 无
 * @return 		: 无
 */
static void __exit chrdevbase_exit(void)
{
	/* 注销字符设备驱动  释放主设备号*/
	unregister_chrdev(CHRDEVBASE_MAJOR, CHRDEVBASE_NAME);
	printk("chrdevbase exit!\r\n");
}

/*
 * 将上面两个函数指定为驱动的入口和出口函数
 */
module_init(chrdevbase_init);
module_exit(chrdevbase_exit);struct file_operations {
struct module *owner;
loff_t (*llseek) (struct file *, loff_t, int);
ssize_t (*read) (struct file *, char __user *, size_t, loff_t *);
ssize_t (*write) (struct file *, const char __user *, size_t, loff_t *);
ssize_t (*aio_read) (struct kiocb *, const struct iovec *, unsigned long,loff_t);
ssize_t (*aio_write) (struct kiocb *, const struct iovec *, unsigned long,loff_t);
int (*readdir) (struct file *, void *, filldir_t);
unsigned int (*poll) (struct file *, struct poll_table_struct *);
long (*unlocked_ioctl) (struct file *, unsigned int, unsigned long);
long (*compat_ioctl) (struct file *, unsigned int, unsigned long);
int (*mmap) (struct file *, struct vm_area_struct *);
int (*open) (struct inode *, struct file *);
int (*flush) (struct file *, fl_owner_t id);
int (*release) (struct inode *, struct file *);
int (*fsync) (struct file *, loff_t, loff_t, int datasync);
int (*aio_fsync) (struct kiocb *, int datasync);
int (*fasync) (int, struct file *, int);
int (*lock) (struct file *, int, struct file_lock *);
ssize_t (*sendpage) (struct file *, struct page *, int, size_t, loff_t *, int);
unsigned long (*get_unmapped_area)(struct file *, unsigned long, unsigned long,
unsigned long, unsigned long);
int (*check_flags)(int);
int (*flock) (struct file *, int, struct file_lock *);
ssize_t (*splice_write)(struct pipe_inode_info *, struct file *, loff_t *,
size_t, unsigned int);
ssize_t (*splice_read)(struct file *, loff_t *, struct pipe_inode_info *,
size_t,unsigned int);
int (*setlease)(struct file *, long, struct file_lock **);
long (*fallocate)(struct file *file, int mode, loff_t offset,loff_t len);
};/*
* 设备操作函数结构体 linux应用程序就是实现file_operations结构体内的各种方法
*/
static struct file_operations chrdevbase_fops = {
.owner = THIS_MODULE,
.open = chrdevbase_open, //打开设备
.read = chrdevbase_read, //从设备读取数据
.write = chrdevbase_write, //向设备写数据
.release = chrdevbase_release, //关闭/释放设备
};#
#
#
include $(TOPDIR)/rules.mk
include $(INCLUDE_DIR)/kernel.mk
include $(INCLUDE_DIR)/package.mk
PKG_NAME:=mydrv
PKG_RELEASE:=1
define KernelPackage/mydrv
SUBMENU:=Other modules
TITLE:=mydrv
FILES:=$(PKG_BUILD_DIR)/mydrv.ko
KCONFIG:=
endef
define KernelPackage/mydrv/description
This is a mydrv drivers
endef
MAKE_OPTS:= \
ARCH="$(LINUX_KARCH)" \
CROSS_COMPILE="$(TARGET_CROSS)" \
SUBDIRS="$(PKG_BUILD_DIR)"
define Build/Prepare
mkdir -p $(PKG_BUILD_DIR)
$(CP) ./src/* $(PKG_BUILD_DIR)/
endef
define Build/Compile
$(MAKE) -C "$(LINUX_DIR)" \
$(MAKE_OPTS) modules
endef
$(eval $(call KernelPackage,mydrv))/*****************************
*
* 驱动程序模板
* 版本:V1
* 使用方法(末行模式下):
* :%s/mydrv/"你的驱动名称"/g
*
*******************************/
#include <linux/mm.h>
#include <linux/miscdevice.h>
#include <linux/slab.h>
#include <linux/vmalloc.h>
#include <linux/mman.h>
#include <linux/random.h>
#include <linux/init.h>
#include <linux/raw.h>
#include <linux/tty.h>
#include <linux/capability.h>
#include <linux/ptrace.h>
#include <linux/device.h>
#include <linux/highmem.h>
#include <linux/crash_dump.h>
#include <linux/backing-dev.h>
#include <linux/bootmem.h>
#include <linux/splice.h>
#include <linux/pfn.h>
#include <linux/export.h>
#include <linux/io.h>
#include <linux/aio.h>
#include <linux/kernel.h>
#include <linux/module.h>
#include <asm/uaccess.h>
#include <linux/ioctl.h>
/**************** 基本定义 **********************/
//内核空间缓冲区定义
#if 0
#define KB_MAX_SIZE 20
#define kbuf[KB_MAX_SIZE];
#endif
//加密函数参数内容: _IOW(IOW_CHAR , IOW_NUMn , IOW_TYPE)
//加密函数用于mydrv_ioctl函数中
//使用举例:ioctl(fd , _IOW('L',0x80,long) , 0x1);
//#define NUMn mydrv , if you need!
#define IOW_CHAR 'L'
#define IOW_TYPE long
#define IOW_NUM1 0x80
//初始化函数必要资源定义
//用于初始化函数当中
//device number;
dev_t dev_num;
//struct dev
struct cdev mydrv_cdev;
//auto "mknode /dev/mydrv c dev_num minor_num"
struct class *mydrv_class = NULL;
struct device *mydrv_device = NULL;
/**************** 结构体 file_operations 成员函数 *****************/
//open
static int mydrv_open(struct inode *inode, struct file *file)
{
printk("mydrv drive open...\n");
return 0;
}
//close
static int mydrv_close(struct inode *inode , struct file *file)
{
printk("mydrv drive close...\n");
return 0;
}
//read
static ssize_t mydrv_read(struct file *file, char __user *buffer,
size_t len, loff_t *pos)
{
int ret_v = 0;
printk("mydrv drive read...\n");
return ret_v;
}
//write
static ssize_t mydrv_write( struct file *file , const char __user *buffer,
size_t len , loff_t *offset )
{
int ret_v = 0;
printk("mydrv drive write...\n");
return ret_v;
}
//unlocked_ioctl
static int mydrv_ioctl (struct file *filp , unsigned int cmd , unsigned long arg)
{
int ret_v = 0;
printk("mydrv drive ioctl...\n");
switch(cmd)
{
//常规:
//cmd值自行进行修改
case 0x1:
{
if(arg == 0x1) //第二条件;
{
}
}
break;
//带密码保护:
//请在"基本定义"进行必要的定义
case _IOW(IOW_CHAR,IOW_NUM1,IOW_TYPE):
{
if(arg == 0x1) //第二条件
{
}
}
break;
default:
break;
}
return ret_v;
}
/***************** 结构体: file_operations ************************/
//struct
static const struct file_operations mydrv_fops = {
.owner = THIS_MODULE,
.open = mydrv_open,
.release = mydrv_close,
.read = mydrv_read,
.write = mydrv_write,
.unlocked_ioctl = mydrv_ioctl,
};
/************* functions: init , exit*******************/
//条件值变量,用于指示资源是否正常使用
unsigned char init_flag = 0;
unsigned char add_code_flag = 0;
//init
static __init int mydrv_init(void)
{
int ret_v = 0;
printk("mydrv drive init...\n");
//函数alloc_chrdev_region主要参数说明:
//参数2: 次设备号
//参数3: 创建多少个设备
if( ( ret_v = alloc_chrdev_region(&dev_num,0,1,"mydrv") ) < 0 )
{
goto dev_reg_error;
}
init_flag = 1; //标示设备创建成功;
printk("The drive info of mydrv:\nmajor: %d\nminor: %d\n",
MAJOR(dev_num),MINOR(dev_num));
cdev_init(&mydrv_cdev,&mydrv_fops);
if( (ret_v = cdev_add(&mydrv_cdev,dev_num,1)) != 0 )
{
goto cdev_add_error;
}
mydrv_class = class_create(THIS_MODULE,"mydrv");
if( IS_ERR(mydrv_class) )
{
goto class_c_error;
}
mydrv_device = device_create(mydrv_class,NULL,dev_num,NULL,"mydrv");
if( IS_ERR(mydrv_device) )
{
goto device_c_error;
}
printk("auto mknod success!\n");
//------------ 请在此添加您的初始化程序 --------------//
//如果需要做错误处理,请:goto mydrv_error;
add_code_flag = 1;
//---------------------- END ---------------------------//
goto init_success;
dev_reg_error:
printk("alloc_chrdev_region failed\n");
return ret_v;
cdev_add_error:
printk("cdev_add failed\n");
unregister_chrdev_region(dev_num, 1);
init_flag = 0;
return ret_v;
class_c_error:
printk("class_create failed\n");
cdev_del(&mydrv_cdev);
unregister_chrdev_region(dev_num, 1);
init_flag = 0;
return PTR_ERR(mydrv_class);
device_c_error:
printk("device_create failed\n");
cdev_del(&mydrv_cdev);
unregister_chrdev_region(dev_num, 1);
class_destroy(mydrv_class);
init_flag = 0;
return PTR_ERR(mydrv_device);
//------------------ 请在此添加您的错误处理内容 ----------------//
mydrv_error:
add_code_flag = 0;
return -1;
//-------------------- END -------------------//
init_success:
printk("mydrv init success!\n");
return 0;
}
//exit
static __exit void mydrv_exit(void)
{
printk("mydrv drive exit...\n");
if(add_code_flag == 1)
{
//---------- 请在这里释放您的程序占有的资源 ---------//
printk("free your resources...\n");
printk("free finish\n");
//---------------------- END -------------------//
}
if(init_flag == 1)
{
//释放初始化使用到的资源;
cdev_del(&mydrv_cdev);
unregister_chrdev_region(dev_num, 1);
device_unregister(mydrv_device);
class_destroy(mydrv_class);
}
}
/**************** module operations**********************/
//module loading
module_init(mydrv_init);
module_exit(mydrv_exit);
//some infomation
MODULE_LICENSE("GPL v2");
MODULE_AUTHOR("from Jafy");
MODULE_DESCRIPTION("mydrv drive");
/********************* The End ***************************/
十 LED驱动程序和应用程序的编写
通过LED点灯实验,教学了linux最原始的对寄存器操作实现目的
通过查看芯片手册,使能GPIO,设置输出模式,设置寄存器
具体看程序把,我感觉后续不太能对寄存器直接操作
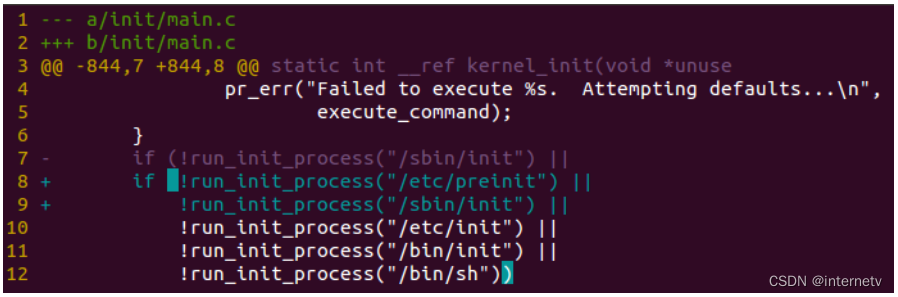
十一 openwrt的启动流程
在openwrt的官网上面下载的源码,其中包括了一些内核补丁,这里究竟为什么要给内核做补丁呢?因为openwrt为了支持更多的路由器,更多的操作和openwrt特有的一些内核功能,linux源码是不具备的,这样openwrt为了增加这些功能,就需要在linux官网上面下载的源代码中做一些修改,在这里体现为给linux源码打补丁。
Openwrt源码中的linux补丁文件放在openwrt/trunk$cd target/linux/generic/文件下面
总结:从上面的分析我们来总结一下openwrt的启动流如下:
![]()
十二 openwrt串口的使用
十三 openwrt 安卓端与开发板通讯
十四 安卓通过开发板控制zigbee网络
十五 配置开发板支持U盘
通过 make menuconfig
make kernel_menuconfig
配置- 编译- 烧写- 生效
U盘的挂载:mount/dev/sda/mnt
十六 配置openwrt支持网络摄像头
最好选择免驱USB摄像头,并支持输出MJPEG压缩格式,安装mipg-streamer 软件,支持视频数据采集、视频数据格式转换、视频数据传输。
然后运行mipg-streamer软件:
一般摄像头:
mjpg_streamer -i "input_uvc.so -d /dev/video0 -y"-o "output_http.so -w www"
支持MJPEG的摄像头:
mjpg_streamer-i "input_uvc.so -d /dev/video0"-o "output_http.so -w www"
其中:-i表示指定输入,这里输入为:input_uvc.so即uvc(usb video),-d是设备位置,我们摄像头的设备位置在:/dev/video0,-y用于区分一般摄像头和支持M)PEG的摄像头,-o指定输出,这里输出到output_http.so即http(何以理解为输出到网页上),-w指定web服务器为www。
十七 编写应用程序交叉编译
mips-openwrt-linux-gcc 与 mipsel-openwrt-linux-gcc


 609
609


 被折叠的 条评论
为什么被折叠?
被折叠的 条评论
为什么被折叠?
 到【灌水乐园】发言


