Class-Protocol Router

定义一个protocol,叫protocolB,让BViewController实现。

protocolB里面可以定义BViewController创建时需要的参数,例如这里的nameage

@protocol ProtocolB <NSObject>
- (void)setBViewControllerName:(NSString *)name age:(int)age;
@end

BViewController实现protocolB

#import "ProtocolB.h"

- (void)setBViewControllerName:(NSString *)name age:(int)age
{
    self.nameText = name;
    self.ageText = [NSString stringWithFormat:@"%d",age];
}

router#import "ProtocolB.h",定义register方法,将protocol和class对应起来,保存到字典protocol_class_map

@property(nonatomic, strong) NSMutableDictionary *protocol_class_map;
- (void)registerProtocol:(Protocol *)protocol forClass:(Class)cls;

BViewController里注册

// 如果在其他地方注册,必然要引入BViewController,造成耦合
[[Router shared] registerProtocol:@protocol(ProtocolB) forClass:BViewController.class];

register方法里将BViewControllerProtocolB关联,

AViewController

#import "Router.h"
#import "ProtocolB.h"

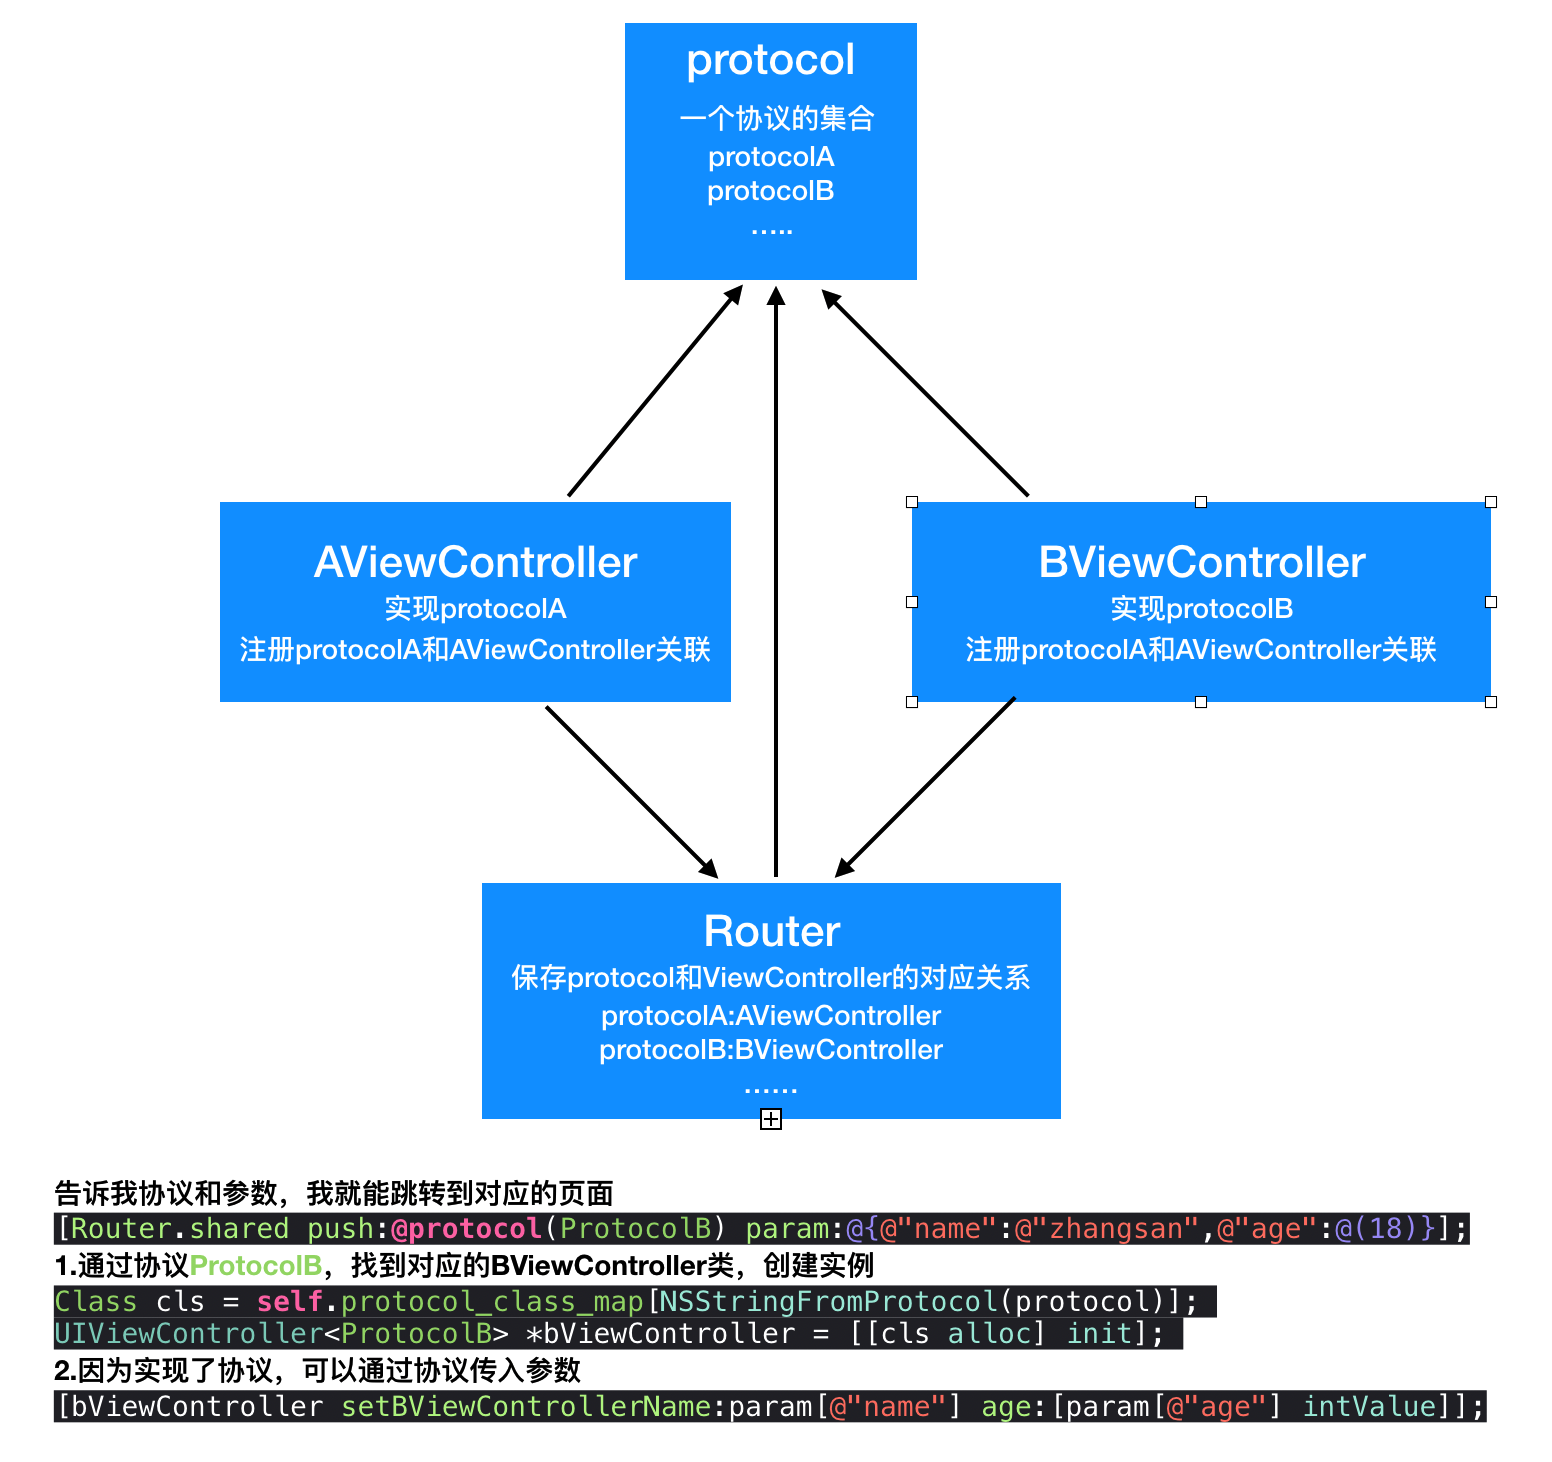
[Router.shared push:@protocol(ProtocolB) param:@{@"name":@"zhangsan",@"age":@(18)}];

push方法实现

- (void)push:(Protocol *)protocol param:(NSDictionary *)param
{
    
    Class cls = self.protocol_class_map[NSStringFromProtocol(protocol)];
    UIViewController<ProtocolB> *bViewController = [[cls alloc] init];
    [bViewController setBViewControllerName:param[@"name"] age:[param[@"age"] intValue]];
    
    [[self topViewController] pushViewController:bViewController animated:YES];
}

这段代码干的事:

1.通过协议ProtocolB,找到对应的BViewController类,创建实例

Class cls = self.protocol_class_map[NSStringFromProtocol(protocol)];
UIViewController<ProtocolB> *bViewController = [[cls alloc] init];

2.因为实现了协议,可以通过协议传入参数

[bViewController setBViewControllerName:param[@"name"] age:[param[@"age"] intValue]];

用一张图总结:

再总结:

我觉得最理想的router是,只要AViewController引入router就可以跳转到BViewController

这里的操作是,ViewController要有相应的protocol,然后ViewController要实现这个protocol,然后ViewController要注册protocolViewController的关联,因为要router来注册,所以还要导入router

这里的router还要导入protocol

router通过导入每个ViewController对应的Protocol来避免导入具体的ViewController,本质上,我觉得没有区别。

的确比较麻烦,不是很好的方案。

demo Class_Protocol_Router


作者:桔子听
链接:https://www.jianshu.com/p/bbcf06e80f14
来源:简书
著作权归作者所有。商业转载请联系作者获得授权,非商业转载请注明出处。

  • 0
    点赞
  • 0
    收藏
    觉得还不错? 一键收藏
  • 0
    评论
翻译 There are several reasons a network designed on layer-2 protocols is selected over a network designed on layer-3 protocols. In spite of the difficulties of using a bridge to perform the network role of a router, many vendors, customers, and service providers choose to use Ethernet in as many parts of their networks as possible. The benefits of selecting a layer-2 design are: Ethernet frames contain all the essentials for networking. These include, but are not limited to, globally unique source addresses, globally unique destination addresses, and error control. Ethernet frames can carry any kind of packet. Networking at layer-2 is independent of the layer-3 protocol. Adding more layers to the Ethernet frame only slows the networking process down. This is known as nodal processing delay. You can add adjunct networking features, for example class of service (CoS) or multicasting, to Ethernet as readily as IP networks. VLANs are an easy mechanism for isolating networks. Most information starts and ends inside Ethernet frames. Today this applies to data, voice, and video. The concept is that the network will benefit more from the advantages of Ethernet if the transfer of information from a source to a destination is in the form of Ethernet frames. Although it is not a substitute for IP networking, networking at layer-2 can be a powerful adjunct to IP networking. Layer-2 Ethernet usage has additional benefits over layer-3 IP network usage: Speed Reduced overhead of the IP hierarchy. No need to keep track of address configuration as systems move around. Whereas the simplicity of layer-2 protocols might work well in a data center with hundreds of physical machines, cloud data centers have the additional burden of needing to keep track of all virtual machine addresses and networks. In these data centers, it is not uncommon for one physical node to support 30-40 instances.
最新发布
07-23

“相关推荐”对你有帮助么?

  • 非常没帮助
  • 没帮助
  • 一般
  • 有帮助
  • 非常有帮助
提交
评论
添加红包

请填写红包祝福语或标题

红包个数最小为10个

红包金额最低5元

当前余额3.43前往充值 >
需支付:10.00
成就一亿技术人!
领取后你会自动成为博主和红包主的粉丝 规则
hope_wisdom
发出的红包
实付
使用余额支付
点击重新获取
扫码支付
钱包余额 0

抵扣说明:

1.余额是钱包充值的虚拟货币,按照1:1的比例进行支付金额的抵扣。
2.余额无法直接购买下载,可以购买VIP、付费专栏及课程。

余额充值