


This series of articles are the study notes of "An Arduino platform and C Programming", by Prof. Harris, Department of Computer Science, University of California, Irvine. This article is the notes of week 1, lessen 3.
3. Lesson 3
3.1 Lecture3-1:ArduinoShields and Libraries
So we've talked about different aspects of the Arduino environment, talked about the Arduino development board, looked at a schematic.
3.1.1 Arduino Shields
(1) Add-on boards that interface with another device/IC
So Arduino Shields are basically add-onboards. Daughter boards are another term for this. That interface with some other device, usually an integrated circuit, but it can be anything. So the ideais that there are often devices that you want to connect your Arduino up tothat are complicated, and require an integrated circuit, an IC, to access them.
(2) Can be stacked directly on top of the Arduino
Take an Ethernet controller for example. An Ethernet jack is a complicated interface. If you want to talk to an Ethernet jack, you can't just wire straight to it. You need to talk to an Ethernet controller chip. A chip that is made to speak the Ethernet protocol. And you need to wire that Ethernet controller chip up to your chip. And it's acomplicated thing, and you need to control it. The data sheet for the control chip could be 150 pages long, and you must understand that. It's a complicate dprocess. So what happens instead is an Ethernet shield is a board that already has the Ethernet control chip, say, wired on there, so you don't have to do any wiring. All you have to do is just take this board, and you stack it directly on top of the Adruino.
Adruino has the pins along the side. Has the holes along the sides that connect to the pins. So the shield is the same size and it's got pins underneath it so you can just stack them on top and push this shield right into those holes. And then the wiring is all done for you.
(3) Libraries exist to make interfacing simple
And in addition to the wiring being done there are library functions. So, every shield comes with a set of library functions. Pre-written functions that you as aprogrammer can call to do things with the component. So, like with an Ethernet shield. You would have functions that allow you to access the Internet and things like this that are simple. You don't have to understand anything about the Ethernet controller and the complexities of it. You could just call this function and it will do the task that it's supposed to do. So the hardware shields come together with these libraries that make it easy for the programmer to access.
(4) Open source hardware but most can be purchased
Open source hardware, these designs are generally open source shield, but you can purchase them pre-made for the most part.
(5) Large variety of shields available
A large variety available. A whole lot of shields to do, Adruino has been around for a while, people love it. There are shields to interface with all sorts of different circuitry.
(6) Big advantage of the Arduino platform
It's a big advantage of the argument of platforms. It's a big reason why people use it, because they can use different types of hardware, exotic types of hardware, that are built into a shield, but they don't have to understand the details of the hardware. They can just call the library functions, and be happy, and things are easy for them.
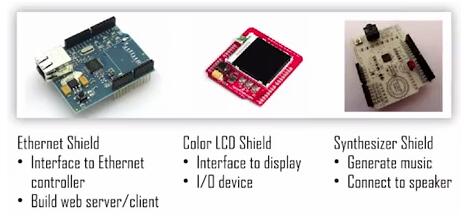
3.1.2 Some Arduino Shields
So here are some shields. There's acomplete list at shield list.org, but there are lots of lists, so just Baidu around out there.
Fairly complete list is at http://shieldlist.org
3.1.3 Ethernet Shield Library Example
Now the great thing about these shields is that they come with these libraries that make their use easy.
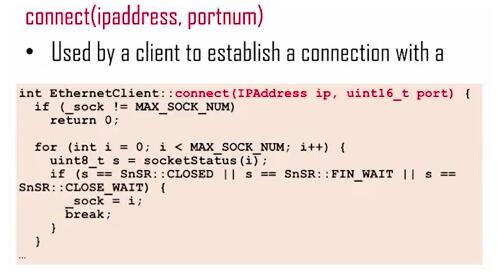
So I'm just giving you a taste of what these libraries do for you. So let's take the Ethernet shield. There are several functions in this library, and if you go to arduino.cc, you can see all of its library functions. But here's one called connect. Now Connect, it takes an IP address and a port number. So the IP address, whatever the internet address is that you want to connect to plus the port number that you want to connect on, you pass those as arguments and this function connect will open up a connection with some remote device. So at the high level, it's a straight forward thing that you want to do to start a connection with a remote device. Now it's very easy to do with this library function, you just call connect with the address and the port number and bam the connection is open. But in reality it's actually a much more complicated operation that has to be preformed, so you can see that code that I have there, that's the implementation of the connect function. So all these libraries are open source so you can go toarduino.cc and look and find this implementation.
3.2 Lecture3-2:Arduino Basic Setup
We’re going to talk about how you set up your Arduino environment in the first place. We'll just go through the basic set up, and we'll have you install the Arduino environment, and then run aprogram just as a sanity check to see that you got it all installed.
3.2.1 Set Up the Arduino IDE
(1) Download the IDE www.arduino.cc/en/Main/Software
- Easiestto run Windows Installer
- Also installs USB and other drivers
I'm using Windows so say Windows installer but you can do this on Mac and on Linux as well. So you run the installer. Now that will automatically install all the drivers that you need, specifically the USB driver and other drivers. Drivers are basically software code that runs on your machine to communicate with other devices. On your desktop, laptop it'll have drivers. Any operating system has a set of drivers. So there'll be drivers to talk to the USB port on the Arduino. So this, if you just run the install, it will automatically, when it asks you, should I install the USB drivers, yes. Any drivers it says, okay.
(2) Connect the board to your computer
Use USBcable
Then connect your board to the computer yards. We know board to the computer. Use a USB cable, connect it.
(3) Launch the Arduino application
Startsthe IDE
Launch the Arduino application. So start the IDE however you want to start it. So you start the IDE with the board connected. Now when you start it, first you get the image you see on the left. You're going to get basically an empty screen. It's not completely empty, this one has sort of a shell set up and a void, but there's no code inside there. They're blank. So you start off with something blank like that, and if you wanted to you could write code and fill in the blanks. Write all your code right in there. That's not going to be the first thing you're going to do. First thing you want to do is basically upload, open a sample problem, a sample file, and run that.
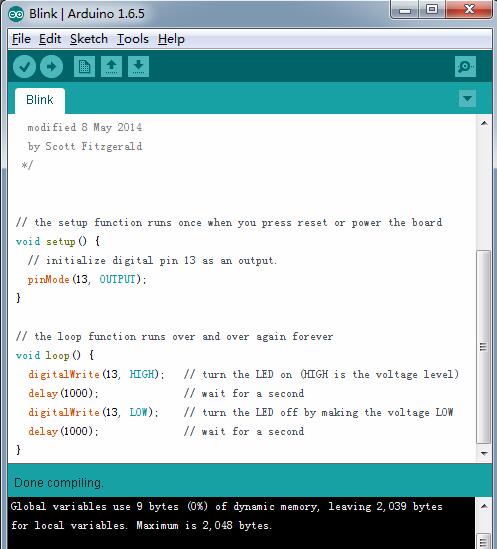
(4) Open the Blink example:File>Examples>Basics>Blink
Open the example of Blink. Your goal's going to be is to run that program. And what it should do, it should make an LED Blink on the Arduino. Okay, and then you know my setup is working correctly.
3.2.2 Run a Program
(1) Select your Arduino in the Tools > Board menu
First select your Arduino board in the Tools Board menu. So if you to Tools and go to the board link it lists a bunchof Arduino boards. Arduino Uno is typically what you are going to be using. But there are many variants on Arduino board. Arduino Lilypad, Arduino Duemilanove and all this. Hopefully, usually it detects it automatically and highlights the one that you are using.
(2) Select your serial port in the Tools > Port menu
Thereshould be only one selection (COM6, etc.)
Serial port, this is more detailed than I want to get into, but there are theseCOM ports, communication ports, on any windows machine. And the windows machine should, when you plug in an external device, it should automatically map the external device to a particular COM port. Whichever one is available, first one to find is available. So, if this is working right, when you look at thetools port menu, there should be one option there. Say COM3 or COM5 or whatever's available, there should be one option and you select it. And that should be all there is to it. Sometimes there are multiple options and then the easiest thing to do, there'sa way to figure out which one is the right one, but the easiest thing to do is just guess. Try one and program it and see what happens, if it fails, try again. But there should be one option, and you select it. If there's no option, then probably the USB drivers are not installed correctly.
(3) Upload the program with the upload button
This write the program onto the flash of the Arduino
Once you've selected the serial port, then you upload the program. You press the Upload button. Now, you press the Upload button on the IDE, it will compile the program, checking for errors and the Blink program will have no errors. It will compile it and then it will upload it.


 1万+
1万+

 被折叠的 条评论
为什么被折叠?
被折叠的 条评论
为什么被折叠?
 到【灌水乐园】发言


