


This series of articles are the study notes of "An Arduino platform and C Programming", by Prof. Harris, Department of Computer Science, University of California, Irvine. This article is the notes of week 3, Arduino Programs, lessen 1.
Week3 - Arduino Programs
1. Lesson 1
1.1 Lecture1-1: Arduino Tool chain
In this lecture we'll start talking about the Arduino Toolchain, meaning that the sequence of commands and code that has to get executed in order to run your code on the Arduino. So that means basically, after you've written your code, what happens to get that thing set up to go, to actually execute on the Arduino. So there are several steps involved and we'll look under the hood a little bit at those steps.
1.1.1 Verify and Upload
Verifyand Upload
(1) Verify
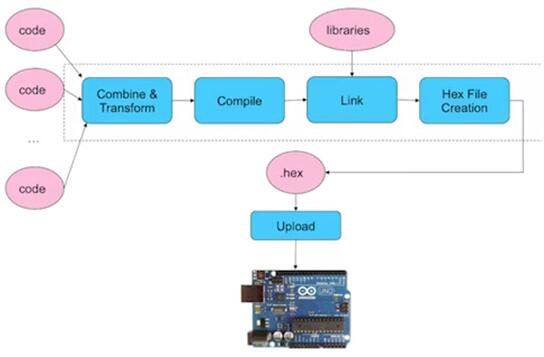
So you can see at the left side you've got code. This can be one code file or many code files that you start with. We were just doing one code, but you can have as many as you want. Now first those code files are all combined and transformed. So there's this pre-processing step right there that we're labeling combine and transform. Then the whole thing gets compiled. The image gets linked and we'll talk about
what linking is, it's where you merge with the libraries that we use. Then, the executable is converted into a hex file and that hex file is actually uploaded to the board. So, those steps if you look at those steps that I have in blue, the first steps combine and transform, compile, link, hex file creation. Those steps are what happen when you verify. When you click the verify button inside the IDE, those steps are what occur.
(2) Upload
You remember verify, it does the compile and all the rest of the process, but it does not upload to the board. So, uploading to the board happens when you click upload. When you click upload, it does everything, it does the compile steps, and then it takes the file and actually uploads it to the board. So, remember uploading to the board means actually taking that code, the executable code and programming into the flash on that RD node so that it can start executing.
1.1.2 Combine and Transform
(1) All program files are combined into one
The combine and transform step is really a pre-processing step. So all the files, all the program files, are combined into one big file. Now, this is assuming you wrote more than one program file, if you have multiple C files, or C++ files. Sketches rather that you want to combine to one big file you can combine them into one.
(2) An #include is added to reference Arduino libraries
Now a #include is added to reference the Arduino libraries. So, what this means is that remember that in addition to our code, the code that you write, the user code, there are all these libraries, these Arduino libraries that we're using inside our code we're referencing. So some of the commands that we use like digital right, digital read, these are commands that we're going to use, those are actually functions that are in a library. Those are not part of native C, C++. Those are Arduino libraries. So those libraries have to be included into your big mess of code. So hash includes are added. You don't add those they get added automatically. And they include the library functions that are used inside your code into the big single source file that's going to compile.
(3) Function prototypes are added
Also, function prototypes are added. Now, we haven't covered function prototypes, but we don't need to because in Arduino programming, the user doesn't have to deal with them directly. In traditional C programming though, and behind the scenes here, they have to be function prototypes though. Every function that's defined, a prototype basically tells you what the return type is for that function and also what its arguments are.
(4) A main() function is created
Also a main is created. So every C function or C++ program has to have a main. The main function is the function where all execution starts. Now if you remember, in our sketches we don't have a main. We have setup and we have loop. But the compiler, the C compiler, actually needs to see a main, so the main is constructed; it is created based on the setup in the loops. So the setup and the loop are combined to create a main and the main function is defined automatically behind the scenes.
1.2 Lecture1-2: Cross-Compilation
So in this lecture, we'll continue talking about the different steps that happen when you click Verify or click Update that are required to get the code onto the Arduino for execution. We'll talk about the rest of the steps, Cross-Compilation being one of them, linking, that type of thing, so we'll talk about those. So compile a link.
1.2.1 Compile and Link
Avr-gcc is invoked to cross-compile the code
Resulting code executes on AVR, not Intel.
(1) compilation
So after you've combined the different source code files into one, and you transform them adding the main and including the libraries and all that type of thing. Then you compile it, actually you cross-compile the code. So,
avr-gcc is the program that is actually invoked to perform cross-compilation. So
compilation is taking the C or C++ source code and generating the machine code required to execute the actual program. Because t
he processor only understands its own machine language; it doesn't understand the high-level language that we are actually coding in. So it has to get transformed into that, that's what compilation is.
(2) cross-compilation
Now,
cross-compilation, which is what we're doing here, i
s when you compile code on one machine for another machine. So, typically, you're compiling it on a desktop machine, laptop machine, which maybe has an Intel x86 type processor on it, something like that. And so you're compiling it on an x86 processor but the code that you get does not execute on an x86 processor. It executes on the Arduino's processor, specifically the AVR processor AVR Atmega328 that's running on the typical Arduino Uno setting. So you're compiling it on an Intel processor but you're compiling it for your target, is actually an AVR processor, a different processor. So if you take that executable and try to run it on your Intel it will not work.
So this is called cross-compilation, you compile on one machine, but the target is another machine.
Now
avr-gcc is the tool that is used to, behind the scenes, the tool that is used to actually do this cross compilation. Now when I say behind the scenes, I mean that you as a user, as a programmer, you don't have to see that tool. You just click Verify or you click Upload, and the Arduino IDE invokes this program for you.
(3) Generates an object file (.o)
So, once you do compilation, you get an object file, a .o file, it's compiled but it's not finished yet because it still needs to be linked.
1.2.2 Linking
So
linking means taking the object files and combining them. So including the object files for your libraries. So you have these libraries, these Arduino libraries that you're using, and they have their own .o files, and those have to be linked together. So when we say linked, generally that means, it implies several things, but mostly it means, inside your code, whenever you make a call to a library function from Arduino, you have to insert a branch or a jump statement that jumps you to their code. And, so, they have to be, but the question is separately when you compile them originally, you don't know where to jump to. But
once you combine these .o files into one then you know where each function is relative to the other functions, so you can put the jumps in. That's the linking process, you take the data files and you join them together. So
the object file is linked to the Arduino library functions, which we're definitely using.
1.2.3 Hex File Creation and Programming
- Avr-objcopy is invoked to change the format of the executable file
- A .hex file is generated from the .elf file
Now, once we get these .o files, actually once we link it, once we get actually finish the linking, you get what's called a .elf file. That's an executable file. And you can execute that code. But, the Arduino processor does not accept ELF files. So we have to take the ELF file and change its format to another format. So for that,
the IDE uses a program called avr-objcopy.
And that's invoked to change the format of the executable file to the one that the Arduino expects to see. So this is a formatting thing, and we're not going to go into details of it, but the .hex file is generated from the .elf file that's created after linking. So it changes from one format to another, and the hex file can actually be executed by the Arduino's processor.
1.3 Lecture1-3:ArduinoSketches
In this lecture, we'll talk about what a sketch is. A sketch is basically another name for an Arduino program. We'll start looking at the structure of the sketch but actually in this particular lecture, before we get to that, I want to define the language subset being used in Arduino. So really,
an Arduino program is a C++ program, and we talk about classes in C++. Now we're not covering classes in this course, but we need a little bit, so you understand how to use them in the context of Arduino Sketches.
1.3.1 Arduino Programs
- A program is called a sketch
- C++ program using Arduino library functions
So
an Arduino program, it's called a sketch, that's the term you see. So,
Arduino is really the language that you're writing a sketch in, is really C+ using Arduino library functions. So, there are a lot of pre-defined library functions, and you invoke those, but really it's C++ code that you are writing.
- C++ is a superset of C, all C programs are legal C++
Now, I would say that C++ is a superset of C. So there is C, and there's C++. Anything that is legal C, is also legal C++. So C++ has more features than C. And generally, when you look at Arduiono's sketches, the code that they are using, that people use, they restrict themselves primarily to the features of C. They don't go outside and use too many features of C++. Now, you could, but generally that's not what I see. But they do use some aspect of classes, because they're used with libraries.
1.3.2 Object-Oriented Programming
- C++ also includes classes
- Organize your code through encapsulation
So C++ includes classes, so let's just talk a little bit about what a
class is. So, a class is something that's used in the context of
what we'll call object-oriented programming. So object-oriented programming, the idea
is just a way to organize your code, really. That's all it's for, as far as I can tell. It's for organizing your code
to make it easier to understand, which by the way is very important in big pieces of code, because code can get very difficult to understand. So, object-oriented is a way to organize the data and the functions to make it more easier to understand. You're using what's called
encapsulation, so you're
grouping things together,
encapsulating them into these units.
So you group together data and functions that are related. So if you see a bunch of information, by data, I mean variables, say, arrays, things like that. You have a bunch of data and a bunch of functions that act on that data, that operate on that data, and they are related in some conceptual way, then you group them together into a single class. This is a common way to do it.
- User-defined type is specific to an application
- Ex. ints have data (the number) and functions (+, -, *, /)
1.3.3 Class
(1) Class of integer
So, a class you can think of as a type that can be defined by the programmer, a user-defined type or programmer-defined type. So, think of type like integers, right? The class of integers, we'll call it the class of integers, that type, it has data, which is the number, the actual integer. So the integer three, it has value three, right? So that's its data. But in addition, the class of integers also has a set of functions, right? Plus, minus, times, divide. Different operations that you can perform on integers.
So every class you can see as having data, whatever the data is, and a set of functions associated with it.
Classes allow you to define new types based on whatever type of program you're defining. So, you can make application specific types.
(2) example of class
- All data contained in one object
- Reduced number of parameters
- Point-specific functions are easily identified
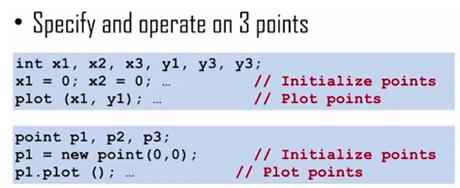
Here’s an example of the use of classes, and how it helps you to organize your code a little bit. So, we get two examples of code that do exactly the same thing, the top and the bottom. Top example, we don't use classes. We say look, we want to write some code that plots some points on the screen, points of two dimensions, x and y dimensions. So, one way to do it, say I want to plot three points. So, I say int at top line, and I declare a bunch of variables, x1, x2, x3, y1, y2, y3. And these are the x and y coordinates of three different points. And you can tell the x1 is related to the y1, because they both have a 1 after them. You as a programmer have to keep that in your head. x1 is related to y1 because of that 1 after them. x2 is related to y2 because of the 2 after them. So that's an extra burden on me as a programmer. I have to do appropriate naming so I can realize, oh, this variable is related to this variable. x2 is related to the y2. And this is what you're trying to get away from with classes, right? We don't want to have to rely on the coder. If the programmer does some bad variable naming, it would be very hard to be able to tell which x and which y were related, right? But it's a burden of the programmer to name things in such a way that he, she can understand which variables are related to what. Okay, so I define these variables. Then the next line, I initialize them to 0s or whatever I wanna initialize them to. And then I call this function plot and it takes the x and y coordinates that I wanna plot. So I would call plot(x1, y1), then call plot(x2, y2), and so on. So that's one way that you can represent these three points and plot them. Now below, what we're doing is, we're showing how you might do this if you have a class. If you have already defined a class called point, then you can do it in the way show down below. So this class is called point. Every point would have to have an x and a y coordinate inside it, so in our class definition, which I'm not showing you right here. It would define an int x and an int y, so now when I declare my variables, I don't declare the int. I declare the points. I say point p1, p2, p3. So that declares three different points, and I don't have to explicitly declare the x and the y for each one of these points. I can just say point p1, p2, p3, and because I have defined this class of points, the machine will know okay, p1 has gotta have an x and y, p2 has its own x y, p3 has its own. So those get defined without me having to think about the details. But I just say, make a point, and the program says, oh, a point means there's an x and a y. So, I declare my points, then I make a new point. So there I say
p1 = new point(0,0). new is a function that creates a new object of any particular class.So that actually initializes the p1 and the p2 and p3. You'd make a new point and (0,0) are the arguments, those will become the x and the y values for this point. So, I'd initialize that, and then I'd call a function called p1.plot in order to plot the point.
Now notice how that plot is different than the plot above, right. The plot above takes two arguments, x1 and y1, which are the coordinates that I want to plot. The bottom plot doesn't have any arguments. It's just p1.plot. So, the reason why it doesn't need the arguments is because it's called from p1. So p1 is the object that we've created, the point.
And if you say p1.plot, it basically tells the plot function look, when you're looking for variables like x and y, refer to what is on the left-hand side of the dot. The left-hand side of the dot is p1, so they will use the x and the y values from p1 and plot the point accordingly. And actually that notation right there, we're going to be using that.
Where
we give the name of an object or a class, then you give a dot, then you give the name of a function. We're going to be using that throughout. That's how library functions are often invoked, is with that type of syntax.
So, in this case, point-specific, so the function plot is specific to the point class. You can only call plot, in this example, on something in the point class, so p1.plot. Say you have an integer, x, you can't say x.plot. Because plot doesn't work for an x. There's no plot function defined for an integer, right? But p1.plot, since p1 is the point, and we've defined plot for points, then that will work. So you can make these class specific functions.


 1万+
1万+


 被折叠的 条评论
为什么被折叠?
被折叠的 条评论
为什么被折叠?
 到【灌水乐园】发言


