


 本文介绍了Arduino平台上的EEPROM使用方法,包括EEPROM的基本概念、如何读写数据,并通过实例展示了如何处理多字节数据。
This series of articles are the study notes of "Interfacing with the Arduino", by Prof. Harris, Department of Computer Science, University of California, Irvine. This article is the notes of week 3, lessen 1.
1. Lesson 1
1.1 Lecture 1.1 -Arduino Libraries
So we'll talk now about Arduino libraries, the different libraries that come with Arduinos. Arduino is a board, it's a type of board, it's a piece of hardware. But it's also this software in the form of these libraries that come
with the board. And the libraries actually very important to the usability of an Arduino. Part of the reason why people really like Arduino is because these libraries help you use the Arduino. Help you use the hardware. Because these micro controls have been
in existence for a very long time. But, only with Arduino and things like it coming along with libraries that are really easy to use.
1.1.1 Arduino Libraries
(1) Many devices are more complicated then simple sensors/ actuators
So there are lots of sensors actuators and things that you connect to Arduinos, or to any micro controller. And these devices, these sensors, these actuators and other devices that we haven't much talked about, that you connect
in the system you connect to the microcontroller. Some of them are simple. The resistive sensors and the voltage controlling sensors, and so on. You can just use pulse with modulation or analog read, analog write, digital read, digital write. You can use those
functions to actually control these devices and observe these devices.
But there are a lot of other devices that are significantly more complicated than that. That you also want to be able to connect to your Arduino and your microcontroller in general and you want to be able to use. So, for these
type of devices, it's hard for your average person to write code that directly controls these devices. They can be very complicated.
(2) Microcontroller (ATMega328) has components, communication interfaces, PWM logic, etc.
- memories, communication
- interfaces, PWM logic, etc
Now, some of these devices that we want to control. They are actually inside the micro controller itself. So the Arduino UNO any way has a microcontroller, an ATMega328, and this ATMega328 has a lot of different devices on it.
So it runs code but it has other devices on it that we would like to use.
So, for instance, memories. It has memories and maybe we want to write things to memory and read things from memory.
Communication interfaces. We'll talk about these. But maybe an I2C bus. Actually we've talked about some of these already. I2C or SPI, different bus communication interfaces. Maybe we want the microcontroller to talk to another
microcontroller through one of these communication interfaces, something like that.
Pulse width modulation logic. We've talked about this, right. There are lots of things, timers, lots of different components on there on the chip. That we want to have access to as programmers and we want to use for different
things.
So some of these things are complicated so what happens is, rather than you having to read the data sheet on exactly how to control the pulse with modulation logic Or the I2C control logic and things like this.
(3) Arduino provides libraries to facilitate their use
Rather than you having to do all that, instead what they do is they provide you with these libraries. And these libraries, they have relatively simple functions that are predefined. And you
call the function, and it does whatever it's supposed to do without you having to understand all the details of what's going on inside the library.
And so these libraries are immensely helpful in using lots of interesting things with your Arduino with any microcontroller.
(4) Libraries are also available for external hardware
- Wifi controller, LCD, GSM controller
Also there are third-party libraries too. Now libraries are also available for external hardware. So not only are these libraries useful in helping you use the hardware that's on the chip. Like a timer built in to the chip, a
memory built in to the chip. But it helps you use other hardware, other chips, other parts that are external to the Arduino that you connect to the Arduino. And this is in the form of shields, which we'll talk about in the next module. But those also have
a set of libraries that allow you to use them, cause otherwise it's fairly complicated to use them. So libraries make things much easier for you as a programmer.
1.1.2 EEPROM
(1) Electronically Erasable Programmable Read-only Memory (EEPROM)
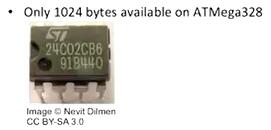
So what we'll talk about first, we'll talk about the EEPROM. This is actually a memory. It stands for Electronically Erasable Programmable Read-Only Memory. So the picture at the bottom, that picture is a picture of an EEPROM.
That is not the EEPROM we're using. The EEPROM that we're using is memory that's already embedded into the ATMega328 processor. So you wouldn't see it as a separate chip. It's just a little piece of the chip we see on the Arduino, the main processor.
It has some EEPROM memory. Now there's very little of it available, only 1k so 1024 bytes available on our ATMega processor.
(2) Non-volatile memory; holds data without power
EEPROM memory is non-volatile memory so non-volatile means. It holds its data without power. So that's like a disk. A disk is non-volatile memory, or a flash, so flash is also a non-volatile memory. You can write something, you
lose power. When you turn on power again, it still has the same memory.
(3) Similar to Flash but more flexible
- Write a single bytes at a time
So in fact, EEPROM technology is similar to flash. But it's more flexible in the sense that you can write a single byte at a time. Now with flash, you can't actually write a byte at a time. Memory is grouped into blocks. You
might now know this, you might not be aware of this, but it's grouped into blocks. So if you want to write to one byte, you've gotta write to the whole block. Maybe you don't even need to write to the whole block. You just want to change one byte, but you've
gotta overwrite the whole block again. So this wastes time and things like this but that's the way it's organized.
- Support many more write cycles
EEPROM's more flexible. It's byte right writable so you can do one byte at a time. And it supports many more right cycle so what that means is, flash and EEPROM both they don't last forever. Flash maybe it'll last tens of thousands
of write cycles. So, what that means is if you've got Flash, and you've got a particular address in the Flash, you write to that address 10,000 times. After that maybe 10,000, 20,000, 30,000 times, that address will wear out. So, eventually that address won't
work anymore. And, the chip will just, the memory will just fail. So the flashes have a limited lifetime. And EEPROM is better than flash. So maybe a flash might be tens of thousands of write cycles, EEPROM would be a lot more than that, maybe a hundred thousand,
something like that. Now this isn't as good as disk, disk has a lot more than that.
(4) Only 1024 bytes available on ATMega328
So EEPROM takes up a lot of area on the chip so there's only space on our part for a 1024 bytes or 1k bytes. But it's useful for certain things so your program might want might store some more variables in there, in this EEPROM
the same way you might use a flash. Although, see the flash on our ATMega What happens is that Flash is used for the program itself. So the code itself is sitting on the Flash, plus the boot-loader. But the EEPROM is a place where you might store settings,
or variables, or something like that, that you want to save time and time again.
You could put little pieces of data inside this EEPROM. Of course these are tiny files because there're only 10-24. But you can store some kind of data that you want to be persistent in this EEPROM. So it can be useful.
1.1.3 Reading and Writing
So you need to read it and you need to write it. So how do you do that? So they provide library functions to access the EEPROM and it's pretty straight forward actually.
(1) Access one address at a time
You access one address at a time. And
each address is one byte, so we call byte addressable, meaning every address has one byte in it.
(2) Each address contains one byte
(3) EEPROM.read(address): returns the contents of an address
So the way you read an address is you call this function called EEPROM.read. It's in the EEPROM library. It's called read. And you pass it an argument, which is an address, which is just a number. And that number, that function
returns the contents of that address, so all the addresses are numbered. Since there are only 1024 locations in the memory, there are 1024 addresses, they're numbered 0 through 1023. So that address argument can be any value from 0 to 1023, and EEPROM.read
will return the contents of that address, the byte. It'll return a one byte value.
(4) EEPROM.wirte(address, data): write single byte of data into that address
EEPROM.write does what it sounds like. It takes two arguments, an address and some data some byte size piece of data. So that data's one byte, and write set byte into that address. And that's it. And the address has to be between
zero and 1023 because that's as big as the EEPROM is.
- Address must by between 0 and 1023
1.2 Lecture 1.2 - EEPROM
Now let's go through a little piece of code that just shows how some of the EEPROM library functions, namely read and write, could be used in practice.
1.2.1 Reading and Writing
- Example of reading and writing EEPRM
<div style="text-align: justify;"><span style="font-family: Arial, Helvetica, sans-serif;">void setup(){</span></div>	int addr;
<div style="text-align: justify;"><span style="font-family: Arial, Helvetica, sans-serif;">	Serial.begin(9600);</span></div><div style="text-align: justify;"><span style="font-family: Arial, Helvetica, sans-serif;">	for (addr = 0; addr<1024; addr++){ //writing from the EEPROM</span></div><div style="text-align: justify;"><span style="font-family: Arial, Helvetica, sans-serif;">		EEPROM.write(addr, addr); //the second addr is the data want to write into the first addr (location)</span></div>	}
	for (addr = 0; addr<1024; addr++){ //reading from the EEPROM
<div style="text-align: justify;"><span style="font-family: Arial, Helvetica, sans-serif;">}</span></div>		Serial.print(EEPROM.write(addr), DEC);
<div style="text-align: justify;"><span style="font-family: Arial, Helvetica, sans-serif;">	}</span></div>
Notice those are both arguments are addr. So what I'm doing here is the first argument is the address I want to write to. The second argument is the data want to write to that address. So in this case the data that I'm writing
to the address is actually the address itself. So I'm writing a zero to address zero, one to address one, and so on.
Then the second for loop reads the contents of the address, and just prints it to the serial monitor. Now note that Serial.print it takes a second argument DEC, that just stands for decimal, to tell it to interpret the data,
the byte that it gets that says, when you print in this interpreter as a decimal number just so we it as a decimal number in the serial monitor.
Now this program is incomplete, it's not including the hashtag include that you have to have at the top. So whenever you use one of these libraries you want to include the library right. So
there will be .header files .h files which are called header files for every library.
So in this case I believe it's called EEPROM.h So you have to say #include < EEPROM.h > at the top. Or you can do that through the IDE as well but either way
that would be in there.
1.2.2 Multiple Bytes
(1) Can only read/write one byte at a time
Okay so now let's say you want to access multiple bytes in the EEPROM. So the way the EEPROM works is it's one address, one byte. But there are numbers that are bigger than one byte.
(2) How do you deal with large number?
- int is a 2 bytes long
So for instance, in the ATmega328 that we're working with an integer is 2 bytes long. So say you want to take this two byte number and store it in an address. So first thing to remember is that you can't store it in one address,
you have to store it in two addresses. It's two bytes, it takes two addresses.
(3) Using masking to access a single byte at a time
So the common way to do this is to use masking to access a single byte at a time. So take an integer. You've got a two byte number. Say you want to write this to memory. You want to write the first byte, write one byte then write
the next byte. So, when you write the one byte, you want to ignore the other bytes. It's a two byte number. One is the most significant byte, one is the least significant byte. When you're writing the least significant byte you need to ignore the most significant
byte. When you're writing the most significant byte you need to ignore the least significant byte.
(4) Mask is a series of bits that highlights the bits in the number that you are interested in
So, masking is just a way of ignoring bits inside a word.So if we're looking at integers it's going to be 16-bits long, if we want to focus on the low byte, the least
significant 8-bits, we need to ignore the high bits.
So masking is a way so that we can say, hey look, these are the bits we're interested in, and these other bits ignore them.
So a mask, when you’re using masking, performing masking, you need to use what's called a mask.
A mask is a series of bits that highlights the bits in the number that we're interested in. So if you've got an integer, 16 bits and we're only interested in the high bit, the high 8 bits. Then
the mask is going to say, is going to have, it's also going to be a 16 bit number.The high 8 bits will be ones. And the low 8 bits will be zeros, and the bits that are zeros are the ones that we're going to ignore. The bits that
are ones which will be the high eight bits in our data will be the ones that we're going to focus on.
So that's what a mask is, it highlights the bits in the number that we're interested in.
(5) Performing a bitwiseand operation with the mask zeros out non-interesting bits
So, the mask is a different number that has ones in the bits that we're interested in, zeros in the bits that we're not. And then you perform what's called a bitwise and operation. You take
the data that you're looking at and you and it. You perform a bitwise and with the mask. And a bitwise and, basically what that does is any mask bit that has a one in the split position, that bit doesn't change. But the bits that have zeros, they're zeroed
out. It becomes zero because that's how an AND operation works. So when you and something with a 0, it becomes a 0. So what that does by doing that bitwise and, it zeroes out all the bits that you're not interested in, but the bits that you are interested
in keep their value. That's the intuition.
1.3 Lecture 1.3 - Masking
1.3.1 Masking
(1) Write 259 to EEPROM
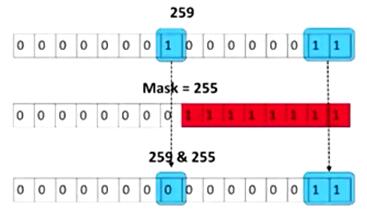
So we have a number and we want to write it to the EEPROM. And it's a two byte number. So it's an integer, it's got two bytes. And in this case we're using the number 259. So 259 in binary is shown there at the top. A sequence
of zeros and ones. And notice it has three ones in it. The least significant two bits are ones, and the bit in the eighth position is a one. And the rest of them are zeroes. So that's 259. And we want to put that into EEPROM.
So first, we want to just focus on the least significant byte. Then we want to focus on the most significant byte. So the least significant byte are the least significant eight bits, and they include two of those 1s, okay. The
low two, the least significant 1s are in there. Then the most significant byte has that other 1 in it.
(2) Create a mask
So we want to focus on the least significant byte first, so how do we do that? What we do, is we create a mask. Now the mask you can see is valued 255. That's its decimal representation. But in binary, you see it right there
underneath the 255. It's, basically it looks like its high bits, high eight bits or all zeros. And its low eight bits which are highlighted red are all ones. So what this is trying to tell us is, in our mask, is that the bits that we are interested in our
original number 259. Are the low bits, the least significant eight bits. Those are the ones that the mask has assigned to one.
(3) Take the mask bitwise AND with 259
We take the mask and AND it, perform a bitwise AND with the number 259, so we take 259, AND it with 255. Which it's easy to see what that does, if we look at the binary representations.
So what actually happens when you do a bitwise and is it performs 16 different and operations. So it takes the least significant bits, the bits in the zeroth position, ands those, and then it gets the zeroth position of the result.
Which in our case, if you look at the mask, the zeroth bit is a 1, and the zeroth bit, the least significant bit of 259 is also 1.
in this case, we're taking the least significant eight bits of 259 and anding them with 1s, because the mask is all 1s. When you take a number, bitwise and it with 1s, you get that same number back. So you'll notice in the results
at the bottom, the least significant eight bits are exactly the same as the least significant eight bits of the number 259 that we're interested.
Now, the most significant bits of the mask are all 0s. So we're ANDing the most significant bits of 259 with the most significant bits of the mask. And any time you AND a number with a zero, you get a zero. So you notice in the
results, in the result at the bottom, the most significant eight bits are all 0s.
(4) One byte at a time to write to EEPROM
Because we could only write EEPROM one byte at a time, one eight bit chunk at a time. So this masking you create the mask where you put ones in the bits and the mask bits you're interested in. Then you perform a bit wise and,
and you see that ampersand that's right there. That's how you do bit wise and.
1.3.2 Masking High Bits
Now, this example shows us how to get at the least significant eight bits. We'll also want to look at the most significant eight bits. So, how do we do that? We've got 259, again, up at the top. This time, we want to focus on
those bits that we have in blue, there, the most significant eight bits. Which are all zeros and then a one.

(1) Right shift 8 bits
So first thing we're going to do is take the number 259 and right shift it eight. So what does right shift mean? Right shift means just take the bits and shift them over one. But we're going to shift it over eight. So we're going
to take every bit in a position in 259, we're going to shift it over eight positions. And what it does do is that the most significant eight bits are now the least significant eight bits. And the most significant bits are all zeroes now, because when we did
the right shift, when you're shifting into the end, you shift zeroes in. So you get zeroes in high bits.
(2) Then Bitwise AND with a mask 255
Now we've put the bits we're interested in the low eight positions, and then we perform our same bitwise mask again. We verified AND with the mask. So we use that same mask we use in the last slide which allows us to focus on
the least significant eight bits. And we use that same mask and we get the result. So in the final result you can see that what was originally the high eight bits. The most significant bits in 259 they've been shifted to the least significant eight bits. And
then by doing the masking we always see in the final result, are the least significant eight bits, which are actually the most significant eight bits of the original 259. And then all the high bits are zeroed out, because of the masking operation.
And then at that point, you can take that number and do an EEPROM write, and write that byte into the EEPROM. And you'll write the byte correctly.
1.3.3 Writing an int to EEPROM
<div style="text-align: justify;"><span style="font-family: Arial, Helvetica, sans-serif;">int bigData;</span></div><div style="text-align: justify;"><span style="font-family: Arial, Helvetica, sans-serif;">byte littleData;</span></div>void setup(){
<div style="text-align: justify;"><span style="font-family: Arial, Helvetica, sans-serif;">	littleData = bigData & 0xFF; // 0xFF = 11111111</span></div>	EEPROM.write(0, littleData);
<div style="text-align: justify;"><span style="font-family: Arial, Helvetica, sans-serif;">	EEPROM.write(1, littleData);</span></div>	littleData = (bigData >> 8) & 0xFF;
<div style="text-align: justify;"><span style="font-family: Arial, Helvetica, sans-serif;">}</span></div>
So here's a little program that shows that going on. We start off with an integer. We'll call this bigData. Some integer, 16 bits that we're interested in, okay. And we want to write this into the EEPROM into an address. Then
you got a byte we'll call littleData. What we're going to do is make
littleData one byte of bigData. So we're going to take big data and first write one byte of it as little data and then another byte.
(1) Write the least significant byte to the first address
In setup function, littleData equals big data and 0xFF. So what does that mean? That is performing the bid wise and with the mask so 0xFF is my mask. Now that notation is called hexidecimal notation right. A hexidecimal notation,
we didn't go over it but hexadecimal is base 16. And at base 16 you have 16 digits. Zero through nine plus a, b, c, d, e, and f. Okay, so, a is ten, B is 11, so on, and F is a 15. So notice that is 0x, 0x means hexidecimal, and the actual value in hexidecimal
is FF, and F is a 15, which in binary is all ones.
So 0xFF is the same as the mask that we used on the last two slides. So this is just a shorthand. Now people, you should be used to this shorthand a little bit, because this hexadecimal shorthand is commonly used. It just makes
numbers shorter.
so big data and 0xFF, that does the bitwise masking. The bitwise and with the mask 0xFF. And so now littleData is going to be the least significant byte. And then we can just write that, EEPROM.write to location zero littleData.
(2) Write the most significant byte to the next address
Then now I say littleData equals bigData right shifted eight, and then masked. So now littleData is equal to what was the most significant byte inside bigData, and then we'd write that. EEPROM.write(1, littleData). So note that
we are writing the next byte into the next address, which we have to do. Because each address only takes one byte.
(3) Little Endian ordering
So what we've done is we've done what's called little endian ordering, meaning we took the least significant byte and wrote it into the lowest address, zero. And we took the most significant byte, and wrote it into the higher
address one.
(4) Big Endian ordering
We could've done it the other way. We could've said well I'm going to take the most significant byte and put that in address zero and then the least significant byte, put that in address one. That's called Big Endian ordering,
and we can do it either way. And different hardware architectures, different machines, do use different ordering. Some machines are Little Endian, some machines are Big Endian. And you need to be aware that when you're working with a machine


 被折叠的 条评论
为什么被折叠?
被折叠的 条评论
为什么被折叠?
 到【灌水乐园】发言


