


一上来的python文件就遇到了缺少OVS控制器的问题,明天早上我应该会
在本例中, 我们会创建一个不连接到任何控制器的 OVS 交换机 (昨晚解决了所以这个要延后了)
还有一个重要的就是examples的文件夹,最好跟着走一遍
What are Mininet's limitations?
mininet只能在Linux下运行
--nat可以从mininet链接到本地的网
最好将host独立低建在一个
然后再开始导入那个啥


之后强制关闭sudo fuser -k 6653/tcp
如果是多节点之间连接
linkopts=dict(bw=10,dalay='5ms',loss=2,max_queue_size=1000,use_htb=True)
self.addLink(node1,node2,**linkopts)
(**dict)可以将选项传给matplotlib等库

        for h in range(n):
            host = self.addHost('h%s' % (h + 1),cpu=.5/n) 给主机分配50%/n的COU
            self.addLink(host, switch,bw=10,dalay='5ms',loss=2,
                         max_queue_size=1000,use_htb=True)
            bw的单位是M,delay可以是100us,1s等,loss是百分比
如果是多节点之间连接
mininet本质是个 a bash shell process attached to one or more network interfaces

print "starting tast00"
    h1.cmd('while true;do date;sleep 1;done > date.out &')
    sleep(10)
    print "stopping trest"
    h1.cmd('kill %while')
    print "reading output"
    f=open('date.out')
    lineno=1
    for line in f.readlines():
        print "%d:%s" % (lineno,line.strip())
        lineno+=1
    f.close()
sleep一秒再输出,总共10s
the background execution feature & of the shell to run the command in the background, and job control kill %while to shut down the program that is running in the background.
&在后台启动,kill while停止程序
命令有两种,一种是Unix指令(在前台工作),一种是bash shell自带的(没有pid,在后台工作)
pid = int( h1.cmd('echo $!') ) echo这个什么也输不出来,最后显示valueError,base10>>> int('5')
5
>>> float('5.0')
5.0
>>> float('5')
5.0
>>> int(5.0)
5
>>> float(5)
5.0
>>> int('5.0')
Traceback (most recent call last):
File "<stdin>", line 1, in <module>
ValueError: invalid literal for int() with base 10: '5.0'
>>> int(float('5.0'))
5shell's wait mechanism?
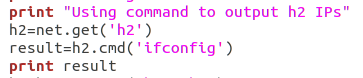
monitors output from multiple hosts
multiping.py输出这样的结果

popenpoll.py

bind.py:解决的是hosts独立空间的问题,否则在共用的情况下,若需要改动/etc,得给每个host都重新配置
:
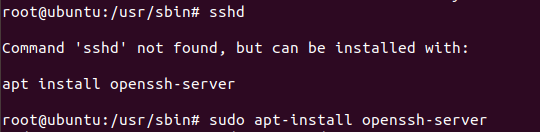
baresshd.py : 不用openflow创建一个sshd进程
如果未在监听:通过看源码发现sshd是在/usr/sbin目录下,进入目录发现没有sshd,按照提示即可解决
![]() 成功
成功
此处跳过了集群
consoles.py 为每个nodes建立一个控制台窗口

单击ping图标后:(使用interrupy终止ping命令)

单击iperf图标后:
控制台得到了iperf的输出后就会解析和累加,得到所有console的输出后回在bandwidth那增加

单击窗口后即可建立起对应的xterm

所有能实现的功能在class ConsoleApp( Frame )中定义,拓扑结构还是原来的建法
controller.py :使用subclass子类创建多控制器网络
c0 = Controller( 'c0', port=6633 )
c1 = Controller( 'c1', port=6634 )
c2 = RemoteController( 'c2', ip='127.0.0.1', port=6633 )

cmap = { 's1': c0, 's2': c1, 's3': c2 }

class MultiSwitch( OVSSwitch ):
    "Custom Switch() subclass that connects to different controllers"
    def start( self, controllers ):
        return OVSSwitch.start( self, [ cmap[ self.name ] ] )

topo = TreeTopo( depth=2, fanout=2 )
net = Mininet( topo=topo, switch=MultiSwitch, build=False )
for c in [ c0, c1 ]:
    net.addController(c)
controller2.py 和上面差不多,节点自己增加
编程技巧
info( "*** Creating hosts\n" )
    hosts1 = [ net.addHost( 'h%d' % n ) for n in ( 3, 4 ) ]
    hosts2 = [ net.addHost( 'h%d' % n ) for n in ( 5, 6 ) ]

    info( "*** Creating links\n" )
    for h in hosts1:
        net.addLink( s1, h )
    for h in hosts2:
        net.addLink( s2, h )
    net.addLink( s1, s2 )
controlnet.py 建立多个网络,需要配置好openflow,跳过
cpu.py 检测不同CPUlimits下的iperf bandwidth,主要包含bwtest和dump两个函数
原地气炸GitHub上源码有问题!

root@ubuntu:/usr/lib/python2.7/dist-packages/mininet/examples# python hwintf.py
*** Connecting to hw intf: eth1*** Checking eth1
Error: eth1 does not exist! 查看源码:未配置Eth1 ,尚未解决
def checkIntf( intf ):
    "Make sure intf exists and is not configured."
    config = quietRun( 'ifconfig %s 2>/dev/null' % intf, shell=True )
    if not config:
        error( 'Error:', intf, 'does not exist!\n' )
        exit( 1 )
    ips = re.findall( r'\d+\.\d+\.\d+\.\d+', config )
    if ips:
        error( 'Error:', intf, 'has an IP address,'
               'and is probably in use!\n' )
        exit( 1 )
intfoptions.py:重新配置TCIntf来测试网络性能
 info( '\n*** Configuring one intf with bandwidth of 5 Mb\n' )
    link1.intf1.config( bw=5 )
    info( '\n*** Running iperf to test\n' )
    net.iperf()

    info( '\n*** Configuring one intf with loss of 50%\n' )
    link1.intf1.config( loss=50 )
    info( '\n' )
    net.iperf( ( h1, h2 ), l4Type='UDP' )

    info( '\n*** Configuring one intf with delay of 15ms\n' )
    link1.intf1.config( delay='15ms' )
    info( '\n*** Run a ping to confirm delay\n' )
    net.pingPairFull()

limit.py: 如何使用link和CPU limits
源码中只有函数定义没有调用?
for sched in 'rt', 'cfs':
        info( '*** Testing with', sched, 'bandwidth limiting\n' )
        if sched == 'rt':
            release = quietRun( 'uname -r' ).strip('\r\n')
            output = quietRun( 'grep CONFIG_RT_GROUP_SCHED /boot/config-%s'
                               % release )
            if output == '# CONFIG_RT_GROUP_SCHED is not set\n':
                info( '*** RT Scheduler is not enabled in your kernel. '
                      'Skipping this test\n' )
                continue
        host = custom( CPULimitedHost, sched=sched, cpu=cpu )
        net = Mininet( topo=myTopo, intf=intf, host=host )
        net.start()
        testLinkLimit( net, bw=bw )
        net.runCpuLimitTest( cpu=cpu )
        net.stop()
linearbandwidth.py: This example shows how to create a custom topology programatically by subclassing Topo, and how to run a series of tests on it.
耗时态长,未看结果
linuxrouter.py:
This example shows how to create and configure a router in Mininet that uses Linux IP forwarding.
使用IP forwarding将node转化为router
info( '*** Routing Table on Router:\n' )
print net[ 'r0' ].cmd( 'route' )

mininet.py 总共3584行,我肯定不需要修改,跳过跳过
mobility.py:
This example demonstrates detaching an interface from one switch and attaching it another as a basic way to move a host around a network.
for sw in net.switches:
sw.dpctl( 'del-flows' ) 可见之前不能用是我没配置好
multiLink.py:
This example demonstrates the creation of multiple links between nodes using a custom Topology class.
    def __init__( self, n, **kwargs ):
        Topo.__init__( self, **kwargs )

        h1, h2 = self.addHost( 'h1' ), self.addHost( 'h2' )
        s1 = self.addSwitch( 's1' )

        for _ in range( n ):
            self.addLink( s1, h1 )
            self.addLink( s1, h2 )
nat.py:
This example shows how to connect a Mininet network to the Internet using NAT. It also answers the eternal question "why can't I ping google.com?"

 # Add NAT connectivity
    net.addNAT().configDefault()
    net.start()
    print "*** Hosts are running and should have internet connectivity"
    print "*** Type 'exit' or control-D to shut down network"
natnet.py:
This example demonstrates how to create a network using a NAT node to connect hosts to the internet.

lass InternetTopo(Topo):
    "Single switch connected to n hosts."
    def __init__(self, n=2, **opts):
        Topo.__init__(self, **opts)

        # set up inet switch
        inetSwitch = self.addSwitch('s0')
        # add inet host
        inetHost = self.addHost('h0')
        self.addLink(inetSwitch, inetHost)

        # add local nets
        for i in irange(1, n):
            inetIntf = 'nat%d-eth0' % i
            localIntf = 'nat%d-eth1' % i
            localIP = '192.168.%d.1' % i
            localSubnet = '192.168.%d.0/24' % i
            natParams = { 'ip' : '%s/24' % localIP }
            # add NAT to topology
            nat = self.addNode('nat%d' % i, cls=NAT, subnet=localSubnet,
                               inetIntf=inetIntf, localIntf=localIntf)
            switch = self.addSwitch('s%d' % i)
            # connect NAT to inet and local switches
            self.addLink(nat, inetSwitch, intfName1=inetIntf)
            self.addLink(nat, switch, intfName1=localIntf, params1=natParams)
            # add host and connect to local switch
            host = self.addHost('h%d' % i,
                                ip='192.168.%d.100/24' % i,
                                defaultRoute='via %s' % localIP)
            self.addLink(host, switch)
需要花不少时间去啃这一块:
监测多个进程同时将结果输出到文件中
给每个hosts配置独立空间
Naming in Mininet
h1-eth0 is host h1's default interface, and s1-eth1 is switch s1's first data port
Host interfaces are only visible from within the host itself, but switch data ports are visible in the "root" namespace (you can see them by typing ip link show in another window while Mininet is running.
it's easy to examine switch interfaces but slightly trickier to examine host interfaces, since you must tell the host to do so (typically using host.cmd().)???
Customizing mn using --custom files
可以自定义topo,test,CLI command,感觉不是很难,遇到了再看introduction
Understanding the Mininet API
Mininet API Documentation
神奇滴是,在terminal里既可以运行Python2又可以运行Python3
python
	>>> from mininet.node import Host
	>>> help(Host.IP)
	Help on method IP in module mininet.node:

	IP(self, intf=None) unbound mininet.node.Host method
		Return IP address of a node or specific interface.
Measuring Performance
These are recommended, though you’re free to use any tool you’re familiar with.
- Bandwidth (
bwm-ng,ethstats) - Latency (use
ping) - Queues (use
tcincluded inmonitor.py) - TCP
CWNDstatistics (tcp_probe, maybe we should add it tomonitor.py) - CPU usage (global:
top, or per-containercpuacct)
不是很明白如何操纵emm
OpenFlow and Custom Routing
https://github.com/mininet/openflow-tutorial/wiki
External OpenFlow Controllers hin简单的亚子,回头用到的时候再排坑叭
https://github.com/mininet/mininet/wiki/FAQ#ethernet-loops
等到遇到问题的时候再看和controller有关的东西
-
Invoking system utilities from Python
http://docs.python.org/library/subprocess.html http://docs.python.org/library/os.html] https://github.com/amoffat/pbs
-
Parsing output files in your own format
-
Passing command line arguments to your script
-
matplotlibfor plotting graphs
introduction建议把examples的代码都读懂并且运行,解决相应的问题,自己的需求可以在上面的基础上改


 311
311


 被折叠的 条评论
为什么被折叠?
被折叠的 条评论
为什么被折叠?
 到【灌水乐园】发言


