


安装前提示
操作系统选择要注意:
-
Ceph Kernel Client
We currently recommend:
- 4.1.4 or later
- 3.16.3 or later (rbd deadlock regression in 3.16.[0-2])
- NOT 3.15.* (rbd deadlock regression)
- 3.14.*
These are considered pretty old, but if you must:
- 3.10.*
Firefly (CRUSH_TUNABLES3) tunables are supported starting with 3.15. See CRUSH Tunables for more details.
-
B-tree File System (Btrfs)
If you use the btrfs file system with Ceph, we recommend using a recent Linux kernel (3.14 or later).
请详细读过官网对于client内核需求和ceph节点内核需求之后再选择Linux版本,内核版本,ceph版本,否则有些功能不支持什么的很蛋疼,官网详细->detail
确保内存、cpu、磁盘不要再满载情况 :
* monitor默认是会安装在主磁盘空间上的,磁盘空间 运行 ceph health 会提示 HEALTH_WARN mon.test-2 low disk space
* osd可以选择安装目录和磁盘,使用闲置磁盘。也可以动态添加。
* 安装环境的内核版本有也有要求,否则会出现rdb映射失败的情况,看官网内核推荐
1)If you are using ext4 file system, you need to place this in config global section: filestore xattr use omap = true
2)the ext4 is too small to be usable. If you are using the ext4 filesystem for your Ceph OSD, you should always add
filestore xattr use omap = true to the following setting to the [OSD] section of your ceph.conf file.
ceph对于磁盘是有一定的限制的,默认配置中,ceph要求monitor安装目录所在磁盘available空间 >5%(总磁盘空间)
Tip 不顾分区而在单个硬盘上运行多个OSD,这样不明智!
Tip 不顾分区而在运行了OSD的硬盘上同时运行监视器或元数据服务器也不明智!
文件系统也有一定要求(最大文件扩展属性 osd maxobject name length 默认是2048,一般ext4 是1024) detail
安装方法主要参考官网
可以借鉴网文:点击打开链接
0、安装中提示
1) 提供一种简单有效的方式来处理安装过程中出现的问题:
如果在某些地方碰到麻烦,想从头再来,可以用下列命令清除配置:
ceph-deploy purgedata {ceph-node} [{ceph-node}]
ceph-deploy forgetkeys
用下列命令可以连 Ceph 安装包一起清除:
ceph-deploy purge {ceph-node} [{ceph-node}]
如果执行了 purge ,你必须重新安装 Ceph 。
2) ceph配置文件样例(osd pool default size = 2 只用于测试或者你不需要3份副本来保证 数据reliable):
[global]
fsid = f3349fe2-52b3-47fc-9c29-55573490f41f
mon_initial_members = ceph-3
mon_host = 192.168.10.15
auth_cluster_required = cephx
auth_service_required = cephx
auth_client_required = cephx
osd pool default size = 2
osd max object name len = 256
osd max object namespace len = 64
rbd_default_features =3
------------------------------------------------------------------

rbd_default_features = 1+2=3(目前内核只支持1 、2 特性 )3)mdzz 网络问题
使用国内镜像加速下载 (detail)
export CEPH_DEPLOY_REPO_URL=http://mirrors.163.com/ceph/debian-jewel
export CEPH_DEPLOY_GPG_URL=http://mirrors.163.com/ceph/keys/release.asc
ceph-deploy install node-1 node-2 node-3 node-4
4)常用的参数
ceph-deploy --overwrite-conf (覆盖原来的配置文件)
1、admin_socket问题
执行上述命令之后,遇到的蛋疼的问题:
admin_socket: exception getting command descriptions: [Errno 2] No such file or directory
谷歌之后发现有很多原因会引起这个问题。
查看
我遇到的是 磁盘空间不够了,默认磁盘少于5%就会报错。需要在ceph.conf中设置 mon data avail crit = x(百分比值)
2、 permission denied
执行以下命令发生的权限不足问题
ERROR: error creating empty object store in /var/local/osd0: (13) Permission denied
手动在主机上通过更改目录的owner(所有者) chown ceph:ceph /path/to/directory
参考 : 点击打开链接
3、文件系统的扩展属性问题 max attr value size
NOT RECOMMENDED
We recommend against using ext4 due to limitations in the size of xattrs it can store, and the problems this causes with the way Ceph handles long RADOS object names. Although these issues will generally not surface with Ceph clusters using only short object names (e.g., an RBD workload that does not include long RBD image names), other users like RGW make extensive use of long object names and can break.
Starting with the Jewel release, the ceph-osd daemon will refuse to start if the configured max object name cannot be safely stored on ext4. If the cluster is only being used with short object names (e.g., RBD only), you can continue using ext4 by setting the following configuration option:
Note
This may result in difficult-to-diagnose errors if you try to use RGW or other librados clients that do not properly handle or politely surface any resulting ENAMETOOLONG errors.
4、ceph health
提示 HEALTH_WARN 64 pgs incomplete; 64 pgs stuck inactive; 64 pgs stuck unclean
参照 link
5、 reached critical levels of available space on local monitor storage
mon主磁盘空间不足导致 mon自动shutdown 问题 link 如果不降低磁盘的使用率是无法启动ceph mon的6、基准测试 benchmark
7、基准测试遇到的问题
In some cases useful info is found in syslog - try "dmesg | tail" or so.
rbd: map failed: (5) Input/output error
8、阿里云问题?
9、 rbd: map failed: (6) No such device or address
Tried to follow along here: http://docs.ceph.com/docs/hammer/start/quick-rbd/

But on my Ubuntu 16.04 client, when it got to the rbd map command, I got:

$ sudo rbd map foo --pool rbd --name client.admin
rbd: sysfs write failed
rbd: map failed: (6) No such device or address
$
Found the reason here: https://bugs.launchpad.net/ubuntu/+source/ceph/+bug/1578484

Got it working with:

$ rbd feature disable foo exclusive-lock object-map fast-diff deep-flatten
Now the map works:

$ sudo rbd map foo --pool rbd --name client.admin
/dev/rbd0
$
Has to do with these new Ceph features not being supported by the kernel client, which is why they must be disabled.features
文件,可以看到这个对应关系,总结了下就是下面的列表
rbd map问题
使用rbd map镜像时候报错增加删除monitor
firewall-cmd来开放端口
ceph要求固定端口开放使用,可以通过firewall-cmd来控制端口开放之类的工作
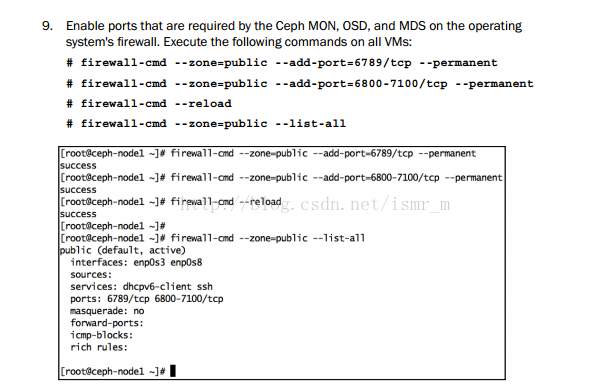
(截图来自ceph cookbook )


 2191
2191

 被折叠的 条评论
为什么被折叠?
被折叠的 条评论
为什么被折叠?
 到【灌水乐园】发言


