胸部X光图像-数据集

166 篇文章 31 订阅

原文:

Chest X-Ray Images (Pneumonia)

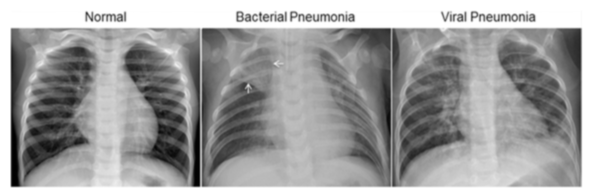
Figure S6. Illustrative Examples of Chest X-Rays in Patients with Pneumonia, Related to Figure 6

The normal chest X-ray (left panel) depicts clear lungs without any areas of abnormal opacification in the image. Bacterial pneumonia (middle) typically exhibits a focal lobar consolidation, in this case in the right upper lobe (white arrows), whereas viral pneumonia (right) manifests with a more diffuse ‘‘interstitial’’ pattern in both lungs.

The dataset is organized into 3 folders (train, test, val) and contains subfolders for each image category (Pneumonia/Normal). There are 5,863 X-Ray images (JPEG) and 2 categories (Pneumonia/Normal).

Chest X-ray images (anterior-posterior) were selected from retrospective cohorts of pediatric patients of one to five years old from Guangzhou Women and Children’s Medical Center, Guangzhou. All chest X-ray imaging was performed as part of patients’ routine clinical care.

For the analysis of chest x-ray images, all chest radiographs were initially screened for quality control by removing all low quality or unreadable scans. The diagnoses for the images were then graded by two expert physicians before being cleared for training the AI system. In order to account for any grading errors, the evaluation set was also checked by a third expert.

译:

胸部X光图像(肺炎)

图S6。肺炎患者胸部X射线的示例,如图6所示

正常胸部X光片(左图)显示的是清晰的肺部,图像中没有任何异常不透明的区域。细菌性肺炎(中)通常表现为局灶性肺叶实变,本例为右上肺叶(白色箭头),而病毒性肺炎(右)表现为两肺更弥漫的“间质”模式。

数据集被组织成3个文件夹(训练、测试、val),并包含每个图像类别(肺炎/正常)的子文件夹。共有5863张X射线图像(JPEG)和两类(肺炎/正常)。

胸部X光图像(前后)取自广州市妇幼医学中心1至5岁儿童患者的回顾性队列。所有胸部X光成像均作为患者常规临床护理的一部分进行。

对于胸部x光图像的分析,所有胸部x光片最初都是通过移除所有低质量或不可读的扫描进行质量控制筛查的。然后由两位专家医生对图像的诊断进行评分,然后再进行人工智能系统培训。为了解释评分错误,第三位专家也对评估集进行了检查。

大家可以到官网地址下载数据集,我自己也在百度网盘分享了一份。可关注本人公众号,回复“202204”获取下载链接。 

  • 0
    点赞
  • 2
    收藏
    觉得还不错? 一键收藏
  • 打赏
    打赏
  • 0
    评论
好的,我可以为您提供一些代码示例和步骤来完成这个任务。 首先,您需要下载并导入所需的软件包,包括`numpy`、`pandas`、`matplotlib`、`scikit-learn`和`tensorflow`或`pytorch`。您还需要下载并解压Kaggle上的胸部X光图像数据集。 接下来,您需要加载和预处理数据。在这个数据集中,您将有两个子目录,分别是`train`和`test`。`train`子目录包含训练图像,`test`子目录包含测试图像。每个子目录都有两个子文件夹,分别是`NORMAL`和`PNEUMONIA`,其中`NORMAL`文件夹包含正常的胸部X光图像,`PNEUMONIA`文件夹包含有肺炎的胸部X光图像。 您可以使用以下代码来加载和预处理数据: ```python import os import cv2 import numpy as np from sklearn.model_selection import train_test_split # Load data data = [] labels = [] PNEUMONIA_path = "./chest_xray/train/PNEUMONIA/" NORMAL_path = "./chest_xray/train/NORMAL/" for img in os.listdir(NORMAL_path): img_path = os.path.join(NORMAL_path, img) img = cv2.imread(img_path, cv2.IMREAD_GRAYSCALE) img = cv2.resize(img, (224, 224)) data.append(img) labels.append(0) for img in os.listdir(PNEUMONIA_path): img_path = os.path.join(PNEUMONIA_path, img) img = cv2.imread(img_path, cv2.IMREAD_GRAYSCALE) img = cv2.resize(img, (224, 224)) data.append(img) labels.append(1) # Convert to numpy array data = np.array(data) / 255.0 labels = np.array(labels) # Split data into train and validation sets train_data, val_data, train_labels, val_labels = train_test_split(data, labels, test_size=0.2, random_state=42) ``` 在上面的代码中,我们首先定义了两个变量`PNEUMONIA_path`和`NORMAL_path`,分别指向包含有肺炎和正常胸部X光图像的子目录。然后,我们遍历每个子目录中的图像,并将其读取为灰度图像,然后调整大小为`224x224`。我们还将标签存储在一个名为`labels`的列表中,其中0表示正常,1表示肺炎。最后,我们将数据和标签转换为NumPy数组,并将数据集拆分为训练和验证集。 现在,您可以尝试使用不同的分类方法来对数据进行分类和预测。下面是三种不同的分类方法示例: ## 1. Logistic Regression ```python from sklearn.linear_model import LogisticRegression from sklearn.metrics import classification_report # Train model lr = LogisticRegression() lr.fit(train_data.reshape(train_data.shape[0], -1), train_labels) # Evaluate model on validation set val_preds = lr.predict(val_data.reshape(val_data.shape[0], -1)) print(classification_report(val_labels, val_preds)) ``` 上面的代码使用scikit-learn中的逻辑回归模型进行分类。我们首先将训练数据`train_data`转换为二维数组,然后使用`fit`方法来训练模型。接下来,我们使用验证数据`val_data`进行预测,并使用`classification_report`函数生成分类报告。 ## 2. Support Vector Machine (SVM) ```python from sklearn.svm import SVC from sklearn.metrics import classification_report # Train model svm = SVC() svm.fit(train_data.reshape(train_data.shape[0], -1), train_labels) # Evaluate model on validation set val_preds = svm.predict(val_data.reshape(val_data.shape[0], -1)) print(classification_report(val_labels, val_preds)) ``` 上面的代码使用scikit-learn中的支持向量机模型进行分类。我们使用与逻辑回归相同的方法来训练模型并进行预测,然后使用`classification_report`函数生成分类报告。 ## 3. Convolutional Neural Network (CNN) ```python import tensorflow as tf from keras.utils import to_categorical from keras.models import Sequential from keras.layers import Dense, Conv2D, MaxPooling2D, Flatten # Convert labels to one-hot encoding train_labels = to_categorical(train_labels) val_labels = to_categorical(val_labels) # Build CNN model cnn = Sequential() cnn.add(Conv2D(32, (3,3), activation='relu', input_shape=(224, 224, 1))) cnn.add(MaxPooling2D((2,2))) cnn.add(Conv2D(64, (3,3), activation='relu')) cnn.add(MaxPooling2D((2,2))) cnn.add(Conv2D(128, (3,3), activation='relu')) cnn.add(MaxPooling2D((2,2))) cnn.add(Conv2D(256, (3,3), activation='relu')) cnn.add(MaxPooling2D((2,2))) cnn.add(Flatten()) cnn.add(Dense(128, activation='relu')) cnn.add(Dense(2, activation='softmax')) # Compile model cnn.compile(optimizer='adam', loss='categorical_crossentropy', metrics=['accuracy']) # Train model cnn.fit(train_data.reshape(train_data.shape[0], 224, 224, 1), train_labels, epochs=10, batch_size=32, validation_data=(val_data.reshape(val_data.shape[0], 224, 224, 1), val_labels)) # Evaluate model on validation set val_loss, val_acc = cnn.evaluate(val_data.reshape(val_data.shape[0], 224, 224, 1), val_labels) print("Validation loss:", val_loss) print("Validation accuracy:", val_acc) ``` 上面的代码使用Keras和TensorFlow构建了一个卷积神经网络模型。我们首先将标签转换为独热编码,并定义了一个包含四个卷积层和两个全连接层的CNN模型。我们使用`adam`优化器和交叉熵损失函数来编译模型,并在训练集上训练模型。最后,我们使用验证数据集评估模型,并输出损失和准确率。 在这三种不同的分类方法中,CNN模型的表现最好。您可以尝试调整模型的超参数,例如卷积层的数量和大小,全连接层的大小和dropout等,以提高模型的性能。

“相关推荐”对你有帮助么?

  • 非常没帮助
  • 没帮助
  • 一般
  • 有帮助
  • 非常有帮助
提交
评论
添加红包

请填写红包祝福语或标题

红包个数最小为10个

红包金额最低5元

当前余额3.43前往充值 >
需支付:10.00
成就一亿技术人!
领取后你会自动成为博主和红包主的粉丝 规则
hope_wisdom
发出的红包

打赏作者

不务正业的猿

谢谢您的支持与鼓励!!!

¥1 ¥2 ¥4 ¥6 ¥10 ¥20
扫码支付:¥1
获取中
扫码支付

您的余额不足,请更换扫码支付或充值

打赏作者

实付
使用余额支付
点击重新获取
扫码支付
钱包余额 0

抵扣说明:

1.余额是钱包充值的虚拟货币,按照1:1的比例进行支付金额的抵扣。
2.余额无法直接购买下载,可以购买VIP、付费专栏及课程。

余额充值