


黑马程序员MQ 学习笔记
https://www.rabbitmq.com/
https://www.rabbitmq.com/getstarted.html
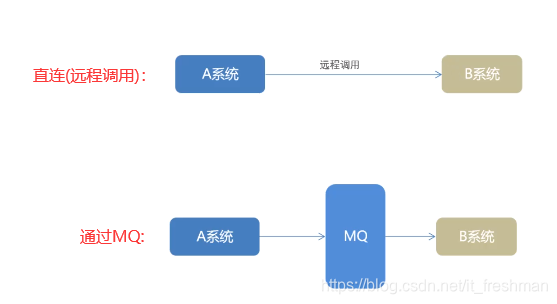
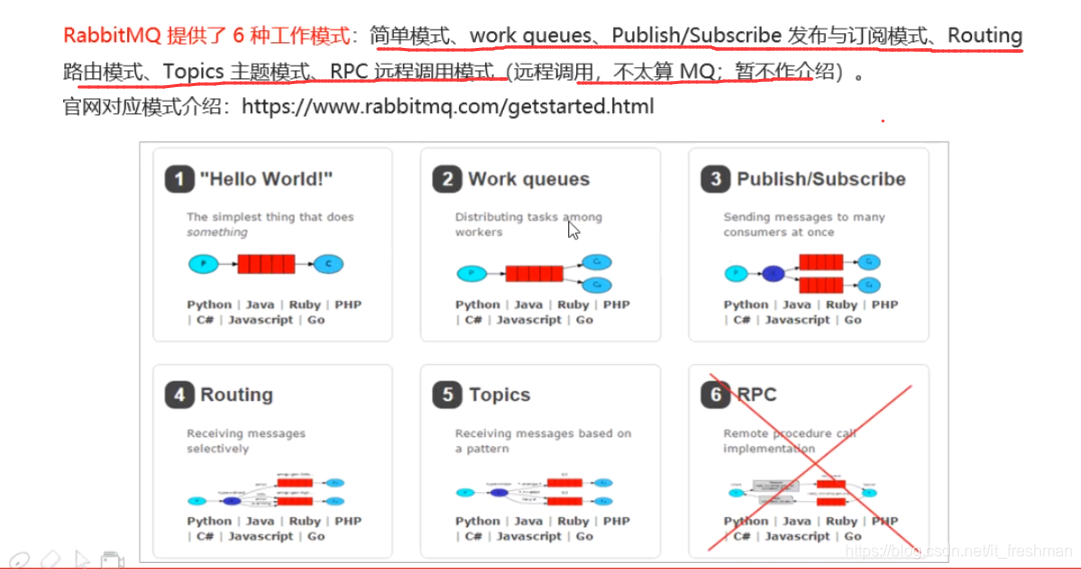
1.MQ的基本概念
1.1MQ概述
MQ全称Message Queue(消息队列),是在消息的传输过程中保存消息的容器。多用于分布式系统之间进行通信。
1.2MQ优势和劣势
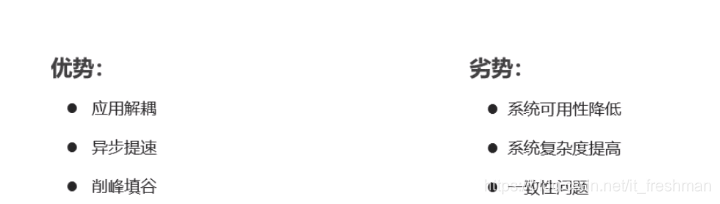
1.3MQ的优势
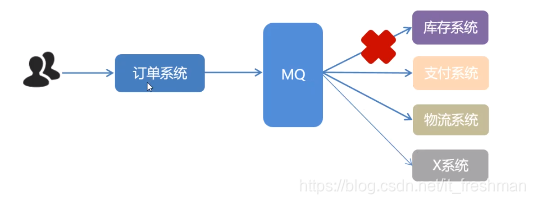
1.应用解耦
before
系统容错性差: 当库存系统不可用,导致整个订单系统不可用。
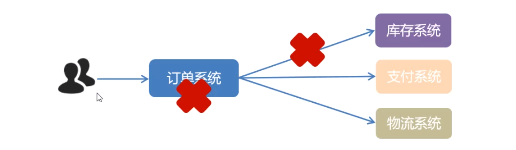
可维护性差: 新增x系统,需要修改订单系统。
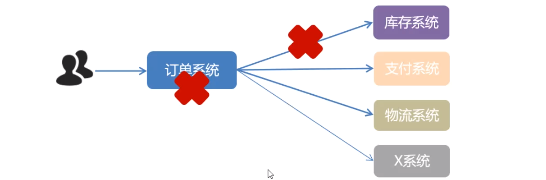
after: 使用MQ
库存系统不可用,仅影响库存系统自身。
新增x系统无需修改订单系统。
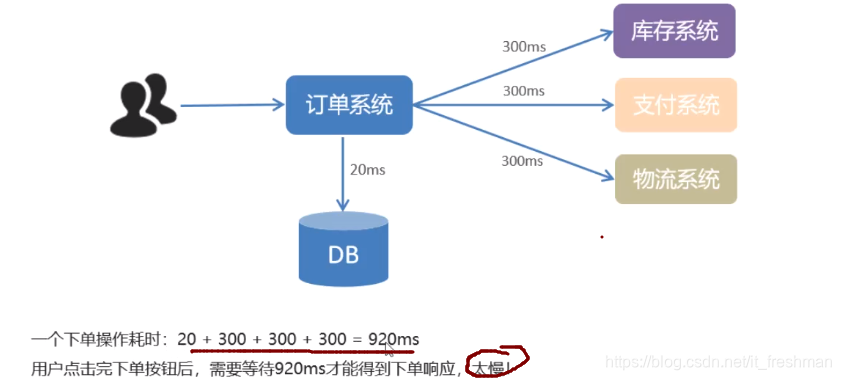
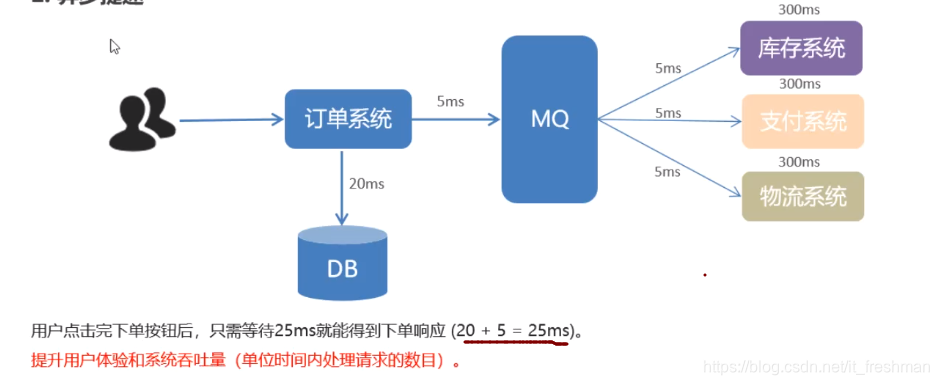
2.异步提速
before
after: 使用MQ
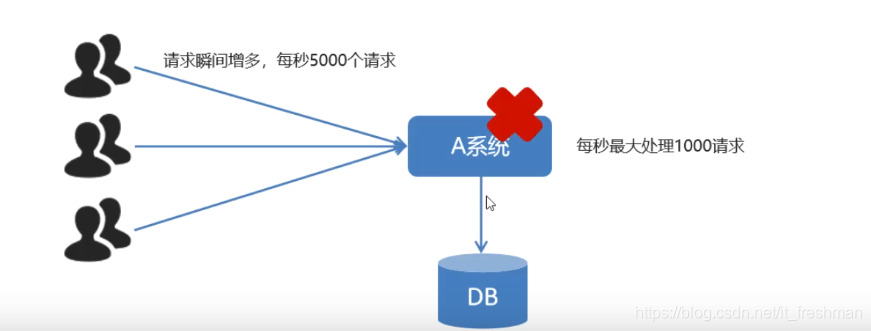
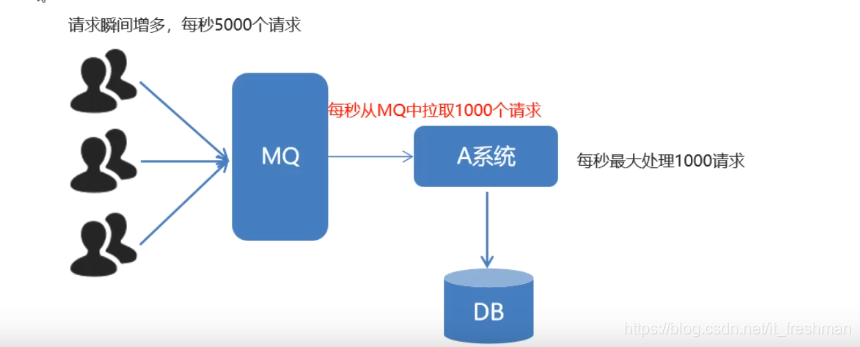
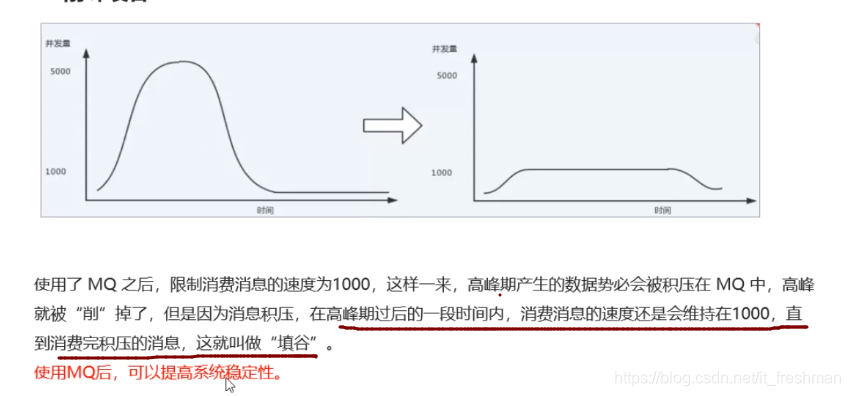
3.削峰填谷
before
after: 使用MQ
1.4 劣势
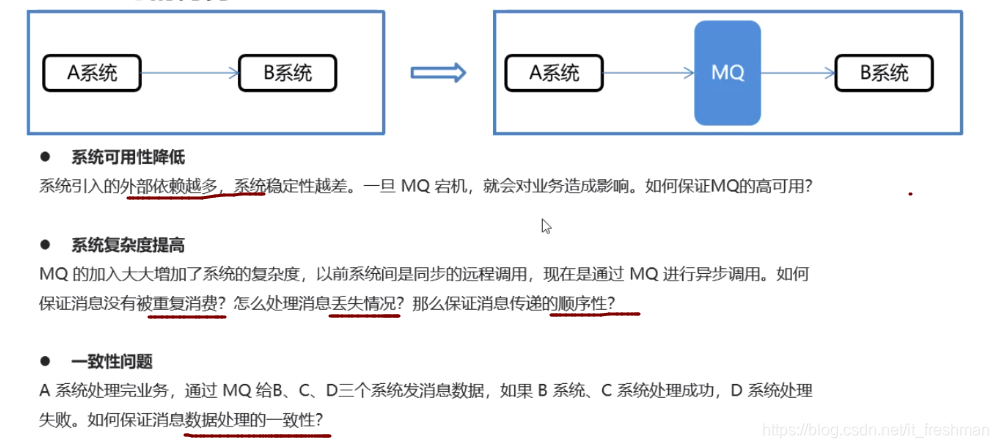
小结
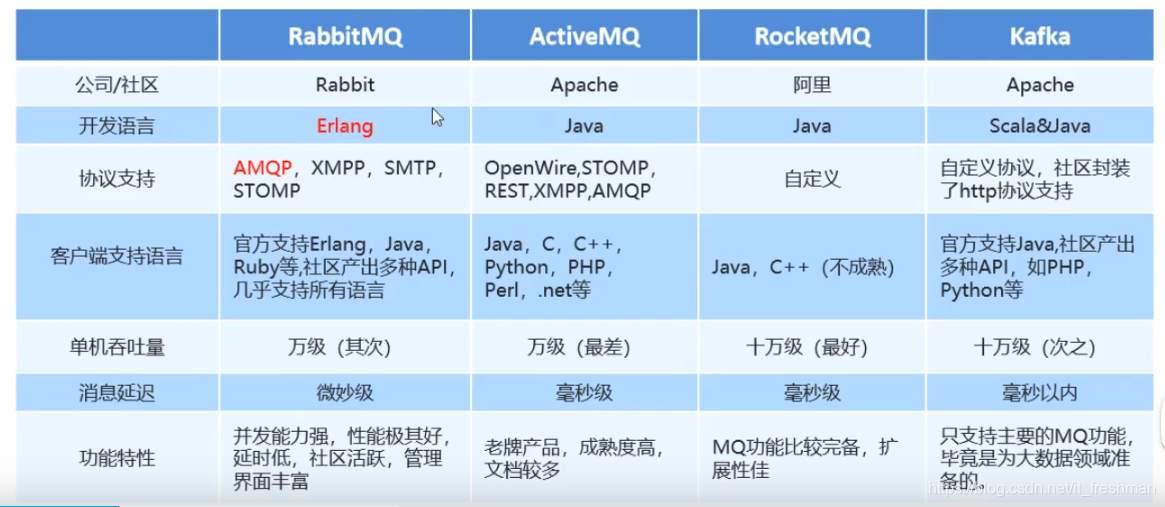
1.5常见MQ产品
1.6RabbitMQ简介
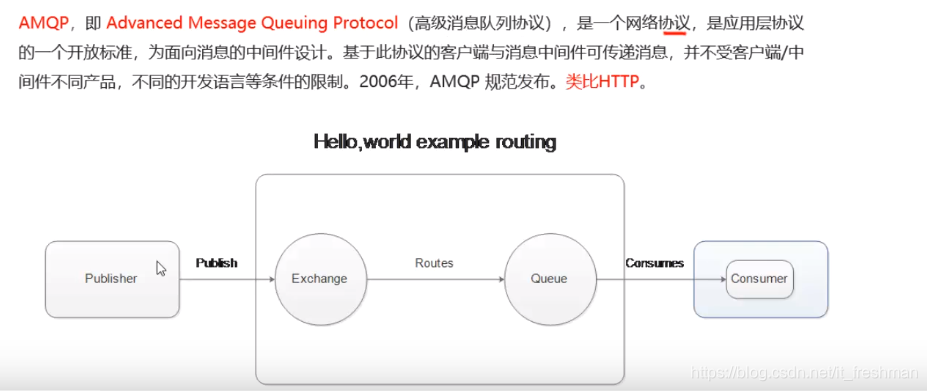
AMQP协议
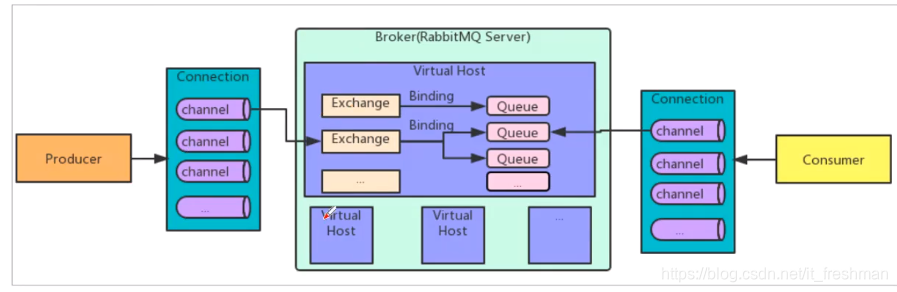
RabbitMQ基础架构
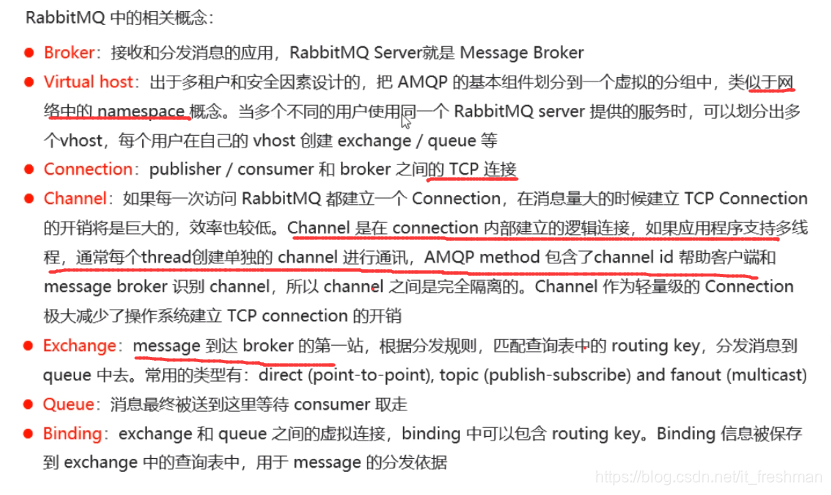
基本概念
RabbitMQ工作模式
1.7JMS(略)
2.RabbiMQ的安装和配置
docker安装
# 5672 : TCP链接的端口
# 15672 :管理界面端口
[root@s160 ~]# docker run -it --rm --name rabbitmq -p 5672:5672 -p 15672:15672 rabbitmq:3-management
登录
访问http://IP:15672/#/,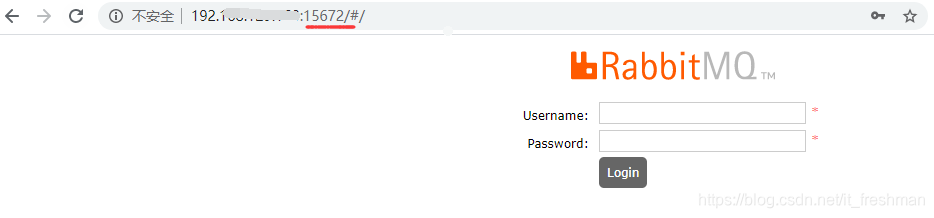
输入用户名密码:guest/guest
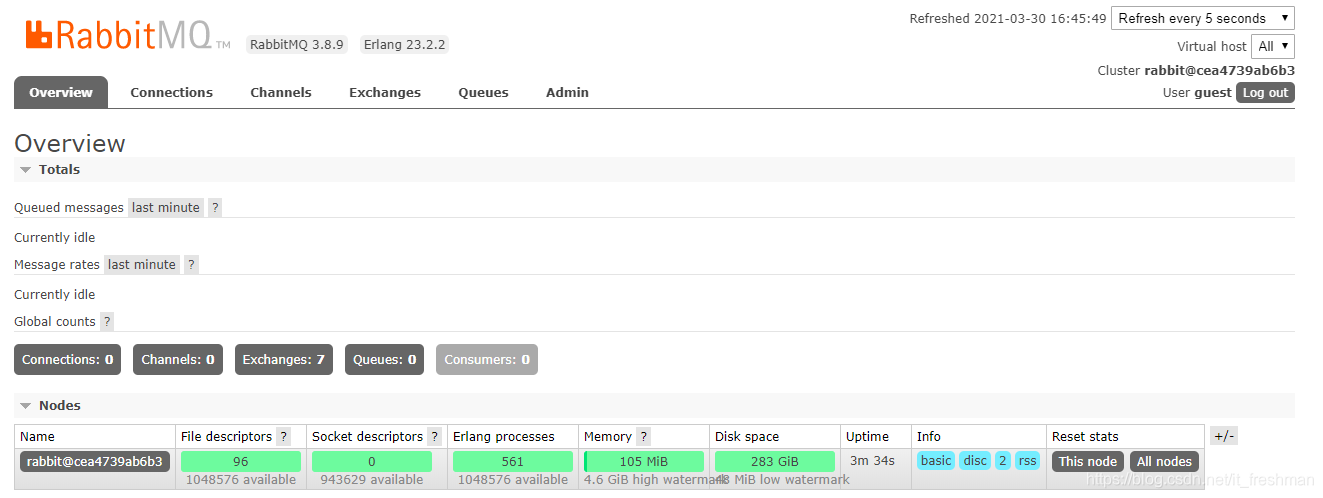
管理控制台使用(略)
3.RabbiMQ快速入门
3.1入门程序
maven依赖
    <dependencies>
      <dependency>
        <groupId>com.rabbitmq</groupId>
        <artifactId>amqp-client</artifactId>
        <version>5.11.0</version>
      </dependency>
    </dependencies>
代码实现
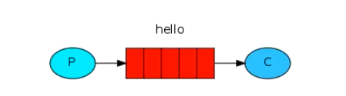
简单消息
不需要使用exchange:
producer代码实现
  public static void main(String[] args) throws IOException, TimeoutException {
        //1. 创建连接工厂
        ConnectionFactory factory = new ConnectionFactory();

        //2. 设置参数
        factory.setHost(HOST);
        factory.setPort(PORT);
        factory.setVirtualHost(VIRTUAL_HOST);
        factory.setUsername(USERNAME);
        factory.setPassword(PASSWORD);

        //3. 创建连接 Connection
        Connection connection = factory.newConnection();

        //4. 创建 Channel
        Channel channel = connection.createChannel();

        //5. 创建队列
        /**

         queue – 独立名称
         durable – 是否持久化(重启之后是否存在)
         exclusive – 独占。 只能有一个消费监听队列。
         autoDelete – 是否自动删除,当没有consumer时自动删除
         arguments – 其他配置参数
         */
        channel.queueDeclare("hello_world", true, false, false, null);

        //6. 发送消息
        /**
             exchange – 交换机名称
             routingKey – 路由名称
             props – 配置信息
             body – 发送的消息体
         */
        String body = "hello rabbitmq~~~~";
        //简单模式,不使用exchange ,则routingKey 为topic名称
        channel.basicPublish("", "hello_world", null, body.getBytes() );


        //7.释放连接
        channel.close();
        connection.close();
    }
consumer代码实现
/**

  queue – 队列名称
  autoAck – 自动确认
  consumerTag – a client-generated consumer tag to establish context
  callback – an interface to the consumer object
  */
 channel.basicConsume("hello_world", false,new DefaultConsumer(channel){
     @Override
     public void handleDelivery(String consumerTag,
                                Envelope envelope,
                                AMQP.BasicProperties properties,
                                byte[] body)
             throws IOException
     {
         System.out.println("consumerTag:"+consumerTag);
         System.out.println("envelope.getExchange:"+envelope.getExchange());
         System.out.println("envelope.getRoutingKey:"+envelope.getRoutingKey());
         System.out.println("properties:"+properties);
         System.out.println("body:"+new String(body));
         System.out.println("---------------------\n");
     }
 });
4.RabbiMQ工作模式
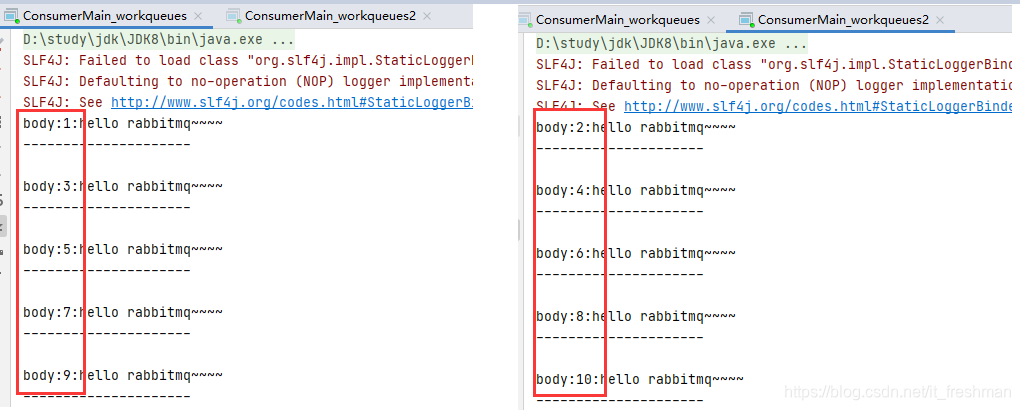
4.1 Work queue工作模式
模式说明
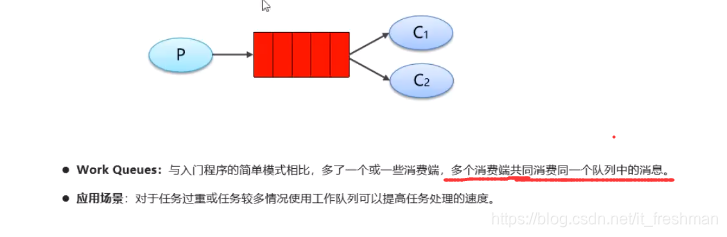
producer,consumer同 简单模式 **
运行结果: 多个consumer均匀交替**的消费 消息队列中的消息。
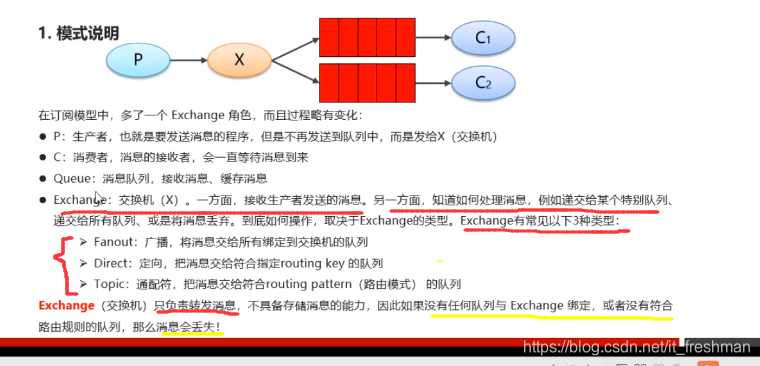
4.2 Pub/Sub订阅模式-广播(fanout)
模式说明
producer实现
  public static void main(String[] args) throws IOException, TimeoutException {
        //1. 创建连接工厂
        ConnectionFactory factory = new ConnectionFactory();
        factory.setHost(HOST);
        factory.setPort(PORT);
        factory.setVirtualHost(VIRTUAL_HOST);
        factory.setUsername(USERNAME);
        factory.setPassword(PASSWORD);

        Connection connection = factory.newConnection();
        Channel channel = connection.createChannel();


        //5. 创建交换机
        /**

         exchange – 交换机名称
         type – 交换机类型:
            DIRECT("direct"),  定向
            FANOUT("fanout"),  广播
            TOPIC("topic"),    通配符
            HEADERS("headers"); 通过参数匹配
         durable – 是否持久化
         autoDelete – 是否自动删除
         internal - 内部使用一般为false
         arguments – 参数
         */
        String exchange = "test_fanout";
        channel.exchangeDeclare(exchange, FANOUT, true, false, false, null);

        //6. 创建队列
        String queue1Name = "test_fanout_queue1";
        String queue2Name = "test_fanout_queue2";
        channel.queueDeclare(queue1Name, true, false, false, null);
        channel.queueDeclare(queue2Name, true, false, false, null);

        //7.绑定队列和交换机
        /**

         queue – 队列名称
         exchange –  队列绑定至 exchange名称
         routingKey –  路由key
         */
        channel.queueBind(queue1Name, exchange,"");
        channel.queueBind(queue2Name, exchange,"");

        //8. 发送消息
        String body = "日志信息:张三调用了findAll方法...日志级别为:info";
        //简单模式,不使用exchange ,则routingKey 为topic名称
        try {
            channel.basicPublish(exchange, "", null, body.getBytes() );
        } catch (IOException e) {
            e.printStackTrace();
        }

        //7.释放连接
        channel.close();
        connection.close();
    }
结果
exchange

queue
将消息发送给多个队列中。

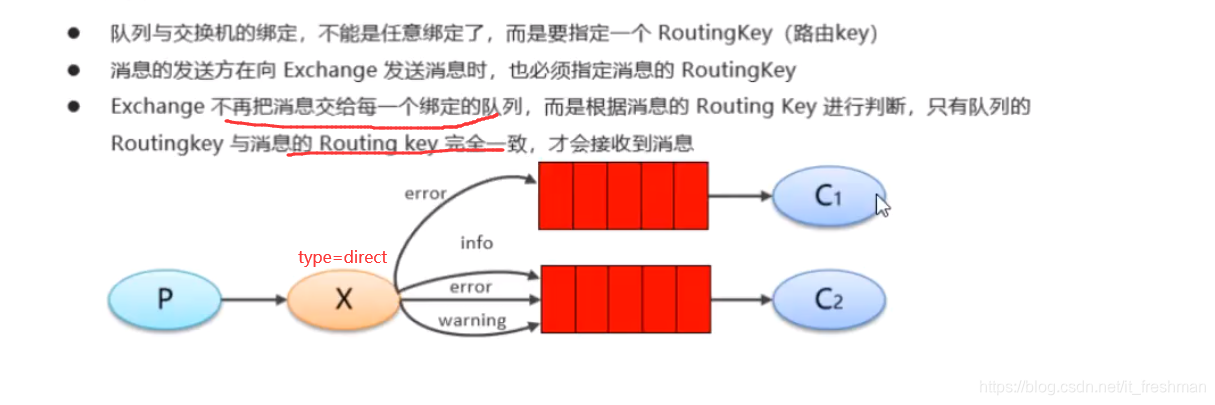
4.3 Routing路由模式(direct)
模式说明
producer实现
public static void main(String[] args) throws IOException, TimeoutException {
        Connection connection = createConnection();
        Channel channel = connection.createChannel();

        String exchange = "test_direct";
        //这里的模式是: DIRECT模式
        channel.exchangeDeclare(exchange, DIRECT, true, false, false, null);

        //6. 创建队列
        String queue1Name = "test_direct_queue1";
        String queue2Name = "test_direct_queue2";
        channel.queueDeclare(queue1Name, true, false, false, null);
        channel.queueDeclare(queue2Name, true, false, false, null);

        //7.绑定队列和交换机
        /**

         queue – 队列名称
         exchange –  队列绑定至 exchange名称
         routingKey –  路由key
         */
        channel.queueBind(queue1Name, exchange,"error");
        channel.queueBind(queue2Name, exchange,"info");
        channel.queueBind(queue2Name, exchange,"error");
        channel.queueBind(queue2Name, exchange,"warning");

        //8. 发送消息
        String body = "日志信息:张三调用了findAll方法...日志级别为:info";
        //简单模式,不使用exchange ,则routingKey 为topic名称
        try {
            channel.basicPublish(exchange, "info", null, body.getBytes() );
        } catch (IOException e) {
            e.printStackTrace();
        }

        //7.释放连接
        channel.close();
        connection.close();
    }
结果
exchange
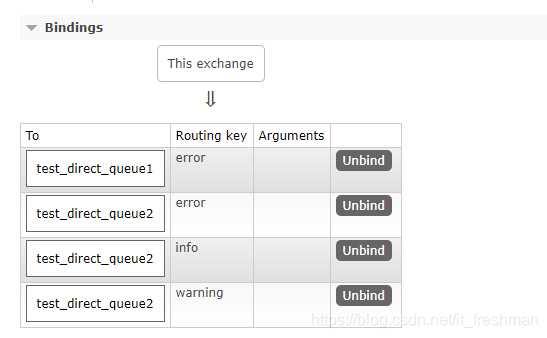
queue

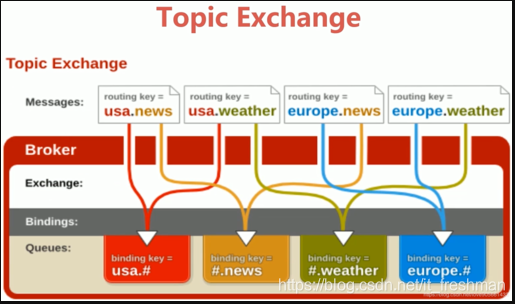
4.4 Topic 通配符模式
模式说明
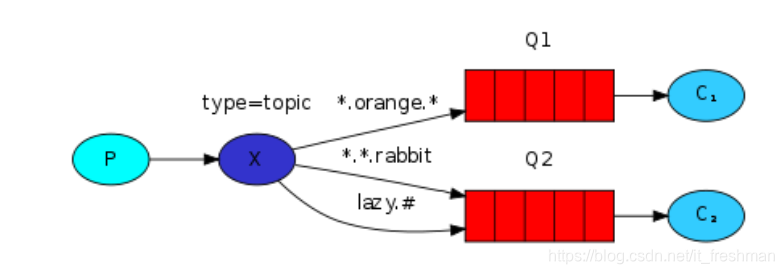
通配符
*:代表一个单词#: 代表0或者多个单词
producer实现
public static void main(String[] args) throws IOException, TimeoutException {
Connection connection = createConnection();
Channel channel = connection.createChannel();
String exchange = "test_topic";
//这里的模式是: DIRECT模式
channel.exchangeDeclare(exchange, TOPIC, true, false, false, null);
//6. 创建队列
String queue1Name = "test_topic_queue1";
String queue2Name = "test_topic_queue2";
channel.queueDeclare(queue1Name, true, false, false, null);
channel.queueDeclare(queue2Name, true, false, false, null);
//7.绑定队列和交换机
//routing_key:
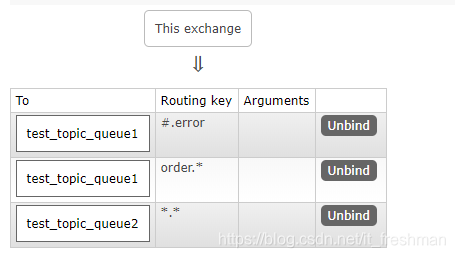
channel.queueBind(queue1Name, exchange,"#.error");
channel.queueBind(queue1Name, exchange,"order.*");
channel.queueBind(queue2Name, exchange,"*.*");
//8. 发送消息
String body = "日志信息:张三调用了findAll方法...日志级别为:info";
//简单模式,不使用exchange ,则routingKey 为topic名称
try {
//该消息会被 "order.*"和*.* 匹配到, 所以会被queue1Name,queue2Name匹配到
channel.basicPublish(exchange, "order.info", null, body.getBytes() );
} catch (IOException e) {
e.printStackTrace();
}
//7.释放连接
channel.close();
connection.close();
}
结果
exchange
topic

Spring整合RabbitMQ
Spring 整合producer
maven依赖
 <dependencies>
      <dependency>
        <groupId>org.springframework</groupId>
        <artifactId>spring-context</artifactId>
        <version>5.1.7.RELEASE</version>
      </dependency>

      <dependency>
        <groupId>org.springframework.amqp</groupId>
        <artifactId>spring-rabbit</artifactId>
        <version>2.3.2</version>
      </dependency>


      <dependency>
        <groupId>junit</groupId>
        <artifactId>junit</artifactId>
        <version>4.12</version>
      </dependency>

      <dependency>
        <groupId>org.springframework</groupId>
        <artifactId>spring-test</artifactId>
        <version>5.1.7.RELEASE</version>
      </dependency>
    </dependencies>
配置信息
rabbitmq.properties
rabbitmq.host=xxx
rabbitmq.port=5672
rabbitmq.username=heima
rabbitmq.password=heima
rabbitmq.virtual-host=/itcast
spring-rabbitmq-producer.xml
<?xml version="1.0" encoding="UTF-8"?>
<beans xmlns="http://www.springframework.org/schema/beans"
       xmlns:xsi="http://www.w3.org/2001/XMLSchema-instance"
       xmlns:context="http://www.springframework.org/schema/context"
       xmlns:rabbit="http://www.springframework.org/schema/rabbit"
       xsi:schemaLocation="http://www.springframework.org/schema/beans
       http://www.springframework.org/schema/beans/spring-beans.xsd
       http://www.springframework.org/schema/context
       https://www.springframework.org/schema/context/spring-context.xsd
       http://www.springframework.org/schema/rabbit
       http://www.springframework.org/schema/rabbit/spring-rabbit.xsd">
    <context:property-placeholder location="classpath:rabbitmq.properties"/>

    <!-- 定义rabbitmq connectFactory -->
    <rabbit:connection-factory id="connectionFactory" host="${rabbitmq.host}"
                               port="${rabbitmq.port}"
                               username="${rabbitmq.username}"
                               password="${rabbitmq.password}"
                               virtual-host="${rabbitmq.virtual-host}"/>
    <rabbit:admin connection-factory="connectionFactory"/>

    <!--定义持久化队列 -->
    <!--
     id: bean名称
     name: queue的名称
     auto-declare: 自动创建
     exclusive: 是否独占
     durable: 是否持久化
    -->

    <rabbit:queue id="spring_queue" name="spring_queue" auto-declare="true" />

    <rabbit:template id="rabbitTemplate" connection-factory="connectionFactory"/>
</beans>
测试用例-无exchange
producer
@RunWith(SpringJUnit4ClassRunner.class)
@ContextConfiguration(locations = "classpath:spring-rabbitmq-producer.xml")
public class ProducerSpringTest {

    @Autowired
    private RabbitTemplate rabbitTemplate;

    @Test
    public void testHelloWorld(){
        //不指定exchange, routingKey即为 queue名称
        rabbitTemplate.convertAndSend("spring_queue","hello world spring...");
    }
}
结果

测试用例-广播
exchange配置
   <rabbit:queue id="spring_fanout_queue_1" name="spring_fanout_queue_1" auto-declare="true"/>
   <rabbit:queue id="spring_fanout_queue_2" name="spring_fanout_queue_2" auto-declare="true"/>

    <!--
    rabbit:fanout-exchange 广播类型交换机
     -->
    <rabbit:fanout-exchange id="spring_fanout_exchange" name="spring_fanout_exchange" auto-declare="true">
        <rabbit:bindings>
            <rabbit:binding queue="spring_fanout_queue_1"/>
            <rabbit:binding queue="spring_fanout_queue_2"/>
        </rabbit:bindings>
    </rabbit:fanout-exchange>
producer-广播
    @Test
    public void testFanout(){
        //不指定exchange, routingKey即为 queue名称
        rabbitTemplate.convertAndSend("spring_fanout_exchange",""," spring fanout...");
    }
exchange
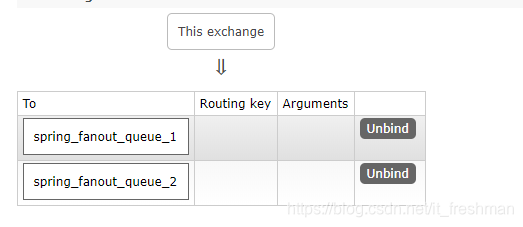
queue

测试用例-direct(略)
exchange配置
    <!--direct-exchange-->
    <rabbit:direct-exchange id="spring_direct_exchange" name="spring_direct_exchange" auto-declare="true">
        <rabbit:bindings>
            <!-- key : 路由key -->
            <rabbit:binding queue="spring_queue" key="xx"/>
        </rabbit:bindings>
    </rabbit:direct-exchange>
测试用例-topic通配符
exchange配置
    <rabbit:queue id="spring_topic_queue_star" name="spring_topic_queue_star" auto-declare="true"/>
    <rabbit:queue id="spring_topic_queue_well" name="spring_topic_queue_well" auto-declare="true"/>
    <rabbit:queue id="spring_topic_queue_well2" name="spring_topic_queue_well2" auto-declare="true"/>
    <!--
    topic-exchange: 通配符
     -->
    <rabbit:topic-exchange id="spring_topic_exchange" name="spring_topic_exchange" auto-declare="true">
        <rabbit:bindings>
            <rabbit:binding pattern="heima.*" queue="spring_topic_queue_star"/>
            <rabbit:binding pattern="heima.#" queue="spring_topic_queue_well"/>
            <rabbit:binding pattern="itcast.#" queue="spring_topic_queue_well2"/>
        </rabbit:bindings>
    </rabbit:topic-exchange>
producer-通配符
    @Test
    public void testTopic(){
        //不指定exchange, routingKey即为 queue名称
        rabbitTemplate.convertAndSend("spring_topic_exchange","itcast.nihao"," spring topic: itcast.nihao...");
    }
exchange
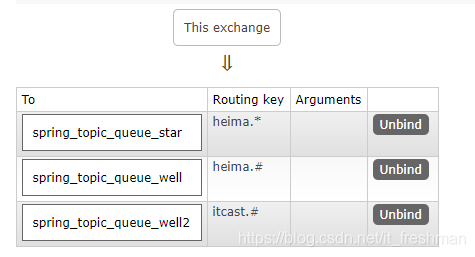
queue

Sprng整合consumer
maven依赖
同生产者(略)
配置信息
rabbitmq.properties
rabbitmq.host=xxx
rabbitmq.port=5672
rabbitmq.username=heima
rabbitmq.password=heima
rabbitmq.virtual-host=/itcast
spring-rabbitmq-consumer.xml
<?xml version="1.0" encoding="UTF-8"?>
<beans xmlns="http://www.springframework.org/schema/beans"
       xmlns:xsi="http://www.w3.org/2001/XMLSchema-instance"
       xmlns:context="http://www.springframework.org/schema/context"
       xmlns:rabbit="http://www.springframework.org/schema/rabbit"
       xsi:schemaLocation="http://www.springframework.org/schema/beans
       http://www.springframework.org/schema/beans/spring-beans.xsd
       http://www.springframework.org/schema/context
       https://www.springframework.org/schema/context/spring-context.xsd
       http://www.springframework.org/schema/rabbit
       http://www.springframework.org/schema/rabbit/spring-rabbit.xsd">
    <!--加载配置文件-->
    <context:property-placeholder location="classpath:rabbitmq.properties"/>

    <!-- 定义rabbitmq connectionFactory -->
    <rabbit:connection-factory id="connectionFactory" host="${rabbitmq.host}"
                               port="${rabbitmq.port}"
                               username="${rabbitmq.username}"
                               password="${rabbitmq.password}"
                               virtual-host="${rabbitmq.virtual-host}"/>

    <bean id="springQueueListener" class="cn.jhs.mq.consumer.listener.SpringQueueListener"/>

    <rabbit:listener-container connection-factory="connectionFactory" auto-declare="true">
    	        <!-- queue-names 监听的队列名称,多个以逗号分隔开-->

        <rabbit:listener ref="springQueueListener" queue-names="spring_queue"/>
    </rabbit:listener-container>
</beans>
测试用例
自定义MessageListener
public class SpringQueueListener implements MessageListener {
    @Override
    public void onMessage(Message message) {
        System.out.println(new String(message.getBody()));
    }
}
consumer.java
@RunWith(SpringJUnit4ClassRunner.class)
@ContextConfiguration(locations = "classpath:spring-rabbitmq-consumer.xml")
public class ConsumerSpringTest {

    @Test
    public void test1(){
        while(true){
        }
    }
}
SpringBoot整合RabbitMQ(略)
生产者
maven依赖
<dependencies>
    <dependency>
        <groupId>org.springframework.boot</groupId>
        <artifactId>spring-boot-starter</artifactId>
    </dependency>


    <dependency>
        <groupId>org.springframework.boot</groupId>
        <artifactId>spring-boot-starter-amqp</artifactId>
    </dependency>

    <dependency>
        <groupId>org.springframework.boot</groupId>
        <artifactId>spring-boot-starter-test</artifactId>
        <scope>test</scope>
    </dependency>
</dependencies>
配置信息
application.yaml
spring:
  rabbitmq:
    host: xxx
    port: 5672
    username: heima
    password: heima
    virtual-host: /itcast
配置configuration
@Configuration
public class RabbitMQConfig {

    public static final String EXCHANGE_NAME = "boot_topic_exchange";
    public static final String QUEUE_NAME1 = "boot_queue1";
    public static final String QUEUE_NAME2 = "boot_queue2";
    public static final String ROUTING_KEY = "boot.*";

    //1.交换机
    @Bean("bootExchange")
    public Exchange bootExchange(){
        return ExchangeBuilder.topicExchange(EXCHANGE_NAME).durable(true).build();
    }

    //2. 队列
    @Bean("bootQueue1")
    public Queue bootQueue1(){
        return QueueBuilder.durable(QUEUE_NAME1).build();
    }

    @Bean("bootQueue2")
    public Queue bootQueue2(){
        return QueueBuilder.durable(QUEUE_NAME2).build();
    }

    /**
     * 3. 绑定队列和交换机的关系 Binding
     *  - 知道那个队列
     *  - 知道那个交换机
     *  - routing key
     */
    @Bean( "bindQueueExchange1")
    public Binding bindQueueExchange(@Qualifier("bootQueue1") Queue queue, @Qualifier("bootExchange") Exchange exchange) {
        return BindingBuilder.bind(queue).to(exchange).with(ROUTING_KEY).noargs();
    }

    @Bean( "bindQueueExchange2")
    public Binding bindQueueExchange2(@Qualifier("bootQueue2") Queue queue2, @Qualifier("bootExchange") Exchange exchange) {
        return BindingBuilder.bind(queue2).to(exchange).with(ROUTING_KEY).noargs();
    }
}
测试-发送消息
@SpringBootTest(classes = SpringbootRabbitApplication.class)
public class ProducerTest {

	//注入rabbitTemplate
    @Autowired
    private RabbitTemplate rabbitTemplate;

    @Test
    public void testSend(){
        String exchangeName = "boot_topic_exchange";
        String routingKey = "boot.haha";
        String msg = "boot mq hello";
        rabbitTemplate.convertAndSend(exchangeName,routingKey, msg);
    }
}
测试结果
exchange
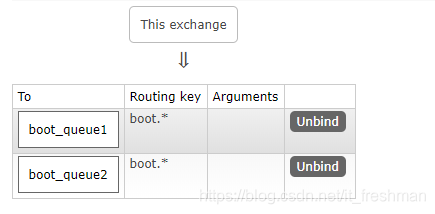
queue

消费者
maven依赖(同provider)
配置RabbitListener
@Component
public class RabbitMQListener {

    @RabbitListener(queues = {"boot_queue1","boot_queue2"})
    public void listenerQueue(Message message){
        System.out.println(message);
    }
}
测试结果
(Body:'boot mq hello' MessageProperties [headers={}, contentType=text/plain, contentEncoding=UTF-8, contentLength=0, receivedDeliveryMode=PERSISTENT, priority=0, redelivered=false, receivedExchange=boot_topic_exchange, receivedRoutingKey=boot.haha, deliveryTag=1, consumerTag=amq.ctag-zedDxckfNB93PmweTnq-SA, consumerQueue=boot_queue1])
(Body:'boot mq hello' MessageProperties [headers={}, contentType=text/plain, contentEncoding=UTF-8, contentLength=0, receivedDeliveryMode=PERSISTENT, priority=0, redelivered=false, receivedExchange=boot_topic_exchange, receivedRoutingKey=boot.haha, deliveryTag=2, consumerTag=amq.ctag-Vq8EGDzeKUiWEW5sHeVeYA, consumerQueue=boot_queue2])


 1005
1005

 被折叠的 条评论
为什么被折叠?
被折叠的 条评论
为什么被折叠?
 到【灌水乐园】发言


