


目录
2、在settings配置文件中,设置访问nexus的账号密码信息
4、使用maven的deploy命令将包推到Nexus私服中
一、使用默认的私服仓库管理项目
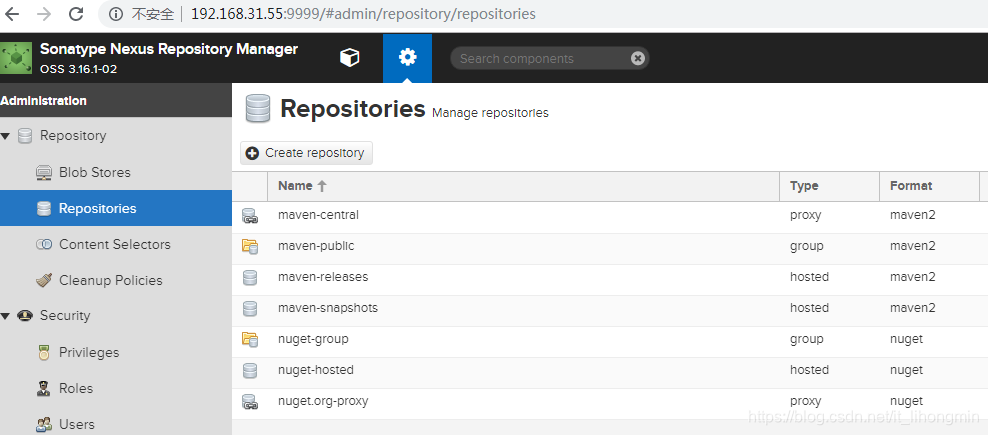
安装上一篇Nexus-3 OSS安装安装完成后,已经有的仓库如下:
默认情况下我们使用maven-开头的私服已经够用了,使用的大致流程图如下:
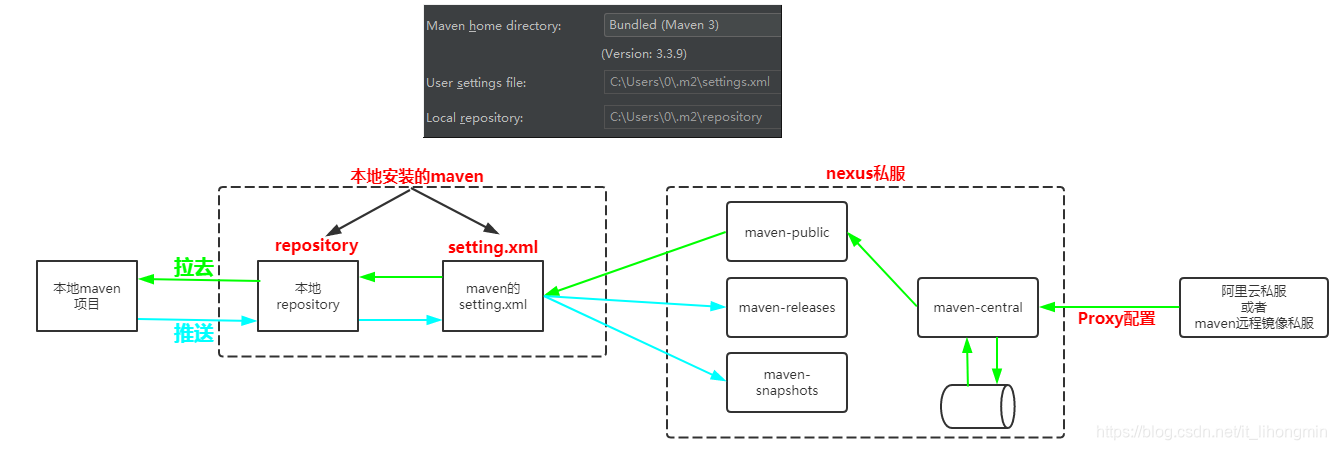
即当我们配置了项目的maven,以及配置maven的本地仓库和setting.xml后,我们就可以经过该流程去私服上拉去包到本地仓库,如果私服没有包则会根据配置的Proxy去更远端的仓库进行获取。我们推送包的时候只需要在本地项目中配<distributionManagement>将自己本地的包推到私服中,让自己项目的其他模块进行拉去和调用(如电商的商品系统需要调用价格系统的包),maven的setting可以配置为:
<?xml version="1.0" encoding="UTF-8"?>
<settings xsi:schemaLocation="http://maven.apache.org/SETTINGS/1.0.0
http://maven.apache.org/xsd/settings-1.0.0.xsd" xmlns="http://maven.apache.org/SETTINGS/1.0.0"
    xmlns:xsi="http://www.w3.org/2001/XMLSchema-instance">

	<mirrors>
		<mirror>
			<id>nexus-qurong</id>
			<mirrorOf>*</mirrorOf>
			<url>http://192.168.31.55:9999/repository/maven-public/</url>
		</mirror>
	 	<!--<mirror>
			<id>nexus-aliyun</id>
			<mirrorOf>central</mirrorOf>
			<name>Nexus Aliyun</name>
			<url>http://maven.aliyun.com/nexus/content/groups/public/</url>
        </mirror>
		<mirror>


			<id>nexus</id>
			<mirrorOf>*</mirrorOf>
			<url>http://localhost:8081/repository/kevin-repo/</url>
		</mirror>-->
    </mirrors>

	<servers>
		<!-- <server>x
			<id>nexus-aliyun</id>
			<username>admin</username>
			<password>admin123</password>
		</server> -->

		<server>
			<id>nexus-1</id>
			<username>admin</username>
			<password>admin123</password>
		</server>
		<server>
			<id>releases</id>
			<username>admin</username>
			<password>admin123</password>
		</server>
		<server>
			<id>snapshots</id>
			<username>admin</username>
			<password>admin123</password>
		</server>
		<server>
			<id>public</id>
			<username>admin</username>
			<password>admin123</password>
		</server>
	</servers>

<profiles>
    <profile>
     <pluginRepositories>
		<pluginRepository>
			<snapshots>
				<enabled>true</enabled>
				<updatePolicy>always</updatePolicy>
				<checksumPolicy>warn</checksumPolicy>
			</snapshots>
			<id>public</id>
			<name>Public Repositories</name>
			<url>http://192.168.31.55:9999/repository/maven-public/</url>
		</pluginRepository>
	</pluginRepositories>

      <id>artifactory</id>
    </profile>
  </profiles>

  <activeProfiles>
    <activeProfile>artifactory</activeProfile>
  </activeProfiles>
  <localRepository>C:\Users\0\.m2\repository</localRepository>

</settings>
当需要将项目推到远私服时候,会根据当前项目的maven的类型,是RELEASE(稳定版本)还是SNAPSHOT(快照版本)推送到私服对应的仓库。即在项目的pom.xml的<project>跟标签下配置:
<distributionManagement>
    <snapshotRepository>
      <id>central</id>
      <name>central Repositories</name>
      <url>http://192.168.31.55:9999/repository/maven-central/</url>
    </snapshotRepository>
    <repository>
      <id>releases</id>
      <name>Nexus Release Repository</name>
      <url>http://192.168.31.55:9999/repository/maven-releases/</url>
    </repository>
    <!--<snapshotRepository>
      <id>nexus-1</id>
      <name>Nexus Snapshot Repository</name>
      <url>http://192.168.31.55:9999/repository/maven-snapshots/</url>
    </snapshotRepository>-->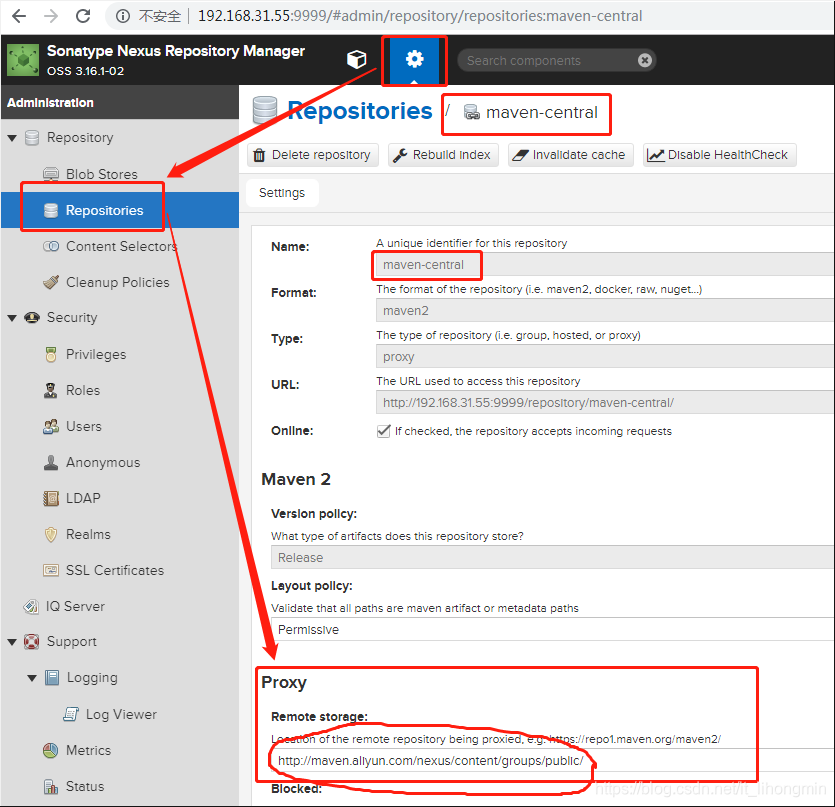
</distributionManagement>最后我们需要注意一下,默认情况下私服的maven-central仓库配置的代理地址(去更远端拉去的仓库)不是国内镜像,速度可能会很慢,建议使用阿里云的私服地址,如下:
如果公司项目比较少或者不需要进行隔离等情况下,则使用上面的私服管理完全够用了,但是如果需要进行扩展添加自定义的仓库等情况则需要如下:
二、Nexus的设置
进入管理页面后主要是设置私服的仓库,管理用户和角色。
1、只有在管理员角色登录后才能进行仓库的创建和管理
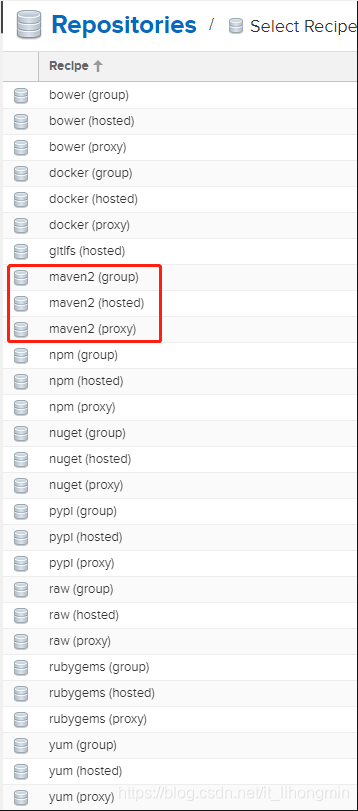
在界面中点击 配置的图标,点击 Repositorys,就可以看见仓库的列表信息,可以看见仓库有一个字段类型叫Type,如下图所示:
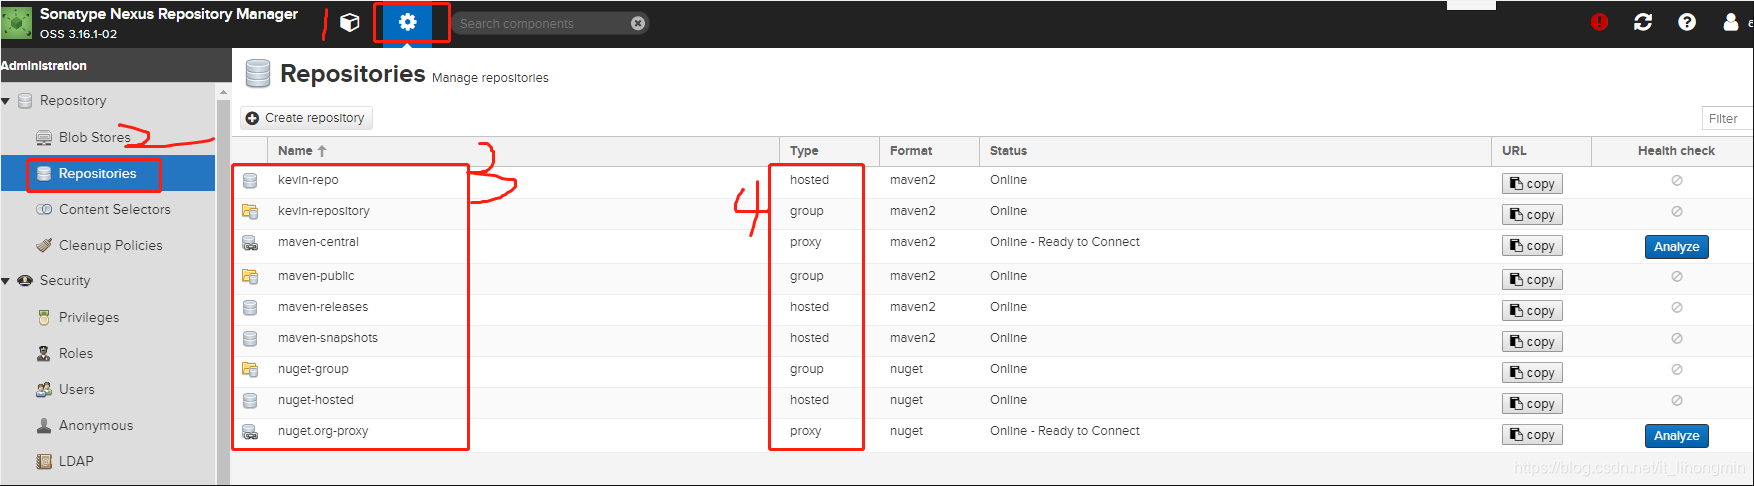
仓库的类型:
1、hosted(宿主仓库): 主要用于存储无法从中央仓库获取的包(比如数据库的驱动包),以及微服务项目之前依赖的API包(比如商品系统需要调用价格系统的 API)
2、proxy (代理仓库):代理公共的远程仓库(比如,所有的服务器都只能访问内外服务器,而只有这台服务器可以访问外网时,就可以用这台服务器为所有的机器做一层代理)
3、virtual 虚拟仓库:用于适配 Maven 1
4、group (仓库组):Nexus 通过仓库组的概念统一管理多个仓库,这样我们在项目中直接请求仓库组即可请求到仓库组管理的多个仓库
2、仓库的创建
在仓库列表上方,点击 Create Repository 进行仓库的创建,会先进行仓库类型的选择,包括上面说的仓库类型(hosted、proxy、group),我就选择了 maven2的hosted进行创建。
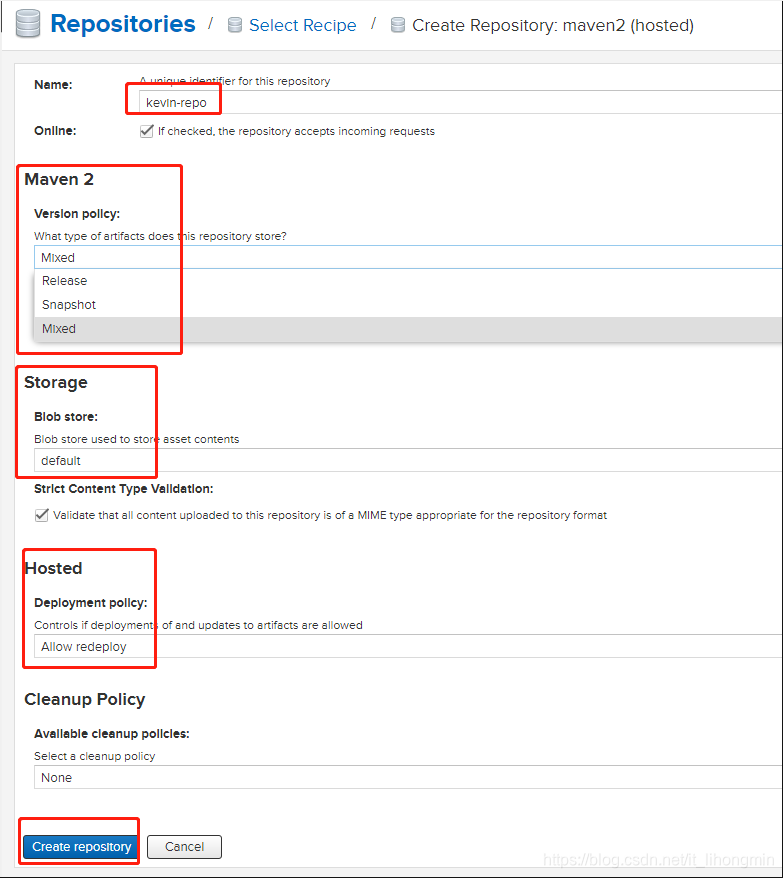
在选择完后会跳转到填写表单页面, 需要填写:
1)、添加仓库的名称
2)、包的类型,是release(稳定版)、Snapshot(快照版)还是Mixed(混合版)。一般快照的包只能提交到快照的仓库中
3)、存储方式,选择默认即可
4)、Hosted配置提交后是否还能再修改等。这个肯定要啊,项目上经常提交好多次
最后点击创建!!!
三、将项目包提交私服
提交到私服时候需要注意几点,否则的话可能会遇到 第三 点中提到的问题。
1、配置mirror
根据nexus创建的仓库的url ,在maven的settings配置文件的mirrors中创建如下配置:
<mirrors>
    <mirror>
        <id>nexus</id>
        <!-- * 表示让所有仓库使用该镜像-->
        <mirrorOf>*</mirrorOf>
        <!-- Nexus仓库中的url地址  -->
        <url>http://localhost:8081/repository/kevin-repo/</url>
    </mirror>
</mirrors>
如果使用的 Idea进行项目的包提交到私服,请保证项目的配置使用的settings配置文件,如下:

2、在settings配置文件中,设置访问nexus的账号密码信息
<servers>
    <server>
        <id>kevin-snapshot</id>
        <username>admin</username>
        <password>admin123</password>
    </server>
</servers>3、在项目pom.xml 中配置:
<distributionManagement>
    <repository>
        <id>kevin-snapshot</id>
        <name>kevin-repo</name>
        <url>http://localhost:8081/repository/kevin-repo/</url>
    </repository>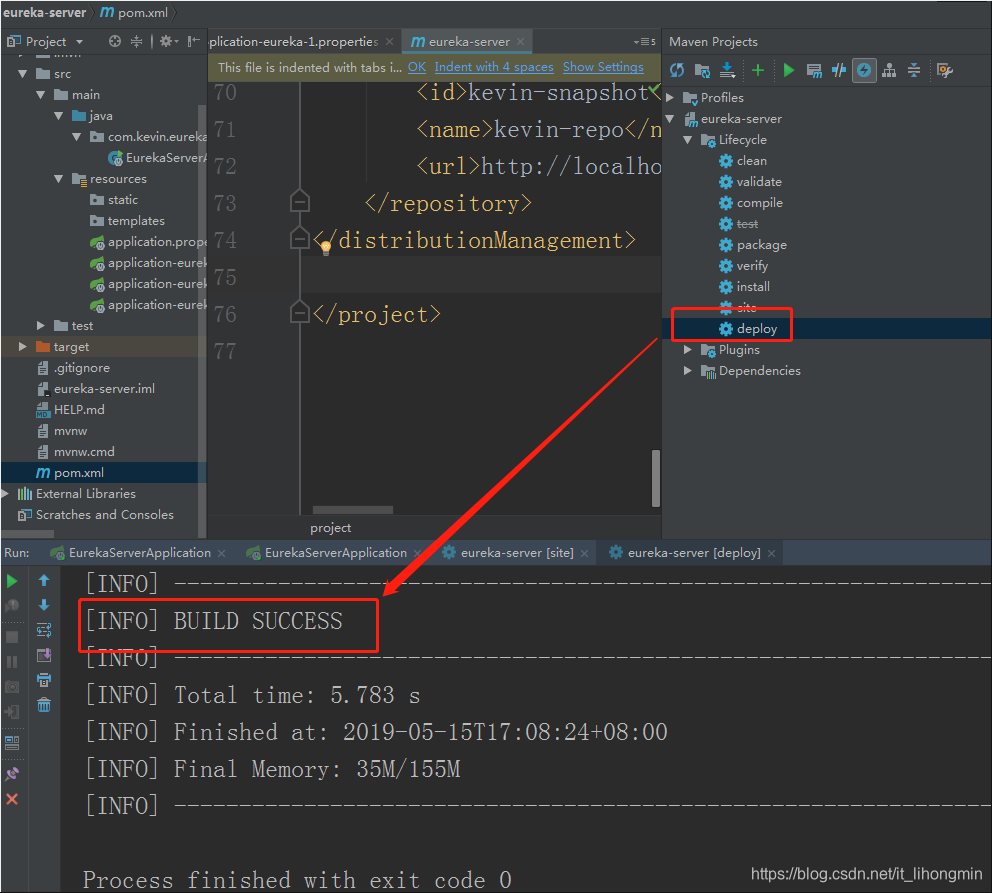
</distributionManagement>4、使用maven的deploy命令将包推到Nexus私服中
我们一般使用 Idea的 Maven Project进行 Deploy即可,如下:
四、遇到的问题
1、Failed to execute goal org.apache.maven.plugins:maven-deploy-plugin:2.8.2:deploy (default-deploy) on project eureka-server: Deployment failed: repository element was not specified in the POM inside distributionManagement element or in -DaltDeploymentRepository=id::layout::url parameter -> [Help 1]
需要在项目的pom根目录下添加该配置信息:
<distributionManagement>
    <repository>
        <!-- id需要与 maven的setting 中的 servers 中的server的 id一致 -->
        <id>kevin-nexus</id>
        <!-- nexus中的repository名称 -->
        <name>kevin-repo</name>
        <!-- nexus的repository的url地址,直接从nexus中进行copy -->
        <url>http://localhost:8081/repository/kevin-repo/</url>
    </repository>
</distributionManagement>
2、Failed to execute goal org.apache.maven.plugins:maven-deploy-plugin:2.8.2:deploy (default-deploy) on project eureka-server: Failed to deploy artifacts: Could not transfer artifact com.kevin:eureka-server:jar:0.0.1-20190515.090238-1 from/to nexus (http://localhost:8081/repository/kevin-repo/): Failed to transfer file: http://localhost:8081/repository/kevin-repo/com/kevin/eureka-server/0.0.1-SNAPSHOT/eureka-server-0.0.1-20190515.090238-1.jar. Return code is: 401, ReasonPhrase: Unauthorized. -> [Help 1]
看到Unauthorized就是知道是 认证不通过,需要设置访问的账号密码, 需要在maven的 setting 配置文件中添加访问用户的配置信息:
<servers>
    <server>
        <id>kevin-snapshot</id>
        <username>admin</username>
        <password>admin123</password>
    </server>
</servers>


 1031
1031

 被折叠的 条评论
为什么被折叠?
被折叠的 条评论
为什么被折叠?
 到【灌水乐园】发言


