


简单图形编程的学习(2)---点 (Windows GDI实现)
write by 九天雁翎(JTianLing) -- blog.csdn.net/vagrxie
一、 又一顿牢骚
虽然知道不应该老是说些与技术无关的话。。。。但是有的时候又总是想说。。。。难怪有同事说我最近已经有点像唐僧了-_-!总而言之,因为相对来说书看的太快,(现在租的房子离公司太远,老是坐地铁,导致有了非常固定的看书时间),而因为工作一直太忙,一直加班回家太晚的原因,所以实际的实践太慢(基本上现在就是以写博客的形式),所以Qt与Android的部分要是同步跟上我DirectX的书都要看好几本了,这样的方式好像不太好,所以目前暂时还是以Windows的为主了。。。。这也体现了一点理想与现实的差距-_-!虽然初期项目目标过大,项目中即时调整起码还能保证项目完成吧。。。。。(扯的远了)。
二、 画点
很简单的一个Windows GDI函数,SetPixel,原型如下:
COLORREF SetPixel(
HDC hdc, // handle to DC
int X, // x-coordinate of pixel
int Y, // y-coordinate of pixel
COLORREF crColor // pixel color
);
也许属于最最简单的Windows GDI 之一了,但是如同在Small Basic画点中所讲解的一样,画点这样简单的函数可以实现无限的效果。还是那句话,能够设置一个像素点,就能够描绘一个世界。。。。。。唯一限制程序实现的就是编写程序人的思维。
因为Windows代码本身的复杂性,不能如Small Basic那样直击要害,要是每次给出完整代码太占用空间,这里给出《Tricks Of the Windows Game Programming GURUS》一书中的框架代码,方便以后代码的添加。
// T3D Game Console, creates a game console application
// INCLUDES ///
#define WIN32_LEAN_AND_MEAN // just say no to MFC
#include <tchar.h>
#include <windows.h> // include important windows stuff
#include <windowsx.h>
#include <mmsystem.h>
#include <iostream> // include important C/C++ stuff
#include <conio.h>
#include <stdlib.h>
#include <malloc.h>
#include <memory.h>
#include <string.h>
#include <stdarg.h>
#include <stdio.h>
#include <math.h>
#include <io.h>
#include <fcntl.h>
// DEFINES
// defines for windows
#define WINDOW_CLASS_NAME _T("WINCLASS1")
// MACROS /
#define KEYDOWN(vk_code) ((GetAsyncKeyState(vk_code) & 0x8000) ? 1 : 0)
#define KEYUP(vk_code) ((GetAsyncKeyState(vk_code) & 0x8000) ? 0 : 1)
// GLOBALS
HWND main_window_handle = NULL; // globally track main window
HINSTANCE hinstance_app = NULL; // globally track hinstance
char buffer[80]; // general printing buffer
#define FRAME_PER_SECOND (20)
#define TIME_IN_FRAME (1000/FRAME_PER_SECOND)
#define WIDTH 800
#define HEIGHT 600
// FUNCTIONS //
LRESULT CALLBACK WindowProc(HWND hwnd,
UINT msg,
WPARAM wparam,
LPARAM lparam)
{
// this is the main message handler of the system
PAINTSTRUCT ps; // used in WM_PAINT
HDC hdc; // handle to a device context
char buffer[80] = {0}; // used to print strings
// what is the message
switch(msg)
{
case WM_CREATE:
{
// do initialization stuff here
// return success
return(0);
} break;
case WM_PAINT:
{
// simply validate the window
hdc = BeginPaint(hwnd,&ps);
// end painting
EndPaint(hwnd,&ps);
// return success
return(0);
} break;
case WM_DESTROY:
{
// kill the application, this sends a WM_QUIT message
PostQuitMessage(0);
// return success
return(0);
} break;
default:break;
} // end switch
// process any messages that we didn't take care of
return (DefWindowProc(hwnd, msg, wparam, lparam));
} // end WinProc
///
int Game_Main(void *parms = NULL, int num_parms = 0)
{
DWORD dwStartTime;
dwStartTime = GetTickCount();
// this is the main loop of the game, do all your processing
// here
// for now test if user is hitting ESC and send WM_CLOSE
if (KEYDOWN(VK_ESCAPE))
SendMessage(main_window_handle,WM_CLOSE,0,0);
while(GetTickCount() - dwStartTime < TIME_IN_FRAME)
{
Sleep(1);
}
// return success or failure or your own return code here
return(1);
} // end Game_Main
int Game_Init(void *parms = NULL, int num_parms = 0)
{
// this is called once after the initial window is created and
// before the main event loop is entered, do all your initialization
// here
// return success or failure or your own return code here
return(1);
} // end Game_Init
/
int Game_Shutdown(void *parms = NULL, int num_parms = 0)
{
// this is called after the game is exited and the main event
// loop while is exited, do all you cleanup and shutdown here
// return success or failure or your own return code here
return(1);
} // end Game_Shutdown
// WINMAIN
int WINAPI WinMain( HINSTANCE hinstance,
HINSTANCE hprevinstance,
LPSTR lpcmdline,
int ncmdshow)
{
WNDCLASSEX winclass; // this will hold the class we create
HWND hwnd; // generic window handle
MSG msg; // generic message
HDC hdc; // graphics device context
// first fill in the window class stucture
winclass.cbSize = sizeof(WNDCLASSEX);
winclass.style = CS_DBLCLKS | CS_OWNDC |
CS_HREDRAW | CS_VREDRAW;
winclass.lpfnWndProc = WindowProc;
winclass.cbClsExtra = 0;
winclass.cbWndExtra = 0;
winclass.hInstance = hinstance;
winclass.hIcon = LoadIcon(NULL, IDI_APPLICATION);
winclass.hCursor = LoadCursor(NULL, IDC_ARROW);
winclass.hbrBackground = (HBRUSH)GetStockObject(BLACK_BRUSH);
winclass.lpszMenuName = NULL;
winclass.lpszClassName = WINDOW_CLASS_NAME;
winclass.hIconSm = LoadIcon(NULL, IDI_APPLICATION);
// save hinstance in global
hinstance_app = hinstance;
// register the window class
if (!RegisterClassEx(&winclass))
return(0);
// create the window
if (!(hwnd = CreateWindowEx(NULL, // extended style
WINDOW_CLASS_NAME, // class
_T("Show Point 0.1"), // title
WS_OVERLAPPEDWINDOW | WS_VISIBLE,
0,0, // initial x,y
WIDTH,HEIGHT, // initial width, height
NULL, // handle to parent
NULL, // handle to menu
hinstance,// instance of this application
NULL))) // extra creation parms
return(0);
// save main window handle
main_window_handle = hwnd;
// initialize game here
Game_Init();
// enter main event loop
while(TRUE)
{
// test if there is a message in queue, if so get it
if (PeekMessage(&msg,NULL,0,0,PM_REMOVE))
{
// test if this is a quit
if (msg.message == WM_QUIT)
break;
// translate any accelerator keys
TranslateMessage(&msg);
// send the message to the window proc
DispatchMessage(&msg);
} // end if
// main game processing goes here
Game_Main();
} // end while
// closedown game here
Game_Shutdown();
// return to Windows like this
return(msg.wParam);
} // end WinMain
///
1. 随机在屏幕上画随机颜色点
int Game_Main(void *parms = NULL, int num_parms = 0)
{
DWORD dwStartTime;
HDC hdc;
dwStartTime = GetTickCount();
// this is the main loop of the game, do all your processing
// here
// for now test if user is hitting ESC and send WM_CLOSE
if (KEYDOWN(VK_ESCAPE))
SendMessage(main_window_handle,WM_CLOSE,0,0);
hdc = GetDC(main_window_handle);
// draw 1000 pixels
for (int index=0; index < 1000; index++)
{
// get random position
int x = rand()%WIDTH;
int y = rand()%HEIGHT;
COLORREF color = RGB(rand()%255,rand()%255,rand()%255);
SetPixel(hdc, x,y, color);
} // end for index
// release the dc
ReleaseDC(main_window_handle, hdc);
while(GetTickCount() - dwStartTime < TIME_IN_FRAME)
{
Sleep(1);
}
// return success or failure or your own return code here
return(1);
} // end Game_Main
同样还是简单,当然,前提是框架存在并且熟悉了一大堆Windows的特性以后,说实话,Windows的死消息机制也不是一天两天就熟悉的了的,我当年学MFC的时候那是一愣一愣的,用了较旧以后才能大概知道怎么回事儿。知道这些以后,剩下的也就是一个Rand函数+SetPixel函数的理解量了。这里不放截图了,这么简单的东西放个截图我都觉得没有意思。
2. 老电视机雪花点的效果:
int Game_Main(void *parms = NULL, int num_parms = 0)
{
DWORD dwStartTime;
HDC hdc;
dwStartTime = GetTickCount();
// this is the main loop of the game, do all your processing
// here
// for now test if user is hitting ESC and send WM_CLOSE
if (KEYDOWN(VK_ESCAPE))
SendMessage(main_window_handle,WM_CLOSE,0,0);
hdc = GetDC(main_window_handle);
// draw 1000 pixels
for (int index=0; index < 500; index++)
{
// get random position
int x = rand()%WIDTH;
int y = rand()%HEIGHT;
COLORREF color = RGB(255,255,255);
SetPixel(hdc, x,y, color);
} // end for index
// release the dc
ReleaseDC(main_window_handle, hdc);
Sleep(10);
InvalidateRect(main_window_handle, NULL, TRUE);
//while(GetTickCount() - dwStartTime < TIME_IN_FRAME)
//{
// Sleep(1);
//}
// return success or failure or your own return code here
return(1);
} // end Game_Main
这样基本能够达到效果,但是实际上还有点问题,为了统一程序的架构方便讲解才这样写代码,这里因为利用Windows原有消息去擦除原有点,放在WM_DRAW中去做画点效果会更好一点。
3. 闪烁的星空:
#define POSITION_COUNT (500)
int gaWidth[POSITION_COUNT];
int gaHeight[POSITION_COUNT];
///
int Game_Main(void *parms = NULL, int num_parms = 0)
{
DWORD dwStartTime;
HDC hdc;
dwStartTime = GetTickCount();
// this is the main loop of the game, do all your processing
// here
// for now test if user is hitting ESC and send WM_CLOSE
if (KEYDOWN(VK_ESCAPE))
SendMessage(main_window_handle,WM_CLOSE,0,0);
hdc = GetDC(main_window_handle);
for (int index=0; index < POSITION_COUNT; index++)
{
SetPixel(hdc, gaWidth[index], gaHeight[index], RGB(255,255,255));
gaWidth[index] += 1;
gaHeight[index] += 1;
} // end for index
Sleep(1000);
Sleep(10);
// release the dc
ReleaseDC(main_window_handle, hdc);
//while(GetTickCount() - dwStartTime < TIME_IN_FRAME)
//{
// Sleep(1);
//}
// return success or failure or your own return code here
return(1);
} // end Game_Main
int Game_Init(void *parms = NULL, int num_parms = 0)
{
// this is called once after the initial window is created and
// before the main event loop is entered, do all your initialization
// here
// 一次初始化一个随机POSITION_COUNT大小的数组用于固定位置
for (int index=0; index < POSITION_COUNT; index++)
{
// get random position
gaWidth[index] = rand()%WIDTH;
gaHeight[index] = rand()%HEIGHT;
} // end for index
// return success or failure or your own return code here
return(1);
} // end Game_Init
按Small Basic实现的方式我发现闪烁效果没有Small Basic好,原因可能是C的Win32程序速度比Small Basic快太多了,以至于几乎看不到闪烁,于是,按上面这样将闪烁实际的用Sleep停留一下才能看到较好的效果。也算是不同语言实现同一个算法(大概这么称呼实现这个效果的方法吧)需要注意的不同之处。
4. 屏幕刮花效果
///
int Game_Main(void *parms = NULL, int num_parms = 0)
{
DWORD dwStartTime;
HDC hdc;
dwStartTime = GetTickCount();
// this is the main loop of the game, do all your processing
// here
// for now test if user is hitting ESC and send WM_CLOSE
if (KEYDOWN(VK_ESCAPE))
SendMessage(main_window_handle,WM_CLOSE,0,0);
hdc = GetDC(main_window_handle);
for (int index=0; index < POSITION_COUNT; index++)
{
SetPixel(hdc, gaWidth[index], gaHeight[index], RGB(255,255,255));
// 这算是实现的一种,横向刮花
gaWidth[index] += 1;
// 这算是实现的另一种,斜向刮花
//gaWidth[index] += 1;
//gaHeight[index] += 1;
// 这算是实现的又一种,纵向刮花,纵向刮花建议配合血红色颜色观看效果。。。。。。
//gaHeight[index] += 1;
} // end for index
// release the dc
ReleaseDC(main_window_handle, hdc);
while(GetTickCount() - dwStartTime < TIME_IN_FRAME)
{
Sleep(1);
}
// return success or failure or your own return code here
return(1);
} // end Game_Main
int Game_Init(void *parms = NULL, int num_parms = 0)
{
// this is called once after the initial window is created and
// before the main event loop is entered, do all your initialization
// here
// 一次初始化一个随机POSITION_COUNT大小的数组用于固定位置
for (int index=0; index < POSITION_COUNT; index++)
{
// get random position
gaWidth[index] = rand()%WIDTH;
gaHeight[index] = rand()%HEIGHT;
} // end for index
// return success or failure or your own return code here
return(1);
} // end Game_Init
一个屏幕刮花效果,不同的方向给人感受完全不同,最有意思的是纵向向下的红色效果,如插图1.让我想起某游戏死亡时的结束画面,满眼都是向下流动的血液。。。。。。。。
5. 移动的星空:
本来用我在Small Basic中的方法实现也可以出现移动的星空的,但是我发现《Tricks of the Windows Game Programming GURUS》一书中的例子更加有趣,这里引用一下了。
///
void Init_Stars(void)
{
// this function initializes all the stars
for (int index=0; index < NUM_STARS; index++)
{
// select random position
stars[index].x = rand()%WINDOW_WIDTH;
stars[index].y = rand()%WINDOW_HEIGHT;
// set random velocity
stars[index].vel = 1 + rand()%16;
// set intensity which is inversely prop to velocity for 3D effect
// note, I am mixing equal amounts of RGB to make black -> bright white
int intensity = 15*(17 - stars[index].vel);
stars[index].col = RGB(intensity, intensity, intensity);
} // end for index
} // end Init_Stars
void Erase_Stars(void)
{
// this function erases all the stars
for (int index=0; index < NUM_STARS; index++)
SetPixel(global_dc, stars[index].x, stars[index].y, RGB(0,0,0));
} // end Erase_Stars
void Draw_Stars()
{
// this function draws all the stars
for (int index=0; index < NUM_STARS; index++)
SetPixel(global_dc, stars[index].x, stars[index].y, stars[index].col);
} // end Draw_Stars
void Move_Stars(void)
{
// this function moves all the stars and wraps them around the
// screen boundaries
for (int index=0; index < NUM_STARS; index++)
{
// move the star and test for edge
stars[index].x+=stars[index].vel;
if (stars[index].x >= WINDOW_WIDTH)
stars[index].x -= WINDOW_WIDTH;
} // end for index
} // end Move_Stars
int Game_Main(void *parms = NULL, int num_parms = 0)
{
// this is the main loop of the game, do all your processing
// here
// get the time
DWORD start_time = GetTickCount();
// erase the stars
Erase_Stars();
// move the stars
Move_Stars();
// draw the stars
Draw_Stars();
// lock to 30 fps
while((start_time - GetTickCount() < 33));
// for now test if user is hitting ESC and send WM_CLOSE
if (KEYDOWN(VK_ESCAPE))
SendMessage(main_window_handle,WM_CLOSE,0,0);
// return success or failure or your own return code here
return(1);
} // end Game_Main
int Game_Init(void *parms = NULL, int num_parms = 0)
{
// this is called once after the initial window is created and
// before the main event loop is entered, do all your initialization
// here
// first get the dc to the window
global_dc = GetDC(main_window_handle);
// initialize the star field here
Init_Stars();
// return success or failure or your own return code here
return(1);
} // end Game_Init
/
int Game_Shutdown(void *parms = NULL, int num_parms = 0)
{
// this is called after the game is exited and the main event
// loop while is exited, do all you cleanup and shutdown here
// release the global dc
ReleaseDC(main_window_handle, global_dc);
// return success or failure or your own return code here
return(1);
} // end Game_Shutdown
书中例子利用不同的亮度,及不同的移动速度来模拟一种类3D的效果。。。。。。。。。。。。估计不是一般的人能想到的,呵呵,要知道,仅仅利用了一个SetPixel函数。。。。。。。
Have Fun,aha?在有了一个大概的思路以后,其实Window下面的GDI编程也没有那么难吧,的确是没有那么难吧?毕竟我们专注的也就一个SetPixel函数而已了 ,越专注反而能让我们有更多新的想法。
这里用Windows GDI来实现我从Small Basic学到的一招显示文字的华丽技巧,你以前要是从来没有看过类似例子(也不是个在图形编程领域混过很多年的骨灰级程序员)你别说看了没有感觉惊艳,要知道其实仅仅是利用了画点和文字输出两个如此平常而简单的特性。
6. 星空中的文字
///
int Game_Main(void *parms = NULL, int num_parms = 0)
{
DWORD dwStartTime;
dwStartTime = GetTickCount();
// this is the main loop of the game, do all your processing
// here
// for now test if user is hitting ESC and send WM_CLOSE
if (KEYDOWN(VK_ESCAPE))
SendMessage(main_window_handle,WM_CLOSE,0,0);
for (int index=0; index < 1000; index++)
{
// get random position
int x = rand()%WIDTH;
int y = rand()%HEIGHT;
COLORREF color = RGB(rand()%255,rand()%255,rand()%255);
SetPixel(ghDC, x,y, color);
} // end for index
TextOut(ghDC, 100, 100, CHAR_OUT, _tcslen(CHAR_OUT));
// release the dc
while(GetTickCount() - dwStartTime < TIME_IN_FRAME)
{
Sleep(1);
}
// return success or failure or your own return code here
return(1);
} // end Game_Main
int Game_Init(void *parms = NULL, int num_parms = 0)
{
// this is called once after the initial window is created and
// before the main event loop is entered, do all your initialization
// here
HFONT hfont;
ghDC = GetDC(main_window_handle);
hfont = CreateFont( 100, 0, 0, 0, 0, 0, 0, 0, 0, 0, 0, 0, 0, _T("新宋体"));
SelectObject(ghDC, hfont);
SetTextColor(ghDC, RGB(0,0,0));
SetBkColor(ghDC, RGB(0,0,0));
DeleteObject(hfont);
// return success or failure or your own return code here
return(1);
} // end Game_Init
/
int Game_Shutdown(void *parms = NULL, int num_parms = 0)
{
// this is called after the game is exited and the main event
// loop while is exited, do all you cleanup and shutdown here
ReleaseDC(main_window_handle, ghDC);
// return success or failure or your own return code here
return(1);
} // end Game_Shutdown
按照以前的实现思想,我很快写出了上述程序,结果效果和我想象的不太一样,反而有点像个面具。。。。。留出了眼睛的观察窗口。。。-_-!见插图2。实际的原因想了一下才知道,背景前景都是黑的,当时的第一想法是不能让星空给盖了,但是这样不都黑了啊?。。。。呵呵,改成下面这个样子,效果就出来了,多的行用红色标明,看了就明白了,让背景透明,能够被星空给盖了,这样才能显示出文字。
///
int Game_Main(void *parms = NULL, int num_parms = 0)
{
DWORD dwStartTime;
dwStartTime = GetTickCount();
// this is the main loop of the game, do all your processing
// here
// for now test if user is hitting ESC and send WM_CLOSE
if (KEYDOWN(VK_ESCAPE))
SendMessage(main_window_handle,WM_CLOSE,0,0);
for (int index=0; index < 300; index++)
{
// get random position
int x = rand()%WIDTH;
int y = rand()%HEIGHT;
COLORREF color = RGB(rand()%255,rand()%255,rand()%255);
SetPixel(ghDC, x,y, color);
} // end for index
TextOut(ghDC, 100, 100, CHAR_OUT, _tcslen(CHAR_OUT));
// release the dc
while(GetTickCount() - dwStartTime < TIME_IN_FRAME)
{
Sleep(1);
}
// return success or failure or your own return code here
return(1);
} // end Game_Main
int Game_Init(void *parms = NULL, int num_parms = 0)
{
// this is called once after the initial window is created and
// before the main event loop is entered, do all your initialization
// here
HFONT hfont;
ghDC = GetDC(main_window_handle);
hfont = CreateFont( 100, 0, 0, 0, 0, 0, 0, 0, 0, 0, 0, 0, 0, _T("新宋体"));
SelectObject(ghDC, hfont);
SetTextColor(ghDC, RGB(0,0,0));
SetBkMode (ghDC, TRANSPARENT);
DeleteObject(hfont);
// return success or failure or your own return code here
return(1);
} // end Game_Init
/
int Game_Shutdown(void *parms = NULL, int num_parms = 0)
{
// this is called after the game is exited and the main event
// loop while is exited, do all you cleanup and shutdown here
ReleaseDC(main_window_handle, ghDC);
// return success or failure or your own return code here
return(1);
} // end Game_Shutdown
我第一次看到这个例子的时候真的感叹作者是个天才-_-!也许是自己太笨了所以想不到用这样的方式去显示文字吧。这次来个系列效果,可以参考《简单图形编程的学习(2)---点 (small basic实现)》文中的插图效果,或者简单的自己运行一下就好了。
三、 小结
一个个简单的点就能够构成如此繁多的效果,简直有点不可思议,但是其实,能够绘制一个点,就能够绘制整个世界,要知道,整个屏幕不过也就是一个一个像素构成的,呵呵。其实,从另外的角度来说,一连串连续的点就能构成一条直线,一排排直线就能构成一个面,有了点,线,面,还有什么不够构成的?你可以表达整个世界。另外,就我看的老的游戏编程书籍介绍,DirectDraw的原始接口也仅仅是能画点/位图而已,游戏的开发的先驱们还不是用这样简单的接口实现了那么多画面丰富,效果华丽的2D游戏啊?
插图
插图一:
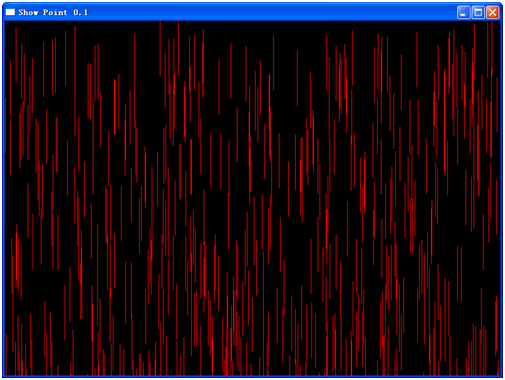
插图2:


 725
725


 被折叠的 条评论
为什么被折叠?
被折叠的 条评论
为什么被折叠?
 到【灌水乐园】发言


